- Preface
- Product Overview
- Getting Started
- Deploying Cisco Mobility Express Solution
- Creating DHCP Scopes for Wireless Networks
- Configuring Mobility Express for Site Survey
- Creating Wireless Networks
- Managing WLAN Users
- Managing Access Points
- Managing the Mobility Express Network
- Using Advanced Settings
- Primary AP Failover and Electing a New Primary
- Cisco Mobility Express with Cisco CMX Cloud
- Managing Mobility Express Deployments from Cisco Prime Infrastructure
Creating Wireless
Networks
WLANs
Cisco Mobility Express solution supports a maximum of 16 WLANs. Each WLAN has a unique WLAN ID (1 through 16), a unique Profile Name, SSID, and can be assigned different security policies.
Access Points broadcast all active WLAN SSIDs and enforce the policies that you define for each WLAN.
A number of WLAN Security options are supported on Cisco Mobility Express solution and are outlined below:
For Guest WLAN, a number of capabilities are supported:
Creating Networks
Creating WLAN using WPA2 Personal
Creating Employee WLAN using WPA2 Enterprise with External Radius Server
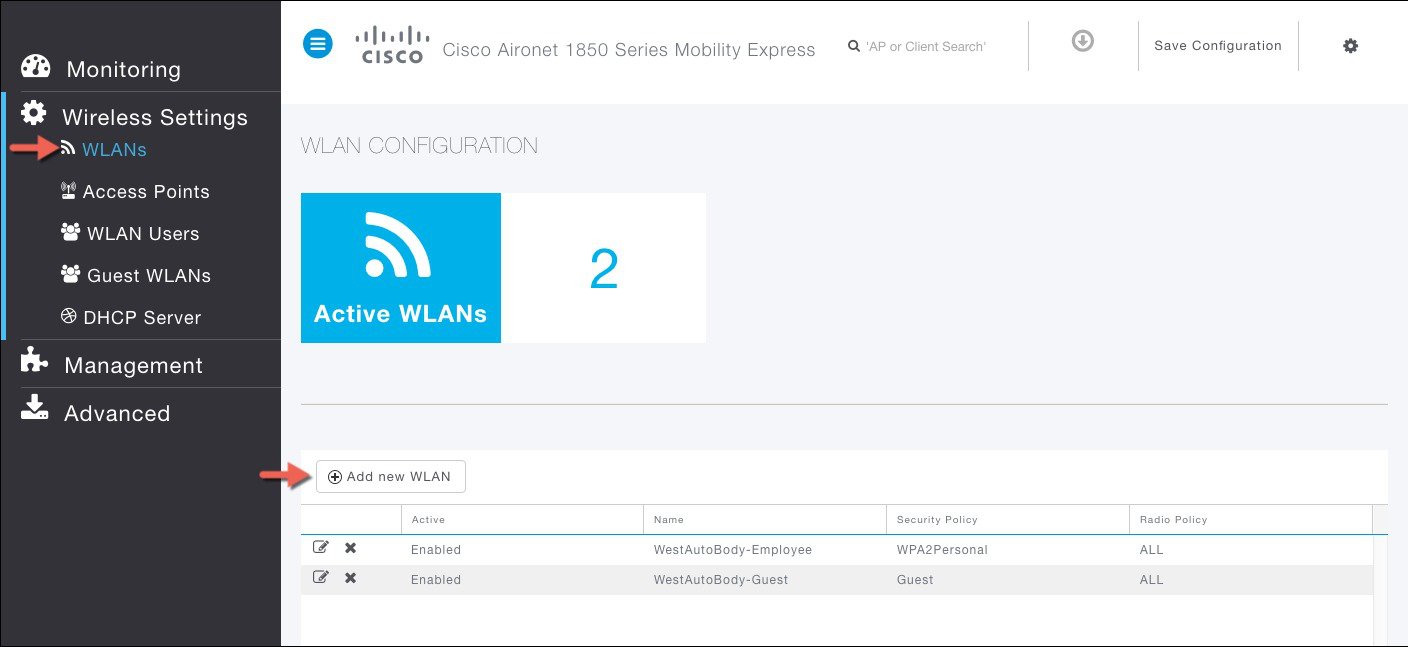
| Step 1 | Navigate
to Wireless Settings > WLANs and then click on
Add new
WLAN button. The
Add new
WLAN Window will pop up.
| ||
| Step 2 | In the
Add new
WLAN window, on the General page configure the following:
| ||
| Step 3 | Click on the WLAN Security and configure the following: | ||
| Step 4 | Click on
the Icon as pointed by the Red arrow to add the Radius server.
| ||
| Step 5 | Click the Apply Button. |
Creating WLAN using WPA2 Enterprise with Local Authentication (AP)
| Step 1 | Navigate to
Wireless Settings > WLANs and then click on
Add new
WLAN button. The
Add new
WLAN Window will pop up.
| ||
| Step 2 | In the
Add new
WLAN window, on the General page configure the following:
| ||
| Step 3 | Click on
the
WLAN Security and configure the following:
| ||
| Step 4 | Click the Apply Button. |
Creating Guest Network on Mobility Express
Mobility Express controller can provide guest user access on WLANs which are specifically designated for use by guest users. To set this WLAN exclusively for guest user access, choose the Security as Guest. You can set the Guest Type by choosing one of the following options in the Guest Type drop-down list:
-
CMX Guest Connect
-
WPA2 Personal—This option stands for Wi-Fi Protected Access 2 with Pre-Shared Key (PSK). WPA2 Personal is a method of securing your network with the use of a PSK authentication. The PSK is configured separately both on the controller AP, under WLAN security policy, and on the client. WPA2 Personal does not rely on an authentication server on your network. This is used when you do not have an enterprise authentication server. If you choose this option, then specify the PSK in the Shared Key field.
-
Captive Portal (AP)
-
Require Username and Password—This is the default option. Choose this option to authenticate guests using the username and password which you can specify for guest users of this WLAN, under Wireless Settings > WLAN Users.
-
Display Terms & Conditions—Choose this option to allow guest access to the WLAN upon acceptance of displayed terms and conditions. This option allows guest users to access the WLAN without entering a username and password.
-
Require Email Address—Choose this option, if you want guest users to be prompted for their e-mail address when attempting to access the WLAN. Upon entering a valid email address, access it provided. This option allows guest users to access the WLAN without entering a username and password.
-
-
Captive Portal (External Web Server)
- Guest Access using CMX Connect in the Cloud
- Guest Access using WPA2 Personal
- Guest Access using Captive Portal (AP)
- Guest Access using Captive Portal (External Web Server)
Guest Access using CMX Connect in the Cloud
 Note | In order to configure Guest Access using CMX Connect in the Cloud, you must have a CMX Cloud Account with subscription to the CMX Connect service. Also, Guest Portal have to be created in CMX Cloud so that when a client connects to the Guest WLAN which is configured for CMX Connect in the Cloud, the Guest Portal is presented to the client. To learn more about CMX Cloud, please refer to the chapter Cisco Mobility Express with Cisco CMX Cloud. To configure a Guest WLAN with CMX Connect in the Cloud, follow the steps below: |
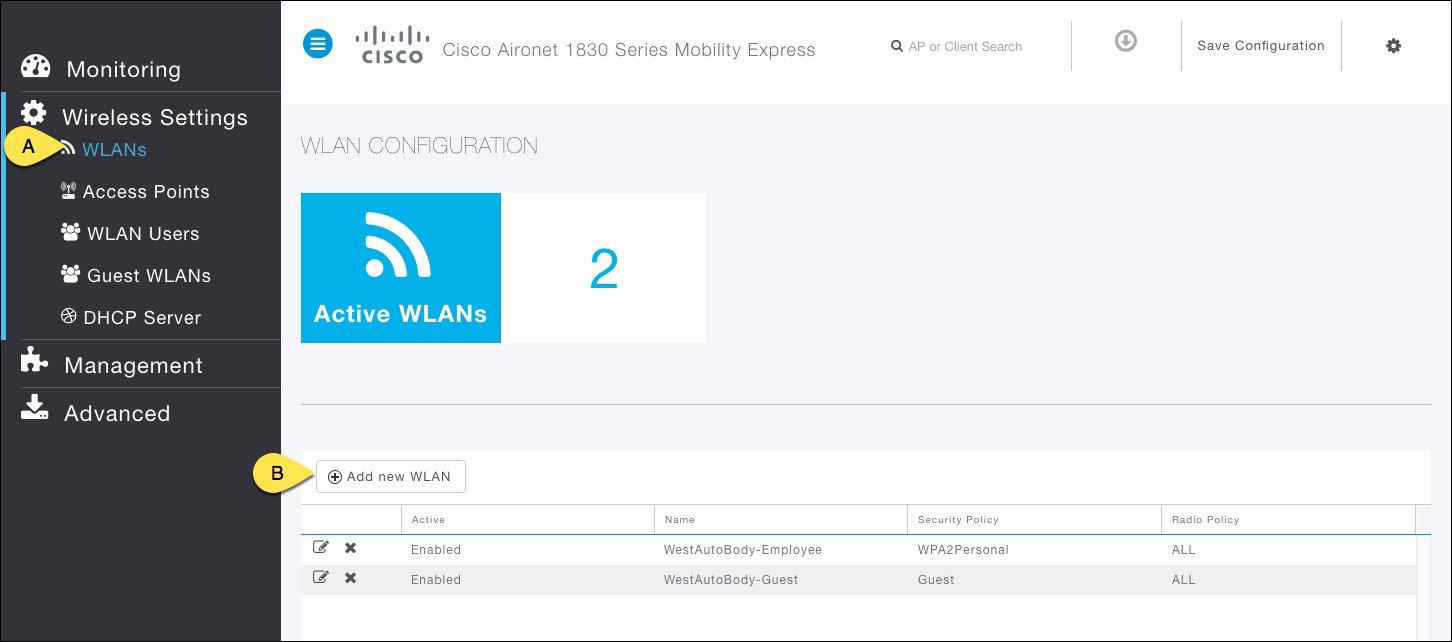
| Step 1 | Navigate to
Wireless
Settings > WLANs and then click on
Add new WLAN
button. The
Add new WLAN
Window will pop up.
| ||
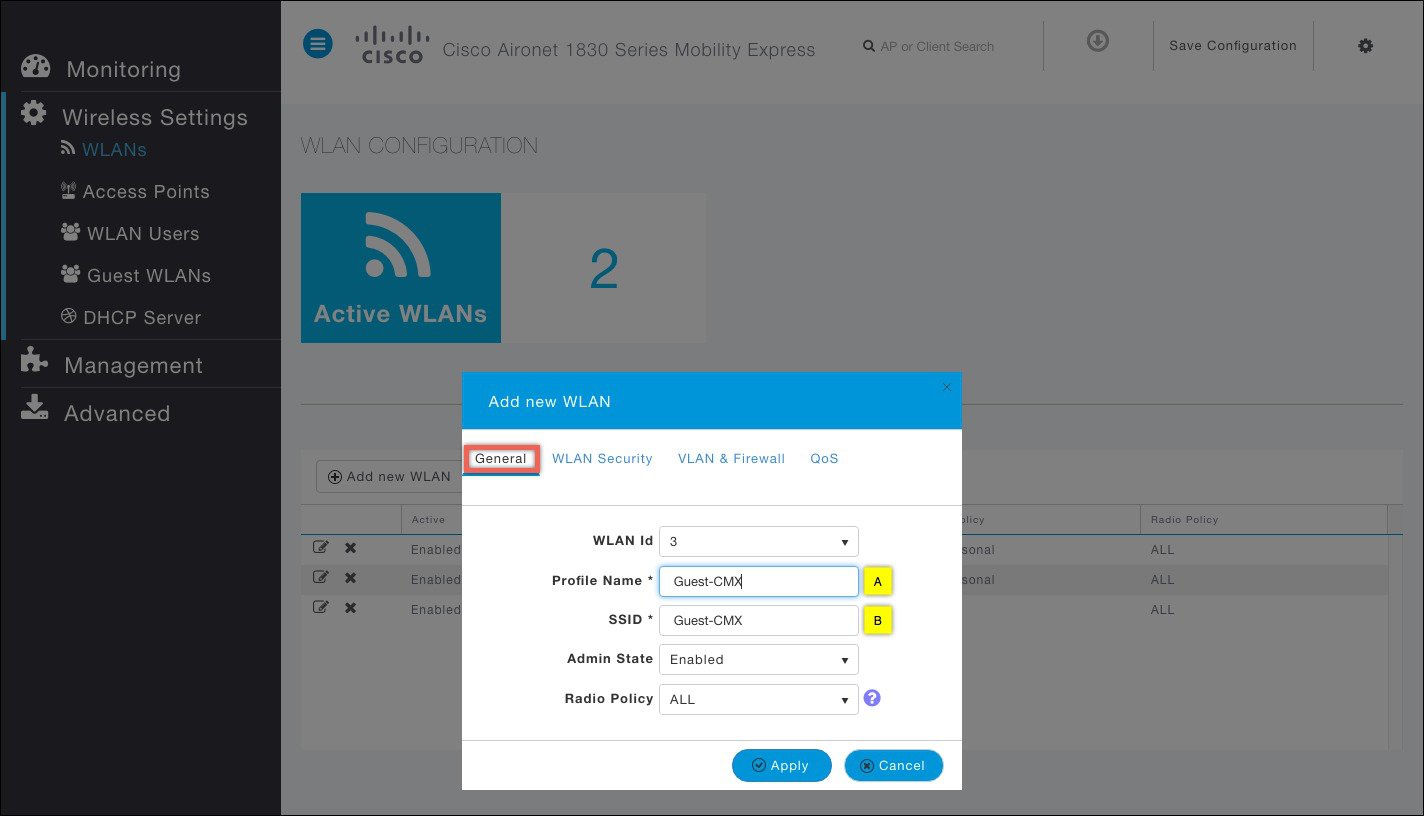
| Step 2 | In the
Add new WLAN
window, on the General page configure the following:
A. Enter the Profile Name B. Enter the SSID
| ||
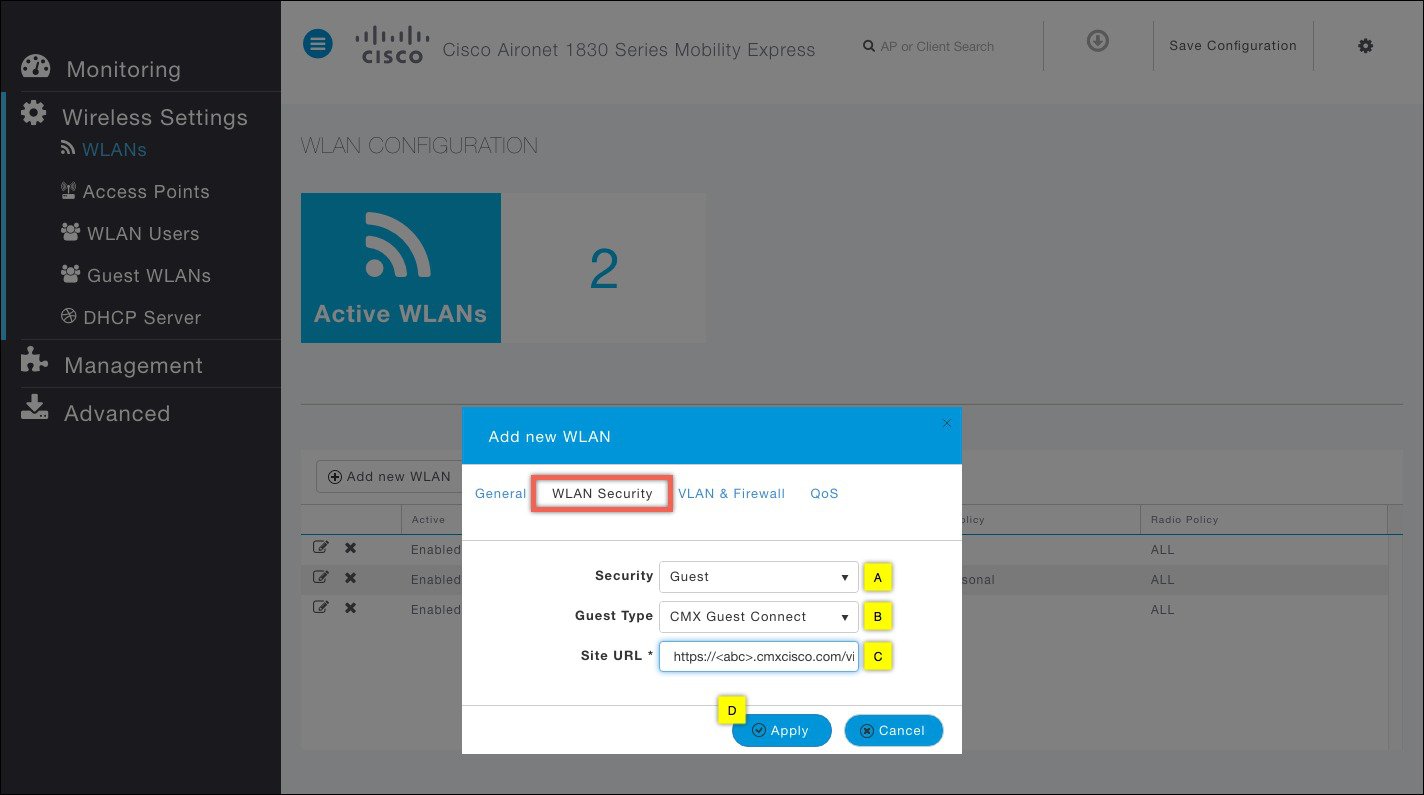
| Step 3 | Click on the
WLAN Security and configure the following:
A. Select Security as Guest B. Select Guest Type as CMX Guest Connect C. Enter the Site URL. Site URL is the Guest Portal URL, which has been configured in CMX Connect in the cloud. D. Click Apply button
|
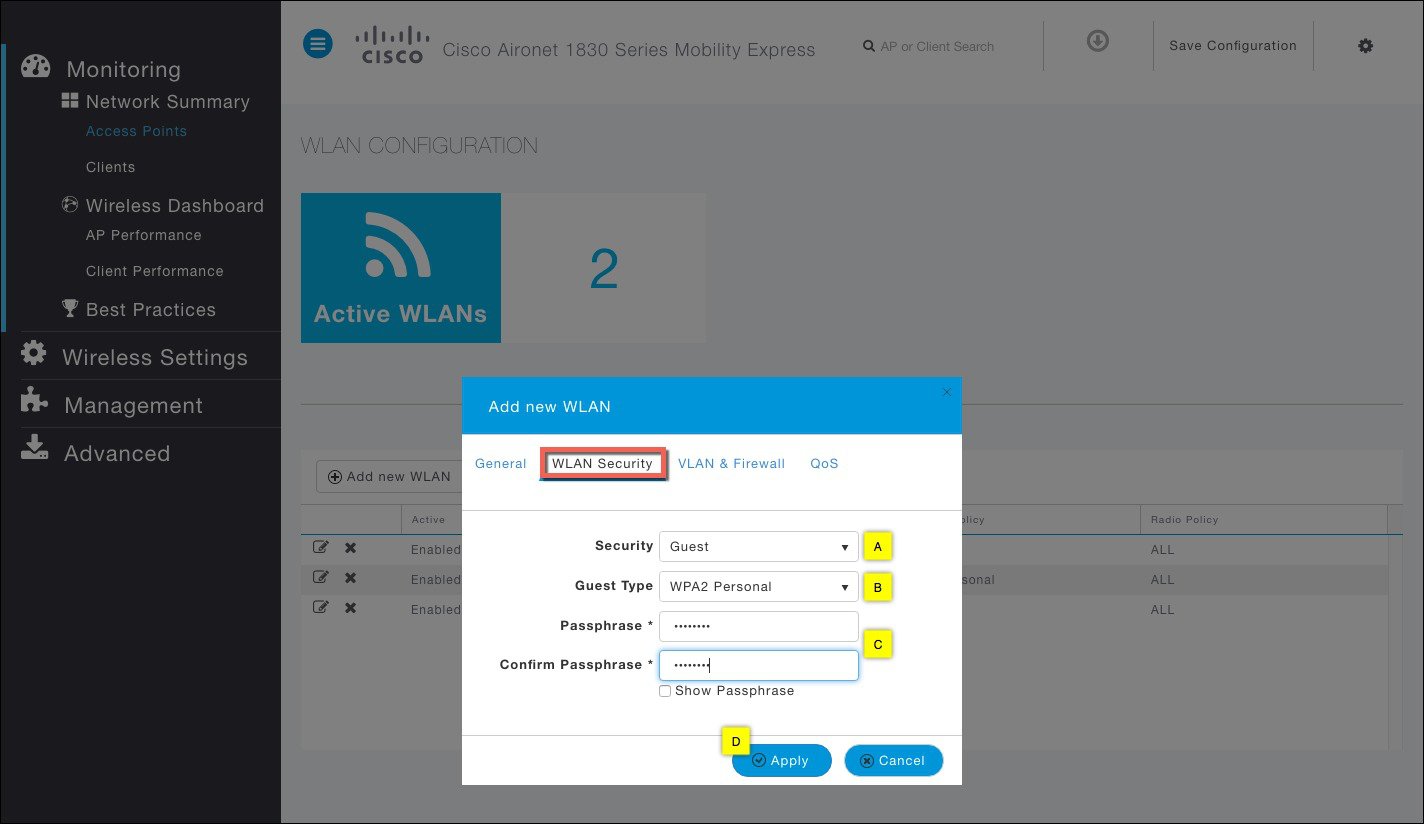
Guest Access using WPA2 Personal
| Step 1 | Navigate to
Wireless Settings > WLANs and then click on
Add new WLAN
button. The
Add new WLAN
Window will pop up.
| ||
| Step 2 | In the
Add new WLAN
window, on the General page configure the following:
A. Enter the Profile Name B. Enter the SSID
| ||
| Step 3 | Click on the
WLAN Security and configure the following:
A. Select Security as Guest B. Select Guest Type as WPA2 Personal C. Enter the Passphrase and Confirm PassPhrase D. Click Apply button
|

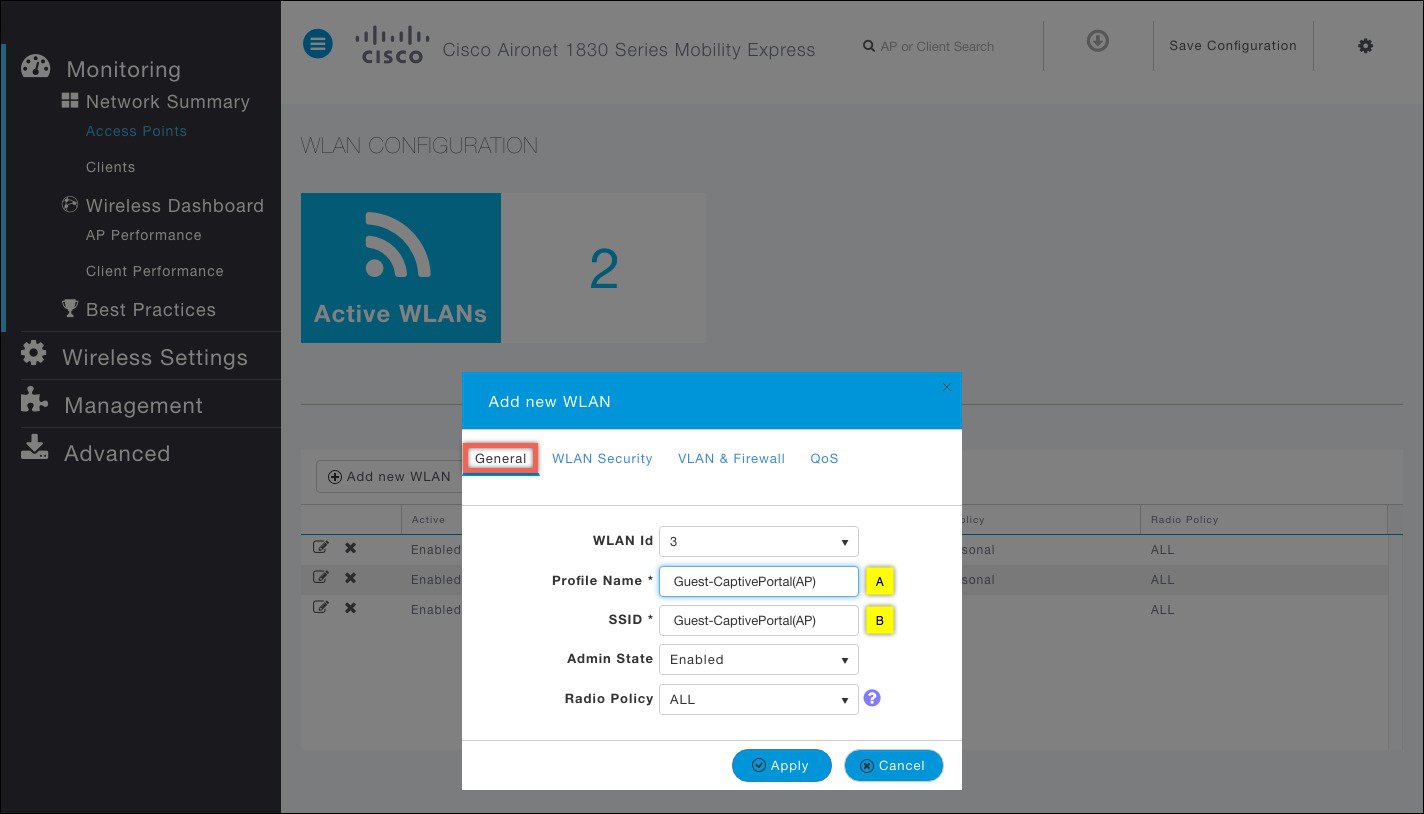
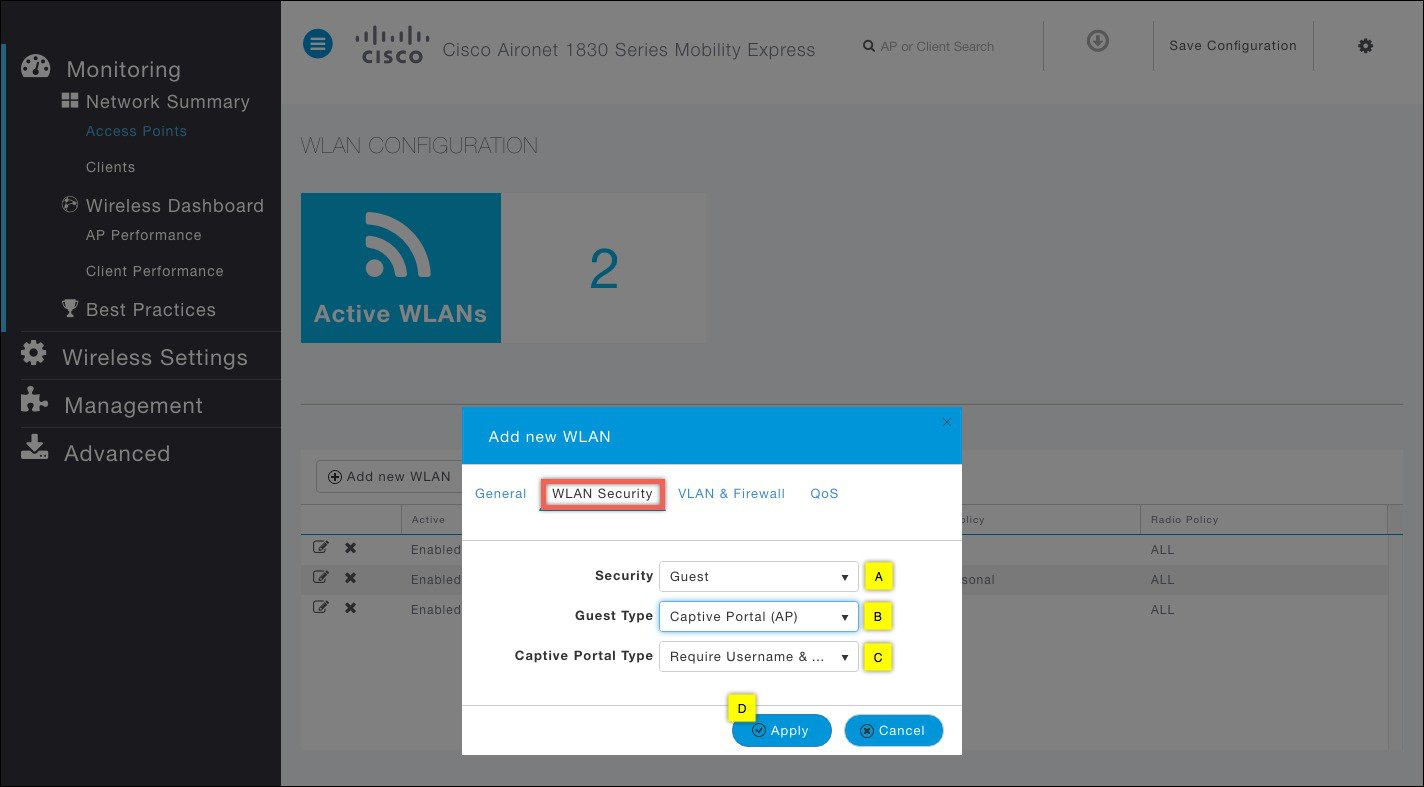
Guest Access using Captive Portal (AP)
| Step 1 | Navigate to
Wireless Settings > WLANs and then click on
Add new WLAN
button. The
Add new WLAN
Window will pop up.
| ||
| Step 2 | In the
Add new WLAN
window, on the General page configure the following:
A. Enter the Profile Name B. Enter the SSID
| ||
| Step 3 | Click on the
WLAN Security and configure the following:
A. Select Security as Guest B. Select Guest Type as Captive Portal (AP) D. Click Apply button
|

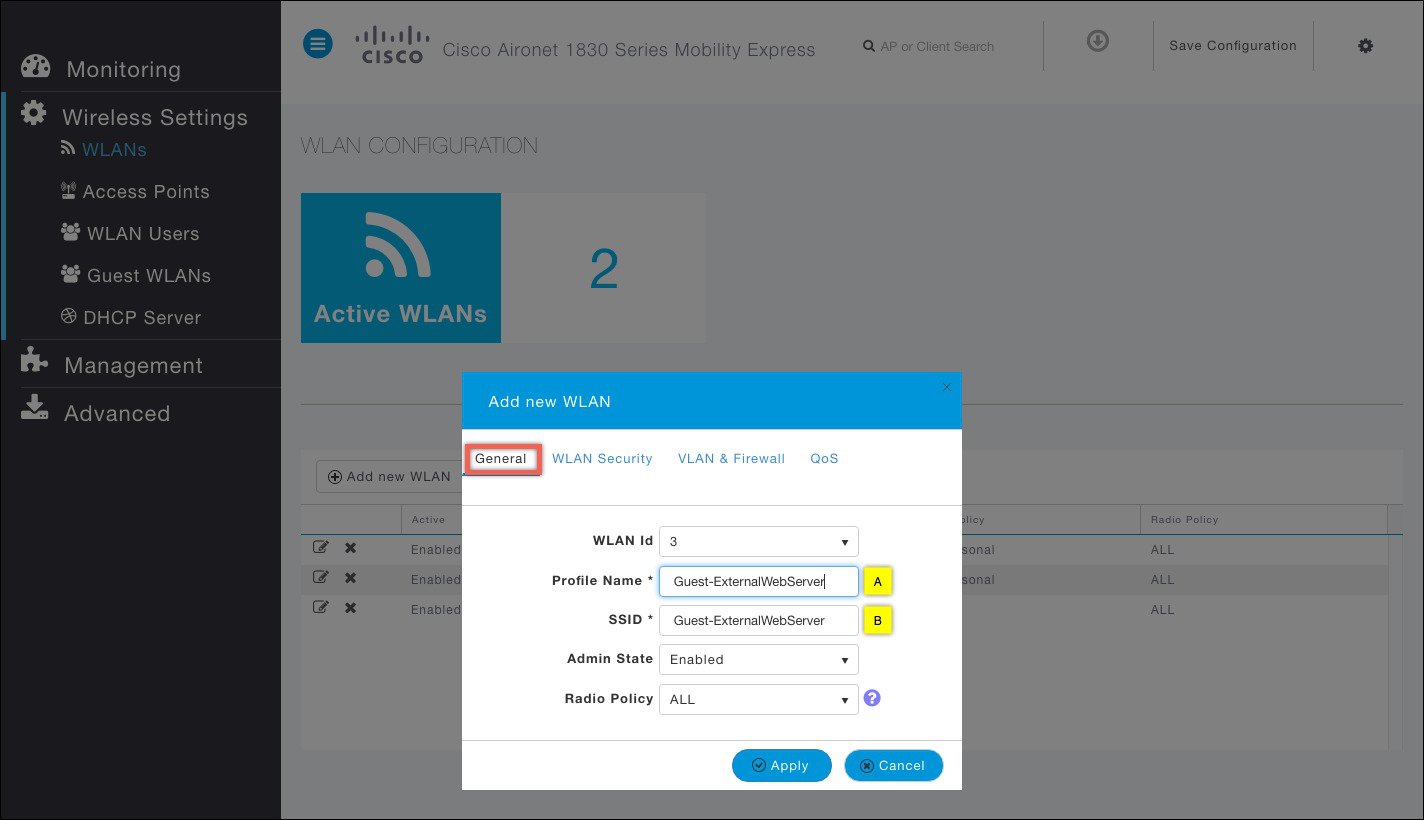
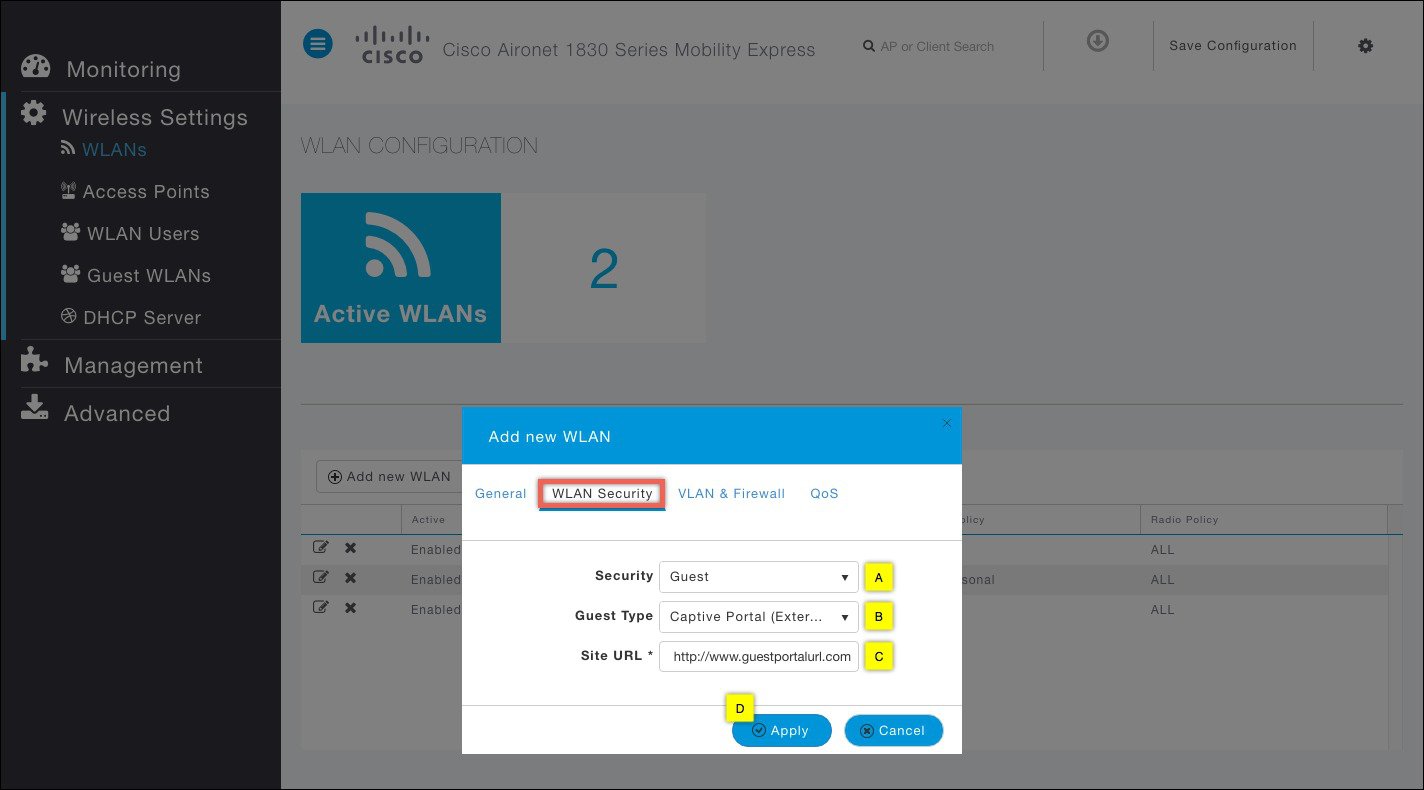
Guest Access using Captive Portal (External Web Server)
| Step 1 | Navigate to
Wireless Settings > WLANs and then click on
Add new WLAN
button. The
Add new WLAN
Window will pop up.
| ||
| Step 2 | In the
Add new WLAN
window, on the General page configure the following:
A. Enter the Profile Name B. Enter the SSID
| ||
| Step 3 | Click on the
WLAN Security and configure the following:
A. Select Security as Guest B. Select Guest Type as Captive Portal (External Web Server) C. Enter the Site URL. Site URL is the Guest Portal URL, which has been configured on the External Web Server D. Click Apply button
|

Guest Portal Page for Internal WebAuth
Cisco Mobility Express supports a default Guest Portal Page that comes built-in and also a customized page, which can be imported by the user.
Note | The internal Guest Portal Page will be used for Guest WLANs with Guest Type as Captive Portal (AP) only. |
To use the default Guest Portal Page or import a customized Guest Portal page, follow the procedure below:
Using Default Guest Portal Page
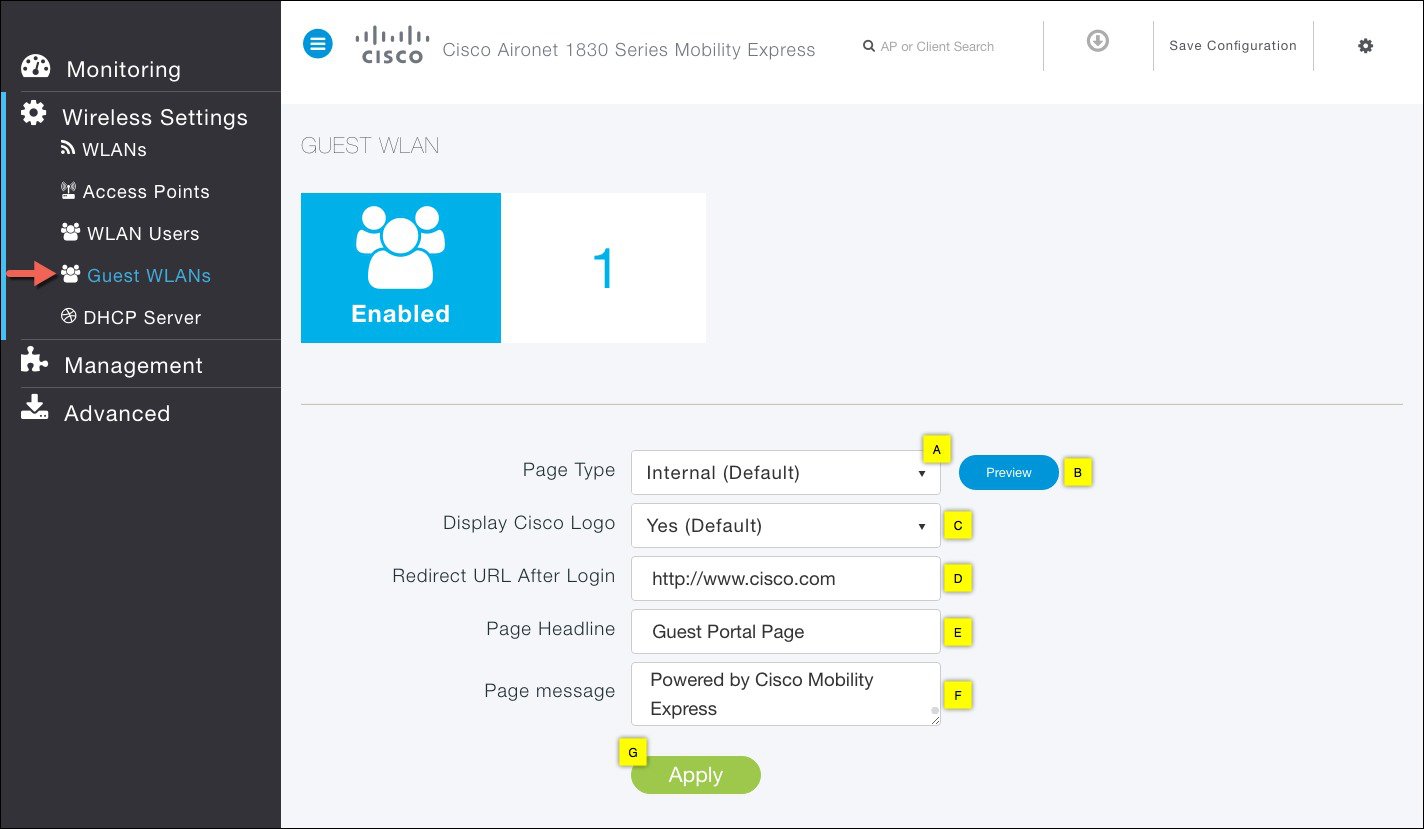
| Step 1 | Navigate to Wireless Settings > Guest WLANs. The Guest WLAN page will be displayed showing the count of Guest WLANs configured on the Mobility Express controller. |
| Step 2 | Configure the
following:
A. Page Type—Select as Internal (Default). B. Preview—You can Preview the page by clicking on the Preview button. C. Display Cisco Logo—To hide the Cisco logo that appears in the top right corner of the default page, you can choose No. This field is set to Yes by default. D. Redirect URL After Login—To have thee guest users redirected to a particular URL (such as the URL for your company) after login, enter the desired URL in this text box. You can enter up to 254 characters. E. Page Headline—To create your own headline on the login page, enter the desired text in this text box. You can enter up to 127 characters. The default headline is Welcome to the Cisco Wireless Network. F. Page Message—To create your own message on the login page, enter the desired text in this text box. You can enter up to 2047 characters. The default message is Cisco is pleased to provide the Wireless LAN infrastructure for your network. Please login and put your air space to work. G. Click Apply button
|
Using Customized Guest Portal Page
If a customized Guest Portal page has to be presented to guest users, a sample page can be downloaded from cisco.com which can then be edited and imported to the Cisco Mobility Express controller.
To download the sample bundle, navigate to
Once the page has been edited and ready to be uploaded to the Cisco Mobility Express controller, follow the steps below.
| Step 1 | Navigate to Wireless Settings > Guest WLANs. The Guest WLAN page will be displayed showing the count of Guest WLANs configured on the Mobility Express controller. |
| Step 2 | Configure the
following:
A. Page Type—Select as Internal (Default). B. Customized page Bundle—Upload the customized page bundle to the Mobility Express controller. C.Preview—You can Preview the page by clicking on the Preview button. D. Redirect URL After Login—To have thee guest users redirected to a particular URL (such as the URL for your company) after login, enter the desired URL in this text box. You can enter up to 254 characters. E. Click Apply button
|

 Feedback