Cisco Embedded Wireless Controller on Catalyst Access Points

Cisco Embedded Wireless Controller on Catalyst Access Points are the next generation wireless controllers that

  • are IOS XE based and integrate the Radio Frequency (RF) performance excellence from Aironet systems,

  • supports intent-based networking that are easy to adapt and scale, and

  • are available in multiple physical and virtual form factors for flexible management options.

Available form factors and deployment options

You can deploy the controllers as physical appliances .

Management options

You can managed them the Cisco Embedded Wireless Controller on Catalyst Access Points with:

  • Cisco Catalyst Center

  • NETCONF or YANG, or

  • GUI or CLI.

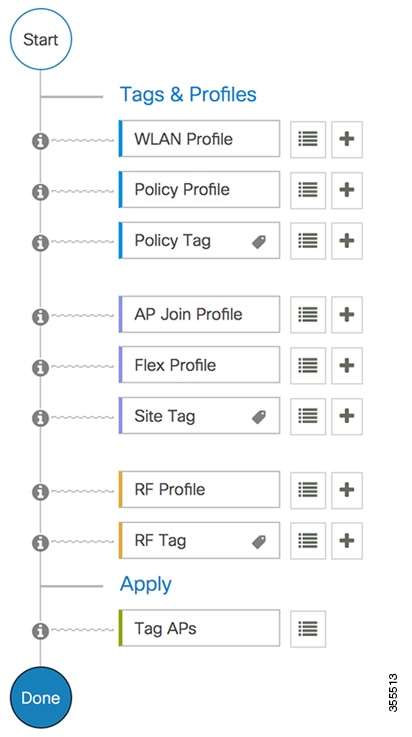
New configuration model, tags, and profile

The new configuration model is a wireless network configuration approach that

  • uses profiles to define feature-specific parameters

  • uses tags to bundle and apply profiles to APs, and

  • separates policy, site, RF, and WLAN definitions for modular deployment.

Profiles define attributes such as WLAN policy, RF behavior, and AP join characteristics. Tags are logical containers that map these profiles to APs, ensuring flexible and scalable configurations.

A tag is a logical container that

  • is defined by the property of policies you associate with it

  • maps multiple profiles—policy, site, and RF—to an AP or client, and determines that device's configuration and behavior, and

  • enables modular and flexible deployment across sites.

Every tag has a default that is created when the system boots up.

A profile is a logical container that

  • include feature-specific attributes and parameters applied to tags

  • represent multiple attributes related to policy, site, and RF

  • determine the configuration and behavior of applied APs and associated clients, and

  • is a reusable entities that can be used across tags.

Configuration workflow

Configuring wireless networks involves establishing profiles and tags that link configurations to APs for effective wireless management.

Summary

The key components involved in the process are:

  • Profiles: Logical groupings of settings (such as WLAN, Policy, AP Join, Flex, and RF) used to configure APs.

  • Tags: Logical containers or labels (such as Policy, Site, Tag) that help link profiles with APs.

  • APs: Devices that implement the configurations provided by profiles and tags to deliver wireless connectivity.

Workflow

Figure 1. Configuration workflow

These are the stages of configuration:

  1. Profile creation creates specific profiles:
    • WLAN profile for managing wireless network settings.
    • Policy profile for enforcing network rules.
    • AP Join profile for controlling AP associations.
    • Flex profile for handling local switching.
    • RF profile for optimizing radio frequency settings.
  2. Tag creation: generates tags to complement profiles:
    • Policy tag to align with the Policy profile.
    • Site tag for specific location identification.
    • RF tag corresponding to the RF profile.
  3. Tag association: associates the created tags with an AP to apply the configured settings and policies.

Result

The configuration workflow enables APs to be set up correctly with designated profiles and tags, resulting in efficient network operation and management.

Initial Setup

Setting Up the Controller

The initial configuration wizard in Cisco Embedded Wireless Controller on Catalyst Access Points is a simplified, out-of-the-box installation and configuration interface for the controller. This section provides instructions to set up a controller to operate in a small, medium, or large network wireless environment, where access points can join and together as a simple solution provide various services, such as corporate employee or guest wireless access on the network.

Configuring the Controller Using Day 0 Wizard (GUI)

To confugure the controller using day 0 wizard, complete the following steps:

Before you begin

When the AP has rebooted in the EWC mode, it broadcasts a provisioning SSID ending with the last digits of the MAC address. You can connect to provisioning SSID using the PSK password.

You can then open a browser and be redirected to mywifi.cisco.com, which takes you to the AP web UI. Enter the username as webui and password as cisco.

Note: The web redirection to the EWC configuration portal only works if you are connected to the provisioning SSID. It does not work if your laptop is connected to another wifi network or on the wired network. You cannot configure the AP from the wired network even if you enter the EWC IP address when it is in day0 wizard provisioning mode

Procedure


Step 1

Log on to the controller and in the Configuration Setup Wizard, go to the General Settings page.

Step 2

In the Configuration Mode option, select one of the following:

  1. Non Mesh: Complete the following fields:

    1. Host Name: Enter the hostname.

    2. Country: From the drop-down list, choose the appropriate country code.

      Note


      As required by the End User License Agreement, please ensure appropriate country code selection so that the unleashed network does not violate local and national regulatory restrictions. Improper country code assignment can disrupt wireless transmissions and may result in government imposed penalties and sanctions on operators of wireless networks utilizing devices set to improper country codes.

    3. In the Management User Settings section, enter the username and password.

    4. In the Wireless Management Settings section, check the DHCP check box, to display the DHCP server IP address.

    5. In the Wireless Network section, click Add to create atleast one WLAN.

  2. Mesh: Complete the following fields:

    1. Host Name: Enter the hostname.

    2. Country: Click the '+' icon to enter the appropriate country code.

    3. In the Management User Settings section, enter the username and password.

    4. In the Wireless Management Settings section, check the DHCP check box, to display the DHCP server IP address.

    5. In the Wireless Mesh Settings section, complete the following fields:

      • Check the Enable Wireless Bridge check box to enable the feature.

      • In the Mesh AP MAC Address field, enter the MAC address or click the '+' icon select the MAC address from the list of Mesh AP MAC addresses that are displayed.

    6. In the Wireless Network section, click Add to create atleast one WLAN.

Step 3

Click Finish.


Configuring the Controller Using Day 0 Wizard (CLI)

To configure the controller using the Day 0 wizard, follow the steps given below. The following steps are common for configuring mesh and non-mesh APs. The existing Day 0 workflow enables the configuration with the factory-reset command.

Before you begin

  • The available options in brackets after each configuration parameter. The default value in all uppercase letters.

  • If you enter an incorrect response, the controller provides you with an appropriate error message, such as an invalid response, and returns you to the wizard prompt.

  • Press the hyphen key to return to the previous command line.

Procedure


Step 1

Enter the wireless ewc-ap factory-reset command to initiate the Day 0 workflow. This command reboots the device when you confirm the action.

Step 2

When the device restarts and when you are prompted with the initial configuration dialog, enter Yes to start the dialog.

Example:

Would you like to enter the initial configuration dialog? [yes/no]: Yes

Step 3

Enter valid inputs to the following questions that are prompted for mesh and non-mesh APs:

  1. Enter the country code for the operation.

    Note

     
    Enter help to view the list of available country codes.

    You can enter more than one country code if you want to manage APs in multiple countries from a single controller. To do so, separate the country codes with a comma (for example, US,CA,MX). After the configuration wizard runs, you must assign each AP joined to the controller to a specific country.

    Example:

    Configure country code(s) for wireless operation in ISO format [US]: US,CH,CN,GB
  2. Enter the country code to configure the AP profile.

    Example:

    Configure default wireless AP profile country code in ISO format [US]:
    
  3. Enter the hostname.

    Example:

    Enter the hostname [EWC]: EWC
  4. Enter the details to configure credentials for management access on the APs.

    Example:

    Configure credentials for management access on Access Points? [yes]: yes
     [AP] Enter the management username: EWC_User
     [AP] Enter the management password: ********
     [AP] Reenter the password: ********
     [AP] Enter the privileged mode access password: ********
     [AP] Reenter the password: ********
  5. Enter the management credentials.

    Example:

    Enter the management username: EWC_User
    Enter the password: ********
    Reenter the password: ********
  6. Configure the DHCP interface.

    Example:

    Configure interface as DHCP [yes/no]? [no]: yes
  7. Configure the wireless network settings.

    Example:

    Configure Wireless network settings? [yes]: yes
     Enter the network name or service set identifier (SSID): test
     Choose the network type
       1. Employee
       2. Guest
     Enter your selection [1]: 1
     Choose the security type
       1. WPA Personal
       2. WPA Enterprise
     Enter your selection [2]: 1
     Enter the pre-shared key: ****

For non-mesh APs, the configuration ends here. Save or discard the configuration.

Step 4

To configure mesh capable APs, follow the steps given below:

  1. Configure mesh mode on the AP.

    Example:

    Set Internal AP in mesh mode [yes/no]? [no]: yes
  2. Configure additional mesh access points (MAPs).

    Example:

    Configure additional MAPs [yes/no]? [no]: yes
    Enter a comma separated list of max 20 Mesh AP ethernet macs (format: 'aabbccddeeff' or 'aabb.ccdd.eeff'): aabbccddeeff, 1122.3344.5566
  3. Enable wireless bridging.

    Example:

    Enable wireless bridging [yes/no]? [no]: yes

Example

The configuration for mesh APs is complete. The following configuration script is generated from the entered choices:
!

ap profile default-ap-profile
country US

!
hostname EWC
!
ap profile default-ap-profile
mgmtuser username EWC_User password 0 test secret 0 test

!
username EWC_User privilege 15 secret 9 $x$xxxxxxxxxx9xxxxxxxxxxjxxxxxxxxxxzxxxxxxxxxxOxxxxxxxxxxxxxxx

!
wireless management interface GigabitEthernet0

!

interface GigabitEthernet0
ip address dhcp

!
wlan test 1 test
security wpa psk set-key ascii 0 test
no security wpa akm dot1x
security wpa akm psk
no shut

!

wireless tag policy default-policy-tag
wlan test policy default-policy-profile

!
end
wireless country US
wireless country CH
wireless country CN
wireless country GB
aaa new-model
aaa authentication login default local
aaa authorization credential-download default local
username 3C5731C58478 mac
 

!
ap profile default-ap-profile
ssid broadcast persistent
username aabbccddeeff mac
username 112233445566 mac


wireless mesh security psk provisioning
wireless mesh security psk provisioning default_psk

!
wireless profile mesh default-mesh-profile
security psk
ethernet-bridging
ethernet-vlan-transparent

What to do next

Save or discard the configuration.

[0] Go to the IOS command prompt without saving this config.
[1] Return back to the setup without saving this config.
[2] Save this configuration to nvram and exit.

Enter your selection:

Example:
Enter your selection: 2

Interactive help

Interactive help is a user interface feature that

  • provides step-by-step guidance within the application

  • adapts instructions and walk-throughs to the user's context, and

  • assists users in completing complex configurations or navigating the system.

Modes of starting the interactive Help

You can start the interactive help in the these ways.

  • Hover over the blue flap at the right-hand corner of a window in the GUI and clicking Interactive Help.

  • Click Walk-me Thru in the left pane of a window in the GUI.

  • Click Show me How whenever displayed in the GUI. Clicking Show me How triggers a specific interactive help that is relevant to the context you are in.

    For example, Show me How in Configure > AAA walks you through the various steps for configuring a RADIUS server. Choose Configuration> Wireless Setup > Advanced and click Show me How to trigger the interactive help that walks you through the steps relating to various kinds of authentication.

Additional troubleshooting information

If the WalkMe launcher is unavailable on Safari, modify the browser settings.

  1. Choose Preferences > Privacy.

  2. In the Website tracking section, uncheck the Prevent cross-site tracking check box to disable this action.

  3. In the Cookies and website data section, uncheck the Block all cookies check box to disable this action.

Resetting Cisco Embedded Wireless Controller on Catalyst Access Points

To reset the controller on Catalyst APs to factory defaults, follow the steps given below:

Procedure


Step 1

Unplug the Access Point from its power source.

Step 2

Plug in the console cable and open serial session on your computer or laptop.

Step 3

Press and hold the Mode/Reset button on the AP.

Step 4

Plug in the AP back to its power source while still pressing the Mode/Reset button.

Step 5

Continue holding the button until a prompt is displayed in the serial session on your computer or laptop.

Note

 
The console session also displays for how long the button has been pressed. At least 20 seconds of button press is required for a complete restart.

What to do next

When the AP reboots, use the default credentials Cisco/Cisco to log in.