Smart Licensing

Information About Cisco Smart Licensing

Cisco Smart Licensing is a flexible licensing model that provides you with an easier, faster, and more consistent way to purchase and manage software across the Cisco portfolio and across your organization. And it’s secure – you control what users can access. With Smart Licensing you get:

  • Easy Activation: Smart Licensing establishes a pool of software licenses that can be used across the entire organization—no more PAKs (Product Activation Keys).
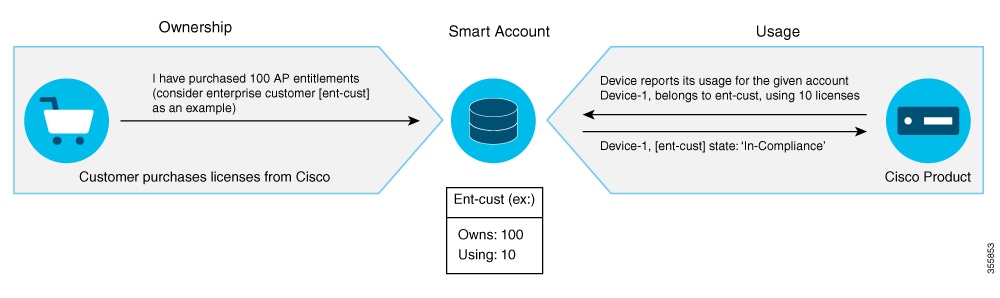
  • Unified Management: My Cisco Entitlements (MCE) provides a complete view into all of your Cisco products and services in an easy-to-use portal, so you always know what you have and what you are using.

  • License Flexibility: Your software is not node-locked to your hardware, so you can easily use and transfer licenses as needed.

To use Smart Licensing, you must first set up a Smart Account on Cisco Software Central (software.cisco.com).

For a more detailed overview on Cisco Licensing, go to cisco.com/go/licensingguide.

Figure 1. Relationship Between Ownership, Smart Account, and Usage

Note

Starting with Cisco IOS XE Gibraltar 16.12.1, the Cisco Catalyst 9800 Series Wireless Controller does not support satellite server for licensing reporting. You should use the Cisco Smart Software Manager (CSSM) for any licensing reporting.


Once your product is registered in CSSM, you will be able to view the license usage using your Smart Account or Virtual Account for every eight hours.


Note

  • Smart Licensing registration is lost when the device switches from controller to autonomous mode and back. In such instances, you should re-register the controller to CSSM to restore licenses authorization.

  • After adding new license in the Cisco Smart Software Manager (CSSM) for customer virtual account, run the license smart renew auth command on the controller to get the license status changed from Out OF Compliance to Authorised.


Access points support the following AIR licensing levels:

  • AIR Network Essential (AIR-NE)

  • AIR Network Advantage (AIR-NA)

  • AIR DNA Essential (AIR-DNA-E)

  • AIR DNA Advantage (AIR-DNA-A)


Note

The AIR-DNA-A and AIR-DNA-E are the available license levels on the controller.

The AIR-DNA-A is the default mode.

You can configure as AIR-DNA-A or AIR-DNA-E license level and on term expiry, you can move to the Network Advantage or Network Essentials license level, if you do not want to renew the DNA license.


Smart Licensing Reservation Types

License reservation is a mechanism to reserve node locked licenses and install them on the controller.

The following are the license reservation types:

  • Permanent License Reservation (PLR)—All licenses are reserved.

  • Specified License Reservation (SLR)—Only specific licenses are reserved. Supports term licenses.

The controller supports four different entitlement registration or reporting on Smart Licensing or service reservation. Every connecting AP requires a Cisco DNA Center License to leverage the unique value properties of the controller.


Note

The controller boots up with AIR-DNA-A as the default. Any change in the license level requires a reboot.


Entitlement Reporting

Entitlement reporting is nothing but reporting the number of access points on the controller to the Cisco Smart Software Manager (CSSM).

The entitlement reporting is based on the configured AIR license level on the controller.


Note

Two types of entitlement reporting occurs when you are in AIR-DNA-E and AIR-DNA-A levels. For instance, if your controller reports 100 APs as count, your entitlement reporting displays 100 AIR-NE and 100 AIR-DNA-E. Similarly, it also displays 100 AIR-NA and 100 AIR-DNA-A to CSSM.


Creating a Smart Account

Procedure


Step 1

Navigate to the Cisco Software Central web page:

https://software.cisco.com/#

The Cisco Software Central page is displayed.

Step 2

From the Important News pop-up window, click Get a Smart Account.

(Or)

From the Administration area, click Request a Smart Account.

Follow the process to create a Smart Account.

Note 

You need to have a Smart Account to use Smart Licensing.


Using Smart Licensing

Before you begin

Follow the procedure given below to cover the high-level steps on how to use smart licensing:

Procedure


Step 1

Configure your device for smart licensing.

Step 2

Login to CSSM customer Smart Account > Virtual Account to generate a token.

Step 3

Execute the following command on your device:

Device# license smart register idtoken <token-id>
Note 

You can get the token-id from the CSSM web portal.

Note 

You can use the license smart register idtoken token-id force command to register the device again even if the same device was registered with CSSM earlier.


Using Specified License Reservation (SLR)

Procedure


Step 1

configure terminal

Example:

Device# configure terminal

Enters global configuration mode.

Step 2

license smart reservation

Example:

Device(config)# license smart reservation

Enables specified license reservation mode on the controller.

Step 3

license smart reservation request local

Example:

Device(config)# license smart reservation request local

Generates a request code.

Note 

Enter this request code in the Cisco Smart Software Manager portal:

CB-ZL-AIR-9500C-K9:9J4FVHMBXCO-BjSeUVwmn-D8
Step 4

end

Example:

Device(config)# end

Returns to privileged EXEC mode. Alternatively, you can also press Ctrl-Z to exit global configuration mode.


Enabling Specified License Reservation in CSSM

Before you begin

You should have a smart account and virtual account to generate the authorization code for the controller.

Procedure


Step 1

Login to CSSM.

Step 2

De-register the smart license, if the controller is reporting to a satellite server.

Device(config)# license smart deregister
Step 3

Enable Specified License Reservation in the controller.

Device(config)# license smart reservation
Step 4

Verify the license reservation status on your controller using the following command:

Device# show license reservation

License reservation: ENABLED

Overall status:
  Active: PID:C9800-CL-K9,SN:9PQFKND9ZR8
      Reservation status: NOT INSTALLED
      Export-Controlled Functionality: NOT ALLOWED
  Standby: PID:C9800-CL-K9,SN:9UD8BBTHL1S
      Reservation status: NOT INSTALLED
      Export-Controlled Functionality: NOT ALLOWED
Step 5

Generate request code on your controller using the following command:

Device(config)# license smart reservation request all

Request code for active : CG-ZC9800-CL-K9:9PQFKND9ZR8-BjSeUVwmn-8E
Request code for standby : CG-ZC9800-CL-K9:9PQFKND9ZR8-BjSeUVwmn-8E

Option all will generate the request code for both active and stand-by, if the controller is in HA pair.

Option local will generate the request code for active or standalone controller.

Step 6

Generate authorization code, using the request code, for each controller separately in CSSM and install both the codes in the controller. You can install the authorization code of standby controller thorough active controller.

  1. Go to CSSM and navigate to your Smart Account and Virtual Account: https://software.cisco.com/software/csws/ws/platform/home#SmartLicensing-Inventory

  2. Click Licenses tab.

  3. Click License Reservation button and enter the request code obtained from the previous step in to the Reservation Request Code field.

  4. Click Next.

  5. In the Select Licenses tab, select the Reserve a specific license radio button and enter the number of licenses required to reserve in the Reserve text box.

  6. Click Next.

  7. In the Review and Confirm tab, check the quantity and license type, and click Generate Authorization Code button.

  8. From the Authorization Code tab, select Download as File option to download the authorization code.

    Note 

    Repeat Step b to Step h to generate authorization code for the standby controller.

Step 7

Upload the authorization code file to the controller bootflash: directory.

Device# copy ftp://<ip-address>authorization-code.txt bootflash:
Destination filename [authorization-code.txt]
Step 8

Install the authorization code file in the controller using the following command.

Device# license smart reservation install file authorization-code.txt 
Note 

Use the same command to install the authorization codefor stand-by controller also using active controller in case of HA.

Step 9

Verify the license summary after installing the authorization code on your controller using the following command:

Device# show license summary

Enabling Smart Software Licensing

Procedure


Step 1

Navigate to the Cisco Software Central web page using the following link:

https://software.cisco.com/#

The Cisco Software Central page is displayed.

Step 2

From the License tab, click Smart Software Licensing.

The Smart Software Licensing page is displayed.

Step 3

Click the Inventory tab to view Virtual Account: Accounting page details.

Step 4

Click New Token to register the product instances to this virtual account.

The Create Registration Token page is displayed.

Step 5

In the Description field, enter a description for the ID token.

Step 6

Check the Allow export-controlled functionality on the products registered with this token checkbox to enable export-controlled functionality.

Step 7

Click Create Token.

Note 

Licenses cannot be purchased with the wireless controller. All licenses can be purchased with access points.


Registering for Smart License (Connected Mode)

Procedure

  Command or Action Purpose
Step 1

Copy the token generated in Enabling Smart Software Licensing.

Step 2

On Catalyst ME, use this token to register to Smart License.

Step 3

license smart register idtoken token

Example:

Device(config)# license smart register idtoken CB-ZL-AIR-9500C-K9:9J4FVHMBXCO-BjSeUVwmn-D8

Registers for Smart License using the token number.

Step 4

license smart register idtoken token [force]

Example:

Device(config)# license smart register  CB-ZL-AIR-9500C-K9:9J4FVHMBXCO-BjSeUVwmn-D8 force

Enables registering for Smart License with force if normal registering does not take place.

Step 5

license smart deregister

Example:

Device(config)# license smart deregister  

De-registers the smart license.

Enabling Smart License Reservation

Procedure

  Command or Action Purpose
Step 1

license smart reservation

Enables Smart License Reservation on ME.

Request code is generated.

Step 2

Navigate to the Cisco Software Central web page using the following link:

https://software.cisco.com/#

The Cisco Software Central page is displayed.

Step 3

From the License tab, click Smart Software Licensing.

The Smart Software Licensing page is displayed.

Step 4

Click the Inventory tab and then click Licenses > License Reservation.

Follow steps 1-4 to Enter Request Code, Select Licenses, Review and Confirm, and to generate an Authorization Code.

Step 5

After generating the Authorization Code, Click Download as File option to save to AuthorizationCode.txt.

The Authorization Code is saved as a text file.

Step 6

On Catalyast ME, copy the authorization file to flash (/bootflash/AutorizationCode.txt).

Step 7

license smart reservation install file filename

Example:

Device(config)# license smart reservation install file AuthorizationCode.txt

Installs the reserved licenses using the Authorization Code file..

Step 8

license smart reservation return

Returns the reserved licenses.

Step 9

no license smart reservation

Exits from the SLR mode.

Enabling Smart Call Home Reporting

Procedure


Step 1

configure terminal

Example:

Device# configure terminal

Enters global configuration mode.

Step 2

call-home reporting contact-email-addr email-address http-proxy proxy-server port-number

Example:

Device(config)# call-home reporting contact-email-addr sample@cisco.com http-proxy 120.20.2.2 5

Enables Call Home reporting.

  • port-number —The valid range is from 1 to 65535.

Step 3

end

Example:

Device(config)# end

Returns to privileged EXEC mode. Alternatively, you can also press Ctrl-Z to exit global configuration mode.

For more information on Smart Call Home, see:

https://www.cisco.com/c/en/us/td/docs/switches/lan/smart_call_home/book/SCH31_Ch3.html


Configuring AIR License Level (GUI)

Procedure


Step 1

Choose Administration > Licensing.

Step 2

Click Change Wireless License Level. The Change Wireless License Level dialog box is displayed.

Step 3

Select the License Level using the drop-downs.

Step 4

After changing the New Level values, click Save & Reload (Or) Save without Reload. Alternatively, you can click Reload to reload the device. During this time, you will lose network connectivity to the device. If you wish to continue, click Yes.

Step 5

Click refresh icon to refresh the device.


Configuring AIR License Level (CLI)

Procedure

  Command or Action Purpose
Step 1

configure terminal

Example:

Device# configure terminal

Enters global configuration mode.

Step 2

license air level {air-network-advantage | air-network-essentials}

Example:

Device(config)# license air level air-network-advantage
Device(config)# license air level air-network-essentials

Configures AIR license level.

  • air-network-advantage—Is the AIR network advantage license level.

  • air-network-essentials—Is the AIR network essential license level.

Step 3

end

Example:

Device(config)# end

Returns to privileged EXEC mode. Alternatively, you can also press Ctrl-Z to exit global configuration mode.

Configuring AIR Network Essentials License Level

Procedure

  Command or Action Purpose
Step 1

configure terminal

Example:

Device# configure terminal

Enters global configuration mode.

Step 2

license air level network-essentials addon air-dna-essentials

Example:

Device(config)# license air level network-essentials addon air-dna-essentials

Configures AIR network essentials license level.

Step 3

end

Example:

Device(config)# end

Returns to privileged EXEC mode. Alternatively, you can also press Ctrl-Z to exit global configuration mode.

Configuring AIR Network Advantage License Level

Procedure

  Command or Action Purpose
Step 1

configure terminal

Example:

Device# configure terminal

Enters global configuration mode.

Step 2

license air level air-network-advantage addon air-dna-advantage

Example:

Device(config)# license air level air-network-advantage addon air-dna-advantage

Configures AIR network advantage license level.

Step 3

end

Example:

Device(config)# end

Returns to privileged EXEC mode. Alternatively, you can also press Ctrl-Z to exit global configuration mode.

Verifying Smart Licensing Configurations

To verify the smart licensing status and license usage, use the following command:

Device# show license all
Smart Licensing Status

======================
Smart Licensing is ENABLED
Registration:
  Status: REGISTERED
  Smart Account: BU Production Test
  Virtual Account: MEWLC-DE       
  Export-Controlled Functionality: Allowed
  Initial Registration: SUCCEEDED on Nov 19 15:36:51 2018 UTC
  Last Renewal Attempt: None                                
  Next Renewal Attempt: May 18 15:36:50 2019 UTC            
  Registration Expires: Nov 19 15:31:24 2019 UTC            

License Authorization:
  Status: AUTHORIZED on Nov 20 07:46:48 2018 UTC
  Last Communication Attempt: SUCCEEDED on Nov 20 07:46:48 2018 UTC
  Next Communication Attempt: Dec 20 07:46:48 2018 UTC            
  Communication Deadline: Feb 18 07:40:49 2019 UTC                

Export Authorization Key:
  Features Authorized:  
    <none>               

Utility:
  Status: DISABLED

Data Privacy:
  Sending Hostname: yes
    Callhome hostname privacy: DISABLED
    Smart Licensing hostname privacy: DISABLED
  Version privacy: DISABLED                  

Transport:
  Type: Callhome

License Usage
==============
AP Perpetual Networkstack Essentials (DNA_NWSTACK_E):
  Description: AP Perpetual Network Stack entitled with DNA-E
  Count: 2                                                  
  Version: 1.0                                               
  Status: AUTHORIZED                                        
  Export status: NOT RESTRICTED                             

 
Product Information
===================
UDI: PID:AIR-AP1900I-B-K9,SN:9ICMGRNU4U0

Agent Version
=============
Smart Agent for Licensing: 4.6.0_rel/2
Component Versions: SA:(1_3_dev)1.0.15, SI:(dev22)1.2.1, CH:(rel5)1.0.3, PK:(dev18)1.0.3

Reservation Info
================
License reservation: DISABLED

To verify the smart licensing status, use the following command:

Device# show license status
Smart Licensing is ENABLED

Utility:
Status: DISABLED
Data Privacy:
Sending Hostname: yes
Callhome hostname privacy: DISABLED
Smart Licensing hostname privacy: DISABLED
		     Version privacy: DISABLED

Transport:
Type: Callhome

Registration:
Status: REGISTERED
Smart Account: BU Production Test
Virtual Account: MEWLC-DE
			Export-Controlled Functionality: Allowed

Initial Registration: SUCCEEDED on Nov 19 15:36:51 2018 UTC
Last Renewal Attempt: None
Next Renewal Attempt: May 18 15:36:51 2019 UTC
Registration Expires: Nov 19 15:31:25 2019 UTC

License Authorization:
Status: AUTHORIZED on Nov 19 16:23:42 2018 UTC
Last Communication Attempt: SUCCEEDED on Nov 19 16:23:42 2018 UTC
Next Communication Attempt: Dec 19 16:23:42 2018 UTC
Communication Deadline: Feb 17 16:18:17 2019 UTC

Export Authorization Key:
Features Authorized:
<none>

To verify the air license level and smart licensing status, use the following command:

Device# show version
AIR License Level: AIR DNA Advantage
Next reload AIR license Level: AIR DNA Advantage           
Smart Licensing Status: REGISTERED/AUTHORIZED 
 cisco AIR-AP1900I-B-K9 (VXE) processor (revision VXE) with 322620K bytes of memory.