Integration, Tools, and Accessories

Jabber Integrations with Accessories and Tools

Cisco Jabber makes it easy for you to use other companies' accessories so you can use a variety of headsets and speakerphones with Jabber's calling and conferencing features.

Accessories

Logitech

For further Logitech and Cisco integration information, and a product overview see the Logitech website.

Cisco Webex

Move Contacts and Common settings to Webex

If your administrator has set you up for an upgrade from Cisco Jabber to Webex, you can use a built in tool to migrate your contacts and common settings over so you're ready for the move to Webex.

After you start Jabber and sign in, the tool automatically appears momentarily (it can take between 5 minutes–3 hours), but you can run it yourself if you're ready by using these steps. You may need to restart Jabber. Your data in Jabber is safe and won't be affected by the tool moving the data to Webex.


Note


You can only sign into the phone service on one calling app at a time. For example, you can't sign into the phone service on both Jabber and Webex at the same time. If you're using Jabber and sign in to Webex, the phone service in Jabber is disconnected.


Before you begin

Make sure you are on the one of the following supported releases of Jabber:

Table 1. Supported Versions of Jabber
Platform Versions Patch What's Migrated
Jabber for Windows The latest major releases (MRs): 12.1.4, 12.5.3, 12.6.4, 12.7.3, 12.8.4, 12.9.3, 12.9.4 No All contacts and settings mentioned in this article are moved over
Jabber for Windows Earlier MRs: 12.1.0, 12.1.1, 12.1.2, 12.1.3, 12.5.0, 12.5.1, 12.5.2, 12.6.0, 12.6.1, 12.6.2, 12.6.3, 12.7.0, 12.7.1, 12.7.2, 12.8.0, 12.8.1, 12.8.2, 12.8.3, 12.9.0, 12.9.1, 12.9.2 Yes—Download from here All contacts and settings mentioned in this article are moved over
Jabber for Mac 12.8.5, 12.8.6, 12.9.4, 12.9.5 No All contacts and settings mentioned in this article are moved over

Make sure you meet the following Webex requirements:

  • We recommend that you download Webex from https://www.webex.com/downloads.html or from the site your administrator directed you to and then install it on the system that you're already using Jabber on.

  • Make sure you install the latest release; you may need to sign into Webex before the Jabber data can be moved over.

Procedure


Step 1

Click Help and then choose Move Data to Webex.

Step 2

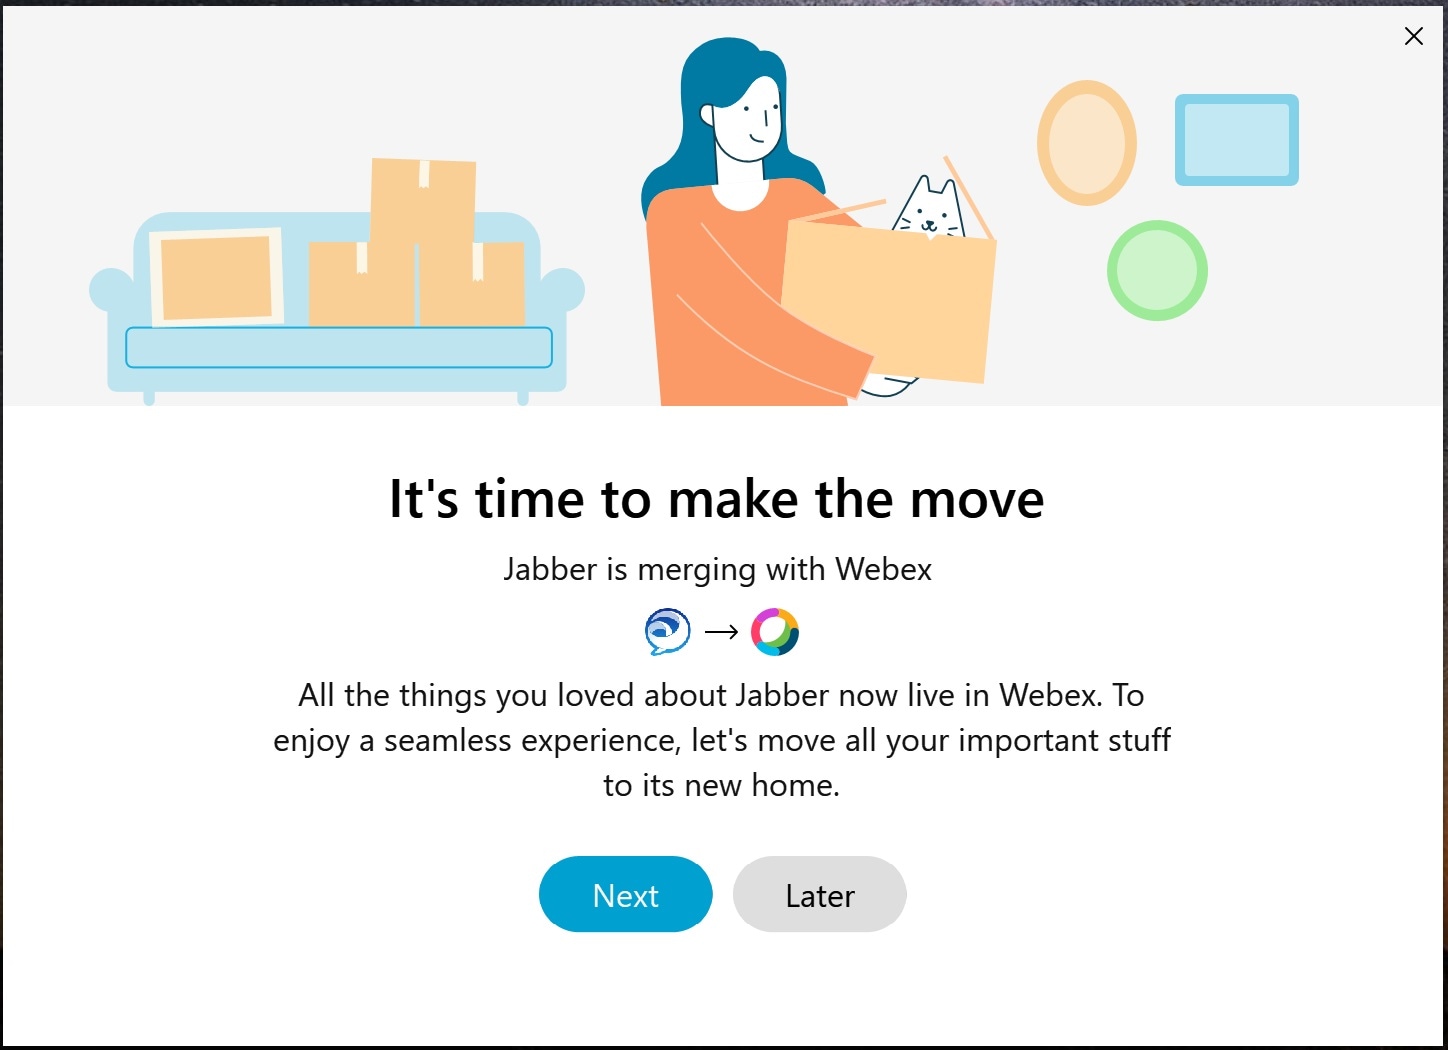
Read the welcome screen and then click Next.

screen dsplay

Step 3

Check the items you want to move to Webex:

  • Contacts—Moves most common contact types: directory contacts with existing emails in the cloud, custom contacts and photos, and XMPP federated contacts.

  • Preferences—Moves calling preferences: video call preferences (on or off), mute notification settings (for chat and calls—mute all if it's set in Jabber, otherwise the default setting in Webex), and audio and video device selection (the currently selected device, if set).

Step 4

Click Move to Webex.

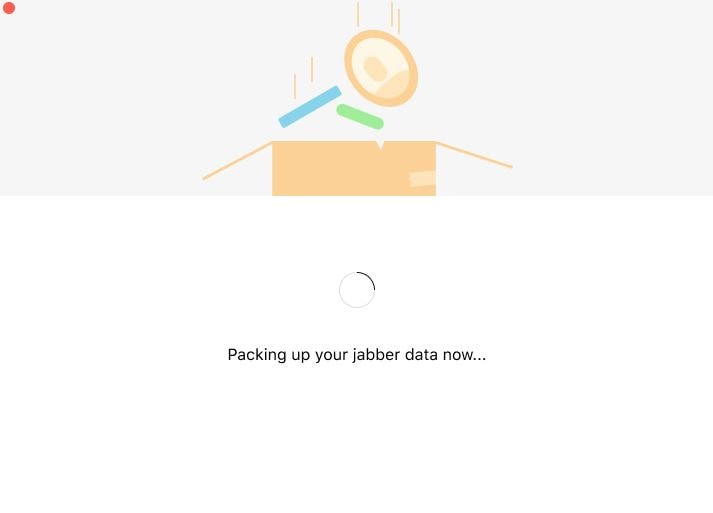
You'll see a status indicator that says your data is being prepared.

screen display

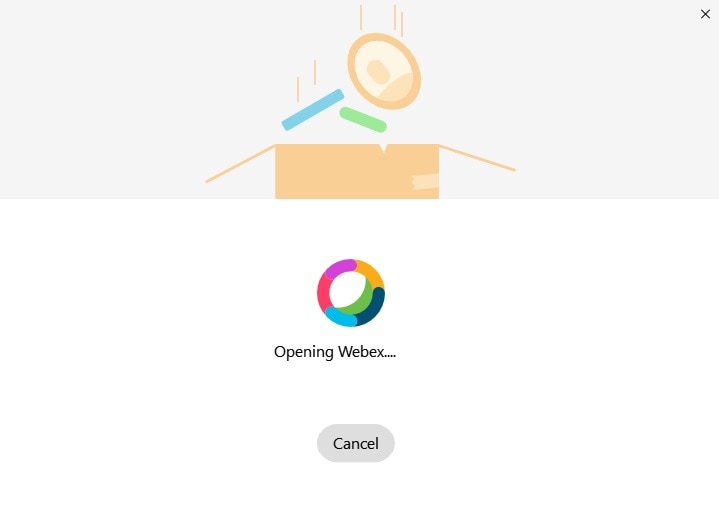
The next screen shows that Webex is going to be launched if it's installed. You may need to sign into Webex if it's the first time you're opening it.

screen display

Note


If Webex is not installed, an error message appears. You can contact your administrator or install the latest version of Webex that's referenced in the prerequisites above.

Step 5

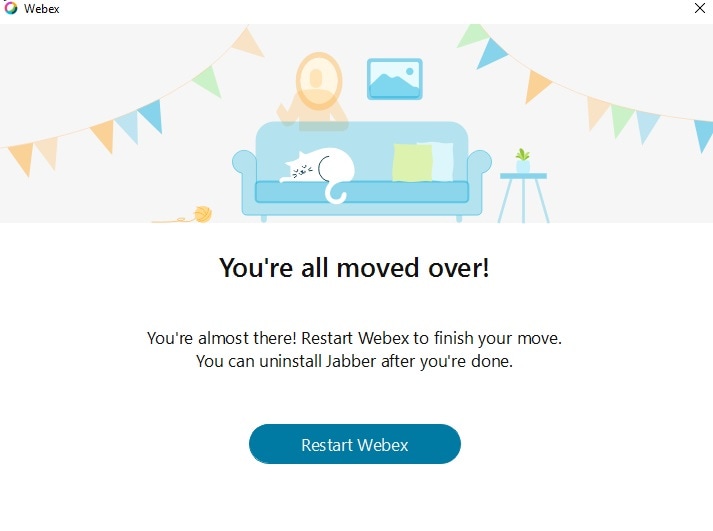
On the You're all moved over! screen, click Restart Webex.

Errors may happen if contacts can't be moved over or there's a network issue. The tool in Jabber will show you a report and next steps you can take if any issues occur—any contacts that can't be moved over (for example, contacts that aren't already in the cloud directory service that Webex uses or local contacts in Active Directory that weren't synchronized to the cloud) are exported as a comma-separated value (CSV) file for your reference. You can restart the built in tool at any time if it fails.

screen display

Chat in Jabber and Meeting in Webex

While you're on a chat conversation with your friends or coworkers, you can also join a Webex Meeting in Cisco Jabber.

Before you join your Webex meeting, make sure that you’ve installed the Cisco Webex Meeting app in your device, and that you’re signed in.

Join a Webex Meeting While Chatting in Jabber for Windows

Procedure

Step 1

From Cisco Jabber, click Meetings to view your meeting invites.

Step 2

Click Join in Webex and follow the prompts to join your call while you are still on a conversation with your coworkers.


Join a Webex Meeting While Chatting in Jabber for Mac

Procedure

Step 1

From Cisco Jabber, click Meetings to view your meeting invites.

Step 2

Click Join in Webex and follow the prompts to join your call while you are still on a conversation with your coworkers.


Join a Webex Meeting While Chatting in Jabber for iPhone and iPad

Procedure

  • If you're using Cisco Jabber for iPhone, then from the chat conversation window, tap + plus icon and then tap icon. Follow the prompts to join your call while you're still on a conversation with your coworkers.
  • If you're using Cisco Jabber for iPad, from the chat conversation window, tap icon. Follow the prompts to join your call while you're still on a conversation with your coworkers.

Join a Webex Meeting While Chatting in Jabber for Android

Procedure

Step 1

Choose one of these options:

  • If you're using Jabber on your phone, then from the chat conversation window, tap + plus icon and icon.
  • If you're using Jabber on your tablet, select the Cisco Webex Meeting icon.

Step 2

Follow the prompts to connect and join the meeting.


Slack

If you work with Jabber and Slack, we've made it even easier to make a direct call from Slack using the Cisco Jabber app. Simply install the app from the Slack Directory, and enable the native caller in Slack to use Jabber. To use Jabber with Slack, you must have a valid Jabber account, and make sure your dialplan is correctly configured to use all features.

What’s New in September 2021

Users

Reinstall Slack to update Cisco Jabber to the latest version and enable new features.

With Jabber installed, you can quickly start a call with someone by entering a specific command into a direct message window. But if it isn't installed, that same command provides you with a link to installation instructions from your administrator.

Administrators

Use the new command: /jabberconfig to set the link that routes your users to more help with installation.

Users

Install Jabber for Slack

Before you begin

If your workspace administrator has already installed this app for your workspace, there is no need to perform this action.

Procedure

Click Add to Slack logo, and follow the instructions.


Make a Call from Slack

Before you begin

The sign-in address you use with Slack has to be the same address that you use to sign in to Jabber.

Your administrator must enable Jabber as a calling option in Slack.

Procedure

Step 1

Open a Direct Message (DM) or channel to the person you want to call.

Step 2

Perform one of the following actions:

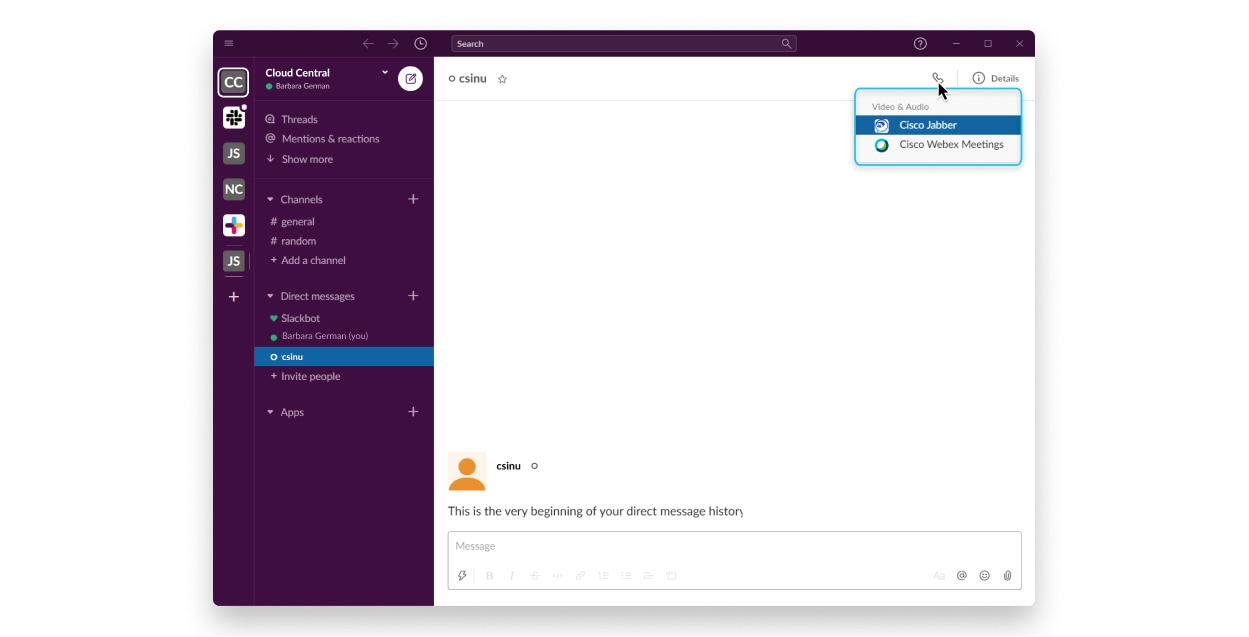
  • In a DM or channel, click the phone icon phone icon and select Cisco Jabber.screen display
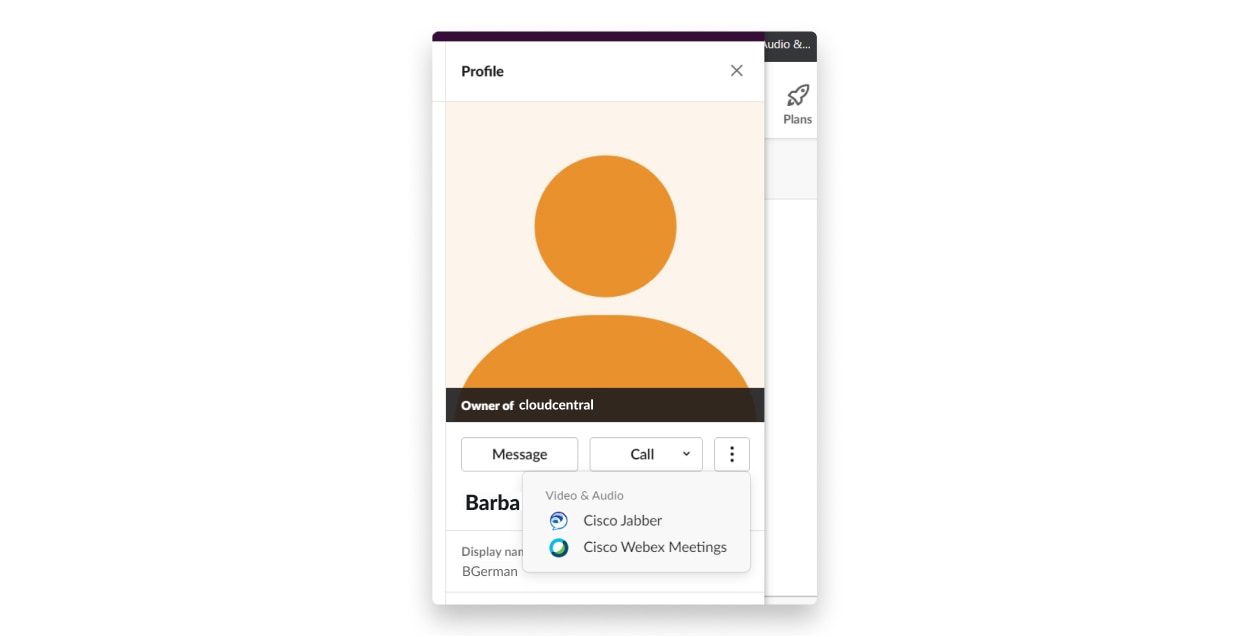
  • Click the user's profile, click Call and then select Cisco Jabber.screen display

Jabber App Commands from Slack


Note


Install App Updates—To enable recently added features, users that authorized Jabber prior to September 2021 must re-install the Slack app.


Use these commands with the Cisco Jabber app in Slack to call someone in a direct message, a phone number or a SIP Uniform Resource Identifier (URI) using Jabber. You can also ask a colleague to call you, and get support information about Jabber using app commands in Slack. Entering a command will create a clickable link in the direct message or channel to launch Jabber.


Note


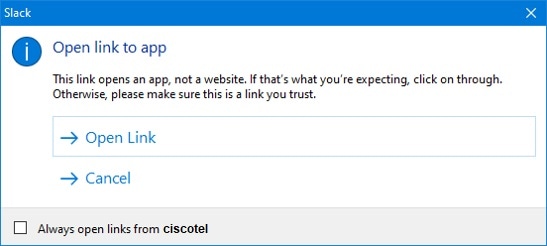
When making a call using the Jabber app for the first time, Slack will ask you for confirmation. To stop receiving this message every time you make a call, select the box Always open links from ciscotel and click Open Link.

screen display
Table 2. App Commands for Jabber
Commands Description
/jabber

New Feature—Slack installed or reauthorized after Sept 2021

In a Direct Message with another user on Slack, performing this command will provide a Join option to open a Jabber call with that user.

If you do not have Jabber installed, Join directs you to an information page from your administrator with further instructions.

screen display
/jabber @[searchname] Search for a colleague in your directory to call.
/jabber [number] Calls the phone number that you entered.
/jabber [email address] Calls the email address that you entered using SIP URI.
/callme

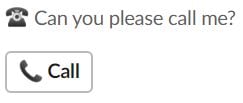
In a Direct Message with another user on Slack, performing this command sends an active call button to your colleague to call you.

screen display

Administrators

Install Jabber for Slack for all Members of Your Workspace

Procedure

Step 1

Sign into your workspace administrator account in Slack.

Step 2

Click Add to Slack below and follow the instructions.

logo

Enable Calling in Slack using Jabber

Before you begin

Note


If you're using the free version of Slack, then you can only use a single calling application with the Slack Call button. If you're on a paid plan, (Standard, Plus, Enterprise), then multiple calling apps can be associated with the Call button.


Procedure

Step 1

Perform one of the following actions:

  • In a web browser, go to your Teams Settings page.
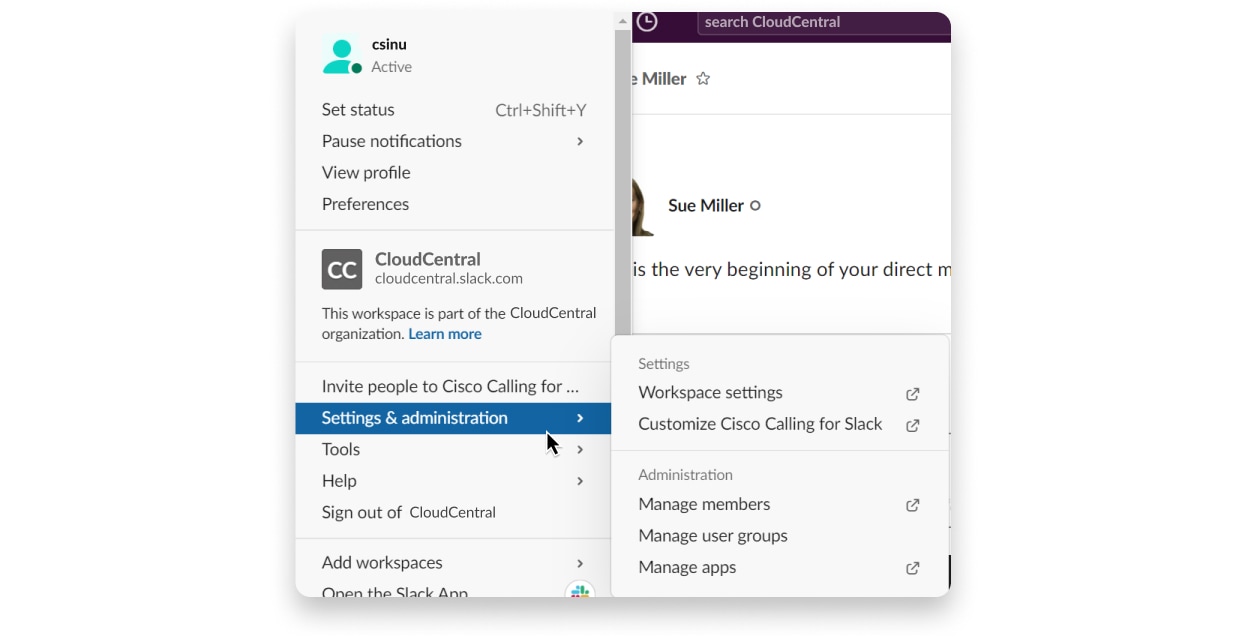
  • Click your workspace name in the top left, and then select Settings and Administration > Workspace Settings.

The following image shows the Workspace Settings screen.

image of screen

Step 2

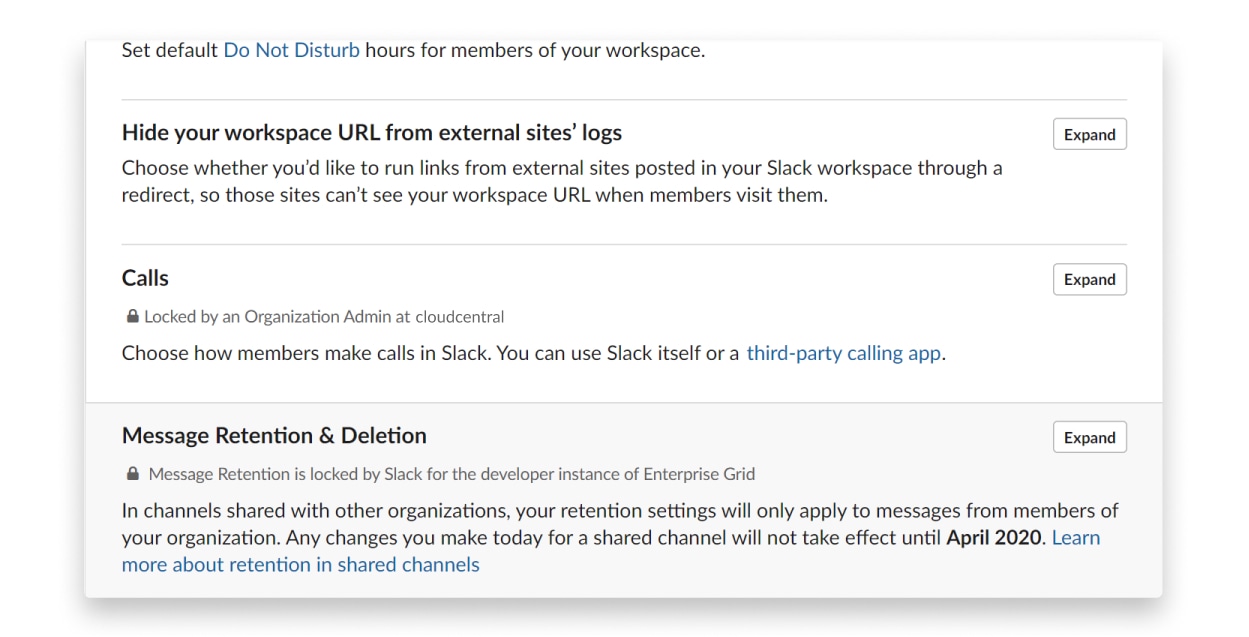
In the Settings tab, scroll down the page, and next to Calls, click Expand.

The following image shows the page.

image of screen

Step 3

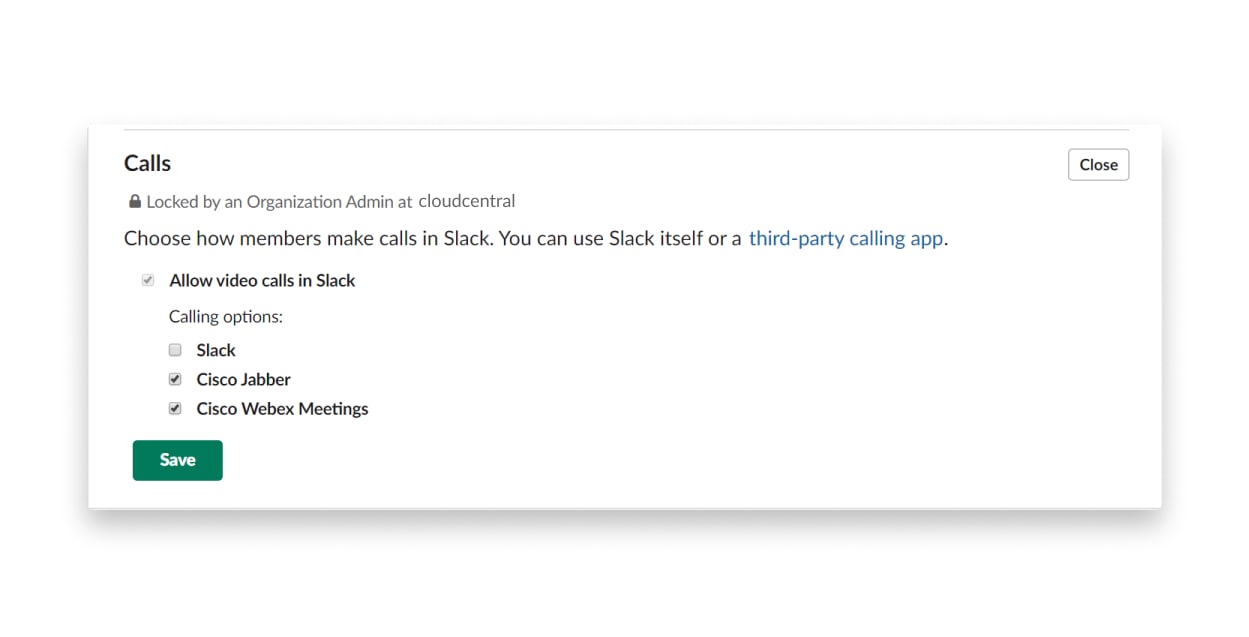
Under Calling Options, check the box next to Cisco Jabber.

The following image shows the page.

image of screen

Step 4

Click Save.


Configure Calling in Slack

The Calling app setting in Slack lets you choose the default calling behavior of the Cisco Jabber calling application. Choose between email address (SIP URI) and phone numbers.

Procedure

Step 1

In your Slack workplace, click Apps.

Step 2

Click Cisco Jabber.

The following image shows the page display.

page display

Step 3

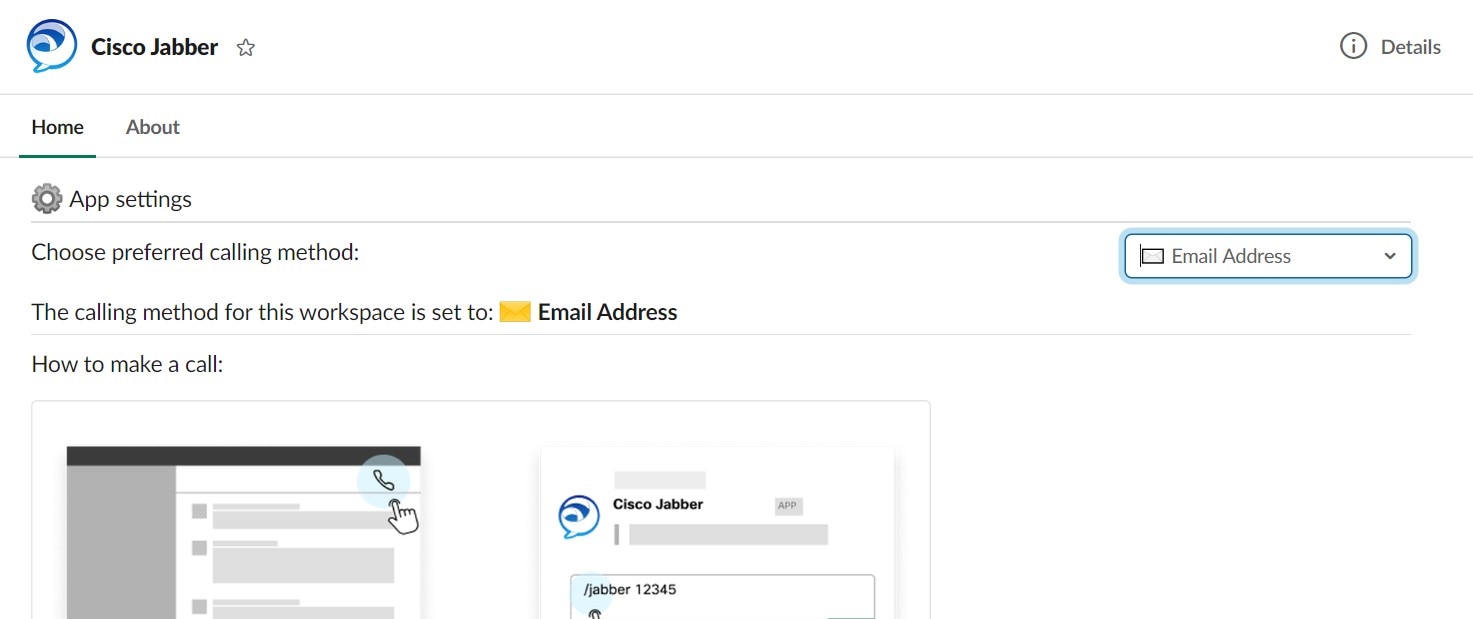
Under the Home tab, select your calling method in the drop-down menu.

The following image shows the page display.

page display

Customize Jabber Calling for Slack

Control what happens when a user attempts to make a Jabber call, but doesn't have Jabber installed. When they type the Jabber call command and click Join, they'll be routed to a Cisco web-page by default. However, you can easily route your users to your own website instead.

Prior to September 2021—Users who authorized Jabber before September 2021 must re-install the app to use the Info page.

Procedure

Step 1

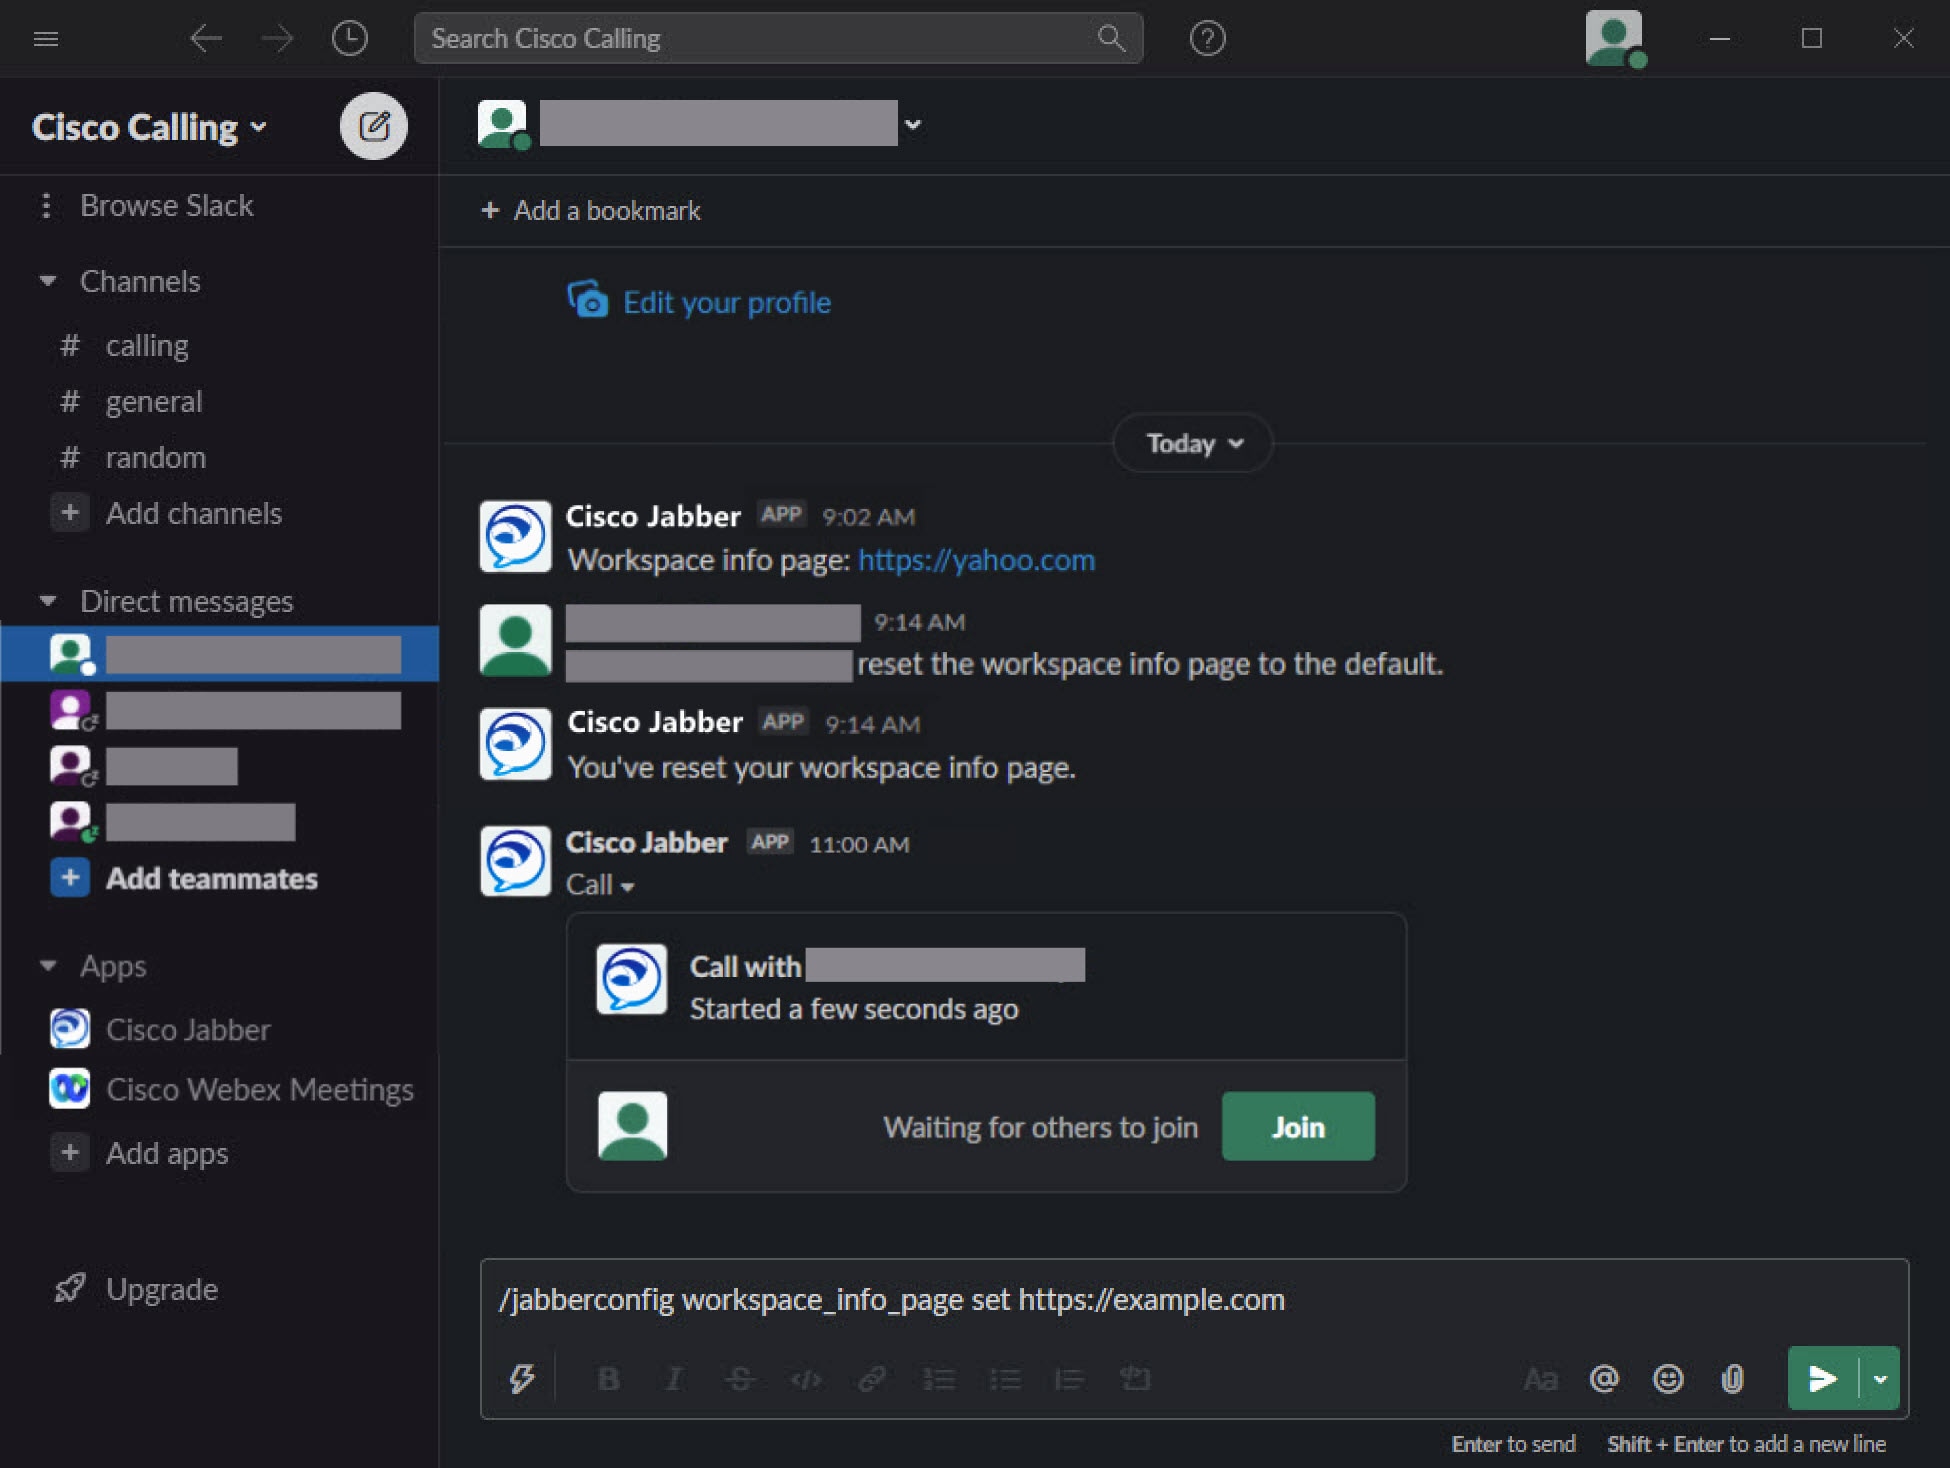
In any message window, type: /jabberconfig workspace_info_page set https://example.com.

Replace https://example.com with your own URL.

Step 2

Do one of these options:

  • To verify your configured info page, type: /jabberconfig workspace_info_page show.
  • To reset the info page to default, type: /jabberconfig workspace_info_page reset.

The following image shows the results of the above actions.

image of step results

Step 3

Repeat steps for each workspace.


Microsoft Teams

Cisco Jabber for Microsoft Teams

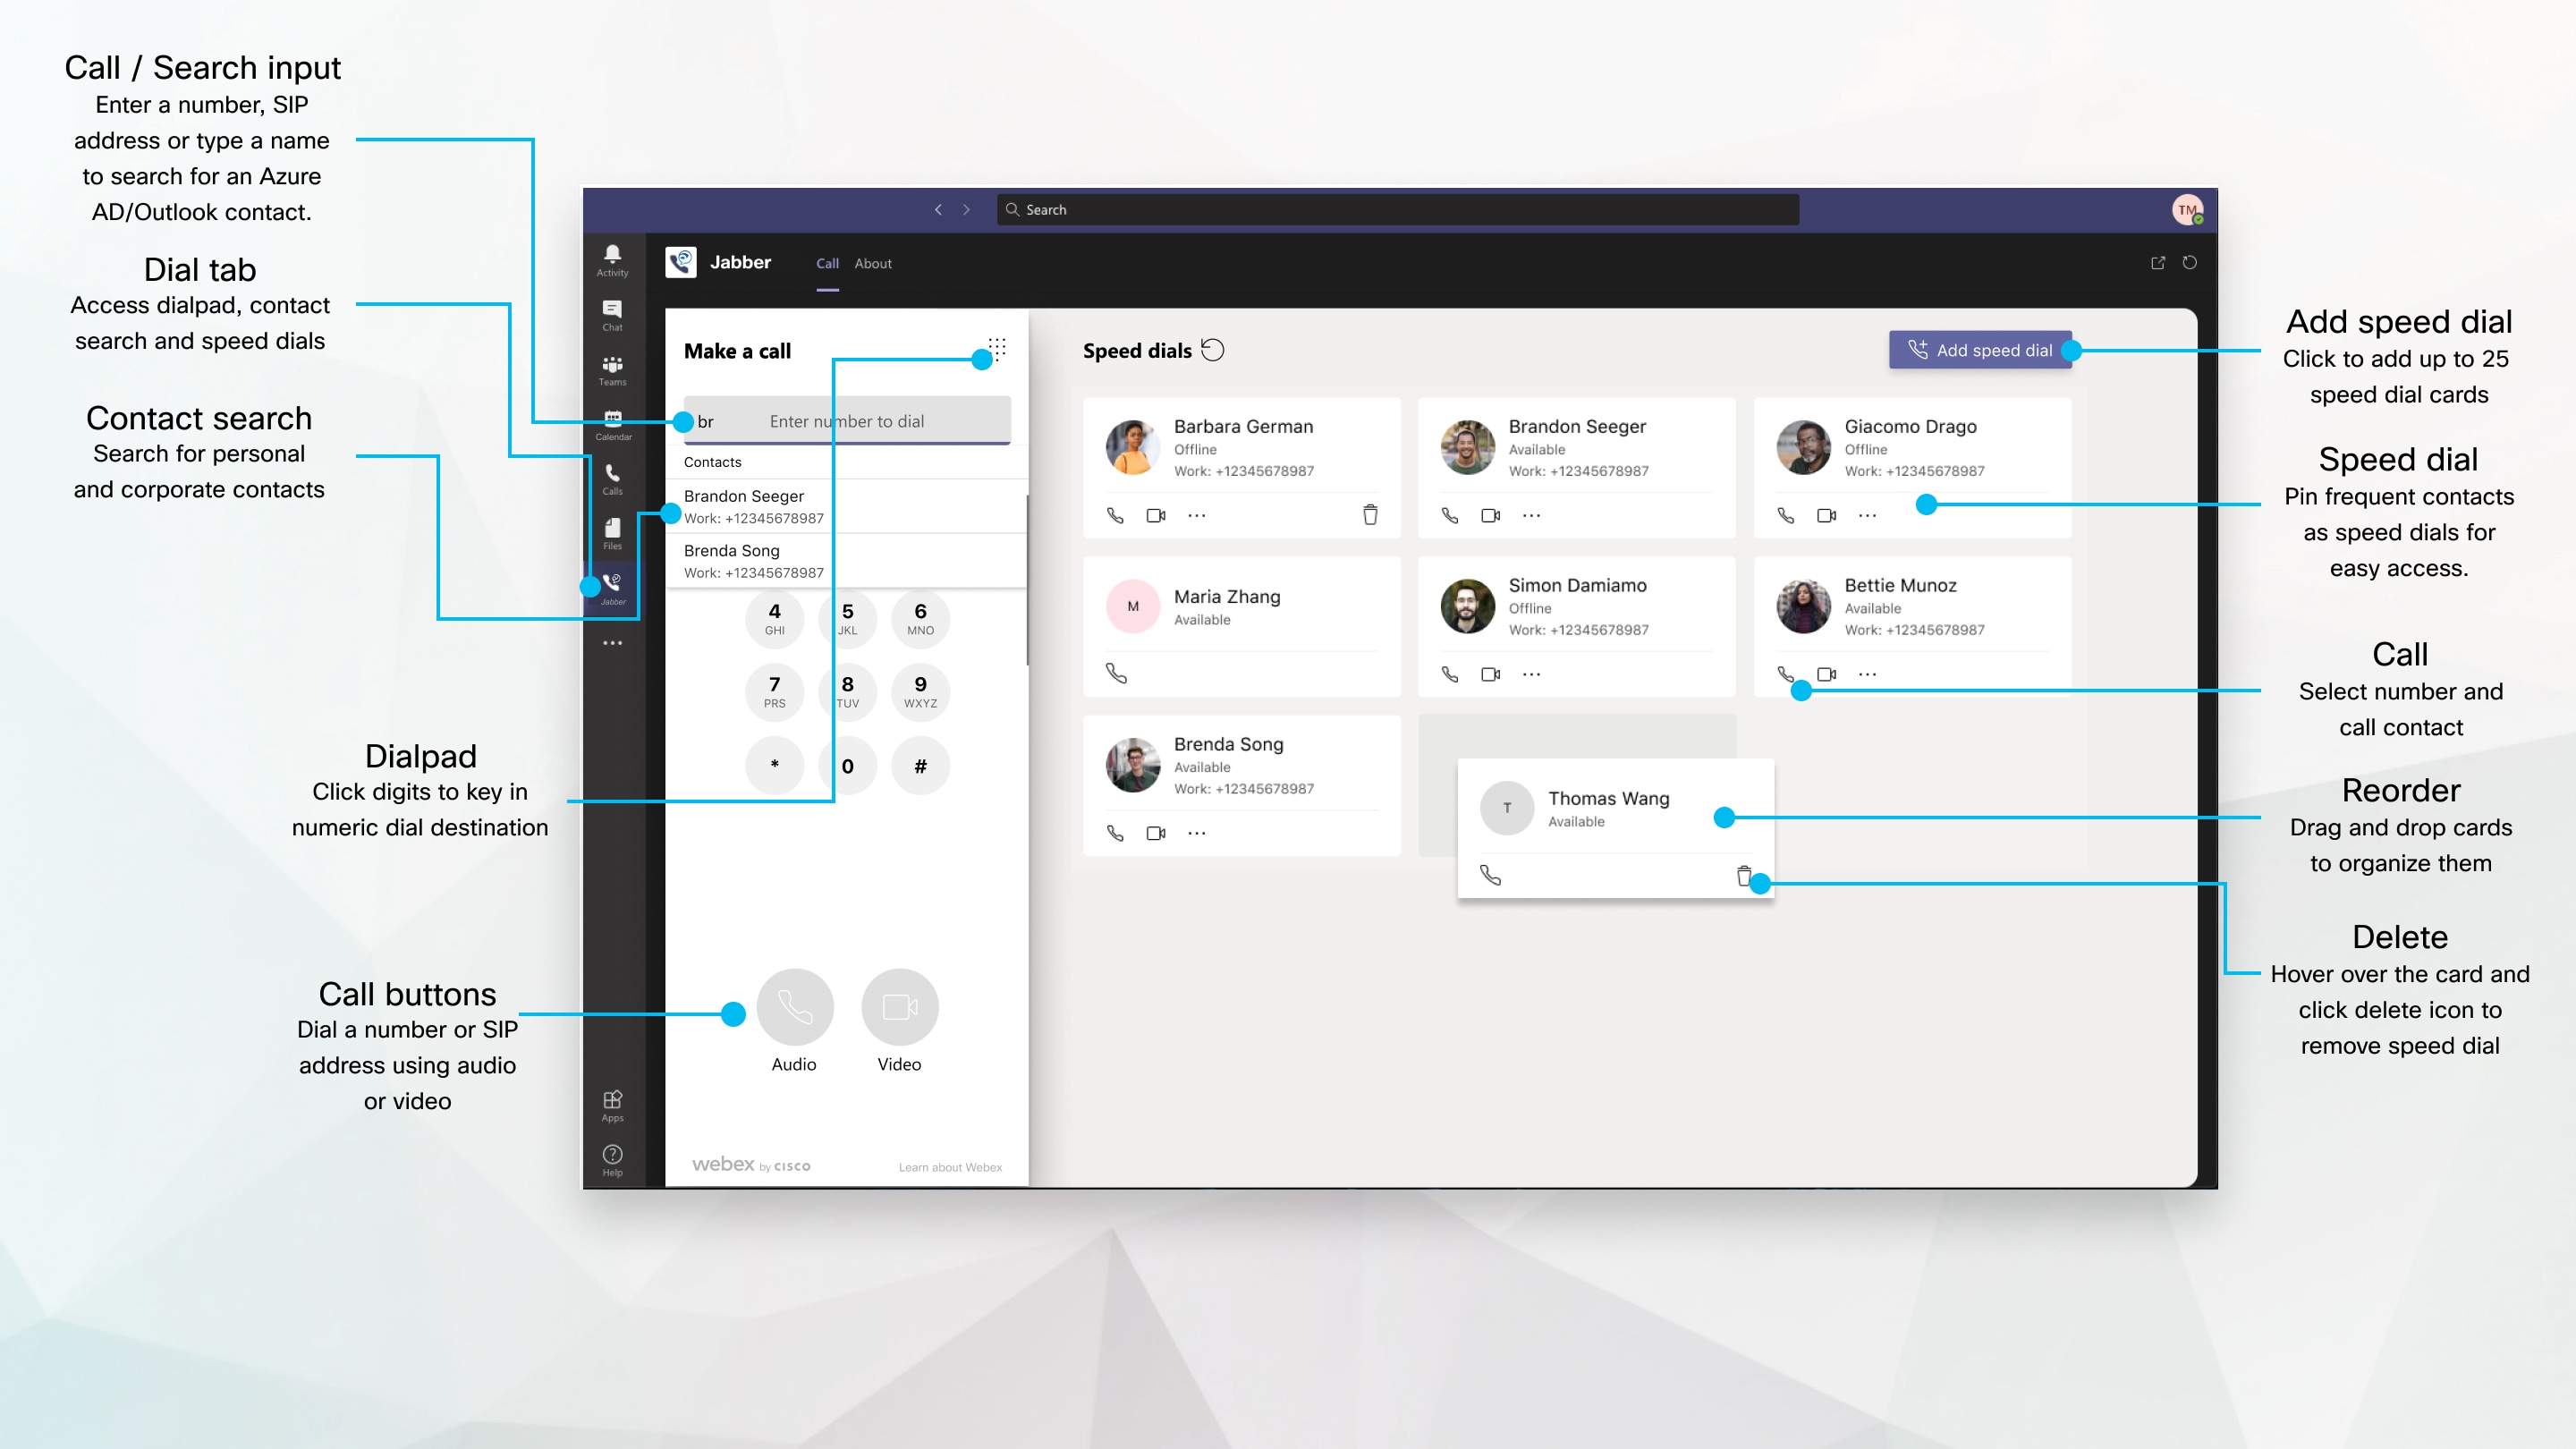
Enhance your Microsoft Teams experience by installing the Jabber app. The app lets you launch Jabber-enhanced voice and video calls from Microsoft Teams.

screen with callouts
For Microsoft Teams Users—Easily make calls with Microsoft Teams
Call using a dial pad or turn a chat conversation into a call using Microsoft Teams for Windows, Mac, Android, iPhone, iPad or Web browser. Call your directory-synchronized and Outlook contacts, or other custom contacts, and add these contacts as speed dials. See the tabs below for more information.
For Administrators—Configure Jabber for Microsoft Teams
For more information on how to configure Jabber for your organization to support a seamless call experience in Microsoft Teams, see Cisco Jabber Administration Tasks.
First Time Users—Permissions
When you first use this Cisco app (or sign out of Microsoft Teams) you're asked to grant permission to search contacts and interact with Microsoft Teams, and then asked to enter your username and password to verify.
Jabber Virtual Desktop Infrastructure (VDI)
The Jabber calling integration for Microsoft Teams can be used in VDI environments. When used in a VDI environment, both Cisco Jabber and Microsoft Teams must be running in the same virtual machine. Jabber must also be deployed in VDI mode with the Jabber VDI agent and client deployed. For more information please see Jabber VDI documentation.

What's New for Cisco Jabber for Microsoft Teams

Here's what's new in Cisco Jabber for Microsoft Teams.

February 2021

Speed Dial Improvements

  • You can now add contact names and phone numbers outside of your Azure Active Directory and Outlook contacts, so you can save that local pizza place as a speed dial for those Friday afternoons!

  • If a contact has more than one number, you can now select which number to save as your speed dial number.

Interactive Voice Response (IVR) dialpad

You can now access the dialpad when in an audio call, giving you full Dual tone Multi Frequency (DTMF) support.

Desktop

Make a Call in a Conversation Tab

Make a call on your iPad in Microsoft Teams using the Jabber app.

Before you begin

Make sure your administrator or your team space owner has installed the Jabber app in Microsoft Teams.

Procedure

Step 1

On the home screen, tap Chat and search icon.

Step 2

Search for the person you want to call, and then tap their name.

Step 3

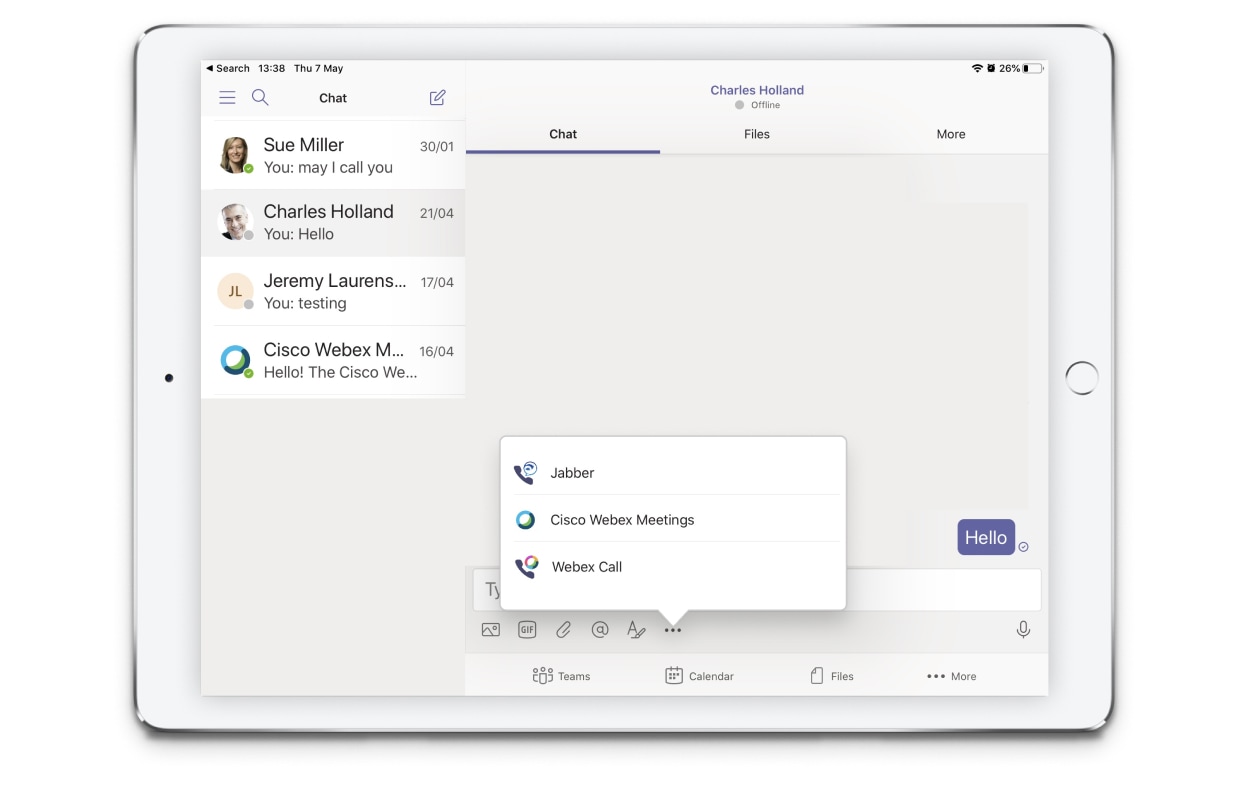
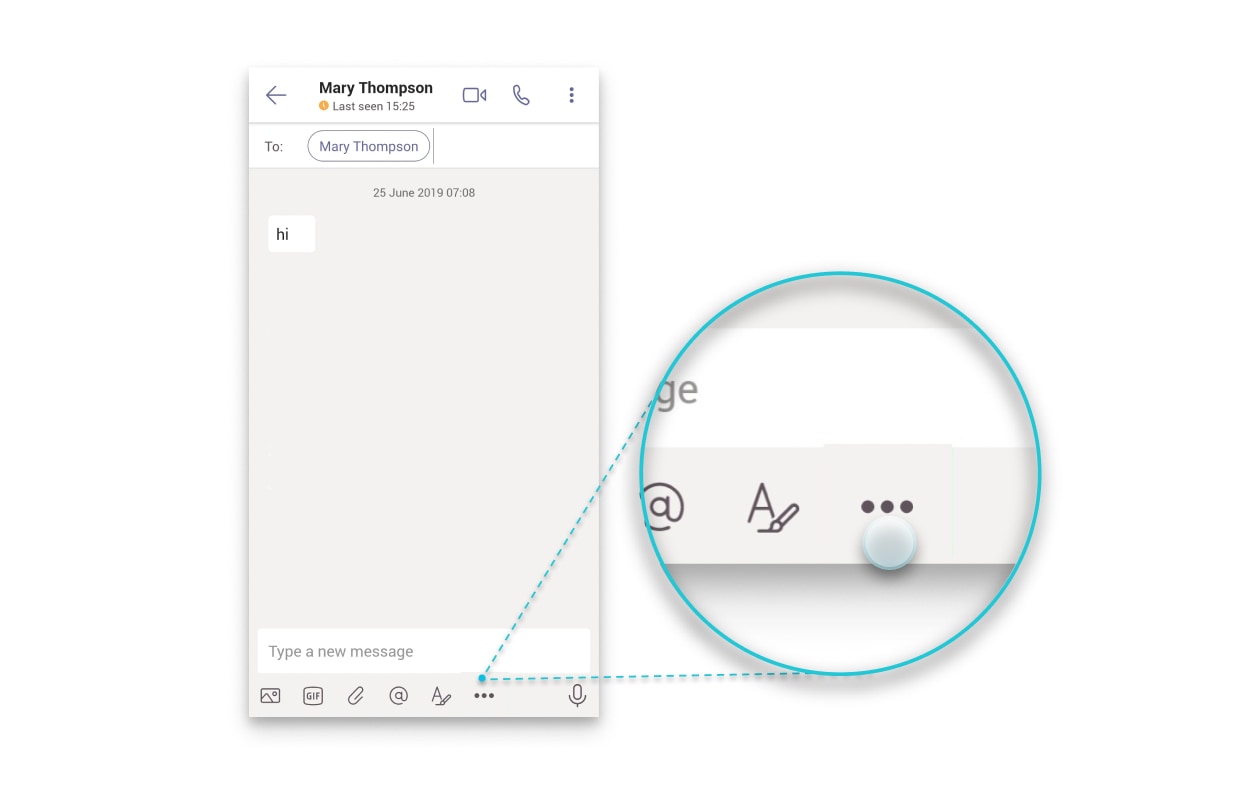
Tap the ellipsis ..., and then select Jabber.

sreen display

Step 4

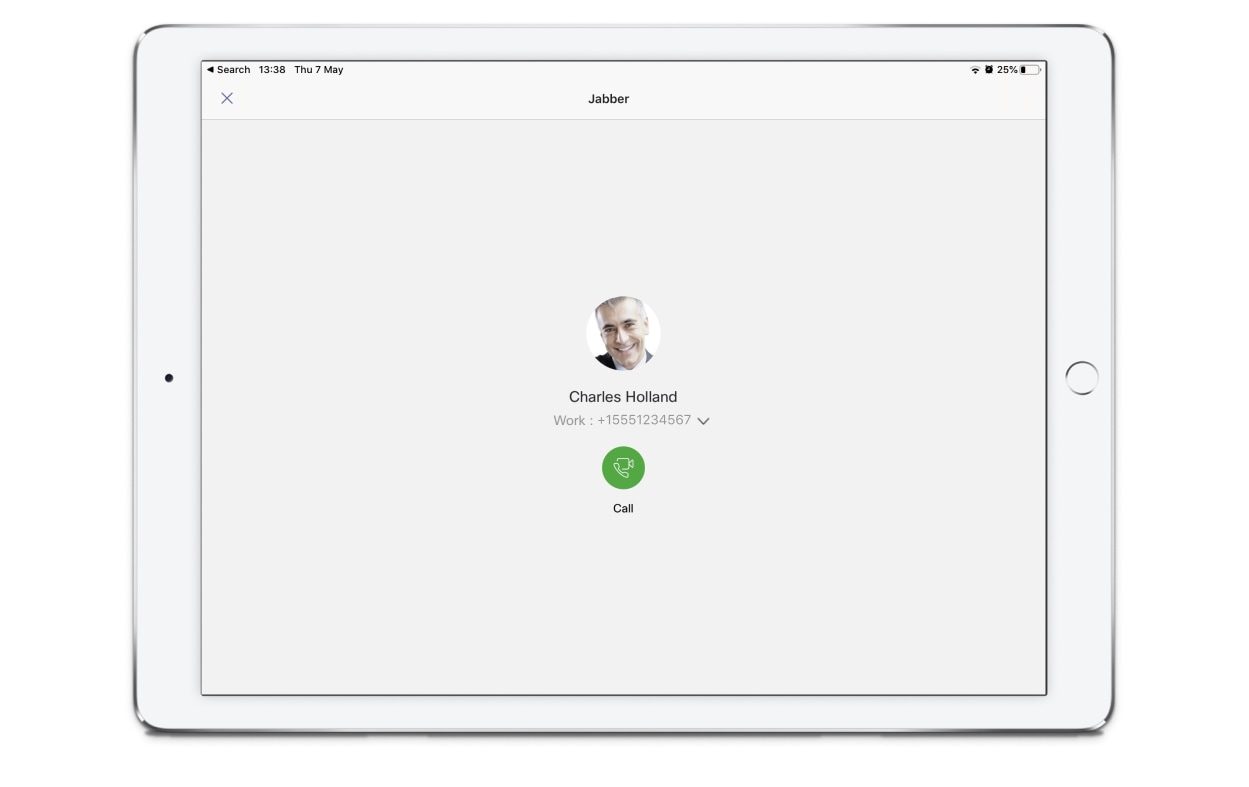
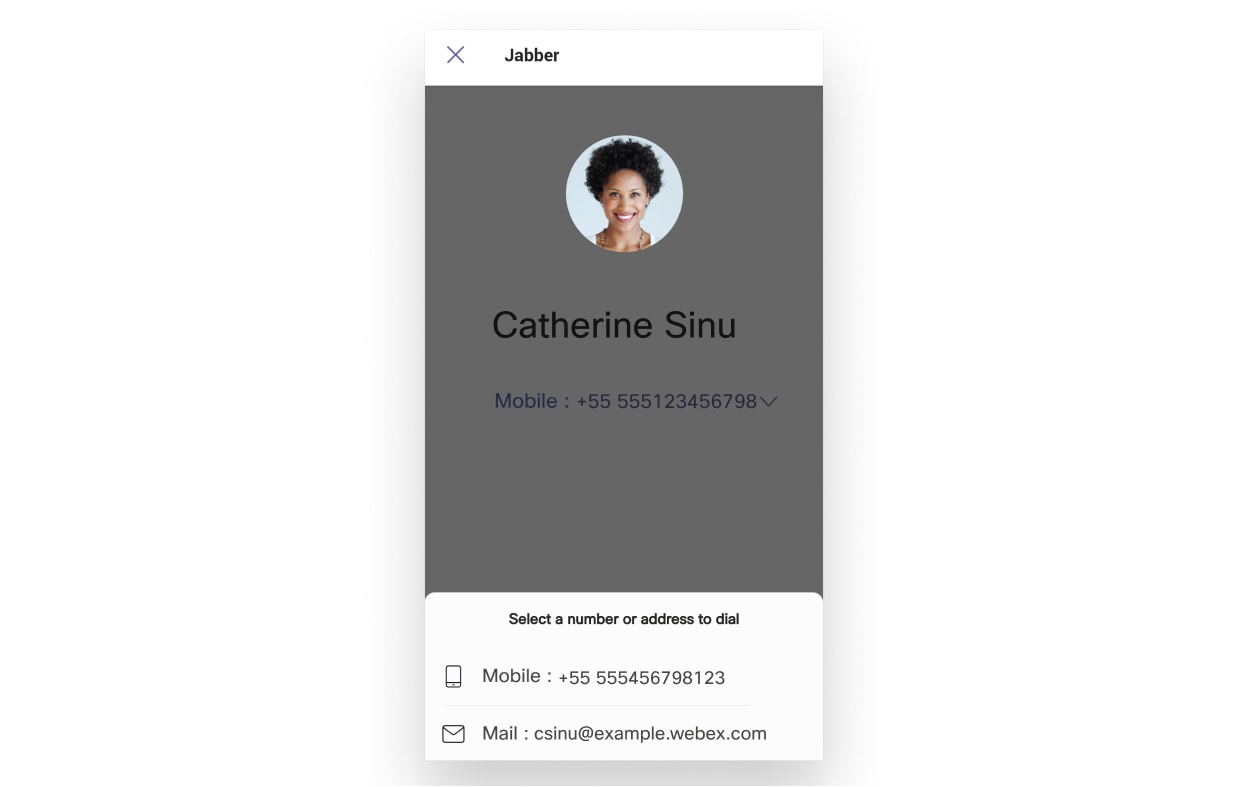
To open call options, tap on the number and then select the number to dial.

screen display

Step 5

Click call icon.


Make a Call Using the Dialpad

You can make a call to a number, Azure active directory or Outlook contact, using your Jabber integration for Microsoft Teams with the dial pad.

Procedure

Step 1

In the team space, on the app bar, click Jabber.

Step 2

Start typing the name, telephone number, or video address of the person you want to call.

Typing a name searches your directory-synchronized and personal Outlook contacts.

Step 3

Click on the suggested contact you want to call.

Step 4

Click Call.


Make a Speed Dial Call

Add and manage up to 25 contacts as speed dials from your Azure active directory and Outlook contacts, so you can call your most frequent contacts quickly and easily with your Cisco Jabber integration in Microsoft Teams. The app saves your speed dials to your Microsoft 365 profile. The indicator next to the speed dial title indicates when speed dials are being saved to the Microsoft cloud. You can also add custom speed dials for contacts not in your Azure active directory or Outlook contacts.

Procedure

Step 1

In the team space, on the app bar, click Jabber.

Step 2

Click Add a speed dial.

Step 3

Start typing a name to search for a contact to add the speed dial, or create a new speed dial.

Step 4

Perform one of the following:

  • Arrange your speed dials on the screen—Click and drag your speed dials to change the order of how they appear on the screen.
  • Remove a speed dial contact—On the contact card, click the elipses and click Remove from speed dial.
  • Edit a custom contact—On the contact card, click the ellipsis and click Edit speed dial.

Make a Microsoft Teams Call on iPhone and Android

Make a call on your mobile device in Microsoft Teams for Android and iPhone using the Jabber app.

Before you begin

Make sure your administrator or your team space owner has installed the Jabber app in Microsoft Teams.

Procedure


Step 1

On the home screen, tap Chat and search icon.

Step 2

Search for the person you want to call, and then tap their name.

Step 3

Tap the ellipsis ..., and then select Jabber.

screen display

Step 4

Tap on the number displayed to open options to call, and then select the number.

screen display

Step 5

Click call icon.


Make a Microsoft Teams Call on iPad

Make a call on your iPad in Microsoft Teams using the Jabber app.

Before you begin

Make sure your administrator or your team space owner has installed the Jabber app in Microsoft Teams.

Procedure


Step 1

On the home screen, tap Chat and search icon.

Step 2

Search for the person you want to call, and then tap their name.

Step 3

Tap the ellipsis ..., and then select Jabber.

sreen display

Step 4

To open call options, tap on the number and then select the number to dial.

screen display

Step 5

Click call icon.


VDI

Cisco Virtual Desktop Infrastructure (VDI) provides users with a hosted desktop environment. For more information, see Virtual Desktop Infrastructure (VDI).

VDI Device Selector

Cisco Jabber Softphone for VDI includes a component called Device Selector. Device Selector is a menu that you can use to manage your cameras, speaker devices, microphones, and ring alerts. You can view your currently active devices or change them. A list of speaker devices appears first in the menu, followed by the lists of microphones, ring devices, and cameras.

The Device Selector icon (icon) appears in the notification area (system tray), in the bottom right corner of the screen. Some icons, including the Device Selector, can be hidden. Click the up arrow in the notification area to show hidden icons.

After you connect a new device, a New device found message appears in the notification area and the new device becomes active.

When you disconnect a device, a Device disconnected message appears in the notification area. Jabber selects the next available device with the highest priority. To change the priority for your devices, go to File > Options > Audio > Advanced.


Note


By default, when you connect a new headset, Cisco Jabber adds it to the top of the priority list. If you work in a hot-desking environment, and you move your thin client and headset, the embedded microphone becomes the preferred device. Your Administrator can set a parameter to override the default behavior. Cisco Jabber then adds new devices to the bottom of the priority list, and your headset remains the preferred device.


Use VDI Device Selector

Use the Device Selector menu to view your active device selections, or to select a different active camera, speaker device, microphone, or ring alert. You must have multiple devices connected.


Note


Device Selector does not override your device priority settings for Jabber (Advanced audio options). Each time that you sign in to Jabber, or reconnect to your hosted virtual desktop, device selection follows these settings.


Procedure


Step 1

In the Windows notification area, click the Device Selector icon.

Check marks indicate the selected devices.

Step 2

Click a device (camera or audio) to make it active.

Step 3

Click anywhere except on the Device Selector icon to close the menu.


Camera Changes

Cisco Jabber Softphone for VDI establishes the video quality at the start of a call. If you start a call with a supported high definition (HD) camera, and then switch to a standard-definition camera, video quality is affected. We recommend that you switch cameras between calls.

Screen Lock and Call Control

While your hosted virtual desktop screen is locked, you cannot make calls, but you can receive them. If you have an incoming call while your hosted virtual desktop screen is locked, you can use one of your accessories to answer the call. With supported audio accessories, the following call control features are available while your screen is locked:

  • Answer call

  • End call

  • Hold call

  • Resume call

  • Toggle audio mute

  • Adjust audio volume

Adjust Settings for Jabra Bluetooth Devices

Most Jabra Bluetooth devices introduce a short delay in bringing up the audio path (about 1 to 3 seconds). For supported Jabra Bluetooth devices, you can eliminate the delay by changing the device settings in Jabra Direct. For more information, visit the Jabra website.

Before you begin

Jabra Direct must be installed.

Procedure


Step 1

Open Jabra Direct.

Step 2

Click the Jabra device for which you want to modify the settings.

Step 3

Click Settings.

Step 4

Click to expand Softphone (PC).

Step 5

From the Preferred softphone list, select Cisco Jabber.

Step 6

Set Open phone line to On.

Step 7

Set PC audio to Off.

Step 8

Click Apply.


Headsets and Ringtones

With some wireless headsets, you may not hear the ringtone for incoming calls, because the wireless link that connects the device is not open. To open the wireless link, press the call answer button on the headset.


Note


Some headsets play their own internal tone.


Jabber Softphone for VDI Feature Support

Cisco Jabber Softphone for VDI supports most Cisco Jabber for Windows features, unless otherwise noted. For a list of exceptions, see the corresponding section for your release of Cisco Jabber Softphone for VDI.

Release 14.0

  • Agent Greeting

  • Application Sharing

  • Audio device selection from the Hub Menu

  • Cisco Headset Firmware Upgrade Notification (Linux)

  • Cisco Sunkist 730 Headset Presence LED Syncs with Jabber (Linux)

  • Cisco Unified Survivable Remote Site Telephony (SRST)

  • Custom Contacts for Team Messaging Mode

  • Far End Camera Control (FECC)

  • Federal Information Processing Standard, Publication 140-2 (FIPS 140-2) and Information Assurance (IA) Compliance

  • H.264 High Profile Support

  • IM-only Screen Sharing

  • Improved Video Resolution

  • Cisco Jabber to Jabber Call

  • Cisco Jabber desk phone video (display of video on the desktop when the thin client is connected to the user's desk phone)

  • Kerberos and Common Access Card (CAC) with Single Sign On (SSO)

  • Cisco Jabber Softphone for VDI does not support CAC, and supports Kerberos only with SSO.

  • MRA Registration Failover

  • PreferP2PDesktopShare (configuration parameter to prioritize person to person screen sharing over video sharing in the Cisco Jabber configuration file)

  • Supervisor Barge

  • Silent Monitoring

  • Wireless Screen Sharing

  • XMPP Federation for Team Messaging Mode

  • Whisper Announcements

Release 12.9

  • Agent Greeting

  • Application Sharing

  • Audio device selection from the Hub Menu

  • Cisco Headset Firmware Upgrade Notification (Linux)

  • Cisco Sunkist 730 Headset Presence LED Syncs with Jabber (Linux)

  • Cisco Unified Survivable Remote Site Telephony (SRST)

  • Custom Contacts for Team Messaging Mode

  • Far End Camera Control (FECC)

  • Federal Information Processing Standard, Publication 140-2 (FIPS 140-2) and Information Assurance (IA) Compliance

  • H.264 High Profile Support

  • IM-only Screen Sharing

  • Improved Video Resolution

  • Cisco Jabber to Jabber Call

  • Cisco Jabber desk phone video (display of video on the desktop when the thin client is connected to the user's desk phone)

  • Kerberos and Common Access Card (CAC) with Single Sign On (SSO)

  • Cisco Jabber Softphone for VDI does not support CAC, and supports Kerberos only with SSO.

  • PreferP2PDesktopShare (configuration parameter to prioritize person to person screen sharing over video sharing in the Cisco Jabber configuration file)

  • Silent Monitoring

  • Supervisor Barge

  • Wireless Screen Sharing

  • XMPP Federation for Team Messaging Mode

Release 12.8

  • Application Sharing

  • Audio device selection from the Hub Menu

  • Custom Contacts for Team Messaging Mode

  • Far End Camera Control (FECC)

  • H.264 High Profile Support

  • IM-only Screen Sharing

  • Improved Video Resolution

  • Cisco Jabber to Jabber Call

  • Cisco Jabber desk phone video (display of video on the desktop, when the thin client is connected to your desk phone)

  • Wireless Screen Sharing

Release 12.7

  • Application Sharing

  • Audio device selection from the Hub Menu

  • Migrate Custom Contacts

  • Far End Camera Control (FECC)

  • Improved Video Resolution

  • Cisco Jabber to Jabber Call

  • Cisco Jabber desk phone video (display of video on the desktop when the thin client is connected to your desk phone)

  • PreferP2PDesktopShare (configuration parameter to prioritize person to person screen sharing over video sharing in the Jabber configuration file)

  • Wireless Screen Sharing

Release 12.6

  • Accessory Call Control (adjust call volume, answer or end phone calls, and mute audio) for the following accessories:

    • Logitech

    • Plantronics

    • Sennheiser

  • Audio device selection from the Hub Menu

  • Device Selection menu on the Call Conversation window

  • Far End Camera Control (FECC)

  • Improved Video Resolution

  • Cisco Jabber to Jabber Call

  • Cisco Jabber desk phone video (display of video on the desktop when the thin client is connected to your desk phone)

  • Multiline

    Only the first line of a multiline account is available. If a second call comes in, while the first line is in use, the second line rings, but no incoming call notification appears.

  • Wireless Screen Sharing

Release 12.5

  • Accessory Call Control (adjust call volume, answer or end phone calls, and mute audio) for the following accessories:

    • Logitech

    • Plantronics

    • Sennheiser

  • Audio device selection from the Hub Menu

  • Binary Floor Control Protocol (BFCP) Desktop Share

  • Device Selection menu on the Call Conversation window

  • Far End Camera Control (FECC)

  • Cisco Jabber to Jabber Call

  • Cisco Jabber desk phone video (display of video on the desktop when the thin client is connected to your desk phone)

  • Multiline

    Only the first line of a multiline account is available. If a second call comes in, while the first line is in use, the second line rings, but no incoming call notification appears.

Release 12.1

  • Accessory Call Control (adjust call volume, answer or end phone calls, and mute audio) for the following accessories:

    • Logitech

    • Plantronics

    • Sennheiser

  • Audio device selection from the Hub Menu

  • Binary Floor Control Protocol (BFCP) Desktop Share

  • Device Selection menu on the Call Conversation window

  • Direct Pickup and Group Pickup

  • Far End Camera Control (FECC)

  • Cisco Jabber to Jabber Call

  • Cisco Jabber desk phone video (display of video on the desktop when the thin client is connected to your desk phone)

  • Multiline

    Only the first line of a multiline account is available. If a second call comes in, while the first line is in use, the second line rings, but no incoming call notification appears.

Check the Connection Settings for Jabber Softphone for VDI

You can easily find information about your Cisco Jabber Softphone for VDI connection, and version. If there is a problem, your System Administrator can use this information to help resolve it.

Procedure


Step 1

Click the gear icon gear icon to open the Settings Menu.

Step 2

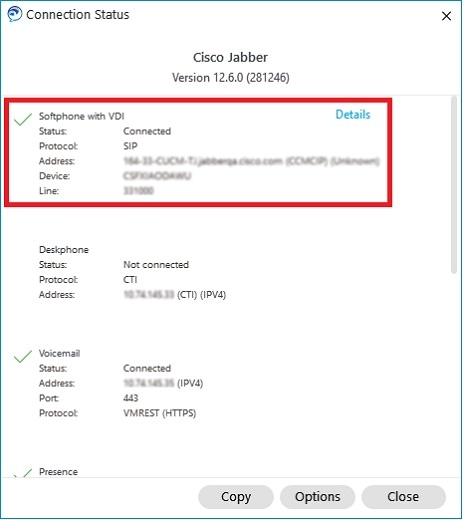
Go to Help > Show connection status.

A green checkmark indicates a successful connection.

screen display

Step 3

To copy the information to your clipboard, click Copy.

You can paste the information into an email to send to your system administrator.

Step 4

For more information, including the JVDI Agent and the JVDI Client versions, click JVDI Details.


Display Settings for Jabber Softphone for VDI

For optimal video performance with Cisco Jabber Softphone for VDI, use the recommended settings for Citrix or VMware.

With Citrix XenDesktop and VMware, only full-screen mode is supported on the Linux-based platforms:

  • Cisco Jabber Softphone for VDI—HP Thin Pro and Ubuntu

  • Cisco Jabber Softphone for VDI—Unicon Elux

Citrix XenApp Published Application is supported only on Cisco Jabber Softphone for VDI—Windows, in windows mode only.

Citrix

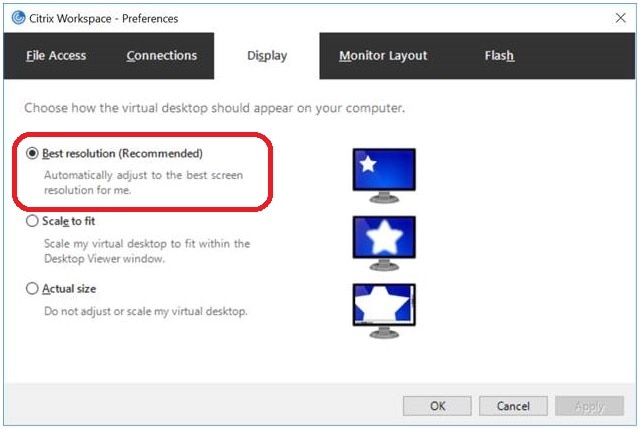
Cisco Jabber Softphone for VDI supports only the Best resolution (Recommended) display option.

screen display

VMware

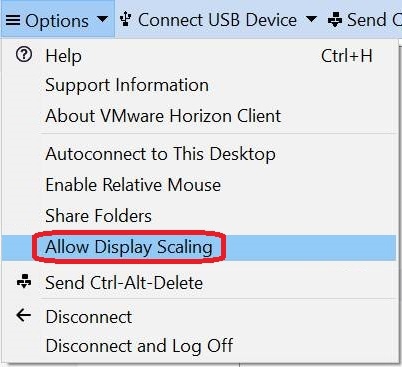
Cisco Jabber Softphone for VDI—Windows Release 12. 8 (and later) supports the Display Scaling feature for VMware. If you have an earlier version, check your VMware options and ensure that the Allow Display Scaling option is unchecked.