Customization
You can customize your Jabber app in many ways. However, some customizations may not apply to your app and device.
The documentation set for this product strives to use bias-free language. For the purposes of this documentation set, bias-free is defined as language that does not imply discrimination based on age, disability, gender, racial identity, ethnic identity, sexual orientation, socioeconomic status, and intersectionality. Exceptions may be present in the documentation due to language that is hardcoded in the user interfaces of the product software, language used based on RFP documentation, or language that is used by a referenced third-party product. Learn more about how Cisco is using Inclusive Language.
You can customize your Jabber app in many ways. However, some customizations may not apply to your app and device.
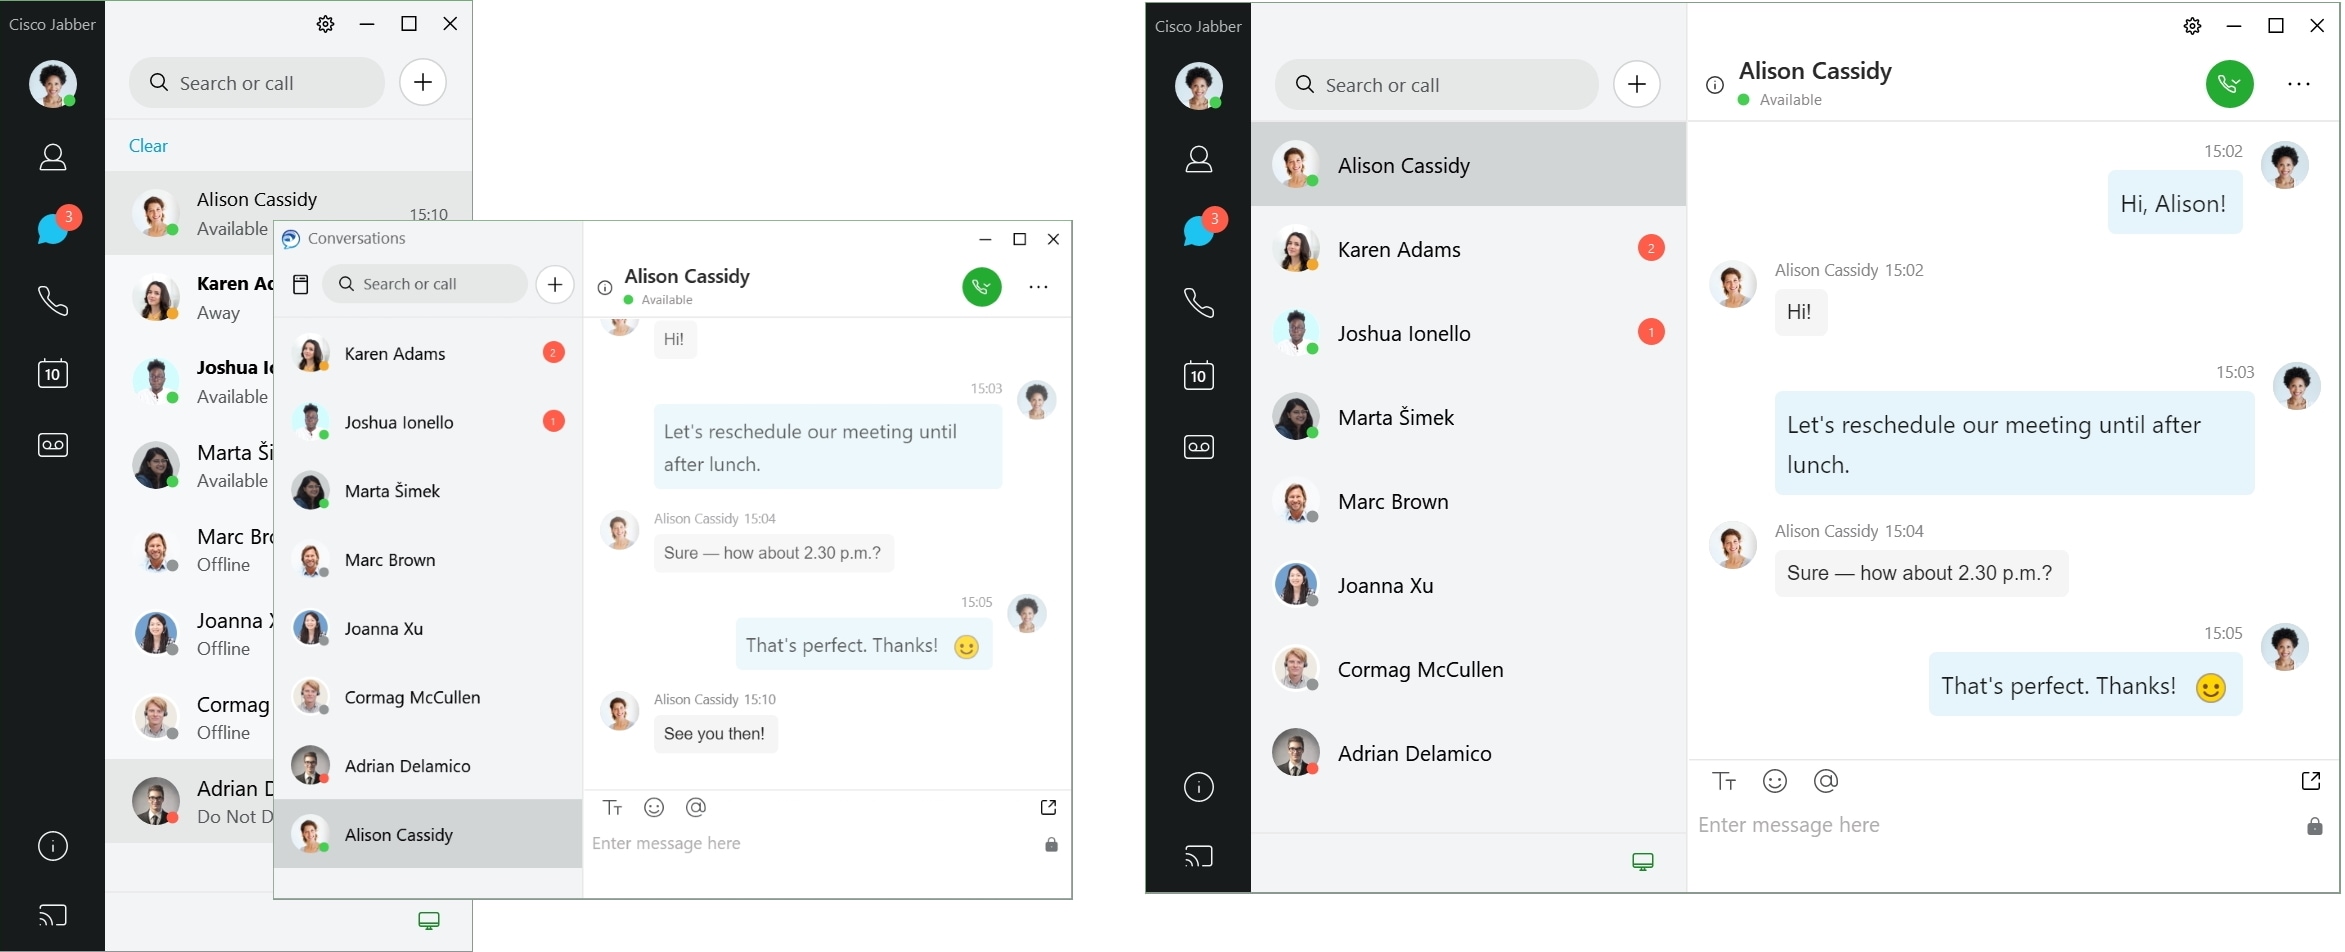
With Jabber's modern design, your contacts, calls, chats, and meetings are brought together into a single window. If you prefer the old layout, you can choose the classic design option in your settings.
|
Step 1 |
Click your profile picture and select Settings or Preferences. |
|
Step 2 |
Go to and select Classic or Modern. The program will restart to apply the changes. |
You can personalize your chat alert sounds by using custom sound files. Copy the custom sound file (in a WAV format) into the Jabber Chat Alerts folder to start using them instantly for all your chat alerts.
Supported formats include:
WAV_FORMAT_PCM_8KHZ
WAV_FORMAT_PCM_16KHZ
WAV_FORMAT_PCM_24KHZ
WAV_FORMAT_PCM_24KHZ_STEREO
WAV_FORMAT_PCM_44KHZ
WAV_FORMAT_PCM_48KHZ
WAV_FORMAT_PCM_48KHZ_STEREO
WAV_FORMAT_MU_LAW_8KHZ
WAV_FORMAT_A_LAW_8KHZ
WAV_FORMAT_G729
|
Step 1 |
Navigate to the Jabber Chat Alerts folder on your system. A typical installation path is: C:\Program Files (x86)\Cisco Systems\Cisco Jabber\Sounds\Jabber Chat Alerts. |
|
Step 2 |
Copy the custom chat alert sound file into the Jabber Chat Alerts folder. You can now see the new chat alert option on the Sounds and Alerts tab of the Options window. |
Customize how Cisco Jabber notifies you that there are new messages, of incoming calls, and how to behave when your availability is set to Do not Disturb.
|
Step 1 |
Go to on your device. |
|
Step 2 |
Turn on Allow Notifications. |
|
Step 3 |
Choose your preferred alert style. |
Cisco Jabber lets you create an allow list that adds exceptions to the block list. You can enter specific contacts or domains in your allow list to make sure those contacts can view your availability status and send you messages.
 Note |
Cisco Jabber uses your contact list as an allow list. You do not need to add contacts in your contact list to your allow list. |
You set your basic privacy settings to block everyone inside your company.
You then add specific IM addresses for contacts inside your company to your allow list.
Cisco Jabber blocks all contacts inside your company, except for those specific people in your allow list.
You set your basic privacy settings to block everyone outside your company.
You then add a specific domain, such as cisco.com, to your allow list.
Cisco Jabber blocks everyone outside your company, except for people who have IM accounts at cisco.com.
You add a specific domain, such as cisco.com, to your block list.
You then add an IM address, such as anitaperez@cisco.com, to your allow list.
Cisco Jabber blocks all people who have IM accounts at cisco.com, except for anitaperez@cisco.com.
|
Step 1 |
Choose one of these options in the hub window:
|
|
Step 2 |
Select the Privacy tab and then select Advanced. |
|
Step 3 |
Enter specific contact addresses or domains in the Allow list. |
|
Step 4 |
Select Apply and then OK. |
If you don't want people to contact you in Cisco Jabber, you can block individuals or everyone from the same domain. For example, you can block everyone with email addresses from the .example domain. When you block people, they can't see your availability status or send you instant messages, even if you're on their contact list.
|
Step 1 |
Choose one of these options in the hub window:
|
|
Step 2 |
Select the Privacy tab and then select Advanced. |
|
Step 3 |
Enter specific contact addresses or domains in the Block list. |
|
Step 4 |
Select Apply and then OK. |
This procedure applies to Cisco Jabber for Android.
|
Step 1 |
On the Settings screen, under Call, tap Calling Options. |
|
Step 2 |
Tap the alternate DvO callback number. |
|
Step 3 |
Enter a new alternate DvO callback number. |
|
Step 4 |
Tap Save. |
You can access Google Calendar events in Cisco Jabber by signing in with your Google credentials. When your event time approaches, Cisco Jabber displays a pop-up, and you can also join that event using Cisco Jabber.
|
Step 1 |
Go to . |
||||
|
Step 2 |
From the Calendar Integration menu, choose Google Calendar, click OK, and restart Cisco Jabber. |
||||
|
Step 3 |
In the Google Calendar Sign In window, enter your Google account username and password, and then select Sign in. |
||||
|
Step 4 |
Select Allow access, and if prompted, select Yes to continue running scripts on the page. |
||||
|
Step 5 |
On the main Cisco Jabber window, select the Meetings tab.
|
|
Step 1 |
Go to . |
||||
|
Step 2 |
From the Calendar Integration drop-down list, choose Google Calendar, click OK to update the settings and restart Cisco Jabber. |
||||
|
Step 3 |
In the Google Calendar Sign In window, enter your Google account username and password, and then select Sign in. |
||||
|
Step 4 |
Select Allow access. |
||||
|
Step 5 |
On the main Cisco Jabber window, select the Meetings tab.
|
You can specify whether you're using a headset, speaker, or microphone with Cisco Jabber. For example, if you work in a shared office and normally use a headset, you can set that as your default option.
|
Step 1 |
Plug in your headset or other audio device to the appropriate USB port. |
|
Step 2 |
Click the phone control menu You'll also see any audio devices that are currently in use. |
|
Step 3 |
To change your audio device, click Audio Options, select a speaker or microphone, then click OK. |
|
Step 1 |
Plug in your headset or other audio device to the appropriate USB port. |
|
Step 2 |
Click the phone control menu You'll also see any audio devices that are currently in use. |
|
Step 3 |
To change your audio device, click Audio /Video Preferences, select a speaker or microphone, and click OK. |
Choose a default audio device in Cisco Jabber for Android. You can pick either a headset or a speaker depending on what’s connected to your Android device.
|
Step 1 |
Go to . |
|
Step 2 |
Tap Default Audio Output. |
|
Step 3 |
Tap either Earphone or Speaker to choose your default audio output. |
You can personalize your Cisco Jabber app audio options to seamlessly collaborate with other people. You can use a headset when you're at office; if you work remotely, you can switch to a connected speaker or microphone. You'll hear people better with an external speaker, and they'll hear you better with an external microphone.
|
Step 1 |
From Cisco Jabber, click the gear icon |
|
Step 2 |
Choose the devices to use for the ringer, speaker, and microphone. |
|
Step 1 |
From Cisco Jabber main menu, choose Preferences and choose Audio/Video preferences. |
|
Step 2 |
Choose the devices and setting options to use for the ringer, speaker, and microphone. |
|
Step 1 |
While on a call, tap More, and select Audio Settings. |
|
Step 2 |
Choose a device. |
On Android, by default, the app uses the device's microphone and speaker. When you connect a headset to the device, the app switches to the headset's microphone and earphone.
|
To use a headset, plug in your headset. |
Most of the time, you use Cisco Jabber over a Wi-Fi connection to make calls. But if a Wi-Fi connection isn't available, you can choose how you want calls handled using your cellular network. Be aware though, that using your cellular network depends on your data plan with it.
If you don't want to receive calls or make calls on mobile network, you can disable the VoIP call over mobile network.
Disabling the VoIP on cellular networks results in the following changes:
Phone Services are disabled on Cisco Jabber.
You cannot make VoIP calls from Cisco Jabber or receive incoming calls.
Battery consumption reduces.
|
Step 1 |
On the Settings screen, tap Call Options. |
|
Step 2 |
Under Call capability over cellular network, tap Disable Call Function. |
You can disable or enable Cisco Jabber calls over cellular network in the Settings option.
If you disable call function on cellular network, then:
Phone services are disconnected.
No incoming calls are received.
You cannot make a Cisco Jabber call.
Battery consumption for Jabber is decreased.
|
Step 1 |
Go to . |
|
Step 2 |
Choose Call options. |
|
Step 3 |
Choose one of these options:
|
|
Step 4 |
Choose Disable call function. |
You can choose a different ringtone for your Cisco Jabber calls.
Personalize your incoming Jabber call ringtone by using custom sound files. Copy the custom sound file (in a WAV format) into the Jabber Chat Ringtones folder to start using them instantly for all your incoming calls.
All sound files must be in .wav audio format. Supported formats include:
WAV_FORMAT_PCM_8KHZ
WAV_FORMAT_PCM_16KHZ
WAV_FORMAT_PCM_24KHZ
WAV_FORMAT_PCM_24KHZ_STEREO
WAV_FORMAT_PCM_44KHZ
WAV_FORMAT_PCM_48KHZ
WAV_FORMAT_PCM_48KHZ_STEREO
WAV_FORMAT_MU_LAW_8KHZ
WAV_FORMAT_A_LAW_8KHZ
WAV_FORMAT_G729
When you add new ringtone files, the new ringtones display in .
|
Step 1 |
Navigate to the Ringtones folder on your system. A typical installation path is: C:\Program Files (x86)\Cisco Systems\Cisco Jabber\Sounds\Ringtones. |
|
Step 2 |
Copy the custom ringtone file into the Ringtones folder. |
|
Step 1 |
Go to . |
|
Step 2 |
In the Ringtone section, choose a ringtone. |
|
Step 3 |
Select Apply. |
|
Step 1 |
Go to . |
|
Step 2 |
In the Ringtone section, choose a ringtone. |
|
Step 3 |
Select Apply. |
|
Step 1 |
Go to . |
|
Step 2 |
Tap Ringtone to choose a ringtone. |
Cisco Jabber lets you choose a ringtone to use for one, or for all your configured phone numbers, in a multiline environment. For example, you can set a unique ringtone for each of your office lines to personalize your call experience.
|
Step 1 |
Go to . |
||
|
Step 2 |
In the Ringtone section, choose a ringtone.
|
||
|
Step 3 |
Select Apply. |
|
Step 1 |
Go to . |
||
|
Step 2 |
In the Ringtone section, choose a ringtone.
|
||
|
Step 3 |
Select Apply. |
You can set a tone for calls and a tone for chat messages.
|
Step 1 |
To set a call ringtone, go to , and choose a ringtone. |
|
Step 2 |
To set a chat notification tone, go to , and choose a notifications tone. |
Some deployments of Cisco Jabber let you control who interacts with you inside your company and outside your company.
|
Step 1 |
Choose one of these options:
|
||||||
|
Step 2 |
Select the Privacy tab. |
||||||
|
Step 3 |
Select one of the following options in the Inside my company section:
|
||||||
|
Step 4 |
Select one of the following options in the Outside my company section:
|
||||||
|
Step 5 |
Select Apply and then OK. |
You can set Jabber to use dark, light, or high contrast color settings just by choosing a different theme. These themes change the way everything in the app looks. For example, if you switch to the dark theme, everything will have a dark background, including messages, teams, calls, and meetings.
The following image shows examples of the light and dark theme.

|
Step 1 |
Click your profile picture, then select . |
|
Step 2 |
Choose your preferred theme, then click OK. |
The following image shows examples of the light and dark theme.
|
Step 1 |
Click your profile picture, then select . |
|
Step 2 |
Click one of the following options:
|
|
Step 3 |
Click OK to save your changes. |
You can set up Cisco Jabber to show what location you're working from. After you add a location, Cisco Jabber recognizes it automatically and updates your location automatically anytime you're back in it.
Enable locations in your client and your contacts will quickly see where you are. Your location is added to your status in the client.
|
Step 1 |
Select . |
|
Step 2 |
Select the Locations tab. |
|
Step 3 |
Select Enable locations. |
|
Step 4 |
(Optional) Select Tell me when new locations are detected. You are alerted when the client detects a new location. |
You can create a location for your contacts to see.
|
Step 1 |
Select . |
|
Step 2 |
Select the Locations tab. |
|
Step 3 |
Select the + icon. |
|
Step 4 |
Select Share this location if you want your contacts to see your location. |
|
Step 5 |
In the Name and Address fields, enter information about your location. |
|
Step 6 |
Select Create. |
You can edit the locations you have created to add additional information.
|
Step 1 |
Select . |
|
Step 2 |
Select the Locations tab. |
|
Step 3 |
In the My Locations window, select a location from the list and select the pen or edit icon to edit your location details. |
|
Step 4 |
Update your location information and select Save. |
You can remove any location that you configure.
|
Step 1 |
Select . |
|
Step 2 |
Select the Locations tab. |
|
Step 3 |
In the My Locations window, select a location that you want to remove. |
|
Step 4 |
Select the -. |
You can reassign your current network location to a location you have already created.
|
Step 1 |
Select . |
|
Step 2 |
In the Preferences window, select the Locations tab. |
|
Step 3 |
In the My Locations window, select a location from the list and then select the Reassign button. |
Some deployments of Cisco Jabber let you manage notifications when people request to view your availability status.
|
Step 1 |
Choose one of these options:
|
||||||||
|
Step 2 |
Select the Privacy tab. |
||||||||
|
Step 3 |
Select one of the following options:
|
||||||||
|
Step 4 |
Select Apply and then OK. |
If you've customized your app with specific tabs, you can remove them when you don't need them.
|
Step 1 |
Select the tab to remove. |
|
Step 2 |
Select . |
|
Step 3 |
Select Remove. |
If you have phone services accounts that use Dial via Office (DvO), you can set your preferences for what kind of network your mobile connects to when making calls.
|
Step 1 |
In the Settings screen, under Call, tap Calling Options. |
||||||||
|
Step 2 |
Select an option.
|
||||||||
|
Step 3 |
If you select either Mobile Voice Network or Autoselect, verify that the DVO Callback Number section is populated with the correct callback number (usually your mobile phone number). |
|
Step 1 |
In the Settings screen, under Call, tap Calling Options. |
||||||||
|
Step 2 |
Select an option.
|
||||||||
|
Step 3 |
If you select either Mobile Voice Network or Autoselect, verify that the DVO Callback Number section is populated with the correct callback number (usually your mobile phone number). |
Cisco Jabber for Android, iPhone, and iPad let you use low-bandwidth mode to improve the call quality when you're making Voice over IP (VoIP) calls over low-bandwidth networks.
Note |
|
To use low-bandwidth mode, your administrator has set up the system to handle calls between devices that use different codecs.
|
Step 1 |
On the Settings screen, under Call, tap Audio and Video. |
|
Step 2 |
Under Audio, set the Low-Bandwidth Mode setting on or off. |
Note |
|
To use low-bandwidth mode, one of the following must be true:
Your administrator has set up the system to handle calls between devices that use different codecs
Both your device and the device of the person you are calling support the same low-bandwidth codec (G.729a or G.729b)
|
Step 1 |
On the Settings screen, under Call, tap Audio and Video. |
|
Step 2 |
Turn the Low-Bandwidth Mode setting on or off. |
With telepresence, anyone can join a meeting from any mobile, desktop, or room system and share video, audio, and content. The private telepresence bridge can be setup for conference calls when you are not using the Webex meeting client. The Collaboration Meeting Room option needs to be disabled in order to setup a private telepresence bridge.
You use bridge information to specify the call details that are sent to users in an invitation when you create conference calls.
|
Step 1 |
Choose one of these options:
|
|
Step 2 |
Select the Calls tab. |
|
Step 3 |
Select the option to Use my conference service. |
|
Step 4 |
Enter a number or URI to use for your bridge. |
|
Step 5 |
(Optional) If you want your bridge to be password protected, specify a Host PIN and Guest PIN. |
|
Step 6 |
Select Apply then OK. |
You can specify an alternative number to use for your conference calls.
|
Step 1 |
Select . |
|
Step 2 |
Select the Calls tab. |
|
Step 3 |
Select the General tab. |
|
Step 4 |
Select Use my conference service option. |
|
Step 5 |
Enter the number or the URI for your bridge. If your administrator has added a bridge pattern you won't be able to edit this field. |
|
Step 6 |
(Optional) Enter a Host PIN. |
|
Step 7 |
(Optional) Enter a Guest PIN. |
You can use the private telepresence bridge for conference calls when you are not using the Cisco Webex meeting client.
Note |
If Collaboration Meeting Room is enabled for your account, you cannot set up the private telepresence bridge. |
|
Step 1 |
On the Settings screen, tap Conference Bridge. |
|
Step 2 |
Turn on the Use My Conference Service option. |
|
Step 3 |
(Optional) Enter your bridge conference number and pin number. |
|
Step 4 |
Tap Apply. |
You can make or answer calls with or without video, depending on what suits you best. You can set a preference to use video for your calls, then for those days you'd rather not, you can change your preference to take calls without video that day.
|
Step 1 |
Go to the Settings menu, select , and select your preference to Always start calls with video or Never start calls with video. |
|
Step 2 |
Select Apply, and then OK. |
|
Step 3 |
(Optional) For Release 12.0 and later: if you use a Windows device that has both front and rear camera, the front camera is used for your video calls, but you can change that setting in . |
|
Go to , and select Always start my calls with video. |
 and select
  Feedback