Cisco Unified ICM ACD Supplement for Avaya Communication Manager, Release 12.5(1) and 12.5(2)
Bias-Free Language
The documentation set for this product strives to use bias-free language. For the purposes of this documentation set, bias-free is defined as language that does not imply discrimination based on age, disability, gender, racial identity, ethnic identity, sexual orientation, socioeconomic status, and intersectionality. Exceptions may be present in the documentation due to language that is hardcoded in the user interfaces of the product software, language used based on RFP documentation, or language that is used by a referenced third-party product. Learn more about how Cisco is using Inclusive Language.
No changes are required to the actual Avaya ACD configuration beyond the changes mentioned in the Chapter 1:Avaya ACD Interface Requirements. However, some ACD-specific settings must be confirmed. This chapter describes these settings and provides guidelines that
help you maintain your Avaya ACD and Unified ICM configurations.
Monitored VDNs and
Inbound ACD Calls
A monitored VDN
handles all inbound ACD calls initially. It is important that all
VDNS involved in
ICM call flow are monitored to ensure that there
are no stale calls. A monitored
VDN is equivalent to a configured Unified
ICM Peripheral Target. For example,
do not specify
a
Hunt Group Extension as the destination for
inbound
ACD calls. Hunt Groups that are vector-controlled
(which is true for all skill groups in an
EAS environment) cannot be monitored for calls.
The inability to
monitor vector-controlled hunt groups is a restriction imposed by
Avaya. An unmonitored call that reaches a Hunt
Group or Agent cannot be tracked and accounted properly in Unified ICM contact
or agent statistics.
Important
It is important
that all VDNs to be monitored are properly configured as
Peripheral Targets in the Unified ICM database.
Monitored Splits
on CMS
The Avaya Hunt Group
configuration screen for each monitored split on CMS must have its Measured
field set to either "both" or "external." The field values are set in order
for the CMS to receive Hunt Group (split) data.
Terminal Endpoint
Identifier (TEI) Values
When you set up the
Avaya ACD, the
TEI value for an
Avaya LAN or
Avaya ACD is set to 1.
Configuring
AES
Application Enablement Services (AES) software runs on an external server that communicates to Avaya Aura Communication Manager
(or Avaya ACD) by using TCP/IP. It exposes a set of APIs that allow external applications like Cisco ICM to perform third-party
call control and receive event notifications. The ICM PG uses either CVLAN or TSAPI link, which is a client/service software.
To best understand
the configuration of the AES switch, begin with the Avaya documentation that
shipped with your switch. The information provided here is meant to supplement
but not replace the Avaya documentation.
We provide a limited amount of information to help you configure the switch to work with Cisco Avaya PG. The following tasks
are described:
Setting Up the CV/LAN and TSAPI Links
Setting Up Agents and Hunt Group
Setting Up Call Routing
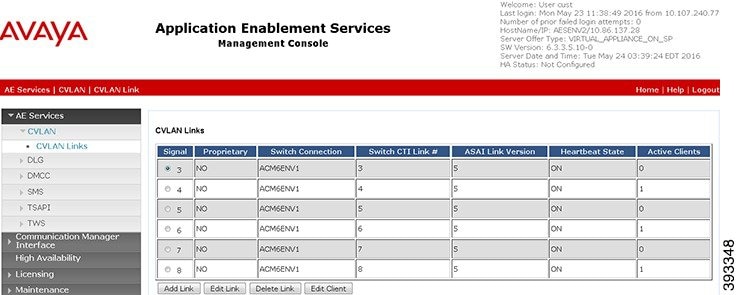
Setting up the CVLAN and TSAPI Links on AES Server
This section describes how to set up the CVLAN andTSAPI links on an AES server.
Perform the following procedure to establish the CVLAN link:
Procedure
Step 1
Open the AES OAM home page.
Step 2
Choose AE Services > CVLAN >CVLANlinks.
Step 3
On the CVLAN Link administration screen, click Add Link and perform the following:
Select the Signal
Uncheck the Proprietary check box
Select the Switch Connection
Select the Switch CTI Link Number
Select the CTI link version
Check the Heartbeat check box
Step 4
Click Apply Changes.
Figure 1. CVLAN Link Setup Screen
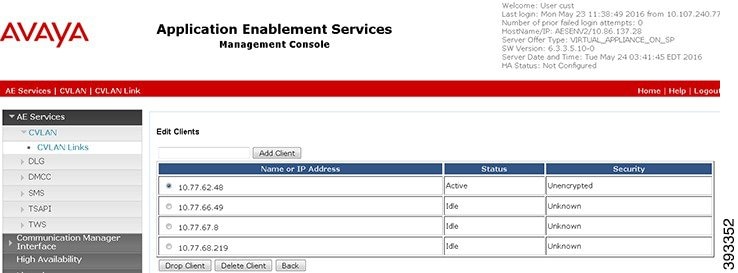
Adding CTI Client IP for a CVLAN Link:
Open the AES OAM home page.
Choose Administration > CTI Link Admin > CVLAN Links.
Select the CVLAN link for which the client IP requires to be added and click Edit Client.
Enter the IP address and click Add Client.
Figure 2. Add CTI Client IP Screen
Step 5
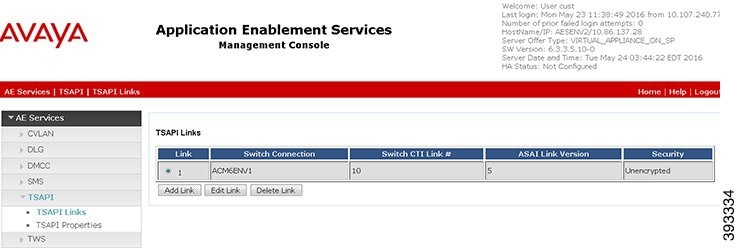
Follow the procedure to establish the TSAPI link:
Open the AES OAM home page.
Choose AE Services > TSAPI > TSAPI Links.
On the TSAPI Link administration screen, click Add Link and perform the following:
Select the Link.
Select the ACM (Avaya Communication Manager) to which you want to establish connection.
Select the Switch CTI Link Number.
Select the ASAI link version.
Note
The minimum link version for ASAI is 5.
Select the security as Unencrypted.
Note
Currently security enabled TSAPI Link is not supported.
Click Apply Changes.
Figure 3. TSAPI Link Setup Screen
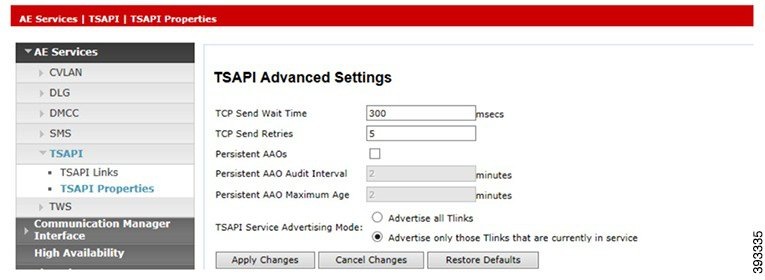
Select AE Services > TSAPI > TSAPI Links.
Go to the TSAPI Link Properties section. Click Advanced Settings.
Figure 4. TSAPI Advanced Settings
Select Advertise only those Tlinks that are currently in service option as TSAPI Service Advertising Mode.
Once the Tlink is created, navigate to the following path and note down the Tlink name. This is the name we use in PIM configuration.
Open the AES OAM home page.
Go to Security-> Security Database-> Tlink -> Tlink Name
Tlink Name for example:AVAYA#CMSIM#CSTA#AESSIM. This is applicable where:
AVAYA is a fixed constant.
Switch_Connection is a unique name, assigned to identify a switch (Communication Manager). In general, hostname of the switch
is assigned as the name of Switch Connection in the AE Services server.
Service Type: refers to the CSTA service type. It can be either of the following:
CSTA — For using unencrypted TSAPI Link (non-secure connection).
CSTA-S — For using encrypted TSAPI Link (secure connection).
The CSTA versus CSTA-S service types specify whether encryption is used between the application and the AE Services server.
AE_Services_Server_Name represents the hostname of the AE Services server which is assigned during the AE Services installation.
Adding CTI User in AES:
Open theAES OAM home page.
Go To UserManagement -> User Admin -> Add User Set the CT User option as "yes" and provide the remaining details as per Avaya documentation.
Note
A CTI user is unique for each PIM, which gets connected to an ACD.
Setting up Hunt
Groups/Skill Groups
On the Avaya switch, a hunt group is a group of extensions to which similar calls are routed. A hunt group may include all agents who
have a particular skill (for example, the ability to speak Spanish). It also includes all the agents who cover a geographical
territory (for example, Boston sales). A hunt group is sometimes referred to as a skill group. By default, Avaya PG (TAESPIM)
supports extensions of up to ten digits and this does not require registry configuration. The Agent Login IDs support up to
ten digits.
Note
The Avaya PG (ECSPIM) supports extensions of up to ten digits – the agent can log in to a Softphone that has an extension up
to ten digits. This ten-digit support applies to Agent Login IDs too. The Hunt Groups and VDNs support up to seven digits
only.
In order to use a seven-digit, or ten digits, the config PIM registry EnableTenDigitExtension must be set to 1 in following path:
If the registry EnableTenDigitExtension is set to 0, then it limits support up to five digits for extension, Agent Login IDs, Hunt Groups, and VDNs.
Some
ACD systems provide a feature called
EAS. For various reasons, you want certain agents to
handle specific types of calls. For example, you require only your most
experienced agents to handle your most important customers. You have
multilingual agents who can serve callers in various languages.
EAS allows you to classify agents according to their
specific skills and then to rank them by ability or experience within each
skill. Avaya uses these classifications to match each call with the best
available agent.
Defining a Hunt
Group/Skill Group for Agents
To set up agents,
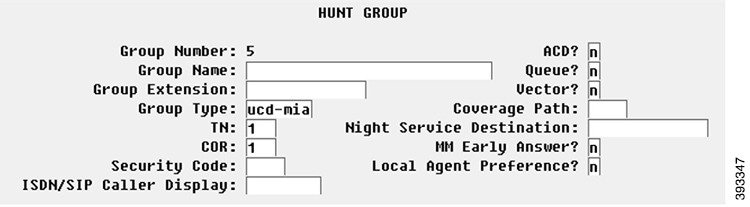
you must define a hunt group by completing the following steps:
Procedure
Step 1
Enter the
command
add
hunt-group next and press
Return. (You can also enter
add
hunt-group.xxx, where .xxx is the hunt group number.) The first
Hunt Group screen appears.
Figure 5. Defining
Agent Hunt Groups
Step 2
Complete
screens 1 through 2 of the hunt group record as described in the Avaya
documentation.
Step 3
Press
Enter. The hunt group is successfully created.
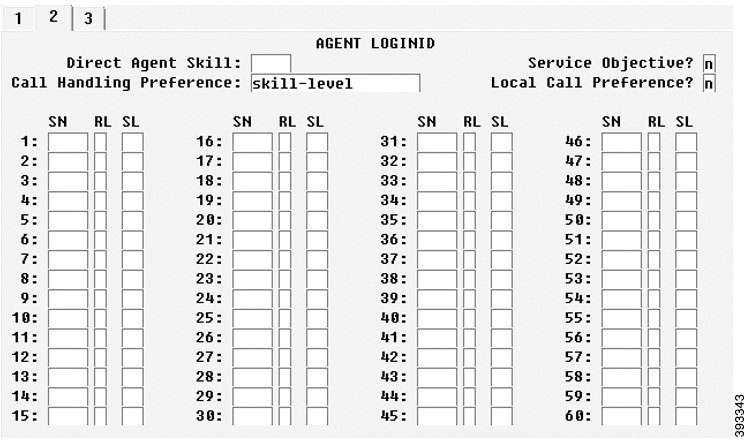
Modifying the
Agent Login ID
For each agent
usingEnterprise Chat and
Email,
add the hunt group to the
Agent
login ID form.
To modify the
Agent
login ID, perform the following steps:
Procedure
Step 1
Enter the
command change <agent login ID number>. The
Agent
Login ID screen appears.
Figure 6. Modifying Agent Login ID
Step 2
Add the
hunt
group that indicates
Unified CCE agents in the
SN (Skill Number) field in the table at the bottom
of the screen.
Step 3
Complete the
remaining fields as described in the
Avaya documentation.
Setting up Call
Routing
After you have set
up your
Enterprise Chat and
Email
agents and the phantom lines, ensure that the Avaya switch routes calls to them
appropriately by:
Writing a vector
to route calls
Creating a
VDN to access the vector
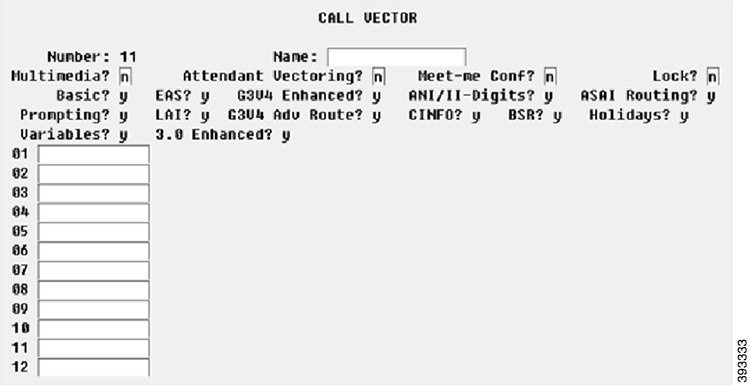
Write a Vector to Route
Call
A vector is a set of instructions the switch follows to ensure that the right call gets to the right agent. Whether you use
predictive or phantom
CTI
strategies, write a vector that routes appropriate
incoming calls to an Enterprise Chat and Email agent hunt group. Write
a vector for each group to which you want to route calls, and you require the hunt
group number established for Enterprise Chat and Email agents when setting up a
vector to route calls to those agents.
To create a vector:
Enter the
command change vector xx (where xx is the vector number) and press Return. The
Call Vector form appears.
Figure 7. Vector
Complete the
Call Vector screens 1 through 6. Instructions for completing these screens are
provided in the Avaya documentation.
Example of a Post route
Vector for a Call
Following is an
example of a Post route call vector. This sends adjunct route request to the
Unified CCE Avaya PG which is connected on routing link 1.
Figure 8. Call Vector
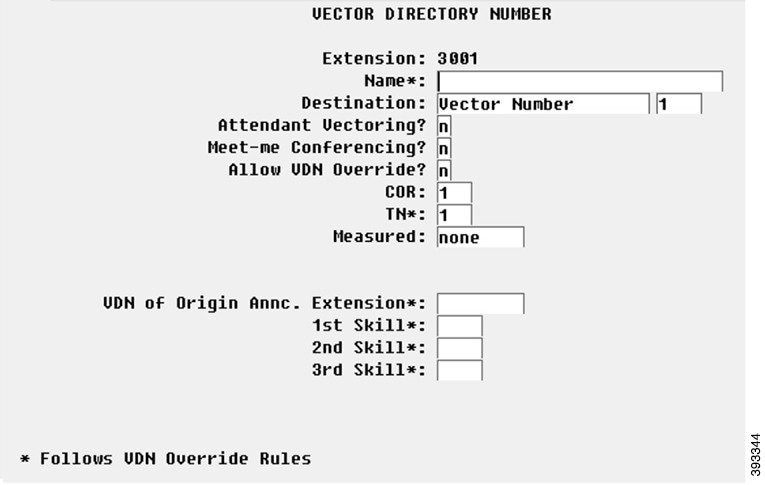
Create a Vector
Directory Number
After setting up a
vector for
Enterprise Chat and
Email
calls, set up Vector Directory Numbers (VDNs) to direct incoming calls to that
vector. You can create several VDNs that refer to the same vector, ensuring
that calls from a variety of sources can be routed to the same skill group.
To create a VDN,
complete the following steps:
Procedure
Step 1
Enter the
command
add
VDN.xxxx
(where
xxxx
indicates the VDN). The Vector Directory Number screen appears.
Figure 9. GUI
for Vector Directory Number
Step 2
Complete the
screens 1 through 3 based on the instructions in the Avaya documentation.
Configuring Return
Destination VDN on Avaya Switch
The Return
Destination automatically redirects a call from one monitored
VDN to another
VDN for continuous call processing, after an agent
disconnects the call.
If the call flow
involves two post-route
VDNs, the call variables are preserved from the
first route request to the second route request when call gets automatically
redirected from a post-route
VDN to another post-route VDN for continued call
processing (after an agent disconnects from the call). (This is according to
the return destination feature enabled on Avaya ACD.)
If the call flow
involves a first post-route
VDN and then a non post-route VDN after return
destination, the call variables are still preserved from the first call
(post-route request) to the second call after return destination.
After return
destination, the last agent also has the call variables which were set in the
first call prior to return destination.
The Avaya PIM
detects whether the return destination is configured on a VDN, by verifying the
parameter string of that VDN in the Peripheral Monitor tab of the PG Explorer.
The PIM then sends a
NEW_TRASACTION_IND to
OPC, allowing the OPC to preserve the call variables
in the second route select.
For example:
VDN 32222 is the first post
route VDN. VDN 32223 is the label returned for 32222. It is the
Return
Destination VDN as well.
After
Return Destination occurs on VDN 32223, the call
variables are preserved in the second post route. VDN 32224 is the
Post Route VDN. It is configured as
Return Destination VDN for VDN 32223 on Avaya
Switch.
When Agent on VDN 32223
drops the call,
Return Destination occurs and call is redirected to
VDN 32224. A NEW_TRANSACTION Indication is sent to OPC.
The
Return
Destination can be configured on the Avaya Switch. The following
example explains the configuration of this feature:
Procedure
Step 1
Click Tab
1 on the VECTOR DIRECTORY NUMBER screen and set the
following field:
Allow
VDN Override: Set this field as
y.
Step 2
Click
Tab
2 on the VECTOR DIRECTORY NUMBER screen to set the return
destination VDN for 3606. Set the Return Destination field as 3001. This value
is configured as return destination VDN for 3606. When an agent on VDN 3606
drops the call, it is automatically redirected to VDN 3001.
To set up Return Destination VDN on Unified ICM, see the section Configuring the Return Destination on Unified ICM
See the section ACD Notes and Restrictions for known caveats for Return Destination VDN.
Ethernet Busy Hour
Call Rates
Each Avaya Ethernet CTI link can support a BHCR of approximately 32,000 in general use by the PG (that is, without Post-Routing or third-party call control). This value is an approximation and may be affected by the number of agents, anticipated peak
busy hour call rate, average number of CTI events/calls, and the number of splits, trunk groups, and VDNs. Provision a dedicated Ethernet CTI link for Unified ICM application.
Post-Routing,
Station Monitoring, Third-Party Call Control
If Post-Routing, station
monitoring, or third-party call control is performed on the same Ethernet CTI
link, the link supports up to 20,000 BHCR due to additional message traffic.
Depending on your configuration, you might need an additional Ethernet CTI link
to be used exclusively for Post‑Routing, station monitoring, or third-party call control.
An Ethernet CTI link
dedicated exclusively to Post-Routing (that is, no event monitoring) can handle
approximately 64,000 BHCR. Calculating throughputs for third-party use is
dependent upon the number of stations involved and anticipated usage. In
general, third-party usage on the CTI link uses some of the CTI bandwidth.
Active Association
Limit
Active associations
are used for all requests made of the switch. Some of the requests made of the
switch remain open for an indefinite period of time (for example, event
notification requests, monitoring VDNs). Other requests end when the switch
returns the response (e.g., value query for time-of-day). The indefinite
requests include VDN event monitoring, station monitoring, and skill group
monitoring.
ASAI_TEST utility
ASAI_TEST is a
utility that allows you to check the connectivity between Unified ICM PG and
the Avaya ACD (Avaya ACD can include either Avaya ACD card or AES Server).
Before running the
ASAI_TEST, ensure the IP connectivity between the PG and the Avaya ACD card. To
do so, initiate a ping test from the PG to the Avaya ACD card. If the ping test
passes, you can proceed with the ASAI_TEST.
Following are the call handling methods you need to avoid:
Avoid setting up station coverage paths where all internal calls are
marked to go to coverage.
Avoid having agents transfer calls directly to other agent stations
or to other agent IDs. Instead, the calls can be transferred to a hunt group
(or split). The calls can also be transferred to a VDN to ensure proper call
monitoring.
Universal Call
ID
If the
Avaya
Universal Call ID (UCID) is preferred. The field
Send UCID to ASAI is set to
Yes. You can do this through
Feature-Related System Parameters form on the Avaya.
Starting with ICM
7.5(9), the Avaya PIM is enhanced to use
UCID information from the Avaya Switch to clean up
old calls in the
Avaya
PIM.
To enable the UCID feature on the
Avaya
Switch, change the following system-parameters features:
Create Universal Call
ID(UCID) ? y
What is the value for UCID
Network Node ID? <any
value_unique to a switch>
Is it necessary to send UCID to ASAI ? y
The UCID value is stored in the Unified CCE
central database, in the Termination Call Detail table, in the CallReferenceID field.
For more information, see the Database Schema Handbook for Cisco Unified Contact Center Enterprise.
CVLAN Link
Configuration
CVLAN link
configuration is set to have
Event
Minimization
set to
Yes. This is especially important if you are using
third-party functionality.
To set Event
Minimization to
Yes:
Stop the PG.
Busy-out and release the
CVLAN link. This activates this CVLAN link attribute.
Restart the PG.
When Event Minimization is enabled, the Unified ICM PG CVLAN links
are dedicated to the PG (that is, no other applications are using those CVLAN
links). In a duplexed environment, both PG sides can use the same CVLAN links.
CMS Cisco
Real-Time Report
The guidelines in
this chapter are intended for Avaya installers of the CMS Cisco RTA report:
Skillnums argument: The
CMS report uses the skillnums argument. The Unified
ICM
PG started supporting skillnums in Unified
ICM software. Therefore, any installation of Unified
ICM software uses
skillnums. This applies to all the new
installations and upgrades to
ICM software.
Agent login: For
CMS report version 3.5 or later, the
PIM does not log agents into a skill group unless
the skill group is monitored by CMS. This is a requirement because
CMS does not pass agent state data or logout events
for non-monitored skill groups. The lack of this CMS data can cause agent count
and agent state mismatches. Conversely, if the
CMS report is a pre-3.5 version, the PIM still logs
agents into all groups provided in the agent login event, but CMS does not
provide logout events for the non-monitored skill groups.
Because no logout record (or any agent state record, for that matter)
is provided by CMS for these non-monitored skills, and because the version of
the
CMS report is pre-3.5, the PIM may leave agents in
their last state. For this reason, use a CMS report that is version 3.5 or
later.
Note
The
Avaya
PG currently supports 20 skills per agent. The enhanced RTA 5.0.5,
which supports 60 skills per agent, is not supported by Unified
ICM.
Noskillnum flag Make
sure that the noskillnum flag is set to skillnums (that is, CMS provides the
list of monitored skills) in the following list of files. Split/Skill numbers
need to be in the CMS startup header provided to the
PG.
The following files are impacted:
Startrta
testrta
skills1
skills2, and
so on
These are files on the CMS machine.
Multiple CMS reports on one
PIM If multiple
CMS reports are configured for a single
PIM on a
PG, the CMS report must use the timestamp argument.
The timestamp argument causes the CMS report to include a UNIX timestamp in
each of the records sent to the PG. The
PG requires the timestamp to properly order the
incoming
CMS records from the multiple reports.
Agent-skill pairs
Upgrade to the newest
CMS report if you find you need increased
agent-skill pairs. The newer
CMS reports can be configured to support up to
10,000 agent-skill pairs (default 2,400). Using this single (increased)
agent-skill pair capability eliminates any need for using multiple CMS reports
(and therefore not require timestamps in the CMS reports).
Note
In later
CMS reports, the arguments (for example, noskillnums
) described above may have changed. Therefore, Avaya installers check for the
correct arguments to achieve the desired functionality as described above.
CMS Minimum
Refresh Rate
The CMS report is
installed to run as an administrator in order to allow a minimum refresh rate
of three seconds. It is necessary for you to ensure that the refresh rate used
for the custom CMS report is allowed for an administrator CMS login. In
addition, administer the CMS report via the appropriate login (for example,
CMS). Using another login to administer the report does not work. The Avaya
Professional Services group can provide the details on which login are used to
administer the report.
If agents are being
dynamically re-skilled (logged into and out of skill groups with some
frequency), it is possible that the CMS report does not see an agent
logout/login sequence for a skill group. For example, if the agent is logged
into skill 1 and is logged out of and back into skill 1 within the CMS refresh
rate period (that is, in between CMS snapshots of data), then CMS does not see
this logout/login transition.
Dynamic re-skilling is supported only when the agent is in "Available" or "AUX" state. If the re-skilling is attempted for
an agent who is in a state other than these states, then the reskill record is held by CMS until the agent state changes back
to “Available” or “AUX” state.
Configuring the
CMS Report
While configuring
the CMS report the following data items are required:
ACD Number: The ACD
number is the Avaya ACD number as known to the CMS system.
Refresh Rate: The
refresh rate is the rate at which the report captures the agent data and pass
it on to the PG. The minimum refresh rate is 3 seconds. A typical refresh rate
is 10 seconds.
Splits to Monitor: The
splits to monitor are the ACD skill groups, that are required to be monitored
by the PG. It is mandatory to update the list of CMS monitored splits
periodically.
Avaya type
For example, Non-EAS or EAS.
PG LAN Information This
includes IP address, netmask, and hostname. The CMS and PG are usually on the
same LAN. The PG LAN information is required by the Avaya Professional Services
engineer to set up the CMS report, so that it is connected to the PG. After the
initial installation, this is never changed.
Important
If any of the above CMS information is changed (for example: Monitored splits
or the refresh rate), the CMS report and PG
must be
stopped and restarted in order for the changes to take place.
Avaya
Configuration for “CMS-less” PGs
In a PG configuration that does not use CMS, additional configuration is necessary on Avaya.
PG requires skill groups to be monitored to track agent login and logout events. No agents can log in to that skill group
if a skill group is not monitored. PG uses 3PDCorMonitor request APIs to monitor a skill group, based on
interface.
Avaya currently restricts one application to third-party domain control of a skill group.
Enable Event Minimization for CVLAN CTI links used by the Peripheral Gateway. This is not applicable when PG uses TSAPI Interface to connect to AES.
For optimal performance, external applications that alter agent state on the Avaya ECS, use the Enterprise CTI interface. Contact your Cisco Unified ICM software representative for comprehensive and up-to-date information on configurations.
ACD Notes and
Restrictions
Following are the
notes and restrictions applicable to Avaya:
Monitoring VDNs - It is
important that all
VDNs to be monitored are properly configured as
Peripheral Targets in the Unified ICM database.
CTI links and BHCC- Each CTI link can support the following link specification (approximate):
8,000 BHCC using a BRI CTI link
32,000 BHCC on a G3r using an Ethernet CTI link
20,000 BHCC on a G3i or G3s using an Ethernet CTI link
These link specifications are derived from Avaya-provided data and are subject to change.
The Avaya PG
supports
Agent IDs, Agent Extensions, Hunt Group Extensions, and VDNs that start with a
zero. This is supported for both CMS and CMS-less environments.
The Avaya PG
does not
support Hunt Group Numbers that start with a leading zero.
Intermittent Failure of Network Transfer: There is occasionally a timing issue in the set of events involved in a Network Transfer. Due to this issueIntermittent Failure of Network Transfer, the NIC Call ID is not populated in the transfer call. This results
in call failure. To avoid this problem, introduce a delay of 1 second in the Vector for the post-route number (VDN); that
is,
Due to this issueIntermittent Failure of
01 wait-time 1-secs hearing silence
02 adjunct
routing link 1
Avaya ECS PIM Failure - The ECS PIM stops functioning when the AES link on the Avaya switch sends a "Busyout" command.
VDN Return Destination
The Return Destination VDN feature does not support the call conference before agent drops the call (expecting return destination to set in). That is, the PG loses its track of the VDN to which the call was originally delivered and call variables are not retained post Return Destination. However, this feature
supports call transfer before the agent drops the call (expecting return destination to set in). That is, the PG tracks the VDN to which the call was originally delivered and call variables are retained post return destination.
Return Destination cannot be run multiple times. That is, Return Destination can occur only once for a call in Avaya.
See sections Configuring Return Destination VDN on Avaya Switch for Configuring the Return Destination VDN on Unified ICM
respectively.
Processing Invalid CMS Records - Whenever the CMS receives an invalid record, the Avaya PG service goes out of service. Create the following registry value
and set its registry value data as 1 so that Avaya PG Service ignores the invalid CMS record and continue its usual operation.
Registry Value: IgnoreInvalidCMSRecord
Registry Value Type: DWORD
Registry Value Path: HKEY_LOCAL_MACHINE\SOFTWARE\Cisco Systems, Inc.\ICM\<cust_inst>\<pg_inst>\PG\CurrentVersion\PIMS\<pim_inst>\ATTData\Dynamic\
Registry Value Data:
0 – Avaya PG Service will go out of service and log out all the Agents, if an invalid CMS record is received.
1 – Avaya PG Service will ignore the invalid CMS record and continue its usual operation.
Multiple
PGs
The Avaya ACD
allows connections from multiple PGs. However, while using such a
configuration, the resources (like Stations, Agents, VDNs, Splits, and any
other resources) used by each PG, are maintained as separate configurations.
Multiple PG
deployments on a single ACD are used to split the load on the PG. These can
also have a dedicated PG to service a business line in the contact center.
To deploy multiple PGs on a single ACD, it is required for you to have distinct configuration between the PGs. Section Dual
PG Setup describes the configuration of two PGs on a single ACD. You can follow the same steps to configure multiple PGs to
the same ACD.
Note
Contact the ACD
vendor for ACD-related issues or limitations on connecting multiple PGs to a
single ACD.
Dual PG
Setup
Note
Ensure that you
adhere to the requirements provided in this section while deploying multiple
PGs. The performance and functionality of the PG is impacted if you do not
follow the requirements listed in this section. When two
PGs are deployed,
ICM routing effectively sees the
Avaya system as two independent peripherals. As
such, there are some specific configuration and operational requirements that
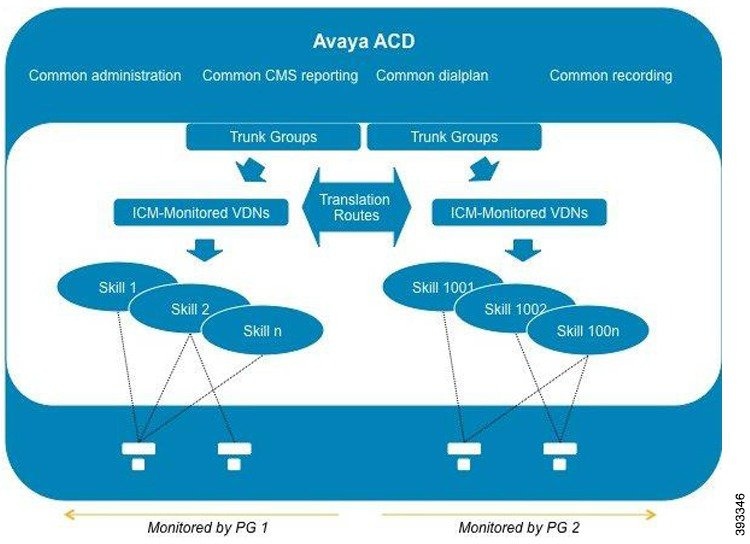
are required to be put in place. The following figure describes the overview of
Dual PG
setup.
Figure 10. Dual PG
Overview
For the same Avaya
ACD to behave as an independent peripheral to
Unified
ICM, avoid having one skill group monitored by the two
PGs. To achieve this, you have to determine which
Avaya skill numbers are associated with PG1 and PG2, respectively. For example,
skill groups 1-1000 and 1001-2000 would be two separate sets monitored by each
instance.
When two
PGs share the load of a single
PG, have a logical correlation between the skill
numbers associated with the different PGs. For example, the "pre-paid sales"
skill associated with
PG1 might be 500, and the one associated with
PG2, 1500 (just added the digit 1 in front). It is
essential for the supervisor to look at a report that combines the information
from the two corresponding skills to understand the overall skill performance.
After the correlation is defined, each agents are assigned only the skill
numbers. These numbers belong to the same PG (considering the example stated
before, an agent must not have skills 500 and 1502 at the same time).
Because the
PGs also monitor Avaya stations, the agents
associated with that PG must log in to the stations monitored by that
PG only. All stations and agent-IDs at a given
physical site is required to be defined at only one
PG. You can avoid having one site with entities from
two PGs. Assign stations sequentially for every
PG.
The
VDNs (that are monitored by Unified ICM) are
independent, regardless of whether they are used by calls when they first enter
the environment or for translation routes. The
CTI
links used by these VDNs (through the vectors they point
to), are separated; the CTI links established with PG1 A and B, and with PG2 A
and B. You can also define dial-plan ranges for VDNs in each PG to make the
configuration simpler (but it is not required).
The calls within the PG can be dialed directly using usual dial plan numbers such as VDNs, Agent IDs, extensions, and hunt groups. Ideally, the calls are not disconnected across two PGs. However, in such scenarios, the call has to be translation routed to the target PG over trunk, which is equivalent to routing
to a PG connected to a different switch. To achieve this kind of a routing, loop back trunks is required to be provisioned on the
switch and used for routing calls to dial plan numbers of another PG.
When the call is
routed from
PG1 to
PG2, the target
PG2 understands the call as an inbound call and the
ICM reporting reflects the same. To prevent
inappropriate agent behavior, the Avaya system can be programmed to block
incorrect call flows (COR or tenant settings). Design the system to avoid or
minimize the call between the two
PG groups.
Cisco mandates that
trunk groups monitored by each PG be separate. If two PGs are used to monitor
the same trunk group, Unified ICM software do not understand that the feeds, it
gets are duplicated.
Other Avaya
resources such as announcements, classes of restriction,
CMS reporting, recording, and so on, are not
affected with dual PG implementation.
Note
Although two
PGs can provide scalability from a Cisco Unified ICM
perspective, it is also necessary for you to consult Avaya about how ACDs
handle the increased
CTI traffic.
It also considers all other applications that currently used, such as recording
and virtual hold. These thresholds are associated with a large number of
CTI-enabled agents in the
Avaya
ACDs, although, two PGs are being used.
Maintaining Your
Configuration
It is preferred
that changes made to your configuration are accomplished on the
Avaya/CMS and in the
Unified ICM database consecutively. This ensures
that the PG gets the configuration updates on the Avaya/CMS systems.
It is imperative
that the
Avaya,
CMS, and the
Unified ICM database configurations are kept
synchronized (that is, up-to-date with each other). Inaccurate or incomplete
data results in inaccurate agent or call data.
Configuring High
Availability CMS
The high
availability
CMS configuration minimizes the down time in the
event of
Avaya
CMS failure. If you want to have such configuration in your call
center environment, set up the
PGs as follows:
Duplex PG
configuration: Both
CMSs (CMS no.1 and CMS no.2) require to use both
PG's IP addresses (that is, IP addresses of PG-A and PG-B) for connections. It
is the same as they do in a single CMS configuration. However, at any
given time, only one CMS can connect to the active PG. The other PG is always
in standby mode. So if PG-B is currently active, PG-A is in standby mode (and conversely).
When running
the Peripheral Gateway Setup tool, ensure that the
CMS Hostname field in the AvayaPIM Configuration
pop-up menu is blank. This allows the PIM to accept a connection from either
HA
CMS server. If one HA CMS server goes down, the other initiates a
connection to the PIM on the active PG.
Note
Irrespective of
this being a
High
Availability CMS configuration or not, a
CMS Data Feed failure results in a failover from one
side of a duplexed PG to the other.
Simplex PG configuration:
Both CMSs use the PG's IP address for connection. But only one CMS can connect
to the PG at any given time. Also, be sure when running Peripheral Gateway
Setup tool that the CMS Hostname field in the
Avaya
PIM Configuration pop-up menu is blank. This allows the PIM to
accept a connection from any one CMS server. If one CMS server goes down, the
other initiates a connection to the PIM.
Note
The
HA
CMS server going down, leads to
CMS Data Feed failure; this results in a brief
outage on a simplex PG.


 Feedback