Certificate Management for Secured Connections

Certificates

Certificates are used to create secure communication between clients and servers. Users can purchase certificates from a certificate authority (CA-signed certificates) or they can use self-signed certificates.

Self-Signed Certificates

Self-signed certificates (as the name implies) are signed by the same entity whose identity they certify, as opposed to being signed by a certificate authority. Self-signed certificates are not considered to be as secure as CA certificates, but they are used by default in many applications.

Unified CCE Certificate Management Utilities

The following certificate management utilities can be used to secure machine-to-machine communication (for example, communication between the Cisco Finesse server and the CTI server), and manage interactions between web applications:

  • Cisco SSL Encryption Utility used for web applications (Unified CCE Administration, WebSetup, and ISE).

  • CiscoCertUtil used for creating and installing self-signed certificates and CA-signed certificates for use in machine-to-machine communications.

  • Diagnostic Framework Cert Utility used for Diagnostic Portico applications.


Note


The Unified CCE Certificate Monitoring service monitors the self-signed and CA-signed certificates and keys that are used for certificate management. The service alerts the system administrator about the validity and expiry of these certificates. For more information, see the Serviceability Guide for Cisco Unified ICM/Contact Center Enterprise at http://www.cisco.com/c/en/us/support/customer-collaboration/unified-contact-center-enterprise/products-installation-and-configuration-guides-list.html


SSL Encryption Utility


Note


Although this utility currently has its original name, the SSL Encryption Utility now configures web applications for use with TLS.


Unified CCE web servers are configured for secure access (HTTPS). Cisco provides SSL Encryption Utility (SSLUtil.exe) to help you configure web servers for use with TLS.

Operating system facilities such as IIS can also accomplish the operations performed by the SSL encryption utility; however, the Cisco utility simplifies the process.

SSLUtil.exe is located in the <ICMInstallDrive>\icm\bin folder. You can invoke the SSL Encryption Utility in standalone mode or automatically as part of setup.

The SSL Encryption Utility generates log messages pertaining to the operations that it perform. When it runs as part of setup, log messages are written to the setup log file. When the utility is in standalone mode, the log messages appear in the SSL Utility Window and the <SystemDrive>\temp\SSLUtil.log file.

The SSL Encryption Utility performs the following major functions:

  • SSL Configuration

  • SSL Certificate Administration

TLS Installation During Setup

By default, setup enables TLS for the Unified CCE Internet Script Editor application.


Note


You must restart the SSL Configuration Utility if you use IIS manager to modify TLS settings while the utility is open.

The SSL Configuration Utility can be used to create self-signed certificates, to install the certificates in IIS, and to remove certificates from IIS. When invoked as part of setup, the SSL Configuration Utility sets TLS port in IIS to 443 if it is found to be blank.

To use TLS for Internet Script Editor, accept the default settings during installation and the supported servers use TLS.

During setup, the utility generates a self-signed certificate, imports it into the Local Machine Store, and installs it on the web server. Virtual directories are enabled and configured for TLS with 256-bit encryption.


Note


During setup, if a certificate exists or the web server has an existing server certificate installed, a log entry is added and no changes take effect. Use the utility in standalone mode or use the IIS Services Manager to make certificate management changes.


Encryption Utility in Standalone Mode

In standalone mode, the SSL Configuration Utility displays the list of Unified ICM instances installed on the local machine. When you select an instance, the utility displays the installed web applications and their SSL settings. You can then alter the SSL settings for the web application.

The SSL Configuration Utility also facilitates the creation of self-signed certificates and the installation of the created certificate in IIS. You can also remove a certificate from IIS using this tool. When invoked as part of setup, the SSL Configuration Utility sets TLS port in IIS to 443 if it is found to be blank.

CiscoCertUtil Utility

The CiscoCertUtil utility helps you manage certificates on any Contact Center Enterprise machine for machine-to-machine secure communication across components. Examples of machine-to-machine secure communications are Finesse to CTI Server (CG), Dialer to CG, MRPG to ECE, and VRU PG to CVP, and so on.

The TLS-enabled components use this utility to set up certificates, and the Contact Center Enterprise setup uses this utility to generate and install certificates.

The CiscoCertUtil utility is supported on servers running Windows Server. It performs the following functions:

  • Generates selfsigned certificates.

  • Generates certificate signing requests (CSR).

  • Installs remote certificates to the local machine certificate store under the Personal/ROOT/CA folder.

  • Deletes certificates from the local machine certificate store under the Personal/ROOT/CA folder.

  • Generates selfsigned certificates in the PEM format, which is an X509 extension.

  • Generates the corresponding key with the filename host.key.

  • Does not validate any certificate.

  • Does not create any log file pertaining to the operations that it performs. If there are errors, the error log appears on the console.


    Note


    Use the CiscoCertUtil utility to install or delete selfsigned certificates only.


How to use CiscoCertUtil Utility:

CiscoCertUtil [/generateCert]|[/generateCSR]|[/generateCert /f]|[/remove <cert_name>]|[/install <cert_file>]| [/list]|[/help]| commands.

Where:

  1. /list displays a list of certificates that are present in the local machine store under personal (LOCAL_MACHINE/MY), root (LOCAL_MACHINE/ROOT) and ca (LOCAL_MACHINE/CA) store.

  2. /generateCert generates a selfsigned RSA certificate with the filename host.pem and a key with the filename host.key. The selfsigned certificate is copied to <install_drive>:\icm\ssl\certs folder. If the key exists, the same key is used to generate the selfsigned certificate host.pem. An RSA key length of 2048 bits is used.

    The /generateCert command does not overwrite host.key and host.pem. To overwrite the existing self-signed certificate, use the /generateCert /f command. This command overwrites host.key and host.pem if already available in the system.


    Note


    During CCE installation, a selfsigned certificate is already generated. You need to use the /generateCert command only if you have to generate a new certificate. For example, you may need to generate a certificate in situations when the key of the certificate is compromised or the selfsigned certificate has expired.


  3. /generateCSR The command generates a CSR with the filename host.csr and a key with the filename host.key, which is a private key. The host.csr file is then sent to Certification Authority to obtain the digital identity certificate. If the key exists, the same key is used to generate host.csr.


    Note


    When you generate a certificate signing request (CSR), you will be prompted to key in the Organization Unit (OU). Based on the RFC5280 standard and baseline requirement, the Organization Unit is not required. You can leave this field blank so that the Certificate Authorities will not include the field in the certificate.

    Use the openssl req -in <csr_file> -noout -text command to validate the presence of the Organization Unit field.


  4. /remove <certificate_name> removes the certificate <cert_name> from the local machine certificate store under the Personal folder. If the command fails to run, an error message appears. To display the list of certificates that are present, use the /list command.

  5. /install <cert_file> <optional_cert_store – my/root/ca> installs the certificate that is mentioned as <cert_file> into the local machine certificate store under the Personal (my) or Trusted root (root) or Intermediate Certificate Authorities (CA) folder based on the option provided. If no option is provided, the certificate will be installed in the Personal folder. If the command fails to run, an error message appears.

    An example of this command:
    CiscoCertUtil /install c:\icm\ssl\certs\host.pem.
  6. /help displays the usage of the commands.


    Note


    If the remove command fails, use the list command to verify whether the certificate you attempted to remove is present in the local machine certificate store.

Manage Secured PII in Transit

The Contact Center Enterprise solution handles customer sensitive Personally Identifiable Information (PII) that include credit card information, PIN, and other sensitive details. Such sensitive information is sent across the system in ECC variables and can be exploited.

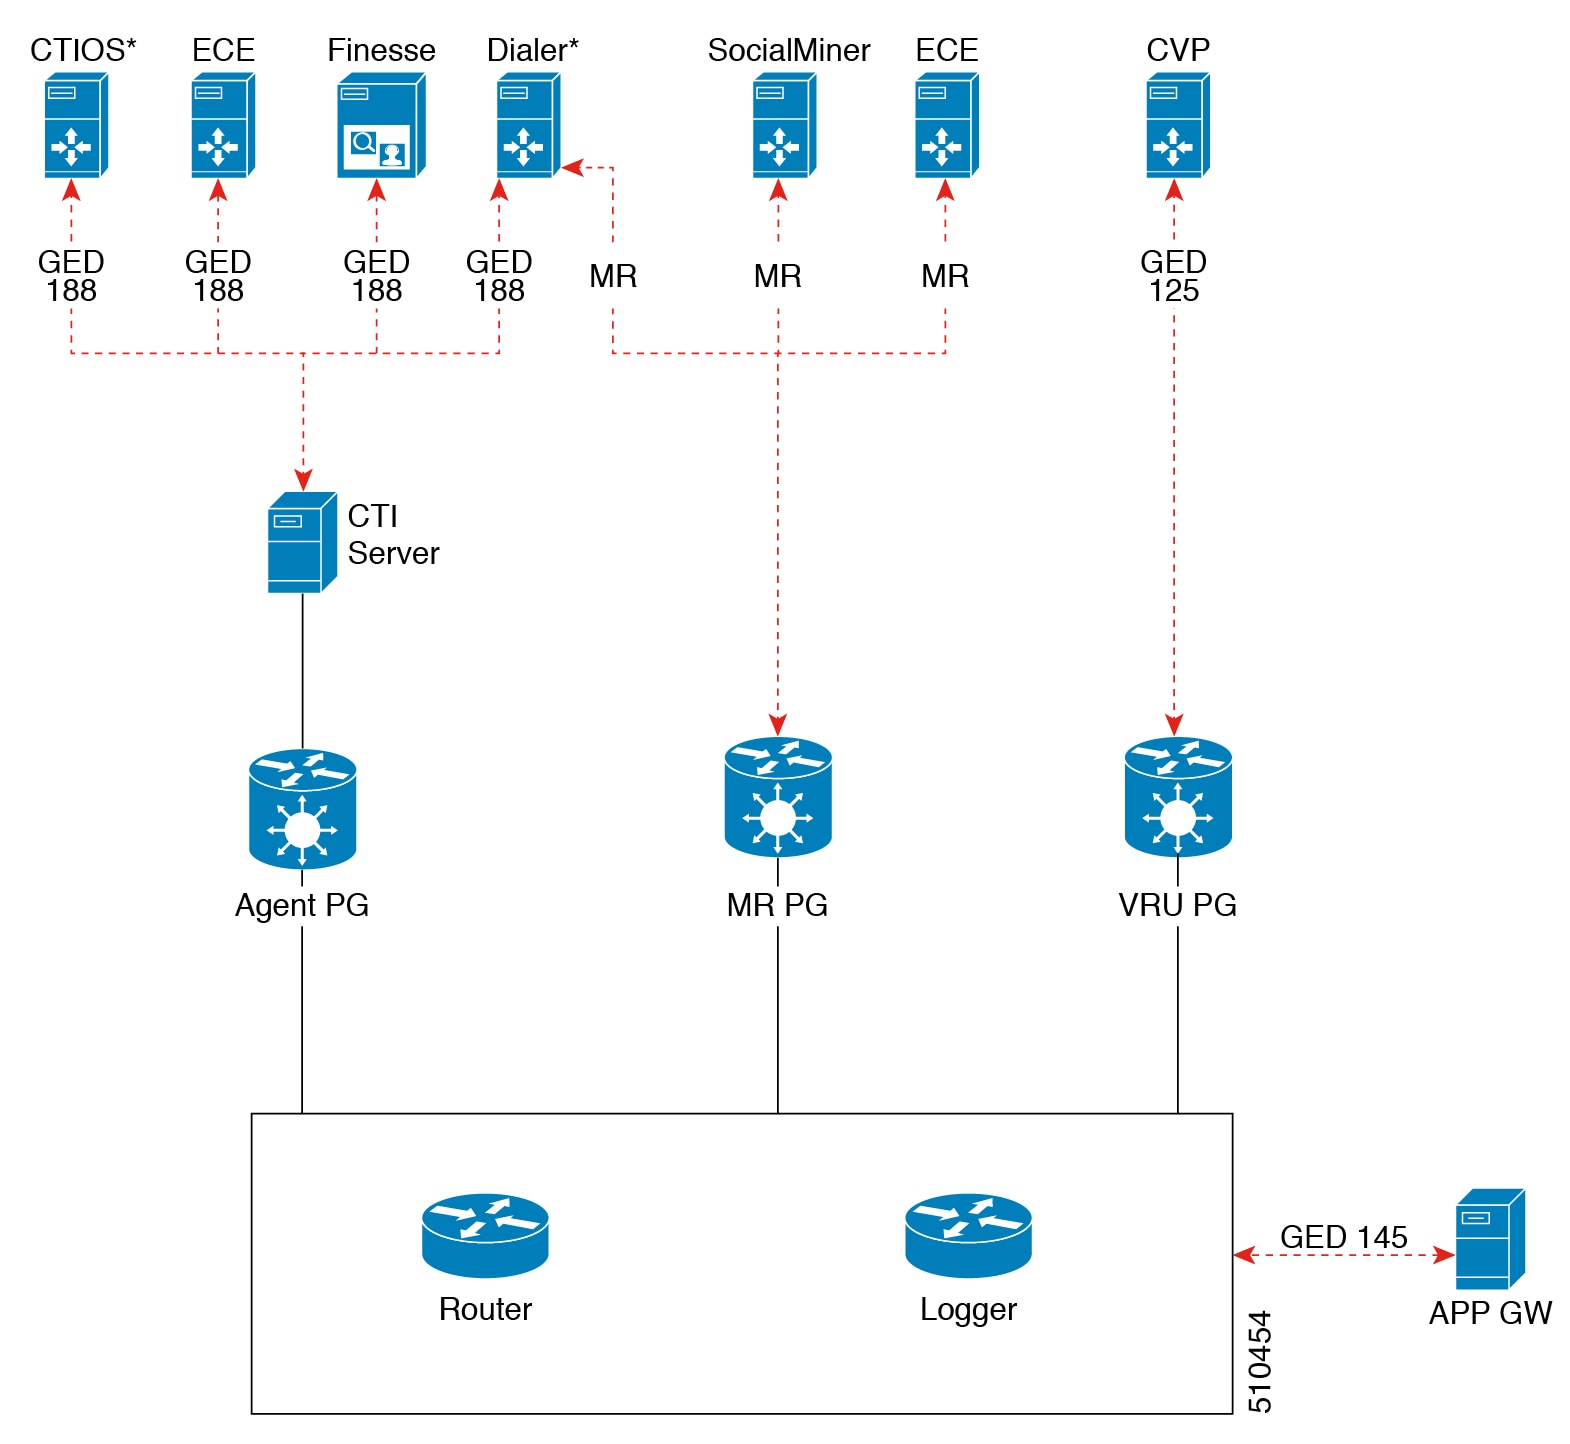
The transport channels such as GED 188, GED 125, GED 145, and MR carry PII and are susceptible to exploitation. It is therefore necessary to secure the transport channels that carry PII and protect them from any threats.

Securing PII is also necessary to adhere to the regulatory security compliance. The CCE solution uses the TLS protocol to enable security of the transport channels that carry PII.


Note


The communication channels between the Central Controller and PG are not secure. For end-to-end solution security, use the IPSec Network Isolation Zone.


Figure 1. Secured Connection Example

The following table lists the use cases for secured connections, the corresponding server-to-client matrix, and the protocol used:

Use Case

Server

Supported Client

Protocol

Secured self-service communications: To secure self-service communications, enable secured connection in CVP and VRU PG.

CVP

VRU PG

GED 125

Secured outbound calls: To secure outbound calls, enable secured connection in the CTI server, Dialer, and Media Routing PG.

CTI Server

Dialer

GED 188

Dialer

MR PG

Media Routing Protocol

Secured agent desktop communications: To secure the communications with Cisco Finesse Server and CTI OS, enable mixed-mode connection in the CTI server. Next, enable secured connection in the Cisco Finesse Server or in CTI OS, as applicable.

CTI Server

Cisco Finesse

GED 188

CTI OS

Secured third-party integration: To secure third-party integration with CCE, enable secured connection in the application gateway servers and clients.

Application Gateway Servers

Application Gateway Clients

GED 145

Secured multi-channel communications:To secure multi-channel communications, enable secured connection between:

  • ECE (Services Server) and MR PG (Client)

  • Customer Collaboration Platform (CCP) and MR PG (Client)

  • CTI server and ECE (Client)

ECE

MR PG

Media Routing Protocol

Customer Collaboration Platform

CTI Server

ECE

GED 188

To establish secured connection between a server and a client, you need to create mutual authentication by using one of the following security certificates:

  • Self-signed Certificate

  • Third-party CA Signed Certificate

Locations for Certificates and Keys

Store the certificates, intermediate and trusted certificates, and keys at the following directories in the respective machines:

The steps to generate and install certificates are provided in following section.

Manage Certificates

Managing Certificates for Unified CCE Component

All certificates are managed using Cisco tools. For more details, see Unified CCE Certificate Management Utilities

Installing the Server Certificate on the Client Machine
Procedure

Step 1

On the server machine, generate a certificate by using the command: <Install_Dir>:\icm\bin>CiscoCertUtil /generateCert. This command generates a certificate in the PEM format and copies it in this path C:\icm\ssl\certs.

If a valid self-signed certificate is already available, skip to step 2. For more information, see the /generateCert section in CiscoCertUtil Utility.

Step 2

Navigate to the path c:\icm\ssl\certs.

Step 3

Copy host.pem to a temporary location on the client machine.

Step 4

On the client machine, install this certificate file on the trusted certificate store, by using the command:CiscoCertUtil /install c:\icm\ssl\certs\host.pem. If the certificate file already exists in the trusted certificate store of the client machine, remove this existing certificate file before installing a new one.

Step 5

To confirm that you installed the certificate file successfully, run the CiscoCertUtil /list command. Then, check if the server host name is listed under LOCAL_MACHINE/ROOT.


Installing the Client Certificate on the Server
Procedure

Step 1

On the client system, generate a certificate by using the command: <Install_Dir>:\icm\bin>CiscoCertUtil /generateCert. This command generates a certificate in the PEM format and copies it in this path C:\icm\ssl\certs.

If a valid self-signed certificate is already available, skip to step 2. For more information, see the /generateCert section in CiscoCertUtil Utility.

Step 2

Navigate to c:\icm\ssl\certs.

Step 3

Copy host.pem to a temporary location on the server.

Step 4

On the server, install this certificate file on the trusted certificate store, by using the command:CiscoCertUtil /install c:\icm\ssl\certs\host.pem. If the certificate file already exists in the trusted certificate store of the server, remove this existing certificate file before installing a new one.

Step 5

To confirm that you have installed the certificate file successfully, run the CiscoCertUtil /list command. Then, check if the client host name is listed under LOCAL_MACHINE/ROOT.


What to do next

Restart the corresponding services after installing the certificates.

Managing Certificates for Finesse

Refer to the following steps for security certificate management for Finesse server.

Exporting a Certificate from Finesse Server

Use this procedure to export security certificates from the Finesse server.

Procedure

Step 1

Sign in to Cisco Unified Operating System Administration console on Finesse server.

Use the FQDN path of the Finesse server (http://FQDN of Finesse server:8443/cmplatform) to sign in.

Step 2

Select Security > Certificate Management.

Step 3

Click Find.

Step 4

Perform one of the following steps based on whether the Tomcat certificate is listed or not:

  • If the Tomcat certificate is not listed:

    • Click Generate New.

    • Reboot the VOS server when the certificate generation is complete.

    • Restart this procedure.

  • If the Tomcat certificate is listed:

    • Click the certificate to select it. Click Download .pem file and save the file to your desktop.

    • Ensure that the certificate you select includes the hostname for the server.


What to do next

Perform these steps for all the Finesse server nodes.

Importing a Certificate to Finesse Server

Use this procedure to import security certificates to the Finesse server.

Procedure

Step 1

Sign in to Cisco Unified Operating System Administration on Finesse server.

Use the FQDN path of the Finesse server (http://FQDN of Finesse server:8443/cmplatform) to sign in.

Step 2

Select Security > Certificate Management.

Step 3

Click Upload Certificate.

Step 4

Select Certificate Name > tomcat-trust.

Step 5

Click Browse.

Browse to the location of the CTI Server certificate with the .pem file extension.

Step 6

Select the file and click Upload File.


What to do next

Repeat steps 3 to 6 for the remaining unloaded certificates.

After you upload all the certificates, restart the Finesse Tomcat application.

Generate and Copy CA Certificates of Unified CCE Components

If you are using Certificate Authority (CA) certificates for mutual authentication of CCE machines, do the following:

  1. Generate CSR using CiscoCertUtil.

    This command generates a host.csr file and sends the CSR to a trusted Certificate Authority for sign-off. To generate a new CSR, see CiscoCertUtil Utility.

  2. Obtain the CA-signed application certificate, Root CA certificate, and Intermediate Authority certificate.

  3. Copy the CA-signed application certificate file into the appropriate folder (<install_drive>:\icm\ssl\certs as applicable.

  4. Restart the services

  5. Install the CA-signed application certificate using the command CiscoCertUtil / install <cert file > <optional cert store>. Certificate store can be my, root or ca with default being my when not specified. You can also manually install the CA Certificate to Windows trust store, if not already installed or present. You can verify if certificate is installed properly using windows certlm.msc utility in personal, Trusted Root or Intermediate Certificate Authorities based on option specified in install command. Default is Personal if no option is provided.

Certificate Management for Customer Collaboration Platform

Control Customer Collaboration Platform Application Access

By default, access to Customer Collaboration Platform administration user interface is restricted. Administrator can provide access by allowing clients IP addresses and revoke by removing the client's IP from the allowed list. For any modification to the allowed list to take effect, Cisco Tomcat must be restarted.


Note


IP address range and subnet masks are not supported.

utils whitelist admin_ui list

This command displays all the allowed IP addresses. This list is used to authorize the source of the incoming requests.

Syntax

utils whitelist admin_ui list

Example
admin: utils whitelist admin_ui list

Admin UI whitelist is:
10.232.20.31
10.232.20.32
10.232.20.33
10.232.20.34

utils whitelist admin_ui add

This command adds the provided IP address to the allowed list of addresses.

Syntax

utils whitelist admin_ui add

Example
admin:utils whitelist admin_ui add 10.232.20.33

Successfully added IP: 10.232.20.33 to the whitelist

Restart Cisco Tomcat for the changes to take effect

utils whitelist admin_ui delete

This command deletes the provided IP address from the allowed list.

Syntax

utils whitelist admin_ui delete

Example
admin:utils whitelist admin_ui delete 10.232.20.34

Successfully deleted IP: 10.232.20.34 from the whitelist

Restart Cisco Tomcat for the changes to take effect

Obtaining a CA-Signed Certificate

Each time you sign-in, the browser validates the certificate presented by the server. If the certificate is not signed by a trusted root Certificate Authority (CA), the browser will typically not allow the connection until the user explicitly allows it. In order to avoid this, you must obtain a root certificate signed by a CA and install it onto Customer Collaboration Platform. Also, you must upload the certificate onto the VOS components.

After You Upload the Certificates

For the uploaded certificates to take effect, do the following:

  1. Restart the XMPP Service. (SSH to Customer Collaboration Platform and enter the command utils service restart CCP XMPP Server as an administrator in the Commad Line Interface).

  2. Restart the Cisco Tomcat service. (SSH to Customer Collaboration Platform and enter the command utils service restart Cisco Tomcat as an administrator in the Command Line Interface).

Obtaining a Self-Signed Certificate

Browsers handle self-signed certificates in different ways. The sections below describe how to handle self-signed certificates on the browsers supported for Customer Collaboration Platform.

Internet Explorer and Self-Signed Certificates

When using an IE browser on a Windows machine, make sure your DNS server is properly configured and you can resolve the fully qualified Customer Collaboration Platform hostname to the Customer Collaboration Platform address. Use a signed certificate from a trusted certificate authority (like Verisign).

If you use a self-signed certificate (which is what is installed with Customer Collaboration Platform), follow these steps to avoid getting certificate warnings each time you sign in.

  • In your Start menu, right click on IE and select "Run as Administrator".

  • Enter the URL for your Customer Collaboration Platform server in the address bar.

  • When prompted by the security warning, click on Continue to this website (not recommended).

  • Your address bar turns red and you see a certificate error next to the address bar. Select the certificate error.

  • Select View certificates at the bottom of the popup. This opens a certificate dialog.

  • On the General tab, select Install Certificate....

  • The certificate export wizard launches. Click Next.

  • When prompted for where to store the certificates, select Place all certificates in the following store, then click Browse and select Trusted Root Certification Authorities.

  • Click Ok, then click Next and Finish to complete the certificate import wizard.

  • Click Yes when prompted about importing the certificate.

  • Close and restart your browser to access Customer Collaboration Platform.

Firefox and Self-Signed Certificates

Due to changes in the Firefox security model, there are additional self-signed certificates that must be accepted to use the Customer Collaboration Platform web application on Firefox.

When accessing a Customer Collaboration Platform server using a newly installed Firefox browser (any version), Firefox attempts to connect to the main port that Customer Collaboration Platform uses first (port 443). If it cannot connect, it prompts the user to accept the self-signed certificate.


Note


If pop ups are blocked, you are given instructions on how to manually launch the certificate page. Also, if the certificate window is closed before the certificate is accepted, the page will automatically re-launch.


  • If prompted, click I Understand the Risks, then click Add Exception.

  • Click Confirm Security Exception.

Next, Firefox attempts to connect to port 7443 (the secure XMPP port). With Firefox, a second self-signed certificate must now be accepted to use this port. Customer Collaboration Platform displays a "Checking Connectivity..." screen during this process

If the"Checking Connectivity..." screen persists after a few seconds, click Continue to proceed to the Firefox certificate acceptance screen (as above).

Click I Understand the Risks, then Add Exception, and Confirm Security Exception again.

Users need only go through this process the first time they use a new Firefox browser and self-signed certificates. After the certificates are in place, users may not see the "Checking Connectivity..." screen (or it will appear briefly and proceed to the Customer Collaboration Platform sign on screen).

Google Chrome and Self-Signed Certificates

When accessing a Customer Collaboration Platform server using Google Chrome Browser, it attempts to establish a Private secure connection using port 7443.

  • After keying in the Server IP address in Chrome, the browser displays a connection warning stating "Your Connection is not private." To proceed with a secure connection, click Advanced.

  • Click Proceed to <Server IP Address>. Next, Chrome attempts to connect to port 7443 (the secure XMPP port).

  • The browser displays "Checking connectivity." Click Continue to proceed. This opens another Chrome tab, where you are prompted with another connection warning.
  • Click Advanced.
  • Upon clicking "Proceed to <Server IP Address>", the Customer Collaboration Platform log on page is displayed.

Note


Users need to go through this process only the first time they use a new Chrome browser and self-signed certificates.


Transport Layer Security (TLS) Requirement

Contact center enterprise solutions use Transport Layer Security (TLS). Refer to your browser's documentation for details on how to configure support for TLS. See the Contact Center Enterprise Compatibility Matrix at https://www.cisco.com/c/en/us/support/customer-collaboration/unified-contact-center-enterprise/products-device-support-tables-list.html for the supported TLS versions.


Note


For backward compatibility with the earlier versions of clients, you can downgrade the Unified CCE Windows systems to earlier versions of TLS by following Microsoft procedures.

If you apply security hardening without configuring support for TLS, your browser cannot connect to the web server. An error message indicates that the page is either unavailable or that the website is experiencing technical difficulties.


Upgrading to 12.5(1a)

A new 12.5(1a) base installer is available with OpenJDK JRE as the supporting Java run time for all the CCE applications. Its predecessor, the 12.5(1) installer, employs Oracle JRE.


Note


To verify the base installer version, go to Control Panel > Programs > Programs and Features > Cisco Unified ICM/CCE <version>.


Any installation using the 12.5(1) installer can continue to use Oracle JRE and receive Java security updates and fixes from the Oracle website. However, if you have to apply an ES on 12.5(1), you must install CCE 12.5(1) ES55 as described in Migrating CCE 12.5(1) Oracle JRE to OpenJDK and then install the Java updates from the OpenLogic website.

Run the following checks if you are considering installing an ES after upgrading to 12.5(1a):

  • The following ESs are included in ES 55 and need not be installed if ES 55 is installed: ES4, ES5, ES7, ES12, ES21, ES22, ES25, ES30, ES33, ES39, ES43, ES50, and ES51.

  • The following ESs are not included in ES 55 and can be installed after installing ES 55: ES2, ES9, ES11, ES13, ES16, ES17, ES18, ES19, ES20, ES24, ES26, ES27, ES28, ES31, ES32, ES34, ES35, ES37, ES38, ES40, ES42, ES44, ES45, ES46, ES47, ES49.

  • ES 55 must be installed before you apply any patch greater than ES 55.

For more details, see the Cisco Unified Contact Center Enterprise Engineering Specials (ES) Information at https://www.cisco.com/c/en/us/td/docs/voice_ip_comm/cust_contact/contact_center/icm_enterprise/ucce_b_unified-contact-center-enterprise-engineering/ucce_b_unified-contact-center-enterprise-engineering_chapter_0110.html.

After installing ES 55 patch and switching to Open JDK, you may upgrade the current Open JDK 1.8 version to a later version by one of the following ways:

These procedures also ensure that the certificates are imported to the OpenJDK Java KeyStore path.

Migrating CCE 12.5(1) Oracle JRE to OpenJDK

Follow these steps to install UCCE 12.5(1) ES 55 to migrate the 12.5(1) CCE core components such as Routers, Roggers, and PG servers to OpenJDK JRE.

Before you begin

Do not uninstall any of the ESs installed before ES 55.

Procedure


Step 1

Run the following commands to export the certificates of all the components from the Oracle Java KeyStore.

cd %JAVA_HOME%\bin 
keytool -keystore "C:\Program Files (x86)\Java\jre1.8.0_221\lib\security\cacerts" -export -storepass <store password> -alias <alias of the cert> -file <filepath>.cer

Step 2

Follow the instruction in the Readme file to install the UCCE 12.5(1) ES 55 patch.

ES 55 installs the 1.8 (update 272) version of the 32-bit OpenLogic Java and ensures that all the services run on this Java environment.

Step 3

Modify the JAVA_Home environmental variable to the OpenJDK path used in Step 2.

Step 4

Run the following commands to import the certificates in the new path:

cd %CCE_JAVA_HOME%\bin 
keytool -keystore "C:\Program Files (x86)\OpenJDK\jre-8.0.272.10-hotspot\lib\security\cacerts" -import -storepass <store password> -alias <alias of the cert> -file <filepath>.cer

Upgrade Open JDK Using the Open JDK Upgrade Tool

Follow these steps to upgrade your Open JDK to the latest version using the Open JDK Upgrade tool.

Procedure


Step 1

Download the latest 1.8 version patch from the OpenLogic site at https://www.openlogic.com/openjdk-downloads and copy it to the server.

Step 2

Copy the downloaded file into the Unified CCE component VMs.

Example:

C:\UpgradeOpenJDK

Step 3

Run the following commands to export all the certificates from the existing Oracle Java KeyStore.

cd %CCE_JAVA_HOME%\bin 
 keytool -keystore "C:\Program Files (x86)\OpenJDK\jre-8.0.272.10-hotspot\lib\security\cacerts" -export -storepass <store password> -alias <alias of the cert> -file <filepath>.cer

Step 4

Download the OpenJdkUpgradeTool utility from the following location to a local folder:

https://software.cisco.com/download/home/284360381/type/284416107/release/12.6(1)

Step 5

Run openJDKUtility.exe from the unzipped folder and follow the instructions in the ReadMe file.

Step 6

From the Control Panel, search for "Environmental Variables." From the search results, select Edit the System Environmental Variables.

In the System Properties dialog box that opens, under the Advanced tab, click Environmental Variables.

In the Environmental Variables dialog box that opens, under System variables, ensure that the JAVA_Home variable is set to the OpenJDK path used in Step 4.

Step 7

Run the following commands to import the certificates to the new path.

cd %CCE_JAVA_HOME%\bin 
keytool -keystore "C:\Program Files (x86)\OpenJDK\<jre-8.0.292.10-hotspot or new version>\lib\security\cacerts" -import -storepass <store password> -alias <alias of the cert> -file <filepath>.cer

Manual Upgrade of Open JDK

Follow these steps to manually upgrade your Open JDK to the latest version.

Procedure


Step 1

Download the latest 1.8 version patch from the OpenLogic site at https://www.openlogic.com/openjdk-downloads and copy it to the server.

Step 2

Run the following commands to export all the certificates from the existing Oracle Java KeyStore.

cd %CCE_Java_HOME%\bin 
 keytool -keystore "C:\Program Files (x86)\OpenJDK\jre-8.0.272.10-hotspot\lib\security\cacerts" -export -storepass <store password> -alias <alias of the cert> -file <filepath>.cer

Step 3

Follow the instructions in OpenLogic Java readme file to install the Java patch downloaded in step 1.

Step 4

From the Control Panel, search for "Environmental Variables." From the search results, select Edit the System Environmental Variables.

In the System Properties dialog box that opens, under the Advanced tab, click Environmental Variables.

In the Environmental Variables dialog box that opens, under System variables, ensure that the JAVA_Home variable is set to the OpenJDK path used in Step 4.

Step 5

Run the following commands to import the certificates to the new path.

cd %CCE_Java_HOME%\bin 
keytool -keystore "C:\Program Files (x86)\OpenJDK\<jre-8.0.292.10-hotspot or new version>\lib\security\cacerts" -import -storepass <store password> -alias <alias of the cert> -file <filepath>.cer