- Preface
- Outbound Business Concepts
- Architectural Overview
- Outbound Option Installation: Preliminary Steps
- Outbound Option Installation: SIP Dialer
- Outbound Option Installation: SCCP Dialer
- Configuration of Campaigns and Imports
- Administrative and Supervisory Tasks
- Registry Settings
- Long Distance Digit Prefix Logic
- Dialer_Detail Table
- Termination_Call_Detail Table
- Schedule of Contacts Between Customers and Agents
- CTI OS Outbound Option ECC Variable Settings
- Index
- Outbound Option Configuration Process Overview
- Dialing Modes
- Configuration Process Task Maps
- Configure Skill Group
- Create Dialed Numbers
- Configure Dialed Numbers
- Create Import Rule
- Create a Query Rule
- Create a Campaign
- Notes on Editing a Campaign in Progress
- Create an Enterprise Skill Group
- Create an Enterprise Route
- Create a Call Type
- Outbound Option Scripting
- Set Up Reservation Script
- Configure a Transfer to VRU Script
- Set Up Administrative Script
- Sample Administrative Scripts
- Map Scripts, Call Types, and Dialed Numbers
- Configure Translation Route for Use with SIP Dialer
- Multi-Tenant Customer Instances Configuration
- SIP Dialer Recording Parameters Configuration
- Verification of Dialed NumberDN/Script Selector Configuration
- Verify Campaign Configuration
Configuration of Campaigns and Imports
- Outbound Option Configuration Process Overview
- Dialing Modes
- Configuration Process Task Maps
- Configure Skill Group
- Create Dialed Numbers
- Configure Dialed Numbers
- Create Import Rule
- Create a Query Rule
- Create a Campaign
- Notes on Editing a Campaign in Progress
- Create an Enterprise Skill Group
- Create an Enterprise Route
- Create a Call Type
- Outbound Option Scripting
- Set Up Reservation Script
- Configure a Transfer to VRU Script
- Set Up Administrative Script
- Sample Administrative Scripts
- Map Scripts, Call Types, and Dialed Numbers
- Configure Translation Route for Use with SIP Dialer
- Multi-Tenant Customer Instances Configuration
- SIP Dialer Recording Parameters Configuration
- Verification of Dialed NumberDN/Script Selector Configuration
- Verify Campaign Configuration
Outbound Option Configuration Process Overview
The process of configuring Outbound Option involves the following procedures:
Configuring dialed numbers (DNs) for agent reservation and transferring to IVR
Creating a skill group and a route for the campaign
Creating an import rule to schedule contact and do-not-call imports
Creating a query rule to filter contact records based on SQL queries and associate those records with an import
Create a campaign to define campaign settings, such as the campaign name, description, answering machine detection, personal callback settings, dial settings, query rule selections, and skill group selections
Create call types to map the DNs to a reservation or transfer to IVR routing script
Create reservation, transfer to IVR, and administrative scripts
The following figure provides a high-level overview of this process.

Campaign Task List and Transfer to IVR Campaign Tasks provide a complete list of tasks associated with creating those campaigns.
Dialing Modes
Outbound Option supports three different types of outbound dialing modes:
-
Predictive Dialing: The Dialer component determines the number of customers to dial per agent, based on the abandoned rate. The agent must take the call if logged in to a campaign skill group.
-
Preview Dialing: The agent previews customer information on their desktop, and chooses to contact the customer, skip to another customer, or reject the call.
-
Progressive Dialing: The administrator specifies a fixed number of lines to dial per agent instead of the Dialer component determining the number of lines. The agent must take the call if logged in to a campaign skill group.
 Note | For agent campaigns, all three modes reserve an agent at the beginning of every outbound call cycle by sending a reservation call to the agent. |
Predictive Dialing
In predictive dialing, the dialer determines the number of customers to dial per agent based on the number of lines available per agent and the configured maximum abandon rate. The agent must take the call if that agent is logged in to a campaign skill group.
A Predictive Dialer is designed to increase the resource utilization in a call center. It is designed to dial several customers per agent. After reaching a live contact, the Predictive Dialer transfers the customer to a live agent along with a screen pop to the agent’s desktop. The Predictive Dialer determines the number of lines to dial per available agent based on the target abandoned percentage.
Outbound Option predictive dialing works by keeping outbound dialing at a level where the abandon rate is below the maximum allowed abandon rate. Each campaign is configured with a maximum allowed abandon rate. In Predictive mode, the dialer continuously increments the number of lines it dials per agent until the abandon rate approaches the configured maximum abandon rate. The dialer lowers the lines per agent until the abandon rate goes below the configured maximum. In this way, the dialer stays just below the configured maximum abandon rate. Under ideal circumstances, the dialer internally targets an abandon rate of 85% of the configured maximum abandon rate. Due to the random nature of outbound dialing, the actual attainable abandon rate at any point in time may vary for your dialer.
Predictive Dialing Description
Outbound Option predictive dialing works by keeping outbound dialing at a level where the abandon rate is below the maximum allowed abandon rate. For example, each campaign is configured with a maximum allowed abandon rate. In Predictive mode, the Dialer continuously increments the number of lines being dialed per agent until the abandon rate rises to the preconfigured maximum abandon rate. The Dialer then begins lowering the lines per agent until the abandon rate goes below the preconfigured maximum. In this way, the Dialer stays just below the preconfigured maximum abandon rate. Under ideal circumstances, the Dialer internally targets an abandon rate of 85% of the preconfigured maximum abandon rate. Due to the random nature of outbound dialing, the actual attainable abandon rate at any point in time can vary for the Dialer.
Preview Dialing
Preview dialing reserves an agent before initiating an outbound call and presents the agent with a popup window. The agent can then Accept, Skip, or Reject the call with the following results:
-
Accept: The customer is dialed and transferred to the agent.
-
Skip: The agent is presented with another customer call.
-
Skips-Close: The customer will not be called again, and the agent is presented with another customer call.
-
Reject: The agent is released. The system then delivers another call to the agent, either another Preview outbound call, or a new inbound call.
-
Rejects-Close: The agent is released and the record is closed so it is not called again. The system then delivers another call to the agent, either another Preview outbound call or a new inbound call.
Direct Preview Dialing
The Direct Preview mode is similar to the Preview mode, except that the dialer automatically places the call from the agent's phone after the agent accepts. Because the call is initiated from the agent's phone, the agent hears the ringing, and there is no delay when the customer answers. However, in this mode, the agent must deal with answering machines and other results that the Dialer Call Progress Analysis (CPA) handles for other campaign dialing modes.
Progressive Dialing
Progressive Dialing is similar to predictive dialing (see Predictive Dialing). The only difference is that in Progressive Dialing mode, Outbound Option does not calculate the number of lines to dial per agent, but allows users to configure a fixed number of lines that will always be dialed per available agent.
Configuration Process Task Maps
This section contains configuration process task map tables that list the steps for creating an agent campaign and a transfer to IVR campaign.
Campaign Task List
The following table lists the steps required to create an agent campaign, in the order that you need to perform these steps, and the location (in this document or in another Cisco document) of the instructions for the task. The primary difference in configuration steps between an agent campaign and a transfer to IVR campaign is that the agent campaign requires an agent reservation script, while the transfer to IVR campaign does not.
|
Step Number |
Task |
Where Discussed |
|---|---|---|
|
1 |
Create DN on MR client using IPCC DN tool. |
|
|
2 |
Create DN for Abandon to IVR on the CM PC for the SCCP Dialer, and on the MR PG for the SIP Dialer. |
|
|
3 |
Create DN for AMD to IVR. For the SCCP dialer you create this on the CM PG; for the SIP dialer you create this on the MR PG. |
|
|
4 |
Configure an Import Rule using the Outbound Option Import Rule tool. |
|
|
5 |
Configure Query Rules using the Outbound Option Query Rule tool. |
|
|
6 |
Configure a Campaign using the Outbound Option Campaign tool. |
|
|
7 |
Configure Call Type using IPCC Call Type tool. |
|
|
8 |
Configure Reservation Script using Script Editor. |
|
|
9 |
Configure transfer to IVR scripts for AMD and Abandon to IVR using Script Editor. |
|
|
10 |
Map Scripts to Call Types and DNs using AW Script Editor. |
|
|
11 |
Configure Administrative Script using Script Editor. |
|
|
12 (SCCP Dialer only) |
Configure CTI Route Points for Abandon and AMD to IVR. |
Cisco Unified Communications Manager Administration Guide |
Transfer to IVR Campaign Tasks
The following table lists the steps required to create a transfer to IVR campaign, in the order that you need to perform these steps, and the location (in this document or in another Cisco document) of the instructions for the task.
Step Number |
Task |
Where Discussed |
|---|---|---|
1 |
Create DN for Abandon to IVR. For the SCCP dialer you create this on the CM PG; for the SIP dialer you create this on the MR PG. |
|
2 |
Create DN for AMD to IVR. For the SCCP dialer you create this on the CM PG; for the SIP dialer you create this on the MR PG. |
|
3 |
Configure an Import Rule using the Outbound Option Import Rule tool. |
|
4 |
Configure Query Rules using the Outbound Option Query Rule tool. |
|
5 |
Configure a Campaign using the Outbound Option Campaign tool. |
|
6 |
Configure Call Type using IPCC Call Type tool. |
|
7 |
Configure transfer to IVR script using Script Editor. |
|
8 |
Map Scripts to Call Types and DNs using AW Script Editor. |
|
9 |
Configure Administrative Script using Script Editor. |
|
10 (SCCP Dialer only) |
Configure CTI Route Points for Abandon and AMD to IVR. |
Cisco Unified Communications Manager Administration Guide |
Configure Skill Group
Create Dialed Numbers
Before you configure an Outbound Option campaign, you need to create the dialed numbers to specify for certain fields on the Campaign Skill Group tab page. The following table lists these fields, the purpose for the dialed number to be created, and the routing client associated with that dialed number.
Campaign Skill Group Tab Field Name |
Purpose |
Associated Routing Client |
|---|---|---|
Dialed Number |
Dialed Number to reserve agents. Not applicable for Transfer to IVR campaigns. |
Configure on the MR routing clients for each Dialer. |
After AMD and for transfer to IVR |
Dialed Number for Transfer to IVR. |
For SIP Dialer, configure on the MR Peripheral PG. For SCCP Dialer, configure on the agent controller / PG. |
When no agents are available |
Dialed Number for Transfer to IVR. |
For SIP Dialer, configure on the MR Peripheral PG. For SCCP Dialer, configure on the agent controller / PG. |
For agent campaigns, create all three dialed numbers. For transfer to IVR campaigns, create the dialed numbers for the After AMD and for transfer to IVR field.
Perform the following steps to create these dialed numbers.
Configure Dialed Numbers
Configure at least two dialed numbers on the outbound routing client: one for the agent campaign and one for the VRU campaign. See the Cisco Packaged Contact Center Enterprise Administration and Configuration Guide at http://www.cisco.com/en/US/products/ps12586/tsd_products_support_series_home.html for information about configuring dialed numbers.
Create Import Rule
The Import Rule defines how Outbound Option:
- Locates the imported file and defines the name of the contact table into which the import process places the contact information.
- Recognizes and defines the contact list data in the imported file. The Import Rule defines the import format of the user contact list (fixed length, comma-delimited, or pipe delimited fields), and the information to be found in the fields of the file, such as the first and last names of contacts.
- Schedules updates for your calling lists imports.
There are two types of import rules in Outbound Option:
- Contact - An import rule that you create for a specific campaign. It is possible to have a single import rule with many contacts, and use query rules to separate those contacts into different campaigns.
- Do Not Call - An import rule, created once and applicable to all campaigns, that provides do-not-call information to all campaigns
Before you create an import rule, decide where you want Outbound Option to look for the import list.
Note | When you edit an existing import rule, changing the target table name creates a new table, but does not remove the old table. The old table remains in the database, but the system does not use it. |
When you import records, take note of the following:
-
The dialing rate/CPS is affected.
The "record fetch query performance" is also affected if you are importing huge number of records. The performance of the query impacts the call rate. Purge the contact list manually to maintain and ensure effective query performance.
Perform the following steps to create an import rule.
Note | If you edit an import rule, the changes that you make to that import rule take effect on the next import. |
Import Rule General Tab Page
Specify the following information on the Import Rule General tab page.
|
Field |
Description |
||
|---|---|---|---|
|
Import name (required) |
There is a 32-character limit. |
||
|
Enable option |
This option enables or disables importing for the import rule. |
||
|
Import type |
Select either Contact or Do_Not_Call from the drop-down list.
|
||
|
Target table name (required) |
If you selected Do_Not_Call as the import type, the Import Rule component automatically assigns it to the DoNotCall table. If you selected Contact as the import type, you can enter any name for the target table within the following restrictions: The name must be a maximum 32-character string, including alphanumeric characters, periods (.), underscores (_), and hyphens (-). Alphabetic characters can be upper- or lowercase. The name must begin with an alphanumeric character and must not contain spaces.
|
||
|
Import file path (required) |
Enter the directory path name for the import file. The maximum number of characters allowed is 255. Click Browse to the right of the Edit field to browse for the location. |
||
|
Import data type |
Select the Comma delimited, the Pipe delimited, or the Fixed-length setting, to indicate if the file is comma-delimited, pipe-delimited, or if it uses fixed-length columns to separate fields. |
||
|
Overwrite table |
When this option is enabled, you can overwrite the current import with a new import. When this option is disabled, new import data is appended to the existing data. You cannot append a new field to existing import data. Also, you cannot modify or remove existing fields.
|
Import Rule Definition Tab Page
Specify the following information on the Import Rule Definition tab page.
Imports
This section provides procedures for creating an import rule file, creating a Do Not Call list, and adding attributes for a contact list.
Import Procedure
Before you run an import, first create an import rule file that contains the data to be imported. This import rule can have a maximum of 1024 characters per row, and can be in one of three formats:
-
Comma Delimited - Each column's data is separated by a comma.
-
Fixed Format - Each column has a fixed character width as specified on the Definition tab of the Import rule tool. The number of characters in the entry for each column must exactly match the column definition. If the data for a field does not fill the specified width of the column, pad the entry with spaces to the defined character width.
-
Pipe Delimited - Each column's data is separated by a pipe.
Then, to run the import, specify information about that import in the Import Rule component:
-
On the General tab, specify attributes such as the Import Type (contact list or Do Not Call list), the directory path of the import file, and the format of the import file.
-
On the Definition tab, specify the import file fields that are to appear as columns in the import list. You can specify these fields only if you are creating a contact list. The Do Not Call list import type has fixed fields.
-
On the Schedule tab, specify the time that you want the import to start and how often you want the import to run.
When the import runs, the data is read and the import file is renamed so that it is not reimported. This allows you to read and review the import file (if necessary) to troubleshoot problems.
Create Do Not Call List
When creating a Do_Not_Call list file, format it correctly using the following instructions.
The following is an example of a Do_Not_Call list:
2225554444
2225556666
2225559999
To add a customer to this list, import a Do Not Call list.
The Campaign Manager reads the Do Not Call import files. Dialing List entries are marked as Do Not Call entries only when the Campaign Manager fetches the Dialing List entry and only when there is an exact, digit-for-digit match. This allows Do Not Call imports to happen while a Campaign is running without rebuilding the Dialing List.
Note | If the Dialing List includes a base number plus extension, this entry must match a Do Not Call entry for that same base number and same extension. The dialer will not dial the extension. |
When the Campaign Manager starts it automatically imports from the DoNotCall.restore file that is stored in the <drive>\icm\<instance>\la\bin directory. When reading Do Not Call import files, the Campaign Manager appends the data to the DoNotCall.restore file. This restore file allows recovery of Do Not Call records after the Campaign Manager stops unexpectedly or for planned maintenance, such as a Service Release installation.
The restore file can grow to approximately 1 GB if 60 million DNC records are imported, each having ten-digit numbers plus five-digit extensions. Sufficient disk space must be available on LoggerA to store the DoNotCall.restore file.
Note | To clear the Do Not Call list, import a blank file with the Overwrite table option enabled. |
Create Contact Import File
When creating a contact import file, observe the format you designed according to the database rules set up in Import Rule Definition Tab Page.
The following example assumes that you have contact information with AccountNumber, FirstName, LastName, and Phone column types.
The following is an example of a contact import file in the comma-delimited format:
6782,Henry,Martin,2225554444
3456,Michele,Smith,2225559999
4569,Walker,Evans,2225552000
6782Henry Martin 2225554444
3456Michele Smith 2225559999
4569Walker Evans 2225552000
Import Rule Schedule Tab Page
Specify the following information on the Import Rule Schedule tab page.
|
Field |
Description |
|---|---|
|
Schedule start time |
Enter or select the time when the process starts. Because the setting uses 12-hour time notation, be sure to select AM or PM. The time is based on the local time at the ICM Logger utility. The default is 9:00 AM. |
|
Weekly option |
Enable this option for the import rule process to execute on the same days each week. Enable the days of the week when you want the process to execute. Disable this option if you do not want the process to execute weekly. |
|
Monthly option |
Enable this option for the import rule process to execute on selected days each month. Enter the day of the month on which you want the process to execute. If you select a date that does not occur during a particular month, such as the 31st day of April, the import does not execute on that month. |
|
Start import when file is present option |
Enable this option to import a file as soon as it is copied into the specified location. The folder that you specify must have write permissions. Otherwise, import file copying and renaming cannot occur. The import process polls every second to see when the import file becomes available. After the file is available, the import begins immediately. |
|
Rename File After Import |
When selected, specifies that the import file is renamed by appending ".bak" to the filename after the import is complete. |
|
Delete File After Import |
When selected, specifies that the import file is deleted after the import is complete. |
Create a Query Rule
The Query Rule component defines the SQL rule that the Outbound Option Import process uses to build the dialing list for a particular campaign. Based on SQL queries to the database, the rule defines how the contact records from the Outbound Option database are selected to be inserted in the dialing list.
Perform the following steps to create a query rule.
Create a Campaign
Use the Outbound Option Campaign tool to define or modify the settings that apply to a campaign. You can also add or delete a campaign through this tool.
You can define two types of campaigns: agent-based, and transfer to VRU. However, only one campaign type can be configured per campaign.
Before you create a campaign, first configure the following information:
Perform the following steps to create a campaign.Campaign General Tab Page
Specify the following information on the Campaign General tab page.
|
Field |
Description |
||
|---|---|---|---|
|
Campaign Name (required) |
Maximum 32-character string, including alphanumeric characters, periods (.), and underscores (_). Alphabetic characters can be upper- or lowercase. The name must begin with an alphanumeric character. |
||
|
Description |
Optional description for the campaign; maximum 255 characters. |
||
|
Enable option |
This option enables or disables the campaign. |
||
|
Power Dialing Section |
|||
|
Lines per agent (required) |
The number of lines dedicated to each agent in this campaign. If this value and the Maximum lines per agent value are both set to 1, the mode defaults to Progressive. Default = 1.5 (Three lines for every two agents.) Allowable Range = 1 – 100 This value performs as follows in the Outbound Option dialing modes: |
||
|
Dialing Options Section |
|||
|
Maximum lines per agent (required) |
The upper bound for the number of customers the dialer dials for a reserved agent at a time when the campaign is running in predictive mode. Default = 2 Range = 1 – 100 |
||
|
Abandon calls limit (1-100) |
This option only applies to Predictive campaigns. Enable this option to set an Abandon calls limit (1-100) for the percentage of abandoned calls in this campaign. The granularity is to one-tenth of a percent. Default = 3.0.
|
||
|
Advanced |
Clicking the Advanced button opens a Predictive Dialing Settings dialog box. On this dialog box, you can change the following parameters that control how adjustments are made to the lines per agent in this campaign. Accept the default in most cases.
|
||
|
Dial Settings Section |
|||
|
No answer ring limit (2 to 10) |
Defines the number of times the software allows a dialed telephone number to ring. Enter the maximum number of rings allowed. The length of one ring is specified at the dialer level in the TimeToRingCustomer registry entry. Default = 4.
|
||
|
Maximum attempts (1 to 100) |
Defines the maximum number of attempts, including callbacks and retries. Enter the maximum number of attempts to be made in zone 1 and zone 2. Default = 3. Increasing the number of attempts causes closed records to be reopened, which can result in slower performance. Modifying this parameter while the campaign is in progress can result in longer agent idle times and delays to retrieve records from the dialing list. |
||
|
Abandoned call wait time (0 to 10) (required) |
Minimum duration (in seconds) of an outbound call. If the duration of an outbound call is less than this specified value, Outbound Option considers the call as customer abandoned, and the customer record that is associated with that call is scheduled for a retry. To disable this feature, set this value to 0. Enter the number of seconds. Default = 1. If this feature is disabled, then Outbound Option does not consider this call as customer abandoned. It affects the reporting of this call in the Outbound Option dialer_detail table. |
||
|
Campaign Prefix Digits |
Digits to be prefixed to each customer number dialed from this campaign. For the SIP Dialer, this field represents the phone number that is advertised as the calling number for the campaign. Enter a maximum of 15 digits in this field. |
||
|
Retries Section |
|||
|
No answer delay |
Defines (in minutes) how often the software waits before calling back a no-answer call. Enter the number of minutes. Default = 60. |
||
|
Busy signal delay |
Defines (in minutes) how long the software waits before calling back a busy telephone number. Enter the number of minutes. Default = 60. |
||
|
Customer abandoned delay |
If a customer abandons a call, the time (delay in minutes) before the dialer calls the customer back. Default = 30. |
||
|
Dialer abandoned delay |
If the dialer abandons a call, the time (delay in minutes) before the dialer calls the customer back. Default = 60. |
||
|
Answering machine delay |
If an answering machine answers the call, how long the software waits (in minutes) before calling back. Default = 60. |
||
|
Customer not home delay |
If the customer was not at home and should be called back, the time (in minutes) before the dialer calls the customer back. Default = 60. |
||
|
Callback Settings Section |
|||
|
Personalized callback |
Enables the personal callback option. This option allows an agent to schedule a callback to a customer for a particular date and time, which connects the customer to the agent they originally spoke to at the time the customer requested. |
||
|
Reschedule callback mode (required) |
Determines how Outbound Option handles the personal callback if the agent is not available: |
||
|
Campaign Prefix Digits |
Digits to be prefixed to each customer number dialed from this campaign. This field represents the phone number that is advertised as the calling number for the campaign. Enter a maximum of 15 digits in this field. |
||
Modification of Maximum Number of Attempts in a Campaign
You can recall customers who were previously not reached without having to import their phone numbers again by increasing the maximum number of attempts amount in the Maximum attempts field on the Campaign General tab page This option is useful if the campaign import is an append type instead of an overwrite type.
Note | Do not update the Maximum attempts field while the campaign is in progress. Modifying this option in the campaign configuration results in an update of all customer records that were not successfully contacted. The Campaign Manager can update only about 20 records per second, and no new customer records are delivered to the dialer for this campaign while this update is in progress. |
You can view how many records have been closed and how many were successfully reached by using the Call Summary Count per Campaign Real Time report. See Reports for more information.
Parameter Tuning
The Voice Calls Per Adjustment and Gain parameters are settings in the Advanced Users configuration tab used to control the way the predictive dialing behaves. Do not modify the default values unless you understand the parameters and the possible risks incurred when changing the pacing.
-
The Voice Calls Per Adjustment parameter is a count of the number of live voice connections that are required to trigger a correction. (The default value is 70 voice calls.) If the abandon rate exceeds the target by a significant margin, the dialer can make corrections before collecting 70 calls.
-
The Gain parameter controls the size of the Lines per agent corrections.
Setting the Voice Calls Per Adjustment parameter to a smaller setting leads to larger fluctuations in the measured Abandon Rate because the sample size is less significant. This results in less change in the Lines per agent value over time.
 Caution | Be careful when modifying both parameters (Gain and Voice Calls Per Adjustment) at the same time. For example, increasing the Gain while decreasing the Voice Calls Per Adjustment results in larger changes in the "Lines per agent correction rate," which might overcorrect changes in measured values. Decreasing the Gain while increasing the Voice Calls Per Adjustment can similarly cause too slow of a change to underlying changes in the hit-and-abandon-rates. A campaign that is reaching more than 20 live voice customers every minute (600 per half hour) might benefit from reducing the Gain, but a lower Gain becomes less effective as the number of agents in the campaign dwindles or the hit rate changes rapidly. |
Campaign Purpose Tab Page
Specify the following information on the Campaign Purpose tab page.
Note | You cannot configure both Agent Based campaigns and Transfer to VRU campaigns at the same time. |
|
Field |
Description |
||||
|---|---|---|---|---|---|
|
Agent Based Campaign |
|||||
|
Agent Based Campaign |
This type of campaign uses an outbound mode that causes the dialer to transfer every customer call that is associated with a specific skill group to an agent. |
||||
|
Enable IP AMD |
Selecting this option enables answering machine detection for the IP dialers in the system only. If this option is enabled, when the dialer detects an answering machine, it performs one of the following actions. (Default = Enabled.)
|
||||
|
Call Progress Analysis |
If this option is disabled, all Call Progress Analysis for all calls made from this dialer is disabled on a campaign-by-campaign basis, including voice detection, fax/modem detection, and answering machine detection. (Default = Disabled.) If Call Progress Analysis is enabled, specify the Record CPA parameter. The Gateway provides a media stream and the dialer records .wav files. This parameter improves Call Progress Analysis performance.
|
||||
|
Transfer to IVR Campaign |
|||||
|
Transfer to IVR Campaign |
This type of campaign uses an outbound mode that causes the dialer to transfer every customer call that is associated with a specific skill group to a service control-based VRU instead of an agent. This feature allows a contact center to run unassisted outbound campaigns using prerecorded messages in the VRU. |
||||
|
Enable IP AMD |
Selecting this option enables answering machine detection for the IP dialers in the system only. If this option is enabled, when the dialer detects an answering machine, it does one of the following actions. (Default = Enabled.)
|
||||
|
Call Progress Analysis Parameters |
|||||
|
Minimum Silence Period (100-1000) |
Minimum silence period required to classify a call as voice detected. If many answering machine calls are being passed through to agents as voice, then increasing this value accounts for longer pauses in answering machine greetings. Default is 608. |
||||
|
Analysis Period (1000-10000) |
Number of milliseconds spent analyzing this call. If there is a short agent greeting on an answering machine, then a longer value here categorizes that answering machine call as voice. If the call is to a business where the operator has a longer scripted greeting, a shorter value here categorizes the long, live greeting as answering machine. Default is 2500. |
||||
|
Minimum Valid Speech (50-500) |
Minimum number of milliseconds of voice required to qualify a call as voice detected. Default is 112. |
||||
|
Maximum Analysis Time (1000-10000) |
Maximum number of milliseconds allowed for analysis before identifying a problem analysis as dead air/low volume. Default is 3000. |
||||
|
Maximum Termination Tone Analysis (1000-60000) |
Maximum milliseconds the dialer analyzes an answering machine voice message looking for a termination tone. If the message has an odd tone and the analysis does not recognize it, the call is not transferred or dropped until this timeout occurs. Default is 30000. |
||||
|
Reset to System Default |
Resets all items in the Call Progress Analysis (CPA) Parameters section to the system defaults. |
||||
Query Rule Selection Tab Page
Press the Add button on the Query Rule Selection tab page and specify the following information.
|
Field |
Description |
|---|---|
|
Query rule name |
The name of the query rule. |
|
Enable |
Enables the query rule for this campaign. Default = Enabled. |
|
Start time |
The local time at the ICM Central Controller when a query rule can begin to execute. |
|
End time |
The local time at the ICM Central Controller when a query rule must stop executing. |
|
Penetration (0-400): |
The maximum number of calls that this campaign tries during a query rule execution; for example, 400 contact attempts. When a query rule reaches the penetration number, it stops executing and the next query rule in the list begins to execute. Default = 100. If this option is enabled, Duration and Hit Rate are disabled. |
|
Duration (0-120): |
The total amount of time that this query rule can run; for example, 30 minutes. When the query rule reaches the time limit, it stops executing and the next query rule in the list can begin to execute. Default = 30. If this option is enabled, Penetration and Hit Rate are disabled. |
|
Hit Rate (0-100): |
The minimum percentage of calls that can be answered (excluding answers by answering machines) during this query rule execution; for example, 30 percent. If the hit rate drops below this value, the next query rule begins to execute. Default = 30. If this option that is enabled, Duration and Penetration are disabled. |
Skill Group Selection Tab Page
From the Skill Group Selection tab page, press Add to display the fields available to fill out.
|
Field |
Description |
|---|---|
|
Filter |
|
|
Peripheral |
The name of the Peripheral to which the Skill Groups assigned to this campaign are configured. Click Add in the Skill Group Selection tab to display a pop-up window listing the configured Peripherals. |
|
Skill Group Condition |
Select the condition for filtering the skill groups associated with the selected peripheral, and then click Retrieve.
|
|
Value |
The entry in this field is based on the selections made in the Skill Group Condition field. If None is selected, this field is ignored. |
|
Retrieve |
Click this button to retrieve and display data based on the Peripheral, Skill Group Condition, and Value filters. |
|
Skill Group |
The name of the skill group assigned to this campaign. |
|
Overflow Agents per Dialer (0-100) |
This setting can be useful for Progressive campaigns to reduce the abandon rate at the cost of increasing agent idle times. This setting ensures that there is always at least one extra agent reserved before it begins dialing. When this setting is set to 1, at least two agents must be reserved before the dialer begins dialing. The intention is to increase the odds that an agent is available when two or more customers answer, which increases agent idle times while decreasing the abandon rate. |
|
Dialed number |
The digits that are dialed to reserve an agent in the configured skill group. The Dialed Number allows only alphanumeric and (.)and (_)as valid characters; there is a ten-character limitation. It does not allow special characters like *,@, # ... , which are unacceptable for this dialed number. A matching dialed number also must be created. |
|
Records to cache (1-400) |
The minimum number of dialing numbers that each dialer caches for each of the Outbound Option skill groups. Default = 1. This value cannot exceed 400 records. |
|
Number of IVR Ports |
The total number of IVR ports allocated for the specific skill group. This value indicates how many ports are available for the dialer to transfer customer calls. Since this value indicates the total number of ports supported by the IVR for the current skill group, multiple skill groups can make transfer to IVR calls. They also use one IVR to play different messages based on the route point where the contact is transferred. If there are multiple dialers associated with this skill group, each dialer dials a fraction of the total number of ports. |
|
Route Points for Transferring to an IVR |
|
|
After AMD and for transfer to IVR campaigns |
If the campaign is a Transfer to IVR campaign or is configured to transfer AMD calls to an IVR, this number indicates the route point required to execute the transfer to IVR routing script. This number must coincide with a route point configured on Unified CM and be assigned to the PGUser. Contacts are transferred to this route point, which points to a routing script. This script transfers the call to an IVR. The maximum length is 32 characters. |
|
When no agents are available |
If the campaign is a Transfer to IVR campaign or is configured to transfer AMD calls to an IVR, this number enables the Dialer to play a message to any calls about to be disconnected due to lack of available agents. This number must coincide with a route point configured on Unified CM and be assigned to the agent PG's CTI application (for example, PGUser). Contacts are transferred to this route point, which points to a routing script. This script transfers the call to an IVR. The maximum length is 10 characters. |
|
Pagination |
|
|
Page |
Enter a page number to display a page of retrieved skill groups. |
|
Forward |
Enabled when a retrieve operation retrieves more than 100 skill groups. Click to display the next 100 skill groups. |
|
Reverse |
Enabled when a retrieve operation retrieves more than 100 skill groups from the ICM database. Click to display the previous 100. |
|
Of |
Displays the total number of skill groups retrieved. |
Call Target Tab
Specify the following information on the Call Target tab.
|
Field |
Description |
||
|---|---|---|---|
|
Daylight Savings Zone |
Describes the default time zone to use for any numbers dialed which do not map to the Outbound Option region prefixes. |
||
|
Zone 1 and Zone 2 options |
Enable this option, and then enter the start and end times for reaching your calling targets. Zones are useful for distinguishing phone locations. For example, Zone 1 can be designated as work, and Zone 2 can be home.
|
||
|
Numbers to dial |
Lists the phone numbers in dialing order for the Zone 1 or Zone 2.
|
||
|
Available numbers |
Contains the available phone numbers that can be added to the Numbers to dial list for Zone 1 or Zone 2. |
Notes on Editing a Campaign in Progress
You can edit most campaign configuration settings while a campaign is running. The changes take effect with new calls after the setting has been changed. However, do not edit the following settings while a campaign is in progress:
Create an Enterprise Skill Group
To use the Personal Callback feature, create the enterprise skill group for the agent using the Enterprise Skill Group List tool.
Create an Enterprise Route
After you create the enterprise skill group for the agent, create an enterprise route. This route targets the enterprise skill group.
Create a Call Type
The dialed numbers and routing scripts that you create reference call types, so you should create them as needed. For example, you can create one call type for an agent campaign and another for a VRU campaign. You associate the call types with the dialed numbers you create.
For more information about using call types, see Scripting and Media Routing Guide for Cisco Unified ICM/Contact Center Enterprise and Hosted
Perform the following steps to create the call type that the routing scripts you create will reference.
Outbound Option Scripting
Outbound Option uses Unified CCE scripting configured on the Administrative Workstation to manage campaigns.
There are two types of scripts:
Outbound Option Administrative Scripts
Outbound Option administrative scripts enable, disable, or throttle campaign skill groups for outbound campaigns. The scripts can also automatically close out a skill group for a specific campaign based on time or any other conditional factor that the administrative script can access. This scripting is performed at the skill group level to provide more flexibility when managing larger campaigns that are distributed across multiple skill groups.
Enable a campaign skill group by setting the campaign mode to one of the available modes: Preview, Direct Preview, Progressive, or Predictive. (For more information about these modes, see Dialing Modes.) Schedule an administrative script to run at regular intervals. Disable the campaign skill group in the administrative script by creating a script node to change the campaign mode to inbound for that skill group.
You can also use this script to control the percentage of agents to be used in a campaign skill group and whether this skill group is used for other campaigns or inbound calls.
Note | An administrative script controls a campaign skill group. A campaign skill group can be mapped only to one campaign at a time. A skill group can be reused if new campaigns are added. If a campaign skill group is recycled, reuse its administrative scripting as well. However, note that although it is possible to have two administrative scripts controlling the same skill group, conflicting campaign mode requests for Outbound Option can result. |
Outbound Option Agent Reservation Scripts
Two types of routing scripts are described later in this document. One is for Agent Campaign and one is for VRU Campaign.
The Dialer uses Reservation scripts to reserve agents for specific outbound campaigns and personal callbacks. With this type of script, the Dialer makes a route request via its Media Routing Client using the dialed number that is configured for the campaign skill group. Each campaign has its own dialed number and reservation scripting. If an agent is not available, the default behavior is for the script to end the call and the Dialer receives an error. The Dialer retries the reservation request when it sees available agents in the skill group statistics as described in the Dialer description earlier in this chapter. You can queue reservation calls which have scripts that distribute agents across campaigns when those agents are skilled for multiple, active campaigns.
A call can be transferred to a VRU as part of a transfer to VRU campaign, or transferred to non-VRU campaigns for answering machine or abandons. A transfer to VRU campaign places a route request call to a CTI Route Point dialed number on the Agent PG, which enables the call context of the customer call to be transferred to the VRU. A new call context can be added to the call while the call is being treated at the VRU.
Set Up Reservation Script
Use the Script Editor application to create a reservation script that uses the dialed number for the Outbound Routing Type and routes through a Select node to the previously configured skill group.
Script for Agent Campaign
The following steps and accompanying diagram provide an example of how to create a script for an agent campaign.
 For information on configuring a personal callback, see (Optional) Configure Personal Callbacks |
Configure a Transfer to VRU Script
Note |
|
Perform the following steps to configure Outbound Transfer to VRU.
| Step 1 | Use the Script Editor to create a Transfer to VRU script that includes Translation
Route to VRU, Queue to Skill Group, Run Ext. Script, and Set Variable nodes. The following
diagram illustrates an example. 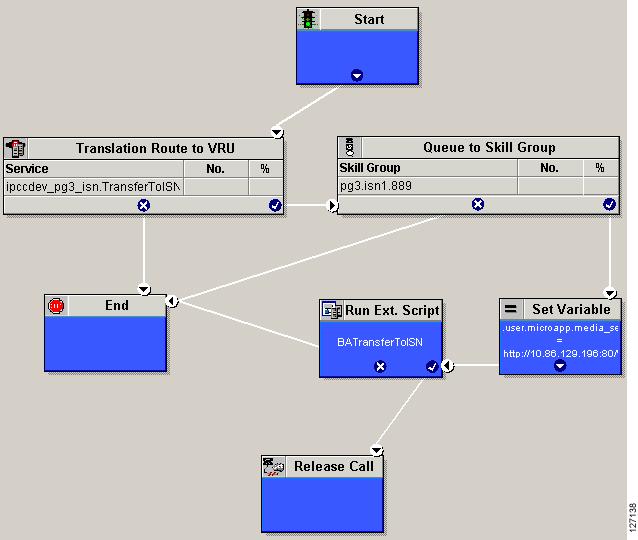
| ||
| Step 2 | To implement answering machine detection as part of this transfer to VRU
script, include an IF node that evaluates the value of the BAResponse variable and prescribes
a call treatment depending on the CPA result of the call (whether the call detected
voice or an answering machine). The following is an example of such an If node. 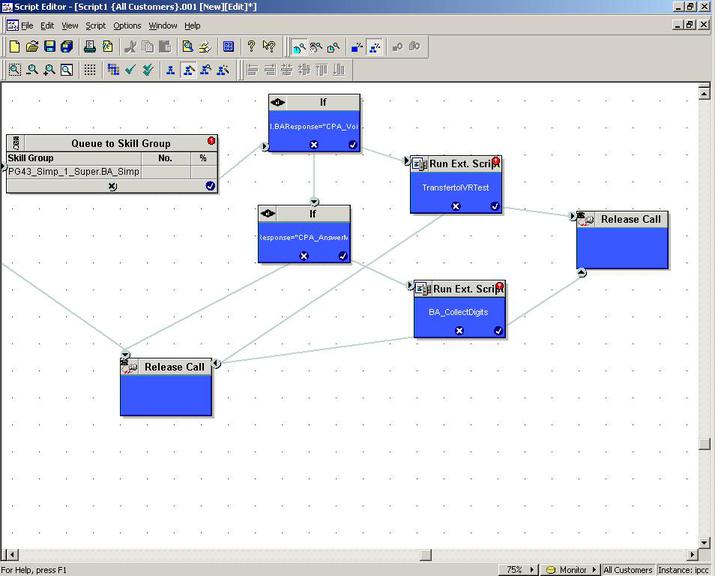 | ||
| Step 3 | Create a VRU script. (Be aware that this script is different from a reservation script.) The VRU script contains a list of commands that tell the VRU what type of information to play to the customer, such as a prerecorded message using a .wav file. The VRU script can also collect survey information by requesting the customer press specific numbers. Consult your Unified CVP, IP/IVR, or documentation for your other third-party VRU for more information. | ||
| Step 4 | Schedule the script by following the procedure in Map Scripts, Call Types, and Dialed Numbers. |
Set Up Administrative Script
Use the Script Editor application to create an administrative script for each skill group to set the OutboundControl variable and the skill group reservation percentage. The Outbound Option Dialer uses the value of this variable to determine which mode each skill group uses.
Note |
|
Perform the following steps to create the administrative script:
| Step 1 | Open the Script Editor application. | ||||||||||||||
| Step 2 | Select . | ||||||||||||||
| Step 3 | Create an administrative script. One script can be used to control all Outbound Option skill groups or multiple scripts can control multiple Outbound Option skill groups. For example, if you want to control skill groups at different times of the day, you need multiple administrative scripts; however, if you are going to initialize the groups all in the same way, you need only one script with multiple Set nodes. | ||||||||||||||
| Step 4 | Set up the script with the following nodes (required): Start, Set
Variable, End, and If.
The following diagram displays a simple administrative script where both the OutboundControl variable and the outbound percentage are set for a skill group. A script in a production call center would typically be more complex, perhaps changing these variables due to time of day or service level. 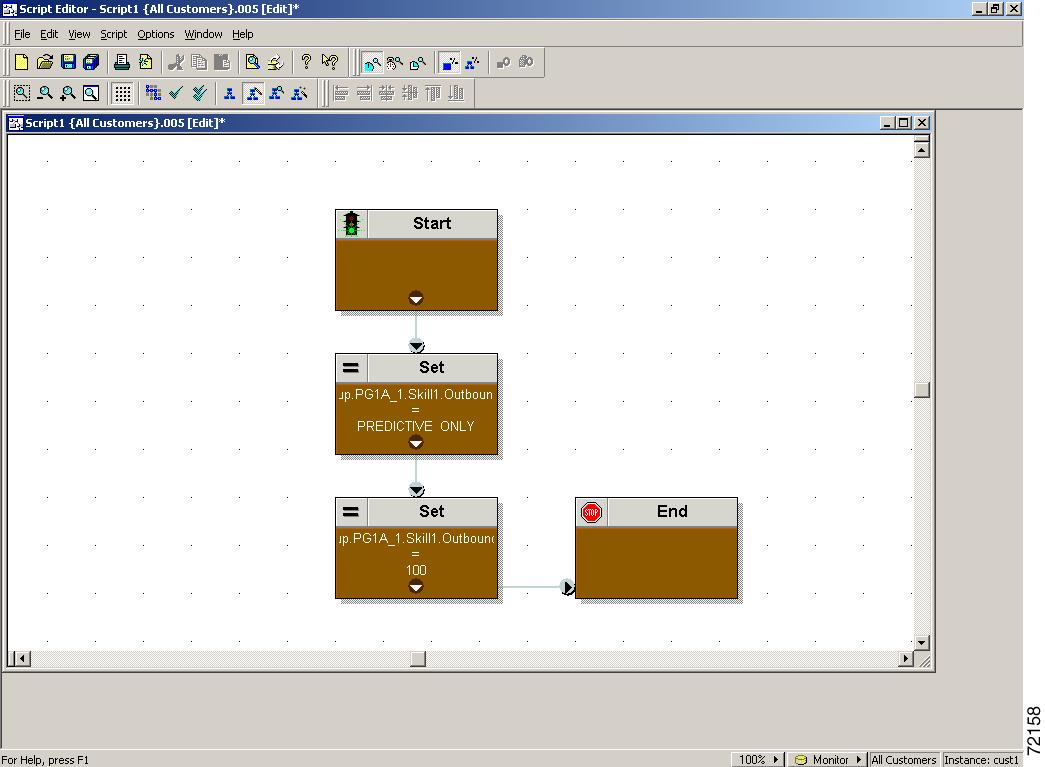
| ||||||||||||||
| Step 5 | Set the OutboundControl variable. Setting this variable enables
contact center managers to control the agent mode. Set this variable to one of
the values listed in the following table.
| ||||||||||||||
| Step 6 | Set the OutboundPercent variable in the same administrative
script; for example, select the OutboundPercent variable in the Set Properties
window and enter the agent percentage in the Value field. This variable
controls the percentage of agents, which are logged in to a particular skill
group, used for outbound dialing. For example, if there are 100 agents
logged in to a skill group, and the OutboundPercent variable is set to 50%, 50
agents would be allocated for outbound dialing for this campaign skill group.
This set up allows the rest of the agents to be used for inbound or other active
campaigns.
The default is 100%.
| ||||||||||||||
| Step 7 | Schedule the script.
|
Sample Administrative Scripts
The following section describes a sample administrative script.
Administrative Script: TimeBasedControl
The following figure is a simple example of setting skill group modes for maximizing the resource utilization in a call center based on time of day.
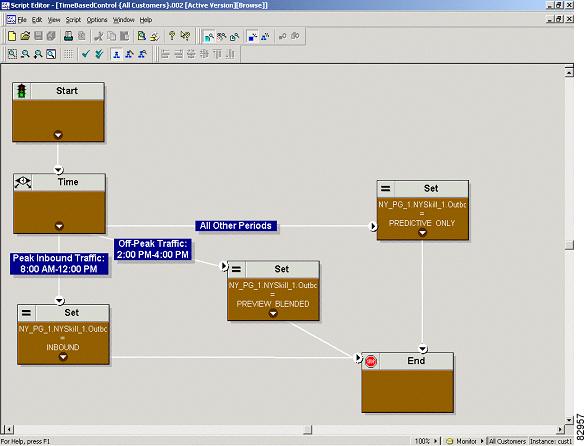
This script divides the day into three parts:
Peak Inbound Traffic Period (8:00 AM to 12:00 PM): During this time, the skill group variable is set to INBOUND only, because more agents are required to handle inbound calls.
Off-Peak Traffic Period (2:00PM to 4:00PM): During this time, the skill group variable is set to PREVIEW_BLENDED, so that when an agent is not on an inbound call, Outbound Option presents the agent with Preview calls. While the agent is reviewing the calls and when the agent is on a Preview outbound call, Unified ICM software does not route an inbound call to that agent. As soon as the agent is finished with the Preview call, Unified ICM software routes an inbound call to the agent. If there are no inbound calls, Outbound Option reserves the agent for another outbound call.
All Other Periods: For the rest of the day, the skill group variable is set to PREDICTIVE_ONLY so that if any agents are logged-in, Outbound Option immediately reserves the agents for outbound calls.
Map Scripts, Call Types, and Dialed Numbers
After you create a reservation script, associate that script with the call type and dialed number configured for the campaign. To make the association, perform the following steps.
Configure Translation Route for Use with SIP Dialer
Configure the translation route for the transfer-to-IVR campaign or the agent campaign to transfer a connected outbound call with ECC call variables from the SIP Dialer to a VRU Peripheral.
You need configure the network VRU as Type 2 for IP IVR, or as Type 10 for CVP.
For more information about configuring the translation routes, see Configuration Guide for Cisco Unified ICM/Contact Center Enterprise & Hosted (available at http://www.cisco.com/en/US/products/sw/custcosw/ps1844/products_installation_and_configuration_guides_list.html) and the Campaign Manager online help.
Multi-Tenant Customer Instances Configuration
Outbound Option Multi-Tenant is no longer supported beginning with Release 9.0(1).
SIP Dialer Recording Parameters Configuration
When recording is enabled in a campaign on the SIP dialer, the number of recording files that result can be large. The following table lists registry settings that you can adjust to regulate the number of recording sessions and the maximum recording file size.
|
Registry Setting |
Default Setting |
Description |
|---|---|---|
|
MaxAllRecordFiles |
500,000,000 |
The maximum recording file size (in bytes) of all recording files. per SIP Dialer. |
|
MaxMediaTerminationSessions |
200 |
The maximum number of media termination sessions per SIP Dialer if recording is enabled in the Campaign configuration. |
|
MaxPurgeRecordFiles |
100,000,000 |
The maximum recording file size (in bytes) that the SIP Dialer deletes when the total recording file size, MaxAllRecordFiles, is reached. |
|
MaxRecordingSessions |
100 |
The maximum number of recording sessions per SIP Dialer if recording is enabled in the Campaign configuration. |
Recording files are in the HKEY_LOCAL_MACHINE\SOFTWARE\Cisco Systems, Inc.\ICM\<customer instance>\Dialer directory.
Note | Only the G.711 codec is supported for recording. To record outbound calls, configure the G.711 on the voice gateway. |
Verification of Dialed NumberDN/Script Selector Configuration
Outbound Option places agents in the Reserved state before using them for an outbound call. The dialer uses the dialed number to route to an agent. The following procedure describes how to verify that this mechanism works properly.
Verify DN/Script Selector Configuration
When an Outbound Option Dialer is installed in a Unified CCE environment, the dialer uses the dialed number to make routing requests through the Media Routing (MR) Peripheral Gateway. The following verification steps assume that you have completed all the applicable configuration and reservation script generation.
| Step 1 | Log in an agent to a skill group participating in an outbound campaign, and make the agent available. (Note the dialed number, which was configured in the Skill Group Selection tab in the Campaign component.) If a different dialed number is used for predictive and preview calls, make sure to verify both dialed numbers. |
| Step 2 | Run the Script Editor application and select the Call Tracer utility from the menu. Select the routing client that is associated with the MR PG and select the Dialed Number. |
| Step 3 | Press Send Call to simulate a route request and note the results. If a label was returned for the agent who was logged in above, the reservation script is working properly and the dialer can reserve agents through this script. |
 Feedback