Database Integration

Database Integration

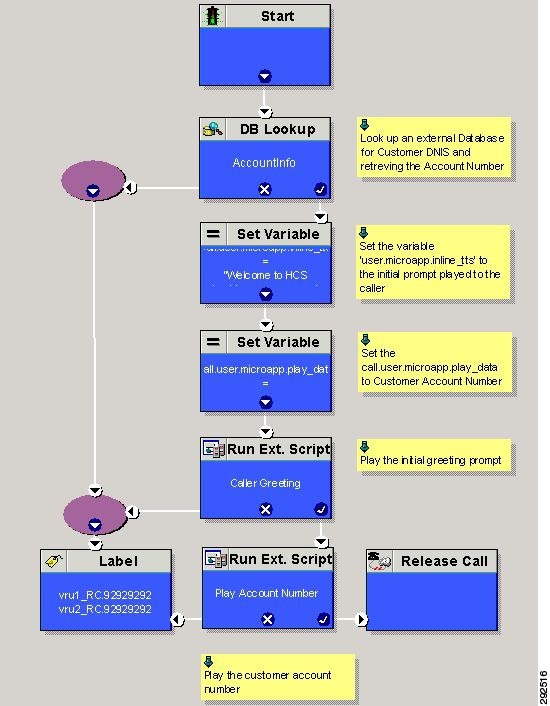
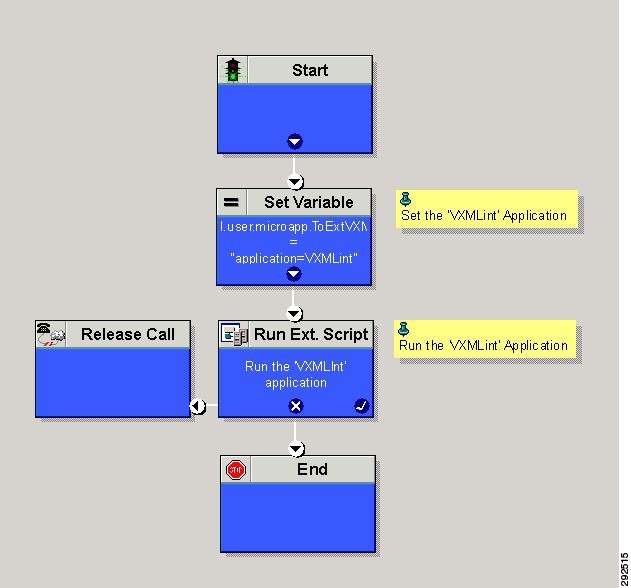
You can integrate your contact center with an external database. Database integration provides create, update, and retrieve operations on tables in the external database. Database integration uses the Database Element in the CVP Call Studio.

Configure Database Integration

Configure Unified CCE

Configure ICM Database Lookup

Complete the following procedure to configure ICM Database Lookup.

Procedure

Step 1

Select Enable Database Routing in Router options to edit Router setup for database lookup changes.

Step 2

Configure Database Lookup explorer:

  1. Click Start > All programs > Cisco Unified CCE Tools > Administration Tools > Configuration Manager.

  2. Open Tools > Explorer Tools > Database Lookup Explorer.

  3. Configure Script Table and Script Table Column as shown in the following example:

    Script Table:

    Name: AccountInfo

    Side A: \\dblookup1\DBLookup.AccountInfo

    Side B: <Update Side B of database here>

    Description: <Provide description here>

    dblookup1 is external database server name, DBLookup is external database name, and AccountInfo is the table name.

    Script Table Column:

    Column name: AccountNo

    Description: <Provide description here>

Step 3

Configure the following to change the registry settings in Unified CCE:

  1. Navigate to HKEY_LOCAL_MACHINE > SOFTWARE > Cisco Systems, Inc. > ICM > <Instance Name> > RouterA > Router > CurrentVersion > Configuration > Database registry.

    Instance Name is the name of the Instance that is configured.

  2. Set the SQLLogin registry key as shown in the following example:

    Example:
    \\dblookup1\DBLookup=(sa,sa)

Where DBLookup is the external database name and (sa,sa) are the SQL server authentication.

Step 4

Create the ICM script with the database lookup node with the respective table and lookup value.

The following figure shows AccountInfo as the table name and Call.CallingLineID as the lookup value.

Figure 1. Example ICM Database Look Up

Configure Unified CVP

Configure VXML Database Element

You need to configure Java Database Connectivity (JDBC) for VXML Database Element configuration.

Complete the following procedures for JDBC configuration:

Install JDBC driver

Complete the following procedure to install the JDBC driver:

Procedure

Step 1

Download the .exe file for Microsoft JDBC Driver for SQL Server

Example:
1033\sqljdbc_3.0.1301.101_enu.exe
Step 2

Run the executable and install the .exe file in the location C:\temp\

Step 3

Copy the file C:\temp\sqljdbc_3.0\enu\sqljdbc4.jar to the Unified CVP VXML servers' folder C:\Cisco\CVP\VXMLServer\Tomcat\common\lib


Add JNDI Context

Complete the following procedure to add the Java Naming and Directory Interface (JNDI) context configuration:

Procedure

Step 1

Go to the context.xml file located at C:\Cisco\CVP\VXMLServer\Tomcat\conf\context.xml file.

Step 2

Enter the JNDI name, SQL server address, SQL database name, username and password.

The following is an example of the SQL authentication context.xml file:

<Context>

<WatchedResource>WEB-INF/web.xml</WatchedResource>

<Manager pathname="" />

<Resource name="jdbc/dblookup"

auth="Container"

type="javax.sql.DataSource"

DriverClassName="com.microsoft.sqlserver.jdbc.SQLServerDriver"

url="jdbc:sqlserver://<dblookupnode_ipaddress>:1433;databaseName=DBLookup;user=sa;password=sa"

>

</Context>

Step 3

Perform following steps to restart VXML server services:

  1. Goto Run window and enter services.msc command.

  2. Select Cisco CVP VXML Server option.

  3. Right-click and select Restart option.


Configure VXML Studio Script

Complete the following procedure to configure the VXML studio script:

Procedure

Step 1

Configure the following to create the VXML application with the database element.

  1. Select single under Type.

  2. Enter the database lookup name in JNDI Name.

  3. Query SQL:

    For example, select AccountNo from AccountInfo where CustomerNo = {CallData.ANI}

    Where AccountNo - Value to be retrieved

    AccountInfo - Table name

    CustomerNo - condition to be queried

    Data:

    Create a database element with the following values:

    Name - AccountNo

    Value - {Data.Element.Database_01.AccountNo}

Step 2

Deploy the script to the local computer or to the remote computer (VXML call server directly) to create CVP Subdialog return element.

Step 3

If you saved this to the local machine, copy the whole folder to the following location:

<Install dir>:\Cisco\CVP\VXMLServer\applications and deploy it using deployApp windows batch file located inside the admin folder of applications.


Create ICM Script

Create an ICM script similar to the one shown in the following figure:

Figure 2. Sample Script with ICM database Lookup