Security

Security


Note


Operating system (OS) security configurations and host hardening are the responsibility of the deployment team. CIS hardening of the deployed image and the application of OS security patches are mandatory for maintaining the security posture of the reverse proxy. However, these tasks are not included as part of this deployment.


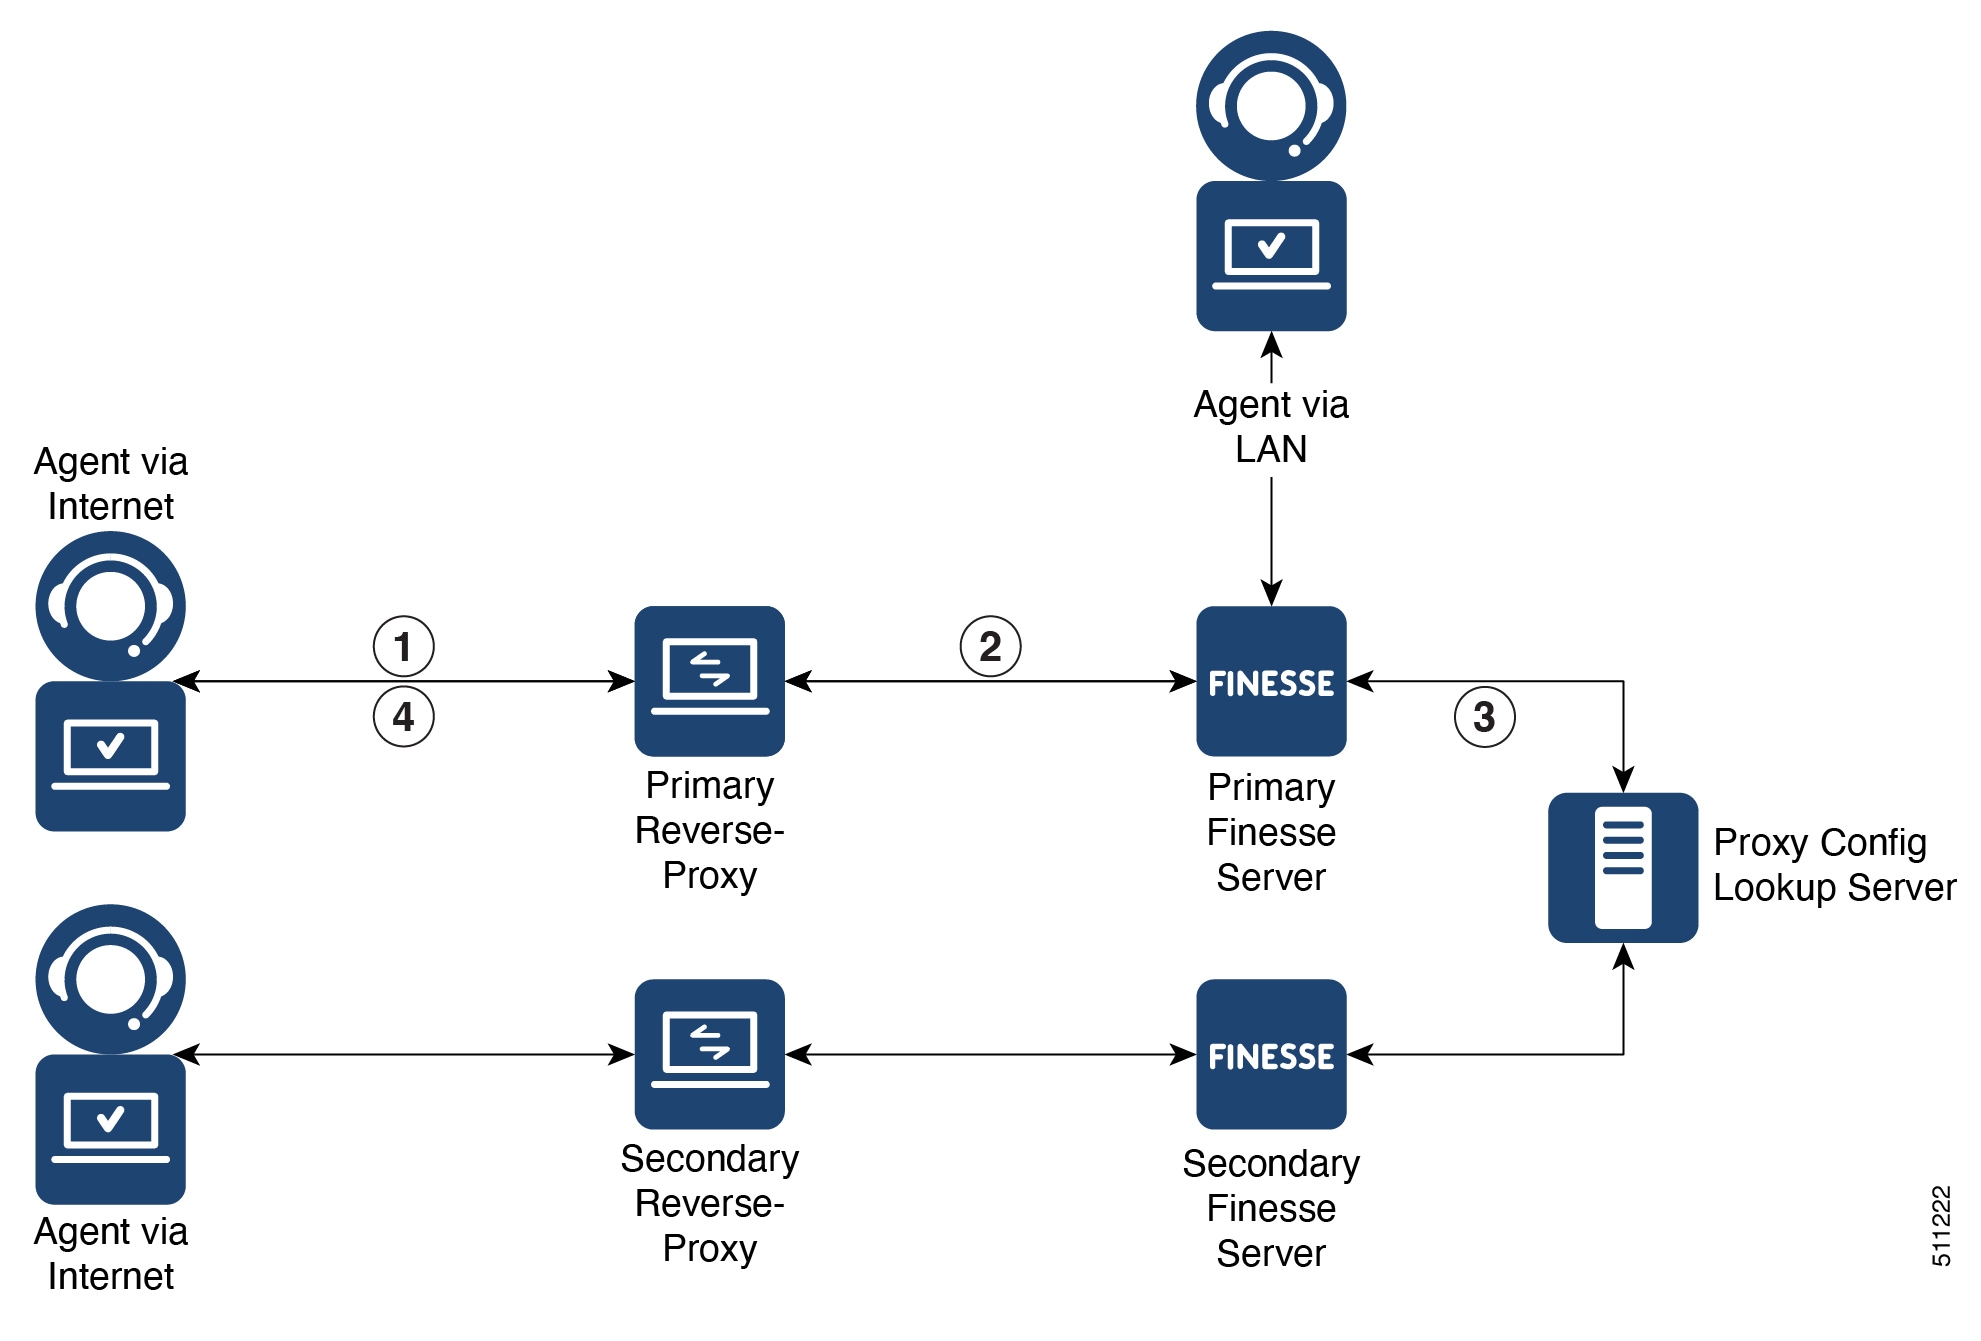
The primary security feature provided by the Reverse Proxy Installer is to authenticate all requests and connections at the edge, ensuring that fraudulent requests do not reach the upstream server and threaten the deployment.

In addition to authentication, the Reverse Proxy Installer automates several essential and mandatory security configurations that are typically tedious to apply and validate. Therefore, the Reverse Proxy Installer is pre-configured to apply iptables and SELinux security rules, and basic kernel configurations for performance and security.

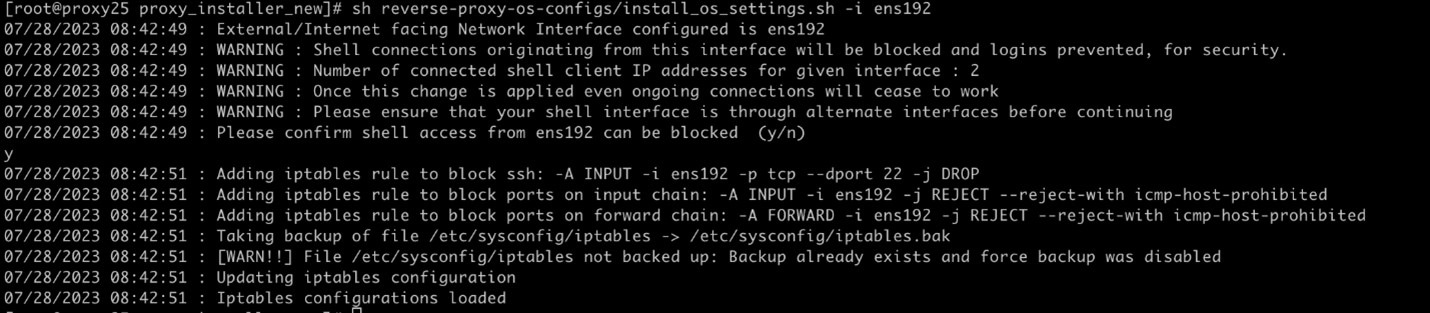
The administrator must enable some of these configurations using the included CLI tool (install_os_settings.sh script) . For details on using the script, refer to Configure Host Operating System.

The following sections describe the security configurations in detail, how they work, configurations it involve, and the troubelshooting steps as appropriate.

Authentication


Note


Authentication isn’t enabled for Digital Channel requests accepted by the proxy.


Proxy supports the authentication at the Edge. Authentication is supported for Single Sign-On (SSO) and Non-SSO deployments. For all requests and protocols that are accepted at the proxy, authentication is enforced before they are forwarded to the respective component servers (Cisco Finesse, Live Data, Cisco Unified Intelligence Center, and Cisco IM&P).

Requests that do not require authentication, such as static files and images, are configured to be served by the reverse-proxy from its cache.

The authentication is enforced by the component servers locally. All authentication uses the common Finesse sign-in credentials to authenticate the requests. Persistent connections, such as websockets which rely on application protocols such as Extensible Messaging and Presence Protocol (XMPP) for authentication, the connections are authenticated at the proxy by validating the IP address. Connections from an IP address are allowed only if there’s a successful application authentication made from the IP address, before initiating the websocket connection.

Non-SSO

Non-SSO authentication does not require any extra component configurations and will work along with the Nginx authentication scripts provided with the corresponding ES release.

The list of valid users is cached at the proxy locally (updated every 15 minutes), which is used to validate the user in a request. User credentials are validated by forwarding the request to the configured Finesse URI and thereafter the credential hash is cached locally (every 15 minutes) to authenticate new requests locally. Any change in the username or password will take effect only after 15 minutes.

The following figure illustrates the sequence of non-SSO authentication, followed by a step-by-step description:

Figure 1. Non-SSO Authentication

SSO

The Reverse Proxy Installer supports the Unified CCE SSO authentication provided by the Cisco Identity Service (IdS).


Note


SSO authentication support by Cisco Unified Communications Manager is different and is not supported by the proxy.


Cisco Identity Service 12.6(1)

SSO authentication using Cisco IdS 12.6(1) requires the administrator to configure the IdS token encryption key at the Nginx server within the configuration file. The IdS token encryption key can be obtained from the IdS server using the show ids secret CLI command. For the SSO authentication to work, the key has to be configured as part of the core.env (NGX_JWT_SECRET option) file that the administrator has to perform in the scripts.

Cisco Identity Service 12.6(2)

SSO authentication mechanism provided by Cisco IdS 12.6(2) and later, has shifted to an asymmetric token key mechanism, which uses self contained tokens that can be validated by a public key.

Once the reverse proxy backend onboarding has been completed using the utils system reverse-proxy allowed-hosts add CLI, the new reverse proxy installer components will be able to successfully fetch the public key automatically from Cisco IdS server and use that for authenticating the JWT tokens.


Note


ADFS 3.0 and 5.0 can be configured to be accessed through the reverse proxy. Other IdP proxy configuration (proxy configuration, Internet visibility, and High Availability for IdP) must be done separately by referring to the relevant IdP documentation. However, VPN-less configuration allows you to configure a different IdP hostname corresponding to the IdP proxy to access the Finesse desktop.


IdS SAML configuration has to be performed for the SSO authentication to work at the proxy. For more information on IdS SAML configuration, see the Single Sign-On chapter in the Cisco Unified Contact Center Enterprise Features Guide.

After SSO authentication is configured, a pair of valid tokens can be used to access any of the endpoints in the system. The proxy configuration validates the credentials by intercepting the token retrieval requests made to IdS or by decrypting valid tokens and thereafter caching them locally for further validations.

The following figure illustrates the sequence of SSO authentication, followed by a step-by-step description:

Figure 2. SSO
  1. Agents and supervisors connect to one of the Finesse servers through the configured reverse-proxy.

  2. Based on the hostname and reverse-proxy rules, the reverse-proxy forwards the request to the configured Finesse server.

  3. The Finesse server checks the proxy configuration map to get the current IdS proxy hostname.

  4. The browsers of agents and supervisors redirect to IdS through the reverse-proxy.

  5. IdS redirects to the configured IdP URL.

  6. The browsers of agents and supervisors redirect the SAML consumer endpoint request to the IdP proxy.

  7. IdP sends the selfposting SAML assertion HTML form the browsers of agents and supervisors.

  8. IdS verifies the SAML assertion and issues an authentication code to the Finesse servers.

  9. Finesse validates the authentication code and gets a token from IdS. Finesse uses the token for authentication. The token has a time limit. For more information about SSO configuration and flow, see the Single Sign-On chapter in the Cisco Unified Contact Center Enterprise Features Guide.

  10. Finesse serves the request to agents and supervisors through the reverse-proxy.


Note


After login, consecutive API requests are forwarded to the Finesse server. If the token is valid, the requests are authenticated using the token and is responded.


Authenticate WebSocket Connections

WebSocket connections do not have a standard authentication mechanism. Therefore, applications rely on post-connection application level protocol payloads for validating the established connection. However, this mechanism is used to establish unauthenticated connections at scale, mounting DoS or DDoS attacks on the servers.

To mitigate this possibility, the OpenResty®Nginx reverse-proxy configuration performs specific check to allow the WebSocket connections. The WebSocket request header must contain "Sec-WebSocket-Protocol" with the list of supported protocols (for finesse it is xmpp) followed by the authorization value.

The sample request header is as follows:

SSO User

Sec-WebSocket-Protocol: xmpp, <URL encoded value of (Authorization: Bearer authtoken)>

Non-SSO User

Sec-WebSocket-Protocol: xmpp, <URL encoded value of (Authorization: Basic password)>

Note


If the deployment uses external clients to connect to the Cisco Finesse notification service and they are not compatible with the new authentication mechanism, disable it using the NGX_AUTHENTICATE_WEBSOCKET flag.


Validating Unauthenticated Static Resources

All valid endpoints that can be accessed without any authentication are actively tracked in the ES04 scripts. Requests to these unauthenticated paths are rejected without sending these requests to the components servers, if an invalid URI is requested.

Brute Force attack prevention

The proxy authentication scripts actively prevent brute force attacks which can be used to guess the user password. It does this by blocking the IP address which is used to access the service. After some failed attempts in a short time, these requests are rejected with the HTTP error 418. You can access the details of the blocked IP addresses from the ${HOST_WORKING_DIR}/logs/blocking.log and ${HOST_WORKING_DIR}/logs/error.log files.

You can configure the threshold for failed requests, the time interval for the threshold, and the blocking duration. The configurations are present in the core.env file. The following are the options:

  • NGX_CLIENT_LOCK_THRESHOLD: Request authorization failure threshold for a source IP

  • NGX_CLIENT_LOCK_DURAION: Request authorization failure threshold over a given interval for a source IP

  • NGX_CLIENT_BLOCK_DURAION: Sets the duration (in seconds) of blocking a client to avoid brute force attack

Operating System Security Configuration


Note


Operating system (OS) hardening using CIS or equivalent tools is mandatory and a necessary step in OS configuration. These steps are assumed to be completed and will not be covered in this document. The Reverse Proxy Installer is compatible with CIS recommended hardening and is validated using the hardening procedures required by the OpenSCAP toolset. For more information, refer to CIS Hardening.


Below are the details regarding the necessary OS configurations for the reverse proxy.

Kernel Configuration

The Reverse Proxy Installer includes essential kernel configurations for performance and security, which can be applied using the provided install_os_settings.sh file. Make sure to run this script before launching the Reverse Proxy Installer. For more details on how to run the script, refer to the Configure Host Operating System section.

SELinux Configuration

Security-Enhanced Linux (SELinux) is a security framework built into the Linux kernel that enforces access control policies. These policies define rules for how processes and users can access system resources like files, devices, and networks. SELinux aims to minimize potential damage from compromised processes by providing a more detailed level of security than traditional UNIX file permissions (read, write, execute). SELinux can operate in three modes: enforcing, disabled, or permissive.

Enforcing SELinux

When SELinux is in enforcing mode, it rigorously applies policies that specify what actions each user, application, or process is permitted to perform. For instance:

  • A process attempting to access a file that it is not authorized to access (as dictated by the policy) will be denied.

  • SELinux policies are context-based, meaning each object (such as a file or process) is assigned a security context, and access is controlled based on these labels.

Enforcing SELinux provides an additional layer of security because, even if a service running as the root user is compromised, SELinux can limit the potential damage by applying fine-grained access controls.

RHEL 9.4 defaults to enforcing mode, which is the recommended mode for the reverse proxy.

Check the SELinux mode

Run the getenforce command to check the current mode of SELinux on the host.

Disable SELinux

Modify the /etc/selinux/config file to change the SELINUX variable to 'disabled,' then reboot the machine.

Start reverse proxy container when SELinux is disabled

The Reverse Proxy Installer will fail to start the container if SELinux is disabled on the host. However, users can bypass the SELinux configuration by setting the NGX_IGNORE_SELINUX value to true. By default, this value is set to false in the core.env configuration file.

CIS Hardening


Note


If you are running cloud-based deployments, you can download the pre-hardened CIS-compatible images from the respective platforms. Alternatively, you can follow the steps outlined below.


In case you don’t have the CIS hardened image, you can apply CIS hardening to RHEL in two ways:

  1. Using OpenSCAP. For more information, refer to https://github.com/OpenSCAP/openscap.

  2. Using Ansible Galaxy script. For more information, refer to https://github.com/RedHatOfficial/ansible-role-rhel9-cis.

Network Security

This section describes the basic firewall hardening performed on the host by the Reverse Proxy Installer.

TCP Firewall and Rate Limits

TCP firewall is important to secure the deployment of any application which might be exposed to external traffic that can possibly be malicious. Rate limits are useful in protecting applications from Denial of Service (DoS) attacks. Linux hosts provide inbuilt firewall capabilities through the iptables service. The Reverse Proxy Installer uses this iptables service to configure firewall settings or rate limits for the reverse proxy host.


Note


The automatically configured iptables settings provide the basic security for the reverse proxy host. It is recommended to deploy the Reverse Proxy Installer with additional security in the demilitarized zone (DMZ) including external firewalls, intrusion prevention system (IPS), or web application firewall (WAF) devices. DMZ deployment security is the customer's responsibility and is not covered in this document.


For more information on the serviceability aspects, see iptables Error Logs.

Types of iptables Hardening

The Reverse Proxy Installer applies two types of firewall rules:

  • Basic network hardening

  • Rate limits applied on ports required to access the upstream server


Note


All the rules are applied on the external facing ingress network interface and the functionality assumes the present of minimum two network interfaces in the reverse proxy deployment.


Basic Network Hardening

The basic iptables hardening is common for all upstream component servers. To apply the basic hardening, you must run the install_os_settings.sh file (available under /proxy_install_location/reverse-proxy-os-config/) along with -i eth1 arguments, where eth1 stands for the external network interface.


Note


SSH connections for the provided interface will be blocked. For example, sh ./reverse-proxy-os-config/install-os-settings -i eth.


After running the install_os_settings.sh file, you see an external interface confirmation message. Press y to continue and n to exit.

Hardenings applied are:

  • Blocks SSH (outgoing and incoming) connections on external firewall interface.

  • Rejects incoming traffic on any ports on the external interface (opened up on a need basis when starting the instance of a container for the required ports)

  • Rejects all incoming ICMP traffic

  • Blocks invalid packets

  • Blocks new packets that don’t belong to an established connection and don’t use the SYN flag

  • Blocks TCP MSS (Maximum Segment Size) values that are not common

  • Blocks packets with invalid TCP flags

  • Blocks spoofed packets from private subnets

  • Blocks incoming fragmented packets

  • Limits TCP reset (RST) packets

  • Blocks UDP packets


Note


iptables hardening blocks SSH connections via the configured external NIC interface. Therefore all administrative access should be initiated only via an internal NIC interface.


Rate Limits Applied on Ports

These are per-component level hardening that is applied on ports that are required to access the upstream server. These ports are configured in the component.env files. To apply these rate limits, configure the NGX_IPTABLES_HARDENING property to 1 (default value is 1) in the core.env file. After you configure this property and launch the container, the iptables rules are applied automatically.

iptables log files are created under the iptables_logs directory with the ${Container_Name}.log files. Whenever you launch the container, the log file is refreshed. The log file contains the container iptables rules that are added or removed for a container.

TCP port configurations and rate limit behavior:

  • IPs configured using the NGX_LOAD_BALANCER_IPS, NGX_CLOUDCONNECT_CLIENT_IPS, and NGX_RATELIMIT_DISABLE_IPS properties are exempted from the rate limit configurations.

  • Traffic through the ports configured in the .env files is allowed with the applicable rate limits once the container is started.

  • Only configured load balancer system is allowed to access the reverse proxy if NGX_TRAFFIC_RESTRICTED is true.

After you configure iptables and run the container, you might encounter issues. For information on the error messages, see the iptables Error Messages section at Bootstrap checks or validations.

Disable iptables Hardening

It’s not recommended to disable iptables hardening due to security concerns. However, if you have any issues, need to do some testing, or use alternate tools, you can disable iptables hardening as follows:

  1. Run iptables –flush.

  2. Configure NGX_IPTABLES_HARDENING=0 in core.env files.

Upstream Connection Limits

The Reverse Proxy Installer automatically restricts the number of upstream connections to backend servers based on the type of component. These limits help prevent overloading the upstream servers by controlling the number of connections Nginx allows to each server. By default, the installer sets these limits for all upstream components. If needed, for debugging purposes, you can disable this feature by setting the NGX_SET_UPSTREAM_MAX_CONNS value to false in the core.env configuration file, where the default value is true.

Logging

You can find the IP addresses that are blocked.

Procedure


To find the IP addresses that are blocked, run the following commands from the directory {HOST_WORKING_DIR}/logs/.

grep "will be blocked for" blocking.log
grep "IP is already blocked." error.log
2021/10/29 17:30:59 [emerg] 1181750#1181750: *19 [lua] block_unauthorized_users.lua:153: _redirectAndSendError(): 10.68.218.190 will be blocked for 30 minutes for exceeding retry limit., client: 10.68.218.190, server: saproxy.cisco.com, request: "GET /finesse/api/SystemInfo?nocache=1636456574482 HTTP/2.0", host: "saproxy.cisco.com:8445", referrer: "https://saproxy.cisco.com:8445/desktop/container/?locale=en_US&"

2021/10/29 19:21:00 [error] 943068#943068: *43 [lua] block_unauthorized_users.lua:53: 10.70.235.30 :: IP is already blocked..., client: 10.70.235.30, server: saproxy.cisco.com, request: "GET /finesse/api/SystemInfo?nocache=1635591686497 HTTP/2.0", host: "saproxy.cisco.com:8445", referrer: "https://saproxy.cisco.com:8445/desktop/container/?locale=en_US"

Note


It’s recommended that the customers integrate with Fail2ban or similar to add the ban to the IP table or firewall rules.


Log Shipping

Log shipping automatically copies logs from the primary server to a centralized logging server, so that a crash or an attack on the primary server doesn't cause loss of information.

VPN-less reverse proxy is an internet facing machine, which lets the agents access Finesse Desktop and other servers without VPN. There are possibilities of attacks on the server that is accessible through the internet. It is important that you protect the access logs and the error logs of the reverse proxy server for identifying such attacks, as attackers often try to hide their attacks by deleting the relevant logs. So, it is important to replicate the proxy server logs to a centralized logging server.

We recommend using rsyslog for log shipping.

Configure Log Shipping

To configure log shipping, perform the following steps:

Procedure


Step 1

Set up a Linux machine within the data center with sufficient storage capacity (based on the volume of logs to be maintained) to serve as the logging server. This server should be accessible from the VPN-less reverse proxy.

Step 2

Install rsyslog and rsyslog-gnutls in the logging server.

For instance, on Linux distributions that support apt-get, you can use the commands sudo apt-get install rsyslog and sudo apt-get install rsyslog-gnutls to install these utilities.

Step 3

Create a configuration file for rsyslog in the configuration directory of rsyslog (/etc/rsyslog.d in most Linux distributions) in the logging server as shown below:

# Setup disk assisted queues
$WorkDirectory /tmp/rsyslog # where to place spool files
$ActionQueueFileName fwdRule1   # unique name prefix for spool files
$ActionQueueMaxDiskSpace 1g    # 1gb space limit (use as much as possible)
$ActionQueueSaveOnShutdown on   # save messages to disk on shutdown
$ActionQueueType LinkedList    # run asynchronously
$ActionResumeRetryCount -1    # infinite retries if host is down
 
# Set the tls provider as gnutls
$DefaultNetstreamDriver gtls
 
# certificate files
# Trust file contains the certificate(s) of reverse proxy(or proxies)
# and the self signed/CA-signed certificate(chain) generated for
# this logging server(server-cert.pem). Created using
# 'cat nginx.crt /home/<user>/ssl/server-crt.pem > /home/<user>/ssl/trust.pem'
$DefaultNetstreamDriverCAFile /home/<user>/ssl/trust.pem
$DefaultNetstreamDriverCertFile /home/<user>/ssl/server-cert.pem
$DefaultNetstreamDriverKeyFile /home/<user>/ssl/server-key.pem
 
 
$ModLoad imtcp  # TCP listener
$InputTCPServerStreamDriverMode 1  # run driver in TLS-only mode
$InputTCPServerStreamDriverAuthMode anon
$InputTCPServerRun 5001  # start up listener at port 5001

Step 4

In the installer.env file of reverse proxy:

  1. Set the NGX_LIVE_LOG_SHIPPING_ENABLED property to true.

  2. Set the logging server hostname in the NGX_LIVE_LOG_SHIPPING_SERVER_HOST property.

  3. Set the logging server port in the NGX_LIVE_LOG_SHIPPING_SERVER_PORT property.

Step 5

For enabling mTLS between the reverse proxy and the logging server:

  1. Generate a self-signed certificate or procure a CA-signed certificate in PEM format for the logging server, with the corresponding private key. For more information, see the Install Certification Authority (CA) Certificate section in the Single Sign-On chapter in the Cisco Unified Contact Center Enterprise Features Guide.

  2. In the installer.env file of reverse proxy:

    1. Set the value of the NGX_LIVE_LOG_SERVER_CRT_AUTH property to 1.

    2. Set the value of the NGX_LIVE_LOG_SHIPPING_CLIENT_CERT property to the reverse proxy certificate to be used for mTLS.

    3. Set the value of the NGX_LIVE_LOG_SHIPPING_CLIENT_KEY property to the reverse proxy's private key corresponding to the certificate.

  3. In the reverse proxy, copy the public key certificate of the logging server to the directory ${HOST_WORKING_DIR}/ssl and rename it to logging_server.crt.

  4. In the logging server:

    1. Copy the public certificate of reverse proxy to a specific location in the logging server.

    2. Create a trust store by appending all the certificates of the rsyslog clients into a single file, so that multiple reverse proxies can send logs to this server.

    3. Set the path to the trust store (/home/<user>/ssl/trust.pem in the sample configuration) in the DefaultNetstreamDriverCAFile property in the rsyslog configuration.

    4. Set the paths to logging server's certificate and key into the DefaultNetstreamDriverCertFile and DefaultNetstreamDriverKeyFile properties respectively in the rsyslog configuration.

    5. Set the DefaultNetstreamDriver property to gtls to use gnu-tls as the TLS provider.

    6. Set the value of the InputTCPServerStreamDriverMode property to 1 (to enable TLS).

    7. Set the value of the InputTCPServerRun property to the port to which the logging should happen (5001 in the sample configuration).

Step 6

If required, set the paths of the logs in the logging server (see https://www.rsyslog.com/doc/master/configuration/examples.html for samples).

Step 7

Ensure that log rotation is enabled in the logging server, to avoid disk space exhaustion, using an appropriate log rotate tool.

Step 8

Start the rsyslog service in the logging server (in Linux distributions, it is usually performed using the systemctl start rsyslog or service rsyslog start commands).

Step 9

Start the reverse proxy container.

Step 10

Ensure that the reverse proxy logs are shipped live into the logging server by monitoring the log directory in that server.


Caching CORS headers

When the first option request is successful, then the following response headers are cached at the proxy for five minutes. These headers are cached for each respective upstream server.

  • access-control allow-headers

  • access-control-allow-origin

  • access-control-allow-methods

  • access-control-expose-headers and

  • access-control-allow-credentials

Install and configure Fail2ban

Fail2ban scans log files and bans IPs that show the malicious signs such as too many password failures, seeking for exploits, and so on. Generally, Fail2Ban is used to update the firewall rules to reject the IP addresses for a specified amount of time. It can also be configured for any arbitrary actions such as sending an email. For more information, see https://www.fail2ban.org/.

Fail2ban can be configured to monitor the blocking log to identify the IP addresses that are blocked by NGINX on detecting brute force attacks, and ban them for a configurable duration.

The following are the steps to install and configure Fail2ban on a RHEL reverse-proxy:

Procedure


Step 1

Install the Fail2ban using yum.

yum update --exclude=kernel* && yum install epel-release
yum install fail2ban 

Step 2

Create a local jail.

Jail configurations allow the administrator to configure various properties such as the ports that are to be banned from being accessed by any blocked IP address. The duration for which the IP address stays blocked, the filter configuration used for identifying the blocked IP address from the log file monitored, and so on.

Use the following steps to add a custom configuration for banning the IP addresses that are blocked from accessing the upstream servers:

  1. Navigate to the Fail2ban installation directory (in this example /etc/fail2ban) cd /etc/fail2ban.

  2. Create a copy of jail.conf into jail.local to keep the local changes isolated in cp jail.conf jail.local.

  3. Add the following jail configurations to the end of the jail.local file. Substitute the ports in the template with the actual ones. Update the ban time configurations as required.

    # Jail configurations for HTTP connections.
    [finesse-http-auth]
    enabled = true
    # The ports to be blocked. Add any additional ports.
    port = http,https,<finesse-ports>,<cuic-ports>,<any-other-ports-to-be-blocked>
    # Path to nginx blocking logs.
    logpath = ${HOST_WORKING_DIR}/logs/blocking.log
    # The filter configuration.
    filter = finesseban
    # Block the IP from accessing the port, once the IP is blocked by lua.
    maxretry= 1
    # Duration for retry set to 3 mins. Doesn't count as the maxretry is 1
    findtime= 180
    # Lock time is set to 3 mins. Change as per requirements.
    bantime = 180
    

Step 3

Configure a filter. A filter tells Fail2ban what to look for in the logs to identify the host to be banned. The steps to create a filter are as follows:

  1. Create filter.d/finesseban.conf. touch filter.d/finesseban.conf

  2. Add the following lines into the file filter.d/finesseban.conf [Definition] # The regex match that would cause blocking of the host. failregex = <HOST> will be blocked for

Step 4

Start Fail2ban. Run the fail2ban-client start command to start Fail2ban.

Open the Fail2ban log files and verify that there are no errors. By default, logs for Fail2ban go into the /var/log/fail2ban.log file.

Step 5

Validate static resource URLs. All valid endpoints which can be accessed without authentication are actively tracked in the proxy scripts.

Requests to these unauthenticated paths are actively rejected, if an invalid URI is requested, without sending these requests to the upstream server.