Reverse Proxy Installer Configurations

Introduction

Download the Reverse Proxy Installer and associated artifacts from the following location:

The content in this chapter is provided as a guidance for customers to install and configure the reverse-proxy artifacts provided by Cisco. We ship with an embedded Nginx-based OpenResty® reverse-proxy.

For information on the deployment details and the prerequisites required, see the VPN-less Access to Finesse Desktop section.

We don’t support issues related to install or configuration requests for custom reverse-proxy images and network configurations. Queries that are related to this subject can be discussed on Cisco community forums.

Prerequisites

Requirements

We recommend that you have knowledge of the following:

  • Cisco Unified Contact Center Enterprise (Unified CCE) Release

  • Cisco Finesse

  • Linux administration

  • Network administration and Linux network administration

Components Used

The information in this section is based on the following software and hardware versions:

  • Cisco Finesse 12.6(1) and above

  • Cisco Unified Intelligence Center 12.6(1) and above

  • Cisco Identity Service 12.6(1) and above

  • Cisco Unified CCE and Packaged CCE 12.6(1) and above

  • Cisco Cloud Connect 12.6(2)

  • ADFS 3.0 and 5.0 for being used as IdP in SSO deployments


Note


To use VPN-Less access to Finesse desktop feature, you must upgrade Finesse, Cisco IdS, and Cisco Unified Intelligence Center to releases mentioned above.

If you are using LiveData 12.6(1), you must upgrade LiveData to releases mentioned above.

Packaged CCE and Unified CCE 2000 agent deployments must be on 12.6(1) or above version of CCE to support the coresident deployment of Livedata (LD) and Cisco Unified Intelligence Center.


Background Information

This deployment model is supported for the Unified CCE and Packaged CCE solutions.

Deployment of a reverse-proxy is supported (available from 12.6 ES07) as an option to access the Cisco Finesse desktop without connecting to a VPN. This feature provides the flexibility for agents to access the Finesse desktop from anywhere through the Internet.

To enable this feature, a reverse-proxy pair must be deployed in the Demilitarized Zone (DMZ).

Media access remains unchanged in reverse-proxy deployments. To connect to the media, agents can use Cisco Jabber over MRA solution or the Mobile Agent capability of Unified CCE with a Public Switched Telephone Network (PSTN) or mobile endpoint. This diagram shows how the network deployment will look like when you access two Finesse clusters and two Cisco Unified Intelligence Center nodes through a single HA pair of reverse-proxy nodes.

Concurrent access from agents on the Internet and agents who connect from LAN is supported as shown in the following image:


Note


For more information on how to select an appropriate reverse-proxy that supports this deployment, see the section Reverse-Proxy Selection Criteria at Security Guide for Cisco Unified ICM/Contact Center Enterprise, Release 12.6(1).

Before you read this section, we recommend that you read the VPN-less Access to Finesse Desktop section. Also, see the Security Considerations for Mobile Agent Deployments section in Security Guide for Cisco Unified ICM/Contact Center Enterprise, Release 12.6(1).


Reverse Proxy Installer

The Reverse Proxy Installer (RP Installer) is an automated tool to make the reverse proxy deployment for Cisco Unified Contact Center a simple and error free exercise.

This RP Installer replaces the older VPN-less Finesse configuration provided as part of the 12.6 ES 01 and ES07 releases. This required manual installation of the proxy along with editing of the provided rules for creating a VPN-less deployment.

The following are the Cisco Unified Contact Center solution components which are supported by the RP Installer:

  • Cisco Finesse

  • Cisco Identity Service

  • Cisco Unified Intelligence Center

  • Cisco Unified Cloud Connect

Installer Components

Reverse proxy within container

The RP Installer deploys the latest load-tested and qualified OpenResty® reverse proxy binary, in a container and adds it within the required configurations automatically. (Follow the process in the sections below).

This makes it very easy to run the reverse proxy configuration that is required to support the VPN-less infrastructure. This simplifies the deployment immensely, without requiring compilation or the knowledge of NGINX configuration.You don't need to know how to compile or install the open source NGINX.

Containerized proxy instances are also more secure as it is locked down and provides an additional barrier for an intruder to overcome compared to a proxy process running on a bare metal operating system.

Proxy Configuration
Environment Files and Templates

The proxy configuration is split into environment configuration and proxy rule configurations is also known as templates.

The simple and unique environment values which differentiate each upstream component server is collated within the respective environment files, with one file for each upstream component server. These are automatically combined into the proxy rules for each unique type of upstream component server (For example: Cisco Finesse, Cisco Identity Service, and so on) by the RP Installer. These and are then pushed into the OpenResty® NGINX proxy which then proceeds to deploy these rules.

This allows easy instantiation of any number of supported upstream component server hosts as required by adding new environment files corresponding to new servers.

The proxy configuration rules, known as rule templates, contain the necessary NGINX rules to access the server and you don't have to understand or change them.

This also makes the RP Installer upgrades easy as the environment files containing the configurations are rarely changed and can be persisted through multiple installer changes without requiring much NGINX expertise.

Sample environment files

The RP Installer archives come with a sample environment that can be used as a starting point to create a new VPN-less Finesse deployment.

Each file the RP Installer contains is an environment for a unique type of upstream host natively supported by the configurations or reverse proxy rules provided, such as Finesse, Unified Intelligence Center and Cisco IdS.

The administrator should clone this directory and create multiple copies of each environment corresponding to each upstream component host which has to be exposed via the proxy and supply this directory location to the RP Installer which will then proceed to instantiate each host configuration based on the supplied parameters contained in the environment file.

Reverse Proxy Installer components

Directory/ File Name

Description

Reverse proxy instance

reverse-proxy-openresty-container/ |

Contains the container image that is used to create the container instance. This contains the OpenResty® NGINX proxy and other dependent libraries and modules

OpenResty® version packaged: Latest RHEL 9.4 based OpenResty® available.

Component Configuration Templates

reverse-proxy-openresty-configs/

Contains the OpenResty® configuration templates.

These templates are used to generate final OpenResty® configurations from provided deployment configuration data.

Host OS configurations:

reverse-proxy-os-configs/

These templates are used to generate the final OpenResty® configurations from the deployment configuration data provided.

Contains the OS configurations for hardening the host. RHEL 9.4 is the only supported OS.

You must manually install the OS configurations using the install_os_settings.sh that is available in this directory.

Note


The OS configurations are tested with OpenResty® version 1.19. These configurations are expected to work with other distributions. You may need to make some minor updates as required.

Installer configuration

installer.env

Contains the configuration data for the Reverse Proxy Installer.

Proxy configuration

sample_envs/

Contains the sample env configuration data for reference. Use this sample env when you are preparing the configuration data for your deployment.

Launcher scripts proxy_launcher.sh

Launcher script to perform the start|stop|reload|hot_reload|clear_cache operations for a given Installer instance.

version.txt:

Contains Installer versions.

Reverse Proxy Installer creates all the configurations afresh on every restart and no configuration is retained. Any additional changes made to the existing proxy configurations are lost after the restart.

Upgrade notes for 12.6(1) ES01-7 based reverse proxy configurations

The configuration formats have been modified with the new Installer-based configuration and can’t be reused as is. The information contained, however, can be easily extracted and plugged into the new Installer configuration, and the format will not be changed further.

The CLI configurations and proxy-map data need not be altered. However, as previously described, the manner in which the upstream component server hosts and their associated configurations are provided to the reverse-proxy instance has now changed. For more information, see the Environment Files and Templates section in Reverse Proxy Installer

The following are some important points to consider when you upgrade your reverse-proxy instance using the automated Installer:

  • The data required in the component host environment will match the individual values replaced in the template configurations using the ## Must-Change notations from the older configurations. This can be used as a reference to fill the data if required.

  • Tmpfs is not used in the new Installer, and earlier configurations that were run with "tmpfs" can be ignored. However, disk subsystem slowness can impact the proxy performance and needs to be efficient.

Upgrade notes for 12.6(2) to 15.0(1) based reverse proxy configurations

Important Considerations

  • The 15.0(1) Reverse Proxy Installer is supported only on RHEL 9.4 operating system.

  • Prior to running the installer, run the install_os_settings.sh script by specifying the external NIC’s interface name.

  • As part of automatic iptables security rule, following restrictions apply:

    • External interface does not allow SSH access.

    • External interface does not allow traffic from private subnets.

    • All unknown ports are blocked and basic DDoS rules are applied.

    • Third party access via VPN-less:

      • Only supported browsers are allowed to access the upstreams through the external interface. Any requests sent by custom browsers or custom applications must use the standard HTTP User-Agent header or update the custom User-Agent header using the variable NGX_VALID_USER_AGENTS_REGEX in the core.env configuration file.

      • Starting Cisco Finesse release 15.0(1), the websocket requests are authenticated at the reverse proxy, using the credentials provided in the "Sec-WebSocket-Protocol" header. This authentication check is based on the flag NGX _AUTHENTICATE_WEBSOCKET, which is enabled by default in the core.env configuration file.

Upgrade Reverse Proxy to 15.0(1)

The 15.0(1) Reverse Proxy Installer is supported only on RHEL 9.4. For more information on installing the reverse proxy, refer to the Install and Operations section.

The 15.0(1) Reverse Proxy Installer supports the automatic upgrade of proxy configuration files such as installer.env, core.env, and component specific environment files. This automatic upgrade retains the existing property values in these configuration files and adds the new properties required by the latest version of the installer.

To perform automatic upgrade of the installer environment files:

  1. Configure the host OS.

  2. Take a backup of the installer.env and component specific environment files.

  3. Clear the installer directory using rm command.

  4. Extract the reverse-proxy-installer.zip for 15.0(1) from CCO <Provide the link to the CCO page>.

  5. Replace the backed up installer.env and sample_env/* files in the respective extracted location.

  6. Start the reverse proxy container using the command mentioned in the Starting the reverse proxy section.


Note


The installer automatically checks and validates the properties provided in the configuration file. If the installer detects any conflicts or errors, it alerts the user and does not start the proxy. In such cases, the user must manually edit the configuration. For details on the error messages and how to fix them, refer to the Bootstrap checks or validations section.


Install and Operations

Setup reverse-proxy

To setup the reverse-proxy server, refer to the following sections:

Proxy Hardware Requirements

The following are the hardware requirements to set up a reverse-proxy server that includes Cisco Finesse, Cisco Identity Server (IdS), Cisco Unified Intelligence Center, Live Data, Enterprise Chat and Email, and Cisco Cloud Connect:

Deployment

Hardware Recommendation

2000 users

4 virtual CPU, 8 GB RAM, and 100 GB HDD

4000 users

8 virtual CPU, 16 GB RAM and 200 GB HDD

6000 users

8 virtual CPU, 16 GB RAM and 200 GB HDD

  • Cache disk space requirements for the following components:

    • Cisco Finesse: 3 GB for one upstream

    • Cisco Unified Intelligence Center: 200 MB for one upstream

    • Cisco IdS: There is nothing cached.

  • Ethernet interfaces must be gigabit speed and connected to gigabit ethernet switches. 10/100 Ethernet is not supported.

  • A minimum of two network interfaces. All the iptables rules are applied on the external facing ingress network interface.


Note


Disk slowness can hamper the proxy performance. Monitor the solution to ensure the disk has adequate IO throughput.

Run the linux command dd if=/dev/zero of=/root/junk bs=512 count=1000 oflag=dsync to check if the throughput shows a minimum of 2 MB per second for a 2k cluster and completion time of less than 0.3 seconds to write the data out. For every additional 2000 users cluster, you must double the throughput. The disk speed is checked by the installer during startup and prompts the user, if the required speed is not met.

To bypass the disk speed check, start the launcher with -y option, for example ./proxy_launcher.sh -e env_configs/elastigirl/pub/ast_envs/ -i env_configs/elastigirl/pub/installer.env -y start.


Prepare Host


Note


If you're planning to run a yum update, you must exclude the kernel from the update using the following command: yum update --exclude=kernel*.


Steps to prepare the host are as follows:

Procedure

Step 1

Install the latest build of RHEL 9.4.

Step 2

To Install the envsubst utility, run the command yum install gettext.

Step 3

Enable Podman before configuring reverse proxy. By default, RHEL 9.4 has the Podman service.

Step 4

Run the yum install logrotate -y command command to install logrotate on the host.

Step 5

Run the following commands to uninstall or stop the firewall daemon service on RHEL:

  • sudo systemctl stop firewalld

  • sudo systemctl disable firewalld

  • sudo systemctl mask --now firewalld

Step 6

Run the following commands to install the iptables service on RHEL:

  • sudo yum install iptables-services -y

  • sudo systemctl start iptables

  • sudo systemctl enable iptables


Install the Reverse Proxy Installer Package

To install the package:

Procedure

Step 1

Download or copy the Installer zip on the host.

Step 2

Extract the archive (.zip) to the location where you need the Installer to be running from.


Configure Host Operating System

Reverse Proxies are more vulnerable to attacks because they are deployed at the edge. Therefore, it is essential to harden them as much as possible against such threats.

The Reverse Proxy installer performs some basic hardening steps, which the administrator should initiate using the tool described below.


Note


OS hardening using CIS or equivalent tools is mandatory and a necessary step in OS configuration. These steps are assumed to be completed and will not be covered here.


Note


The Reverse Proxy installer includes SELinux rules to ensure the proxy operates more securely. To activate this functionality, the customer must install and enable SELinux in the base image.


The following are the OS hardening configurations for the reverse-proxy host that is included in the <install-directory>/reverse-proxy-os-configs/ folder:

  • Kerner hardening configurations – Modify basic settings to improve performance and increase network security

  • iptables configurations – Basic rate limits and blocking of ports on external interfaces

  • Logrotate configuration – Ensures logs are correctly rotated

You can download the Reverse Proxy installer at the following location:

The installer contains the installer script for installing the required configurations automatically. You can provide various options in the script to control the installation and configuration.

Operating System and Network Configuration

Note


Run the install_os_settings.sh script by specifying the external NIC’s interface name.

The different options supported by the script are as follows:


USAGE: reverse-proxy-finesse-installer/reverse-proxy-os-configs/install_os_settings.sh [OPTIONAL_ARGS]
OPTIONAL_ARGS: -k -e -a -i <external-interface> -y -p <source-ip1> -p <source-ip2> ...
-k: configure kernel hardening
-e: escape ddos iptables configuration.
-a: allow private subnets in iptables configuration.
-i: configure iptables with given external interface
-d: disable iptables hardening
-y: escape external interface confirmation.
-p: allowed source ip for ICMP ping messages.

Details:

  • -e: escape ddos iptables configuration. This option is ignored if -i or iptables configuration option is not given.

  • -a: allow private subnets in iptables configuration. This option is ignored if -i or iptables configuration option is not given.

  • -d: disable iptables hardening. This option should not be used in conjunction with -i, -e and -a options.

  • -y: escape external interface confirmation. This option is ignored if -i or iptables configuration option is not given.

  • -p: allowed source ip for ICMP ping messages. By default ICMP ping is blocked for all hosts. This option is ignored if -i or iptables configuration option is not given.

Example usage:

reverse-proxy-finesse-installer/reverse-proxy-os-configs/install_os_settings.sh -k -e -a -i eth1 -y -p allowed.host.for.ping.1 -p allowed.host.for.ping.2

If you configure iptables through the install_os_settings.sh script and start the container, the installer might exit if iptables is not configured properly. For more information, see the iptables Error Messages section at Bootstrap checks or validations.


Note


If iptables security hardening is applied on the OS using the install_os_settings.sh script, do not disable the iptables configuration using the NGX_IPTABLES_HARDENING property in core.env, as this could make the proxy unreachable.


Configure proxy hardware resources and other critical runtime options

The Installer script installer/proxy_launcher.sh that is used to deploy the reverse-proxy takes the following input arguments:

  • installer.env: Path to installer.env file containing Installer configuration data.

  • proxy_env_dir/: Path to proxy_env_dir/ file containing proxy configuration data.


Note


The installer.env file contains properties to configure Installer options. The sample file is provided in the Installer package. Use it as a reference to prepare the actual configuration.


The steps to configure the proxy hardware resources and other runtime options are as follows:

Procedure

Step 1

Copy the sample file installer.env to any other directory, and rename it. If there are multiple proxy instances running on the same host, use the proxy name or the customer name that maps to a particular proxy instance.

Step 2

Modify the installer options as required. Options are included in the configuration file with their intended purpose.


Configure SSL certificates

The environment configuration file for each component includes an SSL CONFIG section that has configurations to set up the SSL connector for the component. In addition, the configurations are used to configure the following:

  • Either custom certificates that you have generated manually or certificates that the Installer has generated can be used for reverse proxy.

    • If you choose to use the custom certificate that is either CA-signed or self-signed, which you’ve generated, place the certificate inside the ssl directory mentioned in the option HOST_SSL_VOL(defaults to ${HOST_WORKING_DIR}/ssl). If the ${HOST_WORKING_DIR}/ssl directory is not present, create the directory.

    • You can also allow the Installer to generate the self-signed certificate. When starting the Installer/proxy_launcher.sh script, set the CREATE_SELF_SIGNED_SSL_CERT option to true. For more information, see Configure proxy hardware resources and other critical runtime options. If the required certificate and key names aren’t present in the ssl directory, the Installer generates the certificate and includes it in the ssl directory mentioned in the option HOST_SSL_VOL(defaults to ${HOST_WORKING_DIR}/ssl). The Installer doesn’t overwrite the existing files.

    These certificates are used to configure the SSL connector for individual component configurations.

  • Supported TLS protocol versions

  • Supported TLS ciphers

  • SSL session cache size and timeout

  • SSL stapling configurations

  • Mutual TLS authentication for upstream connections: By default, this option is disabled. To enable this option, modify the following configurations:

    • Set the NGX_PRXY_SSL_VERIFY option to "on"

    • NGX_PRXY_SSL_TRUST_CRT → Trust file containing certificate of upstream being proxied. Certificate from this file will be verified by NGINX against what is provided by upstream during the TLS handshake.


Note


Self-signed certificates are to be used only for testing and development purposes and CA-signed certificates are mandatory for production deployments. If the certificate received from the CA isn’t a certificate chain containing all the respective certificates, compose all the relevant certificates into a single certificate chain file.


Create Custom Diffie-Hellman Parameter
  1. Create a custom Diffie-Hellman parameter by using the following commands:

    openssl dhparam -out /usr/local/openresty/nginx/ssl/dhparam.pem 2048
    chmod 400 /usr/local/openresty/nginx/ssl/dhparam.pem
  2. Modify the server configuration to use the new parameters in the file /usr/local/openresty/nginx/conf/conf.d/ssl/ssl.conf by using the following command:

    ssl_dhparam /usr/local/openresty/nginx/ssl/dhparam.pem;
Enable OCSP Stapling

Note


In order to enable the Online Certificate Status Protocol (OCSP) stapling, the server should be using a CA-signed certificate and the server should have access to the CA which signed the certificate.

Following parameters are used to configure stapling NGX_SSL_STAPLING & NGX_SSL_STAPLING_VERIFY on the respective component's env files. They are set by default "off".


Configure Mutual TLS Authentication Between Reverse-Proxy and Components

mutual TLS (mTLS) is a standard security requirement for connections established from DMZ into the data center. For more information, see Nginx CIS behcmarks-https://www.cisecurity.org/benchmark/nginx

mTLS requires that both the server and client be pre-configured with mutual information about each other, as well as that the mutual certificates be properly verified. Hence the term Mutual TLS. A properly configured proxy server will be able to circumvent TCP rate limits and provide the client IP to the server for logging purposes. As a result, it is critical that the proxy identity be verified before connecting as a reverse-proxy. For security reasons, by default this feature is turned on.

This requires the upstream component certificates to be made available to the proxy and vice-versa. Reverse-proxy by default establishes verified TLS connections to the upstream server and it is the proxy verification at the client which is optional. Therefore this needs to be enabled at the upstream client server.

Enabling mutual TLS

The mutual TLS needs to be enabled at the upstream component servers using the provided CLI.

Use the utils system reverse-proxy client-auth enable CLI to enable proxy certificate verification at the upstream component server.

After running the CLI, upload the proxy SSL certificate corresponding to the reverse-proxy hostname used to connect to the same server. This can be used to verify TLS connections when the reverse-proxy attempts to establish an upstream connection.

Configure the Mapping File

See the section Host Mapping File for Network Translation.

Use Reverse-Proxy as the Mapping File Server

The following steps are required only if the reverse-proxy is also used as the proxy mapping file host.

  1. Configure the reverse-proxy hostname in the domain controller used by the Finesse, Cisco Unified Intelligence Center and IdS hosts such that its IP address can be resolved.

  2. Upload the generated OpenResty® Nginx signed certificates on both the nodes under tomcat-trust of cmplatform and restart the server.

  3. Update the Must-change values in <NGINX_HOME>/html/proxymap.txt.

  4. Reload OpenResty® Nginx configurations with the nginx -s reload command.

  5. Use the curl command to validate if the configuration file is accessible from another network host.

Configuring Hot Reload

Hot Reload

The Hot Reload feature allows you to apply the new or modified configurations without restarting the Podman container, thus avoiding a downtime.

Use the modified .env files to create the new configuration and reload the running container without restarting it. This instructs the running instance to reload its configuration without interrupting any active connections. Hot Reload is useful when you make changes to the configuration files and want them to take effect without disrupting the ongoing traffic.

An example command:

./proxy_launcher.sh -e env_configs -i env_configs/installer.env -r hulk-reverseproxy125.cisco.com hot_reload

Where,

  • e – Same as the existing configuration, which has the .env files location.

  • -i – The location of installer.env.

  • -r – New parameter that has the container name where the reload action should be performed.

  • hot_reload – Instructs the specified container configurations should be hot reloaded.

Reload and Restart for Configuration Parameters

While some parameters can be configured and reloaded without restarting the server, there are other parameters that require a server restart.

For more information on the parameters that support hot reload, refer to the respective environment properties section in the Reverse Proxy Installer Environment File Properties chapter.


Note


The installer.env properties don't work with reload, as they are related to Podman configurations. Any changes in the installer.env properties require a restart.


Configure deployment environment configurations

The environment configuration data is the main input that the Installer needs to generate the actual proxy configurations from the templates. There is a sample environment data, Installer/sample-envs/ that is provided within the installer.zip. The sample environment data contains up-to-date reference envs for all supported components. The following are the contents of the sample env directory:
installer/sample_envs/
 |- core.env
 |- dirs.env
 |- finesse.env 
 |- ids.env 
 |- cuic.env 
 |- livedata.env
 |- chat.env 
 |- cloudconnect.env

These property files are divided into three categories:

  • The core.env : Mandatory: File containing OpenResty® NGINX core configurations data. This is required to configure OpenResty® NGINX core configurations.

    This environment configuration file contains data for reverse-proxy core configuration template files. Core configuration files include details specific to the running NGINX instance and is applied generally to all the components until or unless it is overridden at the component level.

    The core configuration template file includes:

    • cache.conf: Template file containing cache configurations

    • common.conf: Template file containing common configurations

    • logging.conf: Template file containing logging configurations

    • maps.conf: Template file containing constants and other variable configurations

    • rate_limit.conf: Template file containing rate limit configurations

    • static.conf: Template file containing static configurations

    • ssl_config.conf: Template file containing ssl connector configurations for common server blocks such as status endpoint and static files endpoint

    Values provided in the core.env file is used to substitute all the place holders in the above files.

  • dirs.env : Mandatory: File containing various OpenResty® NGINX directory paths as per OpenResty® installation. This is required to configure directory paths in the configuration templates.

    This environment data contains information regarding the OpenResty® installation directory structure. The default values are included as per the default OpenResty® installation.

    •	# Directory location for various openresty folders required to 
    •	# configure configurations accordingly.
    •	
    •	# Home directory for openresty nginx installation
    •	NGX_HOME="/usr/local/openresty/nginx"
    •	# Openresty directory containing static resources
    •	NGX_HTML_DIR="${NGX_HOME}/html"
    •	# Openresty directory containing lua resources
    •	NGX_LUA_DIR="${NGX_HOME}/lua"
    •	# Cache directory where various resources for components will be cached
    •	NGX_CACHE_DIR="${NGX_HOME}/cache"
    •	# Openresty directory containing SSL resources like certs, keys etc.
    •	NGX_SSL_DIR="${NGX_HOME}/ssl"
    •	# Openresty directory where openresty logs will be put
    •	NGX_LOG_DIR="${NGX_HOME}/logs"
    •	# Openresty directory containing NGINX configurations - core configs, components configs etc.
    NGX_CONF_DIR="${NGX_HOME}/conf"
    
  • component envs : Optional: Files containing configuration data for proxied solution components such as Finesse, Cisco IdS, Unified Intelligence Center, Live Data, Cisco IM&P, and so on. One environment configuration file must be created per upstream solution component that is being proxied.

    Some properties are mandatory in component environment config files, without which the configurations are be generated for those components. The properties are as follows:

    • TEMPLATE_TYPE: Defines which type of upstream component is being configured, so that the correct templates can be referred to generate the actual configurations. The value can be finesse, ids, cuic, livedata, or chat

    • NGX_COMP_DIR_NAME : Defines the output directory where configuration files for the component will be generated. The final output location for the files will be ./configs_out/conf/components/<NGX_COMP_DIR_NAME>/. Also, this directory is used to form the file including the paths in various configuration files of the component.


      Note


      Ensure that each environment configuration file has a unique output directory name (NGX_COMP_DIR_NAME) and hostname (NGX_COMP_HOSTNAME).


    Other properties are different for different components and the default values for all the components are provided in their respective env files.

The following are the steps to configure these options:

Procedure

Step 1

Copy the installer/sample-envs/ directory and the installer/installer.env file to a separate directory and modify it.

Step 2

After the files are copied to a new directory at ~/proxy_config/proxy_instance_name, rename the files such that they can be mapped to a running proxy instance.

Step 3

Modify the core.env file for OpenResty® configuration.

For most of the options the default values can be used. However, for some of the options you must change the values as per the deployment.

Step 4

Validate all the property values given in the core.env file.

Note

 
Do Not Rename this file.

Step 5

Provision is available in the dirs.env file to deploy the configurations on a custom NGINX installation. If you choose to use the Installer as is, avoid modifying the dirs.env file.

Note

 
Do Not Rename this file.

Step 6

Retain the .env files of components that you require and delete the remaining files.

For example, for a proxied Finesse cluster running on non-sso mode with Live Data and Unified Intelligence Center reports, you must retain the finesse.env, cuic.env, and livedata.env files. You must delete the remaining files chat.env, ids.env and cloudconnect.env. The remaining .env files present in the directory is processed by the Installer.

Step 7

Rename the component .env files as per their hostnames, as it is easy to identify them. Modify the component .env file values as per the requirement of the deployment. Generally, you can modify only the hostname values as per the deployment and retain the default values for the other options.

Step 8

Property description in all the .env files should be self-explanatory and it should provide the information regarding the purpose and the usage of a given property. Also, Do not modify any property name or Delete any property from the .env file.

Note

 
All the properties are essential for the Installer, and incase of any missing property, the Installer will not be able to open the proxy instance. Override or change the default values only for the required properties.

Add or Remove the Unified CCE solution component

Any number of Unified CCE solution components can be proxied through the installer.

To add or remove any of the component proxies, the corresponding component environment configuration file must be available in the env directory. The Installer generates the proxy configurations for all the required components from the beginning as per the contents in the env directory.

Configure Auth URL for components

The component configuration file has an option to redirect to Finesse nodes' authorization url (auth url) to perform the authentication at the proxy. Configure this for the component configuration files as per the deployment, to redirect them to the same cluster Finesse node which contains user data. For more information, see NGX_AUTH_URL= https://reverseproxy.host.domain:8445/finesse/api/UserAuth.

Multi-cluster deployment

The Reverse Proxy Installer supports Unified CCE or Packaged CCE that are larger than 2k deployments. These deployments must expose multiple Finesse nodes to the Agents over the internet and needs extra CUIC nodes.

These additional nodes are supported by multiple pairs of reverse-proxy or by configuring the extra nodes. The extra nodes work as added upstream servers on the same proxy pair using a single HA pair of the reverse-proxy.

Adding more upstream servers is as simple as creating a new environment (env) file. The env file corresponds to the upstream server type and modify specific details such as its hostname.

For example, a deployment containing three Finesse clusters must have three Finesse env files in the env directory as follows:

  • Side A proxy env directory:

    • finesse1a.env

    • finesse2a.env

    • finesse3a.env

  • Side B proxy env directory:

    • finesse1b.env

    • finesse2b.env

    • finesse3b.env

You can extended the same for multiple clusters of other components as required.

Consider multi-cluster deployments for the port and the hostname management. The prerequisite for the Installer to communicate through proxy is that the hostname and the port pair are unique for a component across all other components.

To plan the hosts and ports used in the individual component env files, see the Port Management section.

Starting the reverse-proxy

To start the proxy instance from the Installer, we must open the script with the required installer.env file from the proxy_env_dir/ path as input arguments. Check the following steps:

USAGE: ./proxy_launcher.sh [options...] (start|stop|reload|hot_reload|clear_cache) 
Options: -e <ENV-DIR> -i <INSTALLER-ENV-FILE1> -i <INSTALLER-ENV-FILE2> ... 
INSTALLER-ENV-FILE: Mandatory : Installer env files ... Multiple files can be provided to override base env 
ENV-DIR: Mandatory for start, Optional for other actions : Reverseproxy environment config data directory 
Example usage: ./proxy_launcher.sh -e /path/to/env/dir -i /installer/env/1 -i /installer/env/override/1 -i /installer/env/override/2 start

When the command start is initiated, the Installer performs the following:

Procedure


Step 1

Validates if the input arguments are correct, directories and the mandatory files are available.

Step 2

Creates the required working directory, and volume mounts on the host as per the Installer.env file entries.

Step 3

Generates the required OpenResty® configurations and runs the command run.sh inside the reverse-proxy-openresty-configs/ directory.

Step 4

Modifies the generated configurations to their respective directories inside the working directory.

Step 5

Creates the self-signed SSL certificate for the reverse-proxy to use it if necessary. Configures it in the installer.env file.

The SSL certificate is generated only if there’s no other file with the same filename in the directory or no other file is overwritten.

Note


Load image is provided as part of the Installer. This can be overridden from the installer.env file. You can also choose to load a different image.

Step 6

It runs the container with the required arguments as per the Installer configuration data.


Configuration Check

After launching the Reverse Proxy Installer, it automatically validates the provided configuration upon startup and displays errors corresponding to any issues it detects. The Installer currently checks the correctness of the following:

  • Configuration property errors such as variables being empty or duplicated or key variables missing, etc.

  • Deployment configuration

  • Load balancer configuration

  • Hardware configuration

  • Proxymap validation

  • Certificate configuration

  • Upgrade

  • Hot reload

  • Log shipping configuration

For the list of error messages, see Bootstrap checks or validations.

Serviceability

Bootstrap checks or validations

The Installer validates the configurations that are provided through the .env files and stops the deployment if it identifies certain common errors. This is done to prevent lengthy debugging on the configurations provided, which can be easily identified in the validation phase.

The following are the errors which are currently identified and reported during the validation phase.

Scenario

Sample Error Message

Configuration Property Errors

An unknown template type is mentioned on the .env file which isn’t known to the Installer.

[ERROR]: Unknown TEMPLATE_TYPE cuic_1230 found in file cuic.env. Exiting.

The .env file doesn't contain the property TEMPLATE_TYPE which identifies the type of upstream component.

[ERROR]: TEMPLATE_TYPE variable missing in file cuic.env. Exiting.

A particular variable isn’t present in the primary .env file for the template type. However, it’s available in a particular .env file that is being processed in the custom env directory.

[ERROR]: Below unused variable found in ./sample_envs/. Exiting.

NGX_FIN_TEST_HOSTNAME

One of the mandatory variables isn’t configured. (Currently, limited to host and port of the upstream).

[ERROR]: NGX_PRXY_CHAT_HOSTNAME’s value is not configured. Exiting.

Same variable is encountered more than once in the .env file that is being processed.

[ERROR]: NGX_PRXY_CLOUDCONNECT_HOSTNAME’s value is configured in multiple places. Exiting.

Mandatory variable is configured more than once.

[ERROR]: NGX_FIN_HOSTNAME’s configured more than one time. Exiting.

Duplicate environment variable.

[ERROR]: Following variables were found to be duplicate in file sample_env/finesse.env. Exiting.

The .env file is not readable.

[ERROR]: File sample_env/core.env does not exist or does not have appropriate permissions. Exiting.

The primary template is altered. This is just a warning, it won’t exit the installation.

[!!! WARNING !!!] Primary templates have been altered. Note: Some of the pre-install checks that are based on the templates configurations will be skipped.

The primary env file is altered. This is just a warning. It won’t exit the installation.

[!!! WARNING !!!] Primary master_env have been altered. Note: Some of the pre-install checks that are based on the templates configurations will be skipped.

The custom env directory which is passed as a run time option to the Installer is missing.

[ERROR]: Directory sample_env/core doesn’t exist. Exiting.

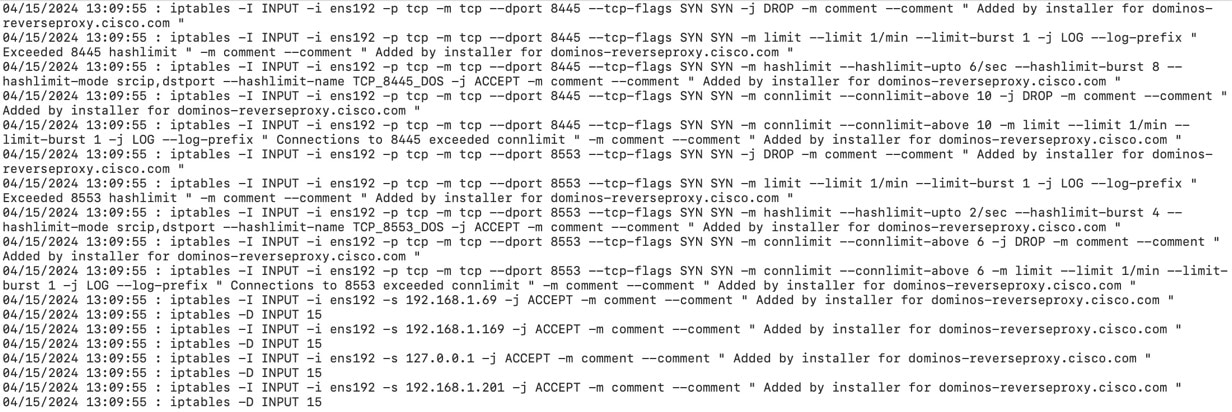
Running multiple proxy containers on the same host is supported by using multiple DNS hostnames mapped to distinct IP addresses on that host. These addresses must be configured on the same external NIC used for the reverse proxy container during the install_os_settings.sh configuration. Specify one of the external NIC's IP addresses as the PROXY_BINDING_IP. This setup ensures that traffic intended for a specific hostname is directed to the container bound to the corresponding IP address.

For example, if the external NIC is ens192 with IP addresses 192.168.1.69 and 192.168.1.70, use 192.168.1.69 as the PROXY_BINDING_IP for one container and 192.168.1.70 for the other container.

An error occurs when CONTAINER_NETWORK_MODE is set to bridge and the external NIC has more than one IP address configured.

[ERROR]: PROXY_BINDING_IP is not configured on the external NIC configured. Exiting.

By default, the installer uses the IP address of the external NIC configured for proxy binding. However, if the external NIC has multiple IP addresses configured, the PROXY_BINDING_IP must be set to one of those IP addresses.

[ERROR]: External NIC configured has multiple IPs. Please provide a valid IP to bind from this list as the value for PROXY_BINDING_IP in installer.env configuration file.

Invalid reverse proxy log level is mentioned.

[ERROR] Invalid log level "<Invalid value>" specified for variable NGX_ERR_LOG_LEVEL. Allowed values are debug|info|warn|error|crit|alert|emerg.

When multiple internal IPs are configured in the VM.

[ERROR] Multiple IPs are available in the system. Please provide the exact IP to bind to in PROXY_BINDING_INTERNAL_IP property, in installer.env configuration file.

There are no IP address configured on external NIC.

[ERROR]: No IP address configured on the NIC <nic name>. Exiting.

Invalid value configured for NGX_USE_REGEX_TO_VALIDATE_USER_AGENT.

The allowed value is true or false.

[ERROR]: Invalid NGX_USE_REGEX_TO_VALIDATE_USER_AGENT value configured in core.env.

Crond service is not started on the reverse proxy host machine.

[ERROR]: Failed to start the cron service 'crond'.

Unable to create a group name (NGX_USER_USERGROUP) for the user ID mentioned in installer.env.

[ERROR]: Failed to create group '<user_group>'.

Unable to create a user ID (NGX_USER_USERID) specified in installer.env. The user ID already exists, but it does not have the required unique UID (NGX_USER_UID).

[ERROR]: User 'userid' exists but has UID <existing uid for userid given> instead of <given uid>.

Unable to create a user ID (NGX_USER_USERID) with the group name (NGX_USER_USERGROUP) and UID (NGX_USER_UID).

[ERROR]: Failed to create user 'userid' with UID <given uid> and groupname <given groupname>.

Deployment Configuration Errors

More than one version for Unified Intelligence Center or LiveData is configured.

[ERROR]: Multiple versions of env files detected for Unified Intelligence Center, retain one type and retry. Exiting.

More than one Cisco IdS instance is configured.

(Each side of the proxy should have only a single instance of IdS configured).

[ERROR]: Number of Cisco IdS instance should not be more than 1. Exiting.

Load Balancer Configuration Errors

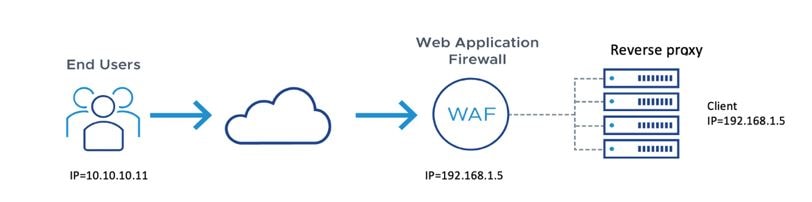
The NGX_LOAD_BALANCER_IPS contains values which can’t be parsed as a valid IP.

[ERROR]: NGX_LOAD_BALANCER_IPS should contain only IP addresses. Exiting.

The NGX_LOAD_BALANCER_REAL_IP_HEADER is configured but the NGX_LOAD_BALANCER_IPS isn’t configured.

[ERROR]: NGX_LOAD_BALANCER_REAL_IP_HEADER should be configured only when NGX_LOAD_BALANCER_IPS is configured. Exiting.

The NGX_LOAD_BALANCER_REAL_IP_HEADER is empty but the NGX_LOAD_BALANCER_IPS is configured.

[ERROR]: NGX_LOAD_BALANCER_REAL_IP_HEADER is empty. It should contain header details when NGX_LOAD_BALANCER_IPS is configured, Exiting.

Proxymap Configuration Errors

Duplicate upstream entries are present in the proxymap.txt file.

[ERROR]: There is more than one entry populated for this upstream entry <Duplicate hostname>. Exiting.

The upstream hostname that is configured in the .env file is not reachable or incorrect.

[ERROR]: Hostname configured is not reachable using DNS server entries. Hostname: <Hostname>, DNS server: <DNS entries>. Exiting.

Hardware Configuration Errors

The container is not configured with enough resources to run all the upstreams that it is configured with.

[ERROR] Not enough resources configured for the container. Available CPUs <>, Available Memory <>GB. Recommended to have minimum <>vCPU and <>GB of available memory. Exiting.

The installer.env file has NOFILE_LIMT value less than the recommended value.

[ERROR] NOFILE_LIMIT in installer.env should be more than or equal to 102400.

The speed of NIC interface is less than 1 Gigabit.

[ERROR] <NIC_NAME> does not have a connection speed greater than or equal to 1000 Mbps. Exiting.

Certificate Configuration Errors

Certificate-based authentication is enabled for a particular upstream server. (Using NGX_PRXY_SSL_VERIFY="on"). However, the certificate isn’t present, nonreadable, or empty.

[ERROR]: Mutual TLS validation is enabled for Finesse, but the upstream server certificate /root/reverse_proxy/contactcenter-reverseproxy/ssl/upstreams_finesse_trust.crt is not present, not readable or invalid. Exiting.

Certificate-based authentication is enabled for a particular upstream server (Using NGX_PRXY_SSL_VERIFY="on"), without defining the certificate path.

[ERROR]: Mutual Transport Layer Security validation is enabled for finesse, but the upstream server certificate path in NGX_PRXY_SSL_TRUST_CRT is empty. Exiting.

Value entered for NGX_AUTHENTICATE_WEBSOCKET is other than 'true' or 'false'.

[ERROR]: NGX_AUTHENTICATE_WEBSOCKET must be 'true' or 'false'.

Upgrade Errors

The upgrade script of each component must contain the upgrade functions to upgrade the configuration from current version to latest version. The Installer reports an error when one or more components are missing the upgrade functions to upgrade the configuration.

[ERROR]: The required function name <function_name> is not present in upgrade script <script_path>. Exiting upgrade.

The upgrade script of the component must contain the VERSION_PATH in a sorted order to upgrade the configuration. The Installer reports an error when the VERSION_PATH contains the version in an unsorted order.

[ERROR]: VERSION_PATH value in <script_path> is not sorted. It must be in ascending order.

The upgrade script for the component is missing.

[ERROR]: Upgrade file not present for the given component: {<component_name>}, upgrade script path: {migration/component_upgrade.sh}. Exiting.

Hot Reload Errors

Hot reload must be performed on the container name which is currently running. The Installer reports an error when hot reload is performed on the container which is not running.

[ERROR]: No container name specified to reload. Exiting.

No container is running with the name that you provided.

[ERROR]: Container <GIVEN_NAME> is not running, hence cannot be reloaded. Exiting.

As part of hot reload, user must not change the image name of the container which is already running. The Installer reports an error when the image name is changed in the .env file before hot reload.

[ERROR]: Image name should be same as running one, Exiting.

Container configurations reload is tested functionally by running a temporary container image of the proxy with the provided changes. At times, this container might not exit cleanly and this causes conflicts when the operation is retried. To overcome this, the container with the name TMP_GIVEN_NAME which is provided in the error message, should be stopped manually and the operation retried.

[ERROR]: Fake container with name TMP_<GIVEN_NAME> is already running, stop it and try reload. Exiting.

Hot reload requires one or more configurations to be updated in the .env file. The Installer reports an error when there is no change in the .env file for hot reload.

[ERROR]: There is no config change to reload. Exiting.

The openresty configurations in reverse-proxy container couldn't be fetched for download.

[ERROR]: Not able to get the openresty config from container ${container_name}. Exiting.

The user confirms not to hot reload the changes.

[ERROR]: Config reload rejected by user, Exiting.

Log Shipping Errors

mTLS is enabled between reverse proxy and logging server. However, the logging server certificate path is not configured in the NGX_LIVE_LOG_SHIPPING_SERVER_CERT property.

[ERROR] Secured live log shipping is enabled, but the logging server certificate path is empty. Configure the variable NGX_LIVE_LOG_SHIPPING_SERVER_CERT. Exiting.

mTLS is enabled between reverse proxy and logging server. However, the logging server certificate file defined using the NGX_LIVE_LOG_SHIPPING_SERVER_CERT property is missing, empty, or not readable.

[ERROR] Secured live log shipping is enabled, but the certificate for the logging server is missing, not readable, or invalid. Exiting.

mTLS is enabled between reverse proxy and logging server. However, the client certificate path is not configured in the NGX_LIVE_LOG_SHIPPING_CLIENT_CERT property.

[ERROR] Secured live log shipping is enabled, but the reverse proxy client certificate path is empty. Configure the variable NGX_LIVE_LOG_SHIPPING_CLIENT_CERT. Exiting.

mTLS is enabled between reverse proxy and logging server. However, the logging client certificate file defined using the NGX_LIVE_LOG_SHIPPING_CLIENT_CERT property is missing, empty, or not readable.

[ERROR] Secured live log shipping is enabled, but the certificate for the reverse proxy client is missing, not readable, or invalid. Exiting.

mTLS is enabled between reverse proxy and logging server. However, the client private key path is not configured in the NGX_LIVE_LOG_SHIPPING_CLIENT_KEY property.

[ERROR] Secured live log shipping is enabled, but the reverse proxy client certificate key is empty. Configure the variable NGX_LIVE_LOG_SHIPPING_CLIENT_KEY. Exiting.

mTLS is enabled between reverse proxy and logging server. However, the logging client private key file defined using the NGX_LIVE_LOG_SHIPPING_CLIENT_KEY property is missing, empty, or not readable.

[ERROR] Secured live log shipping is enabled, but the certificate key for the reverse proxy client is missing, not readable, or invalid. Exiting.

mTLS is enabled between reverse proxy and logging server. However, the logging server is not configured in the NGX_LIVE_LOG_SHIPPING_SERVER_HOST property.

[ERROR] Live log shipping server is not configured when live log shipping is enabled. Configure the variable NGX_LIVE_LOG_SHIPPING_SERVER_HOST. Exiting.

mTLS is enabled between reverse proxy and logging server. However, the logging server port is not configured in the NGX_LIVE_LOG_SHIPPING_SERVER_PORT property.

[ERROR] Live log shipping server port is not configured when live log shipping is enabled. Configure the variable NGX_LIVE_LOG_SHIPPING_SERVER_PORT. Exiting.

The NGX_LIVE_LOG_SERVER_CRT_AUTH property can be used to enable or disable mTLS between the reverse proxy and the logging server. The allowed values are only 0 (disabled) and 1 (enabled). This error is displayed when the property contains any other value.

[ERROR] Invalid value for the property NGX_LIVE_LOG_SERVER_CRT_AUTH. It should be 1 for secured live log shipping and 0 otherwise. Exiting.

The configured logging server through the NGX_LIVE_LOG_SHIPPING_SERVER_HOST property is not resolved by the DNS server.

[ERROR] Hostname configured is not reachable using DNS server entries. Hostname: invalidserver.autobot.cvp, DNS server: 192.168.1.3|72.163.128.140. Exiting.

The live log shipping is not secured using TLS.

[WARN] TLS disabled for live log shipping.

iptables Error Messages

This section provides you with the list of iptables related error messages.

Table 1. Error messages while starting a container when iptables hardening is enabled

Scenario

Sample Error Message

NGX_IPTABLES_HARDENING=1 but the external interface is empty.

[ERROR] External Interface is empty.

The external interface configured is not present in the system.

[ERROR] Configured interface eth1 is not present in host system.

NGX_IPTABLES_HARDENING=1 but iptables service is not running.

[ERROR] iptables service is not running. iptables hardening cannot be done.

The container has not started after waiting for 30 seconds.

[ERROR] Container $container_name is not running. Exiting.

The iptables rate limits (for example, IPTABLES_CONNECTION_LIMIT_ABOVE) configured are not in the expected format.

[ERROR] ${key} in ${ENV} is not in expected format. Input Provided=$value. Expected Format <Integer>.Eg. 10.

Table 2. Error messages while configuring iptables through install_os_settings.sh

Scenario

Sample Error Message

The logged-in SSH client user doesn't have permission on the host system to run iptables commands.

[ERROR] User ${user} does not have permission to run iptables or ip command.

The interface that is provided through the install_os_settings.sh -i command is not present in the system.

[ERROR] Configured interface ${EXTERNAL_INTERFACE} is not present in host system.

If you choose to configure iptables and is connected through the external interface.

[ERROR] Current shell session is connected through External/Internet facing Network Interface ${EXTERNAL_INTERFACE}. Please connect through Internal/Non-Internet facing Network Interface.

If iptables service not installed/running.

[WARN!] iptables service is not running. Install iptables service to configure iptables rules.

If the -d option is used in conjunction with the -i, -e or -a options while running the install_os_settings.sh script.

Invalid option: option -d cannot be used with -i, -e or -a arguments.

If containers are running while configuring iptables security hardening.

[ERROR]: There are ${container_count} container(s) running. Please stop all container(s) before applying iptables security hardening.

Launcher logs

Proxy instance launcher logs can be located at ${HOST_WORKING_DIR}/logs/openresty_launcher.log. During the NGINX startup, check the logs to see if there are any error information inside the container instance.

Openresty pid file is also located in the same folder at ${HOST_WORKING_DIR}/logs/openresty.pid.

Access and error logs

You can locate the Nginx access and error logs for a given proxy instance at the logs directory inside the proxy working directory as ${HOST_WORKING_DIR}/logs/access.log and ${HOST_WORKING_DIR}/logs/error.log. Check these log files for any debugging information about the OpenResty® startup.

To identify the Digital Routing task requests, the reverse-proxy server generates access logs with the trackingId field. The following is an example snippet of the access.log with the trackingId field:

[09/Feb/2023:07:24:25 +0000] conn_stats:"7 : 1" client:"35.168.152.254" host:"pccedrdmzproxy-cc.cisco.com" host_addr:"173.39.15.27" host_to_upstream:"pccedrdmzproxy-cc.cisco.com->10.10.10.95:8445" 
user:"-" server_block:"173.39.15.27:443" request:"POST /drapi/v1/tasks HTTP/1.1" requestid:"-" server_cache_bypass:"-" cookie:"-" user_agent:"Apache-HttpClient/4.5.2 (Java/1.8.0_242)" 
referer:"-" cache_status:"-" rsp_status:"201(201)" body_bytes_sent:"56" time_taken:"0.021(0.022)" up_connect_time:"0.002" up_header_time:"0.022" up_bytes_sent:"1297" up_bytes_rcvd:"852" trackingId:"WebexConnect_ea54eac0-1d2a-4e09-9fa2-cb212dad13df"

If there are failures in the Digital Routing task requests, the reverse-proxy server generates error logs with the trackingId field only when you set the trace level to debug.

To enable the debug trace level for the reverse-proxy server:

  1. In the "<reverse_proxy_installed_dir>/conf" directory, locate and open the nginx.conf file.

  2. In the nginx.conf file, find the statement [error_log ${NGX_LOG_DIR}/error.log info;].

  3. Change the trace level from info to debug as follows: [error_log ${NGX_LOG_DIR}/error.log debug;].

  4. Reload the reverse-proxy server for the change to take effect.

The following is an example snippet of the error.log with the trackingId field:

2023/02/14 08:01:59 [debug] 206#206: *5 [lua] log_dr_requests.lua:4:  conn_stats:5:1 client:172.16.102.61 host:173.39.15.27 host_addr:173.39.15.27 host_to_upstream:173.39.15.27->10.10.10.95:8445 
user:nil server_block:pccedrdmzproxy-cc.cisco.com:443 request:GET /drapi/v1/tasks?from=0 HTTP/1.1 requestid:nil server_cache_bypass:nil cookie:nil user_agent:PostmanRuntime/7.29.2 referer:nil 
cache_status:nil rsp_status:200(200) body_bytes_sent:46 time_taken:0.004(0.005) up_connect_time:0.002 up_header_time:0.005 up_bytes_sent:3411 up_bytes_rcvd:733 trackingId:WebexConnect_ea54eac0-1d2a-4e09-9fa2-cb212dad13df

IP blocking logs

A separate log file is maintained to track the IPs that block the running proxy instance at ${HOST_WORKING_DIR}/logs/blocking.log. This file can be supplied to the tools such as fail2ban to automate the blocking of IP addresses at IP table level.

Client IPs are blocked if a client makes several failed authentication requests in a given time interval.

Syslogs

Syslogs are released by the reverse-proxy. By default, syslogs are pushed to the local endpoint. However, proxies can be configured to push this to the remote endpoint.

Syslogs are released when the client IP is blocked by the reverse proxy.

iptables Error Logs

The Reverse Proxy Installer can dynamically apply pre-verified iptables rules to secure the required ports with application specific rate limits. When you launch the container, the iptables rules are applied by default.

If the incoming requests exceed the configured rate limits, you will experience connection timeouts. You can run the grep -i "Exceeded" /var/log/messages command to check if the request is rejected by iptables. The logs displayed for the connection timeout depend on the rate limit configured through the IPTABLES_LOG_LIMIT_BURST and IPTABLES_LOG_LIMIT properties in the .env files. For more information, see the Common Rate Limit Properties section.

You can find all the rules applied by the Reverse Proxy Installer when you launch the container using the proxy_launcher.sh script, as shown in the screenshot below:

You can find the firewall rules added by the Reverse Proxy Installer by looking at the comments against the individual rules displayed by the iptables –list command as shown below:

Monitoring

You can monitor the host that runs the reverse proxy using any of the general purpose monitoring tools.

To monitor the container, you can use a monitoring tool such as Zabbix, which has been qualified for the VPN-less offering. For tools other than Zabbix, ensure that it is non-intrusive and does not cause much impact on the host or the container being monitored.

It is important that whichever tool you use to monitor the server has the necessary hardening applied as the server is running on DMZ. For example, perform Zabbix hardening using these basic steps:

  • Modify the default username and password after installing Zabbix.

  • Don't expose the Zabbix port/URI to the internet.

  • Harden the MySQL database that is installed along with Zabbix using mysql hardening scripts, for example mysql_secure_installation.


Caution


The Zabbix hardening measures outlined above are only suggestions to get started. It's advised that you take extra measures to harden the monitoring tool to ensure maximum system security.


Reloading configuration and clearing cache

Static file hosting

Reverse-proxy provides provision to host the static files as required at ${HOST_WORKING_DIR}/html. You can add any of the static files that must be accessed through proxy such as proxymap.txt. These files are accessible through a static file access endpoint provided by the proxy. The endpoint hostname and the port are configurable through the core.env file.

By default, you can access the static files deployed on the reverse-proxy at the URL https://[ip-of-proxy-host]:10000/staticfile.

To configure access from a different port, use the NGX_PRXY_STATIC_FILES_PORT option provided in the core.env file.

The static file port isn’t opened by default in the IP tables. If necessary, it must be explicitly opened by the administrator. The same must be opened in the DMZ firewall to access from the internet.


Note


While enabling access to this port over the internet, you must be cautious as this port isn’t covered under DOS preventive measures.


Reverse-proxy caching

Each and every proxy instance caches the files as specified by different components inside the ${HOST_WORKING_DIR}/cache directory. Inside the cache directory, every upstream has a separate directory where the cache files for that upstream is present. The sample on how the cache is maintained is as follows:

${HOST_WORKING_DIR}/cache
|- client_temp
|- proxy_temp
|- finesse125.autobot.cvp
|- desktop
|- layout 
|- openfire 
|- rest 
|- shindig 
|- cuic126.autobot.cvp
|- cuic
|- cuicdoc

To get the latest upstream resources, the cache has to be cleared. Administrator can either do this manually by clearing all the files inside each and every directory as required or can run the script provided inside the container to clear the cache automatically.

podman exec <PROXY_INSTANCE_NAME>
        /usr/local/openresty/nginx/sbin/openresty_launcher.sh clear_cache

Caching behaviors such as cache expiration, cache sizes, and so on, can be configured from the individual component env files. The configuration options for different components' env files are as follows:

  • Finesse

    • NGX_FIN_DESKTOP_CACHE_SIZE

    • NGX_FIN_DESKTOP_CACHE_MAX_SIZE

    • NGX_FIN_DESKTOP_CACHE_INACTIVE_DURATION

    • NGX_FIN_SHINDIG_CACHE_SIZE

    • NGX_FIN_SHINDIG_CACHE_MAX_SIZE

    • NGX_FIN_SHINDIG_CACHE_INACTIVE_DURATION

    • NGX_FIN_OPENFIRE_CACHE_SIZE

    • NGX_FIN_OPENFIRE_CACHE_MAX_SIZE

    • NGX_FIN_OPENFIRE_CACHE_INACTIVE_DURATION

    • NGX_FIN_REST_CACHE_SIZE

    • NGX_FIN_REST_CACHE_MAX_SIZE

    • NGX_FIN_REST_CACHE_INACTIVE_DURATION

    • NGX_FIN_LAYOUT_CACHE_SIZE

    • NGX_FIN_LAYOUT_CACHE_MAX_SIZE

    • NGX_FIN_LAYOUT_CACHE_INACTIVE_DURATION

  • CUIC

    • NGX_CUIC_CACHE_SIZE

    • NGX_CUIC_CACHE_MAX_SIZE

    • NGX_CUIC_CACHE_INACTIVE_DURATION

    • NGX_CUICDOC_CACHE_SIZE

    • NGX_CUICDOC_CACHE_MAX_SIZE

    • NGX_CUICDOC_CACHE_INACTIVE_DURATION

Use configurations with custom NGINX installation

The proxy Installer package can be deployed as a standalone. However, you can use the following steps to deploy only the generated configuration with the third-party NGINX installations:

Procedure


Step 1

Navigate to the directory reverse-proxy-openresty-configs/ inside the proxy Installer.

Step 2

For third-party NGINX installations, ensure to change the dirs.env as per the NGINX installation directory structure.

Step 3

Generate the configurations by running the command ./run.sh <ENV-DIR> where the ENV-DIR is the path of the directory containing the environment configuration data files.

Step 4

Copy the conf, html, lua folders from the ~/configs-out directory to the NGX_HOME directory.

Note


This requires NGINX installation with Lua support.


Upstream component configuration specifics

Verifying Reverse-Proxy Configuration

Finesse

Procedure

Step 1

From the DMZ, open https://<reverseproxy:port>/finesse/api/SystemInfo and check if it’s reachable.

Step 2

Check if the <host> values in both <primaryNode> and <secondaryNode> are valid in the reverse-proxy hostnames. It shouldn’t be the Finesse hostnames.

Note

 
  • If CORS status is enabled, you must explicitly add the reverse-proxy domain name to the list of CORS trusted domain names.

  • Reverse-proxy supports a maximum of 8000 folders (including sub-directories) in the finesse/3rdpartygadget folder.


Cisco Unified Intelligence Center and LiveData

Procedure

Step 1

If you find the Finesse hostnames in the response instead of reverse-proxy hostnames, validate the proxy-mapping configurations. Also, check if the allowed hosts are properly added in Finesse servers as described in the Populate Network Translation Data section.

Step 2

If the LiveData gadgets load properly in the Finesse Desktop, the CUIC and LiveData proxy configurations are correct.

Step 3

To validate the Cisco Unified Intelligence Center and LiveData configurations, make the HTTP requests from the DMZ to the following URLs and check if they are reachable:

  • https://<reverseproxy:cuic_port>/cuic/rest/about

  • https://<reverseproxy:ldweb_port>/livedata/security

  • https://<reverseproxy:ldsocketio_port>/security


Cisco Identity Service

To validate the Cisco IdS configuration, perform the following steps:

Procedure

Step 1

Log in to the Cisco IdS Admin interface at https://<ids_LAN_host:ids_port>:8553/idsadmin from the LAN because the admin interface isn’t exposed over reverse-proxy.

Step 2

Choose Settings > IdS Trust.

Step 3

Verify that the proxy cluster publisher node is listed on the Download SP metadata page, and click Next.

Step 4

Verify that the IDP proxy is correctly displayed (if configured on the Upload IDP metadata page) and click Next.

Step 5

Initiate test SSO through all proxy cluster nodes from the Test SSO page and validate that all are successful. This requires client system connectivity to reverse-proxy nodes.


Load Balancer, WAF, and Proxy support for reverse-proxy deployments

The reverse-proxy configurations have security features that are dependent on the information about the actual client IP which is making the request.This information is required for enforcing security features such as enforcing rate limits, logging of client activity and blocking brute force attempts and for logging access to the system.

Deployments which directly terminate the internet Agent connections on the reverse proxy do not need anything special to be done here, since the reverse proxy recieves the client IP due to the client connections terminating on the reverse proxy.

However when other network devices are used to terminate the client connections, before forwarding them as fresh requests to the reverse proxy itself, the client IP's are no longer visible to the reverse proxy.

This happens when there are Load Balancers, Web Application Firewall (WAF), etc or when the client access itself is made from behind a forward proxy. CDN deployments also employ multiple reverse proxies and fall into the same deployment category.

Such deployments MUST add certain reverse-proxy configurations to enable the reverse-proxy to identify the actual client IP. The configurations that are required for such deployments are as follows:

  1. The public IPs or the hostnames of these devices which will forward the requests to the proxy in the reverse proxy configurations needs to be added in core.env using the variable NGX_LOAD_BALANCER_IPS.

  2. The new requests originating from the intermediary devices, MUST populate HTTP request header fields with the end-client IP to communicate the same to the reverse-proxy. The name of this field is not pre-determined and can configured in core.env file, in the variable NGX_LOAD_BALANCER_REAL_IP_HEADER.


    Note


    All CDN deployments provide a mechanism to extract the client IP as a HTTP header containing a single-client IP as part of the request payload. A custom header is often recommended to avoid conflict with the standard X-FORWARDED-FOR header. The VPN-less reverse-proxy deployments are also recommended to provide the client IP using a custom header for similar reasons.


  3. For security purpose, the devices which are front ending the reverse-proxy MUST replace X-FORWARDED-FOR and X-REAL-IP headers provided by the client with the actual client IP or drop them if the deployment does not need these headers.

  4. If the deployment is using a custom HTTP header for communicating to the client IP, the particular field MUST be replaced with the client IP before forwarding them upstream to the reverse-proxy.

  5. Verify the configuration by transmitting a high rate of requests to a Finesse API such as SystemInfo/DesktopConfig from an external client. Verify through the Load Balancer or WAF to ensure that the client is blocked while the Load Balancer or intermediate devices are not blocked or rate limited. Ensure that the configurations are working as expected before going live.

    Refer to the Frequently Asked Questions, on page 321 secton for instructions on how to send the requests to the proxy, and also on how to check whether a client is blocked or rate limited.

  6. Pre-test the deployments with all WAF / IPS rules enabled to verify that the desktop API patterrns are compatible with them before going live with the deployment. Certain WAF rules can be too restrictive and may need some modifications before they can be deployed.


    Note


    The reverse-proxy configurations provided have no protection against layer-3 attacks such as IP address spoofing or flooding. The proxy provides only rate limiting, brute force attack detection, and restricting of requests to the allowed destinations. The operating system IP configurations are hardened to a certain level but there are no further protections that are available. It is assumed that the relevant operating system hardening and traffic protection devices are employed to secure the deployment Cisco Contact Center.

    For more details refer to the Security Guidelines for Reverse-Proxy Deployment section in the Security Guide for Cisco Unified ICM/Contact Center Enterprise, Release 12.6(1) guide.

    Load Balancers and other devices which does not have the HTTP header support can skip second and third points that are mentioned above. However, this causes a sub-optimal deployment which will be functional but loses some critical security features listed previously and is not a recommended configuration certain features such as client IP logging for debugging purposes and blocking users attempting to brute force guess passwords.


Access VPN-Less proxy through Forward proxy and NAT

The VPN-less configuration assumes that the proxy is accessed by clients/agents from the internet, who have separate individual IP's which can be used for enforcing security features. However, not all deployments dedicatedly use agents from the internet with their own unique IP addresses. Most deployments will have agents accessing the reverse-proxy deployments both from the internet as well as from LAN using the same reverse-proxy access URI.

So, if you have a deployment which uses agents behind a proxy or a NAT that looks like what is shown above, certain configuration changes have to be made to ensure that the end-user IP's are correctly communicated to the reverse-proxy. The steps to configure are as follows:

  1. The Forward proxy (device A in the diagram above) has to be well-known in advance.

  2. The Forward proxy device has to transmit the agent IP’s in a predefined header. For example, X-Client-IP X-REAL-IP as shown above.

  3. If there are other intermediary devices such as a Load Balancer or WAF at the network where Finesse is deployed, before the requests reach the reverse-proxy, these devices must be able to allow the Forward proxy by its IP address and then transmit the HTTP header without any changes.


    Note


    It is crucial that the Forward proxy IP address is identified and only requests from this IP should be allowed to contain the pre-defined header from Step 3. All other requests unless they are an identified proxy IP should strip this header X-Client-IP transmitted.


  4. In core.env file, the variable NGX_LOAD_BALANCER_REAL_IP_HEADER should identify the header used to send the client IP. For example, X-Client-IP.

  5. The public IPs or the hostnames of the forward proxy needs to be added in the installer core.env using the variable NGX_LOAD_BALANCER_IPS, if the deployment does not have any other intermediary like WAFS before the request reaches the reverse proxy


Note


Deployments that do not have the HTTP header support can skip the steps 2 to 4. However, this causes a sub-optimal deployment which will be functional but loses certain security features listed above, which are dependent on client IP knowledge and these deployments are therefore not suggested.

Ensure that the deployment cannot support multiple HTTP header names to transmit the client IP corresponding to different Forward proxies that the network is interacting with.

Reverse proxy deployment cannot support multiple HTTP header names to transmit the client IP corresponding to different Forward proxies that the network is interacting with.


Deployments that need to support forward proxies AND intermediary devices

Deployments such as these, should transmit or detect the final client IP of the users who are connecting from behind the Forward proxy A and this would be an agreement between Load Balancer and the Forward Proxy.

The Load Balancer or the final intermediary devices that forward requests to the VPN-less reverse-proxy should transmit the required headers and will need configuration as described in the section above. The Forward proxy information is not required to be added to the VPN-less configuration, if the intermediary device is able to identify the correct client IPs and transmit them to the reverse-proxy using the steps mentioned above.

However, if the actual client IP resolution is not setup between the Forward proxy and the Load Balancer, the reverse-proxy considers the IP of the Forward proxy as the actual client IP.

In this case to avoid rate limiting to blocking of the Forward Proxy, its IP must be configured in the NGX_LOAD_BALANCER_IPS variable so that the proxy is not blocked or rate limited. This would be a sub optimal deployment and such deployments are not suggested due to security constraints.

In this case, to avoid rate limiting to block the Forward proxy, its private and public IP addresses must be configured in nginx.conf http block and maps.conf geo block files. Both the files must be updated with the list of Forward-proxies' IP as mentioned in the ##Must-change comments, so that the proxy is not blocked or rate limited. This would be a sub-optimal deployment and transmitting the actual client IP is recommended for a more effective deployment.

Troubleshooting Reverse Proxy

If you encounter the following issues while accessing your host or see errors after the installer starts running, refer below on how to troubleshoot them.

HTTP requests rejected with 412 status code

Check that the request has valid User-Agent configured and the value matches with the NGX_VALID_USER_AGENTS_REGEX value provided in the core.env configuration file.

HTTP requests rejected with intermittent 502 error

If there are frequent 502 responses for the requests, check the reason for the error in reverse proxy error logs. If the error says "no live upstreams while connecting to upstream", it means the number of requests for the upstream is more than what is defined. Set the NGX_SET_UPSTREAM_MAX_CONNS variable in core.env to false and restart the container.

HTTP requests rejected with 429 status code

Number of requests reaching reverse proxy is more than the rate limit defined in the environment configuration file.

Each component has specific rate limit defined, which supports the maximum load the component is qualified with. Investigate if these limits need to be increased. If required, you can increase the corresponding component’s rate limit in the environment configuration file. A scenario where this can occur is due to faulty network configuration where forward proxies are used to serve multiple downstream clients. For more details, refer to the Reverse Proxy Configuration section.

HTTP requests rejected with 403 status code

If the upstream servers return 403 errors for all the requests, check if mTLS is enabled in the upstream server by running the utils system reverse-proxy client-auth status command on the upstream server. If mTLS is enabled, you need to exchange the certificates between reverse proxy and the upstream server.

WebSocket requests rejected with 401 status code

If the WebSocket requests are rejected with 401 status code, check that the WebSocket requests header contains valid credentials as mentioned in the Authenticate WebSocket Connections section. This rejection is likely to occur when custom software attempts to connect to WebSocket but fails to provide the required headers or uses an unrecognized header value in the connection headers. Refer to the Authenticate WebSocket Connections section for instructions on how to disable or extend this check if needed to suit your deployment.

Accessing the desktop results in "This site can't be reached" or "connection timeout" errors

If iptables security hardening is applied on the OS using the install_os_settings.sh script, but the iptables configuration is disabled using the NGX_IPTABLES_HARDENING property in core.env, the container will not open the necessary ports upon startup. This will cause the proxy ports to remain inaccessible to internet clients, resulting in the aforementioned error.

To resolve this issue, either enable the NGX_IPTABLES_HARDENING property in core.env, or stop all containers and run the iptables -F -t mangle command to disable all iptables protection (not recommended).

Check Reverse Proxy Statistics

You can monitor the health of the reverse proxy container and track key statistics such as the number of active connections and requests.

Reverse Proxy Status API

To check the number of active connections the reverse proxy is handling in real time, use the following URL: https://<reverseproxy.fqdn>:10001/reverseproxy_status

Detailed Virtual Host Status API

Additional run time statistics for the Reverse Proxy Installer is now available, and can be accessed through the URL: https://<reverseproxy.fqdn>:10001/vhost_status. The statistics exposed contains the details about reverse proxy endpoints (aka servers), upstreams, and caches.


Note


The URL https://<reverseproxy.fqdn>:10001/vhost_status is not available through the DNS names configured for the external NIC interfaces and can be accessed only through the DNS names configured for internal interfaces.


For details on the statistics exposed, refer this document.

Access the Statistics from Within the Host

To check the statistics of reverse proxy from within the host in real time, run the following commands in the reverse proxy host:

podman exec -it <container_name> curl -k https://<reverseproxy.fqdn>:10001/reverseproxy_status

podman exec -it <container_name> curl -k https://<reverseproxy.fqdn>:10001/vhost_status