VPN-less Access to Finesse Desktop

VPN-less Access to Finesse Desktop

VPN-less Access to Finesse Desktop is a deployment model that allows users to access the Finesse desktop and its features directly from the internet without using a VPN. To enable this capability, you can use the Cisco-provided Reverse Proxy Automated Installer, which includes a built-in reverse proxy based on the OpenResty® Nginx proxy.

This VPN-less access supports all standard functions on the desktop, including Real Time and Historical Reports, as well as SSO authentication. It also includes the mechanism to tunnel ADFS access through the same proxy to facilitate SSO authentications.


Note


The desktop layout changes will take approximately 5 minutes to update on the desktop accessed via the reverse proxy.


In reverse proxy deployments, media access remains unchanged. Agents and supervisors can connect to the media using Cisco Jabber over the Mobile and Remote Access (MRA) solution or the Mobile Agent feature of Cisco Contact Center Enterprise with a PSTN or mobile endpoint.

Supported Reverse-Proxy Deployment Models

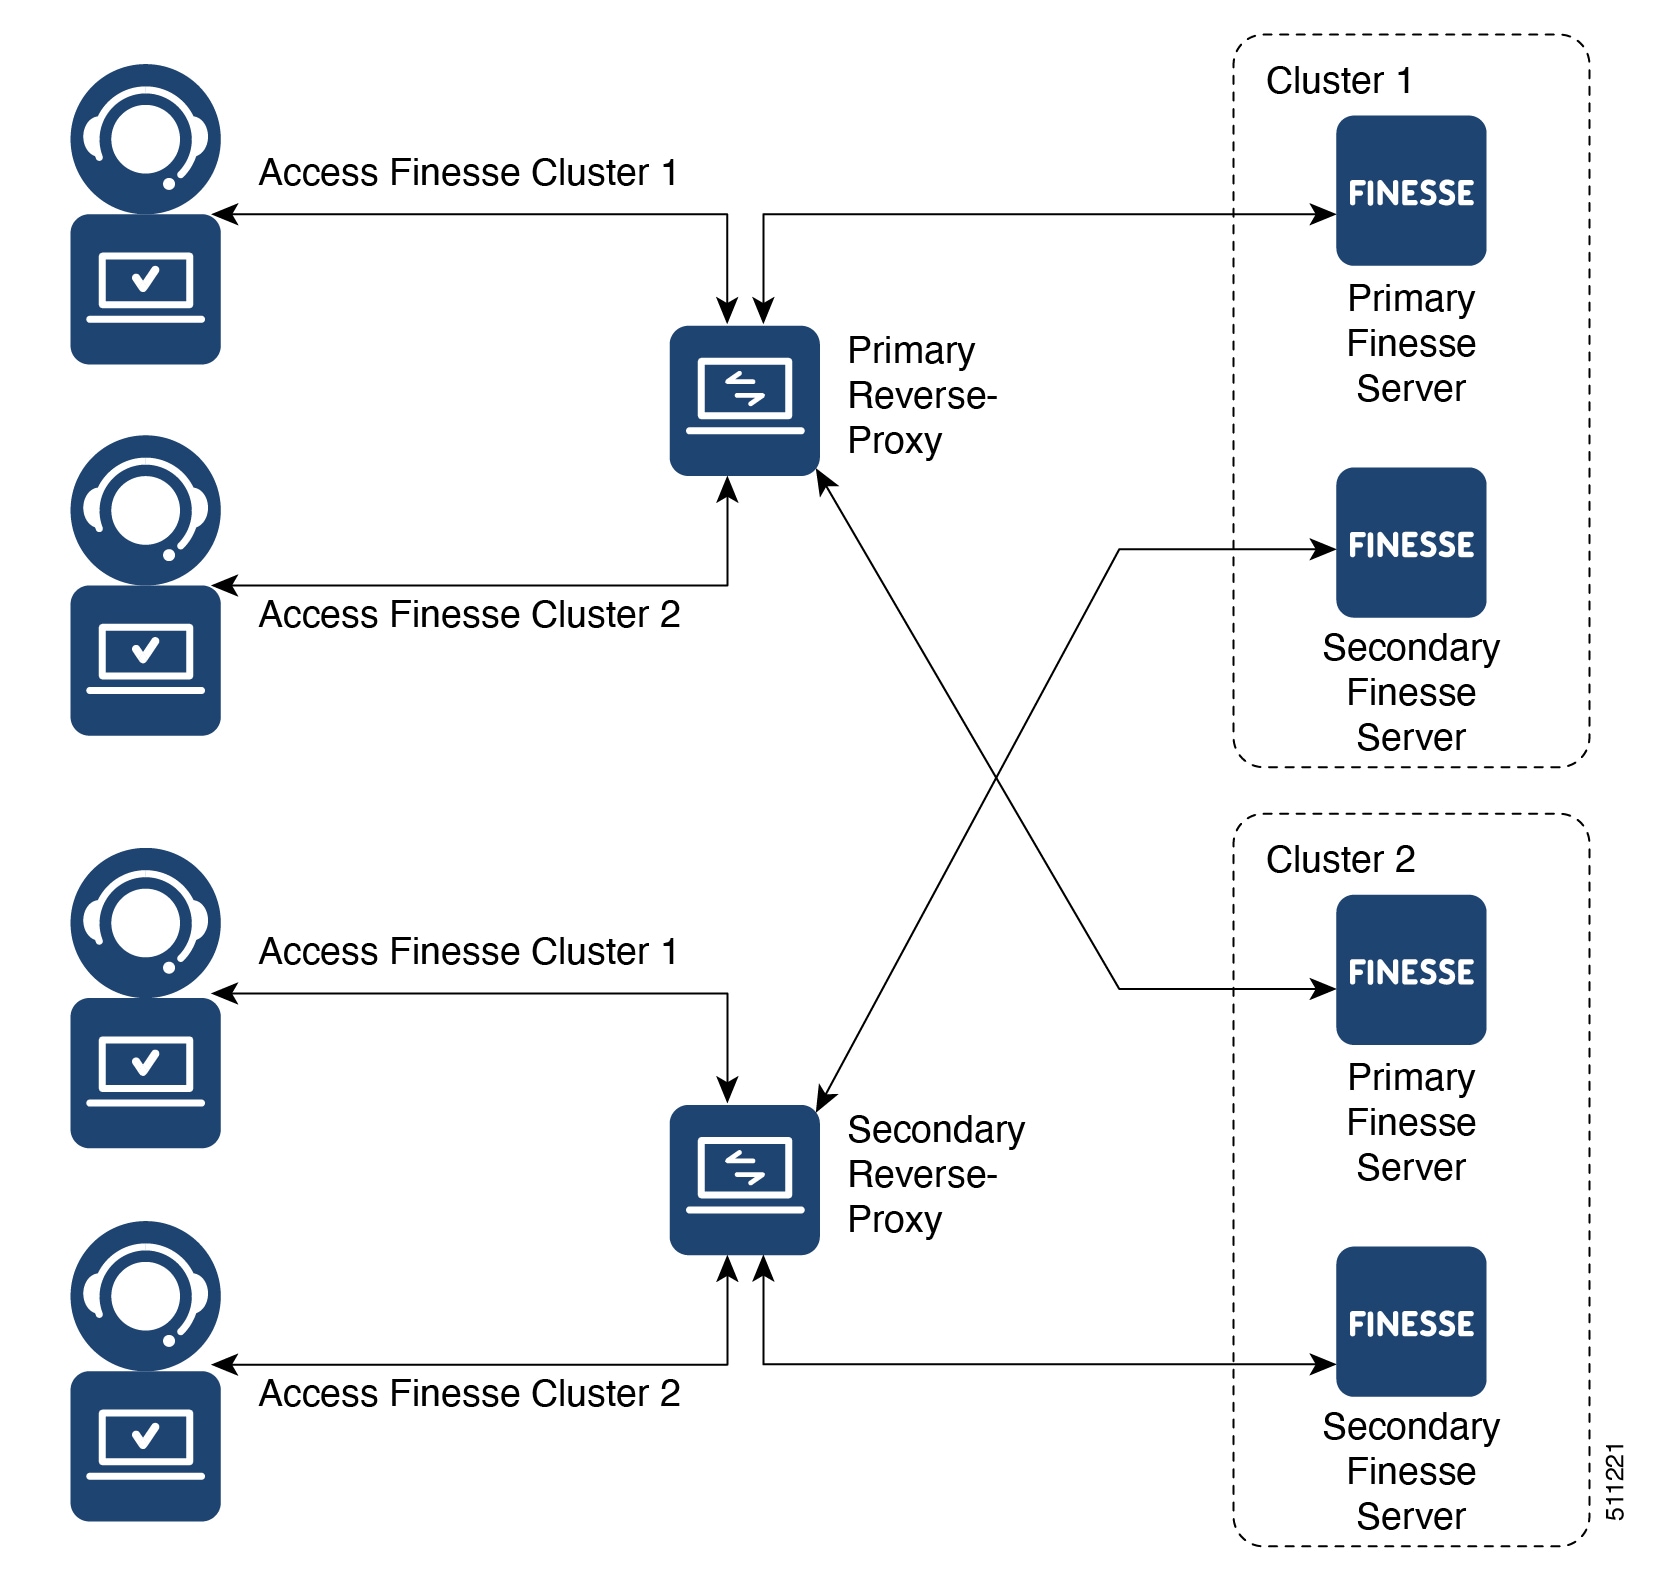
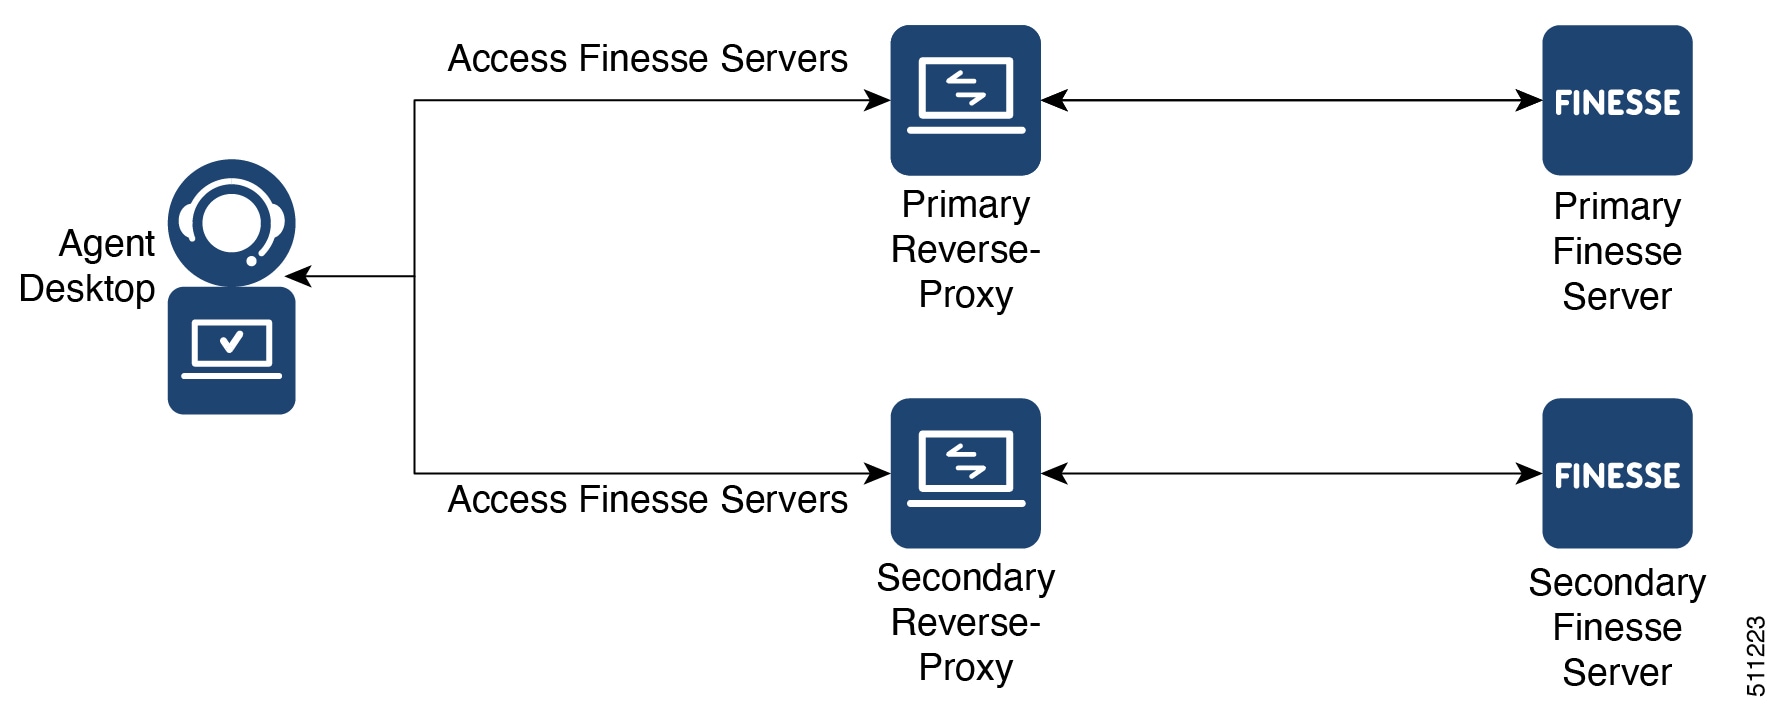
Reverse-Proxy deployment allows agents and supervisors to concurrently access the Finesse desktop from both LAN and via reverse-proxy. Cisco Contact Center supports the following two deployment models for VPN-less access to Finesse desktop using reverse-proxy:

  • One Finesse cluster connects to one high availability (HA) pair of reverse-proxy.

  • Multiple Finesse clusters connect to one HA pair of reverse-proxy.

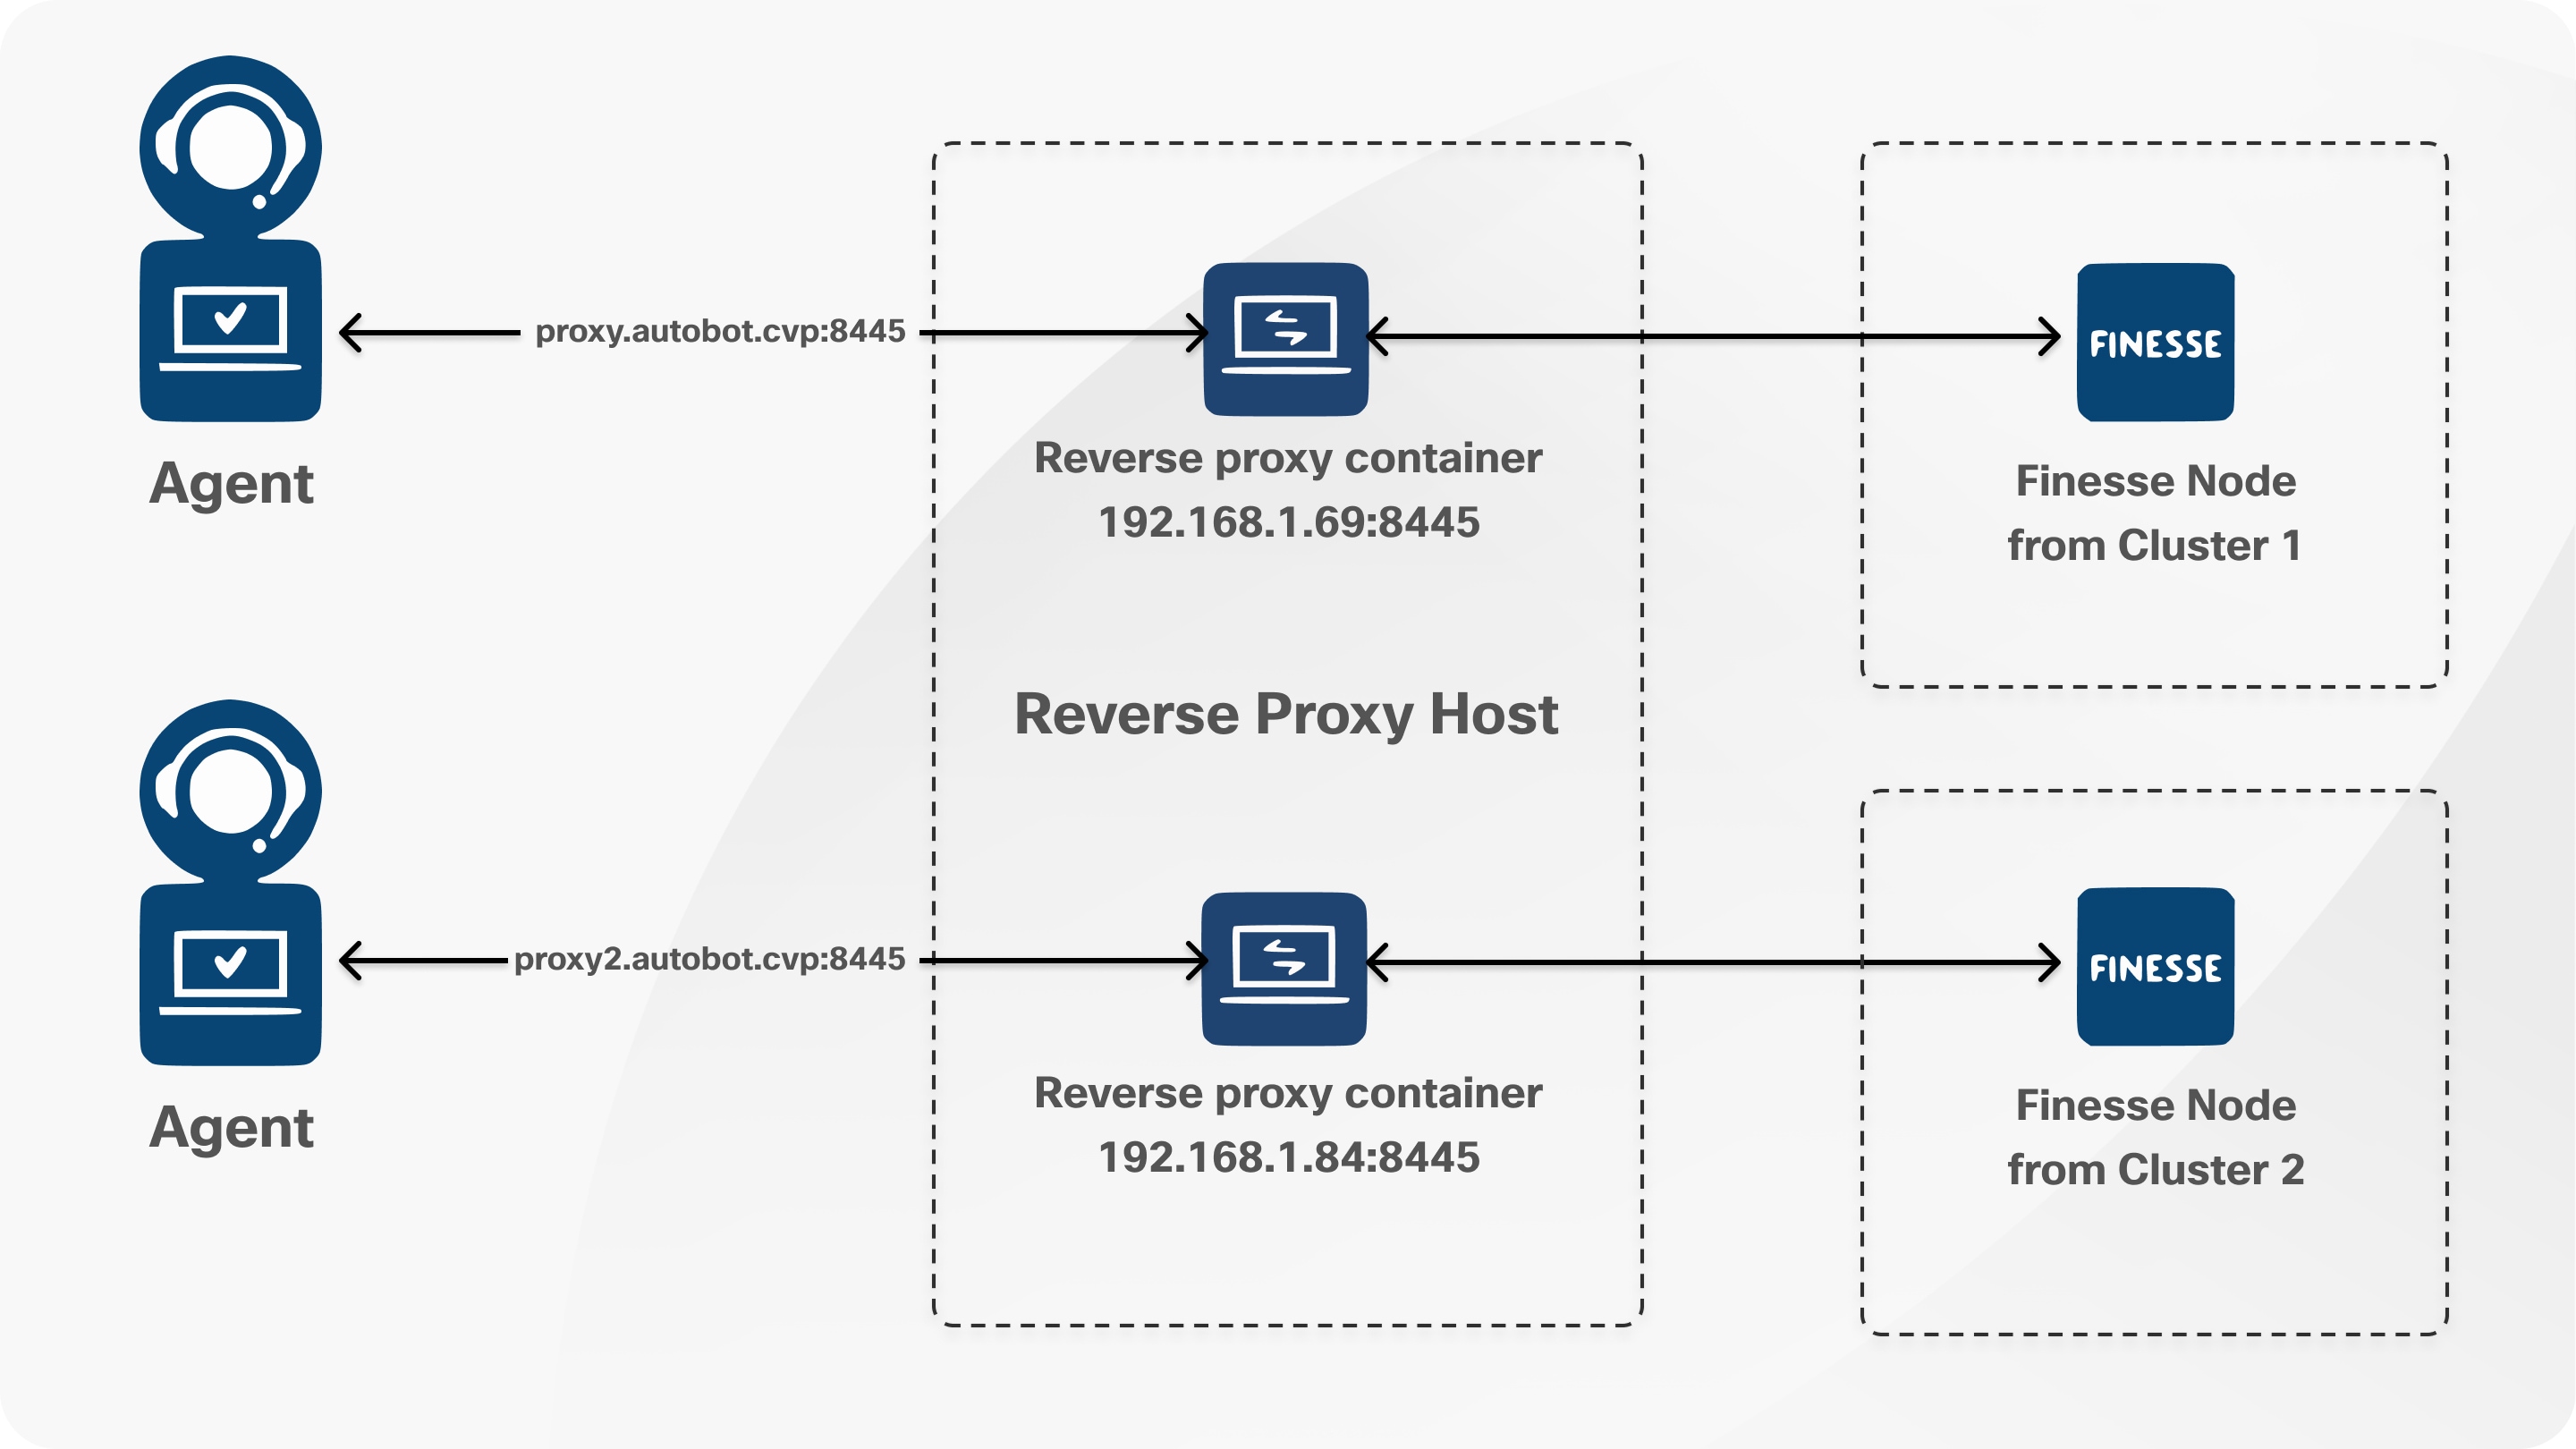
  • Multiple reverse proxy containers on the same host


Note


This is applicable to Finesse, IdS, Cisco Unified Intelligence Center, and Live Data clusters.


Figure 1. Single Finesse Cluster per HA Reverse-Proxy
Figure 2. Multiple Finesse Clusters per HA Reverse-Proxy

Reverse-Proxy Selection and Configurations

This section provides information about the recommendations for hardware, performance, scale, and gadget compatibility for reverse proxy.

If you choose to not use the reverse proxy installer that Cisco has provided and want to deploy a custom reverse proxy, see Guidelines for Custom Reverse Proxy Deployment.

Performance and Hardware Recommendations

The hardware recommendations are as follows:

Deployment

Hardware Recommendation

2000 users

4 virtual CPU, 8 GB RAM, and 100 GB HDD

4000 users

8 virtual CPU, 16 GB RAM and 200 GB HDD

6000 users

8 virtual CPU, 16 GB RAM and 200 GB HDD


Note


The load has been tested on 2000 users and 4000 users deployments. Deployments above 6000 users have not been qualified.


A minimum of 8 GB memory is recommended for the proxy server when all other nonessential services and graphical subsystems are disabled.


Note


It is recommended that deployments gradually onboard new solution components to the proxy until 50-55% of the proxy CPU is free. With this it can cope with unexpected spikes in traffic from the internet.

Additional memory must be configured based on the in-memory cache configuration added to Nginx.


Determine Gadget Compatibility

Determining the gadget compatibility is an important activity for planning a VPN-less Finesse deployment.

After deploying the reverse-proxy, all Cisco-provided gadgets (Cisco Finesse and Cisco Unified Intelligence Center) work seamlessly with their respective servers of Release 12.6(1) or later. The CCAI gadgets also work seamlessly with VPN-less Finesse deployments. You can remove the specific gadgets, if needed.

In some scenarios, depending on the gadget design, custom third-party gadgets require workarounds to enable them to work with the reverse-proxy deployment. Refer to the following sections to determine if any of your gadgets require workarounds.


Note


  • Gadgets that are loaded from servers other than Finesse server should use exclude-url feature in the gadget XML specification to load the Finesse resources such as Finesse.js. For more information, refer to the Use Gadget URI Exclude Feature to Refer to Finesse Resources section.

  • If you use two different URLs, one internal and one external, in Enterprise Chat and Email (ECE), you must update the Finesse desktop layout to use only the external URL. If you use an internal-only ECE (for integrations that support only ECE email routing), you must change the ECE web server to ensure that the ECE services are accessible externally.


Gadget Types and VPN-less Compatibility

Finesse gadgets are classified into the following types based on how they are designed operationally:

  • Gadgets that are self-contained within the desktop. These gadgets do not have to make any additional network requests, or are restricted to invoking Finesse APIs and APIs on the internet.

  • Gadgets that provide their functionality by communicating with an accompanying server that is deployed in the DMZ and is reachable directly from the internet and LAN.


    Note


    To enable the same desktop layout to be used by both LAN-based and internet-based clients, the server installed in a DMZ should also be reachable from servers such as Finesse in LAN, and from clients that are running within the LAN.


  • Gadgets that need to communicate with an accompanying server deployed in LAN, but uses desktop-provided makeRequest API to communicate to the server. The makeRequest API routes all the requests through the Finesse server and does not directly reach the server that is deployed in the LAN.


    Note


    These requests succeed in a reverse-proxy deployment only if the requests are made using the hostname and port. The hostname and the port must be reachable from LAN because the requests are run by Finesse server which runs on LAN.


  • Gadgets that have to communicate directly with any one of the following types of accompanying server:

    • Server deployed within the LAN and is not reachable directly from the internet.

    • Server that communicates with an additional port apart from the HTTP port used to load the gadget.

The last two types of gadgets have to be modified to be used in a reverse-proxy deployment. The steps required to enable these gadgets to be accessed from internet clients are as follows:

  • Enable VPN-less access for custom gadgets

  • Send hostname and port information to gadgets

  • Use gadget's URI Exclude feature to refer to Finesse resources

Enable VPN-less Access for Custom Gadgets

Gadgets that communicate directly with accompanying servers that are deployed in LAN must handle the following aspects to work correctly in a reverse-proxy deployment:

  • Use the right hostname and port for communicating with its accompanying server.

    A gadget can find the correct hostname and port corresponding to the server from which the gadget was loaded, by using the gadgets.util.getUrlParameters().up_urlPrefs API provided by the Finesse Javascript API.

    To find additional ports or hostnames that are required, data can be passed in as gadget preference such that the additional host and port information can be sent to the gadget. For more information, refer to the Send Hostname and Port Information to Gadgets section.

  • Ensure that the communications are forwarded correctly by the reverse-proxy.

    After the gadget starts communicating with the correct host and port information, the hostname and port number have to be forwarded to the server deployed in the LAN. This can be done by opening the appropriate ports in the DMZ firewall. Also, ensure that the appropriate ports and rules are added to the reverse-proxy rules to forward the traffic to the correct server in the LAN.

  • Best Practice: If requests to external servers are made using Finesse authentication headers, a common validation is enabled to authenticate the requests at the proxy. Gadgets that do not use Finesse authentication should plan to implement their own custom authentication schemes to ensure that the requests are validated at the proxy before sending to the Finesse server.

Send Hostname and Port Information to Gadgets

Gadgets that send host and port information corresponding to a server deployed within the LAN can use the UserPreferences feature supported by Finessse gadgets. This feature allows a configurable, named information to be passed to the gadget. The information can be referenced within the gadget XML or programmatically by using a Javascript.

For more information on how to use UserPreferences method, refer to Gadget Preferences.

The UserPreferences that are created for this purpose should start with the keyword externalServerHostAndPort in its name. This enables Finesse to substitute the host and port that are provided with the corresponding entry from the proxyMap file. For example:

<UserPref name="externalServerHostAndPort_chat” display_name="Chat_externalServerHostAndPort"
default_value="SMHostName:7443" datatype ="hidden"/>

Note


The default_value parameter is not case sensitive.


When accessed from the LAN, the UserPreferences continues to have the default value that is configured in the XML. However, when accessed through the reverse-proxy, the UserPreferences receives the value from the proxyMap file. For example:

SMHostName:7443=external-proxy-host:4043

When accessed through the reverse-proxy, the gadget receives the port 4043 and host name as external-proxy-host.

Use Gadget URI Exclude Feature to Refer to Finesse Resources

Add the following content within the ModulePrefs tag of the gadget XML to ensure that the resources that are loaded from Finesse server are excluded from concatenation. This step is mandatory for gadgets that load their XML from custom servers.

<Optional feature="content-rewrite">
<!-- these files will be directly served by Finesse, not through shindig -->
<Param name="exclude-url">finesse.min.js</Param></Optional>

Finesse URL

Agents and supervisors should bookmark two different pairs of URLs (publisher and subscriber) for accessing the Finesse desktop through both the Contact Center network and the reverse-proxy.

VPN-less Finesse configurations

To configure VPN-less access to Finesse desktop, the Contact Center administrators and the network administrators must work in tandem.


Note


Don't allow access to the reverse-proxy in your external firewall until all security configurations are in place. To test your changes, use a host that isn’t publicly accessible.


The configuration steps are as follows:

  1. Populate Network Translation Data

  2. Host the Mapping File

  3. Add Proxy IP by Using CLI

  4. Configure Reverse-Proxy Host Verification

  5. Configure Proxy Mapping by Using CLI

  6. Configure CORS and Frame-Ancestors

  7. Configure SSO

Populate Network Translation Data

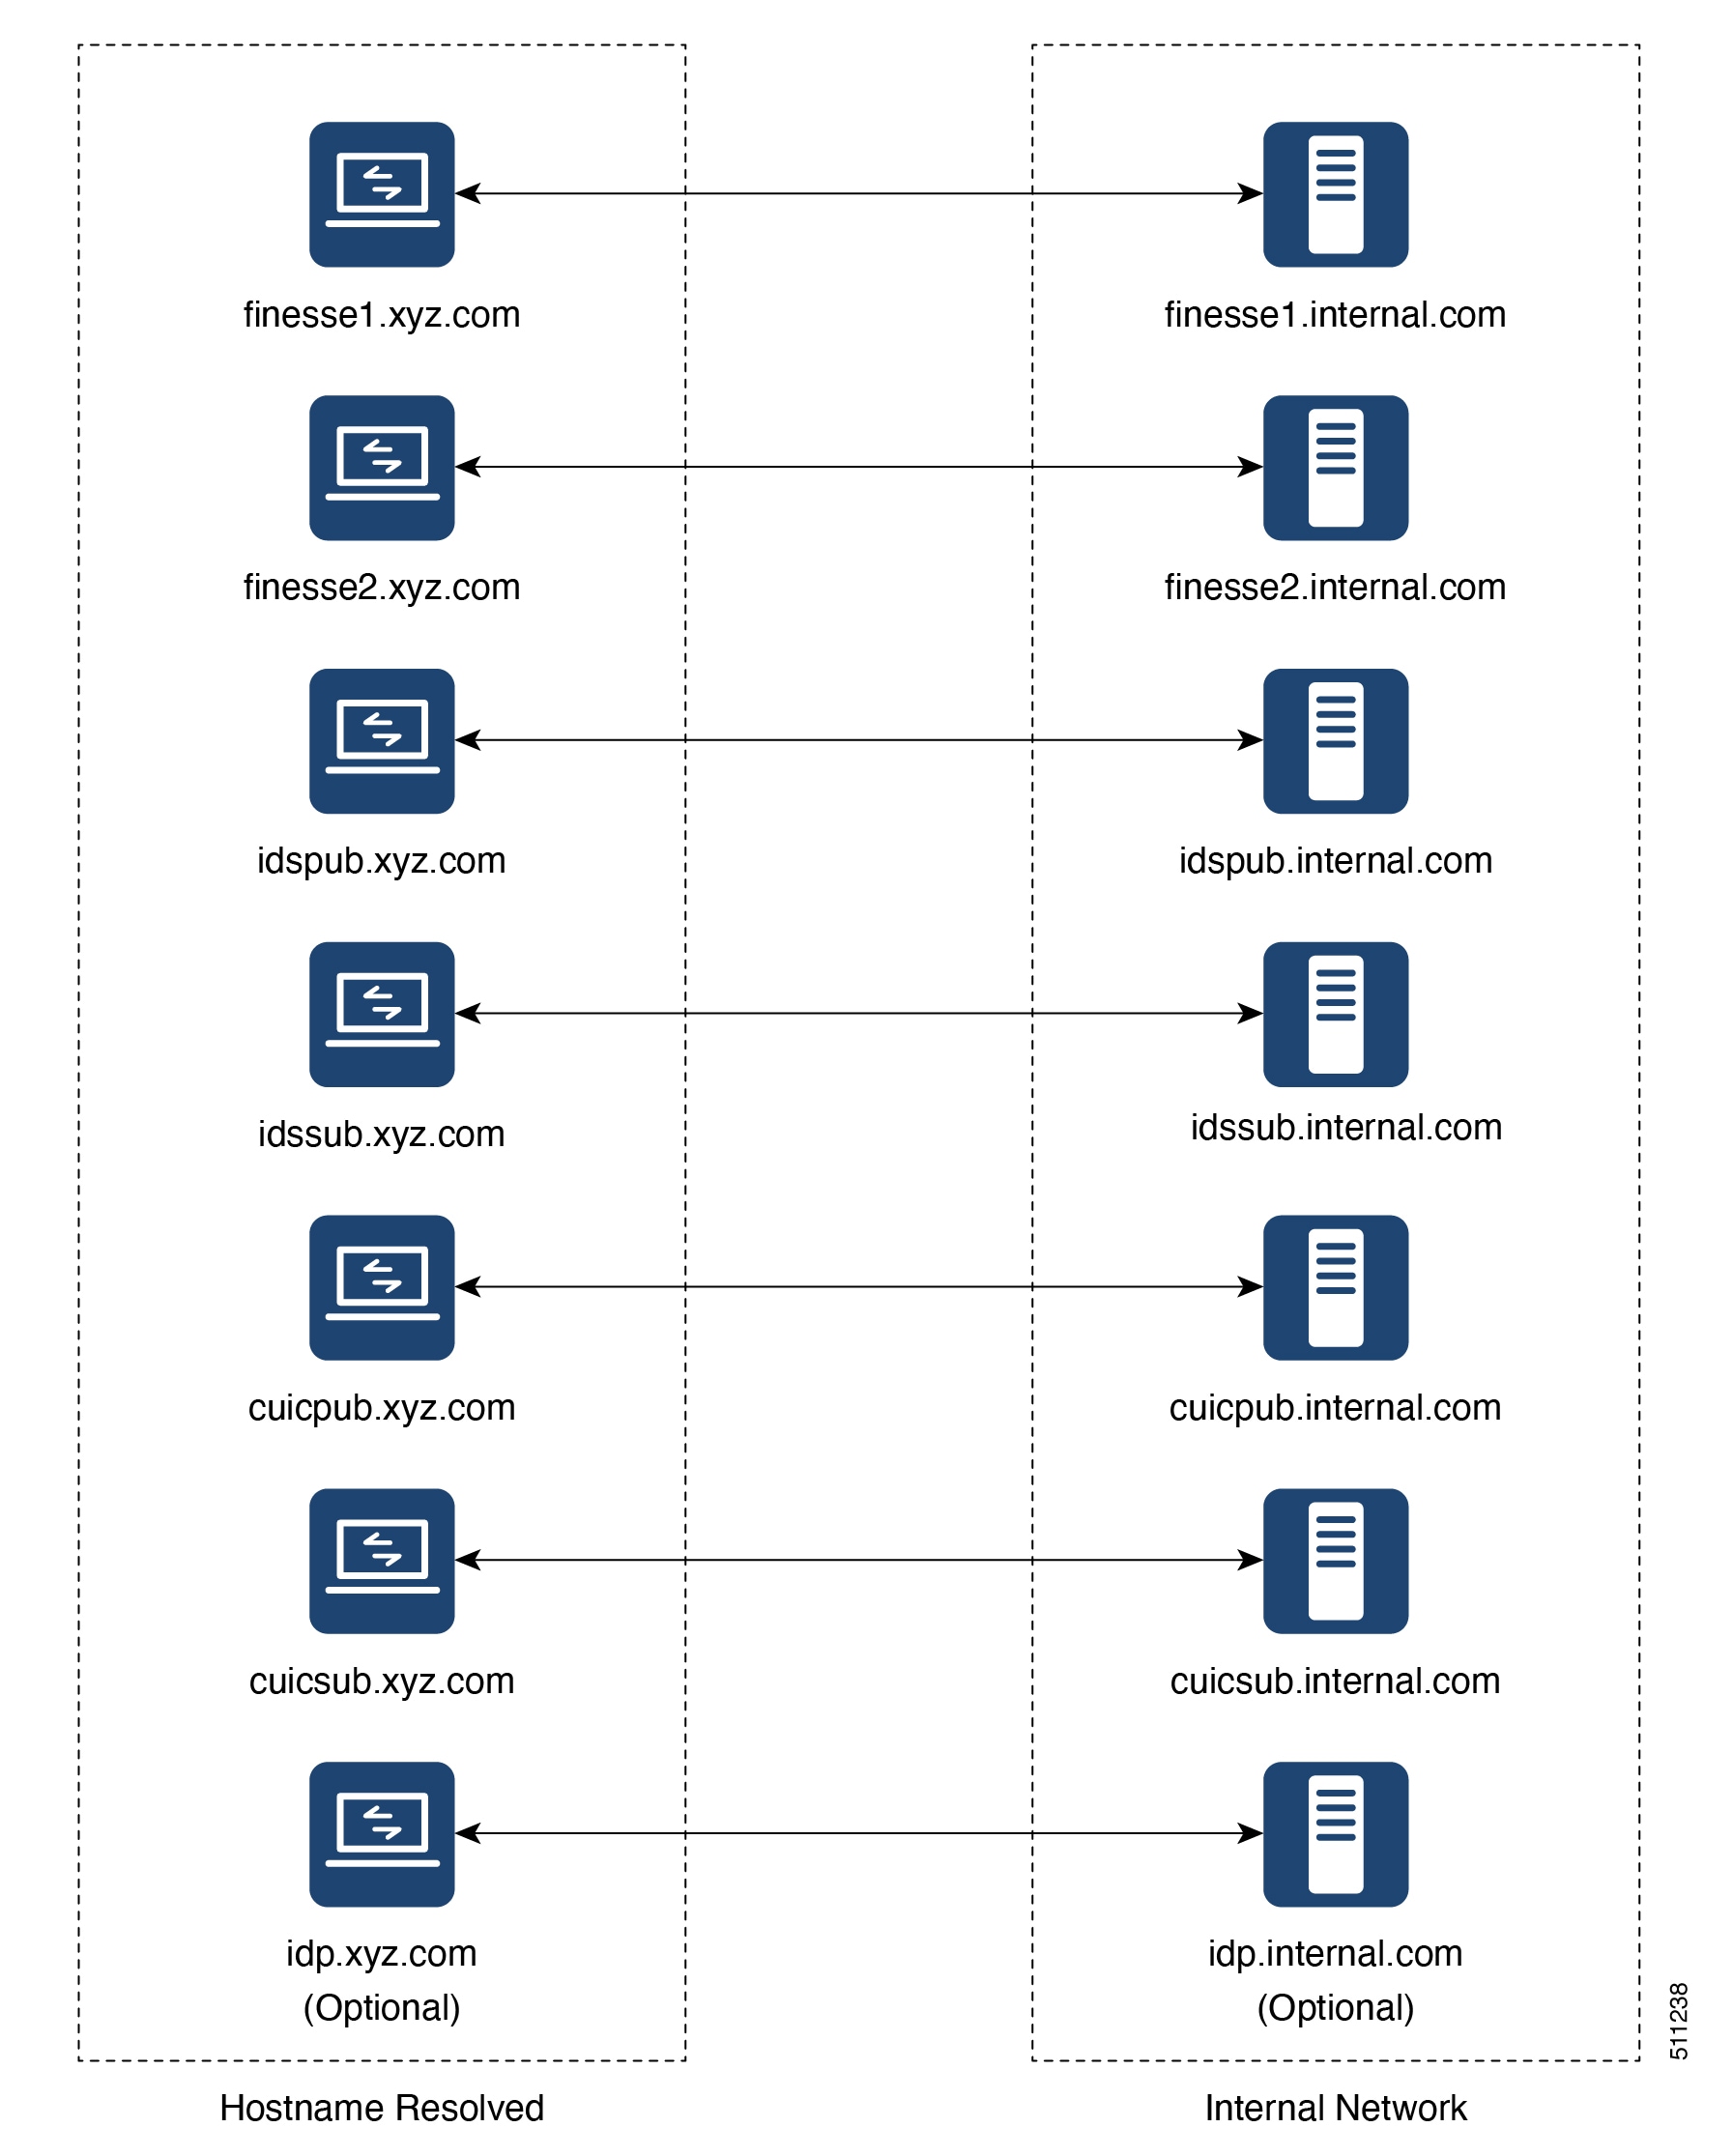
The Proxy-config map file is similar to a plain property file in which the values are separated by the equal sign. Left Hand Side (LHS) contains the host and port of Finesse, IdS, and Cisco Unified Intelligence Center. Right Hand Side (RHS) contains the values of the host and port that are exposed through reverse-proxy to access the Finesse desktop.

Network administrator and Finesse administrator must create a Proxy-config map file that has the mapping for all the default ports of the Cisco components. The external traffic from the Internet will be redirected to the default ports. For example, 8445 port of Finesse, 8553 port of IdS, and 8444 port of Cisco Unified Intelligence Center.

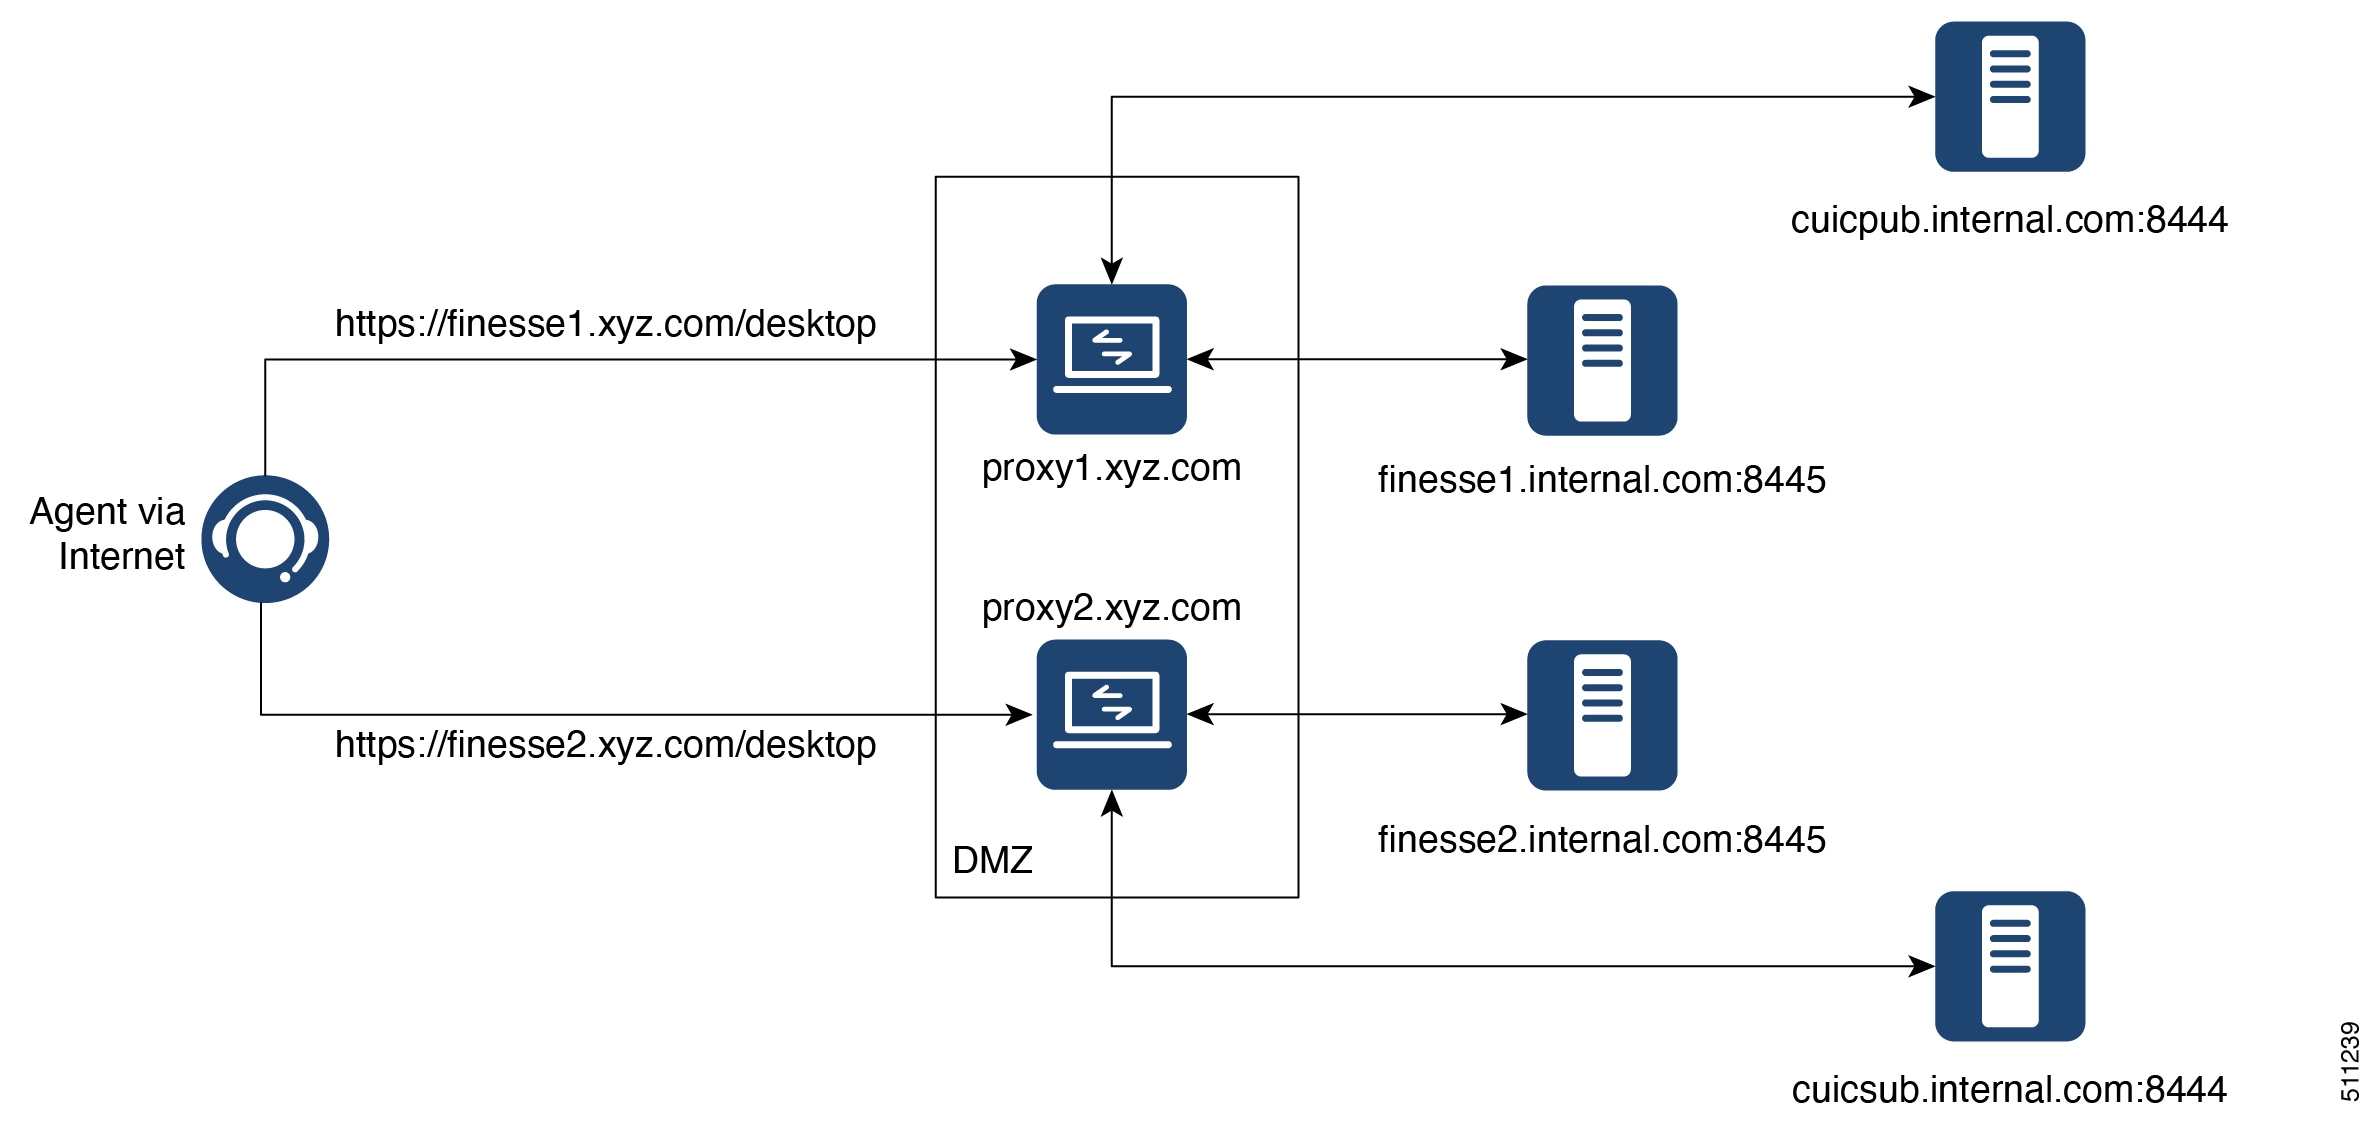
The Proxy-config map file must be hosted on a web server that is accessible by the Finesse, IdS, and Cisco Unified Intelligence Center servers. The following list is an example of systems and hosts that are required for a two-node Finesse cluster with two Cisco Unified Intelligence Center nodes using SSO mode:

  • Publisher = finesse1.internal.com

  • Subscriber = finesse2.internal.com

  • IdS Publisher = idspub.internal.com

  • IdS Subscriber = idssub.internal.com

  • IdP = idp.internal.com (optional)

  • CUIC Publisher = cuicpub.internal.com

  • CUIC Subscriber = cuicsub.internal.com

  • Proxy Node1 = proxy1.xyz.com

  • Proxy Node2 = proxy2.xyz.com

If the selected proxy supports port-based forwarding, the following is an example of a mapping file that contains the entries that are required for a two-node Finesse cluster with two Cisco Unified Intelligence Center nodes using non-SSO mode.


finesse1.internal.com:8445=finesse1.xyz.com:443
finesse2.internal.com:8445=finesse2.xyz.com:443
idspub.internal.com:8553=idspub.xyz.com:443
idssub.internal.com:8553=idssub.xyz.com:443
idp.internal.com:443=idp.xyz.com:443
cuicpub.internal.com:8444=cuicpub.xyz:8444
cuicsub.internal.com:8444=cuicsub.xyz:8444

Note


  • The IdP entry idp.internal.com:443=idp.xyz.com:443 is optional. You must add this entry when the IdP hostname configured with IdS is different for reverse-proxy and LAN.

  • The entries of the proxy-map file are not case sensitive.

  • If the proxy map file entries do not contain colon (:), it is assumed that only the hostname is entered. If you have not provided any port value, the port number 443 is considered as the default port.


Figure 3. Hostname Mapping Example
Figure 4. Network Architecture Example

Host the Mapping File

The mapping file that is created in the Populate Network Translation Data section, is used by the solution components (Finesse, IdS, and CUIC servers) servers to modify their responses, to enable clients to access the solution via the reverse-proxy. This requires the file to be hosted on any web server accessible by the component servers. The reverse-proxy server, Finesse server, or any web server configured by the administrator can be used for this purpose.

To access the mapping file, the host server's SSL certificate must be uploaded (using the cmplatform admin application) to the individual nodes of the services. After uploading the file, verify if the URL is accessible from Finesse, IdS, and CUIC servers. For example, https://proxyserver.xyz.com:10000/proxymap.txt. HTTP-based URLs are allowed for hosting the mapping file through HTTPS, which is the recommended access scheme.

The following is an example of the CLI to view the content of the proxy map file.


admin:utils system reverse-proxy show-proxy-config-map

finesseXX.autobot.cvp:8445=astproxy.cisco.com:8445
finesseXYZ.autobot.cvp:8445=astproxy125.cisco.com:8445
cuic-YY.autobot.cvp:8444=astproxy.cisco.com:8444
cuic-YY.autobot.cvp:8447=astproxy.cisco.com:8447
livedata-LL.autobot.cvp:12005=astproxy.cisco.com:12005
livedata-LL.autobot.cvp:12008=astproxy.cisco.com:12008
cuic-PQR.autobot.cvp:8444=astproxy125.cisco.com:8444
cuic-PQR.autobot.cvp:8447=astproxy125.cisco.com:8447
livedata-ABC.autobot.cvp:12005=astproxy125.cisco.com:12005
livedata-ABC.autobot.cvp:12008=astproxy125.cisco.com:12008
ids.autobot.cvp:8553=astproxy.cisco.com:8553
ids2.autobot.cvp:8553=astproxy125.cisco.com:8553
finadfs-WXY.finesse.com:443=astproxy-idp.cisco.com:443
fincup1-WX.cisco.com:5280=astproxy.cisco.com:5280
fincup2-PQ.cisco.com:5280=astproxy125.cisco.com:15280
fincup3-RST.cisco.com:5280=astproxy.cisco.com:25280

Add Proxy IP by Using CLI

The administrator must use CLI to add the list of trusted reverse-proxy IP addresses and their corresponding hostnames. This must be done on all the nodes of Finesse, IdS, CUIC, and LiveData (12.6(1) ES01 and above). These components consider only requests from the configured hosts or IP addresses as valid.


Note


  • Ensure to add the hostnames that are resolvable from the respective components from where the CLI is run.

  • Ensure to add both public and private IP addresses of the reverse-proxy.

  • The allowed hosts must not contain the hostname or IP address of the load balancer. It should contain only the internal and external hostname and IP address of the reverse-proxy.


The following is an example of the CLI to add the hosts and IP addresses:


admin:utils system reverse-proxy allowed-hosts add 10.78.95.178
Source 10.78.95.178 successfully added
admin:utils system reverse-proxy allowed-hosts add proxy.xyz.com
Source proxy.xyz.com successfully added

Restart Cisco Web Proxy Service for the changes to take effect: utils service restart Cisco
Web Proxy Service

If the added hostname is not resolvable from a component, the following error is displayed:

admin:utils system reverse-proxy allowed-hosts add group.facebook
Either IPv4 address or hostname is invalid or is not resolvable. Now validating IPv6 address
for source group.facebook

Operation failed, please enter valid source(s). Source group.facebook is invalid

After adding proxy hosts as trusted hosts through CLI on individual nodes, you must upload proxy server certificates to the Tomcat trust store of the respective components. This is required for proxy authentication to work. Otherwise, the traffic from proxy will be rejected by the components. For information about generating proxy certificates and uploading to the Tomcat trust store, see the Set up Nginx reverse proxy certificate and Generate and Copy CA Certificates of VOS Components sections in the Security Guide for Cisco Unified ICM/Contact Center Enterprise.


Note


If you are upgrading from 12.6(1) ES01, you must copy and upload proxy server certificates to the Tomcat trust store of the respective components. The certificates are required at the component server to verify and allow TLS connections from the proxy.


The following is an example of the CLI to view the list of allowed hosts and IP addresses:


admin:utils system reverse-proxy allowed-hosts list
Source proxy.xyz.com successfully added list
The following source(s) are configured:
1. 10.78.95.178
2. proxy.xyz.com
3. proxy125.xyz.com

The following is an example of the CLI to delete an entry from the list of allowed hosts and IP addresses. This command lists all the configured proxy hosts and IP addresses, and gets user input to delete specific or all proxy hosts and IP addresses.


admin:utils system reverse-proxy allowed-hosts delete
Select the reverse-proxy source IP to delete:

 1) 10.78.95.178
 2) proxy.xyz.com
 3) proxy125.xyz.com
 4) all
 5) quit

Please select an option (1 - 5 or "q" ): 1
Delete operation successful

Configure Reverse-Proxy Host Verification

You can configure SSL certificate verification for communication between reverse-proxy host and the Cisco Web Proxy Service by running the following CLI command on both publisher and subscriber nodes of Finesse:

utils system reverse-proxy client-auth

This command has the following parameters:

  • enable

  • disable

  • status

By default, the host authentication is enabled.

The following is an example of the CLI to view the status of the host authentication:

admin:utils system reverse-proxy client-auth status

SSL certificate verification for connections established from reverse proxy hosts is disabled

The following is an example of the CLI to enable the host authentication:

admin:utils system reverse-proxy client-auth enable
SSL certificate verification enabled for connections established from reverse proxy hosts

Restart Cisco Web Proxy Service for the changes to take effect:
utils service restart Cisco Web Proxy Service

Note


When client authentication is enabled, ensure that the trusted hostnames added via the reverse proxy CLI are resolvable through a DNS lookup; otherwise, the web proxy server will fail to start.


Note


After enabling the reverse-proxy host authentication, browser-based clients that connect to Finesse Desktop via LAN hostname must select a client certificate. A pop-up is displayed on systems where client certificates are installed. Clients can choose any of the certificates listed in the pop-up, and continue to connect to Finesse.


The following is an example of the CLI to disable the host authentication:

admin:utils system reverse-proxy client-auth disable
SSL certificate verification disabled for connections established from reverse proxy hosts

Restart Cisco Web Proxy Service for the changes to take effect:
utils service restart Cisco Web Proxy Service

Configure Proxy Mapping by Using CLI

The Proxy-config map file can be configured in the Finesse, IdS, and CUIC servers using the utils system reverse-proxy config-uri command. If the URL is configured to use HTTPS protocol, Finesse, IdS, and CUIC must have the certificate (certificate of the web server hosting the URL) uploaded in /cmplatform. The administrator can configure a maximum of two URLs. The URL that is added first takes precedence and that URL is polled to detect changes in the mapping file. When the URL is not accessible, the alternate URL is used. The following is an example of the CLI to list the configured Proxy-config map URLs:


admin:utils system reverse-proxy config-uri list
Currently no source is configured

The following is an example of the CLI to configure the Proxy-config map URL on the Finesse, IdS, and CUIC servers:


admin:utils system reverse-proxy config-uri add https://saproxy.xyz.com:10000/proxyconfig.txt
Operation failed, please enter valid source(s). Source
https://saproxy.xyz.com:10000/proxyconfig.txt is invalid
admin:utils system reverse-proxy config-uri add https://saproxy.xyz.com:10000/proxymap.txt
Source https://saproxy.xyz.com:10000/proxymap.txt successfully added
admin:utils system reverse-proxy config-uri list
The following source(s) are configured:
1. https://saproxy.cisco.com:10000/proxymap.txt

The following is an example of the CLI to delete existing Proxy-config map URLs. This command lists all the configured Proxy-config URLs and gets user input to delete specific or all Proxy-config URLs:


admin:utils system reverse-proxy config-uri delete
Select the reverse-proxy source URI to delete:
1) https://saproxy.xyz.com:10000/proxymap.txt
2) all
q) quit
Please select an option (1 - 2 or "q" ): 1
Delete operation successful

The following is an example of the CLI to set the Proxy-config update frequency (in minutes). Based on the set frequency, the local file system of Finesse, IdS, and CUIC are updated with the content from the Proxy-config map file. Before configuring the URL, this command does not return any value. After configuring the Proxy-config map URL, by default it returns one minute as the value.


admin:utils system reverse-proxy show-config-update-frequency
No config-uri configured
admin:utils system reverse-proxy config-uri add https://saproxy.xyz.com:10000/proxymap.txt
Source https://saproxy.xyz.com:10000/proxymap.txt successfully added
admin:utils system reverse-proxy show-config-update-frequency
1 minute
admin:utils system reverse-proxy set-config-update-frequency 5
admin:utils system reverse-proxy show-config-update-frequency
5 minutes

Configure CORS and Frame-Ancestors

Add both the primary and secondary reverse-proxy origins on publisher and subscriber nodes of Finesse and CUIC. If you change Cross-Origin Resource Sharing (CORS) allowed list and frame-ancestors, you must restart Finesse Notification and Tomcat services. For information about restarting Finesse notification service, see the Cisco Finesse Services section in Cisco Finesse Administration Guide.

  • Administrators must add the list of proxy server origins on the allowed list of CORS origins, if the CORS setting is enabled on Finesse, CUIC, and Live Data.

  • Frame-ancestors are added automatically while adding the reverse-proxy trusted hosts in Finesse servers.

  • Administrators must add frame-ancestors while adding reverse-proxy trusted hosts in CUIC servers.

  • Administrators must delete the corresponding allowed list of CORS and frame-ancestors entries while deleting the trusted hosts of a reverse-proxy.


Caution


If you do not delete the corresponding CORS and frame-ancestors entries, it becomes a security vulnerability.


Note


CORS and frame-ancestors are not applicable to IdS.


For information about deleting CORS see the Cross-Origin Resource Sharing (CORS) section in the Cisco Finesse Administration Guide.

For more information about configuring CORS, see the Live Data CORS Configuration section in Cisco Unified Contact Center Enterprise Installation and Upgrade Guide.

For information about deleting frame-ancestors see the Supported Content Security Policy Directives section in the Cisco Finesse Administration Guide.

Run Multiple Reverse Proxies on a Single Host

Supporting multiple upstreams from a single reverse proxy instance is relatively straightforward, provided they are accessed using different target URI hostnames. However, this setup is not ideal for maintenance activities. Additionally, when multiple Unified CCE instances need to be supported, using a single reverse proxy instance may not be the best approach from a security perspective. In these scenarios, running multiple container instances is necessary or preferable.

Running multiple instances of the reverse proxy on a single host allows the deployment to:

  • Support multiple Finesse clusters from the same Unified CCE deployment

  • Support multiple Unified CCE deployments

  • Administer the instances separately

You can now accomplish this by configuring multiple DNS-to-hostname mappings to ensure proper upstream resolution.

You can run multiple proxy containers on the same host using multiple DNS hostnames mapped to distinct IP addresses on the same host. You must configure these IP addresses against the same external NIC configured for the reverse proxy container as part of the install_os_settings.sh configuration. For details on the configuration steps, see the sections below.

Figure 5. Multiple reverse proxy containers on a single host

Configure Multiple DNS Hostnames for the Reverse Proxy Host

Supporting multiple container instances from the same host requires the following resources:

  1. A mechanism or URL for the client to refer to each end point uniquely. This is typically implemented using multiple DNS entries exposed to the internet so that each end point can be addressed individually.

  2. A unique IP for each set of conflicting ports that needs to be supported from the same machine. Multiple hosts reachable on the same port can be supported within the same instance of reverse proxy without any port conflict as long as the externally visible hostnames are different.

For example, the same reverse proxy instance can support two external servers on the same port, as shown in the following examples:

  • FinesseA.proxy.com:8445

  • FinesseB.proxy.com:8445

This is possible because the proxy redirects the requests based on the request headers and URL accessed to resolve the hostname to the correct upstream.

However, when the two Finesse instances in the example above need to run on two different proxy instances, port conflicts occur. This is because the proxy instances are two distinct physical processes on the same host. As a result, they require unique IP addresses to use the same port.

Follow the steps to configure multiple IP addresses on the same host and enable the reverse proxy to use these distinct IPs:

  1. Configure new IPs for the host. Refer to Configure New IPs for the External NIC.

  2. Add new DNS alias names for the new IPs added.

    This step is dependent on your DNS server. Post DNS addition, ensure that there are two different hostnames / DNS entries that resolve to the appropriate IPs:

    • proxy1.cisco.com → resolves to IP1

    • proxy2.cisco.com → resolves to IP2

    Create multiple DNS entries for each component that is served from each IP, as shown in the following example:

    • finesse.proxy1.cisco.com → resolves to IP1

    • ids.proxy1.cisco.com → resolves to IP1

    • cuic.proxy1.cisco.com → resolves to IP1

    • finesse.proxy2.cisco.com → resolves to IP2

    • ids.proxy2.cisco.com → resolves to IP2

    • cuic.proxy2.cisco.com → resolves to IP2

  3. Configure the environment files and properties in the reverse proxy instances to use the new IP and hostnames.

    Modify the PROXY_BINDING_IP property in installer.env to point the installer to the appropriate IP to be used. Modify the component environment properties to use the appropriate hostname, as shown in the following example:

    • Finesse environment property in reverse proxy instance 1 will use finesse.proxy1.cisco.com

    • IdS environment property in reverse proxy instance 1 will use ids.proxy1.cisco.com

  4. Configure the external redirection to reach the correct internal IP:

    • finesse.proxy1.cisco.com → resolves at the DMZ edge to IP1

    • finesse.proxy2.cisco.com → resolves at the DMZ edge to IP2

Configure New IPs for the External NIC

Procedure

Step 1

Use the following commands to add a new IP address in the NIC:

  • nmcli connection modify <nic name> +ipv4.addresses <new ipaddress/subnetmask>

  • sudo ip addr add <ipaddress>/24 dev <interface-name>

For example:

  • nmcli connection modify ens192 +ipv4.addresses 192.168.1.84/24

  • sudo ip addr add 192.168.1.84/24 dev ens192

    This adds a new IP address 192.168.1.84 for the NIC ens192.

Step 2

Verify that the newly added IP is present in the NIC.

[root@proxy ~]# ip addr show ens192
2: ens192: <BROADCAST,MULTICAST,UP,LOWER_UP> mtu 1500 qdisc mq state UP group default qlen 1000
    link/ether 00:50:56:a5:e4:73 brd ff:ff:ff:ff:ff:ff
    altname enp11s0
    inet 192.168.1.69/24 brd 192.168.1.255 scope global noprefixroute ens192
       valid_lft forever preferred_lft forever
    inet 192.168.1.84/24 brd 192.168.1.255 scope global secondary noprefixroute ens192
       valid_lft forever preferred_lft forever

Configure Installer to Start New Container Bounded to an IP

Cisco Finesse installer requires external interface name to be configured as part of install_os_settings.sh configuration. The installer script fails to start without configuring the external interface name.

External NIC Configured with Single IP

The installer script automatically takes the IP address of the external NIC to bind the reverse proxy container in the bridge network. You don't need to specify the IP address in the configuration file to start the single container as there is no ambiguity in the IP address. For more information, see Operating System and Network Configuration.

External NIC Configured with Multiple IPs

The installer script looks for the IP address to bind the new container, and it uses the value of PROXY_BINDING_IP in installer.env. The value provided must be part of one of the IP addresses of the external NIC.

Serviceability

Monitor Connected Agents and Supervisors

The reverse-proxy has to be monitored by using the proxy-specific features. For more information, refer to the specific reverse-proxy documentation.

Cisco Finesse allows administrators to view the list of currently connected agents and supervisors in cfadmin. The administrator can filter and see the agents and supervisors who are connected to the Finesse desktop based on the connection type. For example, agents and supervisors connected through the Contact Center network and those connected through reverse-proxy can be seen. For more information, see the Connected Agents section in Cisco Finesse Administration Guide. Administrators can also view the summary of connected users by using the following CLI command:


admin:utils finesse show_connected_users summary

Total Connected Users: 6

Desktop Users: 1
FIPPA Users: 2
Third-party Users: 3

Users connected to Finesse via LAN/WAN: 5
Users connected to Finesse via Proxy: 1

To view the complete list of signed-in users, log in to the Cisco Finesse
Administration Console, and navigate to the Connected Agents tab.

To view the real-time list of connected users by using an API, see the ConnectedUsersInfo section in Cisco Finesse Web Services Developer Guide.

API Modifications to Support Reverse-Proxy Deployments

Finesse SystemInfo API

SystemInfo API is now secured when it is accessed through a reverse-proxy. The API is accessible with agent and supervisor credentials. The following field has been added to support this feature:

  • httpsPort: HTTPS port has to be used for all Finesse API and desktop notifications.

For more information, see the SystemInfo and ConnectedUsersInfo sections in Cisco Finesse Web Services Developer Guide at https://developer.cisco.com/docs/finesse/#!rest-api-dev-guide.

HTTP Return codes returned by the reverse-proxy

These are the HTTP return codes returned by the proxy in exceptional scenarios. The HTTP error code and the situations in which these custom error codes are sent are as follows:

Error Code

Error

Reason

444

No Response

Accessing https ports with http requests.

401

Unauthorized

Authentication Failed - Note, even SystemInfo requires to be authenticated when accessed through reverse-proxy.

403

Forbidden

When restricted pages are accessed or the user is unauthorized.

cfadmin/FIPPA/, test sso, and some of the pages are restricted through reverse-proxy.

405

Method not allowed

Accessing URLs with invalid HTTP methods. For example, most of the Cisco IdS URLs support only GET, POST, and OPTIONS methods. Anything other than these methods results in this error.

412

Precondition Failed

Check the User-Agent field of the request header.

Reverse-proxy validates some of the pre-configured User-Agent headers that could be triggered from Bots.

417

Expectation Failed

The server can’t meet the requirements of the Expect request-header field. Please check the referrer header field is populated as one of the valid configured referrer headers.

Please check the NGX_VALID_REFERRERS in the core.env file has all the valid referrer headers configured for the failed request.

421

Misdirected Request

Accessing URL that isn’t supported through reverse-proxy. Reverse-proxy configured to support only a set of upstream URLs. Any URL other than that is requested results in this error.

429

Too Many Requests

The response status code indicates that the user has sent too many requests in a given amount of time ("rate limiting").

Need to check the configured LB and rate limiting configurations on the core.env file and component's envs.

Historical and Real Time Gadgets

The Cisco Unified Intelligence Center release 12.6.1 ES02 and above, supports Historical and Real Time report gadgets in agent and supervisor desktops in VPN-less deployments. To configure the Historical and Real Time report gadgets, refer to the Configure Historical Report Gadgets in Cisco Finesse section in Cisco Unified Intelligence Center User Guide.


Note


  • Stock reports and custom reports can be viewed in VPN-less supervisor desktop. However, before viewing the custom reports as gadgets in VPN-less supervisor desktop, run the command, set cuic properties allow-proxy-custom-report on.

  • To configure the data set size for Historical report, run the command, set cuic properties vpnless-response-size-ht. By default, the data set size for HT is set to 8MB.

  • To configure the data set size for Real Time report, run the command, set cuic properties vpnless-response-size-rt. By default, the data size for RT is set to 300KB.

    If the data set size is more than the configured value, the gadget will display the following error message:

    Failed to load the gadget. Response size is more than allowed limit. Please contact your Administrator.

    This limitation is applicable on VPN-less deployments only. For more information about configuring the data set size, see the Set Cisco Unified Intelligence Center properties section in Administration Console User Guide for Cisco Unified Intelligence Center.


Caveats

Reverse-Proxy deployment allows agents and supervisors to concurrently access the Cisco Finesse desktop from both LAN and via reverse-proxy. After configuring the reverse-proxy, when the agents and supervisors access the Finesse desktop via LAN, all the features work seamlessly. However, when the Finesse desktop is accessed via the reverse-proxy, the caveats are as follows:

  • Finesse IP Phone Agent (FIPPA) is not supported.

  • Administrative applications and the corresponding APIs of Finesse, IdS, and Cisco Unified Intelligence Center are not supported.

  • Multiple devices accessing Finesse desktop via Network Address Translation (NAT) is not supported.

  • Multiple users accessing the VPN-less desktop from behind a common proxy is not supported when multiple sites are involved.

  • If threshold images are used in Live Data, Real Time, and Historical gadgets, add the reverse-proxy rules to allow images to be accessed through reverse-proxy.

  • If threshold images are used in Live Data, Real Time, and Historical gadgets, add the reverse-proxy rules to allow images to be accessed through reverse-proxy.

  • After upgrading Finesse to 12.6(1), Cisco Unified Intelligence Center must be upgraded to 12.6(1) for the Live Data (LD) gadgets to work. Refer to the Unified CCE Compatibility Matrix for general compatibility between CUIC and Finesse when accessed via the Contact Center network or the reverse-proxy.

  • Third-party gadgets on the Finesse desktop could be incompatible with the reverse-proxy deployment. For more information on gadget compatibility, see the Determine Gadget Compatibility section.

  • Finesse API Compatibility:

    • Finesse Desktop supports only WebSocket notification mechanism over reverse-proxy. For third-party servers, BOSH or XMPP over TCP communication through reverse-proxy isn’t supported.

    • When SystemInfo API is accessed via a reverse-proxy, the authorization headers are required.