Cisco IP Phone Hardware

Cisco IP Phone Hardware Overview

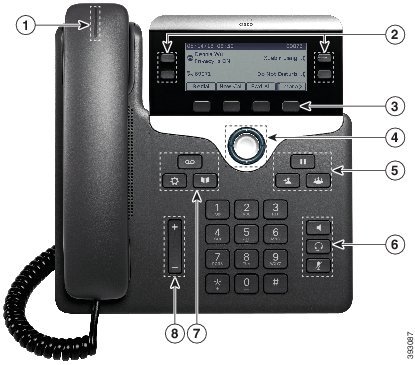
The Cisco IP Phone 7800 Series provides voice communication over an Internet Protocol (IP) network. The CiscoIPPhone functions much like a digital business phone, allowing you to place and receive phone calls and to access features such as mute, hold, transfer, speed dial, call forward, and more. In addition, because the phone connects to your data network, it offers enhanced IP telephony features, including access to network information and services, and customizable features and services.

The Cisco IP Phone 7841 supports Gigabit ethernet connectivity.

When adding features to the phone line keys, you are limited by the number of line keys available. You cannot add more features than the number of line keys on your phone.

Table 1. Cisco IP Phone 7800 Series and Supported Line Keys

Phone

Supported Line Keys

Cisco IP Phone 7811

0

Cisco IP Phone 7821

2

Cisco IP Phone 7841

4

Cisco IP Phone 7861

16

A Cisco IP Phone, like other network devices, must be configured and managed. These phones encode the following codecs:
  • G.711 a-law

  • G.711 mu-law

  • G.722

  • G722.2 AMR-WB

  • G.729a

  • G.729ab

  • iLBC

  • Opus

These phones decode the following codecs:
  • G.711 a-law

  • G.711 mu-law

  • G.722

  • G.729

  • G.729a

  • G.729b

  • G.729ab

  • iLBC

  • Opus


Caution


Use of a cell, mobile, or GSM phone, or two-way radio in close proximity to a CiscoIP Phone might cause interference. For more information, see the manufacturer documentation of the interfering device.

As with other network devices, you must configure Cisco IP Phones to prepare them to access Cisco Unified Communications Manager and the rest of the IP network. By using DHCP, you have fewer settings to configure on a phone. If your network requires it, however, you can manually configure information such as: an IP address, TFTP server, and subnet information.

Cisco IP Phones can interact with other services and devices on your IP network to provide enhanced functionality. For example, you can integrate Cisco Unified Communications Manager with the corporate Lightweight Directory Access Protocol 3 (LDAP3) standard directory to enable users to search for coworker contact information directly from their IP phones. You can also use XML to enable users to access information such as weather, stocks, quote of the day, and other web-based information.


Hardware Versions

We occasionally update our phone hardware to take advantage of new technology, with each version identified by a Product ID (PID) located on the back of your phone. Use the following table to determine if your phone is an early hardware release or a later one.

New phones must run Firmware Release 10.3(1) or later and you cannot downgrade to an earlier firmware release.

Table 2. Cisco IP Phone 7800 Series Hardware Versions

Cisco IP Phone

Original Hardware Version

Current Hardware Version

Cisco IP Phone 7811

-

CP-7811-K9=V01

Cisco IP Phone 7821

CP-7821-K9=V01

CP-7821-K9=V03

Cisco IP Phone 7841

CP-7841-K9=V01, V02, or V03

CP-7841-K9=V04 or later

Cisco IP Phone 7861

CP-7861-K9=V02

CP-7861-K9=V03 or later

Cisco IP Phone 7811

Phone Connections

Use an Ethernet cable to connect your phone to your LAN and enable the phone's full functionality. If your Ethernet port is equipped with Power over Ethernet (PoE), you can power the phone through the LAN port. Do not extend the LAN Ethernet cable outside the building. For your phone to work, it must be connected to the IP telephony network.


1

DC adapter port (DC48V).

4

Network port (10/100 SW) connection. IEEE 802.3af power enabled.

2

AC-to-DC power supply (optional).

5

Access port (10/100 PC) connection (optional).

3

AC power wall plug (optional).

6

Handset connection.


Note


In the EU and UK, your phone is shipped with a power switch cable that is required in order to provide power to your phone when using an AC-to-DC power supply. Connect the power cord to the power switch cable and then connect the other end of the power switch cable to the DC adapter port.


Cisco IP Phone 7821

Phone Connections

Connect your Cisco IP phone to your LAN with an Ethernet cable to enable full functionality of your Cisco IP phone. If your Ethernet port is equipped with Power over Ethernet (PoE), you can power the Cisco IP phone through the LAN port. Do not extend the LAN Ethernet cable outside the building. For your phone to work, it must be connected to the IP telephony network.


1

DC adaptor port (DC48V) (optional).

5

Access port (10/100 PC) connection (optional).

2

AC-to-DC power supply (optional).

6

Auxiliary port (optional).

3

AC power wall plug (optional).

7

Handset connection.

4

Network port (10/100 SW) connection. IEEE 802.3af power enabled.

8

Analog headset connection (optional).


Note


In the EU and UK, your phone is shipped with a power switch cable that is required in order to provide power to your phone when using an AC-to-DC power supply. Connect the power cord to the power switch cable and then connect the other end of the power switch cable to the DC adapter port.


Cisco IP Phone 7841

Phone Connections

Connect your Cisco IP phone to your LAN with an Ethernet cable to enable full functionality of your Cisco IP phone. If your Ethernet port is equipped with Power over Ethernet (PoE), you can power the Cisco IP phone through the LAN port. Do not extend the LAN Ethernet cable outside the building. For your phone to work, it must be connected to the IP telephony network.


1

DC adaptor port (DC48V) (optional).

5

Access port (10/100/1000 PC) connection (optional).

2

AC-to-DC power supply (optional).

6

Auxiliary port (optional).

3

AC power wall plug (optional).

7

Handset connection.

4

Network port (10/100/1000 SW) connection. IEEE 802.3af power enabled.

8

Analog headset connection (optional).


Note


In the EU and UK, your phone is shipped with a power switch cable that is required in order to provide power to your phone when using an AC-to-DC power supply. Connect the power cord to the power switch cable and then connect the other end of the power switch cable to the DC adapter port.


Cisco IP Phone 7861

Phone Connections

Connect your Cisco IP phone to your LAN with an Ethernet cable to enable full functionality of your Cisco IP phone. If your Ethernet port is equipped with Power over Ethernet (PoE), you can power the Cisco IP phone through the LAN port. Do not extend the LAN Ethernet cable outside the building. For your phone to work, it must be connected to the IP telephony network.


1

DC adaptor port (DC48V) (optional).

5

Access port (10/100 PC) connection (optional).

2

AC-to-DC power supply (optional).

6

Auxiliary port (optional).

3

AC power wall plug (optional).

7

Handset connection.

4

Network port (10/100 SW) connection. IEEE 802.3af power enabled.

8

Analog headset connection (optional).


Note


In the EU and UK, your phone is shipped with a power switch cable that is required in order to provide power to your phone when using an AC-to-DC power supply. Connect the power cord to the power switch cable and then connect the other end of the power switch cable to the DC adapter port.


Buttons and Hardware

The Cisco IP Phone 7800 Series has distinct hardware types:

  • Cisco IP Phone 7811 No buttons on either side of the screen

  • Cisco IP Phone 7821 Two buttons on the left side of the screen

  • Cisco IP Phone 7841 Two buttons on either side of the screen

  • Cisco IP Phone 7861 16 buttons at the right edge of the phone

Figure 1. Cisco IP Phone 7800 Series Buttons and Features
Cisco IP Phone 7800 Series with 8 callouts clockwise from the handset. Number 1 points to light strip on the handset. Number 2 points to the 4 buttons on either side of the phone screen. Number 3 points to the 4 buttons along the bottom of the phone screen. Number 4 points to the round navigation cluster near the bottom of the phone screen. Number 5 points to the three buttons on the top right side of the phone. Number 6 points to the three buttons on the lower right side of the phone. Number 7 points to the three buttons on the top left side of the phone. Number 8 points to the volume button.

The following table describes the Cisco IP Phone 7800 Series buttons and hardware.

Table 3. Cisco IP Phone 7800 Series Buttons and Features

1

Handset and Handset light strip

Indicates whether you have an incoming call (flashing red) or a new voice message (steady red).

2

Programmable feature buttons and line buttons

Feature button Access your phone lines, features, and call sessions.

For more information, see Softkey, Line, and Feature Buttons.

The Cisco IP Phone 7811 does not have programmable feature buttons or line buttons.

3

Softkey buttons

Softkey button Access functions and services.

For more information, see Softkey, Line, and Feature Buttons.

4

Navigation cluster

Navigation ring and Select Navigation cluster button. Scroll through menus, highlight items, and select the highlighted item.

5

Hold/Resume, Conference, and Transfer

Hold/Resume Hold/Resume button Place an active call on hold and resume the held call.

Conference Create a conference call.

Transfer Transfer a call.

6

Speakerphone, Mute, and Headset

Speakerphone Toggle the speakerphone on or off. When the speakerphone is on, the button is lit.

Mute Toggle the microphone on or off. When the microphone is muted, the button is lit.

Headset Toggle the headset on. When the headset is on, the button islit. To leave headset mode, you pick up the handset or select Speakerphone .

The Cisco IP Phone 7811 does not have a Headset button.

7

Contacts, Applications, and Messages

Contacts Access personal and corporate directories.

Applications Access call history, user preferences, phone settings, and phone model information.

Messages Autodial your voice messaging system.

8

Volume button

Adjust the handset, headset, and speakerphone volume (off hook) and the ringer volume(on hook).

Softkey, Line, and Feature Buttons

You can interact with the features on your phone in several ways:

  • Softkeys, located below the screen, give you access to the function displayed on the screen above the softkey. The softkeys change depending on what you are doing at the time. The More ... softkey shows you that more functions are available.

  • Feature and line buttons, located on either side of the screen, give you access to phone features and phone lines.

    • Feature buttons—Used for features such as Speed dial or Call pickup, and to view your status on another line.

    • Line buttons—Used to answer a call or resume a held call. When not used for an active call, used to initiate phone functions, such as the missed calls display.

Feature and line buttons illuminate to indicate status.

  • Line button Green, steady LED—Active call or two-way intercom call

  • Line button Green, flashing LED—Held call

  • Line button Amber, steady LED—Privacy in use, one-way intercom call, or logged into a Hunt Group

  • Line button Amber, flashing LED—Incoming call or reverting call

  • Line button Red, steady LED—Remote line in use (shared line or Line Status) or Do Not Disturb (DND) active

  • Line button Red, flashing LED—Remote line on hold

Your administrator can set up some functions as softkeys or as feature buttons. You can also access some functions with softkeys or the associated hard button.

Terminology Differences

The following table highlights some of the terminology differences in the Cisco IP Phone 7800 Series User Guide, the Cisco IP Phone 7800 Series Administration Guide for Cisco Unified Communications Manager , and the Cisco Unified Communications Manager documentation.

Table 4. Terminology Differences

User Guide

Administration Guide

Line Status

Busy Lamp Field (BLF)

Message Indicators

Message Waiting Indicator (MWI) or Message Waiting Lamp

Programmable Feature Button

Programmable Button or Programmable Line Key (PLK)

Voicemail System

Voice Messaging System