Deploy cloud-based Hybrid Calendar for Office 365

Hybrid Calendar with Office 365 deployment task flow

To deploy Hybrid Calendar with your Office 365 organization, perform the following tasks.

Before you begin

Prepare your environment

Procedure

  Command or Action Purpose

Step 1

Prepare your Webex Meetings site

If you have a Webex Meetings site, make sure it's ready for integration with @webex.

Step 2

Enable and configure Hybrid Calendar with Microsoft 365

Register your Office 365 environment to the Webex cloud with an initial tenant, authorize write permission, test the connection, and set the default Webex site.

Step 3

(Optional) Add an additional tenant to Hybrid Calendar with Office 365

(Optional)

Add a tenant to the Webex cloud, authorize write permission, test the connection, and set the default Webex site.

Step 4

(Optional) Modify a tenant of Hybrid Calendar with Office 365

(Optional)

Modify a tenant's configuration to the Webex cloud, to authorize read/write permissions, deactivate the Hybrid Calendar, and identify the Workspace organizer.

Step 5

(Optional) Choose how Hybrid Calendar localizes meeting join details

(Optional)

To override how the Hybrid Calendar localizes meeting join details for your entire organization, set the Default Language setting in https://admin.webex.com.

Step 6

(Optional) Configure @webex and @meet keywords

(Optional)

To change the action that the Hybrid Calendar takes when users enter @webex or @meet, set the Keywords settings in https://admin.webex.com.

Step 7

(Optional) Customize email templates

(Optional)

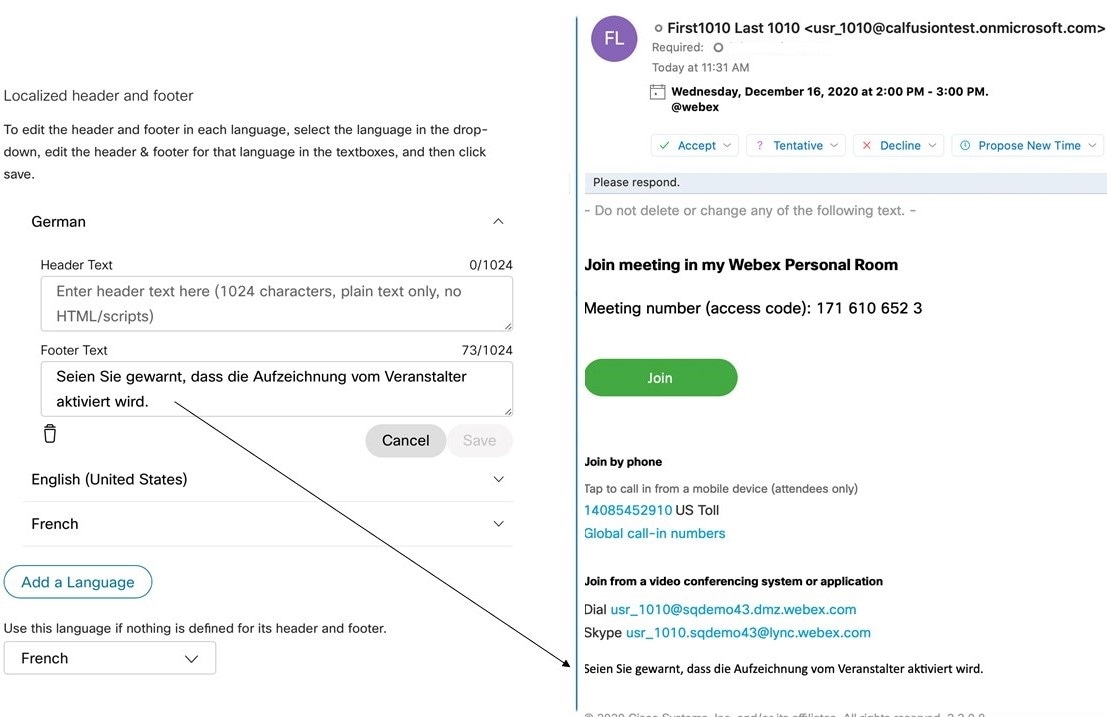
Choose what the Hybrid Calendar adds to meeting invitations, including audio or video join details and a localized header and footer in any language that the service supports.

Step 8

Enable Hybrid Calendar with Office 365 for users

Step 9

(Optional) Add Hybrid Calendar to workspaces with Board, Desk, and Room series

(Optional)

If you want One Button to Push (OBTP) functionality to be provided to cloud-registered room and desk devices and Webex Boards, toggle on the calendar service for the devices, and configure the room mailbox email address.

Step 10

(Optional) Associate Webex personal rooms with Webex App

(Optional)

For OBTP on Webex room and desk devices and Webex Boards, make sure that meeting schedulers have their Personal Rooms associated with their Webex App accounts.

Step 11

Test the Office 365 and Hybrid Calendar integration

Step 12

(Optional) Move a user from an Expressway-based connector

(Optional)

Prepare your Webex Meetings site

In order to provide full @webex functionality, the Hybrid Calendar needs access to user scheduling information from your Webex Meetings site.

If your Webex site is managed in Control Hub, you do not need do anything to make the information available. Otherwise, the preferred method for making this information available is to have an administrator link the site to Webex Teams.

If you have not yet linked the sites, your users can associate their Cisco Webex Personal Rooms with Cisco Webex Teams themselves in the app.

Enable and configure Hybrid Calendar with Microsoft 365

Follow these steps to register your Microsoft 365 environment to the Webex cloud, add the initital tenant, test the connection, and set the default Webex site. The setup wizard in https://admin.webex.com guides you through the process.

Before you begin

  • Use an account that can authorize multi-tenant apps (like Global Administrator or Privileged Role Administrator) to grant permission for the setup process.

Procedure


Step 1

Sign in to the customer view of https://admin.webex.com.

Step 2

In the left-hand navigation pane, under Services click Hybrid.

Step 3

On the hybrid calendar card with the Microsoft 365 logo, click Edit settings.

Step 4

On the Hybrid Calendar (Microsoft 365) page, click Add tenant.

Step 5

Follow the steps to choose your Microsoft 365 instance and authorize Webex cloud access on the appropriate Microsoft 365 administrator account.

The browser should redirect you to https://admin.webex.com when you've finished the authorization steps. If it does not, try these steps again.

Step 6

Follow the step to accept the read permissions requested for your tenant.

Step 7

Chose from the following associated with testing the connection with Microsoft 365 and defining a workspace.

  • Type an email address to test the connection with Microsoft 365 for the new tenant.
  • Check the box to indicate that your organization needs to be able to schedule meetings from Workspaces and enter the email address of the organizer for meetings scheduled from Workspaces.

Step 8

Click Test.

When the connection is successful the browser redirects you to the Services page on https://admin.webex.com when you've finished the test step. When a connection is not created, verify that the user name you are using has a license on the Microsoft account and try these steps again

Step 9

Choose or type the Webex Meetings site to use for @webex scheduling. Save your changes.

Step 10

If there are users with error status, click User Status Report to view the error details.


Add an additional tenant to Hybrid Calendar with Office 365

Use this procedure to add a new tenant to an existing Hybrid Calendar with Microsfot 365.

Before you begin

You should have added an organization with Enable and configure Hybrid Calendar with Microsoft 365.

Procedure


Step 1

Sign in to the customer view of https://admin.webex.com/login.

Step 2

In the left-hand navigation pane, under Services click Hybrid.

You can use the search function to narrow down the list of users.

Step 3

On the hybrid calendar card with the Microsoft 365 logo, click Edit settings.

Step 4

On the Hybrid Calendar (Microsoft 365) page, click Add tenant.

Step 5

Follow the steps to choose your Microsoft 365 instance and authorize Webex cloud access on an appropriate Microsoft 365 administrator account.

Step 6

Follow the step to accept the read permissions requested for your tenant.

Step 7

Chose from the following associated with testing the connection with Microsoft 365 and defining a workspace.

  • Type an email address to test the connection with Microsoft 365 for the new tenant.
  • Check the box to indicate that your organization needs to be able to schedule meetings from Workspaces and enter the email address of the organizer for meetings scheduled from Workspaces.

Step 8

Click Test.


When the connection is successful the browser redirects you to the Services page on https://admin.webex.com when you've finished the test step. When a connection is not created, verify that the user name you are using has a license on the Microsoft account and try these steps again.

Modify a tenant of Hybrid Calendar with Office 365

Use this procedure to modify a tenant for Webex App users for Hybrid Calendar with Microsoft 365.

Before you begin

Add a tenant to Hybrid Calendar.

Procedure


Step 1

Sign in to the customer view of https://admin.webex.com/login.

Step 2

In the left-hand navigation pane, under Services click Hybrid .

Step 3

On the hybrid calendar card with the Microsoft 365 logo, click Edit settings.

Step 4

On the Hybrid Calendar (Microsoft 365) page, on the default tenant domain of the tenant to configure. The Microsoft 365 integration panel displays in the right-hand panel.

Step 5

To authorize the tenant, click Authorize.

If you removed Control Hub authorization from your Microsoft 365 tenant, click Authorize to reset the read and write permissions. Also, if you've just switched from a single tenant to multiple tenants, the previous tenant appears as an "Unknown" domain. Reauthorize this tenant to reinitialize it so that it can have full functionality.

Step 6

To deactivate Hybrid Calendar (Microsoft 365) from this tenant, click Deactivate.

Step 7

To establish an organizer for meetings scheduled fromWorkspaces, enter the Microsoft 365 account email address.


Choose how Hybrid Calendar localizes meeting join details

In Control Hub, the Default Language setting controls the language of the join details that the Hybrid Calendar adds to invitations. If you leave the setting at its default, the service uses the language in the "language":{"locale"} setting from the scheduler's mailbox settings.

To override choosing languages based on meeting schedulers' settings, choose a specific language to use for join details for all meetings across your organization.

Procedure


Step 1

Sign in to the customer view of https://admin.webex.com.

Step 2

In the left-hand navigation pane, under Services click Hybrid.

Step 3

On the hybrid calendar card with the Office 365 logo, click Edit settings.

The Hybrid Calendar (Microsoft 365) displays a list of tenants included in this organization.

Step 4

Select the tenant to configure.

Step 5

Click the Settings tab.

Step 6

In the Meeting Invitations section, choose a language from the Default Language drop-down list, and click Save.

After you save the change, the Hybrid Calendar uses the language you choose each time it adds join to details a meeting. It doesn’t change the language for existing join details.

Configure @webex and @meet keywords

By default, when users add @webex to a meeting location, the calendar service updates the meeting with their Webex Personal Room details. When users add @meet, by default the service updates the meeting with Webex App space details. As an administrator, you can change these default actions for either keyword.

Regardless of how you set these actions, power users can add the modifier :space, :myroom or :onetime to specify the action for either keyword. For example, adding @webex:space causes the service to update the meeting with Webex App space details. As well, @webex:onetime creates a one-time Webex meeting.

Procedure


Step 1

Sign in to the customer view of https://admin.webex.com/login.

Step 2

In the left-hand navigation pane, under Services click Hybrid.

Step 3

From the Hybrid Calendar card for your calendar environment, click Edit settings.

Note


If you have the Hybrid Calendar set up for multiple calendar environments, you can access the keywords settings from multiple pages in Control Hub, but the values that you set apply to all environments.

The Hybrid Calendar (Microsoft 365) displays a list of tenants included in this organization.

Step 4

Select the tenant to configure.

Step 5

Click the Settings tab.

Step 6

In the Keywords section, select the default action that you want for each keyword.

Step 7

Click Save.


Customize email templates

Choose which meeting join details Hybrid Calendar includes in meeting invitations.

Procedure


Step 1

Sign in to the customer view of https://admin.webex.com/login.

Step 2

In the left-hand navigation pane, under Services click Meeting.

Step 3

Locate the Customize Meeting Join Details section.

Step 4

Choose whether to show Join by Phone details.

When you include the dial-in details, you can also choose to add a link to global call-in numbers, a link to toll-free calling restrictions, or both.

Step 5

Show or hide details on joining from an application or video conferencing device.

When you include the video dialing details, you can also choose to include an IVR IP address, a Skype for Business join link, or both.

Step 6

Click Add a Language and then select the language from the drop-down menu to create a custom header and footer for any of the languages that the Hybrid Calendar supports. When you've got the header and footer text that you want, click Save.

The header and footer values have a maximum of 1024 characters each (including spaces).

Step 7

Once you've added a custom header and footer for a language, you can choose that language as a default for any other language that doesn't have a custom header and footer defined. Your default language choice saves automatically.


Enable Hybrid Calendar with Office 365 for users

Use this procedure to enable individual Webex App users for Hybrid Calendar with Office 365.

See the links below for ways to enable services for your Webex users in bulk or in a directory synchronized organization.

Any of these methods requires that users have signed in to the Webex App app to be fully activated. To enable @webex for users who have never signed in to the app, add and verify the users' domain using the Manage your domains process. (You must own a domain for it to be verifiable. You do not need to claim the domain.)

Before you begin

  • Users must have licensed Exchange Online mailboxes.

  • Users must have activated Webex accounts, with email addresses that are exact matches in Webex Meetings, Webex App, and Exchange online (the Primary Email Address).

Procedure


Step 1

Sign in to the customer view of https://admin.webex.com/login.

Step 2

In the left-hand navigation pane, under Management click Users and then choose a specific user from the list.

You can use the search function to narrow down the list of users.

Step 3

Click the row to open an overview of the user.

Step 4

In the Hybrid Services area, click Calendar Service.

Step 5

Toggle on Calendar, ensure that Microsoft Exchange/Office 365 is selected, and save your changes.

After you activate the service, the user's calendar service status changes to Pending Activation and then to Activated. The length of time for this change depends on the number of users that you're enabling for the service.

Users receive an email that indicates the feature is enabled. See the documentation below if you want to disable email notifications.


Add Hybrid Calendar to workspaces with Board, Desk, and Room series

Before you begin

This task assumes that you've already created places for the Board, Desk, and Room devices. If you need to create the workspace, see Add shared devices and services to a workspace.

Procedure


Step 1

Sign in to the customer view of https://admin.webex.com/login.

Step 2

In the left-hand navigation pane, under Management click Workspaces and select the workspace to modify.

Step 3

Go to Scheduling and select Calendar so that users can use One Button to Push (OBTP) on their devices.

Step 4

Select the calendar provider.

Step 5

Enter the email address of the room mailbox. (For help locating this email address, see "Create and manage room mailboxes" on the Microsoft Docs website.)

This is the email address that will be used to schedule meetings.

Step 6

Click Save.


Associate Webex personal rooms with Webex App

To provide the join button to devices when scheduling Webex Personal Room meetings, users must have their Personal Room associated with their Webex App account. This can happen in one of the following ways:

  • The users on your Webex site have been Webex App linked. (For site linking steps, see Link Webex sites to Control Hub.)

  • Users change their own preferred Webex site from the Webex App settings or preferences, see Change your default meeting site

  • For a comprehensive approach, use the bulk CSV import process from Control Hub to set users’ preferredWebExSite in the steps that follow.

Procedure


Step 1

Sign in to the customer view in https://admin.webex.com.

Step 2

In the left-hand navigation pane, under Management click Users.

Step 3

Click Manage Users.

Step 4

See this article for the detailed CSV import/export procedure.

Step 5

Use a CSV editor to change the preferredWebExSite attribute for all or some users.

Step 6

Import the CSV file.


Test the Office 365 and Hybrid Calendar integration

Use these steps to set up a test meeting and verify the Office 365 integration. Direct users to the documentation below for how to schedule meetings.

Procedure


Step 1

Sign in to Outlook, Outlook Web Access, or https:/​/​mail.office365.com with one of the test Office 365 user accounts enabled for Hybrid Calendar.

Step 2

Test the team space scheduling keyword (such as @webex:space or @meet):

  1. Create a new meeting, and then add the keyword to the Location field. To create a new Webex team space for the meeting, invite at least two other people.

  2. To test One Button to Push on a video device, go to the Scheduling Assistant and click Add room, and choose the device you want to add.

  3. Fill out other meeting information, as needed, and then click Save.

  4. Open https://teams.webex.com, and sign in with the test user account.

  5. Verify whether a new space was created (if you added two or more other invitees) and contains the calendar invite card. If you only invited one other invitee, the calendar invite card will appear in the conversation space between your test account and the invitee.

  6. Verify that the meeting invitation is updated with the details to join the meeting with Webex App.

  7. If you're testing One Button to Push on a video device, when the meeting is scheduled to begin, verify that the Join button appears on the device.

Step 3

To test out-of-office status, turn on automatic replies in Office 365.

Within 20 minutes, you should see the test account's profile picture display an out-of-office overlay in Webex Teams, like this:

Note


The display picture update is triggered when others see your presence in a space. If the test user does not interact with other active users, you may need to use another account to verify the update.

Step 4

Test the Personal Room scheduling keyword (such as @webex):

  1. Create a new meeting, and then add the keyword to the Location field.

  2. To test One Button to Push on a video device, go to the Scheduling Assistant and click Add room, and choose the device you want to add.

  3. Fill out other meeting information, as needed, and then click Save.

  4. Verify that the meeting invitation is updated with the details to join the meeting .

  5. If you're testing One Button to Push on a video device, when the meeting is scheduled to begin, verify that the Join button appears on the device.


Move a user from an Expressway-based connector

Hybrid Calendar automatically moves any Office 365 users who are not part of a resource group from your Expressway-based calendar connector to the cloud-based service. This process can take up to an hour, because the service checks for users to move once an hour. (If you're also moving the user's mailbox from Microsoft Exchange to Office 365, it can take up to 40 minutes longer.) If you want to have users activated faster, use the following procedure to toggle Hybrid Calendar for users, thereby forcing the activation within minutes.


Note


You must remove Office 365 users from a resource group in order for them to move off of the Calendar Connector. This procedure also covers that process.


Procedure


Step 1

If applicable, move the user mailbox from Microsoft Exchange to Office 365.

Step 2

Sign in to the customer view of https://admin.webex.com/login.

Step 3

In the left-hand navigation pane, under Management click Users.

Step 4

To modify an individual user, do the following sub-steps:

  1. Search for the user in the list and click the row for that user.

  2. In the panel that opens on the right, click Calendar Service.

  3. From the Resource Group drop-down list, click None.

  4. Next to Calendar, toggle the service off.

  5. Wait a minute, and then toggle the service back on.

The user should be activated within a few minutes.

Step 5

To modify users in bulk, do the following sub-steps:

  1. Click Manage Users, and choose CSV Add or Modify User.

  2. Click Export to download the file.

  3. Edit the exported_users.csv file.

  4. For any users that you want to move, delete the value in the Hybrid Calendar Resource Group column.

  5. Save a first copy of the file in this state, for use later.

  6. To speed the move, set Hybrid Calendar (Exchange) to FALSE.

  7. Save a second copy of the file.

  8. Click Import, select the second file copy that you saved, and click Open.

  9. Choose Add and remove services, and click Submit.

    If you also add new users in this process and don't suppress admin invite emails, new users receive activation emails.

  10. Wait several minutes, and then re-import the first copy of the file.

The users should be activated within a few minutes.