Deploy Expressway calendar connector with Office 365

Hybrid Calendar with Office 365 deployment task flow

To deploy Hybrid Calendar with your Office 365 environment, perform the following tasks.

Before you begin

Prepare your environment

Procedure

  Command or Action Purpose

Step 1

Register Expressway-C connector hosts to Cloud

Add the Hybrid Calendar to your organization and connect your Expressway to the Webex cloud. This creates a resource in https://admin.webex.com and downloads connector software on to the Expressway.

Step 2

(Optional) Append the Exchange CA certificate to the Expressway trusted CA list

(Optional)

If you want Microsoft Exchange Web Services (EWS) traffic to be encrypted, make sure the Expressway trust list contains the certificate of the CA that signed the Exchange Server certificate.

Step 3

Link Calendar Connector to Office 365

Configure Exchange Servers for the calendar connector.

Step 4

(Optional) Configure the Calendar Connector's Webex site settings

(Optional)

If you have a Webex Meetings site, configure the @Webex functionality.

Step 5

(Optional) Choose How the Hybrid Calendar Service Localizes Meeting Join Details

(Optional)

To override how the calendar connector localizes meeting join details for your entire organization, set the Default Language setting in https://admin.webex.com.

Step 6

(Optional) Configure @webex and @meet Keywords

(Optional)

To change the action that the calendar connector takes when users enter @webex or @meet, set the Keywords settings in https://admin.webex.com.

Step 7

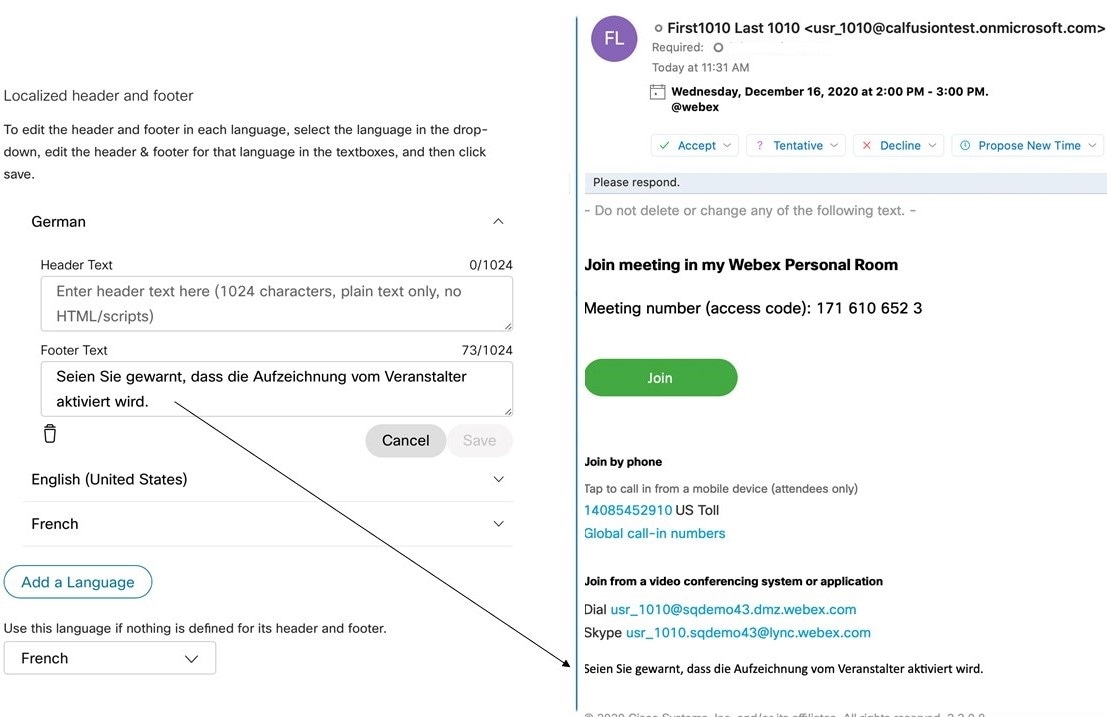
(Optional) Customize Email Templates

(Optional)

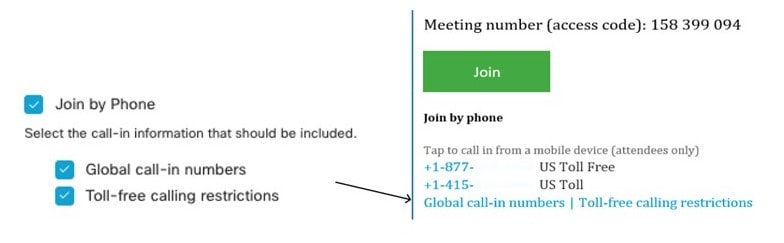
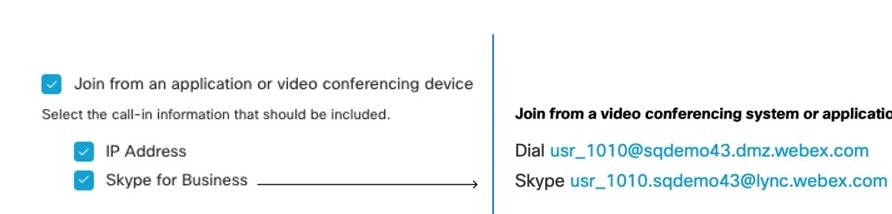
Choose what the Hybrid Calendar adds to meeting invitations, including audio or video join details and a localized header and footer in any language that the service supports.

Step 8

Start the calendar connector

Step 9

Enable Hybrid Calendar for users

Step 10

(Optional) Add the Hybrid Calendar Service to Workspaces with Webex Room, Desk, and Board Devices

(Optional)

If you want One Button to Push (OBTP) functionality to be provided to Webex room and desk devices and Webex Boards that are registered to the Webex cloud, configure places for the devices.

Step 11

(Optional) Associate user's Personal Rooms with Webex

(Optional)

For OBTP on Webex room and desk devices and Webex Boards, make sure that meeting schedulers have their Personal Rooms associated with their Webex App accounts.

Step 12

Test join button with room devices

If you configured OBTP in the previous step, test it with a device.

Register Expressway-C connector hosts to Cloud

Hybrid Services use software connectors hosted on Expressway-C to securely connect Webex to your organization's environment. Use this procedure to register Expressway-C resources to the cloud.

After you complete the registration steps, the connector software is automatically deployed on your on-premises Expressway-C.

Before you begin

  • Make sure your Expressway-C is running on a version that's supported for hybrid services. See the Supported Versions of Expressway for Cisco Webex Hybrid Services Connectors documentation (https://help.webex.com/article/ruyceab) for more information about which versions are supported for new and existing registrations to the cloud.

  • Sign out of any open connections to the Expressway-C interface that are open in other browser tabs.

  • If your on-premises environment proxies the outbound traffic, you must first enter the details of the proxy server on Applications > Hybrid Services > Connector Proxy before you complete this procedure. Doing so is necessary for successful registration.

Procedure


Step 1

Sign in to the customer view of https://admin.webex.com/login.

Step 2

In the left-hand navigation pane, under Services click Hybrid and then choose one:

  • If this is the first connector host you're registering, click Set up on the card for the hybrid service you're deploying, and then click Next.
  • If you've already registered one or more connector hosts, click View all on the card for the hybrid service you're deploying, and then click Add Resource.

The Webex cloud rejects any attempt at registration from the Expressway web interface. You must first register your Expressway through Control Hub, because the Control Hub needs to hand out a token to the Expressway to establish trust between premises and cloud, and complete the secure registration.

Step 3

Choose a method to register the Expressway-C:

  • New Expressways—choose Register a new Expressway with its Fully Qualified Domain Name (FQDN), enter your Expressway-C IP address or fully qualified domain name (FQDN) so that Webex creates a record of that Expressway-C and establishes trust, and then click Next. You can also enter a display name to identify the resource in Control Hub.

    Caution


    To ensure a successful registration to the cloud, use only lowercase characters in the hostname that you set for the Expressway-C. Capitalization is not supported at this time.

  • Existing Expressways—choose Select an existing Expressway cluster to add resources to this service, and then choose the node or cluster from the drop-down that you previously registered. You can use it to run more than one hybrid service.

Tip


If you're registering a cluster, register the primary peer. You don't need to register any other peers, because they register automatically when the primary registers. If you start with one node set up as a primary, subsequent additions do not require a system reboot.

Step 4

Click Next, and for new registrations, click the link to open your Expressway-C. You can then sign in to load the Connector Management window.

Step 5

Decide how you want to update the Expressway-C trust list:

A check box on the welcome page determines whether you will manually append the required CA certificates to the Expressway-C trust list, or whether you allow Webex to add those certificates for you.

Choose one of the following options:

  • Check the box if you want Webex to add the required CA certificates to the Expressway-C trust list.

    When you register, the root certificates for the authorities that signed the Webex cloud certificates are installed automatically on the Expressway-C. This means that the Expressway-C should automatically trust the certificates and be able to set up the secure connection.

    Note


    If you change your mind, you can use the Connector Management window to remove the Webex cloud CA root certificates and manually install root certificates.

  • Uncheck the box if you want to manually update the Expressway-C trust list. See the Expressway-C online help for the procedure.

    Caution


    When you register, you will get certificate trust errors if the trust list does not currently have the correct CA certificates. See Certificate Authorities for Hybrid Services.

Step 6

Click Register. After you're redirected to Control Hub, read the on-screen text to confirm that Webex identified the correct Expressway-C.

Step 7

After you verify the information, click Allow to register the Expressway-C for Hybrid Services.

  • Registration can take up to 5 minutes depending on the configuration of the Expressway and whether it's a first-time registration.

  • After the Expressway-C registers successfully, the Hybrid Services window on the Expressway-C shows the connectors downloading and installing. The management connector automatically upgrades itself if there is a newer version available, and then installs any other connectors that you selected for the Expressway-C connector host.

  • Each connector installs the interface pages that you need to configure and activate that connector.

    This process can take a few minutes. When the connectors are installed, you can see new menu items on the Applications > Hybrid Services menu on your Expressway-C connector host.

Troubleshooting Tips

If registration fails and your on-premises environment proxies the outbound traffic, review the Before You Begin section of this procedure. If the registration process times out or fails (for example, you must fix certificate errors or enter proxy details), you can restart registration in Control Hub.


Append the Exchange CA certificate to the Expressway trusted CA list

If you want to verify the certificates presented by the Exchange Server, then the Expressway trust list must contain the certificate of the CA that signed the Exchange Server certificate. The CA certificate may already be in the trust list; use this procedure on each Expressway cluster to check the list and append the certificate if necessary.

If you're using a custom domain, make sure that you add the CA certificate for the domain certificate issuer to the Expressways.

Before you begin

You must import certificates to each Expressway-C.

Procedure


Step 1

On the Expressway-C connector host, go to Maintenance > Security certificates > Trusted CA certificate.

Step 2

Review the CA certificates in the trust list to check if the correct CA certificate is already trusted.

Step 3

To append any new CA certificates:

  1. Click Browse (or the equivalent in your browser) to locate and select the PEM file.

  2. Click Append CA certificate.

The newly appended CA certificate appears in the list of CA certificates.

Step 4

To replace an existing CA certificate with an updated one, for a particular issuer and subject:

  1. Check the check box next to the Issuer details.

  2. Click Delete.

  3. Append the replacement certificate as described above.


Certificate Authorities for Hybrid Services in an Office 365 Environment

The table lists the Certificate Authorities that your existing environment must trust when using Hybrid Services.

If you opted to have Webex manage the required certificates, then you do not need to manually append CA certificates to the Expressway-C trust list.


Note


The issuers used to sign the Webex host certificates may change in future, and the table below may then be inaccurate. If you are manually managing the CA certificates, you must append the CA certificates of the issuing authorities that signed the currently valid certificates for the hosts listed below (and remove expired/revoked CA certificates).


Cloud hosts signed by this CA

Issuing CA

Must be trusted by

For this purpose

CDN

O=Baltimore, OU=CyberTrust, CN=Baltimore CyberTrust Root

Expressway-C

To ensure Expressway downloads connectors from a trusted host

Common Identity (CI) service

O=VeriSign, Inc., OU=Class 3 Public Primary Certification Authority

Windows Server 2003 or Windows Server 2008 hosting the Cisco directory connector

Expressway-C

To synchronize users from your Active Directory with Webex and to authenticate Hybrid Services users

Webex App

O=The Go Daddy Group, Inc., OU=Go Daddy Class 2 Certification Authority

Expressway-C

Office 365 cloud

O=Baltimore, OU=CyberTrust, CN=Baltimore CyberTrust Root

Expressway-C

Office 365 support

Office 365 cloud

O=DigiCert Inc, OU=www.digicert.com, CN=DigiCert Global Root CA, C=US

Expressway-C

Office 365 support

Link Calendar Connector to Office 365

The calendar connector installs automatically after you register your Expressway for Hybrid Services. The connector does not start automatically, and requires some configuration to link to your calendar environment.

Procedure


Step 1

From the Expressway-C connector host, go to Applications > Hybrid Services > Calendar Service > Microsoft Exchange Configuration, and then click New.

Note


Make sure you choose Microsoft Exchange Configuration, not Cisco Conferencing Services Configuration. You cannot configure the Calendar Connector for Microsoft Exchange or Office 365 in the same organization with the conferencing services (integration with Cisco TelePresence Management Suite).

Step 2

Enter the credentials of the service account that you want the calendar connector to use to connect to Exchange.

The service account queries calendars on behalf of your users, using the impersonation role. You can use these formats:
  • username@domain.com—The userPrincipalName. Typically, this value matches the user's primary email address, but the properties are separate. userPrincipalName consists of the User Logon Name (not always the same as sAMAccountName) and the UPN suffix, which is based on the Active Directory domain (not always the same as the NetBIOS domain).

  • DOMAIN\username—DOMAIN is the NetBIOS domain (the pre-Windows 2000 domain); "username" is the sAMAccountName (the legacy username or pre-Windows 2000 username).

    If you're unsure about what to use for these formats, use Active Directory Users and Computers on a Windows machine to view the Account tab of the Properties pane for the user in question. The correct values to use are displayed as:

    • User logon name for the first format.

    • User logon name (pre-Windows 2000) for the second format.

Step 3

Enter a unique Display Name for this Exchange Server.

Step 4

For the Type, select Office365.

Step 5

For Need Proxy for Connection?, select Yes if https access goes through a web proxy to your Exchange environment.

Step 6

For Enable this Exchange server?, select Yes.

You can select No for debugging purposes, but users will not be subscribed to this Exchange.

Step 7

Check Basic for the Authentication Type.

For Hybrid Exchange (on-premises and Office 365) deployments, you can check both NTLM and Basic authentication types. If one method fails, then the other method is used.

Step 8

Leave TLS Verify Mode as the default value On so that this Expressway-C verifies the certificate presented by the Exchange Server.

You may need to update the trust stores on both servers to ensure that each one trusts the CA that signed the other's certificate.

Step 9

Enter an Email Address so that calendar connector can test the connection and check that the directory query worked.

Use the email address of a user that you will enable for the Hybrid Calendar Service, as it appears in Control Hub.

If the test fails, then your settings are not saved. If you omit the mailbox name, then your settings are saved without verifying connectivity.

Step 10

To manually configure any Autodiscover redirect URLs that the Calendar Connector should trust, click Configure Trust List.

Once you click Add, the Calendar Connector automatically populates any missing Autodiscover redirect URLs that it finds while contacting the Autodiscover service. URLs from unauthenticated sources are placed in pending state, and blocked unless you choose to allow them. If you skip this step now, you can still manually add URLs later, or explicitly accept or deny the pending URLs.

Step 11

Click Add to store the Exchange Server configuration on the Expressway-C.

The calendar connector tests the connection to the Exchange environment.


Configure the Calendar Connector's Webex site settings

After you configure the Exchange settings, configure the details for your Webex Meetings sites. If you have more than one Webex site, do these steps for each site, and set the default to the site with the most users. Users who are not on the default site, or who want to use a different site, must set up their Personal Room in the Webex app.

Before you begin

  • For the @webex functionality to work for users, verify the following:

  • Gather the Webex user account email address of a valid user on your site. The calendar connector uses this account to access the Webex Personal Room details for users who schedule meetings with @webex.

Procedure


Step 1

From the Expressway-C connector host, go to Applications > Hybrid Services > Calendar Service > Cisco Conferencing Services Configuration, and then click New.

Step 2

Select Type as Webex under Conferencing Services Type.

Step 3

Enter the Fully Qualified Site Name for this Webex Meetings site.

Example:

If your site is accessed as example-co.webex.com, you'd enter example-co.webex.com.

Step 4

Enter a valid Webex user account email address, leave the password field blank, and then click Test Connection to validate the site information that you entered. If testing the connection fails, you can save the configuration with both the user name and password fields blank.

Step 5

Indicate whether or not this site is the default.

The default site is used for @webex unless the user has a different site configured in their My Personal Room setting in the Webex App app (either because the user's Webex site has been linked to Control Hub by an administrator, or because the user configured the setting with a different site).

Step 6

Click Save to save the configuration.


Choose How the Hybrid Calendar Service Localizes Meeting Join Details

In Control Hub, the Default Language setting controls the language of the join details that the Hybrid Calendar adds to invitations. If you leave the setting at its default, the service uses the language from the item.Culture property of each meeting invitation. (Typically, the scheduler's operating system controls the value of item.Culture.)

To override choosing languages on a meeting-by-meeting basis from item.Culture, choose a specific language to use for join details for all meetings across your organization.

Procedure


Step 1

Sign in to the customer view of https://admin.webex.com/login.

Step 2

In the left-hand navigation pane, under Services click Hybrid.

Step 3

From the Hybrid Calendar card for Exchange, click Edit settings.

Step 4

In the Meeting Invitations section, choose a language from the Default Language drop-down list, and click Save.

After you save the change, the Hybrid Calendar uses the language you choose each time it adds join to details a meeting. It doesn’t change the language for existing join details.

Configure @webex and @meet Keywords

By default, when users add @webex to a meeting location, the calendar service updates the meeting with their Webex Personal Room details. When users add @meet, by default the service updates the meeting with Webex App space details. As an administrator, you can change these default actions for either keyword.

Regardless of how you set these actions, power users can add the modifier :space, :myroom or :onetime to specify the action for either keyword. For example, adding @webex:space causes the service to update the meeting with Webex App space details. As well, @webex:onetime creates a one-time Webex meeting.

Procedure


Step 1

Sign in to the customer view of https://admin.webex.com/login.

Step 2

In the left-hand navigation pane, under Services click Hybrid.

Step 3

From the Hybrid Calendar card for your calendar environment, click Edit settings.

Note


If you have the Hybrid Calendar set up for multiple calendar environments, you can access the keywords settings from multiple pages in Control Hub, but the values that you set apply to all environments.

The Hybrid Calendar (Microsoft 365) displays a list of tenants included in this organization.

Step 4

Select the tenant to configure.

Step 5

Click the Settings tab.

Step 6

In the Keywords section, select the default action that you want for each keyword.

Step 7

Click Save.


Customize Email Templates

Choose which meeting join details Hybrid Calendar includes in meeting invitations.

Procedure


Step 1

Sign in to the customer view of https://admin.webex.com/login.

Step 2

In the left-hand navigation pane, under Services click Meeting.

Step 3

Locate the Customize Meeting Join Details section.

Step 4

Choose whether to show Join by Phone details.

When you include the dial-in details, you can also choose to add a link to global call-in numbers, a link to toll-free calling restrictions, or both.

Step 5

Show or hide details on joining from an application or video conferencing device.

When you include the video dialing details, you can also choose to include an IVR IP address, a Skype for Business join link, or both.

Step 6

Click Add a Language and then select the language from the drop-down menu to create a custom header and footer for any of the languages that the Hybrid Calendar supports. When you've got the header and footer text that you want, click Save.

The header and footer values have a maximum of 1024 characters each (including spaces).

Step 7

Once you've added a custom header and footer for a language, you can choose that language as a default for any other language that doesn't have a custom header and footer defined. Your default language choice saves automatically.


Start the calendar connector

You can do this task before you configure the calendar connector links to your Exchange environment and Webex environment, but all tests will fail until the calendar connector is Running and you may need to restart the connector after configuration.

Procedure


Step 1

From Expressway, go to Applications > Hybrid Services > Connector Management.

The Connector management section of the page has a list of connectors and the status of each. The Management Connector is Running and the Calendar Connector is Not enabled.

Step 2

Click Calendar Connector.

Step 3

Select Enabled from the Active drop-down list.

Step 4

Click Save.

The calendar connector starts and the status changes to Running.

What to do next

Enable Hybrid Calendar for users

Enable Hybrid Calendar for users

Use this procedure to enable a small number of Webex users for Hybrid Calendar with Microsoft Exchange or Office 365.

See Ways to add and manage users in Control Hub for other methods, such as using a bulk CSV template or Active Directory synchronization through Cisco directory connector.

Any of these methods requires that users have signed in to the Webex App to be fully activated. To enable @webex for users who have never signed in to the app, add and verify the users' domain using the Add, verify, and claim domains process. (You must own a domain for it to be verifiable. You do not need to claim the domain.)

Before you begin

By default, users receive email notifications regarding the Hybrid Calendar, including a welcome email after you enable them. For steps to toggle off these User Email Notifications, see the Configure notifications for Hybrid Services help article.

Procedure


Step 1

Sign in to the customer view of https://admin.webex.com/login.

Step 2

In the left-hand navigation pane, under Management click Users.

Step 3

Choose a specific user from the list, or use the search to narrow the list, and then click the row to open an overview of the user.

Step 4

Click Edit, and then ensure that the user is assigned at least one paid service under Licensed Collaboration Services. Make necessary changes, and then click Save.

Step 5

Click Calendar Service, toggle on Calendar, choose Microsoft Exchange, and then save your changes.

After you activate the service, the user status changes from Pending Activation to Activated. The length of time for this change depends on the number of users that you're enabling for the service.

If email notifications are enabled, users receive a message indicating that the feature is enabled.


Add the Hybrid Calendar Service to Workspaces with Webex Room, Desk, and Board Devices

Before you begin

This task assumes that you've already created places for the Board, Desk, and Room devices. If you need to create the workspace, see Add shared devices and services to a workspace.

Procedure


Step 1

Sign in to the customer view of https://admin.webex.com/login.

Step 2

In the left-hand navigation pane, under Management click Workspaces and select the workspace to modify.

Step 3

Go to Scheduling and select Calendar so that users can use One Button to Push (OBTP) on their devices.

Step 4

Select the calendar provider.

Step 5

Enter the email address of the room mailbox. (For help locating this email address, see "Create and manage room mailboxes" on the Microsoft Docs website.)

This is the email address that will be used to schedule meetings.

Step 6

Click Save.