Media Assets and Embedded Software
Revised: May 4, 2015
OL-15762-05

 You will populate and manage a library of DMP-compatible media assets for playback, as well as firmware and kernel files that expose and expand upon DMP features.
 Concepts
Overview
To simplify management, you can organize your assets for Cisco Digital Signs and Cisco Cast.
We recommend that you create categories for sets of characteristics that your assets have in common — such as their file type, intended audience, or genre.
Restrictions
User Permission Restrictions
Media Restrictions
- Audio-Video Sync on a DMP 4305G
- Misidentified Codecs Can Trigger a Gray Screen, and Then Restart a DMP 4310G
- Component Signal Cables Prevent DMP 4310G Playback of 1080p60 Video
- SDP Support and Restrictions
- Shockwave Flash (SWF) Support and Restrictions
- MP3 Support and Restrictions
- MPEG-4 Support and Restrictions
- Bitmapped/Raster Image (JPG, GIF, PNG) Support and Restrictions
- URL and Website Support and Restrictions
Audio-Video Sync on a DMP 4305G
- In some cases, after a DMP 4305G plays a multicast video stream for 24 hours, audio and video from the stream are no longer perfectly synchronized. (CSCsy37539 ; CSCty77956)
- When a DMP 4305G is restarted, video playback might begin even before the DMP has cleared its splash screen (CSCtb48195). Although audio plays correctly in this case, the lingering splash screen hides a video temporarily.

Tip![]() You can use DMPDM to shorten the splash screen duration.
You can use DMPDM to shorten the splash screen duration.
Misidentified Codecs Can Trigger a Gray Screen, and Then Restart a DMP 4310G
A misconfigured or malfunctioning encoder might output video in which the PMT table names a different codec than was used. When you then try to play this asset through a DMP 4310G, the DMP might restart suddenly after rendering only a gray screen on your digital sign (CSCth61274).
Tip![]() You can use free or open source software — such as MediaInfo (see http://mediainfo.sourceforge.net/en) — to check if the PMT table is wrong. If so, you can use other tools to re-encode or transcode the video properly for playback.
You can use free or open source software — such as MediaInfo (see http://mediainfo.sourceforge.net/en) — to check if the PMT table is wrong. If so, you can use other tools to re-encode or transcode the video properly for playback.
A DMP 4400G Might Not Output Audio After Finishing the Playback of a WMV File
After a DMP 4400G renders a Windows Media video asset for playback, you might find that subsequent assets play without any audible sound (CSCtb09480). Our testing suggests that this behavior can occur only when encoding of the WMV asset’s audio track has combined lossy compression with the following attributes.
Tip![]() You can use free or open source software — such as MediaInfo (see http://mediainfo.sourceforge.net/en) — to check if the audio track is encoded like this. If so, you can use other tools to re-encode or transcode the audio properly for playback.
You can use free or open source software — such as MediaInfo (see http://mediainfo.sourceforge.net/en) — to check if the audio track is encoded like this. If so, you can use other tools to re-encode or transcode the audio properly for playback.
Component Signal Cables Prevent DMP 4310G Playback of 1080p60 Video
When a Component Video signal cable connects your DMP 4310G to its presentation system, the DMP cannot render 1080p60 (progressive-scan) video for playback (CSCtf01345). However, the DMP 4310G in this case can render 1080i60 (interlaced-scan) video correctly.
SDP Support and Restrictions
We support ECDS live streams for digital signage, through the use of SDP files. However, our support for SDP is limited.
- We can play MPEG-TS/RTP/UDP multicast streams over Cisco ECDS networks when the multicast host is a Cisco MDE 1100.
- Alternatively, we can play other MPEG-TS/RTP/UDP multicast streams whose protocol is HTTP.
- The SDP file must be generated by Cisco ECDS.
We do not support SDP optional values e, k, p, r, u, or z. Nor do we support SAP.

Note![]() When you tell DMM the location of an SDP file on an ECDS server, you must enter the ECDS Delivery Service “Service Routing Domain Name.” Do not enter the real host FQDN or the real host IP address.
When you tell DMM the location of an SDP file on an ECDS server, you must enter the ECDS Delivery Service “Service Routing Domain Name.” Do not enter the real host FQDN or the real host IP address.
Also, you must specify the TCP port.
Shockwave Flash (SWF) Support and Restrictions
Note![]() This release does not support audio in Shockwave Flash media. If your media library contains any Shockwave Flash files that use audio, their playback will be silent.
This release does not support audio in Shockwave Flash media. If your media library contains any Shockwave Flash files that use audio, their playback will be silent.
- The filename extension must be SWF and you must enter the estimated duration.
- On a DMP 4305G, avoid playing MP3 audio at the same time as a SWF. Otherwise, the SWF plays approximately 50 percent slower than it should. The cause is a hardware limitation. (CSCty77918 ; CSCtg15314)
- When a SWF asset has a memory leak that depletes DMP memory, the DMP will not necessarily reboot automatically, as it is designed to do in some other low-memory scenarios. Instead, if you have enabled DMP failover (content substitution) and if the alternative content is loadable, your DMP will load it. But if this attempt fails, your DMP will restart itself automatically, as it does in those other low-memory scenarios. (CSCty84687 ; CSCtt29360 ; CSCtw90991)
MP3 Support and Restrictions
- This release does not support DMP playback of any MP3 file that contains embedded cover art (CSCtw78806).
- This release does not support DMP 4305G playback of any MP3 file with a 24000 sample rate (CSCtb79824).
- On a DMP 4305G, avoid playing MP3 audio at the same time as a SWF. Otherwise, the SWF plays approximately 50 percent slower than it should. The cause is a hardware limitation. (CSCty77918 ; CSCtg15314)
MPEG-4 Support and Restrictions
Our support for MPEG-4 requires that you use the MPEG-4 Part 2 or Part 10 (H.264) codec and that you multiplex audio and video in an MPEG-2 Transport Stream.
- When your DMP is a 4400G, we support MPEG-4 Part 10/H.264 video in MPEG-2 TS.
- Neither the 4300G nor the 4305G supports MPEG-4 Part 10/H.264.
The filename extension must be MPG or MPEG and you must enter the estimated duration.
Bitmapped/Raster Image (JPG, GIF, PNG) Support and Restrictions
- A DMP 4305G in this release does not support use of PNG images.
- The maximum supported file size per bitmapped image asset is 450 KB on a DMP 4305G and 1 MB on a DMP 4400G.
- When your designs for digital signage call for an image with fixed dimensions, such as 640 x 480, import a bitmap asset of exactly these dimensions. Do not import a larger or smaller version. Otherwise, your DMP must resize the wrong-sized bitmap on-the-fly for rendering. This work is computationally expensive, and degrades DMP performance over time. (CSCtx99460 ; CSCty83930)
URL and Website Support and Restrictions
- The URL for a media asset cannot be any more than 128 characters long. (CSCts62766)
- To render a Twitter page correctly on your digital sign, do not add the Twitter page URL to your media library. Instead, use the Go To URL system task. Otherwise, the dynamic center column on the Twitter page, which is coded to refresh itself every 2 seconds, is blank. (CSCtw78817)
- DMPs cannot render webpages from servers that use self-signed certificates (CSCtt01371).
- Some webpages with embedded SWF content use JavaScript code that includes multiple getElementById() calls or multiple timers, such as setDuration or setInterval. After a DMP 4305G renders such pages continuously for as little as 12 hours, the DMP can run out of memory and reboot automatically, or it might render only a white screen instead of the SWF. Such cases are the combined result of a Flash 7 memory leak and an over-reliance on JavaScript. (CSCsy01098 ; CSCty77900)
File Size and Storage Restrictions
- The media library can store assets for your digital signs temporarily on the same disk partition that DMM uses for webserver swap space (CSCsi66683; CSCtt27032). If this entire partition becomes filled before your media library can move its assets to their permanent location:
–![]() License verification might fail, preventing any access to UI pages for licensed features.
License verification might fail, preventing any access to UI pages for licensed features.
–![]() License installations might fail with a spurious message that a license is not valid.
License installations might fail with a spurious message that a license is not valid.
–![]() Upload of additional assets might fail.
Upload of additional assets might fail.
–![]() Charting services might fail.
Charting services might fail.
–![]() Any other server operation might fail that requires swap or temp space.
Any other server operation might fail that requires swap or temp space.
Tip So, before you bulk-import assets, use the DMS-Admin dashboard to check available space!
Local Storage Restrictions
Locally Stored Presentations Should Not Include Remote Assets
We recommend as a best practice that you avoid calling upon any remote assets from a playlist or presentation to you store locally to a DMP. Otherwise, any network disruptions will interfere with playback of media that should be impervious to all such disruptions.
Local Storage Restrictions for DMP 4310G
A DMP 4310G that uses an attached USB storage volume might corrupt or erase data on this attached volume. Likewise, a DMP 4310G might lose its ability to mount this attached volume. After the DMP reaches this general state, it sometimes reports incorrectly that the attached volume is still mounted and working.
These problems can occur when you disconnect the external volume from the upper USB interface on a DMP 4310G and then, without any delay, plug it immediately into the lower USB interface on the same DMP. However, these problems do not occur in every such case. In our tests, they occurred approximately 1 percent of the time.
To reduce your possible exposure to these problems, wait no less than 3 seconds after you connect or disconnect an attached volume, before you do the reverse. In our tests, this best practice eliminated the risk.
Restart the DMP if it merely unmounts its attached volume.
There is no workaround after the attached volume is erased or its data becomes corrupted. All that you can do after the fact is reformat the volume and restore its data from a recent backup.
Understand HTTP ‘HEAD’ Request Timeout
Before it tries to download content from a webserver, your DMP first makes sure that the content exists at its expected address. Your DMP starts this validation by sending the webserver what’s called an HTTP HEAD request. Then, when the webserver responds within a configurable interval (10 seconds, by default) to verify that the expected address is valid, your DMP sends an HTTP GET request that triggers the actual download.
Note![]() This configurable interval is based on the “Failover Timeout (ms)” value in DMPDM. Therefore, this value has a powerful effect on your digital signs even when content failover is disabled. It is the maximum duration that can elapse before your DMP sends an HTTP GET request.
This configurable interval is based on the “Failover Timeout (ms)” value in DMPDM. Therefore, this value has a powerful effect on your digital signs even when content failover is disabled. It is the maximum duration that can elapse before your DMP sends an HTTP GET request.
- Timeout Benefit
- Timeout Risk
- You Can Configure the Timeout on Centrally Managed DMPs
- You Can Configure the Timeout on One DMP in Isolation
- You Can Disable the Timeout on Centrally Managed DMPs
- You Can Disable the Timeout on One DMP in Isolation
When the webserver takes more than the configured interval to respond OR when its response is negative, your DMP enters a content substitution (“failover”) state. In this state, your DMP substitutes available assets for unavailable ones. So, instead of showing a black screen, this behavior causes an affected digital sign to play alternative content that you chose previously. The underlying logic for this behavior anticipates a serious problem and overcomes it gracefully.
However, this logic cannot account for all possible scenarios. When a webserver would otherwise verify that an asset’s address is valid, your DMP misinterprets the delay and enters its content failover state unnecessarily.

You Can Configure the Timeout on Centrally Managed DMPs
You can use DMM to edit this timeout.
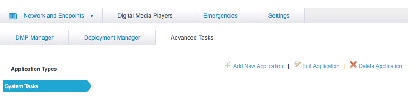
1.![]() Click Network and Endpoints.
Click Network and Endpoints.
2.![]() Choose Digital Media Players > Advanced Tasks > System Tasks.
Choose Digital Media Players > Advanced Tasks > System Tasks.
4.![]() Create a “Set” system task with this command string:
Create a “Set” system task with this command string:
failover.timeout= < interval > &mib.save=1
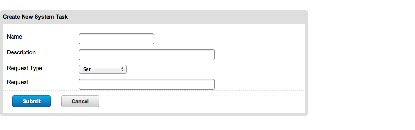
where <interval> is the desired interval in milliseconds.
5.![]() Deploy the system task to DMPs, as needed.
Deploy the system task to DMPs, as needed.

You Can Configure the Timeout on One DMP in Isolation
Alternatively, you can use either of these methods to edit the timeout on one DMP at a time.
- Point your desktop browser to https://admin:< password >@< DMP_FQDN >:7777/set_param?failover.timeout= < interval > &mib.save=1, where:
–![]() < password > is whichever password you set most recently for this DMP’s admin user.
< password > is whichever password you set most recently for this DMP’s admin user.
–![]() < DMP_FQDN > is the DNS-resolvable hostname for exactly this DMP.
< DMP_FQDN > is the DNS-resolvable hostname for exactly this DMP.
–![]() <interval> is the desired interval in milliseconds.
<interval> is the desired interval in milliseconds.
- Use DMPDM to point TVzilla (the browser on your DMP) to https://admin:< password >@localhost:7777/set_param?failover.timeout= < interval > &mib.save=1, where:
–![]() < password > is whichever password you set most recently for this DMP’s admin user.
< password > is whichever password you set most recently for this DMP’s admin user.
–![]() <interval> is the desired interval in milliseconds.
<interval> is the desired interval in milliseconds.
You Can Disable the Timeout on Centrally Managed DMPs
You can use DMM to disable this timeout (CSCua03897).
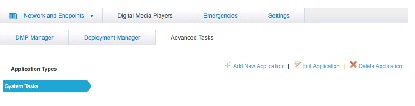
1.![]() Click Network and Endpoints.
Click Network and Endpoints.

2.![]() Choose Digital Media Players > Advanced Tasks > System Tasks.
Choose Digital Media Players > Advanced Tasks > System Tasks.
4.![]() Create a “Set” system task with this command string:
Create a “Set” system task with this command string:
video.force_wget_use=0&mib.save=1

5.![]() Deploy the system task to DMPs, as needed.
Deploy the system task to DMPs, as needed.
Note![]() To reenable the timeout, use this command string: video.force_wget_use=1&mib.save=1.
To reenable the timeout, use this command string: video.force_wget_use=1&mib.save=1.
You Can Disable the Timeout on One DMP in Isolation
Alternatively, you can use either of these methods to disable the timeout on one DMP at a time.
- Point your desktop browser to https://admin:< password >@< DMP_FQDN >:7777/set_param?video.force_wget_use=0&mib.save=1, where:
–![]() < DMP_FQDN > is the DNS-resolvable hostname for exactly this DMP.
< DMP_FQDN > is the DNS-resolvable hostname for exactly this DMP.
–![]() < password > is whichever password you set most recently for this DMP’s admin user.
< password > is whichever password you set most recently for this DMP’s admin user.
- Use DMPDM to point TVzilla (the browser on your DMP) to https://admin:< password >@localhost:7777/set_param?video.force_wget_use=0&mib.save=1, where < password > is whichever password you set most recently for this DMP’s admin user.
Note![]() To reenable the timeout on one DMP in isolation, change the set_param command string to: video.force_wget_use=1&mib.save=1.
To reenable the timeout on one DMP in isolation, change the set_param command string to: video.force_wget_use=1&mib.save=1.
Procedures
- Work with Assets and Categories in Your Media Library
- Add One Asset at a Time to Your Media Library
- Add Multiple Assets Simultaneously to Your Media Library
Work with Assets and Categories in Your Media Library
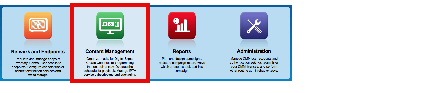
Step 1![]() Click Content Management.
Click Content Management.

A tree on the left side of the Media Library page names the types of media that are supported and shows the hierarchy of categories that you have created to organize assets without regard for their media type.
Step 3![]() Click the name of a media type or of a category.
Click the name of a media type or of a category.
An untitled table on the right side of the page is updated automatically to describe assets of the relevant type that your library contains.
Step 4![]() Enter the values and choose the options that meet your requirements.
Enter the values and choose the options that meet your requirements.
Step 5![]() Stop. You have completed this procedure.
Stop. You have completed this procedure.
Add One Asset at a Time to Your Media Library
Note ●![]() After you start to import an asset, do not click any browser button or navigate away from this page until the import is finished. When you do, the import will not finish successfully.
After you start to import an asset, do not click any browser button or navigate away from this page until the import is finished. When you do, the import will not finish successfully.
- We recommend that you do not use your DMM appliance as if it is a storage server. It has limited capacity to store files and DMM might not function as designed when space runs low.
Step 1![]() Click Content Management.
Click Content Management.

The Add Asset dialog box opens.
Step 5![]() Do one of the following in the Source area to specify the full local pathname or remote HTTP URL of the asset.
Do one of the following in the Source area to specify the full local pathname or remote HTTP URL of the asset.
Note The URL must be encoded properly (using “%20” instead of spaces, for example), according to the principles set forth in RFC 2396.
Step 6![]() Choose the option in the Asset Type area that best describes the asset.
Choose the option in the Asset Type area that best describes the asset.
Step 7![]() Enter a title for the asset.
Enter a title for the asset.
Step 8![]() Enter the estimated duration for playback.
Enter the estimated duration for playback.

• To avoid this behavior altogether, use only video clips whose full duration is 3 seconds or more.
• To prevent this behavior temporarily when extremely brief video is somehow essential, disable video failover.
• To recover from this behavior, restart the application.
A DMP 4310G does not exhibit this behavior.
Note![]() The user interface in Cisco Digital Signs sometimes shows a mistaken estimate of 0 (zero) seconds as the full duration of a video playlist. Even though the estimate is wrong, the error does not have any practical consequences. Playback starts and stops as scheduled, without disruption.
The user interface in Cisco Digital Signs sometimes shows a mistaken estimate of 0 (zero) seconds as the full duration of a video playlist. Even though the estimate is wrong, the error does not have any practical consequences. Playback starts and stops as scheduled, without disruption.
This occurs after you set any video asset in the playlist to use 0 seconds as its planned duration. A video asset whose planned duration is 0 (zero) seconds will play from beginning to end.
When you want to skip a video instead of playing it, you must remove it from the playlist. Any playlist’s constituent nonvideo assets must have a planned duration of at least 1 second.
Step 9![]() Choose at least one category.
Choose at least one category.
Step 10![]() (Optional) Enter a description.
(Optional) Enter a description.
Step 11![]() (Optional) Enter an owner for the asset.
(Optional) Enter an owner for the asset.
Step 12![]() Click Save.
Click Save.
OR
Click Cancel.
Step 13![]() Stop. You have completed this procedure.
Stop. You have completed this procedure.
Add Multiple Assets Simultaneously to Your Media Library
The amount of time that a batch download operation requires depends on the speed of your connection, the number of directory levels that you search for downloadable files, and the total combined file size of all files that you transfer.
Note ●![]() After you start to import an asset, do not click any browser button or navigate away from this page until the import is finished. When you do, the import will not finish successfully.
After you start to import an asset, do not click any browser button or navigate away from this page until the import is finished. When you do, the import will not finish successfully.
- We recommend that you do not use your DMM appliance as if it is a storage server. It has limited capacity to store files and DMM might not function as designed when space runs low.
- Use the DMS-Admin dashboard to check available space. For details, see File Size and Storage Restrictions.
Step 1![]() Click Content Management.
Click Content Management.
The Add Asset dialog box opens.
Step 5![]() Enter, in the Base URL area, the root-level URL for the batch download operation.
Enter, in the Base URL area, the root-level URL for the batch download operation.
We do not support any use of spaces in URLs.
Step 6![]() Enter, in the Pattern area, a filename pattern that identifies which files to download.
Enter, in the Pattern area, a filename pattern that identifies which files to download.
For example, to download every file that uses the three-letter MPG filename extension, the pattern is *.MPG.
Note![]() Do not enter the filename pattern to use any unsupported file type.
Do not enter the filename pattern to use any unsupported file type.
Step 7![]() Make choices and enter values to add assets to your library.
Make choices and enter values to add assets to your library.
Step 8![]() Click Save.
Click Save.
OR
Click Cancel to discard your work.
Step 9![]() Stop. You have completed this procedure.
Stop. You have completed this procedure.
Reference
Software UI and Field Reference Tables
Elements to Manage Assets and Categories
Content Management > Media Library
|
|
|
|
|---|---|---|
| A complete list of the types of assets that are supported. The supported assets are:
When you click the name of a media type, an untitled table on the right side of the page is updated automatically to describe assets of the relevant type that your library contains. |
||
| A hierarchical list of categories in your media library. A category can contain assets or it might be empty. You can create new categories, edit existing categories, delete categories, or click a category whose assets the untitled table should describe. You can add almost any number of nested categories to your media library. |
||
| Options — A menu from which you can choose among these options: |
||
|
Filter by |
||
| Methods by which you can cause the untitled table to describe only the assets from your media library that match parameters you have specified. Choose the filtering method, specify the parameters, and then click Go. You can use only one filter per query. You cannot apply a second filter to results that are already filtered. |
||
| Enter in hours, minutes, and seconds, the duration to be matched. |
||
| Click the first calendar icon to choose the start date for the range of modification dates to be matched, and then click the second calendar icon to choose the end date for the range. |
||
| Choose whether the asset is stored locally (File) or remotely (URL). |
||
|
untitled table |
||
| Describes all assets contained in the category, or of the media type, that you clicked in the list. The table sorts information into columns. |
||
| Identifies the format of the asset that the corresponding row describes. |
||
|
• To avoid this behavior altogether, use only video clips whose full duration is 3 seconds or more. • To prevent this behavior temporarily when extremely brief video is somehow essential, disable video failover. • To recover from this behavior, restart the application. A DMP 4310G does not exhibit this behavior. The duration value that you entered when you added this asset to your media library, or when you edited attributes of this asset. |
||
| Time stamp (in the format |
||
|
pagination controls |
||
|
Options |
||
|
|
Elements to Add Categories and Rename Them
The Add Category and Rename Category dialog boxes help you to manage the categories for organizing assets in your media library.
- Content Management > Media Library > Create Category
- Content Management > Media Library > Options > Create Category
- Content Management > Media Library > Options > Rename Category
|
|
|
|---|---|
Elements to Add Assets and Edit Their Attributes
Features of the Add Media Asset and Edit Media Asset dialog boxes help you to populate and manage your media library. Options are sorted under two tabs, Single and Batch, which help you to manage either one asset or multiple assets, respectively.
- Content Management > Media Library > Add Media Asset
- Content Management > Media Library > Options > Add Media Asset
- Content Management > Media Library > Options > Edit Media Asset
|
|
|
|---|---|
The full local pathname or remote HTTP URL of the asset. We do not support any use of spaces in filenames or URLs. |
|
Choose the type that best describes the asset:
|
|
The estimated duration for playback, counted in hours, minutes, and seconds. |
|
Describes each of the categories that should contain this asset. To add a category to the list, click Select Category. |
|
|
Batch tab |
|
An HTTP URL that points to a directory on a server. The directory that you point to serves as the root-level URL for the batch download operation; every file that you download is retrieved from this directory or from one of its children at a lower level. We do not support any use of spaces in URLs. |
|
The filename pattern that identifies which files to download. We do not support any use of spaces in filenames. |
|
Choose the type that best describes these assets:
|
|
The number of levels below the specified base URL to search for (and download) files with filenames that match the specified pattern. |
|
Click the name of the one category that should contain these assets. |
|
|
2.See the “MPEG-4 Support and Restrictions” section. 3.See the “Shockwave Flash (SWF) Support and Restrictions” section. |
Elements To Describe and Preview One Asset
The View Asset dialog box describes the attributes of one asset in your Media Library and, in some cases, shows a preview. Attribute information is sorted under two tabs, Overview and Usage. Click a tab to see the asset attributes that it describes. To close the View Asset dialog box, click Close.
Content Management > Media Library > Options > View Media Asset
|
|
|
|---|---|
|
Overview tab |
|
| Attributes that are derived from information in your media library include the elements with these field labels: Title, Description, File Type, Estimated Duration, Owner, Category Names, and Source. To understand these elements, see Elements to Add Assets and Edit Their Attributes. Other elements on the Overview tab are as follows. |
|
Either a generic icon that represents the asset type or a thumbnail that you can click to view this asset, assuming that its file type is viewable in your browser. |
|
The total count of playlists that contain and are dependent upon this asset. To learn more about these playlists, click the Usage tab. |
|
The total count of presentations that contain and are dependent upon this asset. To learn more about these presentations, click the Usage tab. |
|
Time stamp (in the format |
|
|
Usage tab |
|
| Shows either the Playlists for Asset table or the Presentations for Asset table, depending on whether you click Playlist or Presentation , respectively. The table sorts information into the following columns. |
|
The name of the presentation or the playlist that is dependent upon this asset. |
|
The total count of instances when the described presentation or playlist includes this asset. |
|
Time stamp (in the format |
|
 Feedback