Troubleshooting operating system issues
This section helps you troubleshoot operating system issues in your system.
NOTE: If the problem persists, contact Wistron Technical Support for further assistance.
Topics:
-
How to install the operation system via Virtual media – Ubuntu 22.04
-
AMD GPU
-
How to add amdgpu driver to blacklist in Linux
-
How to Install and Reinstall AMD MI300X ROCm and Driver in Ubuntu
-
AMDGPU driver cause fatal error with AMD platform
-
How to uninstall ROCm
-
Why do AMD Applications hang on Multi-GPU systems
-
How to update AMD MI300X UBB Firmware via BMC Console
-
How to install the operation system using Virtual media - Ubuntu 22.04
Before you begin
-
Ensure that the server supports the operating system you intend to install.
-
Make sure you have the OS source media available for the server.
-
Prepare a storage location where you can store the necessary installation files.
SUMMARY STEPS
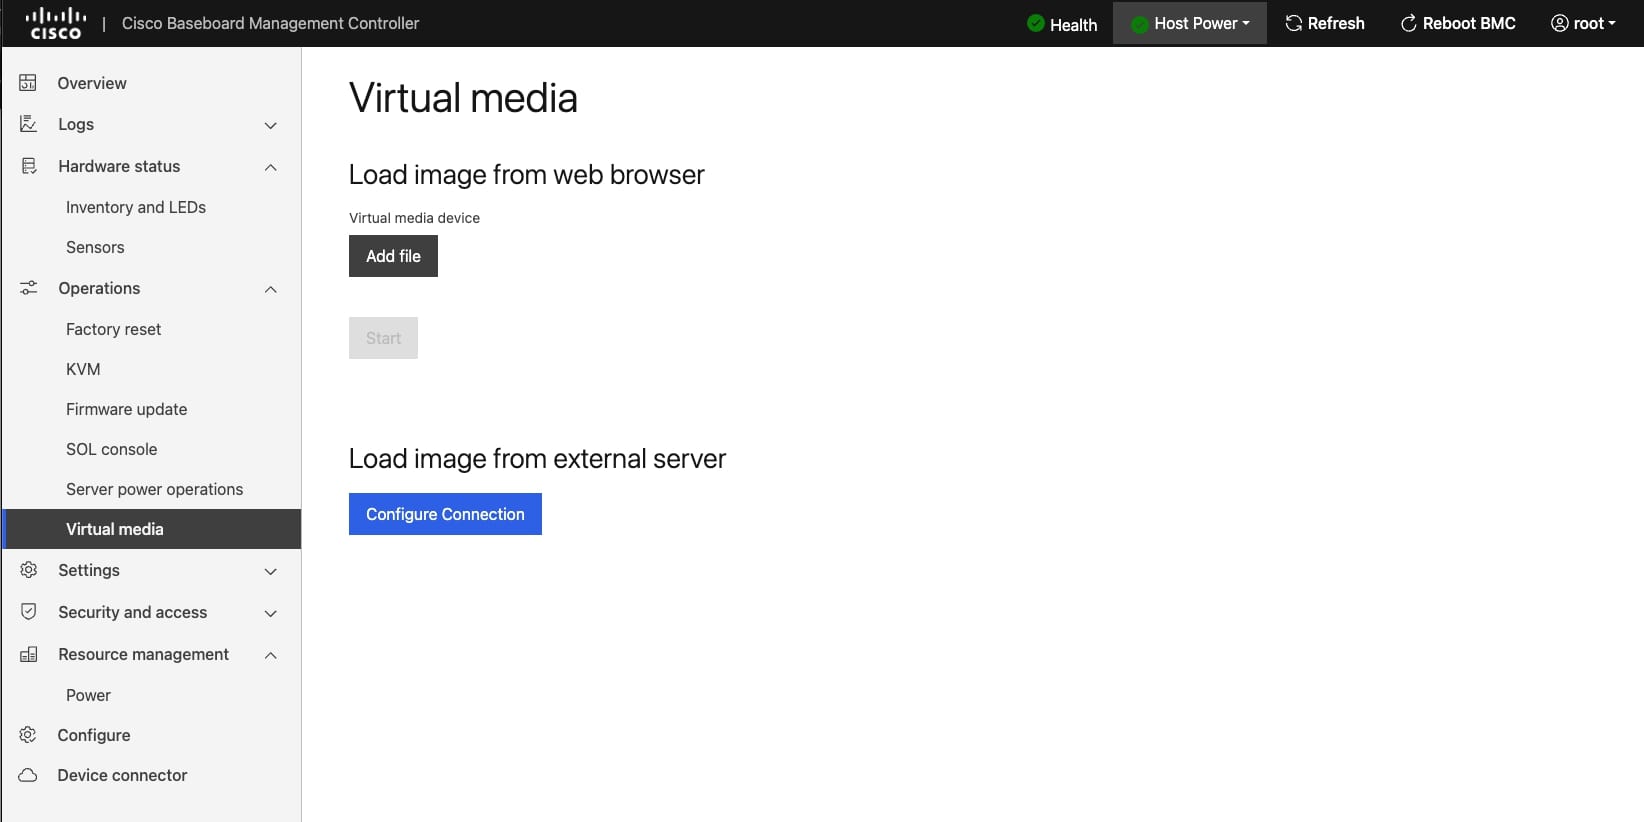
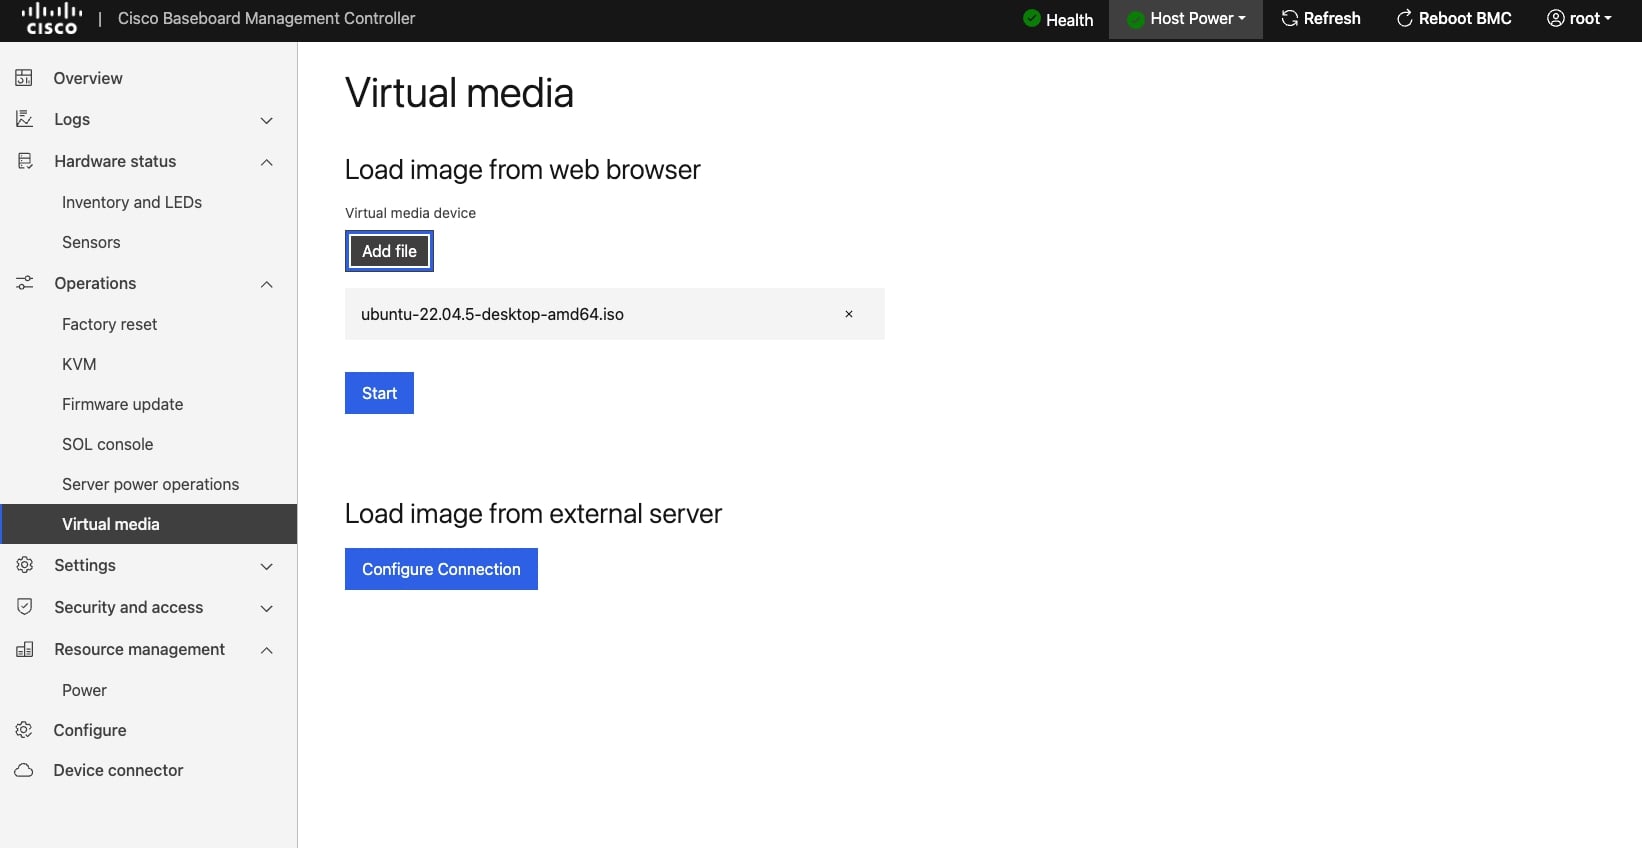
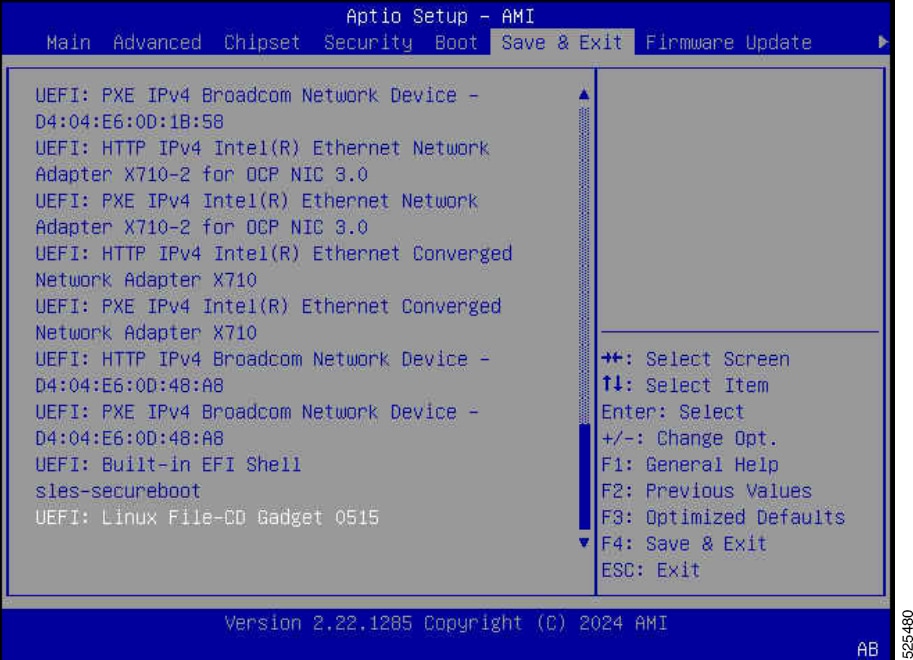
- Access the OpenBMC Web UI interface by entering the server's IP address in a web browser.
- Mount OS Source media into the Virtual Media drive.
- Click Add file (such as an ISO file) to add the virtual media device.
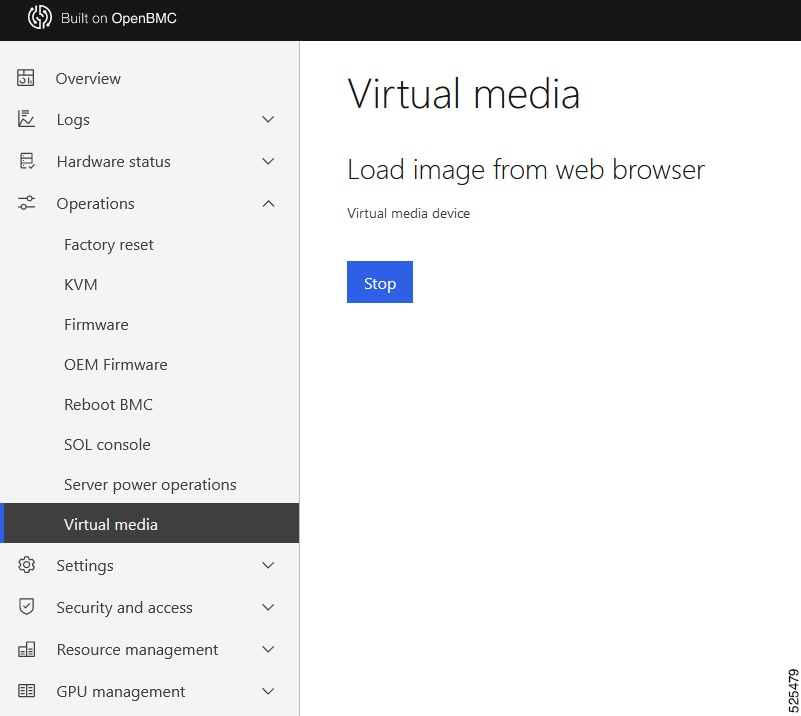
- Click Start to start the virtual media after the file is added.
- After mount iso image success.
- Save the changes, reboot the server, and boot into the OS installation image.
- In the BIOS setup utility or boot menu, navigate to the Save & Exit section or a similar option.
- Select the UEFI: Linux File-CD Gadget 0515 or similar entry from the available boot devices.
- Save the changes and exit the BIOS setup utility or boot menu.
- The server will now boot from the selected boot device, which is the OS installation image on the virtual media drive.
- Once the installation completes, the server reboots again, this time booting from the installed operating system on the server's local disk.
DETAILED STEPS
| Command or Action | Purpose | |||
|---|---|---|---|---|
|
Step 1 |
Access the OpenBMC Web UI interface by entering the server's IP address in a web browser. |
|
||
|
Step 2 |
Mount OS Source media into the Virtual Media drive. |
|||
|
Step 3 |
Click Add file (such as an ISO file) to add the virtual media device. |
|
||
|
Step 4 |
Click Start to start the virtual media after the file is added. |
|
||
|
Step 5 |
After mount iso image success. |
|
||
|
Step 6 |
Save the changes, reboot the server, and boot into the OS installation image. |
|||
|
Step 7 |
In the BIOS setup utility or boot menu, navigate to the Save & Exit section or a similar option. |
|||
|
Step 8 |
Select the UEFI: Linux File-CD Gadget 0515 or similar entry from the available boot devices. |
|||
|
Step 9 |
Save the changes and exit the BIOS setup utility or boot menu. |
|||
|
Step 10 |
The server will now boot from the selected boot device, which is the OS installation image on the virtual media drive. |
|
||
|
Step 11 |
Once the installation completes, the server reboots again, this time booting from the installed operating system on the server's local disk. |
AMD GPU
How to add amdgpu driver to blacklist in Linux
Cause: If the amdgpu driver or firmware have some issues, it can result in the system shutting down or rebooting when the user loads the amdgpu driver. Therefore, it is necessary for the user to blacklist the amdgpu driver to prevent it from being automatically loaded. If the user forgets to set up the blacklist, the issue may persist.
Solution:
To add the parameter behind GRUB_CMDLINE_LINUX in /etc/default/grub, perform the following:
SUMMARY STEPS
- Run the following command to open the GRUB configuration file in a text editor:
$ sudo nano /etc/default/grub - Locate the line that starts with GRUB_CMDLINE_LINUX in the file.
- Save the changes by pressing
Ctrl + X, followed byY, and thenEnter. - Update the GRUB configuration by running the following command:
- Reboot your system for the changes to take effect:
- When the amdgpu is added to blacklist, you should manually load the module using the following command:
DETAILED STEPS
| Command or Action | Purpose | |
|---|---|---|
|
Step 1 |
Run the following command to open the GRUB configuration file in a text editor: |
|
|
Step 2 |
Locate the line that starts with GRUB_CMDLINE_LINUX in the file. |
For example, if you need to add the parameter " modprobe.blacklist=amdgpu iommu=pt pci=noats ", the line would look like: |
|
Step 3 |
Save the changes by pressing |
|
|
Step 4 |
Update the GRUB configuration by running the following command: |
|
|
Step 5 |
Reboot your system for the changes to take effect: |
|
|
Step 6 |
When the amdgpu is added to blacklist, you should manually load the module using the following command: |
|
What to do next
NOTE: After rebooting, the amdgpu driver will be loaded with the specified parameters or options. Be aware that manually loading the driver may introduce potential issues or conflicts. If you experience any problems, consider reviewing the parameters or options added in Step 2 or consult AMD technical support for further assistance.
How to Install AMD MI300X ROCm and Driver in Ubuntu
Before installing ROCm, complete the following prerequisites.
SUMMARY STEPS
- Confirm the system has a supported Linux version.
- Verify the kernel version.
DETAILED STEPS
| Command or Action | Purpose | |
|---|---|---|
|
Step 1 |
Confirm the system has a supported Linux version. |
|
|
Step 2 |
Verify the kernel version. |
What to do next
-
To check the kernel version of your Linux system, type the following command:
$uname -srmvExample: The preceding command lists the kernel version in the following format:
Linux 5.15.0-46-generic #44~20.04.5-Ubuntu SMP Fri Jun 24 13:27:29 UTC 2022 x86_64 -
Confirm that your kernel version matches the system requirements, as listed in Supported operating systems.
-
Install ROCm Method:
For a quick summary on installing ROCm on Linux, choose your preferred operating system and installation method and follow the steps listed in the table. If you want more in-depth installation instructions, refer to ROCm installation options.
-
Ubuntu 22.04
Native package manager
sudo apt install "linux-headers-$(uname -r)" "linux-modules-extra-$(uname -r)"sudo usermod -a -G render,video $LOGNAME # Adding current user to Video, Render groups. See prerequisites.wget https://repo.radeon.com/amdgpu-install/6.1.1/ubuntu/jammy/amdgpu-install_6.1.60101-1_all.debsudo apt install ./amdgpu-install_6.1.60101-1_all.debsudo apt updatesudo apt install amdgpu-dkmssudo apt install rocmecho "Please reboot system for all settings to take effect." -
Install AMDGPU Method:
AMDGPU installer
sudo apt install "linux-headers-$(uname -r)" "linux-modules-extra-$(uname -r)"sudo usermod -a -G render,video $LOGNAME # Adding current user to Video, Render groups. See prerequisites.sudo apt updatewget https://repo.radeon.com/amdgpu-install/6.1.1/ubuntu/jammy/amdgpu-install_6.1.60101-1_all.debsudo apt install ./amdgpu-install_6.1.60101-1_all.debsudo amdgpu-install --usecase=graphics,rocm
-
Before installing ROCm, ensure that your operating system is clean or uninstall any old versions of ROCm.
-
Check your kernel version by running the command uname -r to confirm that it matches the requirements specified in the ROCm README or documentation.
-
Extract the ROCm package by running the command:
$ tar -xvzf $ROCm_FILEReplace $ROCm_FILE with the name of the downloaded ROCm file.
-
Change to the ROCm directory by running the command:
$ cd $ROCm_DIRReplace $ROCm_DIR with the name of the extracted ROCm directory.
-
Give execute permissions to the amdgpu-install script by running the command:
$chmod u+x amdgpu-installBegin the installation process by running the command: $./amdgpu-install --usecase=hiplibsdk,rocmFollow the prompts and provide any necessary inputs during the installation process.
Once the ROCm installation is complete, it is recommended to blacklist the amdgpu driver to prevent auto-probing upon booting into the operating system, before rebooting the system.
You can refer to the How to Add amdgpu to Blacklist in Ubuntu section for instructions on how to blacklist the amdgpu driver.
Please note that the steps provided are general guidelines, and the exact commands or procedures may vary depending on your specific OS and ROCm version. For detailed instructions specific to your setup, consult the ROCm documentation or official resources.
AMDGPU driver cause fatal error with AMD platform
Cause: Some versions of the amdgpu driver may have issues that can result in fatal errors on AMD platforms.
Solution: To avoid potentially fatal errors caused by the amdgpu driver, you can try the following two methods:
Method 1: Add amdgpu driver to blacklist in Linux-
Run the following command to open the GRUB configuration file in a text editor:
$ sudo nano /etc/default/grub
-
Locate the line that starts with "GRUB_CMDLINE_LINUX" in the file.
Add the “modprobe.blacklist=amdgpu” "iommu=pt" and "pci=noats" parameters behind the existing content within the quotation marks ("").
For example, if the line is:
$ GRUB_CMDLINE_LINUX=" modprobe.blacklist=amdgpu iommu=pt pci=noats "
-
Save the changes by pressing Ctrl + X, then Y, and finally Enter.
-
Update the GRUB configuration by running the following command:
$sudo grub-mkconfig -o /boot/efi/EFI/ubuntu/grub.cfg
$sudo update-grub
-
Reboot your system for the changes to take effect:
$sudo
reboot
Figure 6. After updated the grub configuration 

Note
After rebooting, the iommu=pt and pci=noats parameters will be added to the kernel command line. These parameters may help address certain issues or improve compatibility for your AMD platform.
Please note that modifying the GRUB configuration can have potential consequences on system behavior. If you experience any further issues or instabilities, consider reverting the changes or seeking assistance from AMD technical support or your distribution's support channels.
-
Set IOMMU to disable in BIOS: Advance > AMD CBS > NBIO Common Options > IOMMU disable
Figure 7. Disable IOMMU 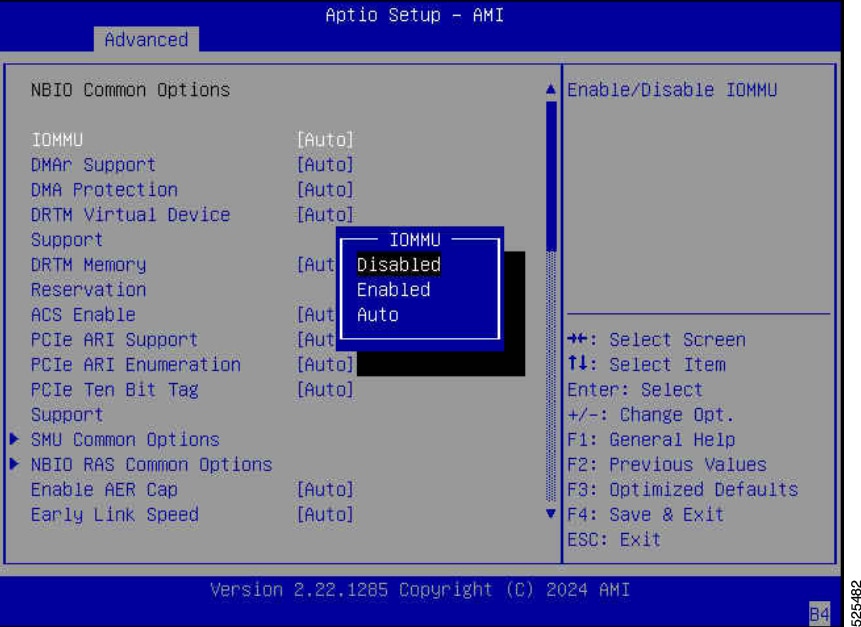
How to uninstall ROCm
Solution:
To uninstall ROCm, please follow the steps below:
SUMMARY STEPS
- Open a terminal window.
- Run the following command to uninstall the ROCm packages from your system:
- Next, clean the ROCm repository configuration by running the following command:
- Use the following command to remove the amdgpu-install package:
- Finally, remove the amd-nonfree-radeon package by running the following command:
DETAILED STEPS
| Command or Action | Purpose | |
|---|---|---|
|
Step 1 |
Open a terminal window. |
|
|
Step 2 |
Run the following command to uninstall the ROCm packages from your system: |
$sudo amdgpu-uninstall |
|
Step 3 |
Next, clean the ROCm repository configuration by running the following command: |
$sudo amdgpu-repo –clean |
|
Step 4 |
Use the following command to remove the amdgpu-install package: |
$sudo apt-get -y purge amdgpu-install |
|
Step 5 |
Finally, remove the amd-nonfree-radeon package by running the following command: |
$sudo apt-get -y purge amd-nonfree-radeon These steps will uninstall the ROCm packages and related components from your system. |
What to do next
Note: Please note that the specific commands provided are suitable for Ubuntu or Debian-based systems. If you are using a different Linux distribution, the package manager commands may vary. Adjust the commands accordingly or refer to the documentation provided by your distribution for the correct package management commands.
After completing these steps, it is recommended to reboot your system to ensure any remaining ROCm components are fully cleared.
Why does the AMD application become unresponsive on multi-GPU systems
Cause: Running on a system with multiple GPUs the application hangs with the GPU use at 100%, but without the expected GPU temperature buildup
This issue often results in the following message in the application transcript:
| NCCL WARN Missing "iommu=pt" from kernel command line which can lead to system instability or hang! |
Solution:
To resolve this issue add iommu=pt to GRUB_CMDLINE_LINUX_DEFAULT in /etc/default/grub.
Then run the following command:
$ sudo update-grub
Reboot the system, and run the following command:
$ cat /proc/cmdline
The returned information should reflect the addition of iommu:
| BOOT_IMAGE=/vmlinuz-5.15.0-101-generic root=/dev/mapper/ubuntu--vg-ubuntu--lv ro iommu=pt |
 Feedback