- Supported RAID Controllers and Required Cables
- RAID Card Firmware Compatibility
- Cisco 12G SAS Modular RAID Controller Considerations
- Cisco UCS SAS 9300-8e HBA Considerations
- Mixing Drive Types in RAID Groups
- RAID Backup Units
- RAID Controller Migration
- RAID Controller Cabling
- Embedded SATA RAID Controller Requirements
- Embedded SATA RAID: Two SATA Controllers
- Embedded SATA RAID Controller Considerations
- Installing a Software RAID 5 Key Module for Embedded RAID 5 Support
- Enabling the Embedded SATA RAID Controller in the BIOS
- Disabling the Embedded RAID Controller in the BIOS
- Launching the LSI Embedded RAID Configuration Utility
- Installing LSI MegaSR Drivers For Windows and Linux
RAID Controller Considerations
This appendix contains the following sections:
- Supported RAID Controllers and Required Cables
- RAID Card Firmware Compatibility
- Write-Cache Policy for Cisco 12G SAS Modular RAID Controller
- Cisco UCS SAS 9300-8e HBA Considerations
- RAID Controller Migration
- Mixing Drive Types in RAID Groups
- RAID Backup Units
- RAID Controller Migration
- RAID Controller Cabling
- Embedded SATA RAID Controllers
- Restoring RAID Configuration After Replacing a RAID Controller
- For More Information
Supported RAID Controllers and Required Cables
This server supports the RAID controller options and cable requirements shown in Table C-1 .


Note![]() NVMe PCIe SSDs cannot be controlled with a SAS RAID controller.
NVMe PCIe SSDs cannot be controlled with a SAS RAID controller.
|
|
|
Maximum Drives Controlled |
|
|
|
|---|---|---|---|---|---|
|
(PCH SATA) |
The embedded RAID option is not available with the large form factor drives, 4-drive version of the server at this time. |
0, 1, 51, 10 |
|||
|
This controller can be ordered with modular flash-backed write cache (FBWC) options: 512 MB, 1 GB, 2 GB, or 4 GB. Note: See also Cisco 12G SAS Modular RAID Controller Considerations. |
Yes2 |
||||
|
|
|||||
|
Note: See also Cisco UCS SAS 9300-8e HBA Considerations. |
8 external SAS+SATA ports, controlling up to 1024 non-RAID external drives |
NOTE: This HBA does not support optical cables for connection to external storage (copper only). |
|
1.Embedded RAID 5 support requires an optional RAID 5 key module. |
RAID Card Firmware Compatibility
Firmware on the RAID controller must be verified for compatibility with the current Cisco IMC and BIOS versions that are installed on the server. If not compatible, upgrade or downgrade the RAID controller firmware accordingly using the Host Upgrade Utility (HUU) for your firmware release to bring it to a compatible level.
See the HUU guide for your Cisco IMC release for instructions on downloading and using the utility to bring server components to compatible levels: HUU Guides
Cisco 12G SAS Modular RAID Controller Considerations
Stripe-Size Limitation When No Flash-Backed Write Cache is Present
This controller can be ordered with several modular flash-backed write cache (FBWC) options: 512 MB, 1 GB, 2 GB, or 4 GB.
Write-Cache Policy for Cisco 12G SAS Modular RAID Controller
For this server and other Cisco Generation M4 servers, the default write-cache policy for the Cisco Modular RAID controller is Write Through (irrespective of the presence of a charged Supercap power module or “good BBU”). This utilizes the optimal performance characteristics of the controller.
If you have Cisco IMC 2.0(5) or later firmware installed to the M4 server, the write policy can be set to Write Back, if preferred.
You can set the write policy using the following methods:
- For standalone servers, use the Cisco IMC interface to set Virtual Drive Properties > Write Policy. See the “Managing Storage Adapters” section in your Cisco IMC Configuration Guide.
Cisco IMC GUI and CLI Configuration Guides - For Cisco UCS-integrated servers, use the Cisco UCS Manager interface to set the write-cache policy as part of virtual drive configuration in your storage profile.
Cisco UCS Manager Configuration Guides - Use the LSI Option ROM Configuration Utility.
Cisco UCS SAS 9300-8e HBA Considerations
This section contains the following topics:
- Optical Cables Not Supported for 9300-8e HBA
- Mixing Rules for 9300-8e HBA
- Bad Drive and Predictive Failure Behavior for 9300-8e HBA
- Setting the Preferred Boot Device For 9300-8e HBA
Optical Cables Not Supported for 9300-8e HBA
The 9300-8e HBA does not support optical cables for connection to external storage (copper only).
Mixing Rules for 9300-8e HBA
Mixing the Cisco UCS 9300-8e HBA in the same server as the Cisco UCS 12G SAS Modular HBA requires the following firmware levels:
Bad Drive and Predictive Failure Behavior for 9300-8e HBA
The bad drive and predictive failure behavior for the Cisco UCS SAS 9300-e HBA cards is different than that for LSI MegaRAID cards. The list below compares behavior for these HBA cards and LSI MegaRAID cards.
–![]() MegaRAID: The bad drive is marked BAD in the GUI/CLI interfaces and the fault LED on the drive is solid amber.
MegaRAID: The bad drive is marked BAD in the GUI/CLI interfaces and the fault LED on the drive is solid amber.
–![]() HBA: The bad drive is not shown in the GUI/CLI and there is no LED indication.
HBA: The bad drive is not shown in the GUI/CLI and there is no LED indication.
–![]() MegaRAID: If the drive is part of a RAID volume with a spare, the software performs an auto-copy backup and then marks the drive failed/BAD with the fault LED on the drive solid amber.
MegaRAID: If the drive is part of a RAID volume with a spare, the software performs an auto-copy backup and then marks the drive failed/BAD with the fault LED on the drive solid amber.
–![]() HBA: There is no error handling and there is no LED indication. The operating system must handle the fault.
HBA: There is no error handling and there is no LED indication. The operating system must handle the fault.
Setting the Preferred Boot Device For 9300-8e HBA
Currently, the boot device order for these HBAs does not map to a physical slot as seen in the Boot Option dialog of the server BIOS Setup Utility. This makes it difficult to differentiate between multiple devices.
Use the following procedure to select the preferred boot device in the LSI BIOS CU SAS Topology screen. When you select the preferred boot device in the BIOS CU SAS Topology screen, it is displayed at the top of the list in the server BIOS Setup Utility Boot Option dialog, making it easy to identify.
Step 1![]() In the LSI SAS BIOS CU, navigate to the SAS Topology screen.
In the LSI SAS BIOS CU, navigate to the SAS Topology screen.
Step 2![]() Press Alt+B to select or deselect a device as the preferred boot device. On this screen, you can identify the device by slot number.
Press Alt+B to select or deselect a device as the preferred boot device. On this screen, you can identify the device by slot number.
Step 3![]() Press Alt+A to select or deselect a device as the alternate boot device. On this screen, you can identify the device by slot number. The alternate boot device is used if the preferred boot device is not detected.
Press Alt+A to select or deselect a device as the alternate boot device. On this screen, you can identify the device by slot number. The alternate boot device is used if the preferred boot device is not detected.
Step 4![]() Return to the BIOS CU SAS Topology screen.
Return to the BIOS CU SAS Topology screen.
The Device Info column shows which devices you selected with the designators Boot and Alt.
Step 5![]() In the server BIOS Setup Utility, open the Boot Option dialog.
In the server BIOS Setup Utility, open the Boot Option dialog.
The preferred device that you selected in the LSI BIOS CU is listed at the top of the list.
Step 6![]() Select the device at the top of the list as your boot option.
Select the device at the top of the list as your boot option.
Mixing Drive Types in RAID Groups
Table C-2 lists the technical capabilities for mixing hard disk drive (HDD) and solid state drive (SSD) types in a RAID group. However, see the recommendations that follow for the best performance.
|
in RAID Group |
|
|---|---|
Mixing Drive Types in RAID Groups
RAID Backup Units
This server supports installation of one SuperCap Power Module (SCPM). The unit mounts to a bracket in-line with the fan modules (see Figure 3-23).
The optional SCPM provides approximately three years of backup for the disk write-back cache DRAM in the case of a sudden power loss by offloading the cache to the NAND flash.
For SCPM replacement instructions, see Replacing the Supercap Power Module (RAID Backup).
RAID Controller Migration
This server supports hardware RAID (PCIe controller card) and embedded software RAID. See Table C-3 for which migrations are allowed and a summary of migration steps.
RAID Controller Cabling
This section includes the following topics:
Cable Routing
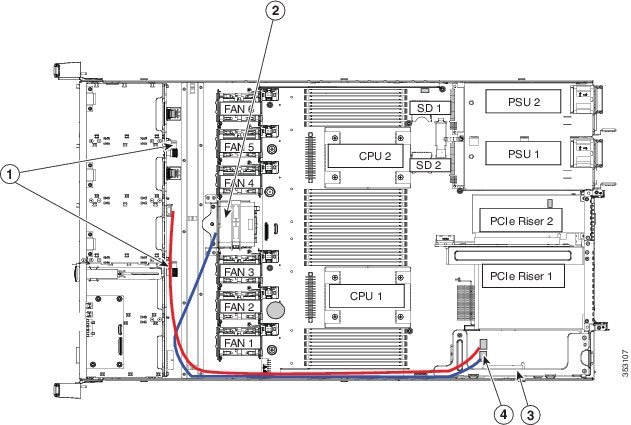
The RAID controller connectors in this server are shown in Figure C-1.
- The red line shows the recommended cable routing path from the Cisco modular RAID controller card or the embedded SATA RAID motherboard connectors to the drive backplane. Cable guides on the chassis wall help route the cables.
- The blue line indicates the recommended cable routing path from the Cisco modular RAID controller to the SCPM (RAID backup).
- The green line shows the recommended cable routing path from an HBA card in slot 1 to the drive backplane.
Figure C-1 RAID Controller Connectors
|
|
|
Cisco modular RAID controller riser (dedicated internal riser) |
|
|
|
|
Cisco UCS C220 M4 Server Cabling
SFF 8-Drive Backplane Cabling
The cable connections required for each type of controller are as follows:
Embedded RAID
This option can control up to eight SATA drives.
The required UCS-220CBLSR8= cable kit has two mini-SAS cables (mini-SAS HD to mini-SAS iPass connectors).
Step 1![]() Connect mini-SAS cable 1 from the PORT A motherboard connector to the PORT A connector on the backplane.
Connect mini-SAS cable 1 from the PORT A motherboard connector to the PORT A connector on the backplane.
Step 2![]() Connect mini-SAS cable 2 from the PORT B motherboard connector to the PORT B connector on the backplane.
Connect mini-SAS cable 2 from the PORT B motherboard connector to the PORT B connector on the backplane.
Cisco UCS 12G Modular RAID Controller
This option can control up to eight SAS/SATA drives.
The required UCS-220CBLMR8= cable kit has one Y-cable with a mini-SAS HD double connector on one end and two mini-SAS HD single connectors on the other end.
Step 1![]() Connect the mini-SAS double connector to the modular RAID controller card.
Connect the mini-SAS double connector to the modular RAID controller card.
Step 2![]() Connect single connector PORT A to the PORT A connector on the backplane.
Connect single connector PORT A to the PORT A connector on the backplane.
Step 3![]() Connect single connector PORT B to the PORT B connector on the backplane.
Connect single connector PORT B to the PORT B connector on the backplane.
Cisco UCS SAS 9300-8i HBA
This option can control up to eight SAS/SATA drives (non-RAID).
The required UCS-220CBLHBA8= cable kit has one Y-cable with a mini-SAS HD double connector on one end and two mini-SAS HD single connectors on the other end.
Step 1![]() Connect the mini-SAS double connector to the HBA card.
Connect the mini-SAS double connector to the HBA card.
Step 2![]() Connect single connector PORT A to the PORT A connector on the backplane.
Connect single connector PORT A to the PORT A connector on the backplane.
Step 3![]() Connect single connector PORT B to the PORT B connector on the backplane.
Connect single connector PORT B to the PORT B connector on the backplane.
LFF 4-Drive Backplane Cabling
The cable connections required for each type of controller are as follows:
Embedded RAID
Note![]() The embedded RAID option is not available with the large form factor drives, 4-drive version of the server at this time.
The embedded RAID option is not available with the large form factor drives, 4-drive version of the server at this time.
Cisco UCS 12G Modular RAID Controller
This option can control up to four SAS/SATA drives.
The required UCS-220CBLMR4= cable kit has one Y-cable with a mini-SAS HD double connector on one end and two mini-SAS HD single connectors on the other end.
Step 1![]() Connect the mini-SAS double connector to the modular RAID controller card.
Connect the mini-SAS double connector to the modular RAID controller card.
Step 2![]() Connect single connector PORT A to the PORT A connector on the backplane.
Connect single connector PORT A to the PORT A connector on the backplane.
Step 3![]() Connect single connector PORT B to the PORT B connector on the backplane.
Connect single connector PORT B to the PORT B connector on the backplane.
Embedded SATA RAID Controllers
Note![]() The VMware ESX/ESXi operating system is not supported with the embedded SATA MegaRAID controller in SW RAID mode. You can use VMWare in AHCI mode.
The VMware ESX/ESXi operating system is not supported with the embedded SATA MegaRAID controller in SW RAID mode. You can use VMWare in AHCI mode.
Note![]() The Microsoft Windows Server 2016 Hyper-V hypervisor is supported for use with the embedded MegaRAID controller in SW RAID mode, but all other hyperviors are not supported. All Hypervisors are supported in AHCI mode.
The Microsoft Windows Server 2016 Hyper-V hypervisor is supported for use with the embedded MegaRAID controller in SW RAID mode, but all other hyperviors are not supported. All Hypervisors are supported in AHCI mode.
This server includes an embedded MegaRAID controller that can control up to eight SATA-only drives.
This section contains the following topics:
- Embedded SATA RAID Controller Requirements
- Embedded SATA RAID: Two SATA Controllers
- Embedded SATA RAID Controller Considerations
- Installing a Software RAID 5 Key Module for Embedded RAID 5 Support
- Enabling the Embedded SATA RAID Controller in the BIOS
- Disabling the Embedded RAID Controller in the BIOS
- Launching the LSI Embedded RAID Configuration Utility
- Installing LSI MegaSR Drivers For Windows and Linux
Embedded SATA RAID Controller Requirements
The embedded SATA RAID controller hub requires the following items:
- The embedded RAID option is available only with the small form factor drives version of this server at this time.
- Mini-SAS cables:
- The embedded SATA RAID controller must be enabled in the server BIOS.
- (Optional) A SATA RAID 5 key module.
This optional module can be installed to a motherboard header to add SATA RAID 5 support.
Embedded SATA RAID: Two SATA Controllers
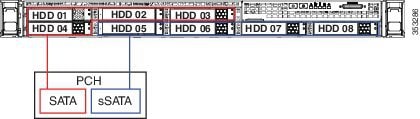
The embedded RAID Patsburgh controller hub (PCH) is split into two controllers: SATA and sSATA (secondary SATA). These two controllers are seen as separate RAID controllers in the Cisco IMC interface and are configurable separately.
- The first SATA controller controls drives 1–4; the secondary sSATA controller controls drives 5–8.
- When configuring RAID groups, you cannot create a group that spans more than four drives.
–![]() The first SATA controller can control a RAID group of up to four drives, comprised only of drives 1–4.
The first SATA controller can control a RAID group of up to four drives, comprised only of drives 1–4.
–![]() The secondary sSATA controller can control a RAID group of up to four drives, comprised only of drives 5–8. See Figure C-2.
The secondary sSATA controller can control a RAID group of up to four drives, comprised only of drives 5–8. See Figure C-2.
Figure C-2 Embedded RAID Controller Drive Groups
- See Enabling the Embedded SATA RAID Controller in the BIOS for instructions on enabling the two SATA controllers.
- Each controller is listed separately in the BIOS. You can select the boot order of the controllers in the BIOS (use the Boot Options tab in the BIOS Setup Utility).
Note![]() To set boot order for virtual drives, use the LSI Embedded RAID Configuration Utility. See Launching the LSI Embedded RAID Configuration Utility.
To set boot order for virtual drives, use the LSI Embedded RAID Configuration Utility. See Launching the LSI Embedded RAID Configuration Utility.
Embedded SATA RAID Controller Considerations
Note the following considerations:
- The default setting for this embedded controller hub is SATA RAID 0, 1, and 10 support for up to eight SATA drives (in two groups of four drives).
- You can upgrade to SATA RAID 0, 1, 5, 10 support for up to eight SATA drives (in two groups of four drives) by installing a RAID 5 key module on the motherboard. See Installing a Software RAID 5 Key Module for Embedded RAID 5 Support.
- When you order the server with this embedded controller, the controller is enabled in the BIOS. Instructions for enabling the controller are included for the case in which a server is reset to defaults (Disabled). See Enabling the Embedded SATA RAID Controller in the BIOS.
- You cannot downgrade from using a hardware RAID controller card to using the software RAID embedded controller (see RAID Controller Migration).
- The required drivers for this controller are already installed and ready to use with the LSI SWRAID Configuration Utility. However, if you will use this controller with Windows or Linux, you must download and install additional drivers for those operating systems. See Installing LSI MegaSR Drivers For Windows and Linux.
Installing a Software RAID 5 Key Module for Embedded RAID 5 Support
The software RAID 5 key module contains a chip on a small circuit board. This module attaches to a two-pin motherboard header. This chip upgrades support to add embedded SATA RAID 5 support.
To install a RAID 5 key module, see Installing a Software RAID 5 Key Module for Embedded RAID 5 Support.
Enabling the Embedded SATA RAID Controller in the BIOS
Note![]() The default setting in the BIOS for the embedded controller is disabled.
The default setting in the BIOS for the embedded controller is disabled.
When you enable this controller, both the primary (SATA) and secondary (sSATA) controllers are enabled.
Enabling SATA Mode and Selecting Option ROM Mode
Step 1![]() Set the SATA mode for managing the two boot drives:
Set the SATA mode for managing the two boot drives:
a.![]() Boot the server and press F2 when prompted to enter the BIOS Setup utility.
Boot the server and press F2 when prompted to enter the BIOS Setup utility.
b.![]() Choose the Advanced tab, and then choose LOM and PCIe Slots Configuration.
Choose the Advanced tab, and then choose LOM and PCIe Slots Configuration.
c.![]() Select PCH SATA Mode and then choose one of the options from the dialog:
Select PCH SATA Mode and then choose one of the options from the dialog:
–![]() Disabled—The embedded RAID controller is disabled.
Disabled—The embedded RAID controller is disabled.
–![]() LSI SW RAID—In supported server versions, you can manage the internal SSD boot drives or the front-facing drives by using the server’s embedded SATA RAID controller.
LSI SW RAID—In supported server versions, you can manage the internal SSD boot drives or the front-facing drives by using the server’s embedded SATA RAID controller.
Note![]() Before you change from LSI SW RAID mode to AHCI mode, delete all the RAID volumes configured in the connected physical drives.
Before you change from LSI SW RAID mode to AHCI mode, delete all the RAID volumes configured in the connected physical drives.
d.![]() If you selected LSI SW RAID mode and you want to set the option ROM mode, continue with the next step. If not, skip to Step 3.
If you selected LSI SW RAID mode and you want to set the option ROM mode, continue with the next step. If not, skip to Step 3.
Note![]() There is no option ROM mode setting in AHCI SATA mode.
There is no option ROM mode setting in AHCI SATA mode.
Step 2![]() Optional: Set the SATA option ROM mode for the two boot drives (only with LSI SW RAID SATA mode):
Optional: Set the SATA option ROM mode for the two boot drives (only with LSI SW RAID SATA mode):
a.![]() Choose the Advanced tab, and then choose LOM and PCIe Slots Configuration.
Choose the Advanced tab, and then choose LOM and PCIe Slots Configuration.
b.![]() Select PCH SATA OPROM Mode and then choose one of the options from the dialog:
Select PCH SATA OPROM Mode and then choose one of the options from the dialog:
–![]() Enabled—You can boot from these boot drives. You can use the UEFI management interface or the free-standing legacy management utility.
Enabled—You can boot from these boot drives. You can use the UEFI management interface or the free-standing legacy management utility.
–![]() Disabled—You cannot boot from these boot drives.
Disabled—You cannot boot from these boot drives.
–![]() UEFI Only—Select this to enable booting but manage RAID only by using the UEFI version of the LSI utility that is built into the server BIOS. See Launching the LSI Embedded RAID Configuration Utility.
UEFI Only—Select this to enable booting but manage RAID only by using the UEFI version of the LSI utility that is built into the server BIOS. See Launching the LSI Embedded RAID Configuration Utility.
–![]() Legacy Only—Select this enable booting but manage RAID only by using the free-standing version of the LSI utility. See Launching the LSI Embedded RAID Configuration Utility.
Legacy Only—Select this enable booting but manage RAID only by using the free-standing version of the LSI utility. See Launching the LSI Embedded RAID Configuration Utility.
Step 3![]() Press F10 to save your changes and exit the utility.
Press F10 to save your changes and exit the utility.
Disabling the Embedded RAID Controller in the BIOS
Step 1![]() Boot the server and press F2 when prompted to enter the BIOS Setup Utility.
Boot the server and press F2 when prompted to enter the BIOS Setup Utility.
Step 2![]() Select the Advanced tab, and then select LOM and PCIe Slots Configuration.
Select the Advanced tab, and then select LOM and PCIe Slots Configuration.
Step 3![]() Set PCH SATA Mode to Disabled.
Set PCH SATA Mode to Disabled.
Step 4![]() Press F10 to save your changes and exit the utility.
Press F10 to save your changes and exit the utility.
Launching the LSI Embedded RAID Configuration Utility
Launch the LSI utility by pressing Ctrl-M when you see the prompt during system boot.
For information about using the Embedded MegaRAID software to configure your disk arrays, see the LSI Embedded MegaRAID Software User Guide.
Installing LSI MegaSR Drivers For Windows and Linux
Note![]() The required drivers for this controller are already installed and ready to use with the LSI software RAID Configuration Utility. However, if you will use this controller with Windows or Linux, you must download and install additional drivers for those operating systems.
The required drivers for this controller are already installed and ready to use with the LSI software RAID Configuration Utility. However, if you will use this controller with Windows or Linux, you must download and install additional drivers for those operating systems.
This section explains how to install the LSI MegaSR drivers for the following supported operating systems:
For the specific supported OS versions, see the Hardware and Software Interoperability Matrix for your server release.
Downloading the LSI MegaSR Drivers
The MegaSR drivers are included in the C-Series driver ISO for your server and OS. Download the drivers from Cisco.com.
Step 1![]() Find the drivers ISO file download for your server online and download it to a temporary location on your workstation:
Find the drivers ISO file download for your server online and download it to a temporary location on your workstation:
a.![]() See the following URL: http://www.cisco.com/cisco/software/navigator.html
See the following URL: http://www.cisco.com/cisco/software/navigator.html
b.![]() Type the name of your server in the Select a Product search field and then press Enter.
Type the name of your server in the Select a Product search field and then press Enter.
c.![]() Click Unified Computing System (UCS) Drivers.
Click Unified Computing System (UCS) Drivers.
d.![]() Click the release number that you are downloading.
Click the release number that you are downloading.
e.![]() Click the Download icon to download the drivers ISO file.
Click the Download icon to download the drivers ISO file.
Step 2![]() Continue through the subsequent screens to accept the license agreement and then browse to a location where you want to save the drivers’ ISO file.
Continue through the subsequent screens to accept the license agreement and then browse to a location where you want to save the drivers’ ISO file.
Microsoft Windows Driver Installation
This section describes how to install the LSI MegaSR driver in a Windows installation.
Windows Server 2008R2 Driver Installation
The Windows operating system automatically adds the driver to the registry and copies the driver to the appropriate directory.
Step 1![]() Create a RAID drive group using the LSI Software RAID Configuration Utility before you install this driver for Windows. Launch this utility by pressing Ctrl-M when
Create a RAID drive group using the LSI Software RAID Configuration Utility before you install this driver for Windows. Launch this utility by pressing Ctrl-M when LSI SWRAID is shown during the BIOS POST.
Step 2![]() Download the Cisco UCS C-Series drivers’ ISO, as described in Downloading the LSI MegaSR Drivers.
Download the Cisco UCS C-Series drivers’ ISO, as described in Downloading the LSI MegaSR Drivers.
Step 3![]() Prepare the drivers on a USB thumb drive:
Prepare the drivers on a USB thumb drive:
a.![]() Burn the ISO image to a disk.
Burn the ISO image to a disk.
b.![]() Browse the contents of the drivers folders to the location of the embedded MegaRAID drivers:
Browse the contents of the drivers folders to the location of the embedded MegaRAID drivers:
c.![]() Expand the Zip file, which contains the folder with the MegaSR driver files.
Expand the Zip file, which contains the folder with the MegaSR driver files.
d.![]() Copy the expanded folder to a USB thumb drive.
Copy the expanded folder to a USB thumb drive.
Step 4![]() Start the Windows driver installation using one of the following methods:
Start the Windows driver installation using one of the following methods:
- To install from local media, connect an external USB DVD drive to the server and then insert the first Windows installation disk into the drive. Skip to Step 6.
- To install from remote ISO, log in to the server’s Cisco IMC interface and continue with the next step.
Step 5![]() Launch a Virtual KVM console window and click the Virtual Media tab.
Launch a Virtual KVM console window and click the Virtual Media tab.
a.![]() Click Add Image and browse to select your remote Windows installation ISO file.
Click Add Image and browse to select your remote Windows installation ISO file.
b.![]() Check the check box in the Mapped column for the media that you just added, and then wait for mapping to complete.
Check the check box in the Mapped column for the media that you just added, and then wait for mapping to complete.
Step 6![]() Power cycle the server.
Power cycle the server.
Step 7![]() Press F6 when you see the F6 prompt during bootup. The Boot Menu window opens.
Press F6 when you see the F6 prompt during bootup. The Boot Menu window opens.
Step 8![]() On the Boot Manager window, choose the physical disk or virtual DVD and press Enter. The Windows installation begins when the image is booted.
On the Boot Manager window, choose the physical disk or virtual DVD and press Enter. The Windows installation begins when the image is booted.
Step 9![]() Press Enter when you see the prompt, “Press any key to boot from CD.”
Press Enter when you see the prompt, “Press any key to boot from CD.”
Step 10![]() Observe the Windows installation process and respond to prompts in the wizard as required for your preferences and company standards.
Observe the Windows installation process and respond to prompts in the wizard as required for your preferences and company standards.
Step 11![]() When Windows prompts you with “Where do you want to install Windows,” install the drivers for embedded MegaRAID:
When Windows prompts you with “Where do you want to install Windows,” install the drivers for embedded MegaRAID:
a.![]() Click Load Driver. You are prompted by a Load Driver dialog box to select the driver to be installed.
Click Load Driver. You are prompted by a Load Driver dialog box to select the driver to be installed.
b.![]() Connect the USB thumb drive that you prepared in Step 3 to the target server.
Connect the USB thumb drive that you prepared in Step 3 to the target server.
c.![]() On the Windows Load Driver dialog that you opened in Step a, click Browse.
On the Windows Load Driver dialog that you opened in Step a, click Browse.
d.![]() Use the dialog box to browse to the location of the drivers folder on the USB thumb drive, and then click OK.
Use the dialog box to browse to the location of the drivers folder on the USB thumb drive, and then click OK.
Windows loads the drivers from the folder and when finished, the driver is listed under the prompt, “Select the driver to be installed.”
e.![]() Click Next to install the drivers.
Click Next to install the drivers.
Updating the Windows Driver
Step 1![]() Click Start, point to Settings, and then click Control Panel.
Click Start, point to Settings, and then click Control Panel.
Step 2![]() Double-click System, click the Hardware tab, and then click Device Manager. Device Manager starts.
Double-click System, click the Hardware tab, and then click Device Manager. Device Manager starts.
Step 3![]() In Device Manager, double-click SCSI and RAID Controllers, right-click the device for which you are installing the driver, and then click Properties.
In Device Manager, double-click SCSI and RAID Controllers, right-click the device for which you are installing the driver, and then click Properties.
Step 4![]() On the Driver tab, click Update Driver to open the Update Device Driver wizard, and then follow the wizard instructions to update the driver.
On the Driver tab, click Update Driver to open the Update Device Driver wizard, and then follow the wizard instructions to update the driver.
Linux Driver Installation
This section explains the steps to install the embedded MegaRAID device driver in a Red Hat Enterprise Linux installation or a SUSE Linux Enterprise Server installation.
Obtaining the Driver Image File
See Downloading the LSI MegaSR Drivers for instructions on obtaining the drivers. The Linux driver is offered in the form of dud-[ driver version ].img, which is the boot image for the embedded MegaRAID stack.
Note![]() The LSI MegaSR drivers that Cisco provides for Red Hat Linux and SUSE Linux are for the original GA versions of those distributions. The drivers do not support updates to those OS kernels.
The LSI MegaSR drivers that Cisco provides for Red Hat Linux and SUSE Linux are for the original GA versions of those distributions. The drivers do not support updates to those OS kernels.
Preparing Physical Installation Disks For Linux
This section describes how to prepare physical Linux installation disks from the driver image files, using either the Windows operating system or the Linux operating system.
Note![]() This procedure requires a USB thumb drive.
This procedure requires a USB thumb drive.
Note![]() Alternatively, you can mount the dud.img or dd.iso file as a virtual floppy disk, as described in the installation procedures.
Alternatively, you can mount the dud.img or dd.iso file as a virtual floppy disk, as described in the installation procedures.
Note![]() For RHEL 7.1 and later, there is no dud.img file--the driver is contained in a dd.iso file.
For RHEL 7.1 and later, there is no dud.img file--the driver is contained in a dd.iso file.
Preparing Physical Installation Disks with the Windows Operating System
Under Windows, you can use the RaWrite floppy image-writer utility to create disk images from image files.
Step 1![]() Download the Cisco UCS C-Series drivers ISO, as described in Downloading the LSI MegaSR Drivers and save it to your Windows system that has a diskette drive.
Download the Cisco UCS C-Series drivers ISO, as described in Downloading the LSI MegaSR Drivers and save it to your Windows system that has a diskette drive.
Step 2![]() Extract the dud.img or dd.iso file:
Extract the dud.img or dd.iso file:
a.![]() Burn the ISO image to a disc.
Burn the ISO image to a disc.
b.![]() Browse the contents of the drivers folders to the location of the embedded MegaRAID drivers:
Browse the contents of the drivers folders to the location of the embedded MegaRAID drivers:
c.![]() Expand the Zip file, which contains the folder with the driver files.
Expand the Zip file, which contains the folder with the driver files.
Step 3![]() Copy the driver update disk image dud-[driver version].img and your file raw write.exe to a directory.
Copy the driver update disk image dud-[driver version].img and your file raw write.exe to a directory.
Note![]() RaWrite is not included in the driver package.
RaWrite is not included in the driver package.
Step 4![]() If necessary, use this command to change the filename of the driver update disk to a name with fewer than eight characters: copy dud-[ driver version ].img dud.img
If necessary, use this command to change the filename of the driver update disk to a name with fewer than eight characters: copy dud-[ driver version ].img dud.img
Step 5![]() Open the DOS Command Prompt and navigate to the directory where raw write.exe is located.
Open the DOS Command Prompt and navigate to the directory where raw write.exe is located.
Step 6![]() Enter the following command to create the installation diskette: raw write
Enter the following command to create the installation diskette: raw write
You are prompted to enter the name of the boot image file.
Step 8![]() Enter: dud.img or dd.iso
Enter: dud.img or dd.iso
You are prompted for the target disk.
Step 10![]() Insert a floppy disk into the server and enter: A:
Insert a floppy disk into the server and enter: A:
Step 12![]() Press Enter again to start copying the file to the diskette.
Press Enter again to start copying the file to the diskette.
Step 13![]() After the command prompt returns and the floppy disk drive LED goes out, remove the disk.
After the command prompt returns and the floppy disk drive LED goes out, remove the disk.
Step 14![]() Label the diskette with the image name.
Label the diskette with the image name.
Preparing Installation Disks with a Linux Operating System
Under Red Hat Linux and SUSE Linux, you can use a driver disk utility to create disk images from image files.
Note![]() The driver image is too large for a floppy disk, so use a USB thumb drive instead.
The driver image is too large for a floppy disk, so use a USB thumb drive instead.
Step 1![]() Download the Cisco UCS C-Series drivers ISO, as described in Downloading the LSI MegaSR Drivers and save it to your Linux system that has a disk drive.
Download the Cisco UCS C-Series drivers ISO, as described in Downloading the LSI MegaSR Drivers and save it to your Linux system that has a disk drive.
Step 2![]() Extract the dud.img or dd.iso file:
Extract the dud.img or dd.iso file:
a.![]() Burn the ISO image to a disc.
Burn the ISO image to a disc.
b.![]() Browse the contents of the drivers folders to the location of the embedded MegaRAID drivers:
Browse the contents of the drivers folders to the location of the embedded MegaRAID drivers:
c.![]() Expand the Zip file, which contains the folder with the driver files.
Expand the Zip file, which contains the folder with the driver files.
Step 3![]() Copy the driver update disk image dud-[driver version].img or dd.iso to your Linux system.
Copy the driver update disk image dud-[driver version].img or dd.iso to your Linux system.
Step 4![]() Insert a blank USB thumb drive into a port on your Linux system.
Insert a blank USB thumb drive into a port on your Linux system.
Step 5![]() Create a directory and mount the dud.img or dd.iso to that directory:
Create a directory and mount the dud.img or dd.iso to that directory:
mount -oloop <driver_image> <destination_folder>
Step 6![]() Copy the contents in the directory to your USB thumb drive.
Copy the contents in the directory to your USB thumb drive.
Installing the Red Hat Linux Driver
Note![]() This server supports Red Hat Linux 6.5 or later.
This server supports Red Hat Linux 6.5 or later.
For the specific supported OS versions, see the Hardware and Software Interoperability Matrix for your server release.
This section describes the fresh installation of the Red Hat Enterprise Linux device driver on systems with the embedded MegaRAID stack.
Step 1![]() Before starting driver installation: Create a RAID drive group using the LSI Software RAID Configuration utility before you install this driver for the OS. Launch this utility by pressing Ctrl-M when
Before starting driver installation: Create a RAID drive group using the LSI Software RAID Configuration utility before you install this driver for the OS. Launch this utility by pressing Ctrl-M when LSI SWRAID is shown during the BIOS POST.
Note![]() For RHEL 7.1 and later, there is no dud.img file--the driver is contained in a dd.iso file.
For RHEL 7.1 and later, there is no dud.img file--the driver is contained in a dd.iso file.
Step 2![]() Prepare the dud.img or dd.iso file using one of the following methods:
Prepare the dud.img or dd.iso file using one of the following methods:
- To install from a physical disk: Use one of the procedures in Preparing Physical Installation Disks For Linux.
Then return to Step 4 of this procedure. - To install from a virtual disk: Download and save the Cisco UCS C-Series drivers’ ISO image, as described in Downloading the LSI MegaSR Drivers.
Then continue with the next step.
Step 3![]() Extract the dud.img or dd.iso file:
Extract the dud.img or dd.iso file:
a.![]() Burn the Cisco UCS C-Series Drivers ISO image to a disc.
Burn the Cisco UCS C-Series Drivers ISO image to a disc.
b.![]() Browse the contents of the drivers folders to the location of the embedded MegaRAID drivers:
Browse the contents of the drivers folders to the location of the embedded MegaRAID drivers:
c.![]() Copy the dud-< driver version >.img or dd.iso file to a temporary location on your workstation.
Copy the dud-< driver version >.img or dd.iso file to a temporary location on your workstation.
d.![]() If you are using RHEL 7.x, rename the saved dd.iso to dd.img.
If you are using RHEL 7.x, rename the saved dd.iso to dd.img.
Note![]() If you are using RHEL 7.x, renaming the dd.iso file to dd.img simplifies this procedure and saves time. The Cisco UCS virtual drive mapper can map only one.iso at a time, and only as a virtual CD/DVD. Renaming the file to dd.img allows you to mount the RHEL installation ISO as a virtual CD/DVD and the renamed dd.img as a virtual floppy disk or removable disk at the same time. This avoids the steps of unmounting and remounting the RHEL ISO when the dd.iso driver file is prompted for.
If you are using RHEL 7.x, renaming the dd.iso file to dd.img simplifies this procedure and saves time. The Cisco UCS virtual drive mapper can map only one.iso at a time, and only as a virtual CD/DVD. Renaming the file to dd.img allows you to mount the RHEL installation ISO as a virtual CD/DVD and the renamed dd.img as a virtual floppy disk or removable disk at the same time. This avoids the steps of unmounting and remounting the RHEL ISO when the dd.iso driver file is prompted for.
Step 4![]() Start the Linux driver installation using one of the following methods:
Start the Linux driver installation using one of the following methods:
- To install from local media, connect an external USB DVD drive to the server and then insert the first RHEL installation disk into the drive.
Then continue with Step 5. - To install from virtual disk, log in to the server’s Cisco IMC interface.
Then continue with the next step.
Step 5![]() Launch a Virtual KVM console window and click the Virtual Media tab.
Launch a Virtual KVM console window and click the Virtual Media tab.
a.![]() Click Add Image and browse to select your remote RHEL installation ISO image.
Click Add Image and browse to select your remote RHEL installation ISO image.
Note![]() An.iso file can be mapped only as a virtual CD/DVD.
An.iso file can be mapped only as a virtual CD/DVD.
b.![]() Click Add Image again and browse to select your RHEL 6.x dud.img or the RHEL 7.x dd.img file that you renamed in Step 3.
Click Add Image again and browse to select your RHEL 6.x dud.img or the RHEL 7.x dd.img file that you renamed in Step 3.
Note![]() Map the.img file as a virtual floppy disk or removable disk.
Map the.img file as a virtual floppy disk or removable disk.
c.![]() Check the check boxes in the Mapped column for the media that you just added, then wait for mapping to complete.
Check the check boxes in the Mapped column for the media that you just added, then wait for mapping to complete.
Step 6![]() Power cycle the target server.
Power cycle the target server.
Step 7![]() Press F6 when you see the F6 prompt during bootup. The Boot Menu window opens.
Press F6 when you see the F6 prompt during bootup. The Boot Menu window opens.
Note![]() Do not press Enter in the next step to start the installation. Instead, press e to edit installation parameters.
Do not press Enter in the next step to start the installation. Instead, press e to edit installation parameters.
Step 8![]() On the Boot Menu, use the arrow keys to select Install Red Hat Enterprise Linux and then press e to edit installation parameters.
On the Boot Menu, use the arrow keys to select Install Red Hat Enterprise Linux and then press e to edit installation parameters.
Step 9![]() Append one of the following blacklist commands to the end of the line that begins with linuxefi:
Append one of the following blacklist commands to the end of the line that begins with linuxefi:
- For RHEL 6. x (32- and 64-bit), enter:
linux dd blacklist=isci blacklist=ahci nodmraid noprobe=<ata drive number >
Note![]() The noprobe values depend on the number of drives. For example, to install RHEL 6.5 on a RAID 5 configuration with three drives, enter
The noprobe values depend on the number of drives. For example, to install RHEL 6.5 on a RAID 5 configuration with three drives, enter
Linux dd blacklist=isci blacklist=ahci nodmraid noprobe=ata1 noprobe=ata2
Step 10![]() Optional: To see full, verbose installation status steps during installation, delete the Quiet parameter from the line.
Optional: To see full, verbose installation status steps during installation, delete the Quiet parameter from the line.
Step 11![]() On the Boot Manager window, press Ctrl+x to start the interactive installation.
On the Boot Manager window, press Ctrl+x to start the interactive installation.
Step 12![]() Below Driver disk device selection, select the option to install your driver.img file. (Type r to refresh the list if it is not populated.)
Below Driver disk device selection, select the option to install your driver.img file. (Type r to refresh the list if it is not populated.)
Note![]() The installer recognizes the driver file as an.iso file, even though you renamed it to dd.img for mapping.
The installer recognizes the driver file as an.iso file, even though you renamed it to dd.img for mapping.
Type the number of the driver device ISO in the list. Do not select the RHEL ISO image. In the following example, type 6 to select device sdb:
 5) sr0 iso9660 RHEL-7.6\x20Server.x
 6) sdb iso9660 CDROM
# to select, ‘r’ - refresh, or ‘c’ -continue: 6
The installer reads the driver ISO and lists the drivers.
Step 13![]() Under Select drivers to install, type the number of the line that lists the megasr driver. For example, type 1 and press Enter:
Under Select drivers to install, type the number of the line that lists the megasr driver. For example, type 1 and press Enter:
 1) [ ] /media/DD-1/rpms/x86_61/kmod-megasr-18.01.2010.1107_e17.6-1.x86_61.rpm
 # to toggle selection, or ‘c’ -continue: 1
Your selection is displayed with an x in brackets.
1) [X] /media/DD-1/rpms/x86_61/kmod-megasr-18.01.2010.1107_e17.6-1.x86_61.rpm
Step 15![]() Follow the Red Hat Linux installation wizard to complete the installation.
Follow the Red Hat Linux installation wizard to complete the installation.
Step 16![]() When the wizard’s Installation Destination screen is displayed, ensure that LSI MegaSR is listed as the selection. If it is not listed, the driver did not load successfully. In that case, select Rescan Disc.
When the wizard’s Installation Destination screen is displayed, ensure that LSI MegaSR is listed as the selection. If it is not listed, the driver did not load successfully. In that case, select Rescan Disc.
Step 17![]() After installation completes, reboot the system.
After installation completes, reboot the system.
Installing the SUSE Linux Enterprise Server Driver
For the specific supported OS versions, see the Hardware and Software Interoperability Matrix for your server release.
This section describes the installation of the SUSE Linux Enterprise Server (SLES) driver on a system with the embedded MegaRAID stack.
Step 1![]() Before starting driver installation: Create a RAID drive group using the LSI SWRAID Configuration utility before you install this driver for the OS. Launch this utility by pressing Ctrl+M when
Before starting driver installation: Create a RAID drive group using the LSI SWRAID Configuration utility before you install this driver for the OS. Launch this utility by pressing Ctrl+M when LSI SWRAID is shown during the BIOS POST.
Step 2![]() Prepare the dud.img driver file using one of the following methods:
Prepare the dud.img driver file using one of the following methods:
- To install from a physical disk, use one of the procedures in Preparing Physical Installation Disks For Linux.
Then return to Step 4 of this procedure. - To install from a virtual disk, download and save the Cisco UCS C-Series drivers’ ISO, as described in Downloading the LSI MegaSR Drivers.
Then continue with the next step.
Step 3![]() Extract the dud.img file that contains the driver:
Extract the dud.img file that contains the driver:
a.![]() Burn the Cisco UCS C-Series drivers ISO image to a disc.
Burn the Cisco UCS C-Series drivers ISO image to a disc.
b.![]() Browse the contents of the drivers folders to the location of the embedded MegaRAID drivers:
Browse the contents of the drivers folders to the location of the embedded MegaRAID drivers:
c.![]() Copy the dud-< driver version >.img file to a temporary location on your workstation.
Copy the dud-< driver version >.img file to a temporary location on your workstation.
Step 4![]() Start the Linux driver installation using one of the following methods:
Start the Linux driver installation using one of the following methods:
- To install from local media, connect an external USB DVD drive to the server and then insert the first SLES install disc into the drive. Skip to Step 6.
- To install from remote ISO, log in to the server’s Cisco IMC interface and continue with the next step.
Step 5![]() Launch a Virtual KVM console window and click the Virtual Media tab.
Launch a Virtual KVM console window and click the Virtual Media tab.
a.![]() Click Add Image and browse to select your remote SLES installation ISO file.
Click Add Image and browse to select your remote SLES installation ISO file.
Note![]() An.iso file can be mapped only as a virtual CD/DVD.
An.iso file can be mapped only as a virtual CD/DVD.
b.![]() Click Add Image again and browse to select your dud.img file.
Click Add Image again and browse to select your dud.img file.
Note![]() Map the.img file as a virtual floppy disk or removable disk.
Map the.img file as a virtual floppy disk or removable disk.
c.![]() Check the check box in the Mapped column for the media that you just added, and then wait for mapping to complete.
Check the check box in the Mapped column for the media that you just added, and then wait for mapping to complete.
Step 6![]() Power cycle the server.
Power cycle the server.
Step 7![]() Press F6 when you see the F6 prompt during bootup. The Boot Menu window opens.
Press F6 when you see the F6 prompt during bootup. The Boot Menu window opens.
Step 8![]() On the Boot Manager window, select the physical or virtual SLES installation ISO and press Enter.
On the Boot Manager window, select the physical or virtual SLES installation ISO and press Enter.
The SLES installation begins when the image is booted.
Step 9![]() When the first SLES screen appears, choose Installation.
When the first SLES screen appears, choose Installation.
Step 10![]() Enter one of the following in the Boot Options field:
Enter one of the following in the Boot Options field:
- For SLES 11 and SLES 11 SP1 (32- and 64-bit), enter: brokenmodules=ahci
- For SLES 11 SP2 (32-and 64-bit), enter: brokenmodules=ahci brokenmodules=isci
- For SLES 12, press e to edit installation parameters. Then append the following parameter to the end of the line that begins with linuxefi : brokenmodules=ahci
Step 11![]() Optional : To see detailed status information during the installation, add the following parameter to the line that begins with linuxefi : splash=verbose
Optional : To see detailed status information during the installation, add the following parameter to the line that begins with linuxefi : splash=verbose
Step 12![]() Do one of the following actions:
Do one of the following actions:
- For SLES 11, press F6 for the driver and choose Yes.
- For SLES 12, press Ctrl+x to start the installation.
Step 13![]() Do one of the following actions:
Do one of the following actions:
- For SLES 11: If you prepared the dud.img file on a physical disk, insert the USB thumb drive to the target server and then insert the disk in the A:/ drive and press Enter.
- For SLES 11: If you mapped the dud.img file as a virtual disk in Step 5, choose the location of the virtual disk. Press Enter to choose Installation.
- For SLES 12: The installer finds the LSI driver automatically in the
dud-<driver version>.imgfile that you provided. With verbose status messages, you see the driver being installed whenLSI MegaRAID SW RAID Moduleis listed
Step 14![]() Follow the SLES installation wizard to complete the installation. Verify installation of the driver when you reach the Suggested Partitioning screen:
Follow the SLES installation wizard to complete the installation. Verify installation of the driver when you reach the Suggested Partitioning screen:
a.![]() On the Suggested Partitioning screen, select Expert Partitioner.
On the Suggested Partitioning screen, select Expert Partitioner.
b.![]() Navigate to Linux > Hard disks and verify that there is a device listed for the
Navigate to Linux > Hard disks and verify that there is a device listed for the LSI - LSI MegaSR driver. The device might be listed as a type other than sda. For example:
If no device is listed, the driver did not install properly. In that case, repeat the steps above.
Step 15![]() When installation is complete, reboot the target server.
When installation is complete, reboot the target server.
Restoring RAID Configuration After Replacing a RAID Controller
When you replace a RAID controller, the RAID configuration that is stored in the controller is lost.
Step 1![]() Replace your RAID controller. See Replacing a PCIe Card.
Replace your RAID controller. See Replacing a PCIe Card.
Step 2![]() If this was a full chassis swap, replace all drives into the drive bays, in the same order that they were installed in the old chassis.
If this was a full chassis swap, replace all drives into the drive bays, in the same order that they were installed in the old chassis.
Step 3![]() Reboot the server and watch for the prompt to press F.
Reboot the server and watch for the prompt to press F.
Note![]() For newer RAID controllers, you are not prompted to press F. Instead, the RAID configuration is imported automatically. In this case, skip to Step 6.
For newer RAID controllers, you are not prompted to press F. Instead, the RAID configuration is imported automatically. In this case, skip to Step 6.
Step 4![]() Press F when you see the following on-screen prompt:
Press F when you see the following on-screen prompt:
Step 5![]() Press any key (other than C) to continue when you see the following on-screen prompt:
Press any key (other than C) to continue when you see the following on-screen prompt:
Step 6![]() Watch the subsequent screens for confirmation that your RAID configuration was imported correctly.
Watch the subsequent screens for confirmation that your RAID configuration was imported correctly.
- If you see the following message, your configuration was successfully imported. The LSI virtual drive is also listed among the storage devices.
- If you see the following message, your configuration was not imported. This situation can happen if you do not press F quickly enough when prompted. In this case, reboot the server and try the import operation again when you are prompted to press F.
For More Information
The LSI utilities have help documentation for more information about using the utilities.
For basic information about RAID and for using the utilities for the RAID controller cards that are supported in Cisco servers, see the Cisco UCS Servers RAID Guide.
Full Avago Technologies/LSI documentation is also available:
- For hardware SAS MegaRAID— Avago Technologies/LSI 12 Gb/s MegaRAID SAS Software User’s Guide, Rev. F
- For software embedded MegaRAID— LSI Embedded MegaRAID Software User Guide
 Feedback