- Title page
- Table of Contents
- Preface
- Getting to Know the Cisco TelePresence System
- Placing and Receiving Calls - Systems That Use an IP Phone for Call Control
- Placing and Receiving Calls - Systems That Use a Touch 12 Device for Call Control
- Cisco TelePresence System On-Screen Icons and Messages
- Cisco TelePresence System Meeting Controls - Systems That Use an IP Phone for Call Control Only
- Tips for Troubleshooting Your Cisco TelePresence Meeting
- Glossary
- Index
- Using Self View Before Starting a Meeting
- Initiating a Call
- Answering a Call
- Joining Calls Together
- Conferencing in an Audio Call
- Checking Call Status
- Placing a Call on Hold
- Muting a Call
- Using the Headset
- Extending Your Meeting
- Call Security Overview
- System Information - Using the Info Softkey
- Unsecured Calls
- Viewing Security Settings
- Audio-Only Call Security
- Summary of Cisco TelePresence System Phone Softkeys
- Where to Go Next
Placing and Receiving Calls—Systems That Use an IP Phone for Call Control
Revised: April 2013, OL-28618-01
This chapter describes the tasks you perform to place calls if your system uses a Cisco Unified IP Phone for call control and contains the following sections:
- Using Self View Before Starting a Meeting
- Initiating a Call
- Answering a Call
- Joining Calls Together
- Conferencing in an Audio Call
- Checking Call Status
- Placing a Call on Hold
- Muting a Call
- Using the Headset
- Extending Your Meeting
- Call Security Overview
- System Information - Using the Info Softkey
- Unsecured Calls
- Viewing Security Settings
- Audio-Only Call Security
- Summary of Cisco TelePresence System Phone Softkeys
- Where to Go Next
For systems that use a Cisco TelePresence Touch 12 for call control, see Chapter3, “Placing and Receiving Calls—Systems that Use a Touch 12 Device for Call Control”
Using Self View Before Starting a Meeting
The Self View feature allows you to view how you will be seen by others in a Cisco TelePresence meeting before the meeting begins. By touching the Self View softkey on your CTS Cisco Unified IP phone while the CTS is idle (not in a call), you can see a mirror image of yourself and your room for a specified amount of time (5 to 180 seconds), as configured in the Maximum Self View Time (in seconds) field in the Product Specific Configuration Layout fields in the Cisco Unified CM Administration interface.
- CTS main display lights turn on (or remain on) when accessing Self View. When you exit Self View, the lights exhibit the same behavior as if a call has just ended. When answering an incoming call while still in Self View mode, the lights remain on throughout the call.
- Dismissing a call while in Self View mode does not disrupt the Self View video. The active presentation stops the incoming call ring if the “Voicemail” has been setup in Cisco Unified CM. Call dismissal returns you to the Self View Control screen.
- Answering a call while in Self View mode smoothly transitions to the incoming video. If there is an active presentation, options on the phone will allow you to share (or not share) the presentation as the new call begins.
Figure 2-1 shows the Self View softkey among other softkey options.
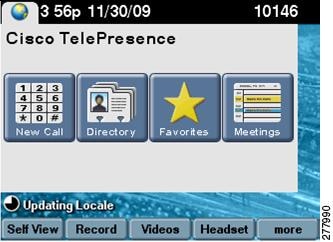
Touching the Self View softkey takes you to the Self View Control screen. Any active presentation is visible during self view (as PiP or on the LCD) and is also present when exiting self view.
Figure 2-2 shows the Self View Control screen for the CTS 500, CTS 1000, CTS 1100, and CTS 3000 and CTS 3200 Series, which are single-camera systems.
Figure 2-2 Self View Camera Control
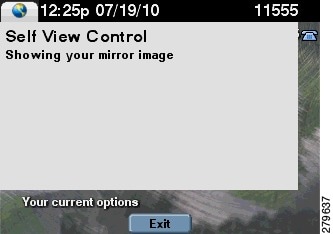
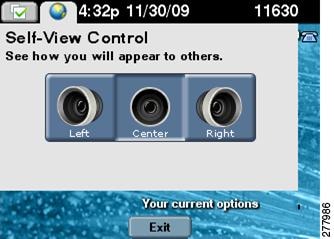
Figure 2-3 shows the Self View Control screen for the CTS 1300, which has three cameras. You can choose how your meeting room looks from the left, center, or right camera by touching the camera icons on the screen.

Tip![]() Simultaneous self view display is visible only if the loopback request is from the center camera. If you select the left or right camera view, the self-view presentation is not visible.
Simultaneous self view display is visible only if the loopback request is from the center camera. If you select the left or right camera view, the self-view presentation is not visible.
Figure 2-3 Self View Camera Control
Initiating a Call
There are several ways to place a Cisco TelePresence call from the CTS phone:
- Placing a Call Using the New Call and Dial Softkeys
- Favorites: Speed Dialing
- Using the Directory
- Placing a Call Using the Meetings Button or Softkey
- Using the Directory
Placing a Call Using the New Call and Dial Softkeys
Step 1![]() Touch the New Call softkey or use the dial keypad to start a new call. The New Call screen is displayed as shown in Figure 2-4.
Touch the New Call softkey or use the dial keypad to start a new call. The New Call screen is displayed as shown in Figure 2-4.
Step 2![]() Enter a dialstring. Dialstring input can be up to 32 digits; this is the maximum length dialstring that the phone user interface will accept.
Enter a dialstring. Dialstring input can be up to 32 digits; this is the maximum length dialstring that the phone user interface will accept.
Tip![]() Touch the << softkey to backspace over any digits you entered.
Touch the << softkey to backspace over any digits you entered.
Step 3![]() Touch the Dial softkey to dial the phone number. The phone number being dialed is displayed while the call is being connected.
Touch the Dial softkey to dial the phone number. The phone number being dialed is displayed while the call is being connected.
Step 4![]() Touch the End Call softkey to end the Cisco TelePresence call.
Touch the End Call softkey to end the Cisco TelePresence call.

Favorites: Speed Dialing
Access the speed dial feature by touching the Favorites softkey or by touching the Favorites icon from the CTS phone Idle screen to dial from a directory of preset phone numbers. The Favorites Screen allows you to fast-dial Cisco TelePresence System (CTS) endpoints that have been registered as a Favorite by the system administrator in Cisco Unified Communications Manager (Cisco Unified CM).
Tip![]() To set up Favorites on your phone, see Chapter6, “Tips for Troubleshooting Your Cisco TelePresence Meeting”.
To set up Favorites on your phone, see Chapter6, “Tips for Troubleshooting Your Cisco TelePresence Meeting”.
To initiate a meeting from Favorites:
Step 1![]() Touch the Favorites softkey or touch the Favorites icon from the CTS phone Idle screen, as shown in Figure 2-5.
Touch the Favorites softkey or touch the Favorites icon from the CTS phone Idle screen, as shown in Figure 2-5.
Step 2![]() Use the Up and Down arrow keys on the phone to scroll through the directory until the Cisco TelePresence room or person you wish to call is highlighted.
Use the Up and Down arrow keys on the phone to scroll through the directory until the Cisco TelePresence room or person you wish to call is highlighted.
Step 3![]() Touch the Dial softkey.
Touch the Dial softkey.
Figure 2-5 Favorites: Speed Dialing

Using the Directory
Placing a Call Using the Directory
Tip![]() For information about configuring Corporate and Personal Directories (Directory) from Cisco Unified Communications Manager, contact your Cisco Administrator. See also Configuring Favorites and the Directory.
For information about configuring Corporate and Personal Directories (Directory) from Cisco Unified Communications Manager, contact your Cisco Administrator. See also Configuring Favorites and the Directory.
To initiate a meeting by placing a call using the Directory:
Step 1![]() Touch the Directory softkey or touch the Directory icon from the Idle screen to display a searchable directory of all available CTS phone numbers.
Touch the Directory softkey or touch the Directory icon from the Idle screen to display a searchable directory of all available CTS phone numbers.
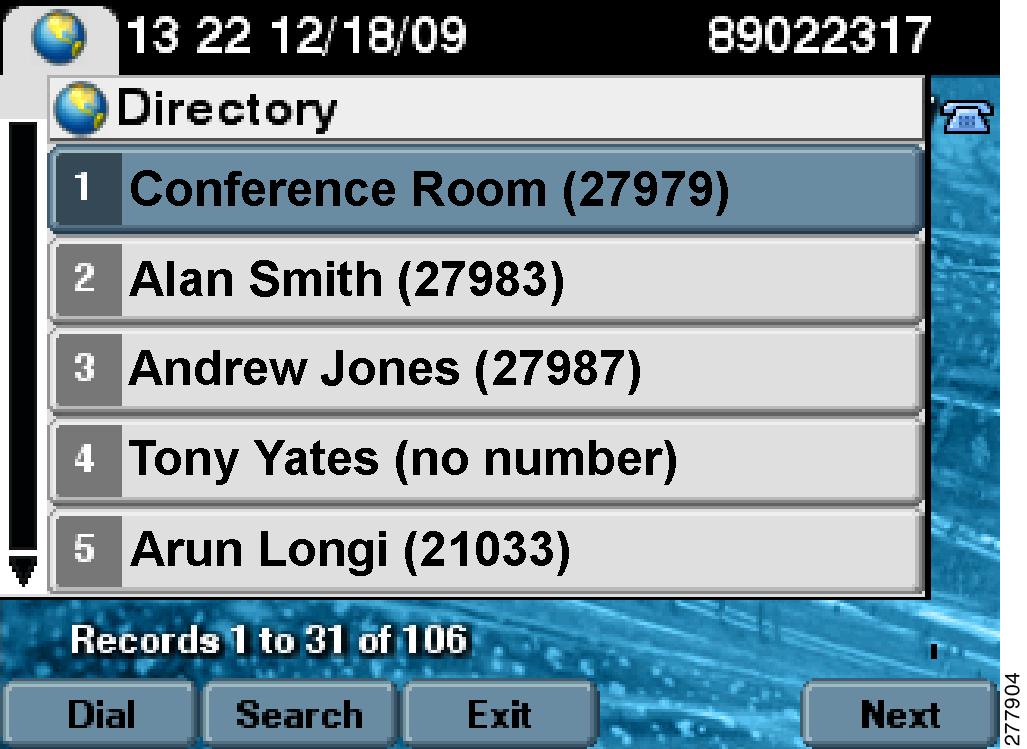
Step 2![]() Use the Up and Down arrow keys on the phone to scroll through the directory until the endpoint or person you wish to dial is highlighted, as shown in Figure 2-6.
Use the Up and Down arrow keys on the phone to scroll through the directory until the endpoint or person you wish to dial is highlighted, as shown in Figure 2-6.
Step 3![]() After you highlight the desired number, touch the Dial softkey to initiate the call.
After you highlight the desired number, touch the Dial softkey to initiate the call.
Using the Directory Search Feature
To search for a particular telephone number from the displayed Directory list:
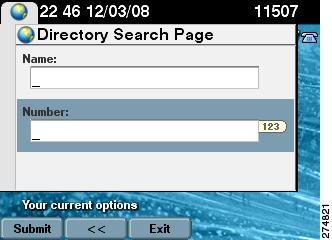
Step 1![]() Touch Search from the Directory screen. The system displays Name and Number fields.
Touch Search from the Directory screen. The system displays Name and Number fields.
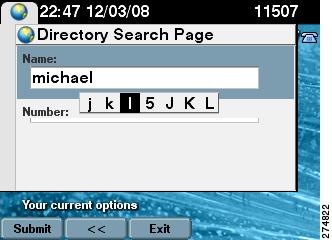
Step 2![]() Use the telephone keypad to type in letters or numbers. For example, when you press the number “4,” the letters associated with the number 4 on the phone keypad are displayed, as shown in Figure 2-8.
Use the telephone keypad to type in letters or numbers. For example, when you press the number “4,” the letters associated with the number 4 on the phone keypad are displayed, as shown in Figure 2-8.
Step 3![]() Touch the number key until the character you want is highlighted.
Touch the number key until the character you want is highlighted.
Step 4![]() Pause to select that character.
Pause to select that character.
Tip![]() If you need to erase a character you have selected, use the << softkey. Use the Up and Down keys to move between Name and Number fields.
If you need to erase a character you have selected, use the << softkey. Use the Up and Down keys to move between Name and Number fields.
You can also search on the first letters of the first name, last name, or directory name.
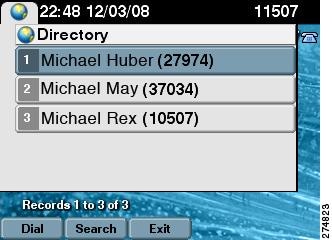
Step 5![]() Touch the Submit softkey to run a search using the information you have entered.
Touch the Submit softkey to run a search using the information you have entered.
Figure 2-8 Directory Search Feature
Placing a Call Using the Meetings Button or Softkey
If Cisco TelePresence Manager is installed on your corporate network, you can schedule meetings using Microsoft Outlook or Lotus Notes. You can then start scheduled meetings using Cisco’s One-Button-to-Push technology. Cisco TelePresence Manager launches the meeting components and determines the best settings for the call.
Step 1![]() Touch the Meetings button to go to a list of scheduled meetings, as shown in Figure 2-9.
Touch the Meetings button to go to a list of scheduled meetings, as shown in Figure 2-9.
Step 2![]() Touch more to navigate to the Meetings softkey and touch to open the list of meetings.
Touch more to navigate to the Meetings softkey and touch to open the list of meetings.
Step 3![]() When you have located your meeting from the meetings list, touch the entry to initiate the meeting, as shown in Figure 2-10.
When you have located your meeting from the meetings list, touch the entry to initiate the meeting, as shown in Figure 2-10.
Tip![]() You can also touch the StartMtg softkey to initiate your meeting.
You can also touch the StartMtg softkey to initiate your meeting.
Figure 2-9 Navigate to the Meetings List
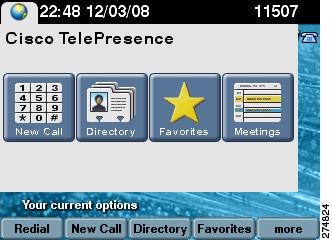
Figure 2-10 Using One-Button-to-Push

The Cisco TelePresence Manager Administrator sets the number of days that meetings are stored and displayed on the phone. The phone is refreshed with new meetings at the following times:
- Each time the Cisco TelePresence System receives a meeting notice from Cisco TelePresence Manager.
- At the end of the each meeting.
- Each night at midnight.
To prevent interruption, Cisco TelePresence Manager waits until there are no active calls or meetings before updating the schedule.
Last Number Redial
Redial the last number called by touching the Redial softkey, as shown in Figure 2-11.
Figure 2-11 Redialing the Last Number Called

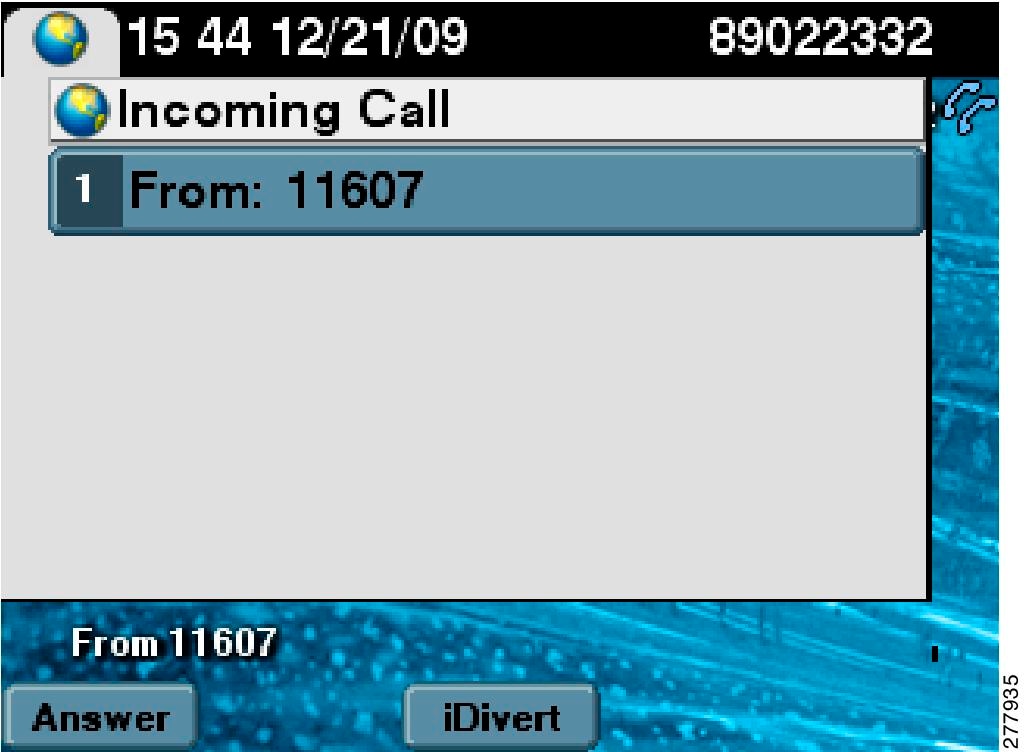
Answering a Call
Tip![]() Your Cisco TelePresence endpoint may be configured to auto-answer the call. The auto-answer feature is configured by your Cisco TelePresence System Administrator.
Your Cisco TelePresence endpoint may be configured to auto-answer the call. The auto-answer feature is configured by your Cisco TelePresence System Administrator.
If auto-answer has not been set, the Cisco TelePresence phone on the receiving end displays the phone number of the incoming call, as shown in Figure 2-12.
Step 1![]() Touch the highlighted meeting or touch the Answer softkey.
Touch the highlighted meeting or touch the Answer softkey.
Tip![]() Remember that all Cisco TelePresence calls are placed and answered with the handset on-hook. Meeting audio is heard through the CTS speakers, not through the phone.
Remember that all Cisco TelePresence calls are placed and answered with the handset on-hook. Meeting audio is heard through the CTS speakers, not through the phone.
Step 2![]() To decline the call and send it to voice mail, touch the iDivert softkey. If iDivert has been configured by your Cisco TelePresence System
To decline the call and send it to voice mail, touch the iDivert softkey. If iDivert has been configured by your Cisco TelePresence System![]() Administrator the call will be diverted to a second phone number.
Administrator the call will be diverted to a second phone number.
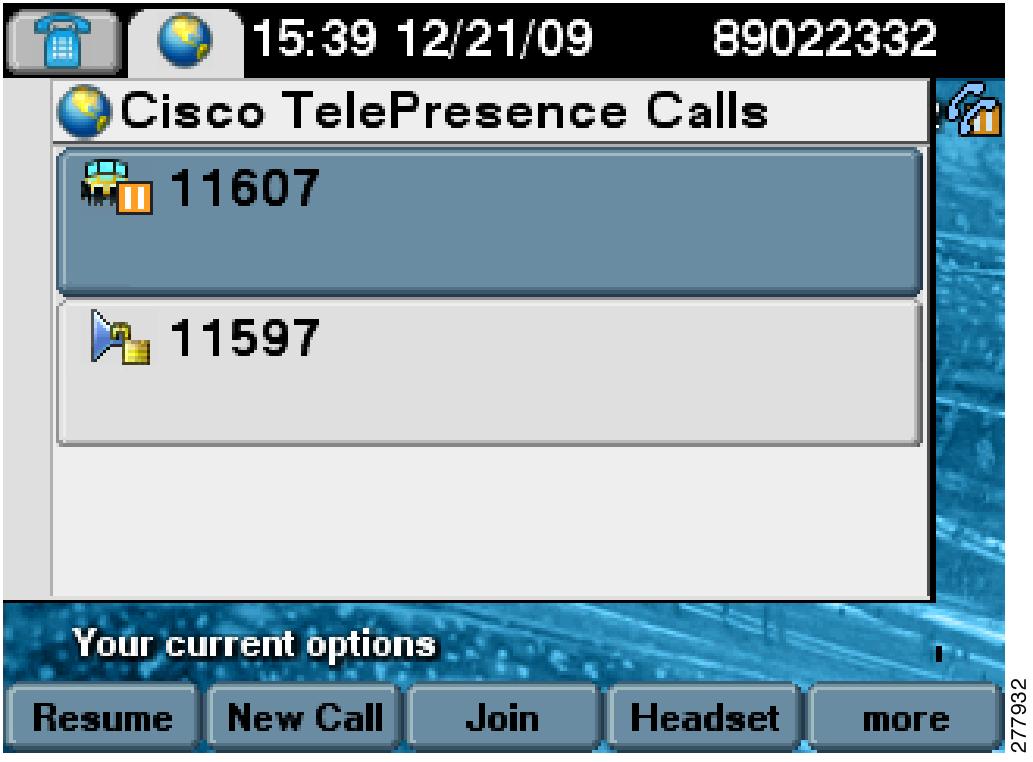
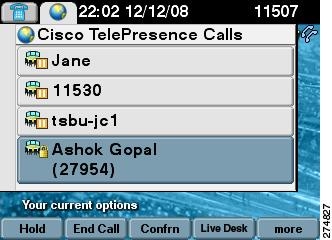
Joining Calls Together
The Join softkey allows you to joins specified calls (11607 and 11597 in Figure 2-13, for example).
Figure 2-13 Joining Cisco TelePresence Calls
Conferencing in an Audio Call
During a meeting, you can add (conference in) one audio-only call. Each Cisco TelePresence endpoint taking part in a meeting may conference in one audio-only call.
Tip![]() Adding (conferencing in) an audio-only phone number is different than placing an audio-only call. When you conference in an audio phone number to an ongoing Cisco TelePresence meeting, the security level of the Cisco TelePresence meeting will change to match the highest security level available for the audio phone number being added. The maximum security setting available for a conferenced audio call is “authentication.” If your Cisco TelePresence meeting was configured for full encryption, the security level for the meeting changes to authentication level. See “Viewing Security Settings” section for more information.
Adding (conferencing in) an audio-only phone number is different than placing an audio-only call. When you conference in an audio phone number to an ongoing Cisco TelePresence meeting, the security level of the Cisco TelePresence meeting will change to match the highest security level available for the audio phone number being added. The maximum security setting available for a conferenced audio call is “authentication.” If your Cisco TelePresence meeting was configured for full encryption, the security level for the meeting changes to authentication level. See “Viewing Security Settings” section for more information.
Adding an Audio-Only Call
Step 1![]() Touch the Confrn softkey to add an audio phone number to your Cisco TelePresence meeting as shown in Figure 2-14.
Touch the Confrn softkey to add an audio phone number to your Cisco TelePresence meeting as shown in Figure 2-14.
Step 2![]() Using the phone keypad, enter the phone number in the field provided, then touch the Dial softkey to dial the phone number.
Using the phone keypad, enter the phone number in the field provided, then touch the Dial softkey to dial the phone number.
Tip![]() Your existing Cisco TelePresence call is placed on hold.
Your existing Cisco TelePresence call is placed on hold.
Step 3![]() Touch the Confrn softkey to add the audio call to your conference.
Touch the Confrn softkey to add the audio call to your conference.
Figure 2-14 Conferencing an Audio Call

Conference Call Member List
To display and manage individual phone numbers that have been added to the conference:
Step 1![]() Touch the ConfList softkey to display the individual phone numbers added to the conference. See Figure 2-15.
Touch the ConfList softkey to display the individual phone numbers added to the conference. See Figure 2-15.
Step 2![]() If desired, highlight a phone number and touch the Remove softkey to end the call to that phone number.
If desired, highlight a phone number and touch the Remove softkey to end the call to that phone number.
Step 3![]() Touch the Exit softkey to exit the conference list screen.
Touch the Exit softkey to exit the conference list screen.
Figure 2-15 Conference Call Member List

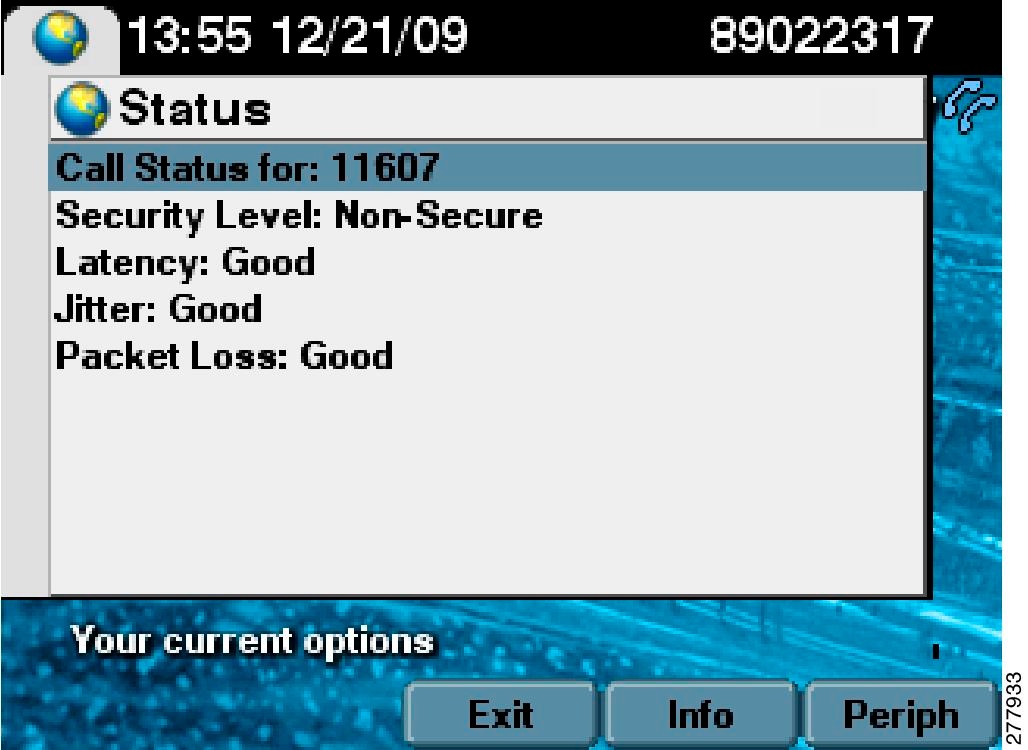
Checking Call Status
Check on call status during an active call by touching the more softkey to navigate to the Info softkey (Figure 2-16).
Figure 2-16 Calls Status Screen
Placing a Call on Hold
You can place any of the following types of calls on hold:
Step 1![]() Highlight the call and touch the Hold softkey as shown in Figure 2-17.
Highlight the call and touch the Hold softkey as shown in Figure 2-17.
- If the call is a Cisco TelePresence conference call, this action suspends operation of the phone, cameras, and microphones on your end of the connection. Icons on the room’s main display screen remind you that the call is active but on hold.
- If the call is an audio-only call, the Cisco TelePresence room microphones are muted.
Step 2![]() Touch the Resume softkey to resume the call. If more than one call is on hold, use the Up and Down arrow keys on the phone to select which call to resume.
Touch the Resume softkey to resume the call. If more than one call is on hold, use the Up and Down arrow keys on the phone to select which call to resume.
Step 3![]() Touch the Status softkey to display network information about the call as shown in Figure 2-16.
Touch the Status softkey to display network information about the call as shown in Figure 2-16.
See Chapter 4, “Cisco TelePresence System Phone Alerts and CTS Main Display Screen Messages” for information about hold function display screen icons.
Figure 2-17 Placing a Cisco TelePresence Call on Hold
When a call is on hold, the following icon is displayed on the main display screen:
Figure 2-18 Call on Hold Main Display Icon

For more on-screen icons, see Chapter4, “Cisco TelePresence System Phone Alerts and CTS Main Display Screen Messages”
Muting a Call
- Muting the Entire Cisco TelePresence Room
- Muting Individual Microphones
- Muting a Call From the Phone on the CTS 500 Only
Muting the Entire Cisco TelePresence Room
To mute the microphones during a conference call:
Step 1![]() Press the Mute button on the table microphone nearest to you.
Press the Mute button on the table microphone nearest to you.
Step 2![]() Press the Mute button again to restore audio input.
Press the Mute button again to restore audio input.
See Screen On-Screen Icons and Animations for information about mute function display screen icons.
Muting Individual Microphones
If your room is configured for single microphone muting:
Step 1![]() Press and hold the Mute button any table microphone for three seconds until the green LED light turns off. That microphone is now muted, but no muted Microphone icon displays on the main screen.
Press and hold the Mute button any table microphone for three seconds until the green LED light turns off. That microphone is now muted, but no muted Microphone icon displays on the main screen.
Step 2![]() To unmute the locally muted microphone, press the Mute button once. The green LED light turns on and the microphone is active again (or muted if the room is already muted).
To unmute the locally muted microphone, press the Mute button once. The green LED light turns on and the microphone is active again (or muted if the room is already muted).
Tip![]() Global room muting is still available by pressing the Mute button on any table microphone once without holding. See Muting the Entire Cisco TelePresence Room.
Global room muting is still available by pressing the Mute button on any table microphone once without holding. See Muting the Entire Cisco TelePresence Room.
Muting a Call From the Phone on the CTS 500 Only
The CTS 500 does not have a standard table microphone. To mute a call on a CTS 500 system:
Step 1![]() Touch the Mute softkey on the phone, as shown in Figure 2-19.
Touch the Mute softkey on the phone, as shown in Figure 2-19.
Step 2![]() Touch the Unmute softkey on the phone to restore audio input.
Touch the Unmute softkey on the phone to restore audio input.
Figure 2-19 Muting Calls on the CTS 500

When a call is muted, the following icon is displayed on the main display screen:
Figure 2-20 Muted Call Main Display Icon

For more on-screen icons, see Chapter4, “Cisco TelePresence System Phone Alerts and CTS Main Display Screen Messages”
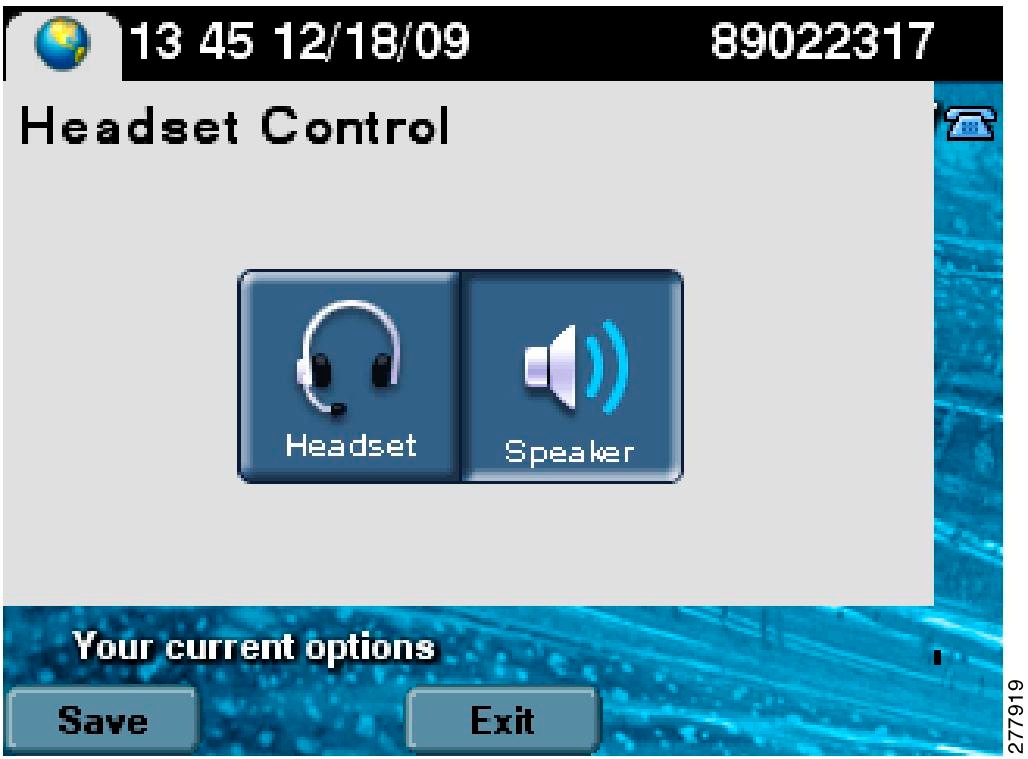
Using the Headset
The Headset Control screen allows you to switch between a headset device and the integrated Cisco TelePresence System (CTS) Cisco Unified IP Phone speaker. Touch the more softkey to navigate to the Headset softkey to access the Headset Control screen, as shown in Figure 2-21 and Figure 2-22.
Figure 2-22 Headset Control Screen
When the headset is in use, the following icon is displayed on the main display screen:
Figure 2-23 Headset in Use Main Display Icon

For more on-screen icons, see Chapter4, “Cisco TelePresence System Phone Alerts and CTS Main Display Screen Messages”
Using the CTS 500-32 Headset
The CTS 500-32 supports any compatible third party headset. Touch the Headset softkey to begin. System speakers and the microphone are disabled while the headset is plugged in.
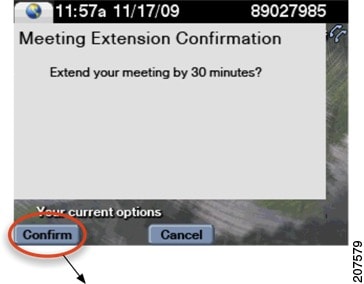
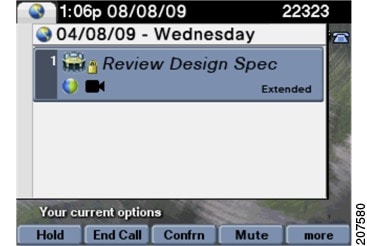
Extending Your Meeting
This feature provides an option to extend Cisco TelePresence meetings past their scheduled end time:
Meeting Extension Softkey Functions
Table 2-2 shows softkey functions on the CTS Cisco Unified IP phone.
|
Type |
|
|---|---|
Request to extend a meeting on a best effort basis. See Figure 2-24 for navigation tips. See also Alternate Meeting Extension Tips. |
|
Touch to confirm that the system has extended your meeting as requested. When your meeting is extended, the word “Extended” appears on the meeting label for all CTS and the Extend softkey is removed from the menu choices. See Figure 2-25. |
|
Figure 2-24 Meeting Extension Softkey
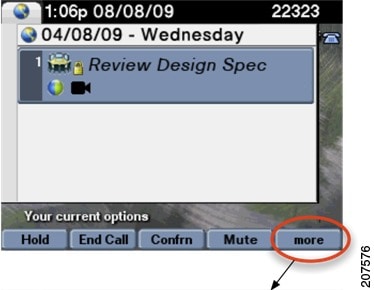
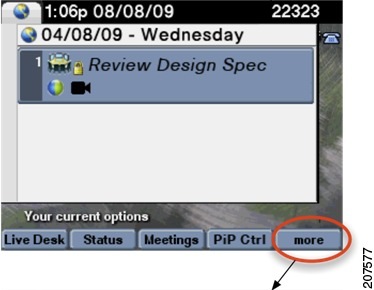
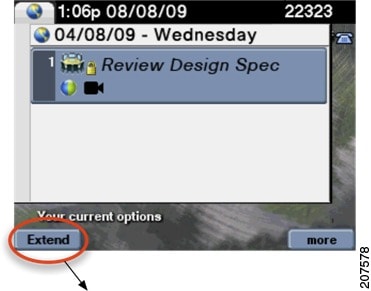
Figure 2-25 Confirming Your Meeting Extension
When your meeting has been successfully extended, one of the following icons will appear on the main display screen:
Figure 2-26 Meeting Extended Main Display Icons

For more on-screen icons, see Chapter4, “Cisco TelePresence System Phone Alerts and CTS Main Display Screen Messages”
Alternate Meeting Extension Tips
An alternate method you can use to extend your meeting from the phone is to touch more > MtgCtrl then scroll down to the Extend Meeting option and touch Select.
Call Security Overview
When a Cisco TelePresence call is in progress, the phone displays the phone number of the called endpoint, or the common phone number if it is a multi-room call. Each Cisco TelePresence endpoint is configured in Cisco Unified Communications Manager, including the maximum security level available for the room. The security level for a specific Cisco TelePresence call is determined by the least secure device joining the call. For example, audio-only calls added to a conference call only support authentication level security.
See “Cisco TelePresence System Phone Alerts and CTS Main Display Screen Messages,” for information about main display screen icons that indicate the level of call security on your system.
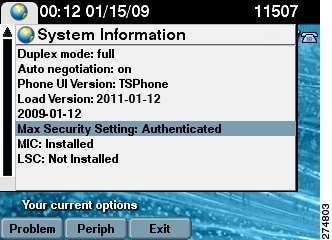
System Information - Using the Info Softkey
When you touch the Info softkey while the phone is idle, you can see the highest level of security that is available for your Cisco TelePresence room in the Maximum Security Setting field, as shown in Figure 2-27.
Figure 2-27 System Information Screen
Unsecured Calls
The open lock, as shown in Figure 2-28, shows on the phone that the call is unsecured.

When a call is not secure, the following icon is displayed on the main display screen:
Figure 2-29 Open Lock Main Display Icon

For more on-screen icons, see Chapter4, “Cisco TelePresence System Phone Alerts and CTS Main Display Screen Messages”
Viewing Security Settings
A closed lock, as shown in Figure 2-30, indicates that the call is authenticated and fully encrypted for the duration of the connection.

When a call is secure, the following icon is displayed on the main display screen:
Figure 2-31 Closed Lock Main Display Icon

For more on-screen icons, see Chapter4, “Cisco TelePresence System Phone Alerts and CTS Main Display Screen Messages”
Audio-Only Call Security
When an audio-only call is in progress, the phone displays the phone number of the called party. During Cisco TelePresence conference calls, audio-only calls are unsecured. The open lock, as shown in Figure 2-32, indicates that the audio call is not authenticated. See also Figure 2-31.
Figure 2-32 Unsecured Audio Call

Summary of Cisco TelePresence System Phone Softkeys
Revised: April 2013, OL-28618-01
Table 2-3 contains a summary of Cisco Unified IP phone softkey functions that are used to manage Cisco TelePresence System calls and meetings.
|
|
|
|---|---|
Manually answers an incoming phone call. See Answering a Call. |
|
Cancels a requested action, usually returning you to the previous screen. |
|
Conferences in a secure audio call. See Adding an Audio-Only Call. |
|
| Displays the list of phone numbers included in the conference call. |
|
| Displays the complete list of phone numbers. This can be all the phone numbers, including Cisco TelePresence endpoints contained in your Active Directory. The list of Directory phone numbers is determined by your Cisco TelePresence System Administrator. Search—Displays the input screen to search the Directory. See Using the Directory. |
|
Hides or displays anything appearing on your data display prior to joining a Cisco TelePresence meeting. |
|
Displays the document camera controls: Off/On—Turns the document camera on and off. Auto-Focus—Activates one-push auto-focus. Light Switch—Turns the document camera light on or off. Zoom In—Zooms in until you release your finger or until maximum zoom level is reached. Zoom Out—Zooms in until you release your finger or until minimum zoom level is reached. |
|
Exits the current selection. Usually takes you to the previous screen. |
|
Request to extend a Cisco TelePresence meeting past the scheduled end time. |
|
Displays a list of speed dial numbers. This list is configurable for each endpoint and is created by your Cisco TelePresence System Administrator. |
|
CTS 500 or CTS 1000 only. Sends a call’s audio to your headset, rather than to the speakers. See Using the Headset. |
|
Hold—Places a call on hold. The Cisco TelePresence screen goes dark and the Hold icon appears. Cisco Hold music plays. Resume—Takes a call off hold. The Cisco TelePresence screen returns to the meeting view. |
|
Sends an incoming call to voice mail. See Answering a Call. |
|
Displays system-related information. See Checking Call Status. |
|
Displays the audio and video on/off controls. This softkey appears only if you have a Cisco Digital Media Player (DMP) installed. |
|
Sets which rooms are allowed to join multipoint meetings using the Cisco TelePresence Multipoint Switch (CTMS). 

|
|
| Displays the meeting list if Cisco TelePresence Manager is installed. NextDay/PrevDay—Scrolls through scheduled meetings. StartMtg—Starts the meeting highlighted on the phone screen. |
|
Displays a list of multipoint meeting options using the Cisco TelePresence Multipoint Switch. View Control—Select the way you see speaking participants:
Participant List—Read-only. Provides users with a list of participants in a meeting. For scheduled meetings, the list also includes invited but yet to attend participants. Meeting Access—Choose to allow more rooms to join the meeting. |
|
| See Muting a Call. |
|
Starts a new Cisco TelePresence call or meeting by dialing a phone number. See Initiating a Call. |
|
Sets the screen location of your Presentation-in-Picture (PiP) window. Swap—Choose to display the Presentation-in-Picture (PiP) larger than the video image of meeting attendees and easily toggle back to a larger video image with a smaller presentation. |
|
Generates a problem report before, during, or at the end of the call. |
|
Dials the number that was last dialed. See Last Number Redial. |
|
Allows you to sign in on the Cisco TelePresence Recording Server (CTRS) to view, record, or delete videos. Sign In—Enter your username and PIN number. Settings—Takes you to the Recording Settings screen. Select—Checks or un-checks the highlighted row of options. Save—Saves the specified recording settings. Share—Takes you to the Share Video screen. Set Title—Sets the video title. Stop—Stops the in-progress recording. Stops the video in progress. Sign Out—Signs you out of the Recording Screen. Cancel—Cancels the current sign-in request. Exits the Recording Settings Screen. Share—Enter the e-mail address of a user with whom you want to share the recording that you just created. Set Title—Enter a title for the recording that you just created. Save To—Saves to the Show and Share feature. Review—Play a recording immediately after you create it. Record Button—Touch to begin recording. Review—Plays back the recently recorded video. Delete—Deletes the recently recorded video. Skip (Rewind)—Skips (rewinds) the video in progress. Pause—Pauses the video in progress. Stop—Stops the video in progress. Skip (Fast Forward)—Skips (fast forwards) the video in progress. |
|
Allows you to view how you will be seen by others in a Cisco TelePresence meeting before the meeting begins; a mirror image of you and the room that you are in. |
|
Touch Share to resume sharing during an active call. The system automatically shares when the VGA cable is plugged in during an active call. Touch Unshare in the Video Input screen to stop sharing. See Controlling Presentations. |
|
| Displays the status of the meeting connection. |
|
Performs a search of the directory entries returning the possible matches. See Using the Directory. |
|
Shares videos with specified individuals or groups. Privacy—Select your privacy settings. Play—Plays back a video on the CTS main display. Share—Enter the e-mail address of a user with whom you want to share the recording that you just created. |
|
Selects presentation video source input options. VGA—Last participant to plug in shares. DVI—Plugs into desktop, PC, or laptop docking station. See Video Input Options. |
|
Hide—Hides your presentation. You are returned to the main idle screen. Exit—Exits the Video Input screen without making any changes. View—View your presentation locally. See Video Input Options. |
|
Changes the conference view in a multipoint meeting from room to speaker. See View Control. |
Where to Go Next
For more information about using the Cisco Unified IP Phone, see the following documentation on Cisco.com:
 Feedback