- Title page
- Table of Contents
- Preface
- Getting to Know the Cisco TelePresence System
- Placing and Receiving Calls - Systems That Use an IP Phone for Call Control
- Placing and Receiving Calls - Systems That Use a Touch 12 Device for Call Control
- Cisco TelePresence System On-Screen Icons and Messages
- Cisco TelePresence System Meeting Controls - Systems That Use an IP Phone for Call Control Only
- Tips for Troubleshooting Your Cisco TelePresence Meeting
- Glossary
- Index
- Joining a Meeting
- Placing a Call
- Answering Calls
- Muting the System During a Conference
- Muting a Single Microphone During a Conference
- Using Self View
- Checking Your Calendar
- Sharing Presentations
- Managing Meetings
Placing and Receiving Calls—Systems that Use a Touch 12 Device for Call Control
Revised: April 2013, OL-28618-01
This chapter shows the procedures you perform to place or receive a call if your system uses a Cisco Telepresence Touch 12 device for call control and includes the following sections:
- Joining a Meeting
- Placing a Call
- Answering Calls
- Placing a Call on Hold
- Muting the System During a Conference
- Muting a Single Microphone During a Conference
- Using Self View
- Checking Your Calendar
- Sharing Presentations
- Managing Meetings
- Sharing Using the Document Camera
- Opening Other Applications During a Call
- Controlling Volume and Other Call Settings
- Using the Digital Media Player
Systems running CTS software Release 1.10 do not support the annotation feature or the 1080p60 fps feature. These features require systems that can run Cisco TelePresence Software TX Release 6.0. The following systems support CTS software Release 1.10 but do not support TX Release 6.0:
- Cisco TelePresence System 500-37
- Cisco TelePresence System 1000
- Cisco TelePresence System 1100
- Cisco TelePresence System 1300-65
- Cisco TelePresence System 3000
- Cisco TelePresence System 3010
- Cisco TelePresence System 3200
- Cisco TelePresence System 3210

Note![]() The examples in this document show the display screens in English. The Touch 12 offers additional language support. Your system administrator configures these languages for your system. For configuration information and for the current list of additional languages, refer to the “Installing Language Versions” chapter of the Cisco Unified Communications Manager Configuration Guide for the Cisco TelePresence System.
The examples in this document show the display screens in English. The Touch 12 offers additional language support. Your system administrator configures these languages for your system. For configuration information and for the current list of additional languages, refer to the “Installing Language Versions” chapter of the Cisco Unified Communications Manager Configuration Guide for the Cisco TelePresence System.
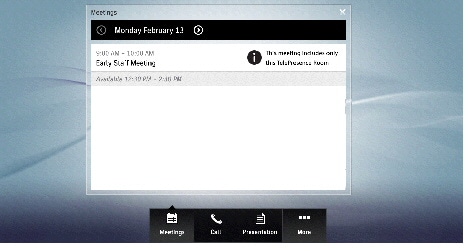
Joining a Meeting
Note![]() Meetings are only available if they have been configured for your system by your system administrator.
Meetings are only available if they have been configured for your system by your system administrator.
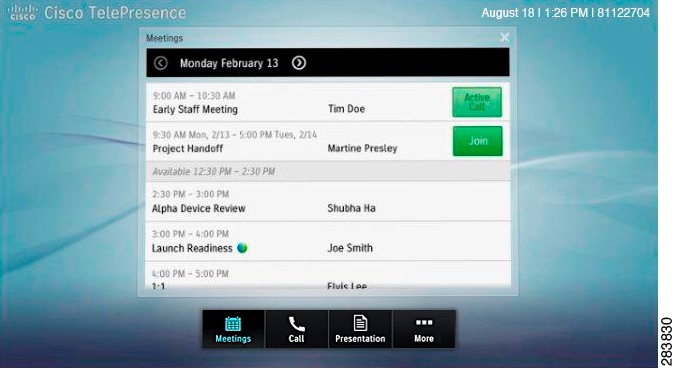
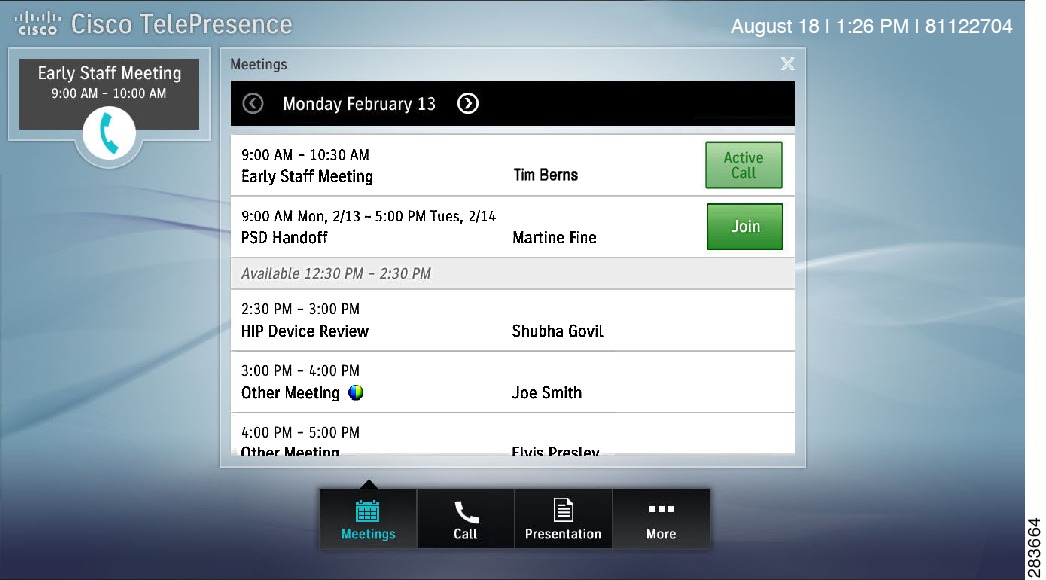
Step 1![]() If the Meetings screen does not already appear, tap the Meetings button in the button bar.
If the Meetings screen does not already appear, tap the Meetings button in the button bar.
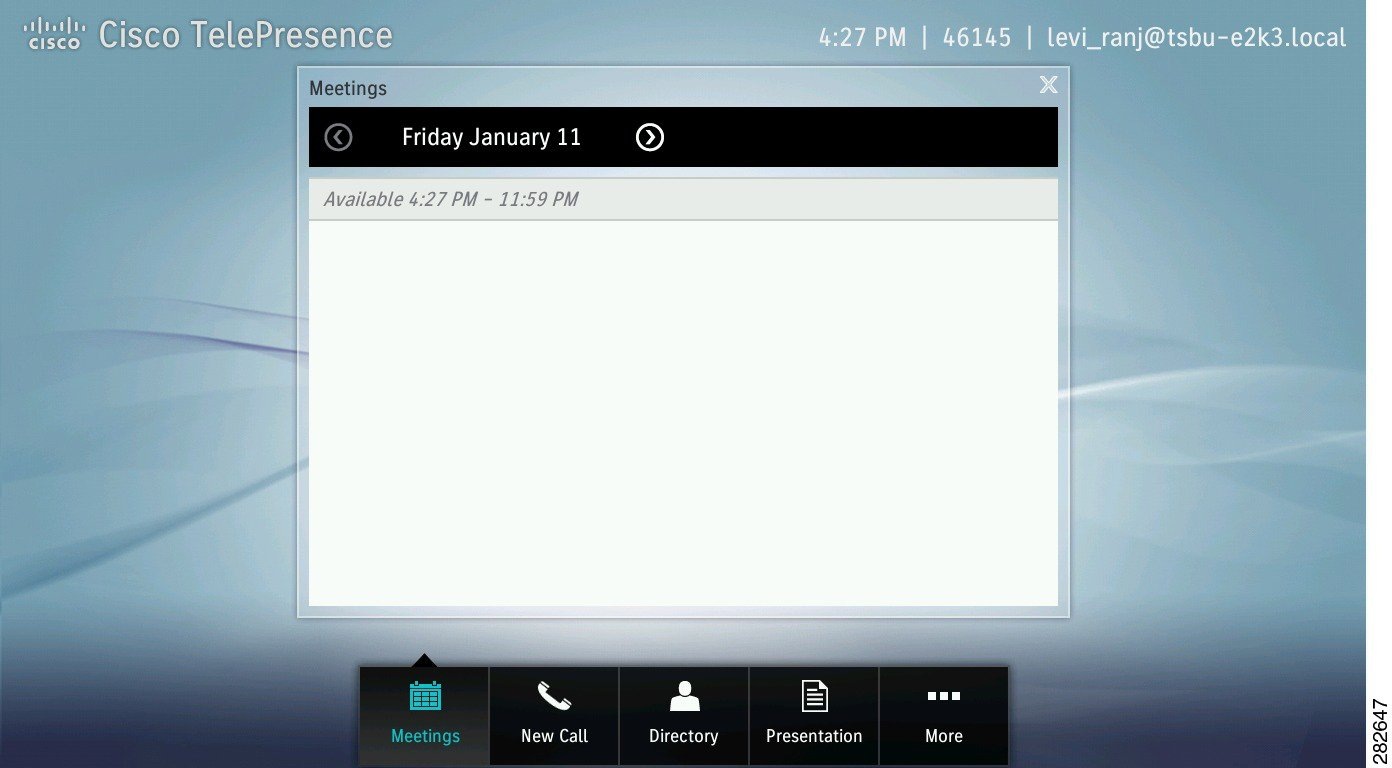
The Meetings screen appears as shown in Figure 3-1.
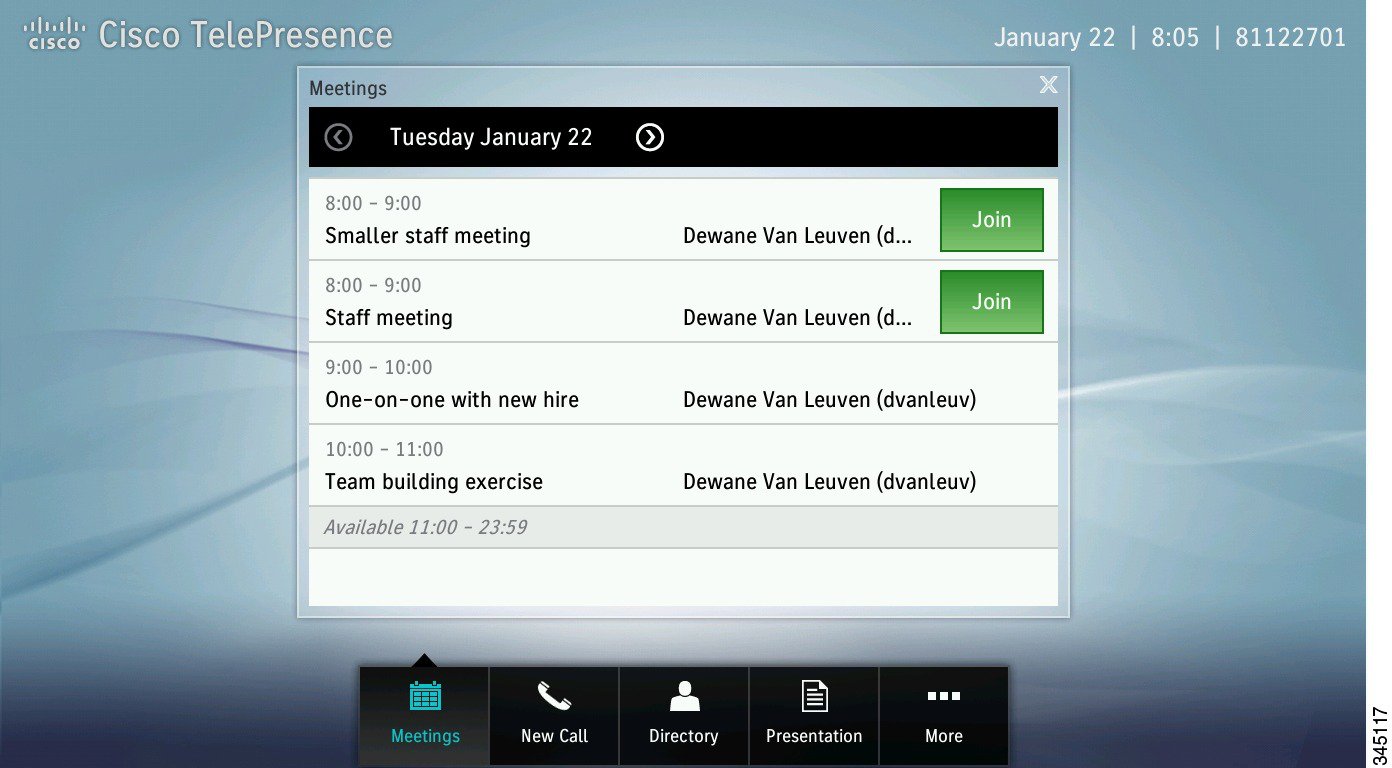
Step 2![]() Locate your meeting from the list and tap the Join button. This button is shown in Figure 3-1.
Locate your meeting from the list and tap the Join button. This button is shown in Figure 3-1.
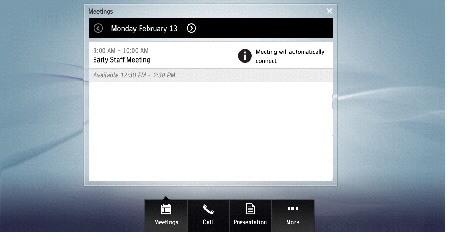
- In an AutoConnect meeting, the choice to join is disabled, and is replaced by text saying that the meeting will automatically connect.
- If a meeting includes only a TelePresence room and no WebEx OneTouch (also known as one-button-to-push) number has been defined, the text in the meeting informs you that the meeting only includes the TelePresence room, and no Join button is shown.
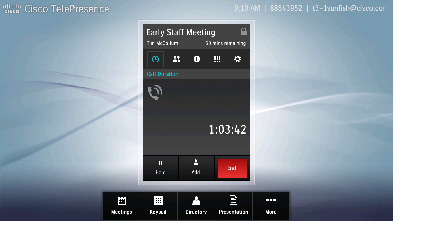
When your meeting connects, the meeting window appears with the Call Duration window open by default, as shown in Figure 3-2.
Step 3![]() Manage your meeting options using the information in the “Managing Meetings” section.
Manage your meeting options using the information in the “Managing Meetings” section.
Placing a Call
You can place a call on a CTS system using the keypad, using a Unified Resource Identifier (URI) string (such as an e-mail address), or directory-type searches.
This section includes the methods you make to place a call and includes the following topics:
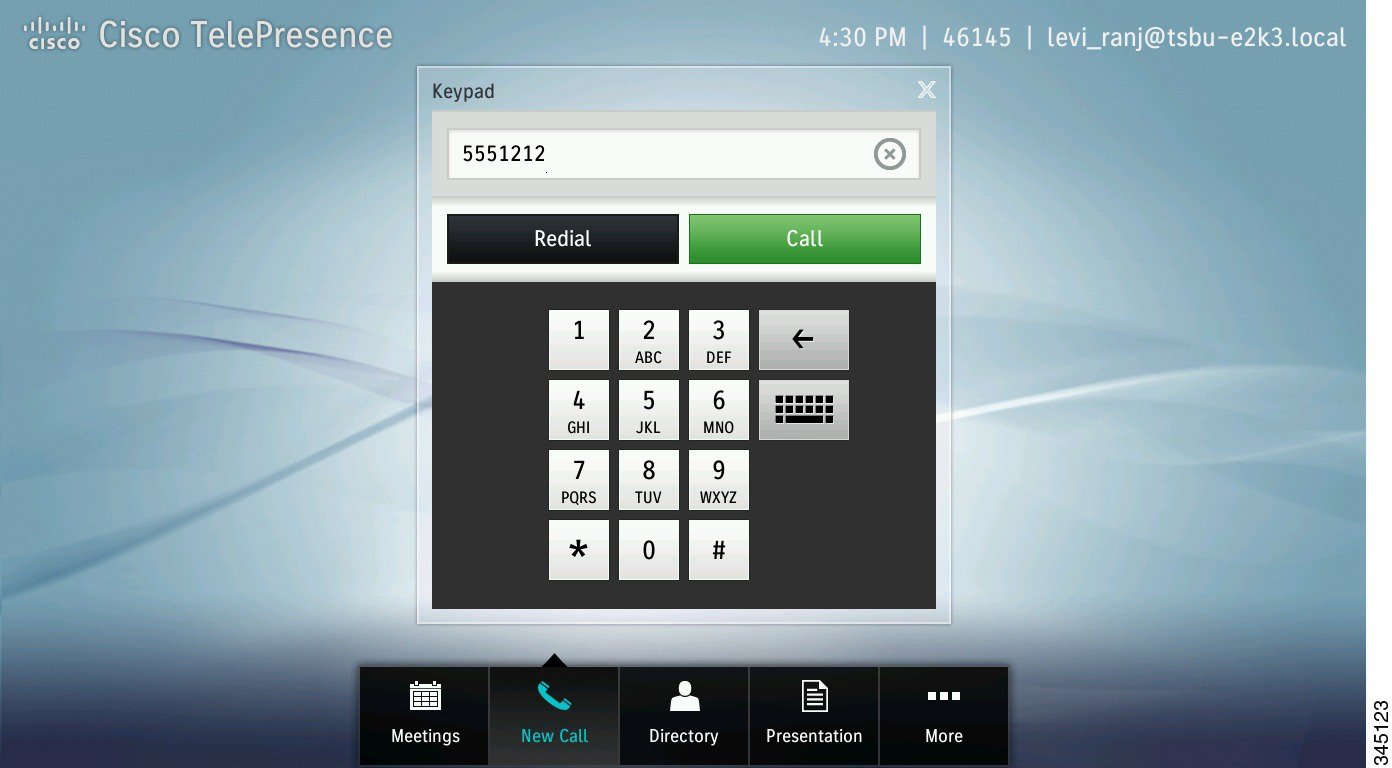
Using the Keypad
To use the phone to dial a number, complete the following steps:
Step 1![]() If the meeting window displays, tap the New Call button on the lower right of the screen.
If the meeting window displays, tap the New Call button on the lower right of the screen.
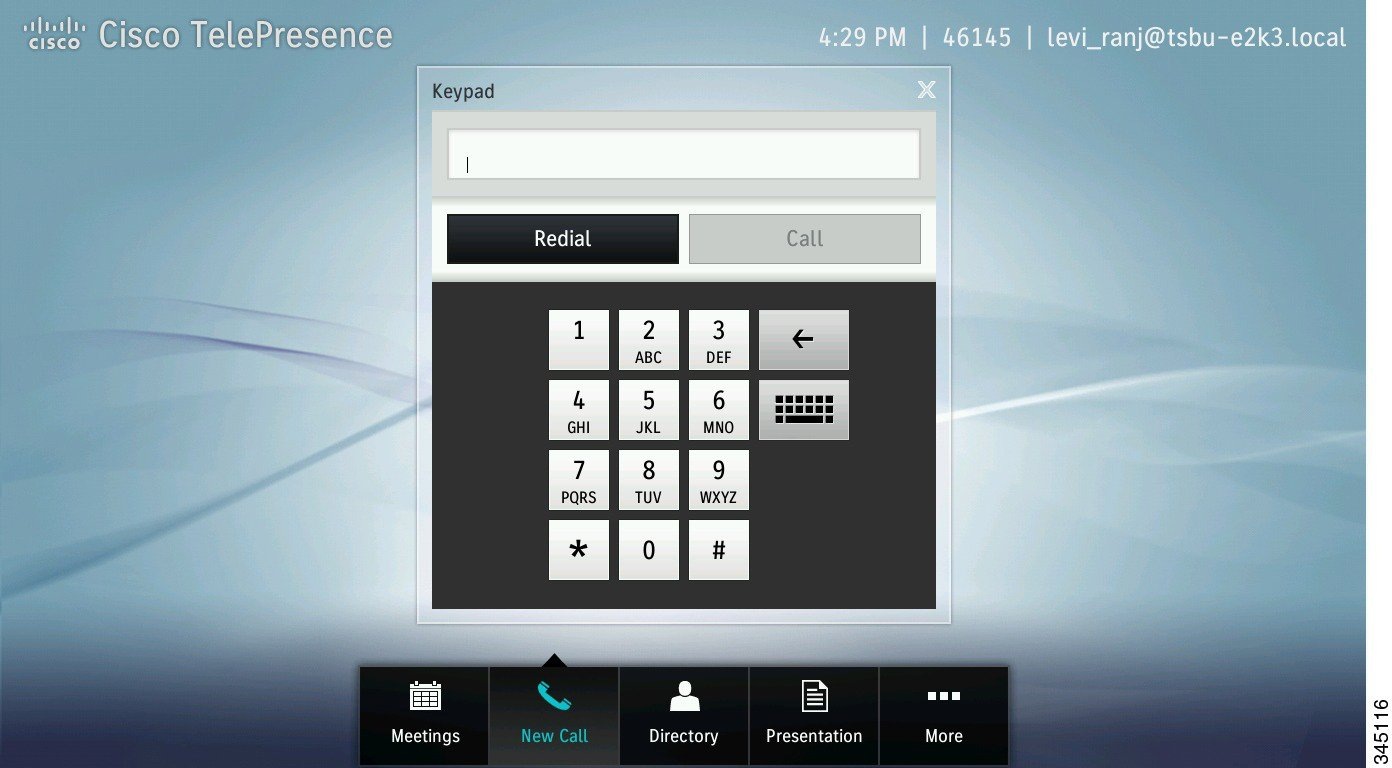
Step 2![]() Dial the number and tap the Call button.
Dial the number and tap the Call button.
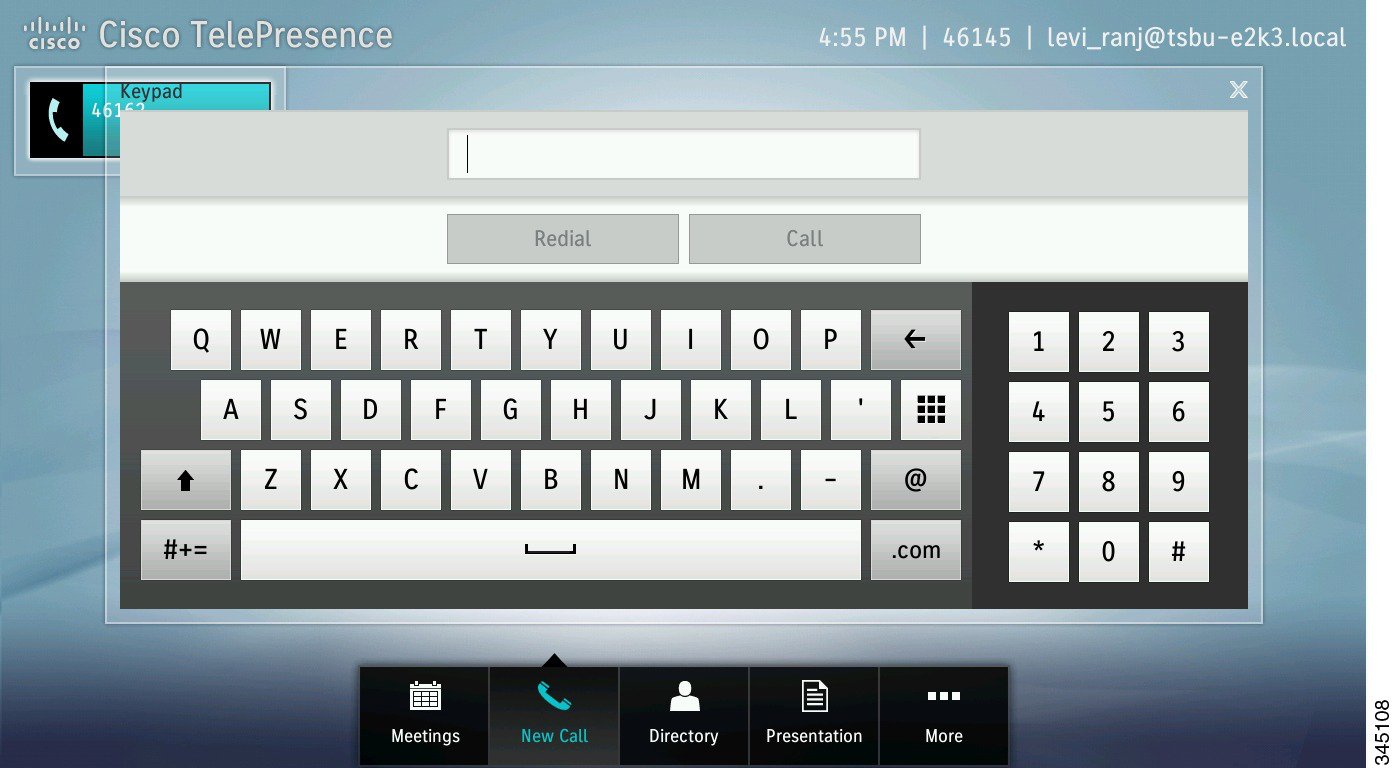
Dialing a URI String
To dial a number using a URI string, complete the following steps:
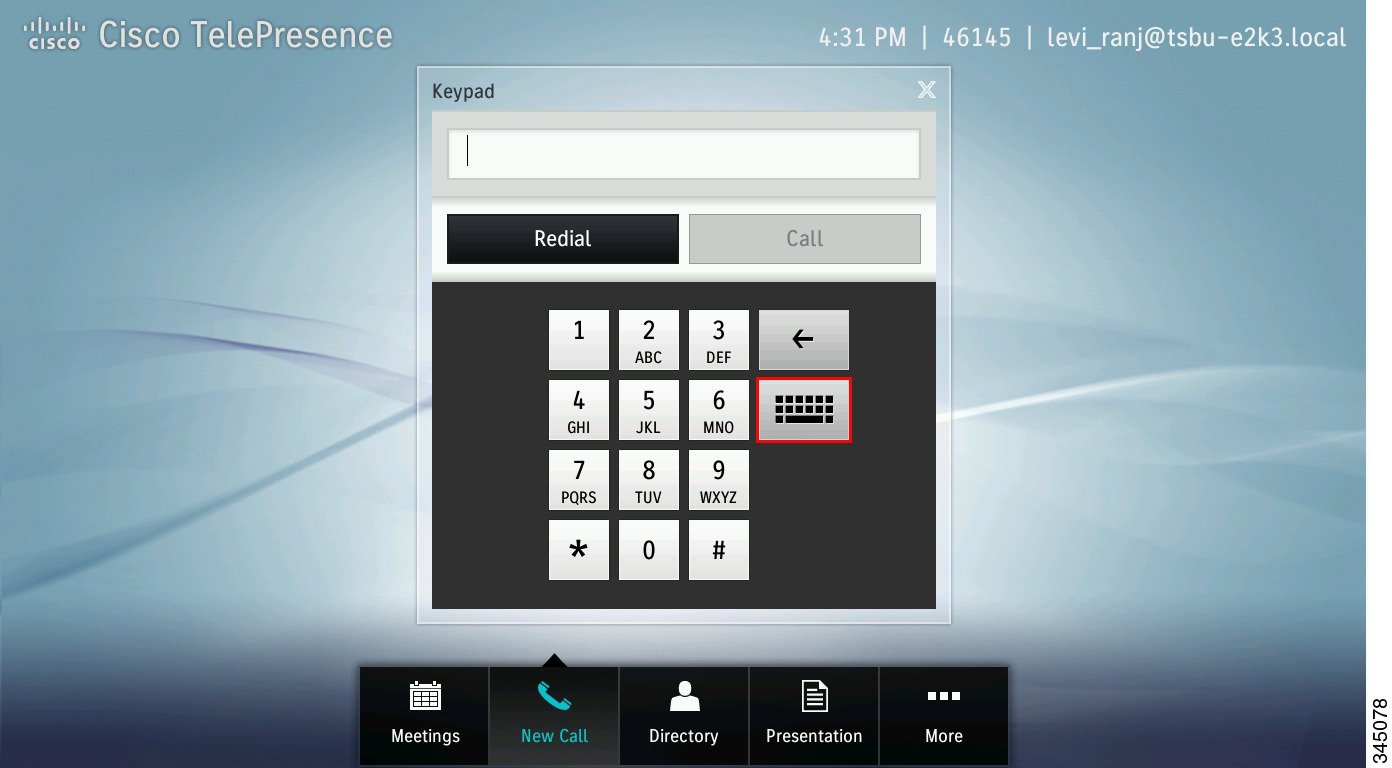
Step 1![]() Tap the Keyboard button in the keypad area.
Tap the Keyboard button in the keypad area.
Note![]() If the keypad area is not active, tap the Keypad area in the main button bar.
If the keypad area is not active, tap the Keypad area in the main button bar.
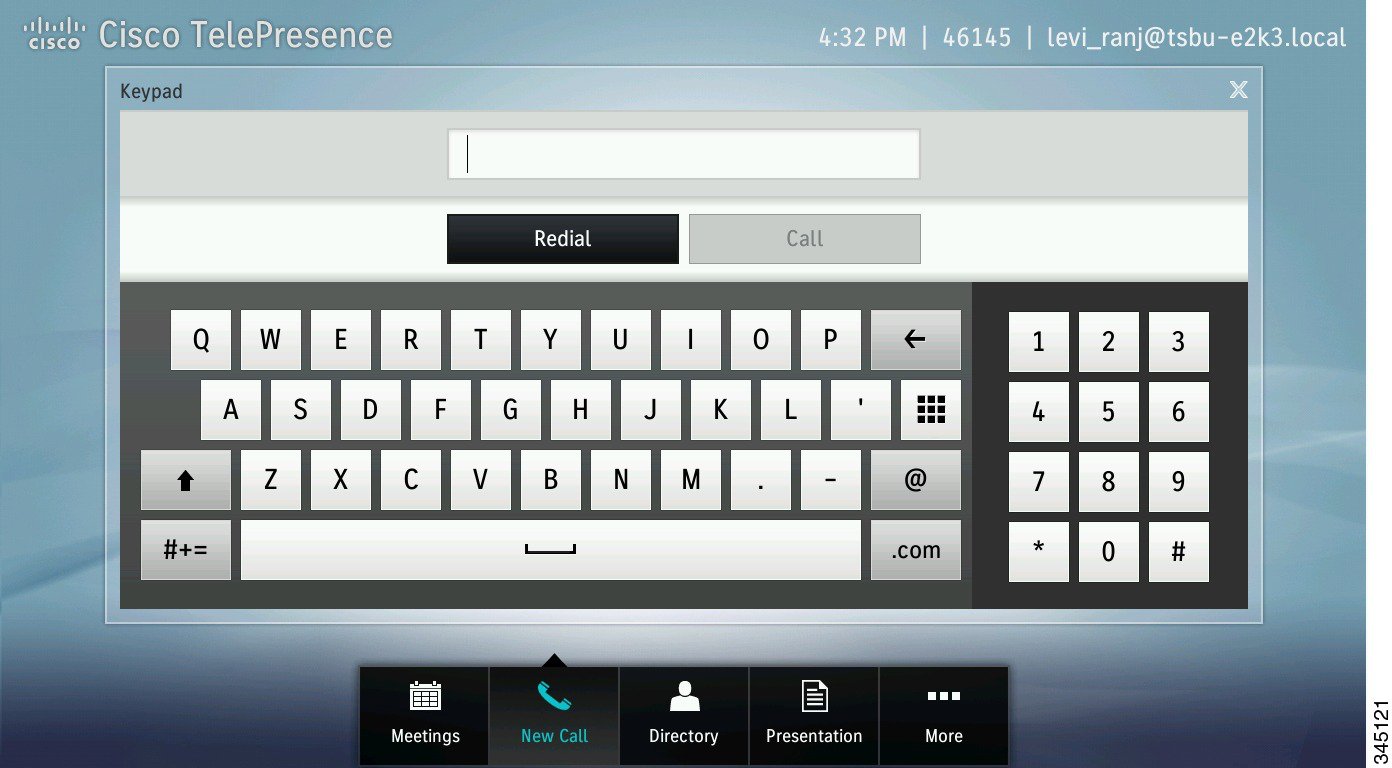
Step 2![]() Enter the URI using the keyboard buttons.
Enter the URI using the keyboard buttons.

Tip![]() To enter special characters, tap the #+= button on the lower part of the screen.
To enter special characters, tap the #+= button on the lower part of the screen.
Figure 3-6 Main Keyboard Screen
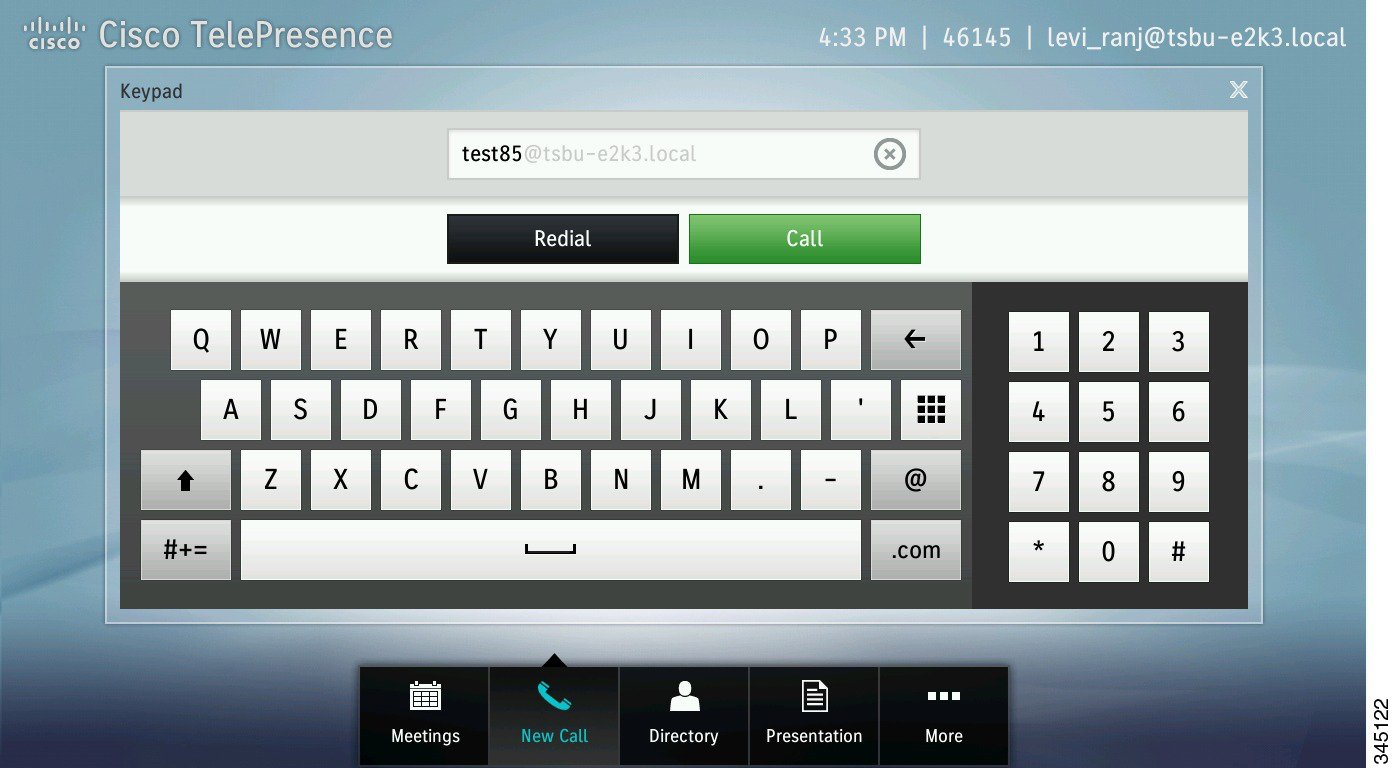
Step 3![]() After you enter a valid URI, tap Call.
After you enter a valid URI, tap Call.
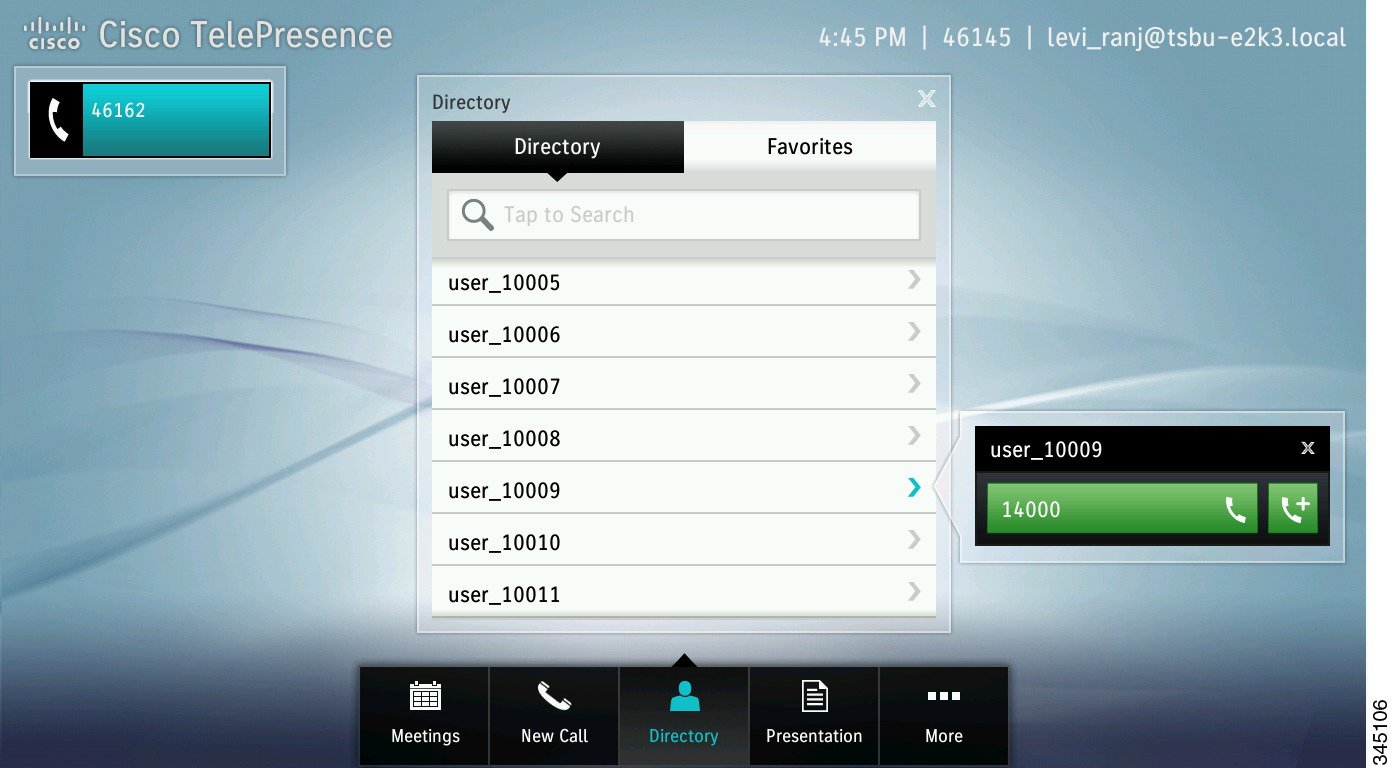
Using Directory Search
Tip![]() The Directory tab will only be present if a directory has been configured by your administrator.
The Directory tab will only be present if a directory has been configured by your administrator.
To place a call using directory search:
Step 1![]() Tap the Directory button in the button bar.
Tap the Directory button in the button bar.
The directory window displays.
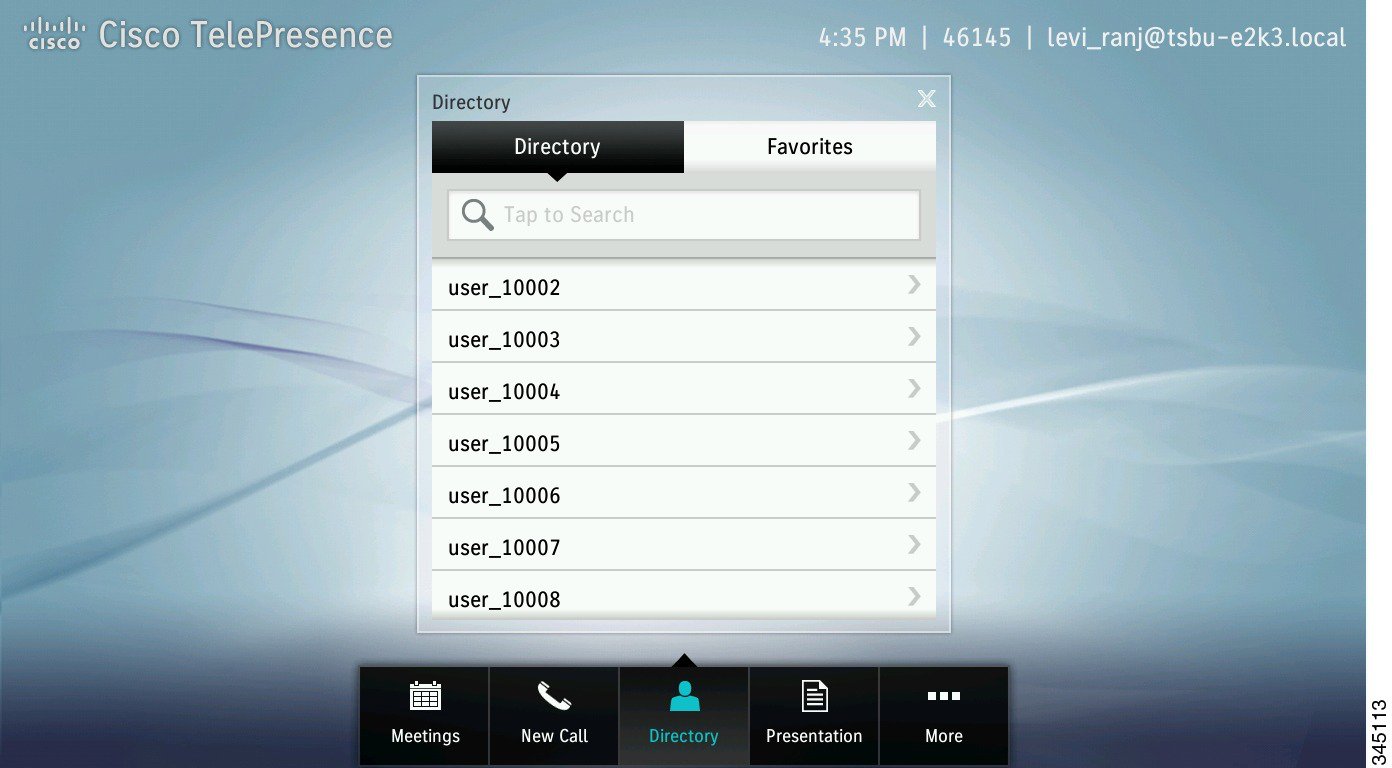
Step 2![]() Use one of the following methods to find the person or resource you are looking for:
Use one of the following methods to find the person or resource you are looking for:
- Use your finger to scroll through entries in the Directory, then tap a name to open the entry for that person or room.
- Tap once into the search field to bring up the standard keyboard and type the names of people or resources.
Figure 3-9 Directory Search with the Standard Keyboard
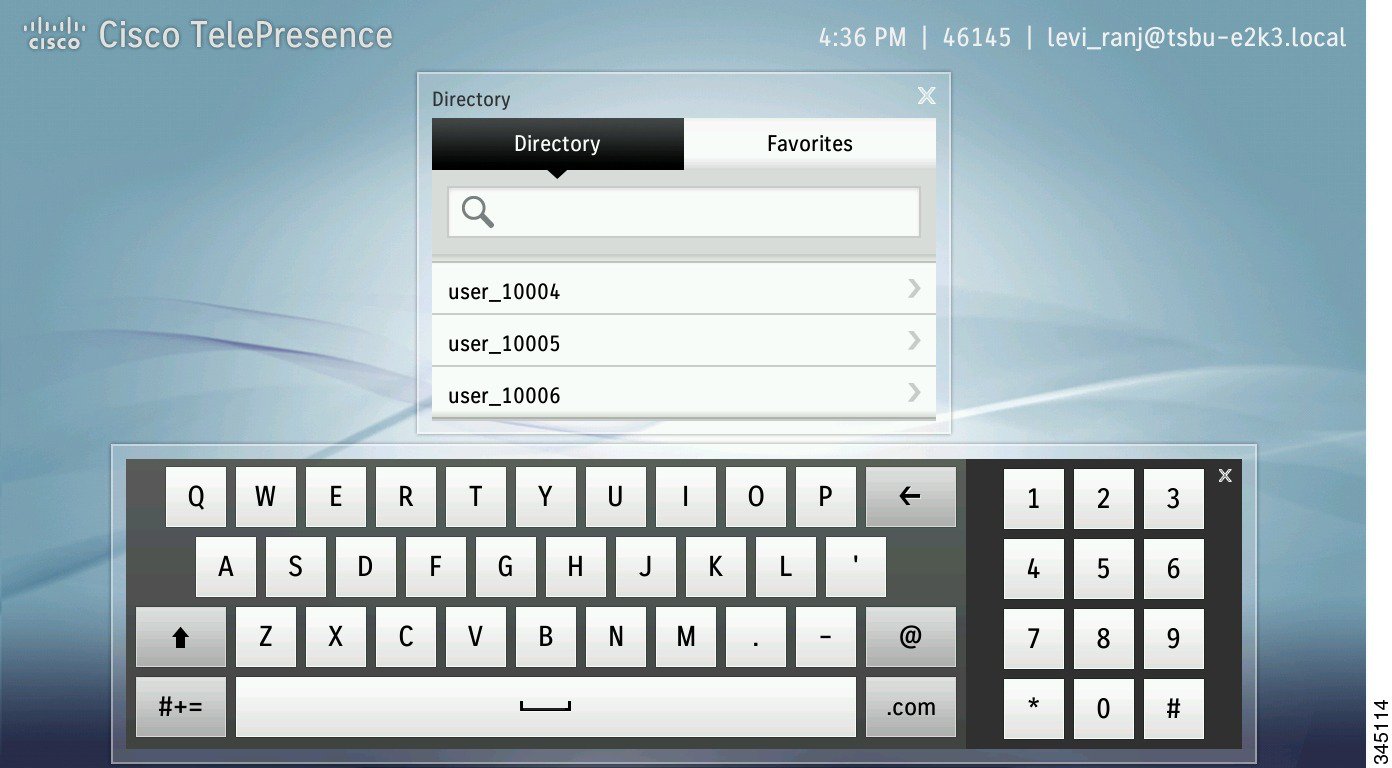
Tip![]() To toggle between the standard keyboard and the special characters keyboard, tap the #+= button or the ABC button.
To toggle between the standard keyboard and the special characters keyboard, tap the #+= button or the ABC button.
To close the keyboard at any time, tap the X at the top right of the keyboard.
Step 3![]() Highlight the name and tap the green Call button that displays on the right.
Highlight the name and tap the green Call button that displays on the right.
Using Favorites
Tip![]() The Favorites tab is displayed only if Favorites have been configured in Cisco Unified Communications Manager. For more information, refer to the “Managing the Speed-Dial Directory (Favorites)” section of the Cisco Unified Communications Manager Configuration Guide for the Cisco TelePresence System.
The Favorites tab is displayed only if Favorites have been configured in Cisco Unified Communications Manager. For more information, refer to the “Managing the Speed-Dial Directory (Favorites)” section of the Cisco Unified Communications Manager Configuration Guide for the Cisco TelePresence System.
To place a call using Favorites, complete the following steps:
Step 4![]() Tap the Directory button, then tap the Favorites tab.
Tap the Directory button, then tap the Favorites tab.
Figure 3-11 Making a Call from Favorites
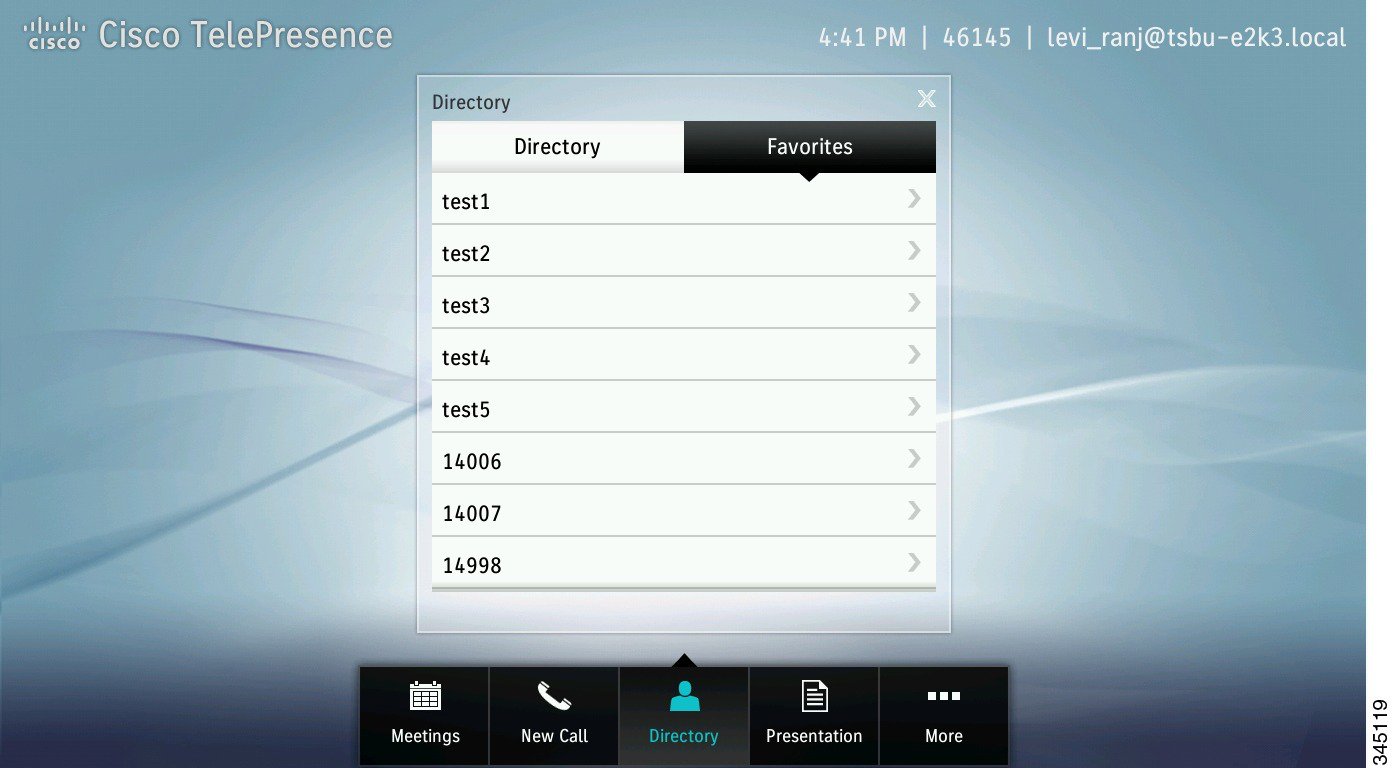
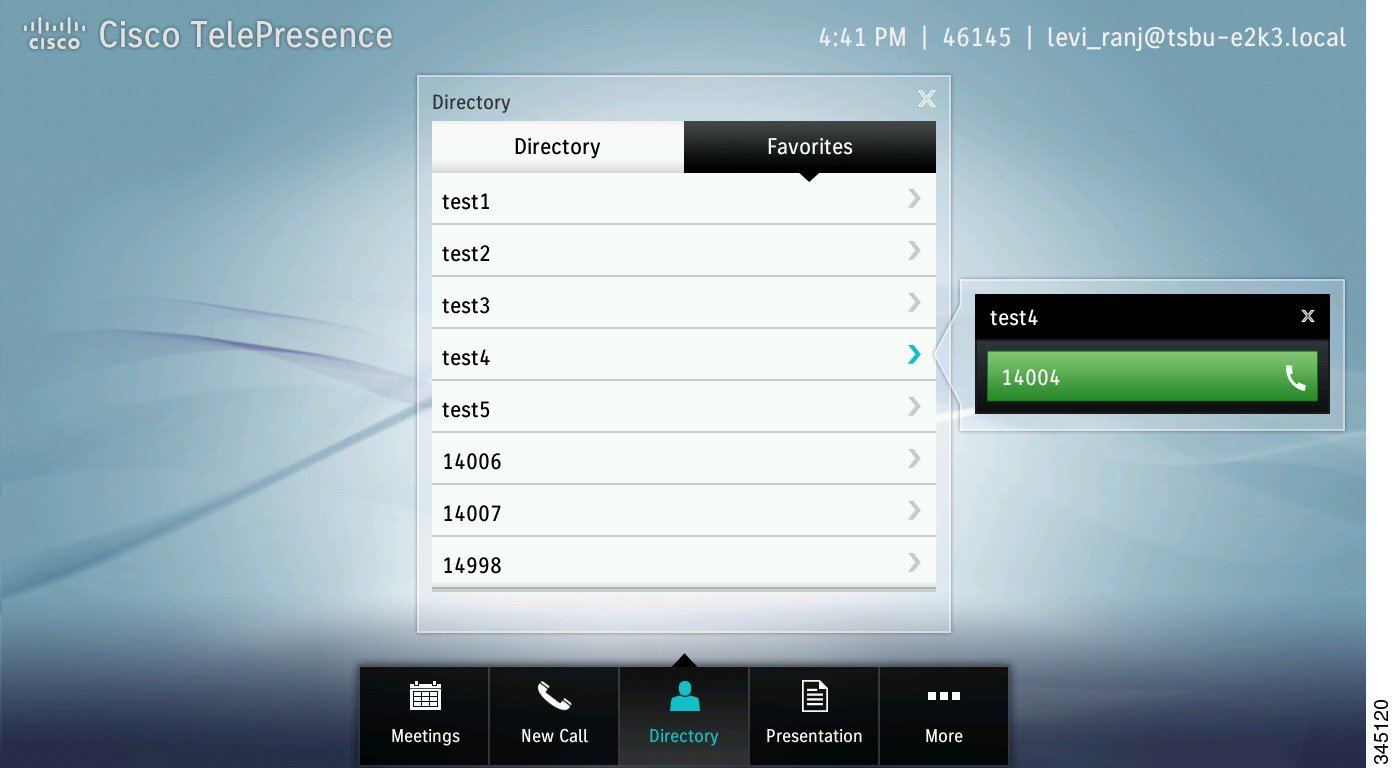
Step 5![]() Use your finger to scroll through entries in Favorites, then tap a name to open the contact card for that person.
Use your finger to scroll through entries in Favorites, then tap a name to open the contact card for that person.
Step 6![]() Tap the Call button in the contact card to call that person.
Tap the Call button in the contact card to call that person.
Adding Another Endpoint To an Existing Conference
To add another endpoint to an existing Cisco TelePresence conference, perform the following actions:

If your directory is enabled on your device, the directory appears.
Step 2![]() Add the new call by performing one of the following actions:
Add the new call by performing one of the following actions:
- To add an endpoint using the directory, select a name in the directory list by tapping that name; then, tap the green telephone icon that appears to the right of the name to dial that number.
Figure 3-14 Adding an Endpoint Using the Directory
Figure 3-15 Adding an Endpoint Using the Keypad
- To add an endpoint using the keyboard, tap the New Call button, then tap the keyboard icon in the keypad area, enter the URI, and tap Call.
Figure 3-16 Adding an Endpoint Using the Keyboard
The current call is placed on hold and your system dials the new endpoint.
Step 3![]() Merge the calls by tapping the Merge button.
Merge the calls by tapping the Merge button.
Tip![]() To return to the original call without adding the new endpoint, tap Resume.
To return to the original call without adding the new endpoint, tap Resume.
The system adds the new endpoint to the existing Cisco TelePresence conference.
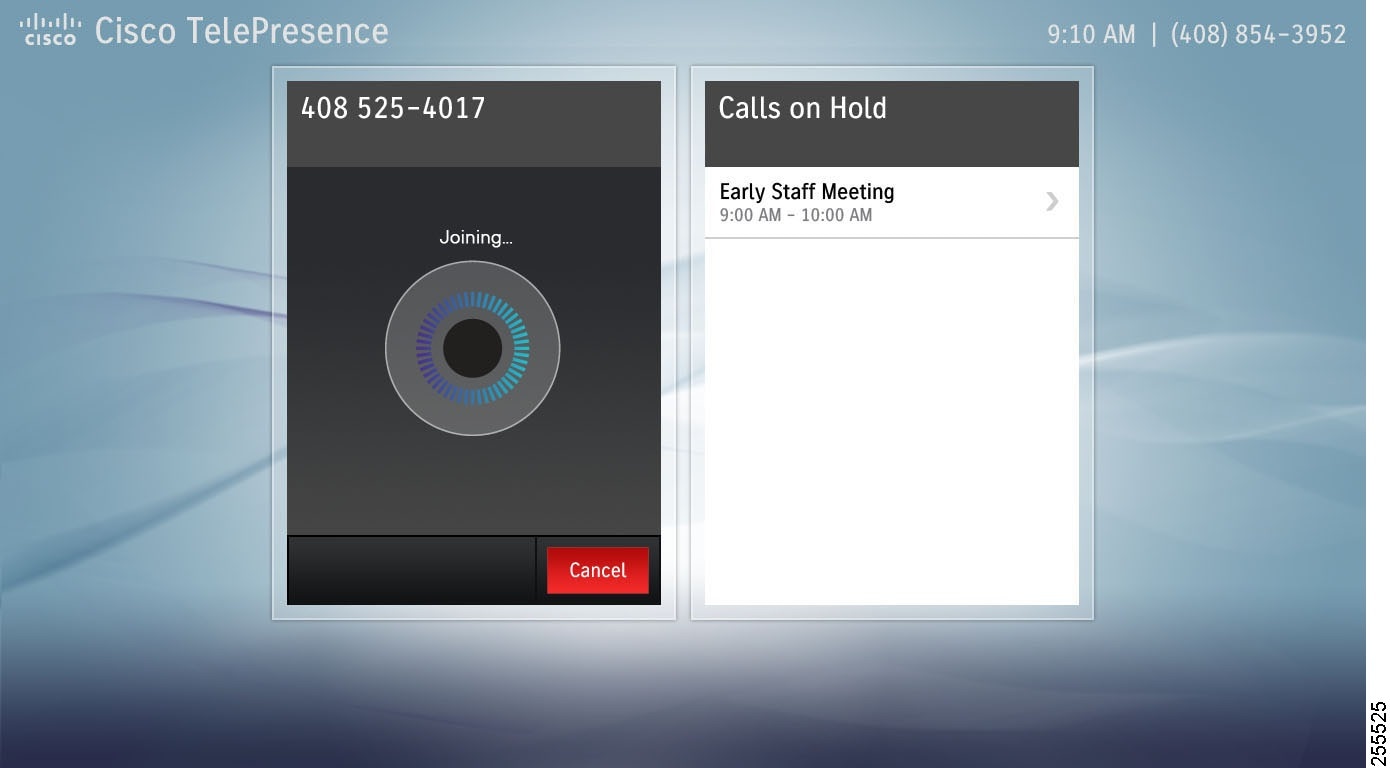
Adding an Audio Participant to an Existing Conference
To add an audio participant, complete the following steps.
Step 1![]() Add the audio call using one of the following methods:
Add the audio call using one of the following methods:
- Tap the Add button, as shown in Figure 3-18.
Figure 3-18 Adding an Audio Participant
The keypad appears and your current meeting is minimized.
Step 2![]() Tap the numbers you wish to dial on the keypad provided.
Tap the numbers you wish to dial on the keypad provided.
Tip![]() You can also tap the keyboard button and enter a URI.
You can also tap the keyboard button and enter a URI.
Your current meeting is placed on hold while the system dials the number, as shown in Figure 3-19.
Figure 3-19 Adding an Audio Participant - Dialing the Number
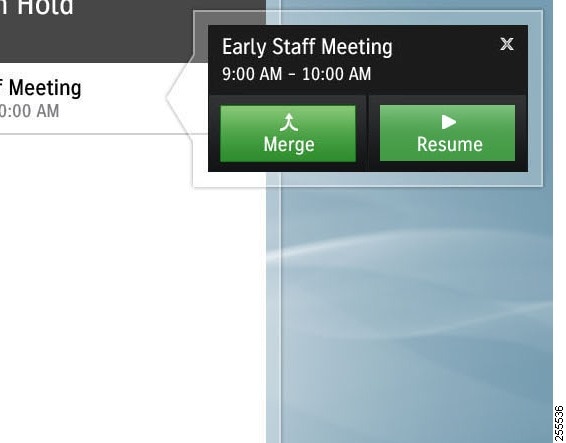
Step 3![]() Once the new call has successfully connected, merge the call into your current meeting by tapping the Merge button in the meeting context card for the current meeting, as shown in Figure 3-20.
Once the new call has successfully connected, merge the call into your current meeting by tapping the Merge button in the meeting context card for the current meeting, as shown in Figure 3-20.
Figure 3-20 Merge an Audio Participant
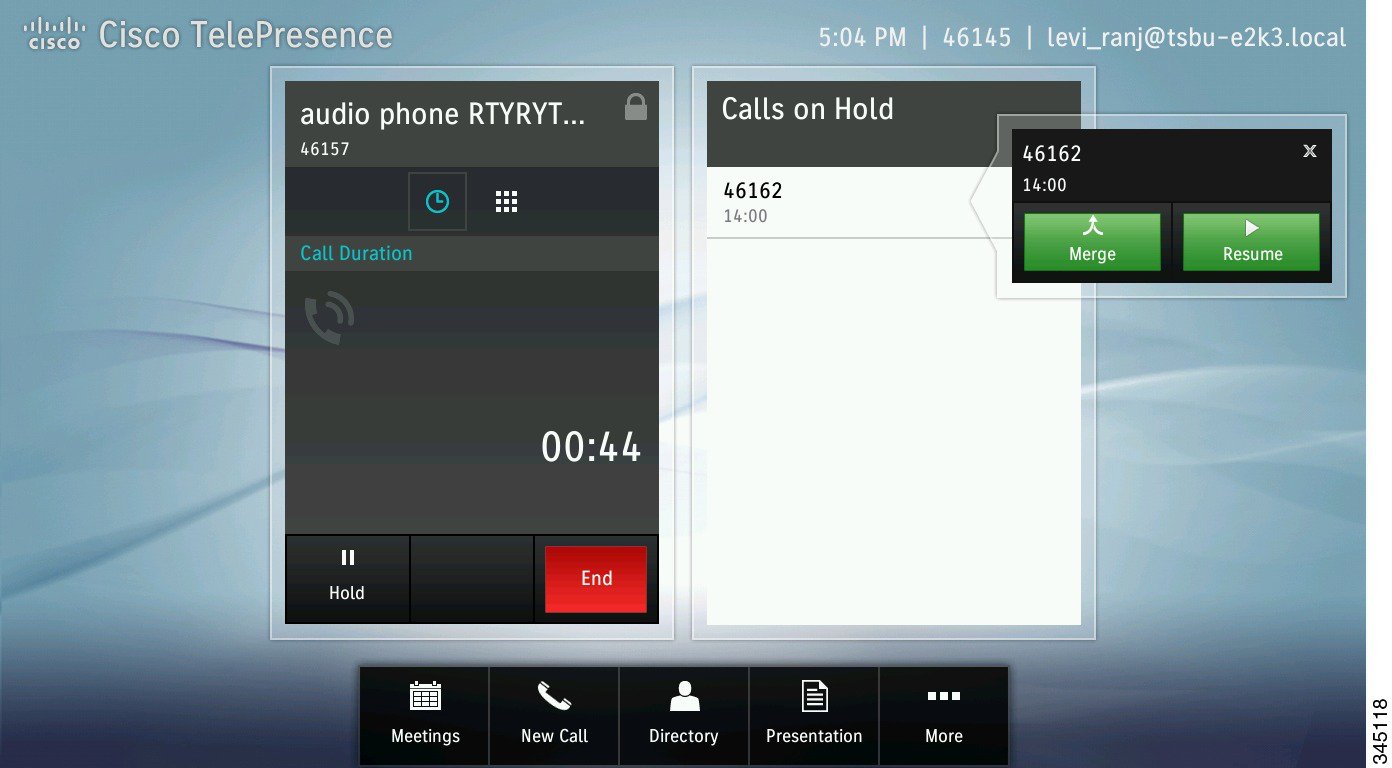
Placing a Call on Hold
To place yourself on hold then resume your call during a meeting, complete the following tasks:
Step 1![]() Tap the Hold button, as shown in Figure 3-21.
Tap the Hold button, as shown in Figure 3-21.
Figure 3-21 Placing Yourself on Hold
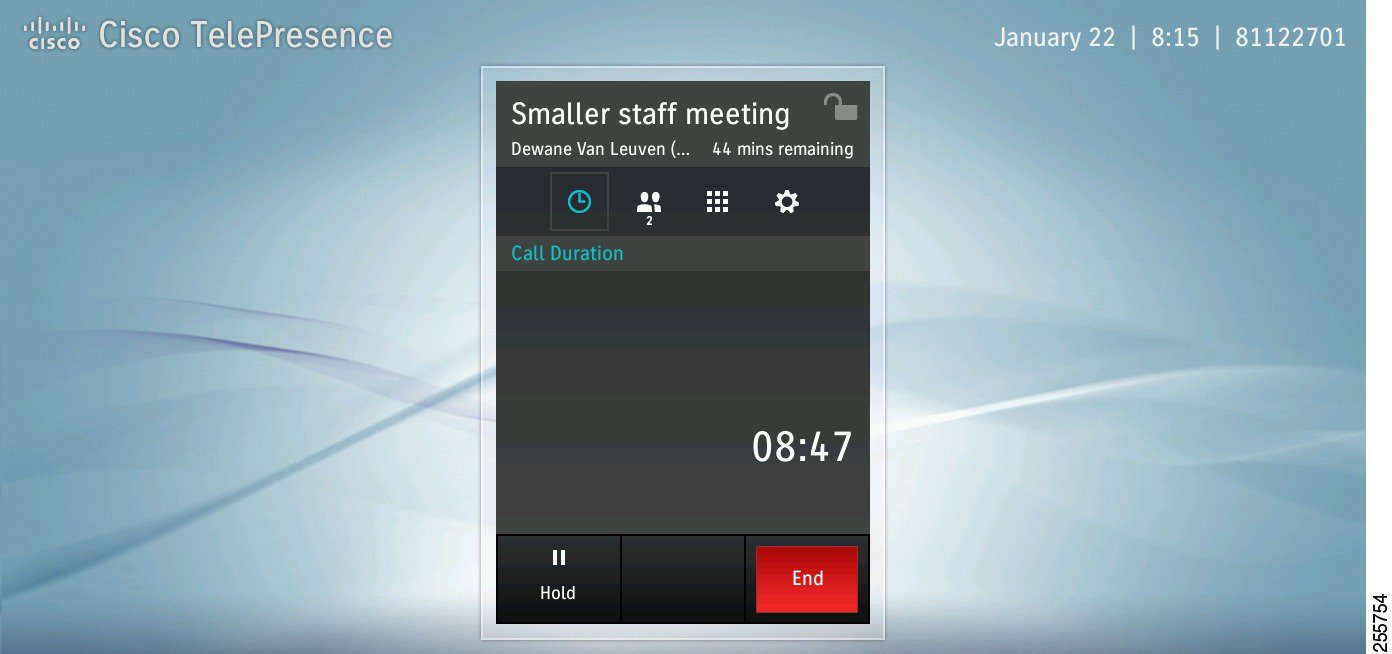
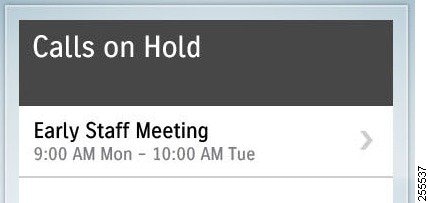
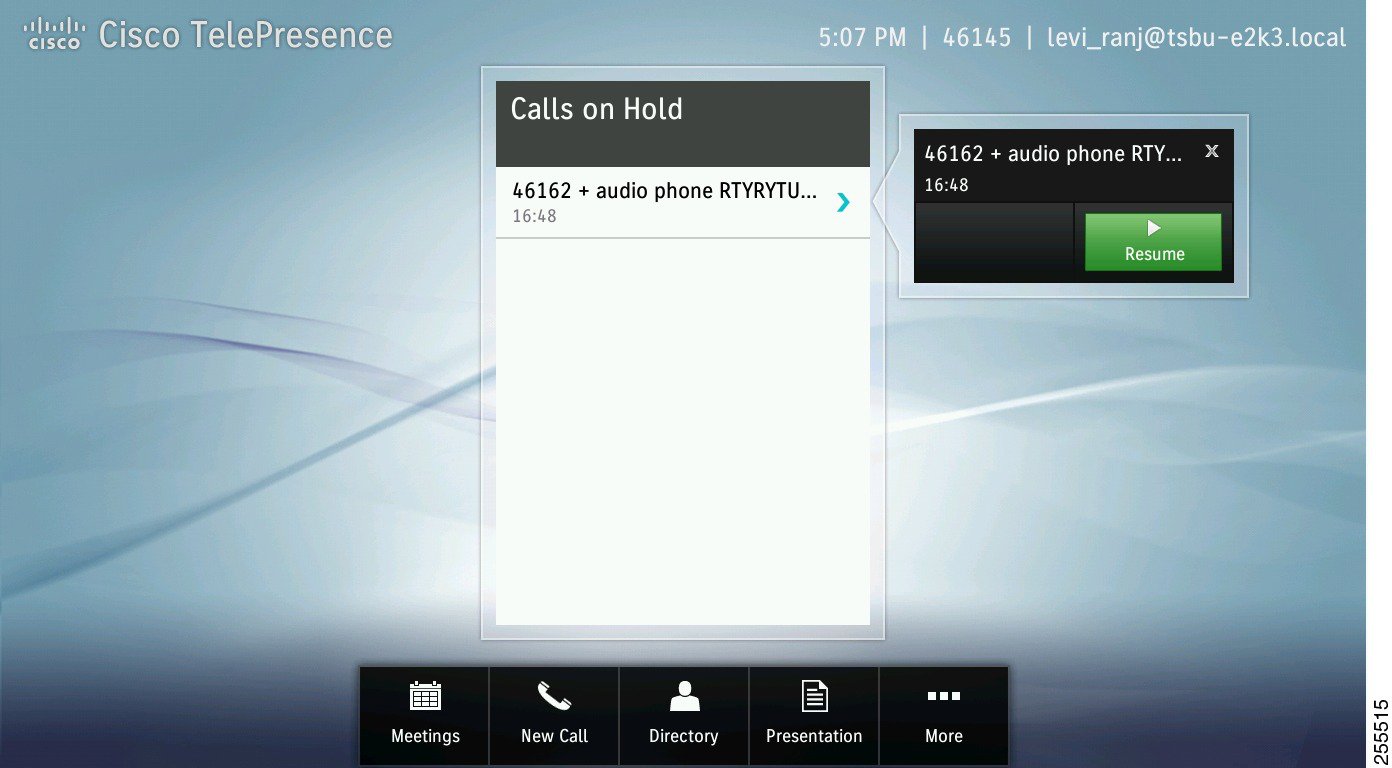
The Calls on Hold window appears, as shown in Figure 3-22.
Step 2![]() Tap the Resume button to be placed back into your meeting. Figure 3-23 shows the hold/resume sequence.
Tap the Resume button to be placed back into your meeting. Figure 3-23 shows the hold/resume sequence.
Figure 3-23 Resuming a Call That is On Hold
Dropping a Call Participant
To drop an audio-only endpoint that from the meeting or to drop a multipoint video participant, complete the following task:
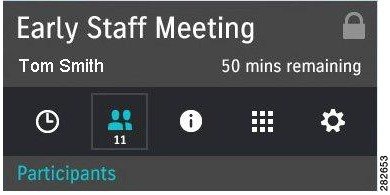
Step 1![]() Tap the Participants button to bring up the Participants list.
Tap the Participants button to bring up the Participants list.

Step 2![]() Tap the audio participant or video participant entry to bring up the contact card for that participant, as shown in Figure 3-24.
Tap the audio participant or video participant entry to bring up the contact card for that participant, as shown in Figure 3-24.
Step 3![]() Tap the Remove button to drop the selected participant.
Tap the Remove button to drop the selected participant.
Figure 3-24 Removing a Participant
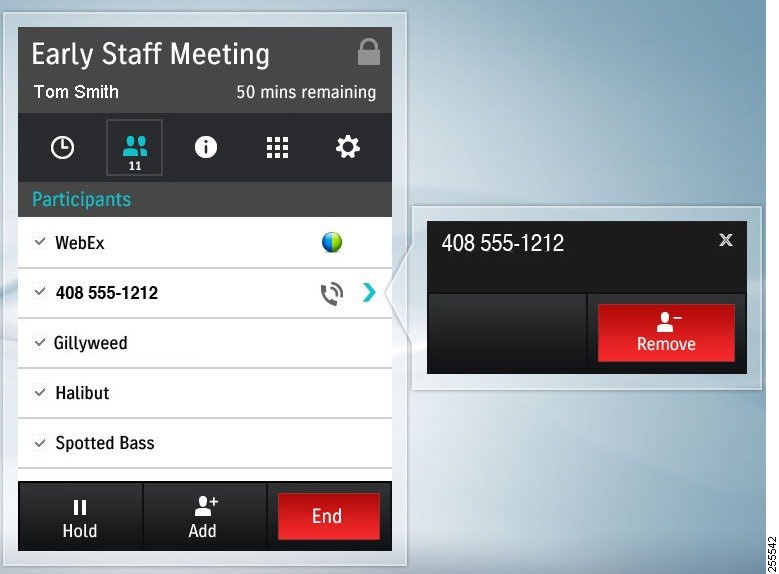
Step 4![]() Navigate away from the Participants window by tapping the Call Duration button to return to the default meeting screen, or tap another meeting button.
Navigate away from the Participants window by tapping the Call Duration button to return to the default meeting screen, or tap another meeting button.
Sending Touch Tones
To send DTMF touch tones during a call, complete the following actions:
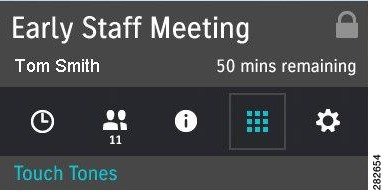
Step 1![]() Tap the Touch Tones button (the keypad icon).
Tap the Touch Tones button (the keypad icon).
Figure 3-25 Touch Tones Button
Step 2![]() Tap the keypad to send the tones.
Tap the keypad to send the tones.
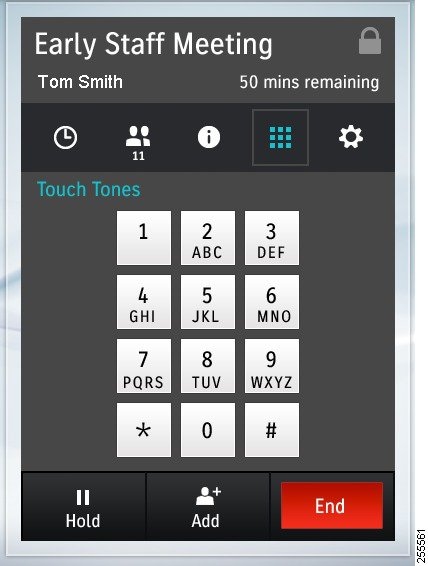
Step 3![]() After you enter the tones, tap either the Call Duration button (clock icon), the Call Participants button (people icon), or any other button on the Touch device to navigate away from the Touch Tones window.
After you enter the tones, tap either the Call Duration button (clock icon), the Call Participants button (people icon), or any other button on the Touch device to navigate away from the Touch Tones window.
Answering Calls
There are two ways to answer calls:
- Answering Incoming Calls from the Touch Screen
- Answering or Ending Calls Using the Answer Button on the Console
Answering Incoming Calls from the Touch Screen
To answer incoming calls using the touch screen:
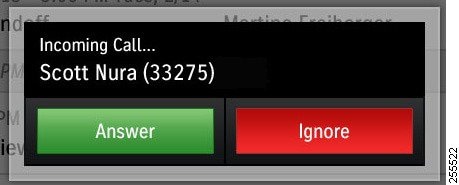
Step 1![]() If no calls are active, tap one of the following choices the Incoming Call window, as shown in Figure 3-27.
If no calls are active, tap one of the following choices the Incoming Call window, as shown in Figure 3-27.
Figure 3-27 No Active Calls - Answer and Ignore Options
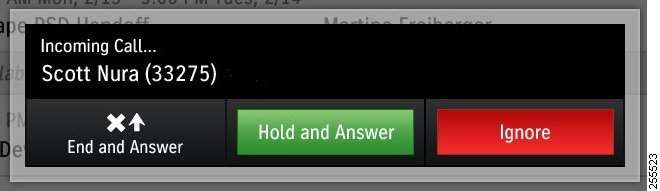
Step 2![]() If there are active calls or if calls are on remote hold, tap one of the following in the Incoming Call window, as shown in Figure 3-28:
If there are active calls or if calls are on remote hold, tap one of the following in the Incoming Call window, as shown in Figure 3-28:
- End and Answer—Ends the current call, answers the incoming call, and closes the Incoming Call window.
- Hold and Answer—Places the current call on hold, answers the incoming call, and closes the Incoming Call window.
Figure 3-28 Active Calls - Answer and Ignore Options
Tip![]() You must choose an action to dismiss the Incoming Call window.
You must choose an action to dismiss the Incoming Call window.
See Answering or Ending Calls Using the Answer Button on the Console.
Answering or Ending Calls Using the Answer Button on the Console
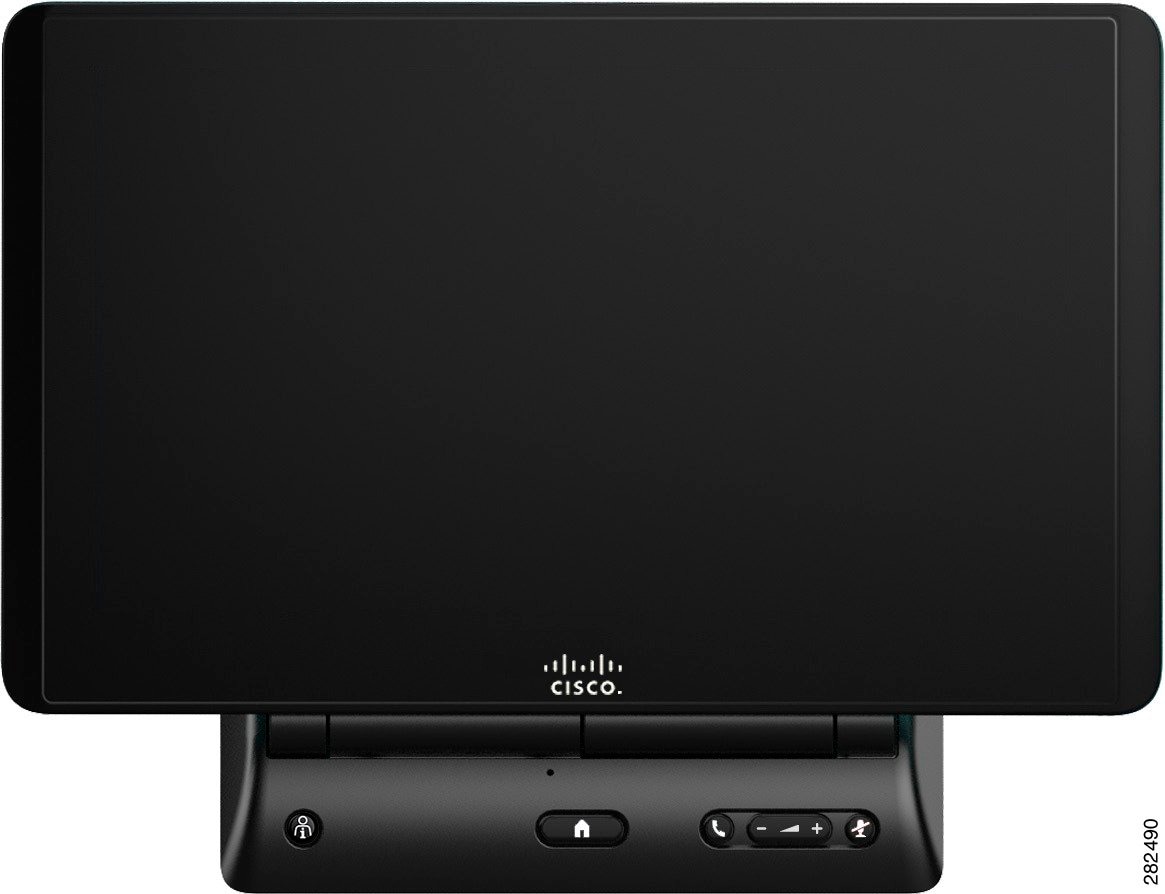
Press the Answer button on the Cisco TelePresence Touch 12 console to answer a call when the Incoming Call dialog is displayed on the Cisco TelePresence Touch 12 screen (Figure 3-29). The button will be backlit in green when selected. If you are already in a call, press this button to end the call. See Answering Incoming Calls from the Touch Screen.
Figure 3-29 Cisco TelePresence Touch 12 Console—Answer Button
Muting the System During a Conference
Mute your system during a conference by pressing the Mute button (Figure 3-30). The button is backlit in red when selected, and a corresponding mute icon appears on the CTS main display to indicate that you are muted.
To unmute yourself, press the Mute button again.
If your system has meeting room microphones, you can mute your conference by briefly pressing the Mute button on any of the meeting room microphones.
Figure 3-30 Cisco TelePresence Touch 12 Console—Mute Button
Muting a Single Microphone During a Conference
Most systems that use multiple microphones have the single microphone mute feature. This feature mutes only one microphone.
To activate this feature during a conference, press and hold the Mute button for three seconds until the green LED light turns off.
To unmute the locally muted microphone, press the Mute button once. The green LED light turns on and the microphone becomes active, unless the muting feature is already activated in the room.
Using Self View
To see yourself before your meeting:
Step 1![]() Tap the More Button. The secondary button bar appears.
Tap the More Button. The secondary button bar appears.
Step 2![]() Tap Self View in the secondary button bar.
Tap Self View in the secondary button bar.

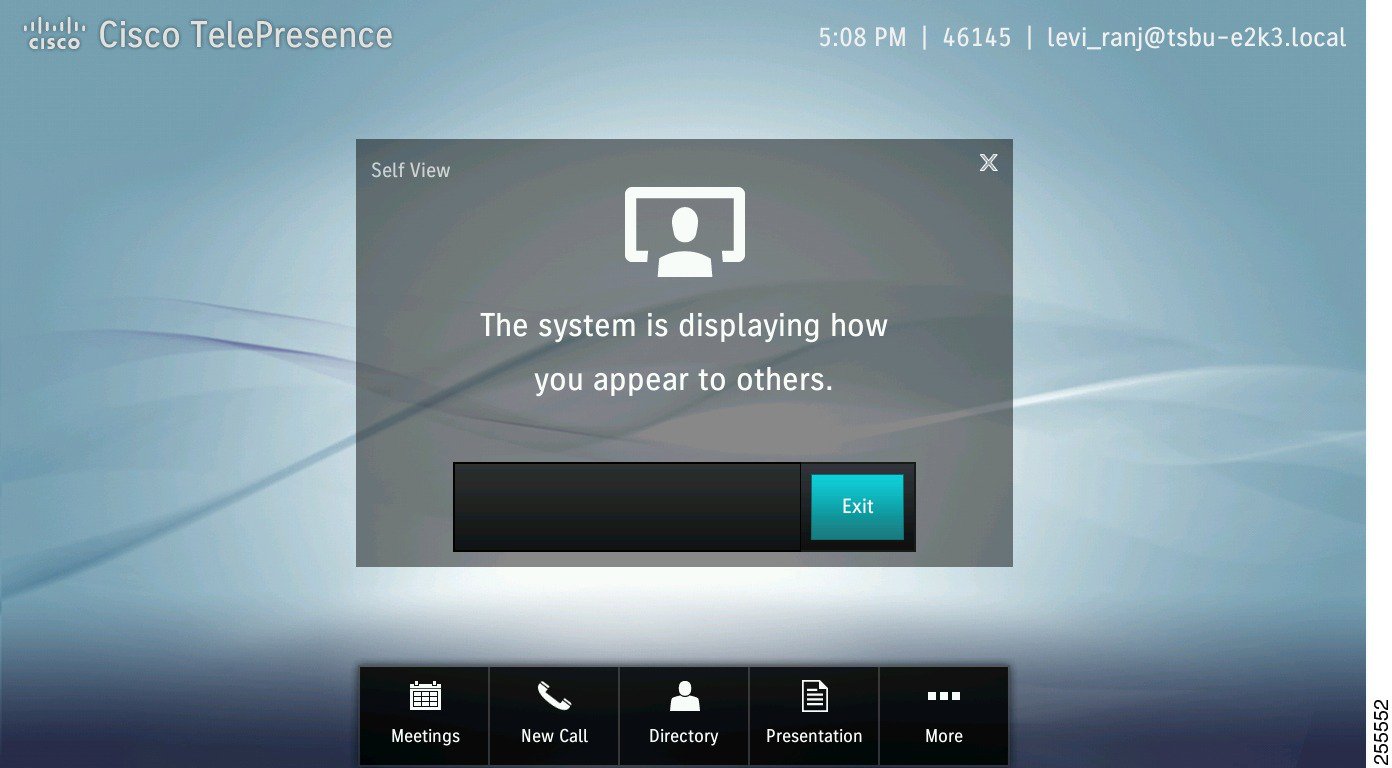
The secondary button bar is dismissed and the Self View screen appears on the Cisco TelePresence Touch 12, as shown in Figure 3-31. Your mirror image appears on your CTS screen. If you have more than one camera on your system, you can choose which camera to use to see yourself.
Step 3![]() Tap Exit to close the window and exit Self View mode.
Tap Exit to close the window and exit Self View mode.
Checking Your Calendar
To check your meetings calendar, complete the following steps:
Note![]() This feature is available only if your system administrator has configured meetings for your system.
This feature is available only if your system administrator has configured meetings for your system.
Step 1![]() Tap the Meetings button in the primary button bar. The Meetings window appears, as shown in Figure 3-32.
Tap the Meetings button in the primary button bar. The Meetings window appears, as shown in Figure 3-32.
Figure 3-32 Cisco TelePresence Touch Scheduled Meetings Window
Step 2![]() Tap the icons at the top of the Meetings window to navigate, as shown in Figure 3-33.
Tap the icons at the top of the Meetings window to navigate, as shown in Figure 3-33.
Figure 3-33 Meeting Screen Navigation
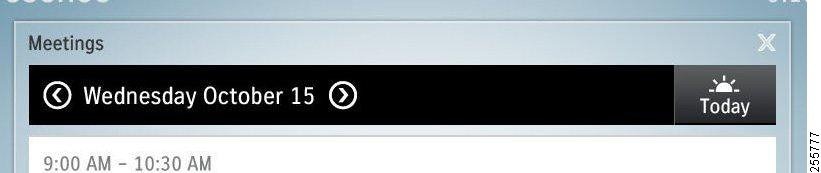
To go forward to see future meetings one day at a time, tap the Forward icon.

To go back one day at a time, tap the Back icon.

To return immediately to the current day, tap the Today icon.

Sharing Presentations
This section provides you with the information you need to share a presentation in a Cisco TelePresence conference and includes the following sections:
- Supported Presentation Resolutions
- Sharing a Presentation in a Cisco TelePresence Conference
- Using PiP Control
- Sharing a Presentation Outside of a Cisco TelePresence Conference
Supported Presentation Resolutions
Make sure to set your laptop screen resolution to 1024x768 when sharing a presentation. Any presentation works at a resolution of 1024 x 768 using a presentation cable with the VGA connector.
Table 3-1 provides a summary of the supported presentation video resolutions sent by a Cisco TelePresence endpoint running CTS 1.10 to any receiving endpoint or device. If required, set your presentation display to one of these resolutions for presentation sharing to work.
|
|
|---|
Sharing a Presentation in a Cisco TelePresence Conference
To share a presentation when in a Cisco TelePresence conference, complete the following steps:
Step 1![]() Once the meeting has started, plug the presentation cable into your presenting device (for example, your laptop).
Once the meeting has started, plug the presentation cable into your presenting device (for example, your laptop).
Step 2![]() If you have any problems viewing the presentation, make a note of the supported resolutions in Table 3-1 and adjust the display resolution of your presenting device; otherwise, continue to Step 3
If you have any problems viewing the presentation, make a note of the supported resolutions in Table 3-1 and adjust the display resolution of your presenting device; otherwise, continue to Step 3![]() .
.
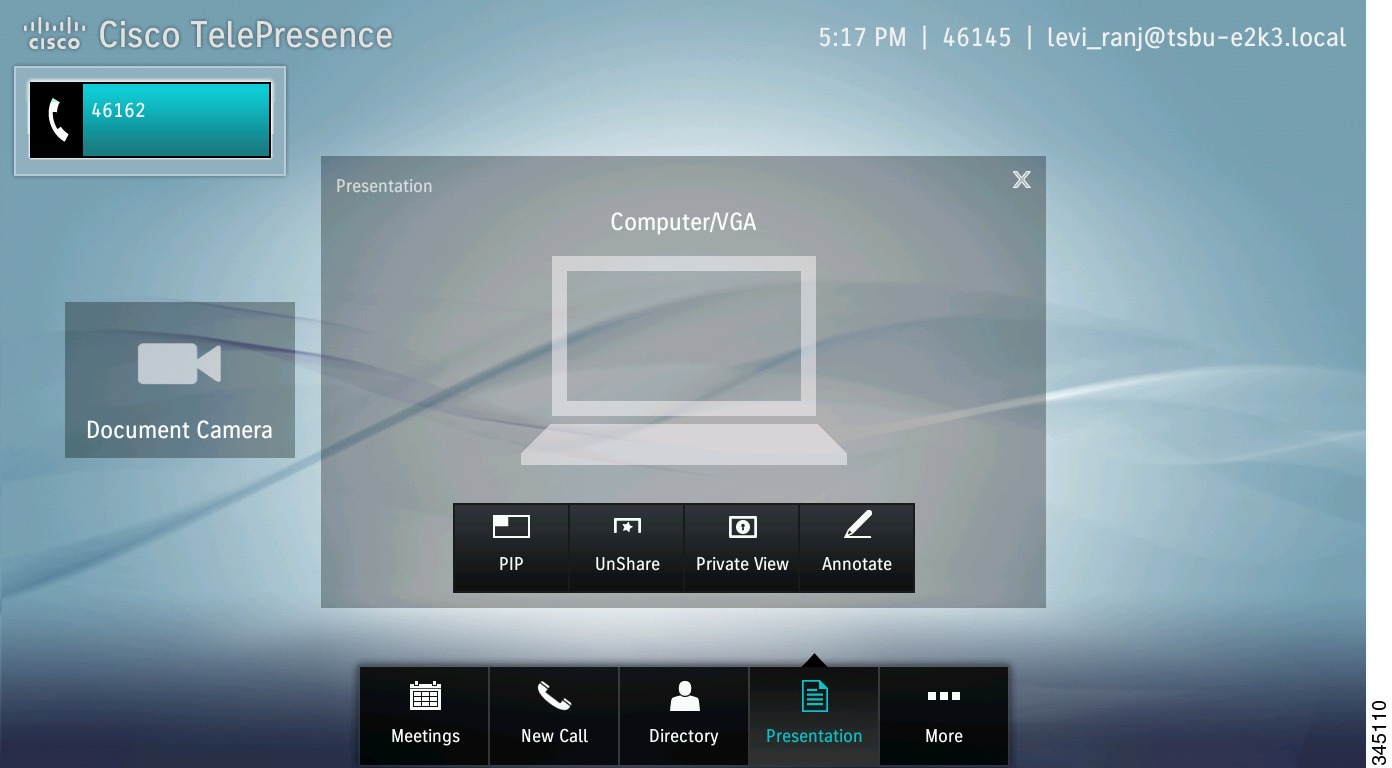
Step 3![]() Tap the Presentation button in the primary button bar on the lower part of the screen.
Tap the Presentation button in the primary button bar on the lower part of the screen.
Figure 3-34 Presentation Button and Sharing Choices
The Presentation Privacy Alert window appears (Figure 3-35Figure 3-35).
Step 4![]() If you are prompted to share the presentation, tap Everyone.
If you are prompted to share the presentation, tap Everyone.
Figure 3-35 Presentation Privacy Area

Your presentation is shared with everyone in the TelePresence conference.
Step 5![]() To stop presenting, tap Unshare. To share the presentation again, tap Share. To view the presentation on your Cisco TelePresence device without sharing it with others in the conference, tap Private View. See Figure 3-34 for example of these choices.
To stop presenting, tap Unshare. To share the presentation again, tap Share. To view the presentation on your Cisco TelePresence device without sharing it with others in the conference, tap Private View. See Figure 3-34 for example of these choices.
Using PiP Control
Presentation-in-Picture (PiP) refers to the location and size of the presentation in relation to the conference participants in a Cisco TelePresence conference. You can move PiP to the left, right, or center or maximize the presentation.
To use PiP, complete the following steps.
Step 1![]() Tap PiP, then tap any of the positional buttons that display to position the presentation to the center, right or left corners, or to maximize the presentation on your screen.
Tap PiP, then tap any of the positional buttons that display to position the presentation to the center, right or left corners, or to maximize the presentation on your screen.
Figure 3-36 Presentation Screen - PiP Controls
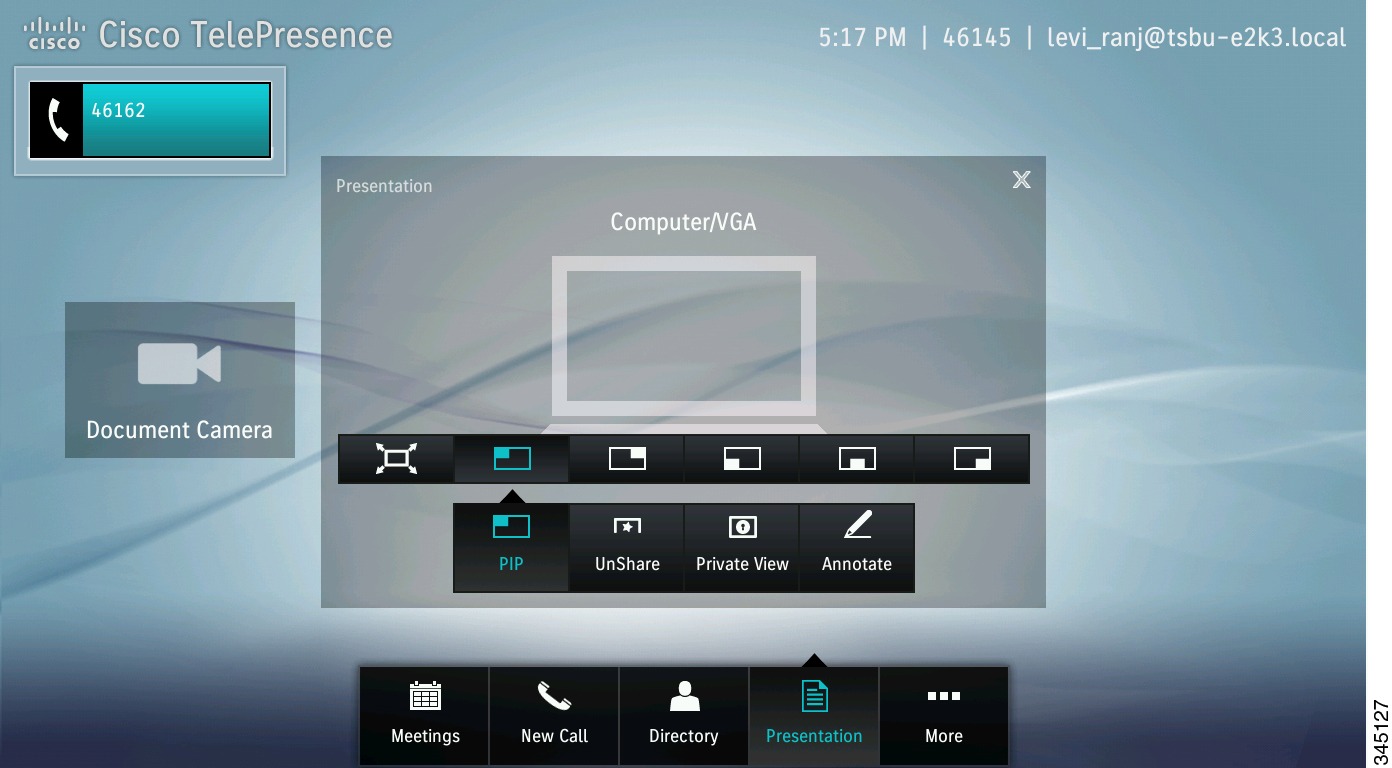
Figure 3-37 shows an example of PiP on the lower right side of the main display screen.

Sharing a Presentation Outside of a Cisco TelePresence Conference
When there is no active video call, you can share your presentation locally by plugging the VGA cable into your presenting device. The presentation on either on the display screen of your system or, if an external presentation display is installed, the external presentation display.
Tip![]() To have a system with an external presentation display show the presentation on the main display screen, turn off or disconnect the external presentation display.
To have a system with an external presentation display show the presentation on the main display screen, turn off or disconnect the external presentation display.
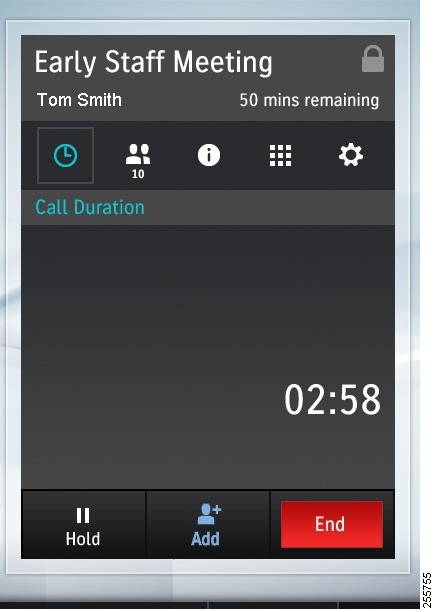
Managing Meetings
This section contains the information you need to manage meetings and includes the following topics:
Meeting Control Button Quick Reference
Table 3-2 describes meeting control buttons that appear during an active meeting. Buttons appear blue when selected.
|
|
|
|---|---|

|
The Call Duration window acts as your active meeting home page. The on-screen counter keeps a record of how long the Cisco TelePresence Touch 12 has been in the current meeting. |


|
Tap to see a list of participants for all scheduled meetings, multipoint calls, and non-scheduled point-to-point calls with audio add-in. Point-to-point calls without audio add-in do not see a participant list. If the local endpoint is audio-only, the audio indicator (non-selectable) is also shown. |

|
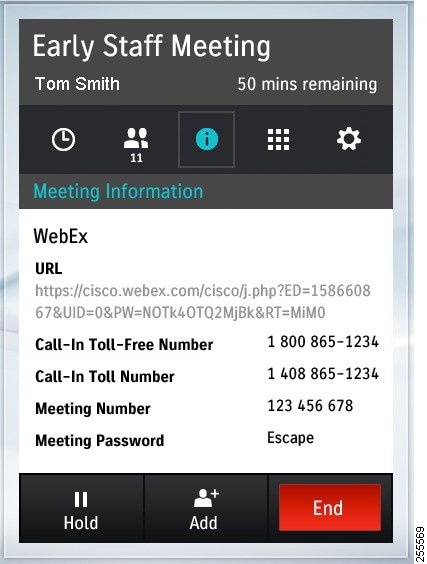
Tap to view meeting information, including phone and meeting numbers, and the Cisco WebEx URL, if available for your meeting. See the Meeting Information Screen. |

|
Tap to bring up the keypad to send Dual Tone Multi-Frequency (DTMF) tones. |

|
Meeting control options for multipoint meetings. Access options can include: |

|
This icon indicates whether the meeting is secure or not secure. A corresponding icon is also shown on the main display. |

|
This icon indicates that a meeting participant is using Cisco WebEx to join the meeting. Multiple Cisco WebEx participants are represented by a single participant entry in the Participant List. |
Meeting Information Screen
To view information about your scheduled meeting:
Step 1![]() Tap the Meeting Information button.
Tap the Meeting Information button.

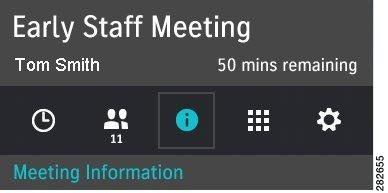
Your meeting details appear, as shown in Figure 3-38.
Figure 3-38 Meeting Information Window
Step 2![]() Navigate away from the Meeting Information window by tapping the Call Duration button to return to the default meeting screen, or tap another meeting button.
Navigate away from the Meeting Information window by tapping the Call Duration button to return to the default meeting screen, or tap another meeting button.
Managing Meeting Settings
To manage your meeting settings:
Step 1![]() Tap the Settings button.
Tap the Settings button.

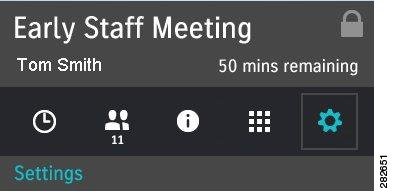
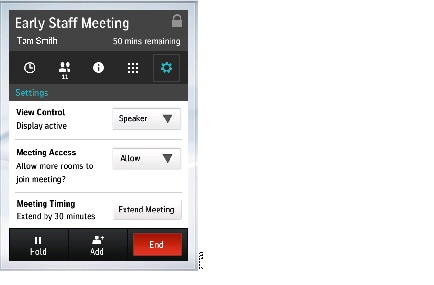
The Settings screen appears, shown in Figure 3-39. This screen allows you to manage the following aspects of your meeting:
Figure 3-39 Settings Screen for Meeting Control
Step 2![]() Once you have finished making changes, navigate away from the Settings window by tapping the Call Duration button to return to the default meeting screen, or tap another meeting button.
Once you have finished making changes, navigate away from the Settings window by tapping the Call Duration button to return to the default meeting screen, or tap another meeting button.
View Control
View Control is displayed only on 3-screen systems in a multipoint call. The following options are available from the menu:
- Speaker—Switches in only the active speaker in a 3-screen room when someone begins talking.
- Room—Switches in all three segments of a 3-screen room when someone begins talking.
Your settings are automatically implemented and are saved for the duration of the current call; the system reverts to original settings when the meeting has ended.
Meeting Access
This option is displayed only for multipoint meetings and allows you to add more rooms to your meeting. The following options are available from the menu:
- Allow—Allows other endpoints to join the meeting.
- Block—Blocks other endpoints from joining the meeting.
Your settings are automatically implemented and are saved for the duration of the current call; the system reverts to original settings when the meeting has ended.
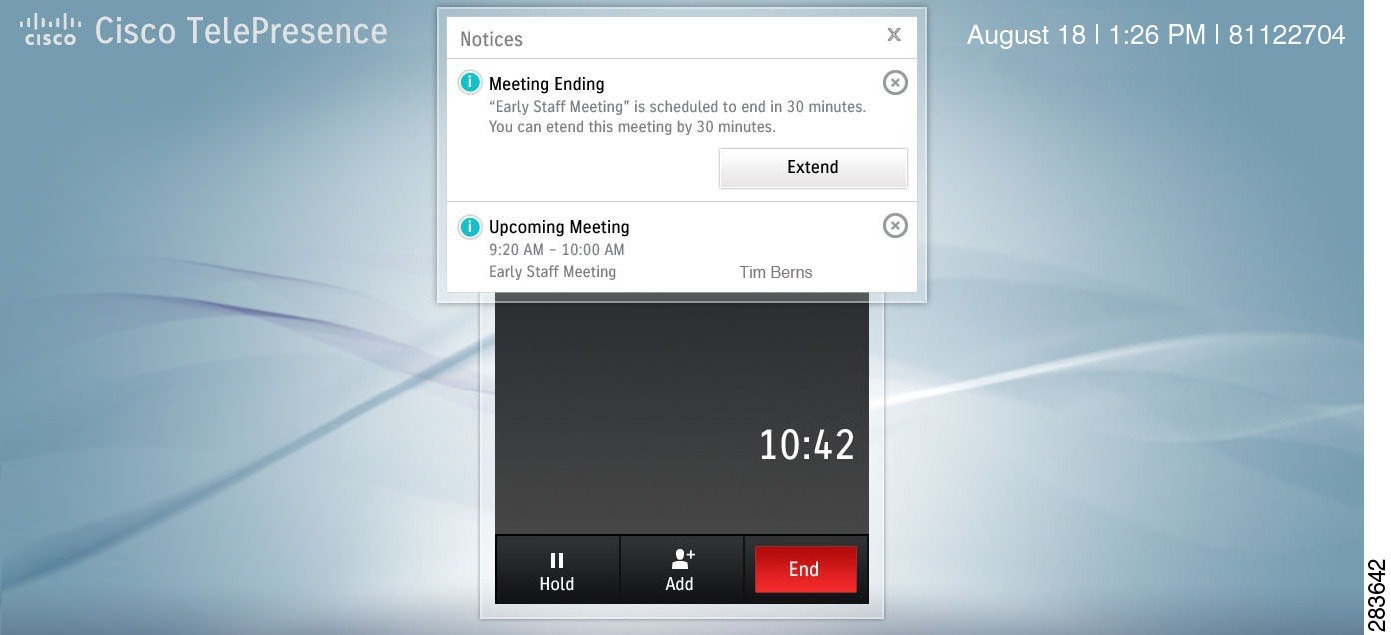
Extend Your Meeting
You may have the option to extend your scheduled meeting. Figure 3-40 shows the Meeting Ending notice at the end of a scheduled meeting. To request a meeting extension:
Step 1![]() Tap Extend in the Notices dialog to open the Settings window (Figure 3-41).
Tap Extend in the Notices dialog to open the Settings window (Figure 3-41).
Figure 3-40 Meeting Extension Notice
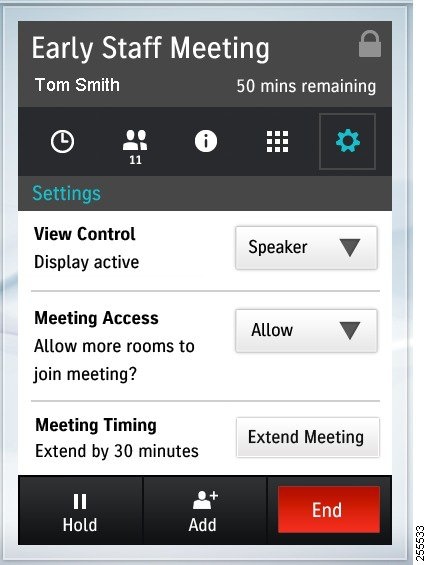
Step 2![]() Tap the Extend Meeting button in the Settings window.
Tap the Extend Meeting button in the Settings window.
A confirmation message appears on the Cisco TelePresence Touch 12: “Meeting has been extended.” Your settings are automatically implemented and are saved for the duration of the current call. Your meeting instance now indicates that your meeting has been extended, as shown in Figure 3-41.
Figure 3-41 Meeting Extended by 30 Minutes
Tip![]() The amount of time that you are allowed to extend your meeting is set by your administrator.
The amount of time that you are allowed to extend your meeting is set by your administrator.
If the system is already at the maximum number of allowable resources, your meeting request may not be accepted. The following message appears: “Meeting not extended. System is currently at maximum number of callers.”
Sharing Using the Document Camera
If your system includes a document camera, you have a choice to share either the connected presentation, or the document camera. To share the document camera complete the following steps:
Step 1![]() Begin sharing a presentation by connecting a presentation to the Cisco TelePresence system using the sharing cable.
Begin sharing a presentation by connecting a presentation to the Cisco TelePresence system using the sharing cable.
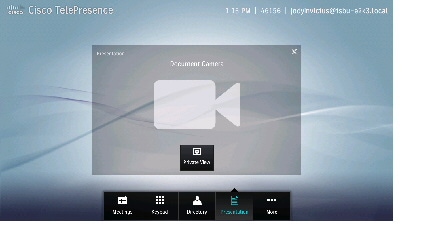
Step 2![]() To share the video that is being sent by the document camera, perform one of the following actions:
To share the video that is being sent by the document camera, perform one of the following actions:
Figure 3-42 Document Camera Screen
- Tap the More button in the primary button bar, then tap the Doc Cam button in the secondary button bar.
Tip![]() If your system does not have a Document Camera configured, no DocCam button will be present on the button bar.
If your system does not have a Document Camera configured, no DocCam button will be present on the button bar.
The Document Camera control screen displays as shown in Figure 3-44.
Figure 3-44 Document Camera Control
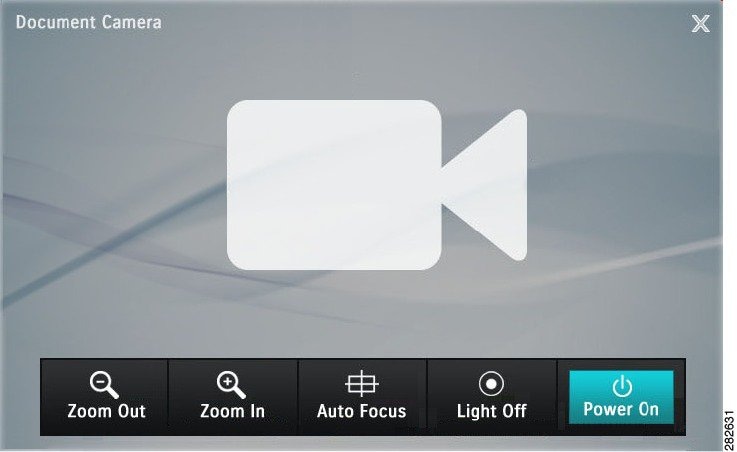
Step 3![]() Tap the Power On button.
Tap the Power On button.
Sharing begins automatically. If there is no active meeting, the image displays locally.
Step 4![]() When the document camera is powered on, you can control Zoom, Auto Focus, and Lights (if present) using the buttons on the Touch device. If the document camera is not turned on, the Zoom, Auto Focus, and Light (if present) buttons are not available.
When the document camera is powered on, you can control Zoom, Auto Focus, and Lights (if present) using the buttons on the Touch device. If the document camera is not turned on, the Zoom, Auto Focus, and Light (if present) buttons are not available.
Tip![]() The Auto Focus task cannot be stopped manually.
The Auto Focus task cannot be stopped manually.
Step 5![]() Power off the document camera by tapping the Power Off button.
Power off the document camera by tapping the Power Off button.
Note![]() Do not power off the camera by using the power button on the camera. The system does not recoguize the state change from On to Off when you power off the document camera using this method.
Do not power off the camera by using the power button on the camera. The system does not recoguize the state change from On to Off when you power off the document camera using this method.
Step 6![]() To change the document camera to private view, tap the Zoom In or Zoom Out buttons, tap the Hide button, then tap Private View.
To change the document camera to private view, tap the Zoom In or Zoom Out buttons, tap the Hide button, then tap Private View.
Figure 3-45 Private View Button
Opening Other Applications During a Call
To open another application while you are in a call, tap the desired button in the button bar. Your current meeting is minimized to the top left side of the screen and the specified application screen appears (see Figure 3-46, for example). To return to your meeting in progress, tap the Active Call button, tap the minimized meeting window, or press the Home button on the Touch device.
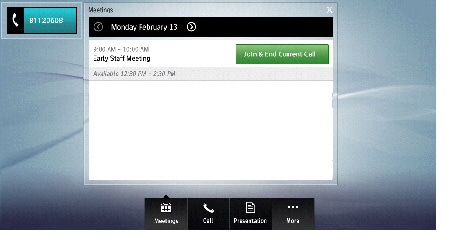
Checking Your Calendar While in a Call
To check your meetings calendar, tap the Meetings button, as shown in Figure 3-46.
Figure 3-46 Checking Your Calendar During a Call
Returning to Your Active Meeting
You can quickly return to your active meeting by pressing the Home on the Touch device, as shown in Figure 3-29. If you are not in an active call, the Home button returns you to your configured default “home” screen.
Figure 3-47 Cisco TelePresence Touch 12 Console—Home Button
Controlling Volume and Other Call Settings
- Controlling Meeting Volume Using the Volume Button on the Console
- Selecting Between Speaker and Headset Audio and Controlling Meeting Volume
- Media Volume
- Changing Screen Brightness
Controlling Meeting Volume Using the Volume Button on the Console
You can also control call volume using the button on the Cisco TelePresence Touch 12 console, as shown in Figure 3-48. The Volume button controls ringer, speaker, and DMP/Presentation volume; corresponding changes are made to the volume settings in More > Settings when you use the Volume button on the console.
Figure 3-48 Cisco TelePresence Touch 12 Console—Volume Toggle Button
Controlling Call and Meeting Volume Using the Touch pad
To control incoming call volume and ringtone settings using the touch pad:
Step 1![]() Tap the More button. The secondary button bar appears.
Tap the More button. The secondary button bar appears.
Step 2![]() Tap Settings in the secondary button bar. The Settings window displays.
Tap Settings in the secondary button bar. The Settings window displays.

Step 4![]() If your system is configured to allow you to change Auto Answer settings, tap and drag the selector to On or Off, as shown in Figure 3-49. Otherwise Auto Answer is set to Off by default.
If your system is configured to allow you to change Auto Answer settings, tap and drag the selector to On or Off, as shown in Figure 3-49. Otherwise Auto Answer is set to Off by default.
Figure 3-49 Setting Auto Answer and Ringtone Settings
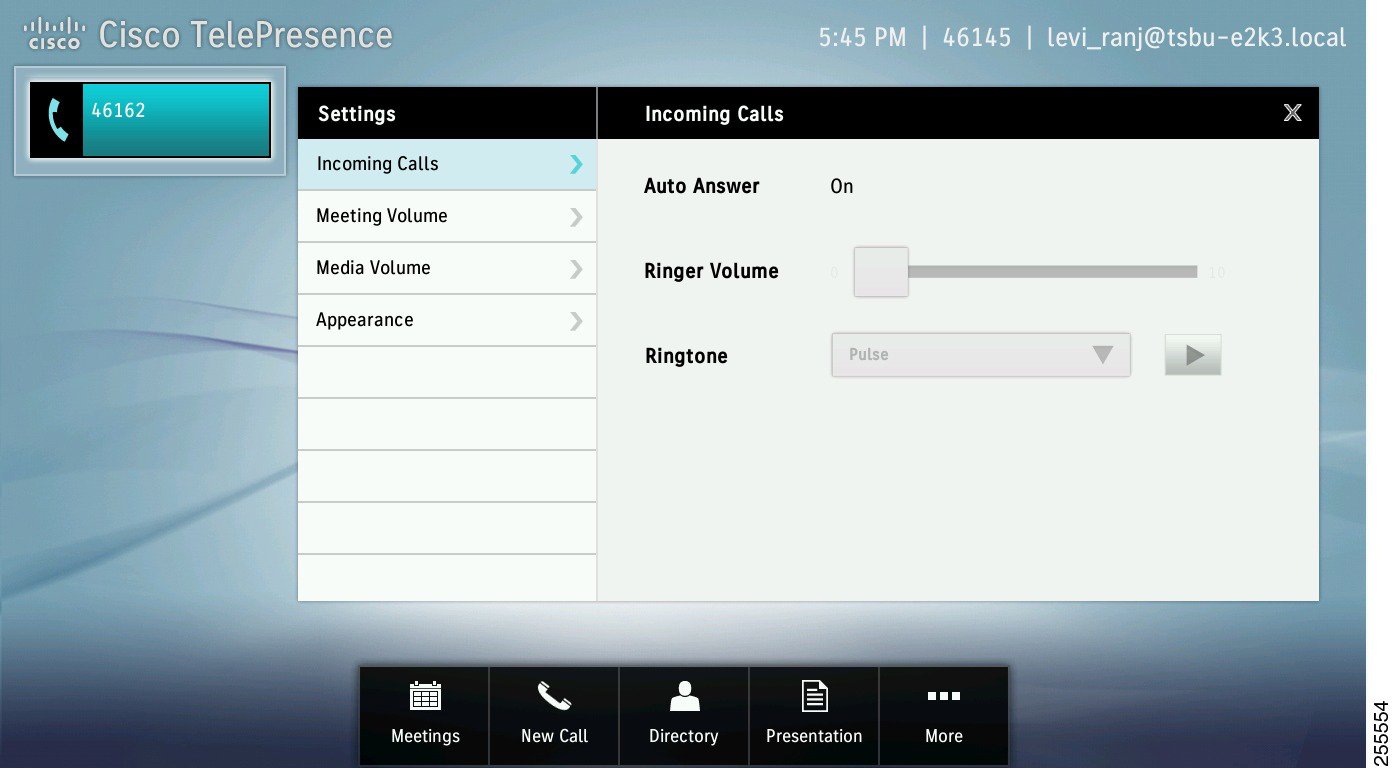
Step 5![]() If your system is configured to allow you to change the ringtone, tap the down arrow to open the menu bar (Figure 3-49) and tap to select from available ringtones. Otherwise the Cisco Standard ringtone is the default.
If your system is configured to allow you to change the ringtone, tap the down arrow to open the menu bar (Figure 3-49) and tap to select from available ringtones. Otherwise the Cisco Standard ringtone is the default.
Step 6![]() Tap Play to hear a sample of the selected ringtone. A sample ringtone is heard when you release the selector and the ringer volume indicator appears, as shown in Figure 3-50.
Tap Play to hear a sample of the selected ringtone. A sample ringtone is heard when you release the selector and the ringer volume indicator appears, as shown in Figure 3-50.
Figure 3-50 Ringer Volume Indicator
Step 7![]() When you are finished changing your settings, tap the X in the upper right corner of the Incoming Calls window to dismiss the window or tap Selecting Between Speaker and Headset Audio and Controlling Meeting Volume or another selection from the menu at left to continue adjusting your Cisco TelePresence Touch 12 settings.
When you are finished changing your settings, tap the X in the upper right corner of the Incoming Calls window to dismiss the window or tap Selecting Between Speaker and Headset Audio and Controlling Meeting Volume or another selection from the menu at left to continue adjusting your Cisco TelePresence Touch 12 settings.
Selecting Between Speaker and Headset Audio and Controlling Meeting Volume
To select audio to be played through a speaker or headset and to control meeting, speaker, and headset volume, complete the following steps:
Step 1![]() Tap the More button. The secondary button bar appears.
Tap the More button. The secondary button bar appears.
Step 2![]() Tap Settings in the secondary button bar.
Tap Settings in the secondary button bar.
Step 3![]() Tap Meeting Volume. The Meeting Volume window appears, as shown in Figure 3-51.
Tap Meeting Volume. The Meeting Volume window appears, as shown in Figure 3-51.
Figure 3-51 Setting Audio Mode and Volume
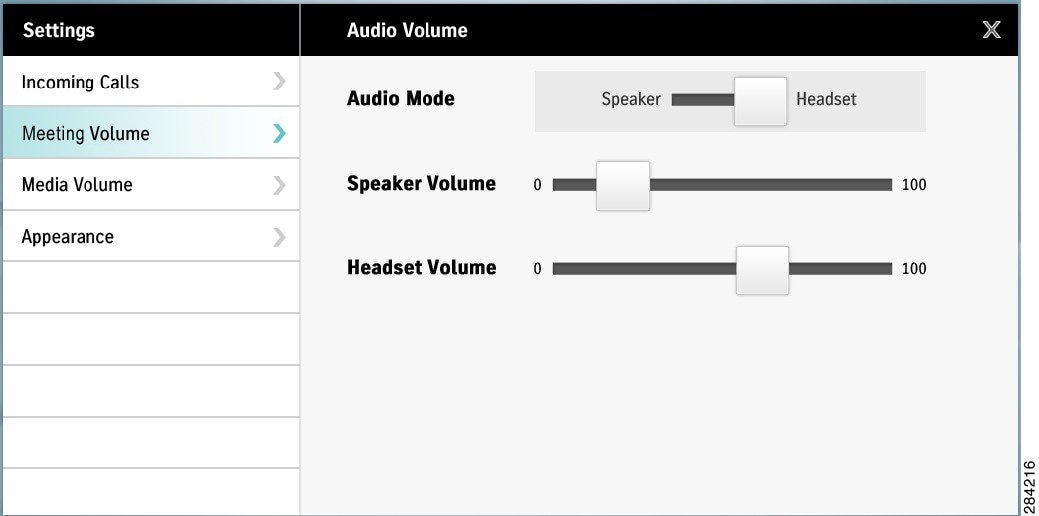
Step 4![]() Select Audio Mode. Tap and drag the slider to choose between Speaker and Headset if you have a headset plugged into your CTS endpoint.
Select Audio Mode. Tap and drag the slider to choose between Speaker and Headset if you have a headset plugged into your CTS endpoint.
Tip![]() If your system is not configured for a headset option, no Headset adjustment controls are visible.
If your system is not configured for a headset option, no Headset adjustment controls are visible.
Step 5![]() Adjust Speaker Volume by tapping and dragging the slider to the desired position. No sample audio tone is played but the speaker volume indicator is displayed, as shown in Figure 3-52.
Adjust Speaker Volume by tapping and dragging the slider to the desired position. No sample audio tone is played but the speaker volume indicator is displayed, as shown in Figure 3-52.
Figure 3-52 Speaker Volume Indicator

Step 6![]() Adjust Headset Volume by tapping and dragging the slider to the desired position. No sample audio tone is played but the headset volume indicator is displayed, as shown in Figure 3-53.
Adjust Headset Volume by tapping and dragging the slider to the desired position. No sample audio tone is played but the headset volume indicator is displayed, as shown in Figure 3-53.
Figure 3-53 Headset Volume Indicator

Step 7![]() When you are finished changing your settings, tap the X in the upper right corner of the Meeting Volume window to dismiss the window or tap Media Volume or another selection from the menu at left to continue adjusting your Cisco TelePresence Touch 12 settings.
When you are finished changing your settings, tap the X in the upper right corner of the Meeting Volume window to dismiss the window or tap Media Volume or another selection from the menu at left to continue adjusting your Cisco TelePresence Touch 12 settings.
Media Volume
To control speaker and headset volume for the Media Player (DMP) and presentation audio:
Step 1![]() Tap the More button. The secondary button bar appears.
Tap the More button. The secondary button bar appears.
Step 2![]() Tap Settings in the secondary button bar.
Tap Settings in the secondary button bar.
Step 3![]() Tap Media Volume. The Media Volume window appears, as shown in Figure 3-51.
Tap Media Volume. The Media Volume window appears, as shown in Figure 3-51.
Figure 3-54 Setting Media Volume
Step 4![]() Adjust Speaker Volume by tapping and dragging the slider to the desired position. No sample audio tone is played but the volume indicator is displayed, as shown in Figure 3-50.
Adjust Speaker Volume by tapping and dragging the slider to the desired position. No sample audio tone is played but the volume indicator is displayed, as shown in Figure 3-50.
Step 5![]() Adjust Headset Volume by tapping and dragging the slider to the desired position. No sample audio tone is played but the volume indicator is displayed.
Adjust Headset Volume by tapping and dragging the slider to the desired position. No sample audio tone is played but the volume indicator is displayed.
Step 6![]() When you are finished changing your settings, tap the X in the upper right corner of the Media Volume window to dismiss the window or tap Changing Screen Brightness or another selection from the menu at left to continue adjusting your Cisco TelePresence Touch 12 settings.
When you are finished changing your settings, tap the X in the upper right corner of the Media Volume window to dismiss the window or tap Changing Screen Brightness or another selection from the menu at left to continue adjusting your Cisco TelePresence Touch 12 settings.
Changing Screen Brightness
To control the screen brightness of your Cisco TelePresence Touch 12:
Step 1![]() Tap the More button. The secondary button bar appears.
Tap the More button. The secondary button bar appears.
Step 2![]() Tap Settings in the secondary button bar.
Tap Settings in the secondary button bar.
Step 3![]() Tap Appearance. The Appearance window is displayed, as shown in Figure 3-51.
Tap Appearance. The Appearance window is displayed, as shown in Figure 3-51.
Figure 3-55 Setting Screen Appearance
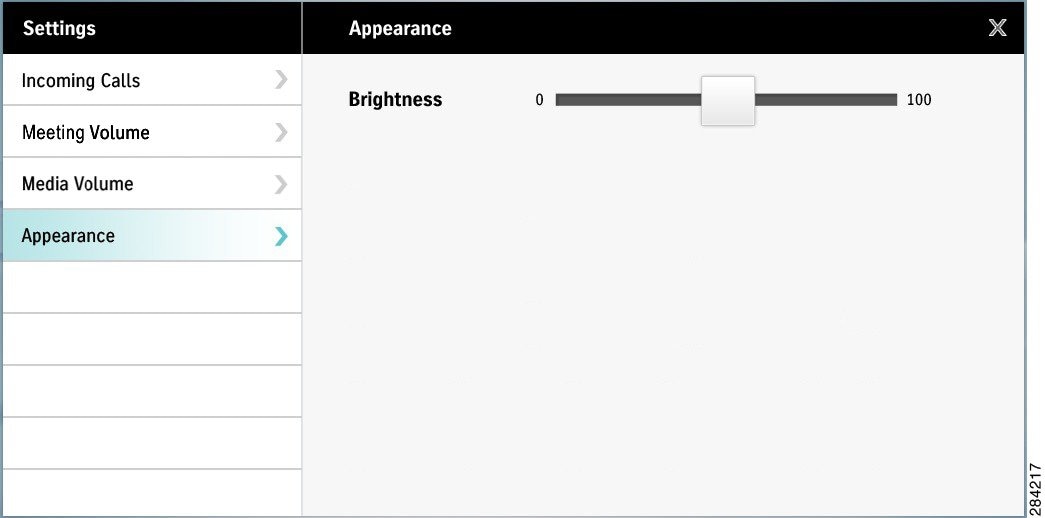
Step 4![]() Adjust Brightness by tapping and dragging the slider to the desired position.
Adjust Brightness by tapping and dragging the slider to the desired position.
Step 5![]() When you are finished changing your settings, tap the X in the upper right corner of the Appearance window to dismiss the window or tap another selection from the menu at left to continue adjusting your Cisco TelePresence Touch 12 settings.
When you are finished changing your settings, tap the X in the upper right corner of the Appearance window to dismiss the window or tap another selection from the menu at left to continue adjusting your Cisco TelePresence Touch 12 settings.
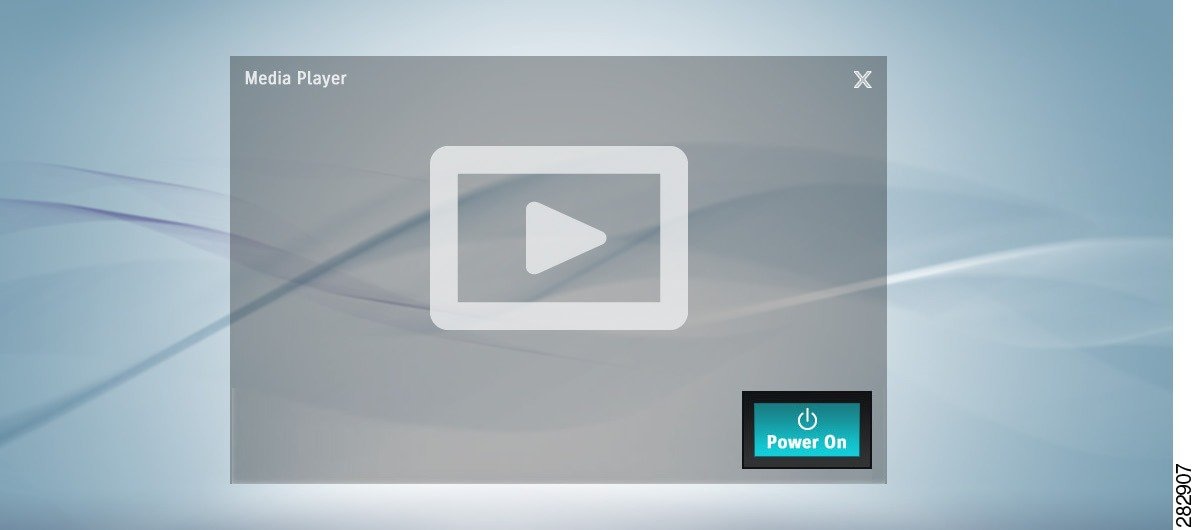
Using the Digital Media Player
Control what the DMP plays using the media player web-based interface. For example, you can switch between playing a DVD or streaming video such as ESPN. For more information, see the Digital Media Players End User Guides home page on Cisco.com.
Tip![]() If your system does not have a DMP configured, no Media Player button will be present on the secondary button bar.
If your system does not have a DMP configured, no Media Player button will be present on the secondary button bar.
To turn on the DMP from the Cisco TelePresence Touch 12:
Step 2![]() Tap the Media Player button in the secondary button bar to launch the application.
Tap the Media Player button in the secondary button bar to launch the application.

Step 3![]() Tap the Power On button to turn on the DMP, as shown in Figure 3-56.
Tap the Power On button to turn on the DMP, as shown in Figure 3-56.
Step 4![]() Adjust DMP volume using the Volume toggle button on the Cisco TelePresence Touch 12 console, as shown in Figure 3-30.
Adjust DMP volume using the Volume toggle button on the Cisco TelePresence Touch 12 console, as shown in Figure 3-30.
Figure 3-57 Cisco TelePresence Touch 12 Console—Volume Toggle Button
No sample sound is heard but the DMP / Presentation volume indicator is displayed, as shown in Figure 3-58.
Figure 3-58 DMP / Presentation Volume Indicator

 Feedback