- Preface
- Using the Command-Line Interface
- Configuring Cisco IOS Configuration Engine
- Assigning the Switch IP Address and Default Gateway
- Managing Switch Stacks
- Clustering Switches
- Administering the System
- Configuring SDM Templates
- Configuring Stack Power
- Configuring Switch-Based Authentication
- Configuring IEEE 802.1x Port-Based Authentication
- Configuring MACsec Encryption
- Configuring Web-Based Authentication
- Configuring Cisco TrustSec
- Configuring Interface Characteristics
- Configuring VLANs
- Configuring VTP
- Configuring Voice VLANs
- Configuring Private VLANs
- Configuring IEEE 802.1Q and Layer 2 Protocol Tunneling
- Configuring Spanning Tree Protocol
- Configuring Multiple Spanning-Tree Protocol
- Configuring Optional Spanning-Tree Features
- Configuring Bidirection Forwarding Detection
- Configuring Resilient Ethernet Protocol
- Configuring Flex Links and the MAC Address-Table Move Update Feature
- Configuring DHCP
- Configuring IP Source Guard
- Configuring Dynamic ARP Inspection
- Configuring MLD Snooping
- Configuring the Cisco Discovery Protocol
- Configuring Port-Based Traffic Control
- Configuring LLDP, LLDP-MED, and Wired Location Service
- Configuring UniDirectional Link Detection
- Configuring SPAN and RSPAN
- Configuring RMON
- Configuring System Message Logging and Smart Logging
- Configuring Simple Network Management Protocol
- Configuring Embedded Event Manager
- Information about Network Security with ACLs
- Configuring QoS
- Configuring IPv6 ACL
- Configuring EtherChannels
- Configuring Link-State Tracking
- Configuring Telepresence E911 IP Phone Support
- Configuring IP Unicast Routing
- Configuring IPv6 Unicast Routing
- Implementing IPv6 Multicast
- Configuring HSRP and VRRP
- Configuring Service Level Agreements
- Configuring Enhanced Object Tracking
- Configuring Cache Services Using the Web Cache Communication Protocol
- Configuring MSDP
- Configuring Fallback Bridging
- Troubleshooting the Software Configuration
- Configuring Online Diagnostics
- Working with the Cisco IOS File System, Configuration Files, and Software Images
- Index
- Finding Feature Information
- Information About Switch Stacks
- Switch Stacks
- Switch Stack Offline Configuration
- Hardware Compatibility and SDM Mismatch Mode in Switch Stacks
- Switch Stack Software Compatibility Recommendations
- Stack Protocol Version
- Major Stack Protocol Version Number Incompatibility Among Stack-Capable Switches
- Minor Version Number Incompatibility Among Switches
- Incompatible Software and Stack Member Image Upgrades
- Switch Stack Configuration Files
- Switch Stack Management Connectivity
- Switch Stack Configuration Scenarios
- Rolling Stack Upgrade
- How to Configure a Switch Stack
- Accessing the CLI of a Specific Stack Member
- Displaying Switch Stack Information
- Troubleshooting Stacks
- Manually Disabling a Stack Port
- Re-Enabling a Stack Port While Another Member Starts
- Understanding the show switch stack-ports summary Output
- Identifying Loopback Problems
- Enabling the Persistent MAC Address Feature: Example
- Provisioning a New Member for a Switch Stack: Example
- Running a Rolling Stack Update: Example
- show switch stack-ports summary Command Output: Example
- Finding a Disconnected Stack Cable: Example
- Fixing a Bad Connection Between Stack Ports: Example
- Where to Go Next
- Additional References for Switch Stacks
Managing Switch Stacks
Finding Feature Information
Your software release may not support all the features documented in this module. For the latest caveats and feature information, see Bug Search Tool and the release notes for your platform and software release. To find information about the features documented in this module, and to see a list of the releases in which each feature is supported, see the feature information table at the end of this module.
Use Cisco Feature Navigator to find information about platform support and Cisco software image support. To access Cisco Feature Navigator, go to http://www.cisco.com/go/cfn. An account on Cisco.com is not required.
Information About Switch Stacks
Review the sections in this module before configuring switch stacks.
- Switch Stacks
- Switch Stack Offline Configuration
- Hardware Compatibility and SDM Mismatch Mode in Switch Stacks
- Switch Stack Software Compatibility Recommendations
- Stack Protocol Version
- Major Stack Protocol Version Number Incompatibility Among Stack-Capable Switches
- Minor Version Number Incompatibility Among Switches
- Incompatible Software and Stack Member Image Upgrades
- Switch Stack Configuration Files
- Switch Stack Management Connectivity
- Switch Stack Configuration Scenarios
- Rolling Stack Upgrade
- How to Configure a Switch Stack
- Accessing the CLI of a Specific Stack Member
- Displaying Switch Stack Information
- Troubleshooting Stacks
- Additional References for Switch Stacks
Switch Stacks
 Note | Mixed stacks are not supported with Switch running the LAN base feature set. |
- A mixed hardware stack with a
mixture of Catalyst 3750-X, Catalyst 3750-E, and 3750
Switch
as stack members.
For example, a stack with Catalyst 3750-E 3750-X and 3750 Switch supporting the IP services features.
- A mixed software stack with
only Catalyst 3750-X, only Catalyst 3750-E, or only Catalyst 3750
Switch
supporting different features as stack members.
For example, a Catalyst 3750-E-only Catalyst 3750-X-only stack with some members running the IP base feature set, other members running the IP services feature set, and the remaining members running the IP services feature set.
- A mixed hardware and software
stack with Catalyst 3750-X, Catalyst 3750-E, and Catalyst 3750
Switch
supporting different features as stack members.
For example, a stack with the Catalyst 3750-E 3750-X members running the IP services feature set and the Catalyst 3750 members running the IP services software image.
One of the Switch controls the operation of the stack and is called the stack master. The stack master and the other Switch in the stack are all stack members. The Catalyst 3750-E Catalyst 3750-E stack members use the Cisco StackWise Plus technology to work together as a unified system. Layer 2 and Layer 3 protocols present the entire switch stack as a single entity to the network.
Note | Switch stacks running the LAN base feature set do not support Layer 3 features. |
In a mixed stack that has Catalyst 3750-X, Catalyst 3750-E, and Catalyst 3750 Switch, we recommend that a Catalyst 3750-X Switch be the master and that all stack members run Cisco IOS Release 12.2(53)SE2 or later. The Catalyst 3750 image is on the Catalyst 3750-X and 3750-E Switch to simplify Switch management.
Switch# dir flash: c3750e-universalk9-tar.122-55.SE1
Directory of flash:/c3750e-universalk9-tar.122-55.SE1/

5 -rwx 14313645 Mar 1 1993 00:13:55 +00:00 C3750e-universalk9-tar.122-55.SE1.tar
6 drwx 5632 Mar 1 1993 00:15:22 +00:00 html
443 -rwx 444 Mar 1 1993 00:15:58 +00:00 info
444 -rwx 14643200 Mar 1 1993 00:04:32 +00:00 c3750-ipservicesk9-tar.122-55.SE1.tar
A switch stack is identified in the network by its bridge ID and, if it is operating as a Layer 3 device, its router MAC address. The bridge ID and router MAC address are determined by the MAC address of the stack master. Every stack member is identified by its own stack member number.
All stack members are eligible to be stack masters. If the stack master becomes unavailable, the remaining stack members elect a new stack master from among themselves. The switch with the highest stack member priority value becomes the new stack master.
Note | In a mixed stack, Catalyst 3750 or Catalyst 3750-E switches running Cisco IOS Release 12.2(53)SE and earlier could be running a noncryptographic image. Catalyst 3750-X switches and Catalyst 3750 and 3750-E Switch with Cisco IOS Releases later than 12.2(53)SE run only the cryptographic software image. |
The stack master contains the saved and running configuration files for the switch stack. The configuration files include the system-level settings for the switch stack and the interface-level settings for each stack member. Each stack member has a current copy of these files for back-up purposes.
You manage the switch stack through a single IP address. The IP address is a system-level setting and is not specific to the stack master or to any other stack member. You can manage the stack through the same IP address even if you remove the stack master or any other stack member from the stack.
- Network Assistant (available on Cisco.com)
- Command-line interface (CLI) over a serial connection to the console port of any stack member or the Ethernet management port of a stack member.
- A network management
application through the Simple Network Management Protocol (SNMP).
Use SNMP to manage network features across the switch stack that are defined by supported MIBs. The Switch does not support MIBs to manage stacking-specific features such as stack membership and election.
- CiscoWorks network management software.
Note | A switch stack is different from a Switch cluster. A switch cluster is a set of Switch connected through their LAN ports, such as the 10/100/1000 ports. |
- Switch Stack Membership
- Stack Master Election and Re-Election
- Switch Stack Bridge ID and Router MAC Address
- Stack Member Numbers
- Stack Member Priority Values
- Supported Features in a Switch Stack
Switch Stack Membership
A Switch stack has up to nine stack members connected through their StackWise Plus ports. A Switch stack always has one stack master.
A standalone Switch is a Switch stack with one stack member that also operates as the stack master. You can connect one standalone Switch to another (Figure - Creating a Switch Stack from Two Standalone Switch) to create a Switch stack containing two stack members, with one of them as the stack master. You can connect standalone Switch to an existing Switch stack (Figure - Adding a Standalone Switch to a Switch Stack) to increase the stack membership.
If you replace a stack member with an identical model, the new Switch functions with exactly the same configuration as the replaced Switch, assuming that the new Switch is using the same member number as the replaced Switch.
The operation of the Switch stack continues uninterrupted during membership changes unless you remove the stack master or you add powered-on standalone Switch or Switch stacks.
Note | Make sure that you power off the Switch that you add to or remove from the Switch stack. After adding or removing stack members, make sure that the Switch stack is operating at full bandwidth (64 Gb/s). Press the Mode button on a stack member until the Stack mode LED is on. The last two right port LEDs on all Switch in the stack should be green. Depending on the Switch model, the last two right ports are 10-Gigabit Ethernet ports or small form-factor pluggable (SFP) module ports (10/100/1000 ports). If one or both of these LEDs are not green on any of the Switch, the stack is not operating at full bandwidth. |
- Adding powered-on Switch (merging) causes the stack masters of the merging Switch stacks to elect a stack master from among themselves. The re-elected stack master retains its role and configuration and so do its stack members. All remaining Switch, including the former stack masters, reload and join the Switch stack as stack members. They change their stack member numbers to the lowest available numbers and use the stack configuration of the re-elected stack master.
- Removing powered-on stack members causes the Switch stack to divide (partition) into two or more Switch stacks, each with the same configuration. This can cause an IP address configuration conflict in your network. If you want the Switch stacks to remain separate, change the IP address or addresses of the newly created Switch stacks. If you did not intend to partition the Switch stack:

Stack Master Election and Re-Election
The stack master is elected or re-elected based on one of these factors and in the order listed:
- The Switch that is currently the stack master.
- The
Switch
with the highest stack member priority value.
Note
We recommend assigning the highest priority value to the Switch that you prefer to be the stack master. This ensures that the Switch is re-elected as stack master if a re-election occurs. - The Switch that is not using the default interface-level configuration.
- The
Switch
with the higher priority feature set and software image combination. These
combinations are listed from highest to lowest priority.
Note
The noncryptographic images apply only to mixed stacks that include Catalyst 3750-E or 3750 Switch running Cisco IOS Release 12.2(53)SE or earlier. Catalyst 3750-X switches and Catalyst 3750-E or 3750 Switch running later releases support only the cryptographic image.- IP services feature set and the cryptographic software image
- IP services feature set and the noncryptographic software image
- IP base feature set and the cryptographic software image
- IP base feature set and the noncryptographic software image
Note
In a Switch stacks running the LAN base feature set, all Switch in the stack must run the LAN base feature set.During the stack master Switch election, differences in start-up times between the feature sets determine the stack master. The Switch with the shorter start-up time becomes the stack master.
For example, a Switch running the IP services feature set has a higher priority than the Switch running the IP base feature set, but the Switch running the IP base feature set becomes the stack master because the other switch takes 10 seconds longer to start. To avoid this problem, upgrade the switch running the IP base feature set to same feature set and software image as the other switch, or manually start the master Switch and wait at least 8 seconds before starting the new member Switch that running the IP base feature set.
- The
Switch
with the lowest MAC address.
A stack master retains its role unless one of these events occurs: In the events marked by an asterisk (*), the current stack master might be re-elected based on the listed factors.
When you power on or reset an entire Switch stack, some stack members might not participate in the stack master election. Stack members that are powered on within the same 120-second time frame participate in the stack master election and have a chance to become the stack master. Stack members that are powered on after the 120-second time frame do not participate in this initial election and become stack members. All stack members participate in re-elections.
The new stack master becomes available after a few seconds. In the meantime, the Switch stack uses the forwarding tables in memory to minimize network disruption. The physical interfaces on the other available stack members are not affected during a new stack master election and reset.
After a new stack master is elected and the previous stack master becomes available, the previous stack master does not resume its role as stack master.
As described in the hardware installation guide, you can use the Master LED on the Switch to see if the Switch is the stack master.
Switch Stack Bridge ID and Router MAC Address
The bridge ID and router MAC address identify the Switch stack in the network. When the Switch stack initializes, the MAC address of the stack master determines the bridge ID and router MAC address.
If the stack master changes, the MAC address of the new stack master determines the new bridge ID and router MAC address. However, when the persistent MAC address feature is enabled, the stack MAC address changes in approximately 4 minutes. During this time period, if the previous stack master rejoins the stack, the stack continues to use its MAC address as the stack MAC address, even if the Switch is now a stack member and not a stack master. If the previous stack master does not rejoin the stack during this period, the Switch stack takes the MAC address of the new stack master as the stack MAC address.
Stack Member Numbers
The stack member number (1 to 9) identifies each member in the Switch stack. The member number also determines the interface-level configuration that a stack member uses. You can display the stack member number by using the show switch EXEC command.
A new, out-of-the-box Switch (one that has not joined a Switch stack or has not been manually assigned a stack member number) ships with a default stack member number of 1. When it joins a Switch stack, its default stack member number changes to the lowest available member number in the stack.
Stack members in the same Switch stack cannot have the same stack member number. Every stack member, including a standalone Switch, retains its member number until you manually change the number or unless the number is already being used by another member in the stack.
-
If you manually change the stack member number by using the switch current-stack-member-number renumber new-stack-member-number command, the new number goes into effect after that stack member resets (or after you use the reload slot stack-member-number privileged EXEC command) and only if that number is not already assigned to any other members in the stack. Another way to change the stack member number is by changing the Switch_NUMBER environment variable.
If the number is being used by another member in the stack, the Switch selects the lowest available number in the stack.
If you manually change the number of a stack member and no interface-level configuration is associated with that new member number, that stack member resets to its default configuration.
You cannot use the switch current-stack-member-number renumber new-stack-member-number command on a provisioned Switch. If you do, the command is rejected.
-
If you move a stack member to a different Switch stack, the stack member retains its number only if the number is not being used by another member in the stack. If it is being used, the Switch selects the lowest available number in the stack.
-
If you merge Switch stacks, the Switch that join the Switch stack of a new select the lowest available numbers in the stack.
As described in the hardware installation guide, you can use the Switch port LEDs in Stack mode to visually determine the stack member number of each stack member.
Stack Member Priority Values
A higher priority value for a stack member increases the probability of it being elected and retaining its stack member number. The priority value can be 1 to 15. The default priority value is 1. You can display the stack member priority value by using the show switch EXEC command.
Note | We recommend assigning the highest priority value to the switch that you prefer to be the . This ensures that the switch is reelected as the if a reelection occurs. |
To change the priority value for a stack member, use the switch stack-member-number priority new priority-value global configuration command. For more information, see the “Setting the Stack Member Priority Value” section.
Another way to change the member priority value is by changing the SWITCH_PRIORITY environment variable as explained in the “Controlling Environment Variables” section.
The new priority value takes effect immediately but does not affect the current . The new priority value helps determine which stack member is elected as the new when the current or the switch stack resets.
Supported Features in a Switch Stack
The system-level features supported on the are supported on the entire switch stack.
The system-level features supported on the stack master are supported on the entire switch stack. If a switch in the stack is running the IP Base or IP Services feature set and the cryptographic (that is, supporting encryption) universal software image, we recommend that this switch be the stack master. Encryption features are unavailable if the stack master is running the IP Base or IP Services feature set and the noncryptographic software image.
Switch Stack Offline Configuration
You can use the offline configuration feature to provision (to supply a configuration to) a new Switch before it joins the switch stack. You can configure the stack member number, the Switch type, and the interfaces associated with a Switch that is not currently part of the stack. The configuration that you create on the switch stack is called the provisioned configuration. The Switch that is added to the switch stack and that receives this configuration is called the provisioned switch.
You manually create the provisioned configuration through the switch stack-member-number provision type global configuration command. You must change the stack-member-number on the provisioned switch before you add it to the stack, and it must match the stack member number that you created for the new Switch on the switch stack. The Switch type in the provisioned configuration must match the Switch type of the newly added Switch. The provisioned configuration is automatically created when a Switch is added to a switch stack and when no provisioned configuration exists.
When you configure the interfaces associated with a provisioned switch (for example, as part of a VLAN), the switch stack accepts the configuration, and the information appears in the running configuration. The interface associated with the provisioned switch is not active, operates as if it is administratively shut down, and the no shutdown interface configuration command does not return it to active service. The interface associated with the provisioned switch does not appear in the display of the specific feature; for example, it does not appear in the show vlan user EXEC command output.
The switch stack retains the provisioned configuration in the running configuration whether or not the provisioned switch is part of the stack. You can save the provisioned configuration to the startup configuration file by entering the copy running-config startup-config privileged EXEC command. The startup configuration file ensures that the switch stack can reload and can use the saved information whether or not the provisioned switch is part of the switch stack.
- Effects of Adding a Provisioned Switch to a Switch Stack
- Effects of Replacing a Provisioned Switch in a Switch Stack
- Effects of Removing a Provisioned Switch from a Switch Stack
Effects of Adding a Provisioned Switch to a Switch Stack
When you add a provisioned Switch to the switch stack, the stack applies either the provisioned configuration or the default configuration. This table lists the events that occur when the switch stack compares the provisioned configuration with the provisioned switch.
|
Scenario |
Result |
|
|---|---|---|
|
The stack member numbers and the Switch types match. |
The switch stack applies the provisioned configuration to the provisioned switch and adds it to the stack. |
|
|
The stack member numbers match but the Switch types do not match. |
The switch stack applies the default configuration to the provisioned switch and adds it to the stack. The provisioned configuration is changed to reflect the new information. |
|
|
The stack member number is not found in the provisioned configuration. |
The switch stack applies the default configuration to the provisioned switch and adds it to the stack. The provisioned configuration is changed to reflect the new information. |
|
|
The stack member number of the provisioned switch is not found in the provisioned configuration. |
The switch stack applies the default configuration to the provisioned switch and adds it to the stack. |
|
If you add a provisioned switch that is a different type than specified in the provisioned configuration to a powered-down switch stack and then apply power, the switch stack rejects the (now incorrect) switch stack-member-number provision type global configuration command in the startup configuration file. However, during stack initialization, the nondefault interface configuration information in the startup configuration file for the provisioned interfaces (potentially of the wrong type) is executed. Depending on the differences between the actual Switch type and the previously provisioned switch type, some commands are rejected, and some commands are accepted.
For example, suppose the switch stack is provisioned for a 48-port switch with Power over Ethernet (PoE), the configuration is saved, and the stack is powered down. Then a 24-port switch without PoE support is connected to the switch stack, and the stack is powered up. In this situation, the configuration for ports 25 through 48 is rejected, and error messages appear during initialization. In addition, any configured PoE-related commands that are valid only on PoE-capable interfaces are rejected, even for ports 1 through 24.
Note | If the switch stack does not contain a provisioned configuration for a new Switch, the Switch joins the stack with the default interface configuration. The switch stack then adds to its running configuration with a switch stack-member-number provision type global configuration command that matches the new Switch. For configuration information, see the Provisioning a New Member for a Switch Stack section. |
Effects of Replacing a Provisioned Switch in a Switch Stack
When a provisioned switch in a switch stack fails, it is removed from the stack, and is replaced with another Switch, the stack applies either the provisioned configuration or the default configuration to it. The events that occur when the switch stack compares the provisioned configuration with the provisioned switch are the same as those when you add a provisioned switch to a stack.
Effects of Removing a Provisioned Switch from a Switch Stack
If you remove a provisioned switch from the switch stack, the configuration associated with the removed stack member remains in the running configuration as provisioned information. To completely remove the configuration, use the no switch stack-member-number provision global configuration command.
Hardware Compatibility and SDM Mismatch Mode in Switch Stacks
The Catalyst 3750-E Catalyst 3750-X Switch supports only the desktop Switch Database Management (SDM) templates.
All stack members use the SDM template configured on the stack master.
Version-mismatch (VM) mode has priority over SDM-mismatch mode. If a VM-mode condition and an SDM-mismatch mode exist, the switch stack first attempts to resolve the VM-mode condition.
You can use the show switch privileged EXEC command to see if any stack members are in SDM-mismatch mode.
For more information about SDM templates and SDM-mismatch mode, see “Configuring SDM Templates.”
For information about mixed hardware stacks, see the Cisco Software Activation and Compatibility Document on Cisco.com.
Switch Stack Software Compatibility Recommendations
To ensure complete compatibility between stack members, use the information in this section and also in the “Hardware Compatibility and SDM Mismatch Mode in Switch Stacks” section.
All stack members must run the same Cisco IOS software image and feature set to ensure compatibility between stack members.
For example, all stack members should run the universal software image and have the IP services feature set enabled for the Cisco IOS Release 12.2(35)SE2 12.2(53)SE2 or later.
For more information, see the “Stack Protocol Version Compatibility” section and the Cisco Software Activation and Compatibility Document on Cisco.com.
For information about mixed hardware and software stacks, see the Cisco Software Activation and Compatibility Document on Cisco.com.
Stack Protocol Version
Each software image includes a stack protocol version. The stack protocol version has a major version number and a minor version number (for example 1.4, where 1 is the major version number and 4 is the minor version number). Both version numbers determine the level of compatibility among the stack members. You can display the stack protocol version by using the show platform stack-manager all privileged EXEC command.You can display the stack protocol version by using the show platform stack manager all privileged EXEC command.
switch with the same Cisco IOS software version have the same stack protocol version. Such switch are fully compatible, and all features function properly across the switch stack. A switch with the same Cisco IOS software version as the can immediately join the switch stack.
If an incompatibility exists, the fully functional stack members generate a system message that describes the cause of the incompatibility on the specific stack members. The sends the message to all stack members.
For more information, see the Major Version Number Incompatibility Among Switches procedure and the Minor Version Number Incompatibility Among Switches procedure.
Major Stack Protocol Version Number Incompatibility Among Stack-Capable Switches
Switch with different major Cisco IOS software versions usually have different stack protocol versions. Switch with different major version numbers are incompatible and cannot exist in the same switch stack.
Minor Version Number Incompatibility Among Switches
Switch with the same major version number but with a different minor version number are considered partially compatible. When connected to a switch stack, a partially compatible Switch enters version-mismatch (VM) mode and cannot join the stack as a fully functioning member. The software detects the mismatched software and tries to upgrade (or downgrade) the Switch in VM mode with the switch stack image or with a tar file image from the switch stack flash memory. The software uses the automatic upgrade (auto-upgrade) and the automatic advise (auto-advise) features.
To see if there are Switch in VM mode, use the show switch user EXEC command. The port LEDs on Switch in VM mode stay off. Pressing the Mode button does not change the LED mode.
You can use the boot auto-download-sw global configuration command to specify a URL pathname for the master switch to use to get an image in case of version mismatch.
Understanding Auto-Upgrade and Auto-Advise
When the software detects mismatched software and tries to upgrade the Switch in VM mode, two software processes are involved: automatic upgrade and automatic advise.
- The automatic upgrade
(auto-upgrade) process includes an auto-copy process and an auto-extract
process. By default, auto-upgrade is enabled (the boot auto-copy-sw global
configuration command is enabled). You can disable auto-upgrade by using the no
boot auto-copy-sw global configuration command on the
.
You can check the status of auto-upgrade by using the show boot privileged EXEC
command and by checking the Auto upgrade line in the display.
- Auto-copy automatically
copies the software image running on any stack member to the
Switch in VM mode to upgrade (auto-upgrade)
it. Auto-copy occurs if auto-upgrade is enabled, if there is enough flash
memory in the
Switch in VM mode, and if the software image
running on the switch stack is suitable for the
Switch in VM mode.
Note
A Switch in VM mode might not run all released software. For example, new Switch hardware is not recognized in earlier versions of software. - Automatic extraction (auto-extract) occurs when the auto-upgrade process cannot find the appropriate software in the stack to copy to the Switch in VM mode. In that case, the auto-extract process searches all Switch in the stack, whether they are in VM mode or not, for the tar file needed to upgrade the switch stack or the Switch in VM mode. The tar file can be in any flash file system in the switch stack (including the Switch in VM mode). If a tar file suitable for the Switch in VM mode is found, the process extracts the file and automatically upgrades that Switch.
The auto-upgrade (auto-copy and auto-extract) processes wait for a few minutes after the mismatched software is detected before starting.
When the auto-upgrade process is complete, the Switch that was in VM mode reloads and joins the stack as a fully functioning member. If you have both StackWise Plus cables connected during the reload, network downtime does not occur because the switch stack operates on two rings.
Note
Auto-upgrade performs the upgrade only when the two feature sets are the same type. For example, it does not automatically upgrade a Switch in VM mode from IP services feature set to IP base feature set (or the reverse). - Auto-copy automatically
copies the software image running on any stack member to the
Switch in VM mode to upgrade (auto-upgrade)
it. Auto-copy occurs if auto-upgrade is enabled, if there is enough flash
memory in the
Switch in VM mode, and if the software image
running on the switch stack is suitable for the
Switch in VM mode.
- Automatic advise
(auto-advise) occurs when the auto-upgrade process cannot find appropriate
stack member software to copy to the
Switch in VM mode. This process tells you the
command (archive copy-sw or archive download-sw privileged EXEC command) and
the image name (tar filename) needed to manually upgrade the switch stack or
the
Switch in VM mode. The recommended image can
be the running switch stack image or a tar file in any flash file system in the
switch stack (including the
Switch in VM mode). If an appropriate image
is not found in the stack flash file systems, the auto-advise process tells you
to install new software on the switch stack. Auto-advise cannot be disabled,
and there is no command to check its status.
The auto-advise software does not give suggestions when the switch stack software and the software of the Switch in VM mode do not contain the same feature sets. For example, if the switch stack is running the IP base image and you add a Switch that is running the IP services image, the auto-advise software does not provide a recommendation.
You can use the archive-download-sw /allow-feature-upgrade privileged EXEC command to allow installing an different software image.
Examples of Auto-Advise Messages
When you add a switch that has a different minor version number to the switch stack, the software displays messages in sequence (assuming that there are no other system messages generated by the switch).
This example shows that the switch stack detected a new switch that is running a different minor version number than the switch stack. Auto-copy starts, finds suitable software to copy from a stack member to the switch in VM mode, upgrades the switch in VM mode, and then reloads it:
*Mar 11 20:31:19.247:%STACKMGR-6-STACK_LINK_CHANGE:Stack Port 2 Switch 2 has changed to state UP
*Mar 11 20:31:23.232:%STACKMGR-6-SWITCH_ADDED_VM:Switch 1 has been ADDED to the stack(VERSION_MISMATCH)
*Mar 11 20:31:23.291:%STACKMGR-6-SWITCH_ADDED_VM:Switch 1 has been ADDED to the stack(VERSION_MISMATCH) (Stack_1-3)
*Mar 11 20:33:23.248:%IMAGEMGR-6-AUTO_COPY_SW_INITIATED:Auto-copy-software process initiated for switch number(s) 1
*Mar 11 20:36:15.038:%IMAGEMGR-6-AUTO_COPY_SW:
*Mar 11 20:36:15.038:%IMAGEMGR-6-AUTO_COPY_SW:Searching for stack member to act
*Mar 11 20:36:15.038:%IMAGEMGR-6-AUTO_COPY_SW:as software donor...
*Mar 11 20:36:15.038:%IMAGEMGR-6-AUTO_COPY_SW:Found donor (system #2) for
*Mar 11 20:36:15.038:%IMAGEMGR-6-AUTO_COPY_SW:member(s) 1
*Mar 11 20:36:15.038:%IMAGEMGR-6-AUTO_COPY_SW:System software to be uploaded:
*Mar 11 20:36:15.038:%IMAGEMGR-6-AUTO_COPY_SW:System Type: 0x00000000
*Mar 11 20:36:15.038:%IMAGEMGR-6-AUTO_COPY_SW:archiving c2960x-universalk9-mz.150-2.EX1 (directory)
*Mar 11 20:36:15.038:%IMAGEMGR-6-AUTO_COPY_SW:archiving c2960x-universalk9-mz.150-2.EX1.bin (4945851 bytes)
*Mar 11 20:36:15.038:%IMAGEMGR-6-AUTO_COPY_SW:archiving c2960x-universalk9-mz.150-2.EX1/info(450 bytes)
*Mar 11 20:36:15.038:%IMAGEMGR-6-AUTO_COPY_SW:archiving info (104 bytes)
*Mar 11 20:36:15.038:%IMAGEMGR-6-AUTO_COPY_SW:examining image...
*Mar 11 20:36:15.038:%IMAGEMGR-6-AUTO_COPY_SW:extracting info (104 bytes)
*Mar 11 20:36:15.038:%IMAGEMGR-6-AUTO_COPY_SW:extracting c2960x-universalk9-mz.150-2.EX1/info(450 bytes)
*Mar 11 20:36:15.038:%IMAGEMGR-6-AUTO_COPY_SW:extracting info (104 bytes)
*Mar 11 20:36:15.038:%IMAGEMGR-6-AUTO_COPY_SW:
*Mar 11 20:36:15.038:%IMAGEMGR-6-AUTO_COPY_SW:Stacking Version Number:1.4
*Mar 11 20:36:15.038:%IMAGEMGR-6-AUTO_COPY_SW:
*Mar 11 20:36:15.038:%IMAGEMGR-6-AUTO_COPY_SW:System Type: 0x00000000
*Mar 11 20:36:15.038:%IMAGEMGR-6-AUTO_COPY_SW: Ios Image File Size: 0x004BA200
*Mar 11 20:36:15.038:%IMAGEMGR-6-AUTO_COPY_SW: Total Image File Size:0x00818A00
*Mar 11 20:36:15.038:%IMAGEMGR-6-AUTO_COPY_SW: Minimum Dram required:0x08000000
*Mar 11 20:36:15.038:%IMAGEMGR-6-AUTO_COPY_SW: Image Suffix:universalk9-mz.150-2.EX1
*Mar 11 20:36:15.038:%IMAGEMGR-6-AUTO_COPY_SW: Image Directory:c2960x-universalk9-mz.150-2.EX1
*Mar 11 20:36:15.038:%IMAGEMGR-6-AUTO_COPY_SW: Image Name:c2960x-universalk9-mz.150-2.EX1
*Mar 11 20:36:15.038:%IMAGEMGR-6-AUTO_COPY_SW: Image 1:flash1:c2960x-universalk9-mz.150-2.EX1
*Mar 11 20:36:15.038:%IMAGEMGR-6-AUTO_COPY_SW: Old image will be deleted after download.
*Mar 11 20:36:15.038:%IMAGEMGR-6-AUTO_COPY_SW:
*Mar 11 20:36:15.038:%IMAGEMGR-6-AUTO_COPY_SW:Extracting images from archive into flash on switch 1...
*Mar 11 20:36:15.038:%IMAGEMGR-6-AUTO_COPY_SW:c2960x-universalk9-mz.150-2.EX1 (directory)
*Mar 11 20:36:15.038:%IMAGEMGR-6-AUTO_COPY_SW:extracting c2960x-universalk9-mz.150-2.EX1/c2960x-universalk9-mz.150-2.EX1 (4945851 bytes)
*Mar 11 20:36:15.038:%IMAGEMGR-6-AUTO_COPY_SW:extracting c2960x-universalk9-mz.150-2.EX1/info (450 bytes)
*Mar 11 20:36:15.038:%IMAGEMGR-6-AUTO_COPY_SW:extracting info (104 bytes)
*Mar 11 20:36:15.038:%IMAGEMGR-6-AUTO_COPY_SW:
*Mar 11 20:36:15.038:%IMAGEMGR-6-AUTO_COPY_SW:Installing (renaming):`flash1:update/c2960x-universalk9-mz.150-2.EX1' ->
*Mar 11 20:36:15.038:%IMAGEMGR-6-AUTO_COPY_SW: `flash1:c2960x-universalk9-mz.150-2.EX1'
*Mar 11 20:36:15.038:%IMAGEMGR-6-AUTO_COPY_SW:New software image installed in flash1:c2960x-universalk9-mz.150-2.EX1
*Mar 11 20:36:15.038:%IMAGEMGR-6-AUTO_COPY_SW:
*Mar 11 20:36:15.038:%IMAGEMGR-6-AUTO_COPY_SW:
*Mar 11 20:36:15.038:%IMAGEMGR-6-AUTO_COPY_SW:Removing old image:flash1:c2960x-universalk9-mz.150-2.EX1
*Mar 11 20:36:15.038:%IMAGEMGR-6-AUTO_COPY_SW:
*Mar 11 20:36:15.038:%IMAGEMGR-6-AUTO_COPY_SW:All software images installed.
*Mar 11 20:36:15.038:%IMAGEMGR-6-AUTO_COPY_SW:Requested system reload in progress...
*Mar 11 20:36:15.038:%IMAGEMGR-6-AUTO_COPY_SW:Software successfully copied to
*Mar 11 20:36:15.038:%IMAGEMGR-6-AUTO_COPY_SW:system(s) 1
*Mar 11 20:36:15.038:%IMAGEMGR-6-AUTO_COPY_SW:Done copying software
*Mar 11 20:36:15.038:%IMAGEMGR-6-AUTO_COPY_SW:Reloading system(s) 1
This example shows that the switch stack detected a new switch that is running a different minor version number than the switch stack. Auto-copy starts but cannot find software in the switch stack to copy to the VM-mode switch to make it compatible with the switch stack. The auto-advise process starts and recommends that you download a tar file from the network to the switch in VM mode:
*Mar 1 00:01:11.319:%STACKMGR-6-STACK_LINK_CHANGE:Stack Port 2 Switch 2 has changed to state UP
*Mar 1 00:01:15.547:%STACKMGR-6-SWITCH_ADDED_VM:Switch 1 has been ADDED to the stack (VERSION_MISMATCH)
stack_2#
*Mar 1 00:03:15.554:%IMAGEMGR-6-AUTO_COPY_SW_INITIATED:Auto-copy-software process initiated for switch number(s) 1
*Mar 1 00:03:15.554:%IMAGEMGR-6-AUTO_COPY_SW:
*Mar 1 00:03:15.554:%IMAGEMGR-6-AUTO_COPY_SW:Searching for stack member to act
*Mar 1 00:03:15.554:%IMAGEMGR-6-AUTO_COPY_SW:as software donor...
*Mar 1 00:03:15.554:%IMAGEMGR-6-AUTO_COPY_SW:Software was not copied
*Mar 1 00:03:15.562:%IMAGEMGR-6-AUTO_ADVISE_SW_INITIATED:Auto-advise-software process initiated for switch number(s) 1
*Mar 1 00:04:22.537:%IMAGEMGR-6-AUTO_ADVISE_SW:
*Mar 1 00:04:22.537:%IMAGEMGR-6-AUTO_ADVISE_SW:
*Mar 1 00:04:22.537:%IMAGEMGR-6-AUTO_ADVISE_SW:Systems with incompatible software
*Mar 1 00:04:22.537:%IMAGEMGR-6-AUTO_ADVISE_SW:have been added to the stack. The
*Mar 1 00:04:22.537:%IMAGEMGR-6-AUTO_ADVISE_SW:storage devices on all of the stack
*Mar 1 00:04:22.537:%IMAGEMGR-6-AUTO_ADVISE_SW:members have been scanned, and it has
*Mar 1 00:04:22.537:%IMAGEMGR-6-AUTO_ADVISE_SW:been determined that the stack can be
*Mar 1 00:04:22.537:%IMAGEMGR-6-AUTO_ADVISE_SW:repaired by issuing the following
*Mar 1 00:04:22.537:%IMAGEMGR-6-AUTO_ADVISE_SW:command(s):
*Mar 1 00:04:22.537:%IMAGEMGR-6-AUTO_ADVISE_SW:
*Mar 1 00:04:22.537:%IMAGEMGR-6-AUTO_ADVISE_SW: archive download-sw /force-reload /overwrite /dest 1 flash1:c2960x-universalk9-mz.150-2.EX1.tar
*Mar 1 00:04:22.537:%IMAGEMGR-6-AUTO_ADVISE_SW:
For information about using the archive download-sw privileged EXEC command, see the Working with Software Images section.
Note | Auto-advise and auto-copy identify which images are running by examining the info file and by searching the directory structure on the switch stack. If you download your image by using the copy tftp: boot loader command instead of the archive download-sw privileged EXEC command, the proper directory structure is not created. For more information about the info file, see the Catalyst 2960-XR Switch Managing Cisco IOS Image Files Configuration Guide. |
Incompatible Software and Stack Member Image Upgrades
You can upgrade a Switch that has an incompatible universal software image by using the archive copy-sw privileged EXEC command. It copies the software image from an existing stack member to the one with incompatible software. That Switch automatically reloads and joins the stack as a fully functioning member.
For more information, see the Copying an Image File from One Stack Member to Another section.
Switch Stack Configuration Files
The configuration files record these settings:
- System-level (global) configuration settings—such as IP, STP, VLAN, and SNMP settings—that apply to all stack members.
- Stack member interface-specific configuration settings that are specific for each stack member.
Note | We recommend that all stack members run Cisco IOS Release 12.2(35)SE2 or later. The interface-specific settings of the stack master are saved if the stack master is replaced without saving the running configuration to the startup configuration. |
When a new, out-of-box Switch joins a switch stack, it uses the system-level settings of that switch stack. If a Switch is moved to a different switch stack, that Switch loses its saved configuration file and uses the system-level configuration of the new switch stack.
- If an interface-specific configuration does not exist for that member number, the stack member uses its default interface-specific configuration.
- If an interface-specific configuration exists for that member number, the stack member uses the interface-specific configuration associated with that member number.
If a stack member fails and you replace with it with an identical model, the replacement Switch automatically uses the same interface-specific configuration as the failed Switch. Hence, you do not need to reconfigure the interface settings. The replacement Switch must have the same stack member number as the failed Switch. For information about the benefits of provisioning a switch stack, see the Switch Stack Offline Configuration section.
You back up and restore the stack configuration in the same way as you would for a standalone Switch configuration. For more information about file systems and configuration files, see Appendix A, Working with the Cisco IOS File System, Configuration Files, and Software Images.
Switch Stack Management Connectivity
You manage the switch stack and the stack member interfaces through the . You can use the CLI, SNMP, and supported network management applications such as CiscoWorks. You cannot manage stack members on an individual Switch basis.
- Connectivity to the Switch Stack Through an IP Address
- Connectivity to the Switch Stack Through an SSH Session
- Connectivity to the Switch Stack Through Console Ports or Ethernet Management Ports
- Connectivity to Specific Stack Members
Connectivity to the Switch Stack Through an IP Address
The switch stack is managed through a single IP address. The IP address is a system-level setting and is not specific to the or to any other stack member. You can still manage the stack through the same IP address even if you remove the or any other stack member from the stack, provided there is IP connectivity.
Note | Stack members retain their IP addresses when you remove them from a switch stack. To avoid a conflict by having two devices with the same IP address in your network, change the IP addresses of any Switch that you remove from the switch stack. |
For related information about switch stack configurations, see the Switch Stack Configuration Files section.
Connectivity to the Switch Stack Through an SSH Session
In a mixed stack, Secure Shell (SSH) connectivity to the switch stack can be lost if a stack master running the cryptographic software image and the IP base or IP services feature set fails and is replaced by a Switch that is running the noncryptographic image and the same feature set. We recommend that a Switch running the cryptographic software image and the IP base or IP services feature set be the stack master. Encryption features are unavailable if the stack master is running the noncryptographic software image.
Note | The noncryptographic software image was available only on Catalyst 3750 or Catalyst 3750-E Switch running Cisco IOS Release 12.2(53)SE and earlier. The Catalyst 3750-X Switch run only the cryptographic software image. |
Connectivity to the Switch Stack Through Console Ports or Ethernet Management Ports
You can connect to the by using one of these methods:
-
You can connect a terminal or a PC to the through the console port of one or more stack members.
-
You can connect a PC to the through the Ethernet management ports of one or more Catalyst 3750-E Catalyst 3750-X stack members. For more information about connecting to the switch stack through Ethernet management ports, see the Using the Ethernet Management Port section.
Be careful when using multiple CLI sessions to the . Commands that you enter in one session are not displayed in the other sessions. Therefore, it is possible that you might not be able to identify the session from which you entered a command.
We recommend using only one CLI session when managing the switch stack.
Connectivity to Specific Stack Members
If you want to configure a specific stack member port, you must include the stack member number in the CLI command interface notation. For more information, see the Using Interface Configuration Mode section.
To debug a specific stack member, you can access it from the by using the session stack-member-number privileged EXEC command. The stack member number is appended to the system prompt. For example, Switch-2# is the prompt in privileged EXEC mode for stack member 2, and the system prompt for the is Switch. Only the show and debug commands are available in a CLI session to a specific stack member.
Switch Stack Configuration Scenarios
The Table provides switch stack configuration scenarios. Most of the scenarios assume that at least two Switch are connected through their StackWise Plus ports.
|
Scenario |
Result |
|||
|---|---|---|---|---|
|
election specifically determined by existing |
Connect two powered-on switch stacks through the StackWise Plus ports. |
Only one of the two becomes the new . None of the other stack members become the . |
||
|
election specifically determined by the stack member priority value |
The stack member with the higher priority value is elected . |
|||
|
election specifically determined by the configuration file |
Assuming that both stack members have the same priority value: |
The stack member with the saved configuration file is elected . |
||
|
election specifically determined by the cryptographic software image and the IP services feature set and the IP services feature set. |
Assuming that all stack members have the same priority value: |
|
||
|
election specifically determined by the cryptographic software image and the IP base feature. |
Assuming that all stack members have the same priority value: |
|
||
|
election specifically determined by the MAC address. |
Assuming that both stack members have the same priority value, configuration file, and feature set, restart both stack members at the same time. |
The stack member with the lower MAC address is elected . |
||
|
Stack member number conflict |
Assuming that one stack member has a higher priority value than the other stack member: |
The stack member with the higher priority value retains its stack member number. The other stack member has a new stack member number. |
||
|
Add a stack member |
The is retained. The new switch is added to the switch stack. |
|||
|
failure |
Remove (or power off) the . |
Based on the factors described in the Stack Master Election and Re-Election section, one of the remaining stack members becomes the new stack master. All other stack members in the stack remain as stack members and do not reboot. | ||
|
Add more than nine stack members |
Two switches become . One has nine stack members. The other remains as a standalone switch. Use the Mode button and port LEDs on the switches to identify which switches are and which switches belong to each . For information about using the Mode button and the LEDs, see the hardware installation guide. |
|||
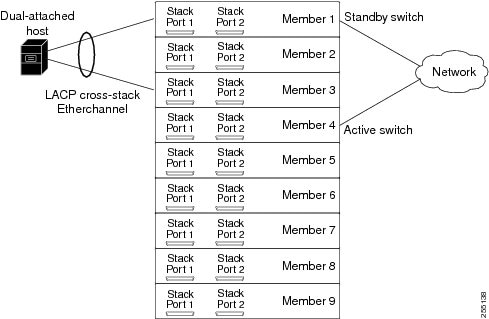
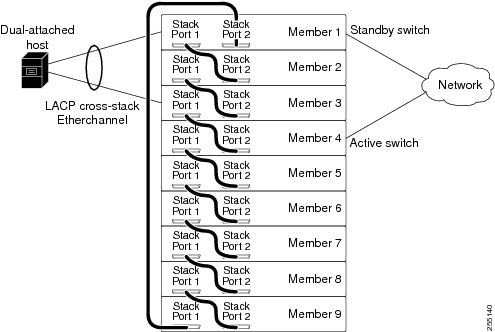
Rolling Stack Upgrade
After you upgrade or downgrade a stack, it reloads, and the connected hosts lose network connectivity. Use the rolling stack upgrade feature to minimize the network disruption only when your stack has redundant links. The members are upgraded one at a time.
Stack Configuration
Upgrade Process
Before you start the process, configure a redundant uplink to the network to ensure that the stack has network connectivity. You can also set the stack boot time.
Enter the archive download-sw /rolling-stack-upgrade privileged EXEC command to start the stack upgrade. During the upgrade, you can display the member upgrade sequence or the upgrade status on an member that is not being upgraded.
This process occurs in the software:
-
The stack is split into the unupgraded and the upgraded stacks. These stacks operate as separate stacks that do not exchange traffic. The Layer 3 interfaces in the upgraded stack are inactive.
-
The software determines the upgrade sequence:
-
It first upgrades a standby member.
-
It continues to upgrade the standby members that can be reached through Stack Port 1 on the first standby member until an active member is reached.
-
It then upgrades the standby members that can be reached through Stack Port 2 on the first standby member until an active member is reached.
After the stack is upgraded, save the stack configuration in the configuration file. If you want the stack to keep the original master and not elect a new one, reload the stack.
-
Upgrade Sequences
When Stack Port 1 on Member 1, the first standby switch, is connected to Stack Port 2 on Member 9, this is the upgrade sequence:
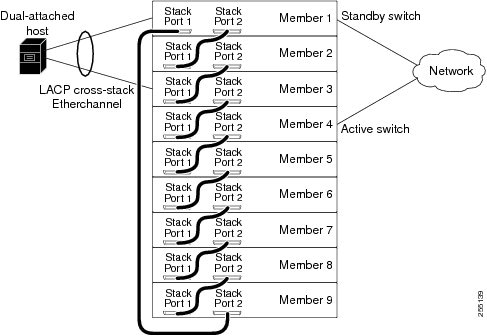
When Stack Port 1 on Member 1, the first standby switch, is connected to Stack Port 2 on Member 2, this is the upgrade sequence:
How to Configure a Switch Stack
- Default Switch Stack Configuration
- Enabling the Persistent MAC Address Feature
- Assigning Stack Member Information
- Running a Rolling Stack Update
Default Switch Stack Configuration
The table shows the default switch stack configuration.
| Feature | Default Setting |
| Stack MAC address timer | Disabled. |
| Stack member number | 1 |
| Stack member priority value | 1 |
| Offline configuration | The switch stack is not provisioned. |
Enabling the Persistent MAC Address Feature
The switch stack MAC address is determined by the MAC address of the . When a is removed from the stack and a new takes over, the default is for the MAC address of the new to immediately become the new stack MAC router address. However, you can enable the persistent MAC address feature to allow a time delay before the stack MAC address changes. During this time period, if the previous rejoins the stack, the stack continues to use its MAC address as the stack MAC address, even if the switch is now a stack member and not a . If the previous does not rejoin the stack during this period, the switch stack takes the MAC address of the new as the stack MAC address. You can also configure stack MAC persistency so that the stack never switches to the MAC address of the new .
Note | When you enter the command to configure this feature, a warning message appears with the consequences of your configuration. You should use this feature cautiously. Using the old MAC address elsewhere in the same domain could result in lost traffic. |
-
If you enter the command with no value, the default delay is 4 minutes. We recommend that you always enter a value. If the command is entered without a value, the time delay appears in the running-config file with an explicit timer value of 4 minutes.
-
If you enter 0, the stack MAC address of the previous stack master is used until you enter the no stack-mac persistent timer command, which immediately changes the stack MAC address to that of the current stack master. If you do not enter the no stack-mac persistent timer command, the stack MAC address never changes.
-
If you enter a time delay of 1 to 60 minutes, the stack MAC address of the previous stack master is used until the configured time period expires or until you enter the no stack-mac persistent timer command.
Note | If the entire switch stack reloads, it uses the MAC address of the stack master as the stack MAC address. |
Follow these steps to enable persistent MAC address:
1.
enable
3.
stack-mac persistent
timer [0 |
time-value]
5.
copy running-config
startup-config
DETAILED STEPS
Use the no stack-mac persistent timer global configuration command to disable the persistent MAC address feature.
Assigning Stack Member Information
- Assigning a Stack Member Number
- Setting the Stack Member Priority Value
- Provisioning a New Member for a Switch Stack
Assigning a Stack Member Number
This optional task is available only from the .
Follow these steps to assign a member number to a stack member:
1.
enable
3.
switch
current-stack-member-number
renumber
new-stack-member-number
5.
reload slot
stack-member-number
6.
show switch
7.
copy running-config
startup-config
DETAILED STEPS
| Command or Action | Purpose | |
|---|---|---|
| Step 1 |
enable
Example:
Switch> enable
|
Enables privileged EXEC mode. Enter your password if prompted. |
| Step 2 | configure
terminal
Example: Switch# configure terminal | |
| Step 3 |
switch
current-stack-member-number
renumber
new-stack-member-number
Example: Switch(config)# switch 3 renumber 4 |
You can display the current stack member number by using the show switch user EXEC command. |
| Step 4 | end
Example: Switch(config)# end | |
| Step 5 |
reload slot
stack-member-number
Example: Switch# reload slot 4
|
Resets the stack member. |
| Step 6 | show switch
Example: showSwitch
|
Verify the stack member number. |
| Step 7 | copy running-config
startup-config
Example:
Switch# copy running-config startup-config
|
(Optional) Saves your entries in the configuration file. |
Setting the Stack Member Priority Value
This optional task is available only from the .
Follow these steps to assign a priority value to a stack member:
1.
enable
3.
switch
stack-member-number
priority
new-priority-number
5.
reload slot
stack-member-number
6.
show switch
stack-member-number
7.
copy running-config
startup-config
DETAILED STEPS
| Command or Action | Purpose | |
|---|---|---|
| Step 1 |
enable
Example:
Switch> enable
|
Enables privileged EXEC mode. Enter your password if prompted. |
| Step 2 | configure
terminal
Example: Switch# configure terminal | |
| Step 3 |
switch
stack-member-number
priority
new-priority-number
Example: Switch(config)# switch 3 priority 2 |
You can display the current priority value by using the show switch user EXEC command. The new priority value takes effect immediately but does not affect the current . The new priority value helps determine which stack member is elected as the new when the current or switch stack resets. |
| Step 4 | end
Example: Switch(config)# end | |
| Step 5 | reload slot
stack-member-number
Example: Switch(config)# reload slot 3 |
Reset the stack member, and apply this configuration change. |
| Step 6 | show switch
stack-member-number
Example: Switch(config)# show switch |
Verify the stack member priority value. |
| Step 7 | copy running-config
startup-config
Example:
Switch# copy running-config startup-config
|
(Optional) Saves your entries in the configuration file. |
Provisioning a New Member for a Switch Stack
Note | This task is available only from the . |
To remove provisioned information and to avoid receiving an error message, remove the specified Switch from the stack before you use the no form of this command.
To remove the provisioned information and to avoid receiving an error message, you can remove power from stack member 3, disconnect the StackWise Plus cables between the stack member 3 and Switch to which it is connected, reconnect the cables between the remaining stack members, and enter the no switch stack-member-number provision global configuration command.
Follow these steps to provision a new member for a switch stack: This procedure is optional.
1.
enable
2.
show switch
4.
switch
stack-member-number
provision type
7.
show switch
stack-member-number
8.
copy running-config
startup-config
DETAILED STEPS
| Command or Action | Purpose | |
|---|---|---|
| Step 1 |
enable
Example:
Switch> enable
|
Enables privileged EXEC mode. Enter your password if prompted. |
| Step 2 |
show switch
|
Display summary information about the switch stack. |
| Step 3 | configure
terminal
Example: Switch# configure terminal | |
| Step 4 | switch
stack-member-number
provision type
|
Specify the stack member number for the preconfigured Switch. By default, no Switch are provisioned. For stack-member-number, the range is 1 to 9. Specify a stack member number that is not already used in the switch stack. See Step 1. For type, enter the model number of a supported Switch that is listed in the command-line help strings. |
| Step 5 | end
Example: Switch(config)# end | |
| Step 6 | show running-config
Example: Switch# show running-config | |
| Step 7 | show switch
stack-member-number
| Verify the status of the provisioned switch. For stack-member-number, enter the same number as in Step 1. |
| Step 8 | copy running-config
startup-config
Example:
Switch# copy running-config startup-config
|
(Optional) Saves your entries in the configuration file. |
Running a Rolling Stack Update
1.
enable
3.
boot time
minutes
4.
interface
interface-id
5.
rsu
{
active
|
standby
}
6.
interface
interface-id
7.
rsu
{
active
|
standby
}
9.
archive download-sw
/rolling-stack-upgrade
10.
show switch stack-upgrade
sequence
11.
show switch stack-upgrade
status
13.
copy running-config
startup-config
14.
archive download-sw
/force-reload
DETAILED STEPS
| Command or Action | Purpose | |||
|---|---|---|---|---|
| Step 1 |
enable
Example:
Switch> enable
|
Enables privileged EXEC mode. Enter your password if prompted. | ||
| Step 2 | configure
terminal
Example: Switch# configure terminal | |||
| Step 3 |
boot time
minutes
Example: Switch(config)# boot time 20
|
(Optional) Sets the stack boot time in minutes. The range is from 7 to 30. The default is 7. | ||
| Step 4 |
interface
interface-id
Example: Switch(config)# interface gigabithethernet3/0/1
|
Specifies the port and enters interface configuration mode. | ||
| Step 5 |
rsu
{
active
|
standby
}
Example: Switch(config-if)# rsu active
|
On a member, configures half of the redundant uplink to the network, and assigns one of these roles to a member interface.
By default, the role is not set. | ||
| Step 6 |
interface
interface-id
Example: Switch(config-if)# interface gigabithethernet3/0/2
|
Specifies the port on another member, and enters interface configuration mode. | ||
| Step 7 |
rsu
{
active
|
standby
}
Example: Switch(config-if)# rsu standby
|
On another member, configures the other half of the redundant uplink, and assigns the other role to the member interface.
By default, the role is not set. To configure another pair, repeat Step 3 to Step 6. | ||
| Step 8 | end
Example: Switch(config)# end | |||
| Step 9 |
archive download-sw
/rolling-stack-upgrade
Example: Switch# archive download-sw /rolling-stack-upgrade
|
Starts the rolling state upgrade process to upgrade the members one at a time. | ||
| Step 10 |
show switch stack-upgrade
sequence
Example: Switch# show switch stack-upgrade sequence
|
(Optional) During the upgrade process, displays the member upgrade sequence. | ||
| Step 11 |
show switch stack-upgrade
status
Example: Switch# show switch stack-upgrade status
|
(Optional) During the upgrade process, displays the rolling stack upgrade status. | ||
| Step 12 | show running-config
Example: Switch# show running-config | |||
| Step 13 | copy running-config
startup-config
Example:
Switch# copy running-config startup-config
|
(Optional) Saves your entries in the configuration file. | ||
| Step 14 |
archive download-sw
/force-reload
Example: Switch# archive download-sw /force-reload
|
(Optional) Forces a system reload after the rolling stack upgrade. Enter this command only if you want the stack to keep the original master and not elect a new one. |
Accessing the CLI of a Specific Stack Member
Note | This task is only for debugging purposes, and is only available from the master. |
You can access all or specific members by using the remote command {all | stack-member-number} privileged EXEC command. The stack member number range is 1 to 9.
You can access specific members by using the session stack-member-number privileged EXEC command. The member number is appended to the system prompt. For example, the prompt for member 2 is Switch-2#, and system prompt for the master is Switch#. Enter exit to return to the CLI session on the master. Only the show and debug commands are available on a specific member.
Displaying Switch Stack Information
To display saved configuration changes after resetting a specific member or the stack, use these privileged EXEC commands:
| Command | Description |
| show platform stack manager all | Display all stack information, such as the stack protocol version. |
| show platform stack ports {buffer | history} | Display the stack port events and history. |
| show switch | Display summary information about the stack, including the status of provisioned switches and Switch in version-mismatch mode. |
| show switch stack-member-number | Display information about a specific member. |
| show switch detail | Display detailed information about the stack ring. |
| show switch neighbors | Display the stack neighbors. |
| show switch stack-ports [summary] | Display port information for the stack. Use the summary keyword to display the stack cable length, the stack link status, and the loopback status. |
| show switch stack-ring activity [detail] | Display the number of frames per member that are sent to the stack ring. The detail keyword displays the number of frames per member that are sent to the stack ring, the receive queues, and the ASIC. |
Troubleshooting Stacks
- Manually Disabling a Stack Port
- Re-Enabling a Stack Port While Another Member Starts
- Understanding the show switch stack-ports summary Output
- Identifying Loopback Problems
- Enabling the Persistent MAC Address Feature: Example
- Provisioning a New Member for a Switch Stack: Example
- Running a Rolling Stack Update: Example
- show switch stack-ports summary Command Output: Example
- Finding a Disconnected Stack Cable: Example
- Fixing a Bad Connection Between Stack Ports: Example
- Where to Go Next
Manually Disabling a Stack Port
If a stack port is flapping and causing instability in the stack ring, to disable the port, enter the switch stack-member-number stack port port-number disable privileged EXEC command. To re-enable the port, enter the switch stack-member-number stack port port-number enable command.
Note | Be careful when using the switch stack-member-number stack port port-number disable command. When you disable the stack port, the stack operates at half bandwidth. |
- A stack is in the full-ring state when all members are connected through the stack ports and are in the ready state.
- The stack is in the partial-ring state when
Re-Enabling a Stack Port While Another Member Starts
Stack Port 1 on Switch 1 is connected to Port 2 on Switch 4. If Port 1 is flapping, disable Port 1 with the switch 1 stack port 1 disable privileged EXEC command.
- Disconnect the stack cable between Port 1 on Switch 1 and Port 2 on Switch 4.
- Remove Switch 4 from the stack.
- Add a switch to replace Switch 4 and assign it switch-number 4.
- Reconnect the cable between Port 1 on Switch 1 and Port 2 on Switch 4 (the replacement switch).
- Re-enable the link between the Switch. Enter the switch 1 stack port 1 enable privileged EXEC command to enable Port 1 on Switch 1.
- Power on Switch 4.
Note | Caution: Powering on Switch 4 before enabling the Port 1 on Switch 1 might cause one of the switches to reload. If Switch 4 is powered on first, you might need to enter the switch 1 stack port 1 enable and the switch 4 stack port 2 enable privileged EXEC commands to bring up the link. |
Understanding the show switch stack-ports summary Output
Only Port 1 on stack member 2 is disabled.
Switch# show switch stack-ports summary
Switch#/ Stack Neighbor Cable Link Link Sync # In
Port# Port Length OK Active OK Changes Loopback
Status To LinkOK
-------- ------ -------- -------- ---- ------ ---- --------- --------
1/1 OK 3 50 cm Yes Yes Yes 1 No
1/2 Down None 3 m Yes No Yes 1 No
2/1 Down None 3 m Yes No Yes 1 No
2/2 OK 3 50 cm Yes Yes Yes 1 No
3/1 OK 2 50 cm Yes Yes Yes 1 No
3/2 OK 1 50 cm Yes Yes Yes 1 No
| Field | Description |
| Switch#/Port# |
Member number and its stack port number. |
| Stack Port Status | |
| Neighbor | Switch number of the active member at the other end of the stack cable. |
| Cable Length |
Valid lengths are 50 cm, 1 m, or 3 m. If the switch cannot detect the cable length, the value is no cable. The cable might not be connected, or the link might be unreliable. |
| Link OK |
This shows if the link is stable. The link partner is a stack port on a neighbor switch. |
| Link Active |
This shows if the stack port is in the same state as its link partner. |
| Sync OK | |
| # Changes to LinkOK |
This shows the relative stability of the link. If a large number of changes occur in a short period of time, link flapping can occur. |
| In Loopback |
Identifying Loopback Problems
- Software Loopback: Examples
- Software Loopback with no Connected Stack Cable: Example
- Software Loopback with Connected Stack Cables: Examples
- Hardware Loopback: Example
- Hardware Loopback With the LINK OK Event: Example
- Hardware Loopback With the LINK NOT OK Event: Example
Software Loopback: Examples
In a stack with three members, stack cables connect all the members:
Switch# show switch stack-ports summary
		Switch#
 Sw#/Port#  Port    Neighbor  Cable     Link  Link    Sync   #Changes   In
            Status            Length    OK    Active  OK     To LinkOK  Loopback
		--------  ------  --------  --------  ----  ------  ----  ---------   --------
		  1/1     OK         3      50 cm     Yes    Yes    Yes        1        No
		  1/2     OK         2      3 m       Yes    Yes    Yes        1        No
		  2/1     OK         1      3 m       Yes    Yes    Yes        1        No
		  2/2     OK         3      50 cm     Yes    Yes    Yes        1        No
		  3/1     OK         2      50 cm     Yes    Yes    Yes        1        No
		  3/2     OK         1      50 cm     Yes    Yes    Yes        1        No
If you disconnect the stack cable from Port 1 on Switch 1, these messages appear:
01:09:55: %STACKMGR-4-STACK_LINK_CHANGE: Stack Port 2 Switch 3 has changed to state DOWN
		01:09:56: %STACKMGR-4-STACK_LINK_CHANGE: Stack Port 1 Switch 1 has changed to state DOWN

		Switch# show switch stack-ports summary
		Switch#
 Sw#/Port#  Port    Neighbor  Cable     Link  Link    Sync  #Changes   In
            Status            Length    OK    Active  OK    To LinkOK  Loopback
		--------  ------  --------  --------  ----  ------  ----  ---------  --------
		  1/1     Absent    None    No cable  No     No     No         1        No
		  1/2     OK         2      3 m       Yes    Yes    Yes        1        No
		  2/1     OK         1      3 m       Yes    Yes    Yes        1        No
		  2/2     OK         3      50 cm     Yes    Yes    Yes        1        No
		  3/1     OK         2      50 cm     Yes    Yes    Yes        1        No
		  3/2     Down      None    50 cm     No     No     No         1        No
If you disconnect the stack cable from Port 2 on Switch 1, the stack splits.
Switch 2 and Switch 3 are now in a two-member stack connected through stack cables:
Switch# show sw stack-ports summary
		Switch#
 Sw#/Port#  Port    Neighbor  Cable     Link  Link    Sync  #Changes   In
            Status            Length    OK    Active  OK    To LinkOK  Loopback
		--------  ------  --------  --------  ----  ------  ----  ---------  --------
		  2/1     Down      None    3 m       No     No     No         1        No
		  2/2     OK         3      50 cm     Yes    Yes    Yes        1        No
		  3/1     OK         2      50 cm     Yes    Yes    Yes        1        No
		  3/2     Down      None    50 cm     No     No     No         1        No
Switch 1 is a standalone switch:
Switch# show switch stack-ports summary
		Switch#
 Sw#/Port#  Port    Neighbor  Cable     Link  Link    Sync  #Changes   In
            Status            Length    OK    Active  OK    To LinkOK  Loopback
		--------  ------  --------  --------  ----  ------  ----  ---------  --------
		  1/1     Absent    None    No cable  No     No     No         1        Yes
		  1/2     Absent    None    No cable  No     No     No         1        Yes
Software Loopback with no Connected Stack Cable: Example
Catalyst 3750 switch port status:
Switch# show switch stack-ports summary
		Switch#/  Stack   Neighbor   Cable    Link   Link   Sync      #         In
		 Port#     Port              Length    OK   Active   OK    Changes   Loopback
		          Status                                          To LinkOK
		--------  ------  --------  --------  ----  ------  ----  ---------  --------
		  1/1     Absent    None    No cable  Yes     No    Yes       1         Yes
		  1/2     Absent    None    No cable  Yes     No    Yes       1         Yes
Catalyst 3750-E or 3750-X switch port status:
Switch# show switch stack-ports summary
		Switch#
 Sw#/Port#  Port    Neighbor  Cable     Link  Link    Sync  #Changes   In
            Status            Length    OK    Active  OK    To LinkOK  Loopback
		--------  ------  --------  --------  ----  ------  ----  ---------  --------
		  1/1     Absent    None    No cable   No     No     No       1         Yes
		  1/2     Absent    None    No cable   No     No     No       1         Yes
Software Loopback with Connected Stack Cables: Examples
-
On Port 1 on Switch 1, the port status is Down, and a cable is connected.
On Port 2 on Switch 1, the port status is Absent, and no cable is connected.
Switch# show switch stack-ports summary
		Switch#
 Sw#/Port#  Port    Neighbor  Cable     Link  Link    Sync  #Changes   In
            Status            Length    OK    Active  OK    To LinkOK  Loopback
		--------  ------  --------  --------  ---- ------  ----  ---------  --------
		  1/1     Down      None    50 Cm      No     No     No       1          No
		  1/2     Absent    None    No cable   No     No     No       1          No
- In a
physical
loopback, a cable connects both stack ports on a switch. You can use this
configuration to test
Switch# show switch stack-ports summary
		Switch#
 Sw#/Port#  Port    Neighbor  Cable     Link  Link    Sync  #Changes   In
            Status            Length    OK    Active  OK    To LinkOK  Loopback
		--------  ------  --------  --------  ----  ------  ----  ---------  --------
		  2/1       OK       2      50 cm     Yes    Yes    Yes       1         No
		  2/2       OK       2      50 cm     Yes    Yes    Yes       1         No
The port status shows that
Hardware Loopback: Example
The show platform stack ports buffer privileged EXEC command output shows the hardware loopback values.
Switch# show platform stack ports buffer
		              Stack Debug Event Data Trace
		==============================================================
		Event type LINK: Link status change
		Event type RAC: RAC changes to Not OK
		Event type SYNC: Sync changes to Not OK
		==============================================================

		  Event    Stack           Stack PCS Info              Ctrl-Status  Loopback   Cable
		  Count    Port                                                     IOS / HW   length
		=========  =====  ===================================  ===========  ========  ========
		Event type: LINK OK Stack Port 1
		0000000011   1    FF08FF00 860302A5 AA55FFFF FFFFFFFF   1CE61CE6     Yes/Yes  No cable
		0000000011   2    FF08FF00 86031805 55AAFFFF FFFFFFFF   1CE61CE6     Yes/Yes  No cable
		Event type: LINK OK Stack Port 2
		0000000012   1    FF08FF00 860302A5 AA55FFFF FFFFFFFF   1CE61CE6     Yes/Yes  No cable
		0000000012   2    FF08FF00 86031805 55AAFFFF FFFFFFFF   1CE61CE6     Yes/Yes  No cable
		Event type: RAC
		0000000013   1    FF08FF00 860302A5 AA55FFFF FFFFFFFF   1CE61CE6     Yes/Yes  No cable
		0000000013   2    FF08FF00 86031805 55AAFFFF FFFFFFFF   1CE61CE6     Yes/Yes  No cable
If a stack port has an connected stack cable, the Loopback HW value for the stack port is No.
If the stack port does not have an connected stack cable, the Loopback HW value for the stack port is Yes.
On a Catalyst 3750 member
-
If at least one stack port has an connected stack cable, the Loopback HW value for both stack ports is No.
-
If neither stack port has an connected stack cable, the Loopback HW value for both stack ports is Yes.
On a Catalyst 3750-E or Catalyst 3750-X member
Hardware Loopback With the LINK OK Event: Example
Switch# show platform stack ports buffer

		              Stack Debug Event Data Trace
  ==============================================================
		Event type LINK: Link status change
		Event type RAC: RAC changes to Not OK
		Event type SYNC: Sync changes to Not OK
		==============================================================

		  Event    Stack           Stack PCS Info              Ctrl-Status  Loopback   Cable
		  Count    Port                                                     IOS / HW   length
		=========  =====  ===================================  ===========  ========  ========
  Event type: LINK OK Stack Port 1
		0000000153   1    FF01FF00 860351A5 55A5FFFF FFFFFFFF   0CE60C10     No /No   50 cm
		0000000153   2    FF01FF00 00017C07 00000000 0000FFFF   0CE60C10     No /No   3 m
		Event type: RAC
		0000000154   1    FF01FF00 860351A5 55A5FFFF FFFFFFFF   0CE60C10     No /No   50 cm
		0000000154   2    FF01FF00 00017C85 00000000 0000FFFF   0CE60C10     No /No   3 m
Hardware Loopback With the LINK NOT OK Event: Example
Switch# show platform stack ports buffer
		Stack Debug Event Data Trace
  ==============================================================
		Event type LINK: Link status change
		Event type RAC: RAC changes to Not OK
		Event type SYNC: Sync changes to Not OK
		==============================================================

		  Event    Stack           Stack PCS Info              Ctrl-Status  Loopback   Cable
		  Count    Port                                                     IOS / HW   length
		=========  =====  ===================================  ===========  ========  ========
  Event type: LINK OK Stack Port 1
		0000000014   1    FF01FF00 860204A7 5555FFFF 00000000   0CE60CA6     No /No   50 cm
		0000000014   2    FF01FF00 85020823 AAAAFFFF 00000000   0CE60CA6     No /No   3 m
		Event type: RAC
		0000000015   1    FF01FF00 860204A7 5555FFFF 00000000   0CE60CA6     No /No   50 cm
		0000000015   2    FF01FF00 85020823 AAAAFFFF 00000000   0CE60CA6     No /No   3 m
		Event type: LINK OK Stack Port 2
		0000000029   1    FF01FF00 860204A7 5555FFFF 00000000   1CE61CE6     No /No   50 cm
		0000000029   2    FF01FF00 86020823 AAAAFFFF 00000000   1CE61CE6     No /No   3 m
		Event type: RAC
		0000000030   1    FF01FF00 860204A7 5555FFFF 00000000   1CE61CE6     No /No   50 cm
		0000000030   2    FF01FF00 86020823 AAAAFFFF 00000000   1CE61CE6     No /No   3 m
		Event type: LINK NOT OK Stack Port 1
		0000009732   1    FF01FF00 00015B12 5555FFFF A49CFFFF   0C140CE4     No /No   50 cm
		0000009732   2    FF01FF00 86020823 AAAAFFFF 00000000   0C140CE4     No /No   3 m
		Event type: RAC
		0000009733   1    FF01FF00 00015B4A 5555FFFF A49CFFFF   0C140CE4     No /No   50 cm
		0000009733   2    FF01FF00 86020823 AAAAFFFF 00000000   0C140CE4     No /No   3 m
		Event type: LINK NOT OK Stack Port 2
		0000010119   1    FF01FF00 00010E69 25953FFF FFFFFFFF   0C140C14     No /Yes  No cable
		0000010119   2    FF01FF00 0001D98C 81AAC7FF 0300FFFF   0C140C14     No /No   3 m
		Event type: RAC
		0000010120   1    FF01FF00 00010EEA 25953FFF FFFFFFFF   0C140C14     No /Yes  No cable
		0000010120   2    FF01FF00 0001DA0C 81AAC7FF 0300FFFF   0C140C14     No /No   3 m
Enabling the Persistent MAC Address Feature: Example
This example shows how to configure the persistent MAC address feature for a 7-minute time delay and to verify the configuration:
Switch(config)# stack-mac persistent timer 7
		WARNING: The stack continues to use the base MAC of the old Master
		WARNING: as the stack MAC after a master switchover until the MAC
		WARNING: persistency timer expires. During this time the Network
		WARNING: Administrators must make sure that the old stack-mac does
		WARNING: not appear elsewhere in this network domain. If it does,
		WARNING: user traffic may be blackholed.
		Switch(config)# end
		Switch# show switch
		Switch/Stack Mac Address : 0016.4727.a900
		Mac persistency wait time: 7 mins
		                                           H/W   Current
		Switch#  Role   Mac Address     Priority Version  State
		----------------------------------------------------------
		*1        0016.4727.a900     1      P2B     Ready
Provisioning a New Member for a Switch Stack: Example
This example shows how to provision a switch with a stack member number of 2 for the switch stack. The show running-config command output shows the interfaces associated with the provisioned switch:
Running a Rolling Stack Update: Example
		Switch# configure terminal
		Switch(config)# boot time 15
		Switch(config)# interface gigabitethernet 1/0/1
		Switch(config-if)# rsu active
		Switch(config-if)# exit
		Switch(config)# interface gigabitethernet 4/0/1
		Switch(config-if)# rsu standby
		Switch(config-if)# end
		Switch# archive download-sw /rolling-stack-upgrade
		Switch# show switch stack-upgrade status
		Upgrade Time Remaining: 21 minutes
		Unupgraded Stack:
		Switch#                 Status
		   1                   RSU in Progress
		   2                   RSU in Progress
		   3                   RSU in Progress
		Upgraded Stack:
		Switch#                 Status
		Switch#
		...
		Switch# copy running-config startup-config
		Destination filename [startup-config]?
		Building configuration...
		.....
		Switch# archive download-sw /force-reload
		...
		Switch# show switch stack-upgrade status
		Upgrade Time Remaining: 21 minutes
		Unupgraded Stack:
		Switch#                 Status
		   1                   Reload In Progress
		   2                   RSU in Progress
		   3                   RSU in Progress
		Upgraded Stack:
		Switch#                 Status
		Switch#
show switch stack-ports summary Command Output: Example
Only Port 1 on stack member 2 is disabled.
Switch# show switch stack-ports summary
		Switch#/  Stack   Neighbor   Cable    Link   Link   Sync      #         In
		 Port#     Port              Length    OK   Active   OK    Changes   Loopback
		          Status                                          To LinkOK
		--------  ------  --------  --------  ----  ------  ----  ---------  --------
		  1/1     OK         3      50 cm     Yes    Yes    Yes        1        No
		  1/2     Down      None    3 m       Yes    No     Yes        1        No
		  2/1     Down      None    3 m       Yes    No     Yes        1        No
		  2/2     OK         3      50 cm     Yes    Yes    Yes        1        No
		  3/1     OK         2      50 cm     Yes    Yes    Yes        1        No
		  3/2     OK         1      50 cm     Yes    Yes    Yes        1        No
|
Field |
Description |
|---|---|
|
Switch#/Port# |
Member number and its stack port number. |
|
Stack Port Status |
Status of the stack port. |
|
Neighbor |
Switch number of the active member at the other end of the stack cable. |
|
Cable Length |
Valid lengths are 50 cm, 1 m, or 3 m. If the switch cannot detect the cable length, the value is no cable. The cable might not be connected, or the link might be unreliable. |
|
Link OK |
Whether the stack cable is connected and functional. There may or may not be a neighbor connected on the other end. The link partner is a stack port on a neighbor switch. |
|
Link Active |
Whether a neighbor is connected on the other end of the stack cable. |
|
Sync OK |
Whether the link partner sends valid protocol messages to the stack port. |
|
# Changes to LinkOK |
The relative stability of the link. If a large number of changes occur in a short period of time, link flapping can occur. |
|
In Loopback |
Whether a stack cable is attached to a stack port on the member. |
Finding a Disconnected Stack Cable: Example
Stack cables connect all stack members. Port 2 on Switch 1 connects to Port 1 on Switch 2.
This is the port status for the members:
Switch# show switch stack-ports summary
		Switch#
 Sw#/Port#  Port    Neighbor  Cable     Link  Link    Sync  #Changes   In
            Status            Length    OK    Active  OK    To LinkOK  Loopback
		--------  ------  --------  --------  ----  ------  ----  ---------  --------
		  1/1     OK         2      50 cm     Yes    Yes    Yes        0        No
		  1/2     OK         2      50 cm     Yes    Yes    Yes        0        No
		  2/1     OK         1      50 cm     Yes    Yes    Yes        0        No
		  2/2     OK         1      50 cm     Yes    Yes    Yes        0        No
If you disconnect the cable from Port 2 on Switch 1, these messages appear:
%STACKMGR-4-STACK_LINK_CHANGE: Stack Port 1 Switch 2 has changed to state DOWN

		%STACKMGR-4-STACK_LINK_CHANGE: Stack Port 2 Switch 1 has changed to state DOWN
This is now the port status:
		Switch# show switch stack-ports summary
		Switch#
 Sw#/Port#  Port    Neighbor  Cable     Link  Link    Sync  #Changes   In
            Status            Length    OK    Active  OK    To LinkOK  Loopback
		--------  ------  --------  --------  ----  ------  ----  ---------  --------
		  1/1       OK       2      50 cm     Yes    Yes    Yes        1        No
		  1/2     Absent    None    No cable   No     No     No        2        No
		  2/1      Down     None    50 cm      No     No     No        2        No
		  2/2       OK       1      50 cm     Yes    Yes    Yes        1        No
Only one end of the cable connects to a stack port, Port 1 on Switch 2.
-
The Stack Port Status value for Port 2 on Switch 1 is Absent, and the value for Port 1 on Switch 2 is Down.
-
The Cable Length value is No cable.
Diagnosing the problem:
Fixing a Bad Connection Between Stack Ports: Example
Stack cables connect all members. Port 2 on Switch 1 connects to Port 1 on Switch 2.
This is the port status:
Switch# show switch stack-ports summary
		Switch#
 Sw#/Port#  Port    Neighbor  Cable     Link  Link    Sync  #Changes   In
            Status            Length    OK    Active  OK    To LinkOK  Loopback
		--------  ------  --------  --------  ----  ------  ----  ---------  --------
		  1/1       OK       2      50 cm     Yes    Yes    Yes       1          No
		  1/2      Down     None    50 cm      No     No     No       2          No
		  2/1      Down     None    50 cm      No     No     No       2          No
		  2/2       OK       1      50 cm     Yes    Yes    Yes       1          No
Diagnosing the problem:
-
The Stack Port Status value is Down.
-
Link OK, Link Active, and Sync OK values are No.
-
The Cable Length value is 50 cm. The switch detects and correctly identifies the cable.
The connection between Port 2 on Switch 1 and Port 1 on Switch 2 is unreliable on at least one of the connector pins.
Where to Go Next
The Catalyst 3750-X stackable switch also supports StackPower, where up to four switches can be connected with power stack cables to allow the switch power supplies to share the load across multiple systems in a stack. Switches in a power stack must be members of the same switch (data) stack.
Additional References for Switch Stacks
Related Documents
| Related Topic | Document Title |
|---|---|
Cabling and powering on a switch stack. |
Error Message Decoder
| Description | Link |
|---|---|
|
To help you research and resolve system error messages in this release, use the Error Message Decoder tool. |
https://www.cisco.com/cgi-bin/Support/Errordecoder/index.cgi |
Standards and RFCs
| Standard/RFC | Title |
|---|---|
None |
— |
MIBs
| MIB | MIBs Link |
|---|---|
All supported MIBs for this release. |
To locate and download MIBs for selected platforms, Cisco IOS releases, and , use Cisco MIB Locator found at the following URL: |
Technical Assistance
| Description | Link |
|---|---|
|
The Cisco Support website provides extensive online resources, including documentation and tools for troubleshooting and resolving technical issues with Cisco products and technologies. To receive security and technical information about your products, you can subscribe to various services, such as the Product Alert Tool (accessed from Field Notices), the Cisco Technical Services Newsletter, and Really Simple Syndication (RSS) Feeds. Access to most tools on the Cisco Support website requires a Cisco.com user ID and password. |
 Feedback