- Preface
- Using the Command-Line Interface
-
- Configuring Spanning Tree Protocol
- Configuring Multiple Spanning-Tree Protocol
- Configuring Optional Spanning-Tree Features
- Configuring EtherChannels
- Configuring Link-State Tracking
- Configuring Flex Links and the MAC Address-Table Move Update Feature
- Configuring UniDirectional Link Detection
- Configuring Resilient Ethernet Protocol
-
- Security Features Overview
- Preventing Unauthorized Access
- Controlling Switch Access with Passwords and Privilege Levels
- Configuring TACACS+
- Configuring RADIUS
- RADIUS Server Load Balancing
- RADIUS Change of Authorization Support
- Local AAA Server
- Configuring Kerberos
- Configuring Accounting
- Configuring Local Authentication and Authorization
- Certification Authority Interoperability
- MAC Authentication Bypass
- Password Strength and Management for Common Criteria
- AAA-SERVER-MIB Set Operation
- Configuring Secure Shell
- Secure Shell Version 2 Support
- X.509v3 Certificates for SSH Authentication
- Configuring Secure Socket Layer HTTP
- Access Control List Overview
- Configuring IPv4 Access Control Lists
- IPv6 Access Control Lists
- ACL Support for Filtering IP Options
- VLAN Access Control Lists
- Configuring DHCP
- Configuring IP Source Guard
- Configuring Dynamic ARP Inspection
- Configuring IEEE 802.1x Port-Based Authentication
- Configuring Web-Based Authentication
- Auto Identity
- Configuring Port-Based Traffic Control
- Configuring Cisco TrustSec
- Configuring FIPS
- Configuring Control Plane Policing
-
- Embedded Event Manager Overview
- Information About Writing EEM Policies Using the Cisco IOS CLI
- Writing Embedded Event Manager Policies Using Tcl
- Signed Tcl Scripts
- EEM CLI Library Command Extensions
- EEM Context Library Command Extensions
- EEM Event Registration Tcl Command Extensions
- EEM Event Tcl Command Extensions
- EEM Library Debug Command Extensions
- EEM Multiple Event Support Tcl Command Extensions
- EEM SMTP Library Command Extensions
- EEM System Information Tcl Command Extensions
- EEM Utility Tcl Command Extensions
- Index
Configuring AVC with DNS-AS
Finding Feature Information
Your software release may not support all the features documented in this module. For the latest caveats and feature information, see Bug Search Tool and the release notes for your platform and software release. To find information about the features documented in this module, and to see a list of the releases in which each feature is supported, see the feature information table at the end of this module.
Use Cisco Feature Navigator to find information about platform support and Cisco software image support. To access Cisco Feature Navigator, go to http://www.cisco.com/go/cfn. An account on Cisco.com is not required.
Prerequisites for AVC with DNS-AS
-
You have the Cisco ONE for Access license to use AVC with DNS-AS.
-
You have enabled Multilayer Switch (MLS) Quality of Service (QoS).
-
You have maintained metadata in the authoritative DNS server and reachability exists - before you enable AVC with DNS-AS
-
The DNS-AS client can snoop forward look-up requests originating from hosts.
-
To ensure DNS packet logging or snooping, you have attached the policy map to the interface, by using the service-policy input command.
Restrictions and Guidelines for AVC with DNS-AS
-
Only a forward look-up is supported.
-
Two DNS servers are supported (in case of a failover). One is considered the primary DNS server and other, the secondary DNS server.
-
IPv6 is not supported—AAAA requests, and IPv6 DNS servers are not supported.
-
AVC with DNS-AS is supported only on physical interfaces, in the ingress direction.
-
Virtual Routing and Forwarding (VRF) is not supported.
-
We recommend a maximum of 300 AVC with DNS-AS applications (domain names) in the binding table, because of its effect on the ternary content addressable memory (TCAM). To know how the addition of applications affects the TCAM see the Troubleshooting AVC with DNS-AS section of this chapter.
Information About AVC with DNS-AS
The Application Visibility Control (AVC) with Domain Name System as an Authoritative Source (DNS-AS) feature (AVC with DNS-AS) provides a centralized means of controlling the identification and classification of trusted network traffic in an organization. It accomplishes this by using network metadata stored in a DNS server that is authoritative to the domain in question, to identify applications, Quality of Service (QoS) to classify the corresponding traffic and apply suitable policies, and Flexible NetFlow (FNF), to monitor and export application information to an external collector.
The feature provides:
-
Application Visibility—Ensuring unambiguous visibility of applications.
The DNS-AS mechanism snoops requests and does not require a CPU-intensive, deep packet inspection (DPI). Since traffic classification is by means of a DNS request and not DPI, this feature is compatible in scenarios where network traffic is encrypted.
-
Metadata Driven—Using information about applications.
You can program the network holistically so it behaves like a self-driving car. You now have information about all the required applications in your network, irrespective of whether traffic is encrypted or not.
-
Centralized Control—Using a cross-domain application intent policy controller.
The feature leverages an existing, universally available query-response mechanism to enable local DNS servers within an organization to act as authoritative servers and propagate application classification information to DNS-AS clients (switches) in an enterprise network.
-
Control without Administrative Access—Proving alternatives to controller-based approaches.
The feature supports scenarios where your network may be in the cloud and you may not own it. You can still control network devices across the Internet, even though you may not have administrative control of these devices.
- Overview of AVC with DNS-AS
- Key Concepts for AVC with DNS-AS
- AVC with DNS-AS Process Flow
- Stacking and AVC with DNS-AS
- Default Configuration for AVC with DNS-AS
Overview of AVC with DNS-AS
The process starts with an organization’s requirements relating to management and control of network traffic. You begin by assessing the software applications that run on the various hosts (phones, PCs etc.) in your network, the domains (websites) and applications accessed by these devices, and the business-relevance of these domains and applications in your organization.
The assessment helps you arrive at a list of domains and applications that are “trusted” by your organization, designating all remaining domains and applications as untrusted.
With DNS-AS enabled on your network and the list of trusted domains at hand, the networking devices or DNS-AS clients in your network identify which applications the network traffic belongs to or which domains are being requested. As long as the traffic is part of the trusted list, the switch requests the DNS server for metadata and IP address information. This request is sent in the form of a DNS-query. The response, once received, is cached locally until the Time-to-Live (TTL) for that resource record expires. The response is bound to the traffic and allows the DNS-AS client to now identify, classify, and forward traffic accordingly.
Key Concepts for AVC with DNS-AS
|
Concept |
Meaning or Definition |
||
|---|---|---|---|
|
Metadata (RFC6759) |
In the context of the AVC with DNS-AS feature, this includes traffic classification information, application identification information, and business relevance information. Metadata is maintained in the form of TXT records. The following is a sample metadata record in the prescribed format: CISCO-CLS=app-name:example|app-class:TD|business:YES|app-id:CU/28202 |
||
|
Forward look-up |
A request for an IP address or a request for an “A” record, originating from a host. Being able to snoop these forward lookups in the network traffic is fundamental to the AVC with DNS-AS feature. |
||
|
Host |
A PC or mobile where users run software applications, access websites and so on. Forward look-up requests originate from hosts. |
||
|
Client or DNS-AS client |
Networking devices throughout your network. Host traffic is always routed through such a client.
DNS-AS clients receive metadata from an authoritative DNS server and maintain a database of this information in the form of records. How long the record remains in the client’s database, is determined by the record’s TTL. |
||
|
Binding table |
A table that resides in the DNS-AS client and serves as a database of parsed DNS server responses [TXT records and “A” records]. Every DNS-AS client has a binding table of its own. This table not to be confused with the trusted domain list which is only a list of the trusted domains. |
||
|
"A" record |
A record containing the domain name and IP address information [Only IPv4 address]. This is one of the DNS-Server responses (the other being the TXT record) and has a predefined lifespan. A forward lookup request from a host is a request for an “A” record. |
||
|
TXT DNS-AS resource record or TXT record |
A record containing metadata. This is one of the DNS-Server responses (the other being the “A” record) and has a predefined lifespan. A TXT record is limited to 255 characters. For AVC with DNS-AS, the TXT attribute is always CISCO-CLS. Any TXT record that starts with CISCO-CLS= can be recognized as an AVC with DNS-AS message. The message format is as follows: CISCO-CLS=<option>:<val>{|<option>:<val>}* |
||
|
Time-to-Live (TTL) |
The lifespan of an “A” record and TXT record in the binding table. TTL values are configured on the DNS server. While a TTL accompanies both TXT and “A” record responses, the DNS client only goes by the “A” record response from the DNS server. |
||
|
Authoritative DNS server |
The go-to DNS server for all client metadata and “A” record requests. Every DNS domain has only one authoritative DNS server. Such a server maintains records of application metadata in the form of a TXT record, and only returns responses to queries about domain names that have been maintained in the required format. The following is a sample metadata record in the prescribed format: CISCO-CLS=app-name:example|app-class:TD|business:YES|app-id:CU/28202 |
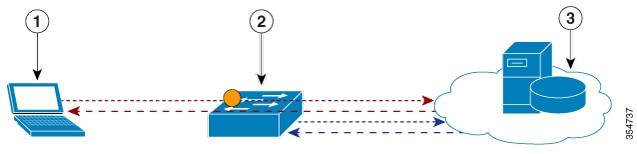
AVC with DNS-AS Process Flow
The working of AVC with DNS-AS involves the DNS snooping process and the DNS-AS client process—both of which are loosely coupled, but independent processes.
DNS Snooping Process
DNS-AS Client Process
| Step 1 | The DNS-AS client sends a DNS query (TXT request) to the authoritative DNS server.
The DNS-AS client, which is constantly snooping for requests (that correspond with entries in the trusted domain list), finds the host’s forward look-up request. Based on the snooped result, the DNS-AS client sends a TXT request to the authoritative DNS server.
| ||
| Step 2 | The authoritative DNS-server responds with a TXT record response. | ||
| Step 3 | A successful TXT response is followed by an “A” record request. | ||
| Step 4 | The authoritative DNS-server responds with an “A” record response. | ||
| Step 5 | The DNS-AS client parses and saves the response in its binding table.
The DNS-AS client saves the TXT record and “A” record in its binding table. The response will remain saved in the binding table for the duration specified by the TTL of the “A” record. The system automatically checks and prevents duplicate entries for a fully qualified domain name in the binding table. The DNS-AS client uses the metadata it receives (from the DNS Server), to determine if a QoS policy should be applied. The DNS-AS client forwards information about identified applications, to FNF, enabling you to export this information. |
Figure: AVC with DNS-AS Process Flow
|
1 |
Host |
2 |
DNS-As Client |
3 |
Authoritative DNS Server |
Stacking and AVC with DNS-AS
AVC with DNS-AS supports stacking. To ensure successful stack management, the binding table database of the active stack master (also a DNS-AS client) is synchronized with the stack member (also a DNS-AS client). As long as AVC with DNS-AS is enabled, no additional user configuration is required. The binding table entries are synchronized at these times:
Default Configuration for AVC with DNS-AS
DNS-AS is disabled.
How to Configure AVC with DNS-AS
Generating Metadata Streams
Application metadata is configured and saved on the local, authoritative DNS server. You configure application classification information, for each trusted domain, in a prescribed format (a metadata stream). This is the information that the server propagates to switches when queried for application metadata. When the switch sends a TXT query regarding an application, the DNS server sends the relevant metadata in the TXT response.
To generate metadata streams, perform the following task:
| Command or Action | Purpose | |||
|---|---|---|---|---|
| Step 1 | Go to the: AVC Resource Record Generator. Example: CISCO-CLS=app-name:example|app-class:TD|business:YES|app-id:CU/28202 | Helps you generate a metadata stream for an application or domain, in a TXT record format. You can specify the following metadata fields:
For information about how traffic class and business relevance fields here map to QoS traffic classification, see App-Class and QoS Traffic Mapping | ||
| Step 2 | Click one of the options to generate the metadata stream.
Example: Generate predefined |
Generate predefined—Generate a predefined metadata stream for well known applications, using best practice defaults. Generate custom—Generate a custom metadata stream for your own applications using custom values. | ||
| Step 3 | Copy metadata into the corresponding TXT Resource Record of the DNS server in charge of the DNS domain that you have marked as a trusted domain. |
Copy and paste the metadata stream from the website, to the authoritative DNS server you are using. |
Configuring a DNS Server as the Authoritative Server
All DNS-AS clients in the network should be configured to send all DNS queries to one authoritative DNS server. On a Cisco Catalyst switch, perform the following task:
Enabling AVC with DNS-AS
DNS-AS is disabled by default. To enable the feature on a Cisco Catalyst switch, perform the following task:
| Command or Action | Purpose | |||
|---|---|---|---|---|
| Step 1 | configure
terminal
Example: Switch# configure terminal | |||
| Step 2 | [no]
avc dns-as client enable
Example: Switch(config)# avc dns-as client enable
|
Enables AVC with DNS-AS on the switch (DNS-AS client). The system then creates a binding table where parsed DNS server responses are stored till the TTL expires.
|
Maintaining the List of Trusted Domains
Trusted domains are saved in every DNS-AS client where AVC with DNS-AS is enabled . When the feature is first enabled on the DNS-AS client, the list is empty. You must enter the domains that the switch should trust. The switch snoops only for network traffic that is maintained in this list. To make entries in the trusted domain list, perform the following task:
| Command or Action | Purpose | |
|---|---|---|
| Step 1 | configure
terminal
Example: Switch# configure terminal | |
| Step 2 | [no]
avc dns-as client trusted-domains
Example: Switch(config)# avc dns-as client trusted-domains
|
Enters the trusted domain configuration mode. |
| Step 3 | [no]
domain
domain-name
Example: Switch(config-trusted-domains)# domain www.example.com OR Switch(config-trusted-domains)# domain *example.com |
Enter the domain name you would like to add to the trusted domain list. This forms part of the list of trusted domains for the DNS-AS client. All remaining domains are ignored and will follow default forwarding behavior. You can enter up to 50 domains. You can use regular expressions to match the domain name. For example, to represent all the domains for an organization, if you enter:Switch(config-trusted-domains)# domain *.example.*, the DNS-AS client matches www.example.com, ftp.example.org and any other domain that pertains to the organization “example”. But use such an entry at your discretion, because it could increase the size of the binding table considerably. |
Configuring QoS for AVC with DNS-AS
In order to isolate and classify trusted traffic as defined in the metadata stream, you must create class maps (one for each traffic class) > define traffic-class match criteria and business-relevance match criteria > create a policy map > add the class map> set action> attach the policy map to the interface. For more information, see the Classification Overview section of the Configuring QoS chapter in this guide.
Class Map Configuration in the Easy QoS Model
In order to determine the number of traffic classes that should be provisioned, you can use the 12-class Easy QoS Model. This model provides a uniform, standards-based recommendations to help ensure that QoS designs and deployments are unified and consistent across an organization. The following sample output displays class map configuration for traffic class and business relevance, according to the 12-class Easy QoS Model:
 Note | Only in the context of the DNS-AS feature, you can specify up to two match attributes for each class. |
class-map match-all VOICE
match protocol attribute traffic-class voip-telephony
match protocol attribute business-relevance business-relevant
class-map match-all BROADCAST-VIDEO
match protocol attribute traffic-class broadcast-video
match protocol attribute business-relevance business-relevant
class-map match-all REAL-TIME-INTERACTIVE
match protocol attribute traffic-class real-time-interactive
match protocol attribute business-relevance business-relevant
class-map match-all MULTIMEDIA-CONFERENCING
match protocol attribute traffic-class multimedia-conferencing
match protocol attribute business-relevance business-relevant
class-map match-all MULTIMEDIA-STREAMING
match protocol attribute traffic-class multimedia-streaming
match protocol attribute business-relevance business-relevant
class-map match-all SIGNALING
match protocol attribute traffic-class signaling
match protocol attribute business-relevance business-relevant
class-map match-all NETWORK-CONTROL
match protocol attribute traffic-class network-control
match protocol attribute business-relevance business-relevant
class-map match-all NETWORK-MANAGEMENT
match protocol attribute traffic-class ops-admin-mgmt
match protocol attribute business-relevance business-relevant
class-map match-all TRANSACTIONAL-DATA
match protocol attribute traffic-class transactional-data
match protocol attribute business-relevance business-relevant
class-map match-all BULK-DATA
match protocol attribute traffic-class bulk-data
match protocol attribute business-relevance business-relevant
class-map match-all SCAVENGER
match protocol attribute business-relevance business-irrelevant
Policy Map Definitions in the Easy QoS Model
policy-map MARKING
class VOICE
set dscp ef
class BROADCAST-VIDEO
set dscp cs5
class REAL-TIME-INTERACTIVE
set dscp cs4
class MULTIMEDIA-CONFERENCING
set dscp af41
class MULTIMEDIA-STREAMING
set dscp af31
class SIGNALING
set dscp cs3
class NETWORK-CONTROL
set dscp cs6
class NETWORK-MANAGEMENT
set dscp cs2
class TRANSACTIONAL-DATA
set dscp af21
class BULK-DATA
set dscp af11
class SCAVENGER
set dscp cs1
class class-default
set dscp default
App-Class and QoS Traffic Mapping
The following table shows how the app-class field in the metadata stream maps to the 12-class Easy QoS Model of traffic classification.
|
Application Class Long Text |
Application Class Short Text |
Corresponding QoS Traffic Class Name and Business Relevance |
|---|---|---|
|
VOIP-TELEPHONY |
VO |
Traffic-class = voip-telephony Business-relevance = YES |
|
BROADCAST-VIDEO |
BV |
Traffic-class = broadcast-video Business-relevance = YES |
|
REALTIME-INTERACTIVE |
RTI |
Traffic-class = real-time-interactive Business-relevance = YES |
|
MULTIMEDIA-CONFERENCING |
MMC |
Traffic-class = multimedia-conferencing Business-relevance = YES |
|
MULTIMEDIA-STREAMING |
MMS |
Traffic-class = multimedia-streaming Business-relevance = YES |
|
NETWORK-CONTROL |
NC |
Traffic-class = network-control Business-relevance = YES |
|
SIGNALING |
CS |
Traffic-class = Signaling Business-relevance = YES |
|
OPS-ADMIN-MGMT |
OAM |
Traffic-class = ops-admin-mgmt Business-relevance = YES |
|
TRANSACTIONAL-DATA |
TD |
Traffic-class = Transactional-Data Business-relevance = YES |
|
BULK-DATA |
BD |
Traffic-class = bulk-data Business-relevance = YES |
|
BEST-EFFORT |
BE |
Traffic-class = <no change> Business-relevance = default |
|
SCAVENGER |
SCV |
Traffic-Class = <no change> Business-relevance = NO |
Classifying Network Control Traffic
The following example shows how to classify network control traffic. The corresponding metadata that should be maintained is:CISCO-CLS=app-name:example|app-class:NC|business:YES
-
Create class maps and match attributes: Switch# configure terminal Enter configuration commands, one per line. End with CNTL/Z. Switch(config)# class-map NETWORK-CONTROL Switch(config-cmap)# match protocol attribute traffic-class network-control Switch(config-cmap)# match protocol attribute business-relevance business-relevant Switch(config-cmap)# end
-
Create the policy map, attach the class map to it and specify priority: Switch# configure terminal Switch configuration commands, one per line. End with CNTL/Z. Switch(config)# policy-map MARKING Switch(config-pmap)# class NETWORK-CONTROL Switch(config-pmap-c)# set dscp ef Switch(config-pmap-c)# end
-
Attach the policy map to an interface: Switch# configure terminal Enter configuration commands, one per line. End with CNTL/Z. Switch(config)# interface tengigabitethernet 1/0/1 Switch(config-if)# service-policy input MARKING Switch(config-if)# end
Configuring FNF for AVC with DNS-AS
With FNF you can gain visibility into the applications running on your network, and use FNF option templates to export application ID, description, and attribute information. You must configure these FNF settings on the DNS-AS client:
-
Configure a flow record to collect nonkey field application-name, and the key fields ipv4 source address and ipv4 destination address
-
Configure a flow exporter and the two option templates. Option templates fetch application information.
Option template application-table, exports only applications resolved by the DNS-AS client, that is, the application ID and name from the binding table. The corresponding application descriptions are from Network Based Application Recognition (NBAR) definition for standard applications. A constructured help string is used for custom applications..
Option template application-attributes fetches attribute information by mapping it to the application name. Where standard application names are used, the option template uses standard Network Based Application Recognition (NBAR) attribute definitions; where custom application names are used, user-defined application names and only certain attribute fields are guaranteed to carry values.
-
Configure a flow monitor and apply it to an interface to enable network traffic monitoring.
FNF Interaction with DNS-AS—With every flow that is created in the flow table, the DNS-AS client resolves the application name for the flow (if the entry exists in the binding table), by using the destination IP address (and if not available), the source IP address.
At periodic, configured intervals (600 seconds, by default), FNF exports option template data, that is mapped to the corresponding application name, to an external collector.
Option Templates
The application-table and application-attributes option templates are supported. Option templates determine the information that is exported to an external collector.
option application-table
This template exports the application name, application tag, and description to the external collector.
On a device where AVC with DNS-AS is enabled, only applications resolved by the DNS-AS client are exported. But as a permanent feature, the application-table template exports applications unclassified and unknown, irrespective of whether the feature is enabled or not.
-
Application Name—For custom and standard applications, this information is derived from the TXT response (app-name:) that is saved in the binding table.
-
Application Tag—The same as the application ID in the context of the AVC with DNS-AS feature. It consists of the engine ID and selector ID.
-
Engine ID or Classification Engine ID—Defines the context for the selector ID. Only these values are supported:
-
L3—IANA layer 3 protocol number (IANA_L3_STANDARD, ID: 1)
-
L4—IANA layer 4 well-known port number (IANA_L4_STANDARD, ID: 3)
-
L7—Cisco global application ID (CISCO_L7_GLOBAL, ID: 13)
-
CU—Custom protocol, (NBAR_CUSTOM, ID: 6)
-
-
Selector ID—Uniquely identifies the application or classification.
For standard applications, the application tag information is derived from these sources, in the given order of precedence:
-
TXT response (app-id:)
-
The NBAR definition for standard applications (if the TXT response does not carry a value).
For custom applications, the following applies to application tag information:
-
It is derived only from the TXT response (app-id:)
-
For the engine ID, the DNS-AS client automatically uses CU—Custom protocol, (NBAR_CUSTOM, ID: 6).
-
For the selector ID, the DNS-AS client allots a custom selector ID. A maximum of 120 custom applications are supported - out of which 110 are available to the DNS-AS client. Starting with selector ID value 243, IDs are assigned in descending order. When there are no remaining IDs to assign, the entry is not saved in the binding table.
-
-
Description—This information is derived from the NBAR definition for standard applications. For custom applications, the DNS-AS client uses: User Defined Protocol <app-name>.
option application-attributes
This template enables the collector to map the application names (from the option application-table), to attributes. Attributes are statically assigned to each protocol or application, and are not dependent on traffic. The template supports the following attributes:
-
Application Tag—See the Application Tag info in the option application-table section above. The same applies here.
-
Category—Groups applications based on the first level of categorization for each protocol as the match criteria. Similar applications are grouped together under one category. For example, the email category contains all email applications such as, Internet Mail Access Protocol (IMAP), Simple Mail Transfer Protocol (SMTP), Lotus Notes, and so on.
-
Sub-category—Groups applications based on the second level of categorization for each protocol as the match criteria. For example, clearcase, dbase, rda, mysql and other database applications are grouped under the database group.
-
Application Group—Groups the same networking applications together. For instance, Example-Messenger, Example-VoIP-messenger, and Example-VoIP-over-SIP are grouped together under the example-messenger-group
-
Peer-to-peer (p2p)—Groups protocols based on whether or not they use p2p technology.
-
Tunnel—Groups protocols based on whether or not a protocol tunnels the traffic of other protocols. Protocols for which the NBAR does not provide any value are categorized under the unassigned tunnel group. For example, Layer 2 Tunneling Protocols (L2TP).
-
Encryption—Groups applications based on the encrypted and nonencrypted status of the applications. Protocols for which the NBAR does not provide any value are categorized under the unassigned encrypted group.
-
Traffic class—Groups applications and protocols based on the traffic class they belong to. For example, all applications that have traffic class TD. Traffic class information is derived from these sources, in the given order of precedence:
-
TXT response (app-class:)
-
The NBAR definition for standard applications (if the TXT response does not carry a value)
-
-
Business relevance—Groups applications based on whether or not they have been marked as business-relevant. For example, all applications that have business relevance as YES. Business relevance information is derived from these sources, in the given order of precedence:
-
TXT response (business:)
-
The NBAR definition for standard applications (if the TXT response does not carry a value)
-
Only these attributes of the application-attributes options template are guaranteed to carry a value:
-
Application Tag—See the Application Tag info in the option application-table section above. The same applies here.
-
Traffic class—This information is derived from the TXT response (app-class:)
-
Business relevance—This information is derived from the TXT response (business:)
Sample FNF Configuration for AVC with DNS-AS
The following example shows how you can configure FNF for AVC with DNS-AS:
-
The source and destination IP addresses as key fields, in order to resolve application names.
-
The use of the application name as a nonkey field in flow record.
Additionally (not mandatory), you can also configure the number of bytes or packets in a flow as a nonkey field, to display the number of applications sent to the collector
Switch# configure terminal
Switch(config)# flow record example-record1
Switch(config-flow-record)# match ipv4 source address
Switch(config-flow-record)# match ipv4 destination address
Switch(config-flow-record)# collect application name
Switch(config-flow-record)# collect counter packets
Switch(config-flow-record)# exit

Switch# show flow record example-record1
flow record example-record1
 match ipv4 source address
 match ipv4 destination address
 collect application name
 collect counter packets
Also configure the application-table and application-attributes option templates in the exporter. Without option templates, the collector cannot retrieve meaningful application information. At a minimum we recommend that you configure the application-table option. For attribute information, also configure the application-attribute option.
You can also change the frequency of template export in seconds (the allowed range is 1 to 86400 seconds; the default is 600 seconds).
Switch(config)# flow exporter example-exporter1
Switch(config-flow-exporter)# option application-table
Switch(config-flow-exporter)# option application-attributes
Switch(config-flow-exporter)# template data timeout 500
Switch(config-flow-exporter)# exit

Switch# show flow exporter example-exporter1
Flow Exporter example-exporter1:
  Description:              User defined
  Export protocol:          NetFlow Version 9
  Transport Configuration:
    Destination IP address: 192.0.1.254
    Source IP address:      192.51.100.2
    Transport Protocol:     UDP
    Destination Port:       9995
    Source Port:            54964
    DSCP:                   0x0
    TTL:                    255
    Output Features:        Not Used
  Options Configuration:
    application-table (timeout 500 seconds)
    application-attributes (timeout 500 seconds)

Switch# show flow exporter example-exporter1 statistics
Flow Exporter example-exporter1:
  Packet send statistics (last cleared 00:00:48 ago):
    Successfully sent:         2                     (924 bytes)

  Client send statistics:
    Client: Option options application-name
      Records added:           4
        - sent:                4
      Bytes added:             332
        - sent:                332

    Client: Option options application-attributes
      Records added:           2
        - sent:                2
      Bytes added:             388
        - sent:                388
Apply the flow monitor to an interface, to perform network traffic monitoring.
You can also apply a QoS policy to the same interface. This example applies the QoS policy created as part of the sample QoS configuration (Classifying Network Control Traffic)
Switch# configure terminal
Switch(config)# flow monitor example-monitor1
Switch(config-flow-monitor)# record example-record1
Switch(config-flow-monitor)#  exporter exporter-export1
Switch(config-flow-monitor)# exit
Switch(config)# interface tengigabitethernet 1/0/1
Switch(config-if)# switchport acceess vlan 100
Switch(config-if)# switchport mode access
Switch(config-if)# ip flow monitor example-monitor1 input
Switch(config-if)# service-policy input MARKING
Switch(config-if)# end

Switch# show flow monitor
flow monitor example-monitor1
 record example-record1
 exporter example-exporter1
!
Switch# show interface tengigabitethernet1/0/1
interface tengigabitethernet1/0/1
 switchport access vlan 100
 switchport mode access
ip flow monitor example-monitor1 input

Switch# show flow monitor example-monitor1 cache
  Cache type:                               Normal
  Cache size:                                16640
  Current entries:                               3
  High Watermark:                                3

  Flows added:                                   6
  Flows aged:                                    3
    - Active timeout      (  1800 secs)          0
    - Inactive timeout    (    30 secs)          3
    - Event aged                                 0
    - Watermark aged                             0
    - Emergency aged                             0

IPV4 SOURCE ADDRESS:       192.0.1.254
IPV4 DESTINATION ADDRESS:  192.51.100.2
counter packets long:      7479
application name:          appexample1

IPV4 SOURCE ADDRESS:       192.51.100.11
IPV4 DESTINATION ADDRESS:  203.0.113.125
counter packets long:      445
application name:          appexample2

IPV4 SOURCE ADDRESS:       192.51.51.51
IPV4 DESTINATION ADDRESS: 203.0.113.100
counter packets long:      14325
application name:          appexample3
Switch#
Switch# show avc dns-as client binding-table detail
DNS-AS generated protocols:
 Max number of protocols      :50
 Customization interval [min] :N/A

 Age            :   The amount of time that the entry is active
 TTL            :   Time to live which was learned from DNS-AS server
 Time To Expire :   Entry expiration time in case device does not see DNS traffic for the entry host

Protocol-Name        : appexample1
 VRF                 : <default>
 Host                : www.appexample1.com
 Age[min]            : 2
 TTL[min]            : 60
 Time To Expire[min] : 58
 TXT Record          : app-name:appexample1|app-class:VO|business:YES
 Traffic Class       : voip-telephony
 Business Relevance  : business relevant
 IP                  : 192.0.1.254

Protocol-Name        : appexample2
 VRF                 : <default>
 Host                : www.appexample2.com
 Age[min]            : 2
 TTL[min]            : 60
 Time To Expire[min] : 58
 TXT Record          : app-name:appexample2|app-class:VO|business:YES
 Traffic Class       : voip-telephony
 Business Relevance  : business relevant
 IP                  : 192.51.100.11

<output truncated>
Switch# show flow exporter option application engines
Engine: prot (IANA_L3_STANDARD, ID: 1)
Engine: port (IANA_L4_STANDARD, ID: 3)
Engine: NBAR (NBAR_CUSTOM, ID: 6)
Engine: cisco (CISCO_L7_GLOBAL, ID: 13)
Switch# show flow exporter option application table
Engine: prot (IANA_L3_STANDARD, ID: 1)
appID 		Name 			Description
----- 		---- 			-----------

Engine: port (IANA_L4_STANDARD, ID: 3)
appID 		Name 			Description
----- 		---- 			-----------

Engine: NBAR (NBAR_CUSTOM, ID: 6)
appID 		Name 			Description
----- 		---- 			-----------
6:28202	appexample1 User defined protocol appexample1

Engine: cisco (CISCO_L7_GLOBAL, ID: 13)
appID 		Name 			Description
----- 		---- 			-----------
13:0		unclassified Unclassified traffic
13:1 		unknown 			 Unknown application
13:518		appexample2 appexample2, social web application and service
Monitoring AVC with DNS-AS
To display the various AVC with DNS-AS settings you have configured, use these commands in the privileged EXEC mode:
|
Command |
Purpose |
Sample Output |
|---|---|---|
|
show avc dns-as client status |
Displays current status of the DNS-AS client. Use this command to know whether AVC with DNS-AS is enabled or not. |
|
|
show avc dns-as client trusted-domains |
Displays list of trusted domains maintined in the binding table. |
|
|
show avc dns-as client binding-table and show avc dns-as client binding-table detail |
Displays AVC with DNS-AS metadata for the list of trusted domains and resolved entries. You can filter the output by application name, domain name, and so on. Both commands display the same information, in different formats. |
|
|
show avc dns-as client statistics |
Displays packet logging information—the number of DNS queries sent and the number of responses received. |
|
|
show avc dns-as client name-server brief |
Displays information about the DNS server to which the metadata request was sent. |
|
|
show ip name-server |
Displays all the name server IP addresses that have been maintained. |
|
|
show platform tcam utilization |
Displays information about TCAM availability |
Switch# show avc dns-as client status
DNS-AS client is enabled
Back to DNS-AS Monitoring Commands
Switch# show avc dns-as client trusted-domains
Id  | Trusted domain
----------------------------------------------------
    1| example.com
    2| www.example.com
    3| example.net
    4| www.example.net
    5| example.org
    6| www.example.org
Back to DNS-AS Monitoring Commands
Switch# show avc dns-as client binding-table
 Switch# show avc dns-as client binding-table detailed
DNS-AS generated protocols:
Max number of protocols :50
Customization interval [min] :N/A

Age : The amount of time that the entry is active
TTL : Time to live which was learned from DNS-AS server
Time To Expire : Entry expiration time in case device does not see DNS traffic for the entry host

Protocol-Name : example
VRF : <default>
Host : www.example.com
Age[min] : 2
TTL[min] : 60
Time To Expire[min] : 58
TXT Record : app-name:example|app-class:VO|business:YES
Traffic Class : voip-telephony
Business Relevance : business relevant
IP : 192.0.2.121
: 192.0.2.254
: 198.51.100.1
: 198.51.100.254
: 192.51.100.12
: 203.0.113.125
<output truncated>
Back to DNS-AS Monitoring Commands
Note | Two DNS servers are configured in this example. |
Switch# show avc dns-as client statistics
Server details: vrf-id = 0 vrf-name = <default> ip = 192.0.2.1
AAAA Query Error packets 0
AAAA Query TX packets 0
AAAA Response RX packets 0
TXT Query Error packets 0
TXT Query TX packets 8
TXT Response RX packets 0
A Query Error packets 0
A Query TX packets 6
A Response RX packets 0
Server details: vrf-id = 0 vrf-name = <default> ip = 192.0.2.2
AAAA Query Error packets 0
AAAA Query TX packets 0
AAAA Response RX packets 0
TXT Query Error packets 0
TXT Query TX packets 2
TXT Response RX packets 2
A Query Error packets 0
A Query TX packets 4
A Response RX packets 2
Total Drop packets 0

avc_dns_as_pkts_logged = 2
avc_dns_as_q_pkts_processed = 2
Back to DNS-AS Monitoring Commands
Switch# show avc dns-as client name-server brief

Server-IP | Vrf-name
------------------------------------------------------
192.0.2.1 | <default>
192.0.2.2 | <default>
Back to DNS-AS Monitoring Commands
Switch# show ip name-server
192.0.2.1
192.0.2.2
2001:DB8::1
Back to DNS-AS Monitoring Commands
Note | The relevant TCAM entry is IPv4 qos aces: |
Switch# show platform tcam utilization
CAM Utilization for ASIC# 0 Max Used
Masks/Values Masks/values

Unicast mac addresses: 16604/16604 24/24
IPv4 IGMP groups + multicast routes: 1072/1072 3/3
IPv4 unicast directly-connected routes: 4096/4096 4/4
IPv4 unicast indirectly-connected routes: 1280/1280 40/40
IPv6 Multicast groups: 1072/1072 18/18
IPv6 unicast directly-connected routes: 4096/4096 1/1
IPv6 unicast indirectly-connected routes: 1280/1280 32/32
IPv4 policy based routing aces: 512/512 14/14
IPv4 qos aces: 512/512 51/51
IPv4 security aces: 1024/1024 78/78
IPv6 policy based routing aces: 256/256 8/8
IPv6 qos aces: 256/256 44/44
IPv6 security aces: 512/512 18/18

Note: Allocation of TCAM entries per feature uses
a complex algorithm. The above information is meant
to provide an abstract view of the current TCAM utilization
Back to DNS-AS Monitoring Commands
Troubleshooting AVC with DNS-AS
|
Problem |
Possible Causes and Solutions |
|---|---|
|
There are no entries in the binding table. |
The binding table may be empty because of either one or both of these reasons:
|
|
Unsuccessful DNS snooping or packet logging. |
To ensure DNS snooping and packet logging, you must attach the policy map (containing the relevant class maps that will determine traffic class) to the interface—See the example in the Configuring QoS for AVC with DNS-AS |
|
The DNS server does not return correct values. |
Verify that the correct DNS-AS metadata is maintained in the DNS system.
|
|
The QoS policy you applied is removed from the port. |
When the DNS-AS client recognises an application, along with saving the "A" record response in the binding table, the system utilises the TCAM to save the IP address of the application. A single application can in effect have multiple IP addresses, each utilising additional space in the TCAM. When the TCAM is exhausted, QoS policies cease to be applied. To avoid the problem, monitor TCAM utilisation on a regular basis. Enter the show platform tcam utilisation command in privilege EXEC mode, to display information about TCAM availability. |
|
The DNS-AS client ignores the QoS mapping you've defined and applies default forwarding behavior. |
The DNS-AS client ignores QoS mapping and applies default forwarding behavior in these cases:
|
Feature History and Information for AVC with DNS-AS
The following table provides release information about the feature or features described in this chapter. This table lists only the software release that introduced support for a given feature in a given software release train. Unless noted otherwise, subsequent releases of that software release train also support that feature.
| Release | Modification |
|---|---|
|
Cisco IOS Release 15.2(5)E1 |
This feature was introduced. |
|
Cisco IOS Release 15.2(5)E2 |
Flexible NetFlow (FNF) for AVC with DNS-AS was introduced - Provides the ability to export application information using FNF. |
 Feedback