Configuring Bidirectional Forwarding Detection

This chapter describes how to configure basic interface parameters on Cisco NX-OS devices.

Finding Feature Information

Your software release might not support all the features documented in this module. For the latest caveats and feature information, see the Bug Search Tool at https://tools.cisco.com/bugsearch/ and the release notes for your software release. To find information about the features documented in this module, and to see a list of the releases in which each feature is supported, see the "New and Changed Information"chapter or the Feature History table in this chapter.

Feature History for BFD

This table includes only the updates for those releases that have resulted in additions or changes to the feature.

Table 1. Feature History for Configuring Basic Interface Parameters

Feature Name

Release

Feature Information

BFD Multihop Sessions

8.4(1)

Starting from Cisco NX-OS Release 8.4(1), the BFD multihop feature is supported over IPv6.

BFD Multihop Sessions

8.1(1)

Added support for BFD multihop session for eBGP and iBGP peers.

The BFD multihop feature supports only the static routes.

Control Plane Independent bit setting

8.0(1)

Added support for Control Plane Independent bit setting for outgoing BFD packets.

BFD FSA offload on M3

7.3(0)DX(1)

Added support for BFD FSA offload on the M3 line cards.

BFD Support for HSRPv6

7.3(0)D1(1)

Added support for BFD on HSRPv6.

BFD Enhancement to Address Per-link Efficiency

7.3(0)D1(1)

Added support for configuring individual BFD session on every LAG member interface as an enhancement to BFD address per-link efficiency.

BFD on unnumbered Interfaces

7.2(1)D1(1)

Added support for configuring BFD on unnumbered interface.

BFD FSA offload on F3

7.2(1)D1(1)

Added support for BFD FSA offload on the F3 line card.

Support for BFD over Layer 2 over a fabricpath core

7.2(0)D1(1)

Added support for BFD over Layer 2 over a fabricpath core.

Support for BFD over SVI over Fabricbath core

7.2(0)D1(1)

Added support for BFD over SVI over Fabricbath core.

BFD on IPv6 Static Routes

6.2(2a)

Added support for configuring BFD on all IPv6 static routes on an interface.

BFD Interoperability

6.2(2)

Added support for configuring BFD interoperability with Cisco NX-OS and Cisco IOS software.

BFD on IPv6

6.2(2)

Added support for BFD on IPv6.

BFD on OSPFv3

6.2(2)

Added support for BFD on OPSPv3.

BFD on IS-ISv6

6.2(2)

Added support for BFD on IS-ISv6.

BFD on M2 and F2 modules

6.1(1)

Added a note on M2 and F2 module support

BFD Authentication

5.2(1)

Keyed SHA-1 authentication is supported on BFD packets.

BFD for VRRP

5.2(1)

Added support for BFD in VRRP.

BFD

5.0(2)

This feature was introduced.

Information About BFD

BFD is a detection protocol designed to provide fast forwarding-path failure detection times for media types, encapsulations, topologies, and routing protocols. You can use BFD to detect forwarding path failures at a uniform rate, rather than the variable rates for different protocol hello mechanisms. BFD makes network profiling and planning easier and reconvergence time consistent and predictable.

BFD provides subsecond failure detection between two adjacent devices and can be less CPU-intensive than protocol hello messages because some of the BFD load can be distributed onto the data plane on supported modules.

Asynchronous Mode

Cisco NX-OS supports the BFD asynchronous mode, which sends BFD control packets between two adjacent devices to activate and maintain BFD neighbor sessions between the devices. You configure BFD on both devices (or BFD neighbors). Once BFD has been enabled on the interfaces and on the appropriate protocols, Cisco NX-OS creates a BFD session, negotiates BFD session parameters, and begins to send BFD control packets to each BFD neighbor at the negotiated interval. The BFD session parameters include the following:

  • Desired minimum transmit interval—The interval at which this device wants to send BFD hello messages.

  • Required minimum receive interval—The minimum interval at which this device can accept BFD hello messages from another BFD device.

  • Detect multiplier—The number of missing BFD hello messages from another BFD device before this local device detects a fault in the forwarding path.

The figure below shows how a BFD session is established. The figure shows a simple network with two routers running OSPF and BFD. When OSPF discovers a neighbor (1), it sends a request to the local BFD process to initiate a BFD neighbor session with the OSPF neighbor router (2). The BFD neighbor session with the OSPF neighbor router is now established (3).

Figure 1. Establishing a BFD Neighbor Relationship

Detection of Failures

Once a BFD session has been established and timer negotiations are complete, BFD neighbors send BFD control packets that act in the same manner as an IGP hello protocol to detect liveliness, except at a more accelerated rate. BFD detects a failure, but the protocol must take action to bypass a failed peer.

BFD sends a failure detection notice to the BFD-enabled protocols when it detects a failure in the forwarding path. The local device can then initiate the protocol recalculation process and reduce the overall network convergence time.

The figure below shows what happens when a failure occurs in the network (1). The BFD neighbor session with the OSPF neighbor router is torn down (2). BFD notifies the local OSPF process that the BFD neighbor is no longer reachable (3). The local OSPF process tears down the OSPF neighbor relationship (4). If an alternative path is available, the routers immediately start converging on it.


Note


The BFD failure detection occurs in less than a second, which is much faster than OSPF Hello messages could detect the same failure.


Figure 2. Tearing Down an OSPF Neighbor Relationship


Distributed Operation

Cisco NX-OS can distribute the BFD operation to compatible modules that support BFD. This process offloads the CPU load for BFD packet processing to the individual modules that connect to the BFD neighbors. All BFD session traffic occurs on the module CPU. The module informs the supervisor when a BFD failure is detected.

BFD Echo Function

The BFD echo function sends echo packets from the forwarding engine to the remote BFD neighbor. The BFD neighbor forwards the echo packet back along the same path in order to perform detection; the BFD neighbor does not participate in the actual forwarding of the echo packets. The echo function and the forwarding engine are responsible for the detection process. BFD can use the slow timer to slow down the asycnhronous session when the echo function is enabled and reduce the number of BFD control packets that are sent between two BFD neighbors. Also, the forwarding engine tests the forwarding path on the remote (neighbor) system without involving the remote system, so there is less interpacket delay variability and faster failure detection times.

The echo function is without asymmetry when both BFD neighbors are running echo function.


Note


Unicast Reverse Path Forwarding check (uRPF) is disabled by default. If you need to enable it on an interface functioning with BFD, the BFD echo function must be disabled.


Security

Cisco NX-OS uses the packet Time to Live (TTL) value to verify that the BFD packets came from an adjacent BFD peer. For all asynchronous and echo request packets, the BFD neighbor sets the TTL value to 255 and the local BFD process verifies the TTL value as 255 before processing the incoming packet. For the echo response packet, BFD sets the TTL value to 254.

From Cisco NX-OS Release 5.2, you can configure SHA-1 authentication of BFD packets.

High Availability

BFD supports stateless restarts and in-service software upgrades (ISSUs). ISSU allows you to upgrade software without impacting forwarding. After a reboot or supervisor switchover, Cisco NX-OS applies the running configuration and BFD immediately sends control packets to the BFD peers.

BFD Interoperability

This feature enables BFD interoperability between Cisco IOS software, Cisco NX-OS software, and Cisco IOS-XR software.

BFD FSA Offload on F3 Line Card and M3 Line Card

The BFD Fabric Services Accelerator (FSA) Offload on F3 Line Card feature allows the offload of asynchronous and echo BFD transmission (Tx) and reception (Rx) to the network processing unit on the F3 line card. The BFD FSA Offload on F3 Line Card feature improves scale and reduces the overall network convergence time by sending rapid failure detection packets or messages to the routing protocols for recalculating the routing table. You should explicitly enable the BFD FSA Offload on F3 Line Card feature for each VDC, using the bfd hw-offload-module module-name command. To disable the feature, use the no bfd hw-offload-module module-name command. The feature can be enabled only if there are no active BFD sessions hosted on the line card in that particular VDC.

The BFD FSA Offload feature is introduced on the M3 line card in Cisco Nexus 7000 Series Release 7.3(0)DX(1).

The offload of BFD sessions to the FSA is disabled by default on the F3 line card, and is enabled by default on the M3 line card. BFD sessions can run at 15 ms when the session is offloaded to FSA.

BFD on Unnumbered Interfaces

The Cisco unified fabric needs to support 32 spines with 1024 leaves with bipartite connectivity. In a 32-spine Vinci Fabric, a given leaf will have 32 Layer3 links, one to each spine. Similarly, each spinet will have 1024 Layer3 links, one to each leaf. Typically, each Layer3 link at spine and leaf needs as many IP addresses, which is complex to assign and manage. To reduce the complexity, these Layer3 links derive IP address from a specified loopback interface, and such Layer3 links are referred as unnumbered links. These Layer3 unnumbered links are associated with their respective Router's MAC address. BFD is used for fast failure detection on these links. This necessitates support for BFD over unnumbered interfaces.

You can use either OSPF or ISIS protocols to provide Layer3 connectivity between spines and leaves.

The following BFD sub features are applicable on unnumbered interfaces:
  • Address Family Support

    BFD clients can bootstrap BFD with either IPv4 or IPv6 address.

  • Echo Support

    By default, echo function is supported on both IPv4 and IPv6 BFD sessions. However, if BFD IPv6 sessions are bootstrapped with link-local addresses, echo will not be supported.

  • BFD session over unnumbered port-channel

    Both Logical Mode and Per-link mode sessions are supported. By default, with no configuration on the port-channel, BFD sessions are in the logical mode.

The following configurations are not supported on unnumbered interfaces:

  • Switched Virtual Interfaces (SVIs) are not expected to be unnumbered.

  • Multipath links between the same set of spines and leaves are not supported.

  • Sub interfaces are not expected to be unnumbered and hence sub interface optimization is not supported.

BFD Enhancement to Address Per-link Efficiency

The Bidirectional Forwarding (BFD) enhancement to address per-link efficiency feature enables users to configure individual BFD sessions on every Link Aggregation Group (LAG) member interfaces (as defined in RFC 7130).

With this enhancement BFD sessions will run on each member link of the port-channel. If BFD detects a link failure, the member link is removed from the forwarding table. This mechanism delivers faster failure detection as the BFD sessions are created on individual port-channel interface.

Users can configure RFC 7130 BFD over main port-channel interface, which does bandwidth monitoring over LAG by having one micro-BFD session over each member. If any of the member port goes down, the port is removed from the forwarding table and this prevents black holing of traffic on that member.

Micro BFD sessions (BFD sessions running on member links of the port-channel are called as "micro BFD sessions") are supported for both LACP and non-LACP based-port channels.

BFD Multihop Sessions

The Bidirectional Forwarding Detection (BFD) multihop feature enables users to configure IPv4 BFD sessions over multihop routes. A BFD multihop session is setup between a unique source and destination address. BFD multihop sessions are defined by the link between the source and destination address, instead of an interface as seen in a single-hop BFD session.


Note


  • BFD multihop is implemented based on RFC5883 and is supported on all linecards.

  • BFD multihop is supported only on IPv4. Starting from Cisco NX-OS Release 8.4(1), the BFD multihop feature is supported over IPv6.

  • BFD multihop session is supported on both iBGP and eBGP neighbors.

  • Static routes are supported on BFD multihop. Dynamic routes are not supported.

  • BFD multihop session over Layer 2 BFD is not supported.

  • BFD multihop echo mode is not supported.

  • BFD multihop sessions cannot be offloaded.


For a BFD multihop session, a static route should exist between the BFD peers. The static route can be added by using the ip route command. If the static route is not configured between the peers, BFD multihop sessions might flap whenever there are route updates. For more information about static routes, see Configuring a Static Route for IPv4.

Prerequisites for BFD

BFD has the following prerequisites:

  • You must enable the BFD feature

  • For any client protocols that you want to enable BFD on, you enable BFD in that client protocol.

  • Disable Internet Control Message Protocol (ICMP) redirect messages on a BFD-enabled interfaces.

  • Disable the IP packet verification check for identical IP source and destination addresses in the default VDC.

  • See other detailed prerequisites that are listed with the configuration tasks.

  • From Cisco NX-OS Release 6.2(2), BFD for IPv6 is supported.

  • To configure the Intermediate System-to-Intermediate System (IS-IS) IPv6 client for BFD, IS-IS must be running on all participating routers. In addition, the baseline parameters for BFD sessions must be configured on the interfaces that run BFD sessions to BFD neighbors.

  • To enable BFD interoperability between Cisco IOS Software, Cisco NX-OS software, and Cisco IOS-XR software, use BFD in echo mode. In addition, configure the no ip redirect command on all the interfaces that are part of BFD and also on the peer device.

Guidelines and Limitations for BFD

BFD has the following configuration guidelines and limitations:

  • BFD supports BFD version 1.

  • In Cisco NX-OS Release 6.2(2) and later releases, BFD supports IPv4 and IPv6.

  • BFD supports only one session per address family (IPv4 or IPv6), per interface.

  • BFD supports keyed SHA-1 authentication from Cisco NX-OS Release 5.2 onwards.

  • BFD supports the following Layer 3 interfaces—physical interfaces, port channels, subinterfaces, and VLAN interfaces.

  • When configuring BFD for iBGP, ensure to configure BGP neighbor update-source command on connected interfaces.

  • BFD depends on a Layer 3 adjacency information to discover topology changes, including Layer 2 topology changes. A BFD session on a VLAN interface (SVI) may not be up after the convergence of the Layer 2 topology if there is no Layer 3 adjacency information available.

  • When Layer 3 over vPC feature is enabled using the layer3 peer-router command, BFD enabled with echo function is not supported on a switched virtual interface (SVIs) using vPC VLANs that are part of a vPC peer-link.

  • BFD does not support monitoring of multiple IPv6 next hops in the same subnet on a single interface.

  • For BFD on a static route between two devices, both devices must support BFD. If one or both of the devices do not support BFD, the static routes are not programmed in the Routing Information Base (RIB).

  • BFD over VLAN interfaces that have member ports only on a N7K-F132XL-15 module are not supported. You should disable BFD over any VLAN with member ports only on a N7K-F132XL-15 module.


    Note


    If you enable BFD at the router level (for example, from OSPF), any BFD sessions over a N7K-F132XL-15 line card will not come up. See the Cisco Nexus 7000 Series NX-OS Unicast Routing Configuration GuideCisco Nexus 7000 Series NX-OS Unicast Routing Configuration Guide for information about OSPF and other routing protocols.
  • When you configure the BFD Echo function on the distributed Layer 3 port channels, reloading a member module flaps the BFD session hosted on that module, which results in a packet loss.

  • Fabricpath BFD sessions are not supported on port-channel logical interface on any type of a line card.

  • If you connect the BFD peers directly without a Layer 2 switch in between, you can use the BFD per-link mode as an alternative solution.


    Note


    Using BFD per-link mode and subinterface optimization simultaneously on a Layer 3 port channel is not supported.
  • The BFD echo function is not supported when using IPv6 link-local addresses.

  • The following BFD command configurations are not supported during a rollback configuration:

    • bfd {ipv4 | ipv6} echo

    • bfd {ipv4 | ipv6} per-link

    • bfd hw-offload-module module-number

    • port-channel bfd track-member-link

    • port-channel bfd destination destination-ip-address

  • HSRP on IPv4 and IPv6 is supported with BFD.

  • If HSRP BFD ALL-INTERFACE is configured, all IPv4 and IPv6 HSRP groups on all interfaces automatically support BFD.

  • BFD is not supported for Anycast HSRP.

  • Supports only port-channel interfaces that are directly connected between two switches (peer devices) running BFD sessions.

  • Supports Layer 3 port channel interfaces in both On mode and LACP mode.

  • Supports all Line cards with Layer 3 capabilities.

  • IPv6 is not supported.

  • Fabric port-channel are not supported.

  • vPC is not supported.

  • Virtual switch interface over port-channels is not supported.

  • Storage VDCs is not supported.

  • Echo functionality is not supported for micro-BFD sessions.

  • RFC 7130 links cannot be configured along with proprietary links and BFD logical links.

  • If RFC 7130 is configured on the main port-channel interface and logical BFD is configured on subinterfaces, the logical BFD session should have lesser aggressive timers than the RFC 7130 BFD sessions.

  • Micro BFD sessions are not supported on port-channel sub interfaces.

  • FEX interfaces (HIF) ports are not supported.

  • If IEFT-BFD is enabled on a port-channel interface, the operational state of port-channel will depend on the minimum micro-BFD session members that are able to establish a session. If the minimum number of links required to have port-channel UP is not met, the port-channel interface is brought down. This in turn brings down the port-channel sub interfaces and the logical BFD sessions.

  • If a LACP port-channel has members in hot-standby state and BFD failure link is one of the active link, then hot-standby links might not come up directly. When the active link with BFD failure goes down, the hot-standby member becomes active. This scenario can cause port-channel to go down before the hot-standby can come up.

  • BFD per-link is supported for BGP.

  • To configure BFD Echo timer to less than 50 milliseconds, you need to configure both the bfd interval and the bfd echo-rx interval commands.

  • Port channel configuration limitations:

    • For Layer 3 port channels used by BFD, you must enable LACP on the port channel. BFD per-link is supported only for EIGRP, ISIS, and OSPF clients.


      Note


      To configure BFD per-link on a port channel, you need to shut down the interface and configure the per-link and then bring up the port-channel again.
    • For Layer 2 port channels used by SVI sessions, you must enable LACP on the port channel.

  • SVI limitations:

    • An ASIC reset will cause traffic disruption for other ports. This event could possibly cause SVI sessions on other ports to flap. Some triggers for an ASIC reset are port moves between VDCs, reloading a VDC, or if the carrier interface is a virtual port channel (vPC), BFD is not supported over the SVI interface.

    • When you change the topology (for example, add or delete a link into a VLAN, delete a member from a Layer 2 port channel, and so on), the SVI session could be affected. It may go down first and then come up after the topology discovery is finished.


      Note


      If you do not want the SVI sessions to flap and you need to change the topology, you can disable the BFD feature before making the changes and re-enable BFD after the changes have been made. You can also configure the BFD timer to be a large value (for example, 5 seconds), and change it back to a fast timer after the above events complete.

Default Settings

Table 2. Default BFD Parameters

Parameter

Default

BFD feature

Disabled

Required minimum receive interval

50 milliseconds

Desired minimum transmit interval

50 milliseconds

Detect multiplier

3

Echo function

Enabled

Mode

Asynchronous

Port channel

Logical mode (one session per source-destination pair address).

Slow timer

2000 milliseconds

Subinterface optimization

Disabled

Configuring BFD

Configuration Hierarchy

You can configure BFD at the global level and at the interface or subinterface level (for physical interfaces and port channels). The interface or subinterface configuration overrides the global configuration. On supported interfaces, the subinterface-level configuration overrides the interface or port channel configuration unless subinterface optimization is enabled. See the “Optimizing BFD on Subinterfaces” section for more information.


Note


Using BFD per-link mode and subinterface optimization simultaneously on a Layer 3 port channel is not supported.


For physical ports that are members of a port channel, the member port inherits the master port channel BFD configuration. The member port subinterfaces can override the master port channel BFD configuration, unless subinterface optimization is enabled.

Enabling BFD

You must enable the BFD feature before you can configure BFD on an interface and protocol within a device (VDC).

Before you begin

Before you configure this feature for the entire system, ensure that you are in the correct VDC. To change the VDC, use the switchto vdc command.

Procedure

  Command or Action Purpose

Step 1

switch# configure terminal

Enters the global configuration mode.

Step 2

switch(config)# feature bfd

Enables the BFD feature.

Step 3

(Optional) switch(config)# show feature | include bfd

(Optional)

Displays enabled and disabled features.

Step 4

(Optional) switch(config)# copy running-config startup-config

(Optional)

Copies the running configuration to the startup configuration.

Use the no feature bfd command to disable the BFD feature and remove all associated configuration.

Command

Purpose

no feature bfd

Disables the BFD feature and removes all associated configuration.

Configuring Global BFD Parameters

You can configure the BFD session parameters for all BFD sessions on the device. The BFD session parameters are negotiated between the BFD peers in a three-way handshake.

See the “Configuring BFD on an Interface” section to override these global session parameters on an interface.

Before you begin

  • Before you configure this feature for the entire system, ensure that you are in the correct VDC. To change the VDC, use the switchto vdc command.

  • Enable the BFD feature.

Procedure

  Command or Action Purpose

Step 1

switch# configure terminal

Enters the global configuration mode.

Step 2

switch(config)# bfd interval mintx min_rx msec multiplier value

Configures the BFD session parameters for all BFD sessions on the device. This command overrides these values by configuring the BFD session parameters on an interface. The mintx and msec range is from 15 to 999 milliseconds and the default is 50. The multiplier range is from 1 to 50. The multiplier default is 3.

Note


Even if the value of the mintx argument is configured as 15 ms, if the bfd hw-offload-module command is not enabled on the session, the configuration is not applied and the session functions at the default timer value, which is 50 ms.

Step 3

switch(config)# bfd slow-timer [interval]

Configures the slow timer used in the echo function. This value determines how fast BFD starts up a new session and at what speed the asynchronous sessions use for BFD control packets when the echo function is enabled. The slow-timer value is used as the new control packet interval, while the echo packets use the configured BFD intervals. The echo packets are used for link failure detection, while the control packets at the slower rate maintain the BFD session. The range is from 1000 to 30000 milliseconds. The default is 2000.

Step 4

switch(config-if)# bfd echo-interface loopback interface number

Configures the interface used for Bidirectional Forwarding Detection (BFD) echo frames. This command changes the source address for the echo packets to the one configured on the specified loopback interface. The interface number range is from 0 to 1023.

Step 5

switch(config)# bfd c-bit

Configures the Control Plane Independent bit setting for outgoing BFD packets.

Step 6

(Optional) switch(config)# show running-config bfd all

(Optional)

Displays all the BFD running configurations.

Step 7

(Optional) switch(config)# copy running-config startup-config

(Optional)

Copies the running configuration to the startup configuration.

Example

This example shows the peer-configured Control Plane Independent bit setting for outgoing BFD packets:

show bfd neighbors dest-ip 10.1.2.2 details
OurAddr         NeighAddr       LD/RD                 RH/RS           Holdown(mult)     State       Int               Vrf                       Type   
10.1.2.1        10.1.2.2        1090519041/1107296257 Up              8598(5)           Up          Eth9/21           default                   SH     
 
Session state is Up and using echo function with 50 ms interval
 
Session type: Singlehop
Local Diag: 0, Demand mode: 0, Poll bit: 0, Authentication: None
MinTxInt: 50000 us, MinRxInt: 2000000 us, Multiplier: 3
Received MinRxInt: 2000000 us, Received Multiplier: 5
Holdown (hits): 10000 ms (0), Hello (hits): 2000 ms (49104)
Rx Count: 49086, Rx Interval (ms) min/max/avg: 0/32150/1516 last: 1401 ms ago
Tx Count: 49104, Tx Interval (ms) min/max/avg: 1515/1515/1515 last: 1402 ms ago
Registered protocols:  netstack
Uptime: 0 days 20 hrs 39 mins 44 secs
Last packet: Version: 1                - Diagnostic: 0 
             State bit: Up             - Demand bit: 0 
             Poll bit: 0               - Final bit: 0 
             Multiplier: 5             - Length: 24 
             My Discr.: 1107296257     - Your Discr.: 1090519041 
             Min tx interval: 555000   - Min rx interval: 2000000 
             Min Echo interval: 50000  - Authentication bit: 0
             C bit : 1
Hosting LC: 9, Down reason: None, Reason not-hosted: None, Offloaded: No

This example shows the locally-configured Control Plane Independent bit setting for outgoing BFD packets:

show running-config bfd all
!Command: show running-config bfd
!Time: Tue Nov 22 06:15:17 2016
version 8.0(1)
feature bfd
bfd interval 555 min_rx 555 multiplier 5
bfd slow-timer 2000
no bfd echo-interface
bfd echo-rx-interval 50
bfd c-bit

Configuring BFD on an Interface

You can configure the BFD session parameters for all BFD sessions on an interface. The BFD session parameters are negotiated between the BFD peers in a three-way handshake.

This configuration overrides the global session parameters for the configured interface.

Before you begin

  • Before you configure this feature for the entire system, ensure that you are in the correct VDC. To change the VDC, use the switchto vdc command.

  • Enable the BFD feature.

Procedure

  Command or Action Purpose

Step 1

switch# configure terminal

Enters the global configuration mode.

Step 2

switch(config)# interface int-if

Enters interface configuration mode. Use the ? keyword to display the supported interfaces.

Step 3

switch(config)# bfd interval mintx min_rx msec multiplier value

Configures the BFD session parameters for all BFD sessions on the device. This command overrides these values by configuring the BFD session parameters on an interface. The mintx and msec range is from 15 to 999 milliseconds and the default is 50. The multiplier range is from 1 to 50. The multiplier default is 3.

Note


The recommended BFD interval value for logical interfaces (such as Switch Virtual Interface, sub-interface, and so on) is 300 milliseconds and the multiplier default is 3.

Note


Even if the value of the mintx argument is configured as 15 ms, if the bfd hw-offload-module command is not enabled on the session, the configuration is not applied and the session functions at the default timer value, which is 50 ms.

Step 4

(Optional) switch(config-if)# bfd authentication keyed-sha1 keyid id key ascii_key

(Optional)

Configures SHA-1 authentication for all BFD sessions on the interface. The ascii_key string is a secret key shared among BFD peers. The id value, a number between 0 and 255, is assigned to this particular ascii_key. BFD packets specify the key by id, allowing the use of multiple active keys.

To disable SHA-1 authentication on the interface, use the no form of the command.

Step 5

(Optional) switch(config-if)# show running-config bfd

(Optional)

Displays the BFD running configuration.

Step 6

(Optional) switch(config-if)#copy running-config startup-config

(Optional)

Copies the running configuration to the startup configuration.

Configuring BFD on a Port Channel

You can configure the BFD session parameters for all BFD sessions on a port channel. If per-link mode is used for Layer 3 port channels, BFD creates a session for each link in the port channel and provides an aggregate result to client protocols. For example, if the BFD session for one link on a port channel is up, BFD informs client protocols, such as OSPF, that the port channel is up. The BFD session parameters are negotiated between the BFD peers in a three-way handshake.

This configuration overrides the global session parameters for the configured port channel. The member ports of the port channel inherit the port channel BFD session parameters, unless you configure subinterface-level BFD parameters on a member port. In that case, the member port subinterface uses the subinterface BFD configuration if subinterface optimization is not enabled. See the “Optimizing BFD on Subinterfaces” section for more information.

Before you begin

  • Before you configure this feature for the entire system, ensure that you are in the correct VDC. To change the VDC, use the switchto vdc command.

  • Enable the BFD feature.

  • Ensure that you enable LACP on the port channel before you enable BFD.

Procedure

  Command or Action Purpose

Step 1

switch# configure terminal

Enters the global configuration mode.

Step 2

switch(config)# interface port-channel number

Enters port channel configuration mode. Use the ? keyword to display the supported number range.

Step 3

switch(config-if)# bfd per-link

Configures the BFD sessions for each link in the port channel.

Step 4

switch(config-if)# bfd interval mintx min_rx msec multiplier value

Configures the BFD session parameters for all BFD sessions on the device. This command overrides these values by configuring the BFD session parameters on an interface. The mintx and msec range is from 15 to 999 milliseconds and the default is 50. The multiplier range is from 1 to 50. The multiplier default is 3.

Note


Even if the value of the mintx argument is configured as 15 ms, if the bfd hw-offload-module command is not enabled on the session, the configuration is not applied and the session functions at the default timer value, which is 50 ms.

Step 5

(Optional) switch(config-if)# bfd authentication keyed-sha1 keyid id key ascii_key

(Optional)

Configures SHA-1 authentication for all BFD sessions on the interface. The ascii_key string is a secret key shared among BFD peers. The id value, a number between 0 and 255, is assigned to this particular ascii_key. BFD packets specify the key by id, allowing the use of multiple active keys.

To disable SHA-1 authentication on the interface, use the no form of the command.

Step 6

(Optional) switch(config-if)# show running-config bfd

(Optional)

Displays the BFD running configuration.

Step 7

(Optional) switch(config-if)#copy running-config startup-config

(Optional)

Copies the running configuration to the startup configuration.

Configuring BFD Echo Function

You can configure the BFD echo function on one or both ends of a BFD-monitored link. The echo function slows down the required minimum receive interval, based on the configured slow timer. The RequiredMinEchoRx BFD session parameter is not set to zero if the echo function is disabled in complaince with RFC 5880. The slow timer becomes the required minimum receive interval if the echo function is enabled.

Before you begin

  • Before you configure this feature for the entire system, ensure that you are in the correct VDC. To change the VDC, use the switchto vdc command.

  • Enable the BFD feature.

  • Configure the BFD session parameters.

  • Ensure that Internet Control Message Protocol (ICMP) redirect messages are disabled on BFD-enabled interfaces. Use the no ip redirects command on the interface.

  • Ensure that the IP packet verification check for identical IP source and destination addresses is disabled. Use the no hardware ip verify address identical command in the default VDC. See the Cisco Nexus 7000 Series NX-OS Unicast Routing Configuration GuideCisco Nexus 7000 Series NX-OS Unicast Routing Configuration Guide for more information about this command.

Procedure

  Command or Action Purpose

Step 1

switch# configure terminal

Enters the global configuration mode.

Step 2

switch(config)# bfd slow-timer echo-interval

Configures the slow timer used in the echo function. This value determines how fast BFD starts up a new session and is used to slow down the asynchronous sessions when the BFD echo function is enabled. This value overwrites the required minimum receive interval when the echo function is enabled. The range is from 1000 to 30000 milliseconds. The default is 2000.

Step 3

switch(config)# interface int-if

Enters interface configuration mode. Use the ? keyword to display the supported interfaces.

Step 4

switch(config-if)# bfd echo

Enables the echo function. The default is enabled.

Note


To configure BFD Echo timer to less than 50 milliseconds, you need to configure both the bfd interval and the bfd echo-rx interval commands.

Step 5

(Optional) switch(config-if)# show running-config bfd

(Optional)

Displays the BFD running configuration.

Step 6

(Optional) switch(config-if)# copy running-config startup-config

(Optional)

Copies the running configuration to the startup configuration.

Optimizing BFD on Subinterfaces

You can optimize BFD on subinterfaces. BFD creates sessions for all configured subinterfaces. BFD sets the subinterface on which the session comes up first as the master subinterface and that subinterface uses the BFD session parameters of the parent interface. The remaining subinterfaces use the slow timer. If the optimized subinterface session detects an error, BFD marks all subinterfaces on that physical interface as down.


Note


BFD hardware offload feature and subinterface optimization must not be used together.


Before you begin

  • Before you configure this feature for the entire system, ensure that you are in the correct VDC. To change the VDC, use the switchto vdc command.

  • Enable the BFD feature.

  • Configure the BFD session parameters.

  • Ensure that these subinterfaces connect to another Cisco NX-OS device. This feature is supported on Cisco NX-OS only.

Procedure

  Command or Action Purpose

Step 1

switch# configure terminal

Enters the global configuration mode.

Step 2

switch(config)# interface int-if

Enters interface configuration mode. Use the ? keyword to display the supported interfaces.

Step 3

switch(config-if)# bfd optimize subinterface

Optimizes subinterfaces on a BFD-enabled interface. The default is disabled.

Step 4

(Optional) switch(config-if)# show running-config bfd

(Optional)

Displays the BFD running configuration.

Step 5

(Optional) switch(config-if)#copy running-config startup-config

(Optional)

Copies the running configuration to the startup configuration.

Configuring BFD for IPv6

Configuring Global BFD Parameters for IPv6

You can specify either the IPv4 or the IPv6 address family when you configure BFD parameters.

Procedure

  Command or Action Purpose

Step 1

switch# configure terminal

Enters the global configuration mode.

Step 2

switch(config)# bfd [ipv4 | ipv6] interval [interval min_rx interval multiplier interval-multiplier

Configures the BFD session parameters, in milliseconds, for all BFD session on the device.

Configuring Per Interface BFD Parameters for IPv6

Before you begin

BFD must be enabled on the device.

Procedure

  Command or Action Purpose

Step 1

switch# configure terminal

Enters the global configuration mode.

Step 2

switch(config)# interface type number

Enters interface configuration mode. Use the ? keyword to display the supported interfaces.

Step 3

switch(config-if)# bfd [ipv4 | ipv6] interval [interval min_rx interval multiplier interval-multiplier

Configures the BFD session parameters, in milliseconds, for all BFD session on the device.

Step 4

(Optional) switch(config-if)# bfd [ipv4 | ipv6] authentication keyed-sha1 keyid id key ascii_key

(Optional)

Configures Secure Hash Algorithm 1 (SHA-1) authentication for all BFD sessions on the specified address family.

Configuring BFD on IPv6 Static Routes

You can configure BFD for all IPv6 static routes on an interface.

Before you begin

  • Before you configure this feature for the entire system, ensure that you are in the correct VDC. To change the VDC, use the switchto vdc command.

  • Ensure that BFD is enabled on the devices at each end of the static route.

  • Configure the BFD session parameters.

Procedure

  Command or Action Purpose

Step 1

switch# configure terminal

Enters the global configuration mode.

Step 2

switch(config)# vrf context vrf-name

Enters VRF configuration mode to configure BFD on an IPv6 static route.

  • Specify the VRF in which the route is to BFD tracked.

Step 3

switch(config-vrf)# ipv6 route route interface {nh-address | nh-prefix}

Creates an IPv6 static route.

  • Specify the IPv6 address for the route argument.

  • Use the ? keyword to display the supported interfaces.

  • Specify the next hop (nh) address or prefix for this static route.

Step 4

switch(config-vrf)# ipv6 route static bfd network-interface {nh-address | nh-prefix}

Enables BFD for all IPv6 static routes on this interface and next hop combination.

  • Use the ? keyword to display the supported interfaces.

  • Specify the next hop (nh) address or prefix for this static route.

Step 5

(Optional) switch(config-vrf)# show bfd neighbors

(Optional)

Displays information about BFD neighbors.

Step 6

(Optional) switch(config-vrf)# show ipv6 route static

(Optional)

Displays static routes.

Step 7

(Optional) switch(config-vrf)# copy running-config startup-config

(Optional)

Copies the running configuration to the startup configuration.

Example

This example shows how to configure BFD on an IPv6 static route between two BFD neighbors:

switch(config)# vrf context red
switch(config-vrf)# ipv6 route 1::5/64 ethernet 3/1 2::2
switch(config-vrf)# ipv6 route static bfd ethernet 3/1 2::2 <===Enables BFD on static
routes for the interface/next hop combination.

Configuring BFD Echo Mode for IPv6

The BFD echo function is not supported on devices with IPv6 link-local addresses. The echo function is enabled by default. You can disable it for IPv4, IPv6, or all address families.

Procedure

  Command or Action Purpose

Step 1

switch# configure terminal

Enters the global configuration mode.

Step 2

switch(config)# interface int-if

Enters interface configuration mode. Use the ? keyword to display the supported interfaces.

Step 3

switch(config-if)# bfd [ipv4 | ipv6] echo

Enables the echo function for the specified address. The default is enabled.

To disable the echo function for the specified address family, use the no form of the command.

Configuring a BFD Echo Interface for IPv6

Perform this task to configure the loopback interface as the source address for all echo frames.

Procedure

  Command or Action Purpose

Step 1

switch# configure terminal

Enters the global configuration mode.

Step 2

switch(config)# interface loopback number

Creates a loopback interface and enters interface configuration mode.

Step 3

switch(config-if)# ip address ip-address mask

Configures the IP address for the interface.

Step 4

switch(config-if)# ipv6 address {ipv6-address / prefix-length | prefix-name sub-bits / prefix-length}

Configures the IPv6 address as the source address for all echo frames.

Configuring BFD Slow Timer for IPv6

Echo mode is enabled by default. You can configure the slow-timer value and disable or enable echo mode for an address family.

Procedure

  Command or Action Purpose

Step 1

switch# configure terminal

Enters the global configuration mode.

Step 2

switch(config)# interface int-if

Enters interface configuration mode. Use the ? keyword to display the supported interfaces.

Step 3

switch(config-if)# bfd [ipv4 | ipv6] slow-timer [interval]

Configures the slow timer, in milliseconds, used in the echo function for the specified address family.

Configuring BFD Support for Routing Protocols

Configuring BFD on BGP

You can configure BFD for the Border Gateway Protocol (BGP).

Before you begin

  • Before you configure this feature for the entire system, ensure that you are in the correct VDC. To change the VDC, use the switchto vdc command.

  • Enable the BFD feature.

  • Configure the BFD session parameters.

Procedure

  Command or Action Purpose

Step 1

switch# configure terminal

Enters the global configuration mode.

Step 2

switch(config)# router bgp as-number

Enables BGP and assigns the AS number to the local BGP speaker. The AS number can be a 16-bit integer or a 32-bit integer in the form of a higher 16-bit decimal number and a lower 16-bit decimal number in xx.xx format.

Step 3

switch(config-router)# neighbor {ip-address | ipv6-address} remote-as as-number

Configures the IPv4 or IPv6 address and AS number for a remote BGP peer. The ip-address format is x.x.x.x. The ipv6-address format is A:B::C:D.

Step 4

switch(config-router-neighbor)# bfd

Enables BFD for this BGP peer.

Step 5

(Optional) switch(config-router-neighbor)# show running-config bfd

(Optional)

Displays the BFD running configuration.

Step 6

(Optional) switch(config-router-neighbor)# copy running-config startup-config

(Optional)

Copies the running configuration to the startup configuration.

Configuring BFD on EIGRP

You can configure BFD for the Enhanced Interior Gateway Routing Protocol (EIGRP).

Before you begin

  • Before you configure this feature for the entire system, ensure that you are in the correct VDC. To change the VDC, use the switchto vdc command.

  • Enable the BFD feature.

  • Configure the BFD session parameters.

  • Enable the EIGRP feature.

Procedure

  Command or Action Purpose

Step 1

switch# configure terminal

Enters the global configuration mode.

Step 2

switch(config)# router eigrp instance-tag

Creates a new EIGRP process with the configured instance tag. The instance tag can be any case-sensitive, alphanumeric string up to 20 characters.

If you configure an instance-tag that does not qualify as an AS number, you must use the autonomous-system command to configure the AS number explicitly or this EIGRP instance will remain in the shutdown state.

Step 3

(Optional) switch(config-router-neighbor)# bfd

(Optional)

Enables BFD for all EIGRP interfaces.

Step 4

switch(config-router-neighbor)# interface int-if

Enters interface configuration mode. Use the ? keyword to display the supported interfaces.

Step 5

(Optional) switch(config-if)# ip eigrp instance-tag bfd

(Optional)

Enables or disables BFD on an EIGRP interface. The instance tag can be any case-sensitive, alphanumeric string up to 20 characters.

The default is disabled.

Step 6

(Optional) switch(config-if)# show ip eigrp [vrf vrf-name] [interfaces if]

(Optional)

Displays information about EIGRP. The vrf-name can be any case-sensitive, alphanumeric string up to 32 characters.

Step 7

(Optional) switch(config-if)#copy running-config startup-config

(Optional)

Copies the running configuration to the startup configuration.

Configuring BFD on OSPF

You can configure BFD for the Open Shortest Path First version 2 (OSPFv2).

Before you begin

  • Before you configure this feature for the entire system, ensure that you are in the correct VDC. To change the VDC, use the switchto vdc command.

  • Enable the BFD feature.

  • Configure the BFD session parameters.

  • Enable the OSPF feature.

Procedure

  Command or Action Purpose

Step 1

switch# configure terminal

Enters the global configuration mode.

Step 2

switch(config)# router ospf instance-tag

Creates a new OSPFv2 instance with the configured instance tag. The instance tag can be any case-sensitive, alphanumeric string up to 20 characters.

Step 3

(Optional) switch(config-router)# bfd

(Optional)

Enables BFD for all OSPFv2 interfaces.

Step 4

switch(config-router)# interface int-if

Enters interface configuration mode. Use the ? keyword to display the supported interfaces.

Step 5

(Optional) switch(config-if)# ip ospf bfd

(Optional)

Enables or disables BFD on an OSPFv2 interface. The default is disabled.

Step 6

(Optional) switch(config-if)# show ip ospf [vrf vrf-name] [interfaces if]

(Optional)

Displays information about OSPF. The vrf-name can be any case-sensitive, alphanumeric string up to 32 characters.

Step 7

(Optional) switch(config-if)#copy running-config startup-config

(Optional)

Copies the running configuration to the startup configuration.

Configuring BFD on OSPFv3

BFD supports Open Shortest Path First version 3 (OSPFv3), which is a link-state routing protocol for IPv6 networks.

There are two methods for enabling BFD support for OSPFv3:

  • You can enable BFD for all of the interfaces for which OSPFv3 is routing by entering the bfd command in router configuration mode. You can disable BFD support on individual interfaces by entering the ospfv3 bfd disable command in interface configuration mode.

  • You can enable BFD for a subset of the interfaces for which OSPFv3 is routing by entering the ospfv3 bfd command in interface configuration mode.


Note


OSPF will only initiate BFD sessions for OSPF neighbors that are in the FULL state.


Procedure

  Command or Action Purpose

Step 1

switch# configure terminal

Enters the global configuration mode.

Step 2

switch(config)# interface int-if

Enters interface configuration mode. Use the ? keyword to display the supported interfaces.

Step 3

switch(config-if)# bfd interval mintx min_rx msec multiplier value

Configures the BFD session parameters for all BFD sessions on the device. This command overrides these values by configuring the BFD session parameters on an interface. The mintx and msec range is from 15 to 999 milliseconds and the default is 50. The multiplier range is from 1 to 50. The multiplier default is 3.

Note


Even if the value of the mintx argument is configured as 15 ms, if the bfd hw-offload-module command is not enabled on the session, the configuration is not applied and the session functions at the default timer value, which is 50 ms.

Step 4

switch(config-if)# end

Exits interface configuration mode and returns to global configuration mode.

Configuring BFD for OSPFv3 for All Interfaces

Before you begin

OSPFv3 must be running on all participating devices. The baseline parameters for BFD sessions on the interfaces over which you want to run BFD sessions to BFD neighbors must be configured.

Procedure

  Command or Action Purpose

Step 1

switch# configure terminal

Enters the global configuration mode.

Step 2

switch(config)# router ospfv3 process-id

Configures an OSFPv3 routing process.

Step 3

switch(config-router)# bfd

Enables BFD for all interfaces participating in the routing process.

Step 4

switch(config-router)# exit

Enter this command twice to return to EXEC mode.

Step 5

switch# show bfd neighbors [details]

Displays a line-by-line listing of existing BFD adjacencies.

Step 6

switch# show ospfv3 [process-id]

Displays general information about OSPFv3 routing processes.

Configuring BFD for OSPFv3 on One or More Interfaces

Before you begin

OSPFv3 must be running on all participating devices. The baseline parameters for BFD sessions on the interfaces over which you want to run BFD sessions to BFD neighbors must be configured.

Procedure

  Command or Action Purpose

Step 1

switch# configure terminal

Enters the global configuration mode.

Step 2

switch(config)# interface int-if

Enters interface configuration mode. Use the ? keyword to display the supported interfaces.

Step 3

switch(config-if)# ospfv3 bfd [disable]

Enables BFD on a per-interface basis for one or more interfaces associated with the OSPFv3 routing process.

Step 4

switch(config-if)# exit

Enter this command twice to return to EXEC mode.

Step 5

switch# show bfd neighbors [details]

Displays a line-by-line listing of existing BFD adjacencies.

Step 6

switch# show ospfv3 [process-id]

Displays general information about OSPFv3 routing processes.

Configuring BFD on IS-IS

You can configure BFD for the Intermediate System-to-Intermediate System (IS-IS) protocol.


Note


Fabricpath BFD sessions are not supported on port-channel logical interface on any type of a line card.


Before you begin

  • Before you configure this feature for the entire system, ensure that you are in the correct VDC. To change the VDC, use the switchto vdc command.

  • Enable the BFD feature.

  • Configure the BFD session parameters.

  • Enable the IS-IS feature.

Procedure

  Command or Action Purpose

Step 1

switch# configure terminal

Enters the global configuration mode.

Step 2

switch(config)# router isis instance-tag

Creates a new IS-IS instance with the configured instance tag.

Step 3

(Optional) switch(config-router)# bfd

(Optional)

Enables BFD for all IS-IS interfaces.

Step 4

switch(config-router)# interface int-if

Enters interface configuration mode. Use the ? keyword to display the supported interfaces.

Step 5

(Optional) switch(config-if)# isis bfd

(Optional)

Enables or disables BFD on an IS-IS interface. The default is disabled.

Step 6

(Optional) switch(config-if)# show isis [vrf vrf-name] [interfaces if]

(Optional)

Displays information about IS-IS. The vrf-name can be any case-sensitive, alphanumeric string up to 32 characters.

Step 7

(Optional) switch(config-if)#copy running-config startup-config

(Optional)

Copies the running configuration to the startup configuration.

Configuring BFD on IS-ISv6

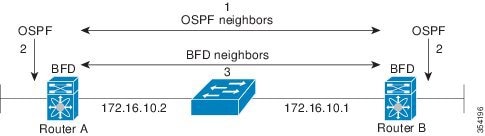
When BFD support is configured with IS-IS as a registered protocol with BFD, IS-IS receives forwarding path detection failure messages from BFD. BFD support for IS-IS can be configured in either router address-family configuration mode or interface configuration mode. IS-IS IPv6 runs in single-topology mode.

IS-IS BFD supports both IPv4 and IPv6 on the same adjacency for single-topology mode. If BFD is enabled for both IPv4 and IPv6, IS-IS sends two BFD session creation requests to BFD. For single-topology mode, the IS-IS adjacency state can only be up if both BFD sessions are up. If either of the BFD sessions is down, the associated IS-IS adjacency state is also down.

When IS-IS BFD IPv6 is disabled on an interface, IS-IS removes related BFD sessions for IPv6 from the adjacent device. When the IS-IS adjacency entry is deleted, all BFD sessions are also deleted. IS-IS requests BFD to remove each BFD session that it has requested when any of the following events occur:

  • The IS-IS instance is deleted or un-configured.

  • The IS-IS adjacency entry is deleted.

  • IS-IS BFD is disabled on the next hop interface for an address-family.

Configuring IS-IS IPv6 Client Support on an Interface

IS-IS requests a BFD session for the interface and the IPv6 address of the neighboring device when all of the following conditions are met:

  • An IS-IS adjacency entry exists.

  • The Address Family Identifier (AFI) specific peer interface address is known.

  • IS-IS BFD is enabled for that AFI on an interface.

  • IS-IS is enabled for that AFI on the local interface.

  • If the neighboring device supports RFC 6213, BFD must be enabled for the specified Network Layer Protocol Identifier (NLPID).

Procedure

  Command or Action Purpose

Step 1

switch# configure terminal

Enters the global configuration mode.

Step 2

switch(config)# interface int-if

Enters interface configuration mode. Use the ? keyword to display the supported interfaces.

Step 3

switch(config-if)# isis ipv6 bfd

Enables IPv6 BFD on a specific interface that is configured for IS-IS.

Step 4

switch(config-if)# end

Exits interface configuration mode and returns to global configuration mode.

Step 5

(Optional) switch(config)# show isis interface type number

(Optional)
Displays interface information about IS-IS.

Configuring IS-IS IPv6 Client Support for BFD on All Interfaces

Procedure

  Command or Action Purpose

Step 1

switch# configure terminal

Enters the global configuration mode.

Step 2

switch(config)# router isis process-id

Enables the IS-IS routing protocol and enters router configuration mode.

Step 3

(Optional) switch(config-router)# metric-style transition

(Optional)

Configures a device that is running IS-IS so that it generates and accepts only new style, type, length, value objects (TLVs).

Step 4

switch(config-router)# address-family ipv6 unicast

Enters address family configuration mode for configuring IS-IS routing session that use standard IPv6 address prefixes.

Step 5

switch(config-router-af)# bfd

Enables BFD for all interfaces that are participating in the routing process.

Step 6

switch(config-router-af)# end

Exits address family configuration mode and returns to global configuration mode.

Step 7

(Optional) switch(config)# show isis [process-id]

(Optional)

Displays interface information about IS-IS.

Configuring FabricPath BFD on a Specific Interface

Before you begin

  • Enable the BFD feature.

  • Configure the BFD session parameters.

  • The ISIS feature is enabled by default when entering the feature-set fabricpath command.

Procedure

  Command or Action Purpose

Step 1

switch# configure terminal

Enters global configuration mode.

Step 2

switch(config)# [no] bfd fabricpath encap-ce

Enables the user to choose an encapsulation mode for the L2BFD frames on a per-session basis. On enabling the command, it sends out the frames without Fabricpath encapsulation. The default mode is to send frames with Fabricpath encapsulation.

Step 3

switch(config-if)# fabricpath isis bfd

Enables the FabricPath BFD on the interface.

Example

This example shows how to configure FabricPath BFD on a specific interface:

switch# configure terminal
switch(config)# [no] bfd fabricpath encap-ce
switch(config-if)# fabricpath isis bfd

Configuring FabricPath BFD on All IS-IS Interfaces

Before you begin

  • Ensure that you are in the correct VRF.

  • Enable the BFD feature.

  • Configure the BFD session parameters.

  • The ISIS feature is enabled by default when entering the feature-set fabricpath command.

Procedure

  Command or Action Purpose

Step 1

switch# configure terminal

Enters global configuration mode.

Step 2

switch(config)# fabricpath domain default

Enters the global FabricPath Layer 2 Intermediate System, to Intermediate System (IS-IS) configuration mode.

Step 3

switch(config-fabricpath-isis)# bfd

Enables FabricPath BFD on all IS-IS interfaces.

Example

This example show how to configure FabricPath BFD on all IS-IS interfaces:

switch# configure terminal
switch(config)# fabricpath domain default
switch(config-fabricpath-isis)# bfd

Configuring BFD on HSRP

You can configure BFD for the Hot Standby Router Protocol (HSRP). The active and standby HSRP routers track each other through BFD. If BFD on the standby HSRP router detects that the active HSRP router is down, the standby HSRP router treats this event as an active time expiry and takes over as the active HSRP router.

Use the show hsrp bfd-sessions command to display the HSRP BFD session information for all the interfaces.

Before you begin

  • Before you configure this feature for the entire system, ensure that you are in the correct VDC. To change the VDC, use the switchto vdc command.

  • Enable the BFD feature.

  • Configure the BFD session parameters.

  • Enable the HSRP feature.

Procedure

  Command or Action Purpose

Step 1

switch# configure terminal

Enters the global configuration mode.

Step 2

(Optional) switch(config)# hsrp bfd all-interfaces

(Optional)

Enables or disables BFD on all HSRP interfaces. The default is disabled.

Step 3

switch(config)# interface int-if

Enters interface configuration mode. Use the ? keyword to display the supported interfaces.

Step 4

(Optional) switch(config-if)# hsrp bfd

(Optional)

Enables or disables BFD on an HSRP interface. The default is disabled.

Step 5

(Optional) switch(config-if)# show running-config hsrp

(Optional)

Displays the HSRP running configuration.

Step 6

(Optional) switch(config-if)#copy running-config startup-config

(Optional)

Copies the running configuration to the startup configuration.

Configuring BFD on VRRP

You can configure BFD for the Virtual Router Redundancy Protocol (VRRP). The active and standby VRRP routers track each other through BFD. If BFD on the standby VRRP router detects that the active VRRP router is down, the standby VRRP router treats this event as an active time rexpiry and takes over as the active VRRP router.

The show vrrp detail will show this event as BFD@Act-down or BFD@Sby-down.

Before you begin

  • Before you configure this feature for the entire system, ensure that you are in the correct VDC. To change the VDC, use the switchto vdc command.

  • Enable the BFD feature.

  • Configure the BFD session parameters.

  • Enable the VRRP feature.

Procedure

  Command or Action Purpose

Step 1

switch# configure terminal

Enters the global configuration mode.

Step 2

switch(config)# interface int-if

Enters interface configuration mode. Use the ? keyword to display the supported interfaces.

Step 3

switch(config-if)# vrrp group-no

Specifies the VRRP group number.

Step 4

switch(config-if)# vrrp bfd address

Enables or disables BFD on an VRRP interface. The default is disabled.

Step 5

(Optional) switch(config-if)# show running-config vrrp

(Optional)

Displays the VRRP running configuration.

Step 6

(Optional) switch(config-if)#copy running-config startup-config

(Optional)

Copies the running configuration to the startup configuration.

Configuring BFD on PIM

You can configure BFD for the Protocol Independent Multicast (PIM) protocol.

Before you begin

  • Before you configure this feature for the entire system, ensure that you are in the correct VDC. To change the VDC, use the switchto vdc command.

  • Enable the BFD feature.

  • Enable the PIM feature.

Procedure

  Command or Action Purpose

Step 1

switch# configure terminal

Enters the global configuration mode.

Step 2

switch(config)# ip pim bfd

Enables BFD for PIM.

Step 3

(Optional) switch(config)# interface int-if

(Optional)

Enters interface configuration mode. Use the ? keyword to display the supported interfaces.

Step 4

switch(config-if)# ip pim bfd-instance [disable]

Enables or disables BFD on a PIM interface. The default is disabled.

Step 5

(Optional) switch(config-if)# show running-config pim

(Optional)

Displays the PIM running configuration.

Step 6

(Optional) switch(config-if)#copy running-config startup-config

(Optional)

Copies the running configuration to the startup configuration.

Configuring BFD on Static Routes

You can configure BFD for static routes on an interface. You can optionally configure BFD on a static route within a virtual routing and forwarding (VRF) instance.

Before you begin

  • Before you configure this feature for the entire system, ensure that you are in the correct VDC. To change the VDC, use the switchto vdc command.

  • Enable the BFD feature.

Procedure

  Command or Action Purpose

Step 1

switch# configure terminal

Enters the global configuration mode.

Step 2

(Optional) switch(config)# vrf context vrf-name

(Optional)

Enters VRF configuration mode.

Step 3

switch(config-vrf)# ip route route interface {nh-address | nh-prefix}

Creates a static route Use the ? keyword to display the supported interfaces.

Step 4

switch(config-vrf)# ip route static bfd interface {nh-address | nh-prefix}

Enables BFD for all static routes on an interface. Use the ? keyword to display the supported interfaces.

Step 5

(Optional) switch(config-vrf)# show ip route static [vrf vrf-name]

(Optional)

Displays the static routes.

Step 6

(Optional) switch(config-vrf)# copy running-config startup-config

(Optional)

Copies the running configuration to the startup configuration.

Configuring BFD on MPLS TE Fast Reroute

MPLS Traffic Engineering (TE) uses BFD accelerate the detection of node failures and to provide fast forwarding path failure detection times. BFD for MPLS TE fast reroute is configured automatically when you enable the fast reroute on a tunnel. See the “Configuring MPLS TE Fast Reroute Link and Node Protection” chapter in the Cisco Nexus 7000 Series NX-OS MPLS Configuration Guide for more information.

Disabling BFD on an Interface

You can selectively disable BFD on an interface for a routing protocol that has BFD enabled at the global or VRF level.

To disable BFD on an interface, use one of the following commands in interface configuration mode:

Table 3. Disabling BFD on an Interface

Command

Purpose

ip eigrp instance-tag bfd disable

Disables BFD on an EIGRP interface. The instance tag can be any case-sensitive, alphanumeric string up to 20 characters.

ip ospf bfd disable

Disables BFD on an OSPFv2 interface.

isis bfd disable

Disables BFD on an IS-IS interface.

Configuring BFD on Unnumbered Interfaces

The following are some basic switch configurations to set up BFD over unnumbered interfaces:

  1. Configure the ethernet interface that is unnumbered.

  2. Configure the loopback interface from which the IP address is derived for the unnumbered interface.

  3. Configure ISIS or OSPF with VRF on the router.

Procedure


Step 1

The following are the steps to configure ISIS on the Ethernet interface that is unnumbered:

  1. Enter the global configuration mode:

    switch# configure terminal

  2. Enter the interface config mode:

    switch(config)# interface ethernet slot / port

  3. Configure the interface medium as point to point:

    switch(config-if)# medium p2p

  4. Enable IP processing on loopback interface:

    switch(config-if)# ip unnumbered instance

  5. Configure the ISIS metric to calculate the cost of routing at different levels:

    switch(config-if)# isis metric {metric-value | maximum} [level-1 | level-2]

  6. Configure the type of adjacency:

    switch(config-if)# isis circuit-type [level-1 | level-1-2 | level-2-only]

  7. Configure an IS-IS routing process for the IP on the configured interface and attach an area designator to the routing process:

    switch(config-if)#ip router isis area-tag

  8. Enable BFD

    switch(config-if)#isis bfd instance

  9. Exit the config mode:

    switch(config-if)#end

Step 2

The following are the steps to configure the loopback interface from which the IP address for the unnumbered interface is derived:

  1. Create a loopback interface and enter the interface config mode:

    switch(config)# interface loopback instance

  2. Configure an IP address for this loopback interface:

    switch(config-if)#ip address address

  3. Configure an IS-IS routing process for the IP on the configured interface and attach an area designator to the routing process:

    switch(config-if)#ip router isis area-tag


Example

This example shows how to configure BFD on unnumbered ethernet interface with ISIS protocol:

interface Ethernet1/2
  medium p2p
  ip unnumbered loopback1
  isis metric 10 level-1
  isis circuit-type level-1
  ip router isis 100
  isis bfd
  no shutdown
router isis 100
  net 49.0001.0000.0000.000a.00
  is-type level-1
  		address-family ipv6 unicast

This example shows how to configure BFD over unnumbered interface with OSPF and VRF:

vrf context vrf3
interface Ethernet1/14
  medium p2p
  vrf member vrf3
  ip unnumbered loopback1
  ip router ospf 10 area 0.0.0.0
  no shutdown

interface loopback1
  vrf member vrf3
  ip address 10.1.1.2/32
line vty
router ospf 10
  bfd
  vrf vrf3
  bfd

Configuring BFD Interoperability

Configuring BFD Interoperability in Cisco NX-OS Devices in a Point-to-Point Link

Procedure

  Command or Action Purpose

Step 1

switch# configure terminal

Enters the global configuration mode.

Step 2

switch(config)# interface int-if

Enters interface configuration mode. Use the ? keyword to display the supported interfaces.

Step 3

switch(config-if)# ip ospf bfd

Enables BFD on an OSPFv2 interface. The default is disabled.

You can enable BFD of any of the supported protocols.

Step 4

switch(config-if)# no ip redirect

Prevents the device from sending redirects.

Step 5

switch(config-if)# bfd interval mintx min_rx msec multiplier value

Configures the BFD session parameters for all BFD sessions on the device. This command overrides these values by configuring the BFD session parameters on an interface. The mintx and msec range is from 15 to 999 milliseconds and the default is 50. The multiplier range is from 1 to 50. The multiplier default is 3.

Note


Even if the value of the mintx argument is configured as 15 ms, if the bfd hw-offload-module command is not enabled on the session, the configuration is not applied and the session functions at the default timer value, which is 50 ms.

Step 6

switch(config-if)# exit

Exits interface configuration mode and returns to EXEC mode.

Configuring BFD Interoperability in Cisco NX-OS Devices in a Switch Virtual Interface

BFD is supported on switched virtual interfaces configured on L3 switches. The ports connecting two such switches can be connected in the following modes:
  • Trunk– The ports of two such devices can be connected using classic Ethernet and configured in the trunk mode.

  • Fabric– The ports of two such devices can be connected using a fabric path core and configured in the fabricpath mode.

Procedure

  Command or Action Purpose

Step 1

switch# configure terminal

Enters the global configuration mode.

Step 2

switch(config)# interface int-if

Creates a dynamic Switch Virtual Interface (SVI).

Step 3

switch(config-if)# bfd interval mintx min_rx msec multiplier value

Configures the BFD session parameters for all BFD sessions on the device. This command overrides these values by configuring the BFD session parameters on an interface. The mintx and msec range is from 15 to 999 milliseconds and the default is 50. The multiplier range is from 1 to 50. The multiplier default is 3.

Note


Even if the value of the mintx argument is configured as 15 ms, if the bfd hw-offload-module command is not enabled on the session, the configuration is not applied and the session functions at the default timer value, which is 50 ms.

Step 4

switch(config-if)# no ip redirect

Prevents the device from sending redirects.

Step 5

switch(config-if)# ip address ip-address/length

Configures an IP address for this interface.

Step 6

switch(config-if)# ip ospf bfd

Enables BFD on an OSPFv2 interface. The default is disabled.

Step 7

switch(config-if)# exit

Exits interface configuration mode and returns to EXEC mode.

Step 8

switch(config)# interface int-if

Configures the port connected to another switch configured as described in the steps above.

Step 9

Do one of the following:

  • switch(config-if)# switchport mode trunk
  • switch(config-if)# switchport mode fabricpath
The interface is configured as a classic ethernet trunk port or a fabric path port.

Step 10

switch(config-if)# end

Returns to privileged EXEC mode.

Configuring BFD Interoperability in Cisco NX-OS Devices in Logical Mode

Procedure

  Command or Action Purpose

Step 1

switch# configure terminal

Enters the global configuration mode.

Step 2

switch(config)# interface type number.subinterface-id

Enters port channel configuration mode. Use the ? keyword to display the supported number range.

Step 3

switch(config-if)# bfd interval mintx min_rx msec multiplier value

Configures the BFD session parameters for all BFD sessions on the device. This command overrides these values by configuring the BFD session parameters on an interface. The mintx and msec range is from 15 to 999 milliseconds and the default is 50. The multiplier range is from 1 to 50. The multiplier default is 3.

Note


Even if the value of the mintx argument is configured as 15 ms, if the bfd hw-offload-module command is not enabled on the session, the configuration is not applied and the session functions at the default timer value, which is 50 ms.

Step 4

switch(config-if)# no ip redirect

Prevents the device from sending redirects.

Step 5

switch(config-if)# ip ospf bfd

Enables BFD on an OSPFv2 interface. The default is disabled.

Step 6

switch(config-if)# exit

Exits interface configuration mode and returns to EXEC mode.

Verifying BFD Interoperability in a Cisco Nexus 7000 Series Device

Table 4. Verifying BFD Interoperability in a Cisco Nexus 7000 Series Device

Command

Purpose

show bfd neighbors [ details]

Displays a line-by-line listing of existing BFD adjacencies.

These examples show how to verify BFD interoperability in a Cisco Nexus 7000 Series device:

switch# show bfd neighbors details
OurAddr NeighAddr LD/RD RH/RS Holdown(mult) State Int
Vrf
10.1.1.1 10.1.1.2 1140850707/2147418093 Up 6393(4) Up Vlan2121
default
Session state is Up and using echo function with 50 ms interval
Local Diag: 0, Demand mode: 0, Poll bit: 0, Authentication: None
MinTxInt: 50000 us, MinRxInt: 2000000 us, Multiplier: 3
Received MinRxInt: 2000000 us, Received Multiplier: 4
Holdown (hits): 8000 ms (0), Hello (hits): 2000 ms (108)
Rx Count: 92, Rx Interval (ms) min/max/avg: 347/1996/1776 last: 1606 ms ago
Tx Count: 108, Tx Interval (ms) min/max/avg: 1515/1515/1515 last: 1233 ms ago
Registered protocols: ospf
Uptime: 0 days 0 hrs 2 mins 44 secs
Last packet: Version: 1 - Diagnostic: 0
State bit: Up - Demand bit: 0
Poll bit: 0 - Final bit: 0
Multiplier: 4 - Length: 24
My Discr.: 2147418093 - Your Discr.: 1140850707
Min tx interval: 2000000 - Min rx interval: 2000000
Min Echo interval: 1000 - Authentication bit: 0
Hosting LC: 10, Down reason: None, Reason not-hosted: None

switch# show bfd neighbors details
OurAddr NeighAddr LD/RD RH/RS Holdown(mult) State Int
Vrf
10.0.2.1 10.0.2.2 1140850695/131083 Up 270(3) Up Po14.121
default
Session state is Up and not using echo function
Local Diag: 0, Demand mode: 0, Poll bit: 0, Authentication: None
MinTxInt: 50000 us, MinRxInt: 50000 us, Multiplier: 3
Received MinRxInt: 100000 us, Received Multiplier: 3
Holdown (hits): 300 ms (0), Hello (hits): 100 ms (3136283)
Rx Count: 2669290, Rx Interval (ms) min/max/avg: 12/1999/93 last: 29 ms ago
Tx Count: 3136283, Tx Interval (ms) min/max/avg: 77/77/77 last: 76 ms ago
Registered protocols: ospf
Uptime: 2 days 21 hrs 41 mins 45 secs
Last packet: Version: 1 - Diagnostic: 0
State bit: Up - Demand bit: 0
Poll bit: 0 - Final bit: 0
Multiplier: 3 - Length: 24
My Discr.: 131083 - Your Discr.: 1140850695
Min tx interval: 100000 - Min rx interval: 100000
Min Echo interval: 0 - Authentication bit: 0
Hosting LC: 8, Down reason: None, Reason not-hosted: None

Verifying BFD FSA Offload on F3 and M3 Modules

To display BFD configuration information, use one of the following commands:

Table 5. Verifying BFD FSA Offload on F3 and M3 Modules

Command

Purpose

show running-config bfd

Displays the running BFD configuration.

show startup-config bfd

Displays the BFD configuration that will be applied on the next system startup.

show bfd neighbors

Displays information about BFD neighbors.

show bfd neighbors neighbors

Displays information about BFD neighbor details.

This example shows how to verify BFD FSA Offload on F3 and M3 line cards feature. The output contains an asterisk (‘*’) symbol displayed beside the offloaded sessions.

switch# show bfd neighbors

OurAddr   NeighAddr  LD/RD   	   RH/RS   Holdown(mult) State  Int  	Vrf
*10.2.2.2   10.2.2.1   1124073477/1  Up      N/A(3)        Up     Eth1/45   default

10.1.1.2   10.1.1.1    1124073478/1   Down    N/A(3)        Down   Eth1/46  default

*10.3.3.2  10.3.3.1    1124073479/1   Up      N/A(3)        Up     Eth1/47  default

10.4.4.2   10.4.4.1    1124073480/1   Down    N/A(3)        Down   Eth1/48  default


This example shows how to verify BFD FSA Offload on a F3 and M3 line cards. The output has a field indicating that a particular session is offloaded.


switch# show bfd neighbors details

OurAddr   NeighAddr LD/RD                RH/RS  Holdown(mult) State Int     Vrf
*10.2.2.1  10.2.2.2   1107296257/1124073474 Up    4880(3)       Up    Eth1/2  default

Session state is Up and using echo function with 50 ms interval
Local Diag: 0, Demand mode: 0, Poll bit: 0, Authentication: None
MinTxInt: 50000 us, MinRxInt: 2000000 us, Multiplier: 3
Received MinRxInt: 2000000 us, Received Multiplier: 3
Holdown (hits): 6000 ms (0), Hello (hits): 2000 ms (1142)
Rx Count: 1139, Rx Interval (ms) min/max/avg: 0/5132/1693 last: 1119 ms ago
Tx Count: 1142, Tx Interval (ms) min/max/avg: 1689/1689/1689 last: 1120 ms ago
Registered protocols:  hsrp_engine
Uptime: 0 days 0 hrs 32 mins 3 secs
Last packet: Version: 1                - Diagnostic: 0
             State bit: Up             - Demand bit: 0
             Poll bit: 0               - Final bit: 0
             Multiplier: 3             - Length: 24
             My Discr.: 1124073474     - Your Discr.: 1107296257
             Min tx interval: 50000    - Min rx interval: 2000000
             Min Echo interval: 50000  - Authentication bit: 0
Hosting LC: 1, Down reason: None, Reason not-hosted: None, Offloaded: Yes

For detailed information about the fields in the output from these commands, see the Cisco Nexus 7000 Series NX-OS Interfaces Command Reference.

Configuring Micro BFD Sessions

Configuring Port Channel Interface

Before you begin

  • Before you configure this feature for the entire system, ensure that you are in the correct VDC. To change the VDC, use the switchto vdc command.

  • Enable the BFD feature. For more information, see "Enabling BFD"

Procedure


Step 1

Configure interface port-channel:

switch(config-if)# interface port-channel port-number

Enters port channel configuration mode. Use the ? keyword to display the supported number range.

Step 2

Configure interface as Layer 3 port-channel:

switch(config-if)# no switchport


(Optional) Configuring BFD Start Timer

Procedure


Configure BFD start timer for a port-channel:

switch(config-if)# port-channel bfd start 60

Note


The default value is infinite (that is no timer is running). The range of BFD Start Timer value for port-channel is from 60 to 3600 seconds. For start timer to work, configure start timer value before completing the port-channel BFD configurations (that is before port-channel bfd track-member-link and port-channel bfd destination are configured for Layer 3 port-channel interface with active members).


Enabling IETF Per-Link BFD

Procedure


Enable IETF BFD on port-channel interface:

switch(config-if)# port-channel bfd track-member-link


Configuring BFD Destination Address

Procedure


Configure an IPv4 address to be used for BFD sessions on member links:

switch(config-if)# port-channel bfd destination ip-address


Configuring BFD Multihop Sessions

Configuring Global Interval Parameters

Before you begin

Ensure that you are in the correct VDC (or use the switchto vdc command).

Enable the BFD feature.

Procedure


Step 1

Enter the global configuration mode:

switch# configure terminal

Step 2

(Optional) Configure the BFD multihop session parameters for all BFD multihop sessions on the device:

switch(config)# bfd multihop interval milliseconds min_rx milliseconds multiplier interval-multiplier

The milliseconds range is from 250 to 999 milliseconds. The default value for bfd multihop interval and min_rx is 250 milliseconds. The interval-multiplier range is from 3 to 250. The default interval-multiplier value is 3.

We recommend that you configure the bfd multihop interval 500 min_rx 500 multiplier 4 command for BFD mulithop sessions.

Note


The interval value configured for the BGP neighbor is used for the BFD multihop session. If the interval value is not configured for the BGP neighbor, the value configured by using the bfd multihop interval command in the global configuration mode is considered. If the interval values are not configured in any case, then the default values are used.

Step 3

Exit the global configuration mode:

switch(config)# end


Example: Configuring Global Interval Parameters

This example shows how to configure global interval parameters for a multihop session. Replace the placeholders with relevant values for your setup.


configure terminal
 bfd multihop interval <500> min_rx <500> multiplier <4>
 end

What to do next

Configure the hosting line card list.

Configuring a Hosting Line Card

Procedure


Step 1

Enter the global configuration mode:

switch# configure terminal

Step 2

Configure the BFD multihop hosting line card:

switch(config)# bfd multihop hosting-linecard add module module_number

The module_number range is from 1 to 16.

Note


You can add multiple hosting line cards by using the bfd multihop hosting-linecard command. If a hosting linecard fails or it is unconfigured, the sessions are moved to the next configured hosting linecard.

Note


If you are configuring multihop BFD sessions in a M2-M3 VDC, then it is mandatory to configure M2 line card as the hosting line card for the mulithop BFD sessions.

Step 3

Exit the global configuration mode:

switch(config)# end


Example: Configuring a Hosting Line Card

This example shows how to configure a hosting line card. Replace the placeholder with relevant values for your setup.


configure terminal
 bfd multihop hosting-linecard add module <10>
 end

Configuring BFD Multihop Sessions on BGP


Note


You can configure multihop hosting linecards. All multi-hop sessions are hosted on one hosting linecard. If the hosting linecard fails or it is unconfigured, the sessions are moved to the next configured hosting linecard.


Before you begin

Configure the hosting line card list.

Procedure


Step 1

Enter the global configuration mode:

switch# configure terminal

Step 2

Enable BGP and assign the AS number to the local BGP speaker. The AS number can be a 16-bit integer or a 32-bit integer in the form of a higher 16-bit decimal number and a lower 16-bit decimal number in xx.xx format:

switch (config)# router bgp as-number

Step 3

Configure the IPv4 address and AS number for a remote BGP peer. The ip-address format is x.x.x.x.

switch(config-router)# neighbor {ip-address | ipv6-address} remote-as as-number

Note


IPv6 address configuration is not supported in Cisco NX-OS Release 8.(1)1.

Step 4

Enable BFD for this BGP peer:

switch(config-router-neighbor)# bfd

Step 5

Configure the BFD multihop session parameters for the BGP neighbor:

switch(config-router-neighbor)#bfd multihop interval milliseconds min_rx milliseconds multiplier interval-multiplier

The milliseconds range is from 250 to 999 milliseconds. The interval-multiplier range is from 3 to 250.

Step 6

Configure Secure Hash Algorithm 1 (SHA-1) authentication parameters for the BFD multihop session on the specified BGP neighbor:

switch(config-router-neighbor)# bfd multihop authentication keyed-SHA1 keyid key_value key sha1_value


Example: Configuring BFD Multihop Session on BGP

This example shows how to configure BFD multihop session on BGP. Replace the placeholders with relevant values for your setup.


configure terminal
 router bgp <200>
		neighbor <10.1.1.2> remote-as <200>
			bfd
			bfd multihop interval <250> min_rx <250> multiplier <10>
			bfd multihop authentication keyed-SHA1 keyid <20> key <sha>		
 		end

Note


The update-source and ebgp-multihop commands are mandatory as part of BGP configuration. Therefore, these commands are not displayed with BFD multihop configuration.


Configuring BFD Multihop Sessions on BGP Template


Note


You can configure multihop hosting linecards. All multi-hop sessions are hosted on one hosting linecard. If the hosting linecard fails or it is unconfigured, the sessions are moved to the next configured hosting linecard.


Before you begin

Configure the hosting line card list.

Procedure


Step 1

Enter the global configuration mode:

switch# configure terminal

Step 2

Enable BGP and assign the AS number to the local BGP speaker. The AS number can be a 16-bit integer or a 32-bit integer in the form of a higher 16-bit decimal number and a lower 16-bit decimal number in xx.xx format:

switch (config)# router bgp as-number

Step 3

Enable peer template configuration mode.

switch(config-router)# template peer template-name

Step 4

Enable BFD for this BGP peer:

switch(config-router-neighbor)# bfd

Step 5

Configure the BFD multihop session parameters for the BGP neighbor:

switch(config-router-neighbor)#bfd multihop interval milliseconds min_rx milliseconds multiplier interval-multiplier

The milliseconds range is from 250 to 999 milliseconds. The interval-multiplier range is from 3 to 250.

Step 6

Configure Secure Hash Algorithm 1 (SHA-1) authentication parameters for the BFD multihop session on the specified BGP neighbor:

switch(config-router-neighbor)# bfd multihop authentication keyed-SHA1 keyid key_value key sha1_value

Step 7

Configure the IPv4 address and AS number for a remote BGP peer. The ip-address format is x.x.x.x.

switch(config-router)# neighbor {ip-address | ipv6-address} remote-as as-number

Note


IPv6 address configuration is not supported in Cisco NX-OS Release 8.(1)1.

Step 8

Apply the peer template to the neighbor address family configuration.

switch(config-router-neighbor-af)# inherit peer template-name

Step 9

(Optional) Display the peer template.

switch# show bgp peer-template template-name


Example: Configuring BFD Multihop Session on a BGP Template

This example shows how to configure BFD multihop session on a BGP template. Replace the placeholders with relevant values for your setup.


configure terminal
 router bgp <200>
		neighbor <10.1.1.2> remote-as <200>
		template peer <multihop>
			bfd
			bfd multihop interval <250> min_rx <250> multiplier <10>
			bfd multihop authentication keyed-SHA1 keyid <20> key <sha>		
			inherit peer <multihop>
 		end

Note


The update-source and ebgp-multihop commands are mandatory as part of BGP configuration. Therefore, these commands are not displayed with BFD multihop configuration.


Related Documents

Table 6. Related Documents

Related Topic

Cisco Nexus 7000 Series NX-OS Interfaces Command Reference

Cisco Nexus 7000 Series NX-OS System Management Configuration GuideCisco Nexus 7000 Series NX-OS System Management Configuration Guide

Cisco Nexus 7000 Series NX-OS High Availability and Redundancy Guide

Cisco Nexus 2000 Series NX-OS Fabric Extender Software Configuration Guide for Cisco Nexus 7000 Series Switches, Release 6.x

Cisco Nexus 7000 Series NX-OS Virtual Device Context Configuration GuideCisco Nexus 7000 Series NX-OS Virtual Device Context Configuration Guide

Cisco NX-OS Licensing Guide

VLANs, MAC address tables, private VLANs, and the Spanning Tree Protocol.

Cisco Nexus 7000 Series NX-OS Layer 2 Switching Configuration GuideCisco Nexus 7000 Series NX-OS Layer 2 Switching Configuration Guide

Cisco Nexus 7000 Series NX-OS FabricPath Command Reference

Cisco Nexus 7000 Series NX-OS FabricPath Configuration Guide

Cisco Nexus 7000 Series NX-OS Release NotesCisco Nexus 7000 Series NX-OS Release Notes

RFCs

Table 7. RFCs

RFCs

Title

RFC 5880

Bidirectional Forwarding Detection (BFD)

RFC 5881

BFD for IPv4 and IPv6 (Single Hop)

Verifying the BFD Configuration

To verify BFD configuration, use one of the folowing commands:

Table 8. Verifying the BFD Configuration

Command

Purpose

show running-config bfd

Displays the running BFD configuration.

show startup-config bfd

Displays the BFD configuration that will be applied on the next system startup.

To verify micro BFD session configurations, use one of the following commands:

Table 9. Verifying Micro BFD Session Configurations

Command

Purpose

show port-channel summary

Display the port-channel and port-channel member operational state.

show bfd neighbors

Display micro-BFD sessions on port-channel members.

show bfd neighbors detail

Display BFD session for a port channel interface, and the associated micro-BFD sessions on members.

show tech-support bfd

Display technical support information for BFD.

show tech-support lacp all

Display the technical support information for Ethernet Port Manager, Ethernet Port-channel Manager and LACP.

show running-config interface port-channel port-channel-number

Display running configuration information of the port-channel interface.

For detailed information about the fields in the output from these commands, see the Cisco Nexus 7000 Series NX-OS Interfaces Command Reference.

Monitoring BFD

To display BFD monitoring, use the following commands :

Table 10. Monitoring BFD

Command

Purpose

show bfd neighbors [application name] [details]

Displays information about BFD for a supported application, such as BGP or OSPFv2.

show bfd neighbors [interface int-if] [details]

Displays information about BGP sessions on an interface.

show bfd neighbors [dest-ip ip-address] [src-ip ip-address][details]

Displays information about the specified BGP session on an interface.

show bfd neighbors [vrf vrf-name] [details]

Displays information about BFD for a VRF.

For detailed information about the fields in the output from these commands, see the Cisco Nexus 7000 Series NX-OS Interfaces Command Reference.

Configuration Examples for BFD

This example shows how to configure BFD for OSPFv2 on Ethernet 2/1, using the default BFD session parameters:

The fields shown below are self-explanatory.


feature bfd
feature ospf
router ospf Test1
interface ethernet 2/1
  ip ospf bfd
  no shutdown

This example shows how to configure BFD for all EIGRP interfaces, using the default BFD session parameters:

The fields shown below are self-explanatory.


feature bfd
feature eigrp
bfd interval 100 min_rx 100 multiplier 4
router eigrp Test2
 bfd

The following example shows how to configure micro BFD sessions :

The following topology is used in the example that follows:

Figure 3. Configuring a Micro BFD Session


This example shows how to configure a micro BFD session on switch 1

The fields shown below are self-explanatory.


feature bfd
configure terminal
    interface port-channel 10
       port-channel bfd track-member-link
       port-channel bfd destination 10.1.1.2
       port-channel bfd start 60
       ip address 10.1.1.1/24   	   

This example shows how to configure a micro BFD session on switch 2

The fields shown below are self-explanatory.


feature bfd
configure terminal
     interface port-channel 10
           port-channel bfd track-member-link
           port-channel bfd destination 10.1.1.1
           port-channel bfd start 60
             ip address 10.1.1.2/24   	   

This example displays the show output of the show port-channel summary command.

The fields shown below are self-explanatory.

switch(config-if-range)# show port-channel summary

Flags:  D - Down        P - Up in port-channel (members)
        I - Individual  H - Hot-standby (LACP only)
        s - Suspended   r - Module-removed
        b - BFD Session Wait
        S - Switched    R - Routed
        U - Up (port-channel)
        M - Not in use. Min-links not met
--------------------------------------------------------------------
Group Port-       Type     Protocol  Member Ports
      Channel
--------------------------------------------------------------------
10    Po10(RD)    Eth     NONE    Eth7/26(b)   Eth7/27(b) Eth7/28(b)

This example displays the show output of the show bfd neighbors detail command.

The fields shown below are self-explanatory.

switch(config-if-range)# show bfd neighbors detail


OurAddr   NeighAddr   LD/RD         RH/RS  Holdown(mult)  State    Int   Vrf
10.1.1.1  10.1.1.2    1107296277/0  Down    N/A(3)        Down    Po10  default
Session state is Down and not using echo function
Local Diag: 1, Demand mode: 0, Poll bit: 0, Authentication: None
MinTxInt: 0 us, MinRxInt: 0 us, Multiplier: 0
Received MinRxInt: 0 us, Received Multiplier: 0
Holdown (hits): 0 ms (0), Hello (hits): 0 ms (0)
Rx Count: 0, Rx Interval (ms) min/max/avg: 0/0/0 last: 0 ms ago
Tx Count: 0, Tx Interval (ms) min/max/avg: 0/0/0 last: 0 ms ago
Registered protocols:  eth_port_channel
Downtime: 0 days 0 hrs 0 mins 4 secs
Last packet: Version: 0                - Diagnostic: 0
             State bit: AdminDown      - Demand bit: 0
             Poll bit: 0               - Final bit: 0
             Multiplier: 0             - Length: 24
             My Discr.: 0              - Your Discr.: 0
             Min tx interval: 0        - Min rx interval: 0
             Min Echo interval: 0      - Authentication bit: 0
Hosting LC: 0, Down reason: Control Detection Time Expired, Reason not-hosted: SUCCESS, Offloaded: No
Parent session, please check port channel config for member info