- Information About Advanced BGP
- Peer Templates
- Authentication
- Route Policies and Resetting BGP Sessions
- eBGP
- iBGP
- Capabilities Negotiation
- Route Dampening
- Load Sharing and Multipath
- BGP Additional Paths
- Route Aggregation
- BGP Conditional Advertisement
- BGP Next-Hop Address Tracking
- Route Redistribution
- BFD
- Tuning BGP
- Multiprotocol BGP
- Virtualization Support
- Licensing Requirements for Advanced BGP
- Prerequisites for BGP
- Guidelines and Limitations for BGP
- Default Settings
- Configuring Advanced BGP
- Configuring BGP Session Templates
- Configuring BGP Peer-Policy Templates
- Configuring BGP Peer Templates
- Configuring Prefix Peering
- Configuring BGP Authentication
- Resetting a BGP Session
- Modifying the Next-Hop Address
- Configuring BGP Next-Hop Address Tracking
- Configuring Next-Hop Filtering
- Disabling Capabilities Negotiation
- Configuring BGP Additional Paths
Configuring Advanced BGP
This chapter describes how to configure advanced features of the Border Gateway Protocol (BGP) on the Cisco NX-OS switch.
Information About Advanced BGP
BGP is an interdomain routing protocol that provides loop-free routing between organizations or autonomous systems. Cisco NX-OS supports BGP version 4. BGP version 4 includes multiprotocol extensions that allow BGP to carry routing information for IP multicast routes and multiple Layer 3 protocol address families. BGP uses TCP as a reliable transport protocol to create TCP sessions with other BGP-enabled switches called BGP peers. When connecting to an external organization, the router creates external BGP (eBGP) peering sessions. BGP peers within the same organization exchange routing information through internal BGP (iBGP) peering sessions.
This section includes the following topics:
- Peer Templates
- Authentication
- Route Policies and Resetting BGP Sessions
- eBGP
- iBGP
- Capabilities Negotiation
- Route Dampening
- Load Sharing and Multipath
- Route Aggregation
- BGP Conditional Advertisement
- BGP Next-Hop Address Tracking
- Route Redistribution
- BFD
- Tuning BGP
- Multiprotocol BGP
- Virtualization Support
Peer Templates
BGP peer templates allow you to create blocks of common configurations that you can reuse across similar BGP peers. Each block allows you to define a set of attributes that a peer then inherits. You can choose to override some of the inherited attributes as well, making it a very flexible scheme for simplifying the repetitive nature of BGP configurations.
Cisco NX-OS implements three types of peer templates:
- The peer-session template defines BGP peer session attributes, such as the transport details, remote autonomous system number of the peer, and session timers. A peer-session template can also inherit attributes from another peer-session template (with locally defined attributes that override the attributes from an inherited peer-session).
- A peer-policy template defines the address-family dependent policy aspects for a peer including the inbound and outbound policy, filter-lists, and prefix-lists. A peer-policy template can inherit from a set of peer-policy templates. Cisco NX-OS evaluates these peer-policy templates in the order specified by the preference value in the inherit configuration. The lowest number is preferred over higher numbers.
- The peer template can inherit the peer-session and peer-policy templates to allow for simplified peer definitions. It is not mandatory to use a peer template but it can simplify the BGP configuration by providing reusable blocks of configuration.
Authentication
You can configure authentication for a BGP neighbor session. This authentication method adds an MD5 authentication digest to each TCP segment sent to the neighbor to protect BGP against unauthorized messages and TCP security attacks.

Note![]() The MD5 password must be identical between BGP peers.
The MD5 password must be identical between BGP peers.
Route Policies and Resetting BGP Sessions
You can associate a route policy to a BGP peer. Route policies use route maps to control or modify the routes that BGP recognizes. You can configure a route policy for inbound or outbound route updates. The route policies can match on different criteria, such as a prefix or AS_path attribute, and selectively accept or deny the routes. Route policies can also modify the path attributes.
When you change a route policy applied to a BGP peer, you must reset the BGP sessions for that peer. Cisco NX-OS supports the following three mechanisms to reset BGP peering sessions:
- Hard reset—A hard reset tears down the specified peering sessions, including the TCP connection, and deletes routes coming from the specified peer. This option interrupts packet flow through the BGP network. Hard reset is disabled by default.
- Soft reconfiguration inbound—A soft reconfiguration inbound triggers routing updates for the specified peer without resetting the session. You can use this option if you change an inbound route policy. Soft reconfiguration inbound saves a copy of all routes received from the peer before processing the routes through the inbound route policy. If you change the inbound route policy, Cisco NX-OS passes these stored routes through the modified inbound route policy to update the route table without tearing down existing peering sessions. Soft reconfiguration inbound can use significant memory resources to store the unfiltered BGP routes. Soft reconfiguration inbound is disabled by default.
- Route Refresh—A route refresh updates the inbound routing tables dynamically by sending route refresh requests to supporting peers when you change an inbound route policy. The remote BGP peer responds with a new copy of its routes that the local BGP speaker processes with the modified route policy. Cisco NX-OS automatically sends an outbound route refresh of prefixes to the peer.
- BGP peers advertise the route refresh capability as part of the BGP capability negotiation when establishing the BGP peer session. Route refresh is the preferred option and enabled by default.
Note![]() BGP also uses route maps for route redistribution, route aggregation, route dampening, and other features. See “Configuring Route Policy Manager,” for more information on route maps.
BGP also uses route maps for route redistribution, route aggregation, route dampening, and other features. See “Configuring Route Policy Manager,” for more information on route maps.
eBGP
External BGP (eBGP) allows you to connect BGP peers from different autonomous systems to exchange routing updates. Connecting to external networks enables traffic from your network to be forwarded to other networks and across the Internet.
You should use loopback interfaces for establishing eBGP peering sessions because loopback interfaces are less susceptible to interface flapping. An interface flap occurs when the interface is administratively brought up or down because of a failure or maintenance issue. See the “Configuring BGP Additional Paths” section for information on multihop, fast external failovers, and limiting the size of the AS-path attribute.
iBGP
Internal BGP (iBGP) allows you to connect BGP peers within the same autonomous system. You can use iBGP for multihomed BGP networks (networks that have more than one connection to the same external autonomous system).
Figure 8-1 shows an iBGP network within a larger BGP network.
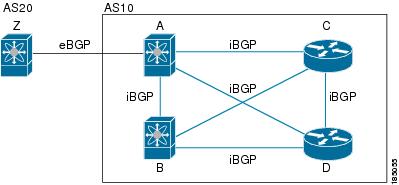
iBGP networks are fully meshed. Each iBGP peer has a direct connection to all other iBGP peers to prevent network loops.
Note![]() You should configure a separate interior gateway protocol in the iBGP network.
You should configure a separate interior gateway protocol in the iBGP network.
AS Confederations
A fully meshed iBGP network becomes complex as the number of iBGP peers grows. You can reduce the iBGP mesh by dividing the autonomous system into multiple subautonomous systems and grouping them into a single confederation. A confederation is a group of iBGP peers that use the same autonomous system number to communicate to external networks. Each subautonomous system is fully meshed within itself and has a few connections to other subautonomous systems in the same confederation.
Figure 8-2 shows the BGP network from Figure 8-1, split into two subautonomous systems and one confederation.
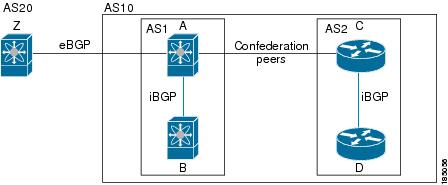
In this example, AS10 is split into two subautonomous systems, AS1 and AS2. Each subautonomous system is fully meshed, but there is only one link between the subautonomous systems. By using AS confederations, you can reduce the number of links compared to the fully meshed autonomous system in Figure 8-1.
Route Reflector
You can alternately reduce the iBGP mesh by using a route reflector configuration. Route reflectors pass learned routes to neighbors so that all iBGP peers do not need to be fully meshed.
Figure 8-1 shows a simple iBGP configuration with four meshed iBGP speakers (router A, B, C, and D). Without route reflectors, when router A receives a route from an external neighbor, it advertises the route to all three iBGP neighbors.
When you configure an iBGP peer to be a route reflector, it becomes responsible for passing iBGP learned routes to a set of iBGP neighbors.
In Figure 8-3, router B is the route reflector. When the route reflector receives routes advertised from router A, it advertises (reflects) the routes to routers C and D. Router A no longer has to advertise to both routers C and D.

The route reflector and its client peers form a cluster. You do not have to configure all iBGP peers to act as client peers of the route reflector. You must configure any nonclient peer as fully meshed to guarantee that complete BGP updates reach all peers.
Capabilities Negotiation
A BGP speaker can learn about BGP extensions supported by a peer by using the capabilities negotiation feature. Capabilities negotiation allows BGP to use only the set of features supported by both BGP peers on a link.
If a BGP peer does not support capabilities negotiation, Cisco NX-OS will attempt a new session to the peer without capabilities negotiation if you have configured the address family as IPv4.
Route Dampening
Route dampening is a BGP feature that minimizes the propagation of flapping routes across an internetwork. A route flaps when it alternates between the available and unavailable states in rapid succession.
For example, consider a network with three BGP autonomous systems: AS1, AS2, and AS3. Suppose that a route in AS1 flaps (it becomes unavailable). Without route dampening, AS1 sends a withdraw message to AS2. AS2 propagates the withdrawal message to AS3. When the flapping route reappears, AS1 sends an advertisement message to AS2, which sends the advertisement to AS3. If the route repeatedly becomes unavailable, and then available, AS1 sends many withdrawal and advertisement messages that propagate through the other autonomous systems.
Route dampening can minimize flapping. Suppose that the route flaps. AS2 (in which route dampening is enabled) assigns the route a penalty of 1000. AS2 continues to advertise the status of the route to neighbors. Each time that the route flaps, AS2 adds to the penalty value. When the route flaps so often that the penalty exceeds a configurable suppression limit, AS2 stops advertising the route, regardless of how many times that it flaps. The route is now dampened.
The penalty placed on the route decays until the reuse limit is reached. At that time, AS2 advertises the route again. When the reuse limit is at 50 percent, AS2 removes the dampening information for the route.
Note![]() The router does not apply a penalty to a resetting BGP peer when route dampening is enabled, even though the peer reset withdraws the route.
The router does not apply a penalty to a resetting BGP peer when route dampening is enabled, even though the peer reset withdraws the route.
Load Sharing and Multipath
BGP can install muliple equal-cost eBGP or iBGP paths into the routing table to reach the same destination prefix. Traffic to the destination prefix is then shared across all the installed paths.
The BGP best-path algorithm considers the paths as equal-cost paths if the following attributes are identical:
- Weight
- Local preference
- AS_path
- Origin code
- Multi-exit discriminator (MED)
- IGP cost to the BGP next hop
BGP selects only one of these multiple paths as the best path and advertises the path to the BGP peers.
Note![]() Paths received from different AS confederations are considered as equal-cost paths if the external AS_path values and the other attributes are identical.
Paths received from different AS confederations are considered as equal-cost paths if the external AS_path values and the other attributes are identical.
Note![]() When you configure a route reflector for iBGP multipath, and the route reflector advertises the selected best path to its peers, the next hop for the path is not modified.
When you configure a route reflector for iBGP multipath, and the route reflector advertises the selected best path to its peers, the next hop for the path is not modified.
Note![]() Nexus OS performs BGP AS PATH check for both iBGP (VPNv4) and eBGP and if it finds its own AS in MP-BGP update, it discards the route. Use ALLOWAS-IN attribute for VPNv4 neighbors to resolve this issue.
Nexus OS performs BGP AS PATH check for both iBGP (VPNv4) and eBGP and if it finds its own AS in MP-BGP update, it discards the route. Use ALLOWAS-IN attribute for VPNv4 neighbors to resolve this issue.
BGP Additional Paths
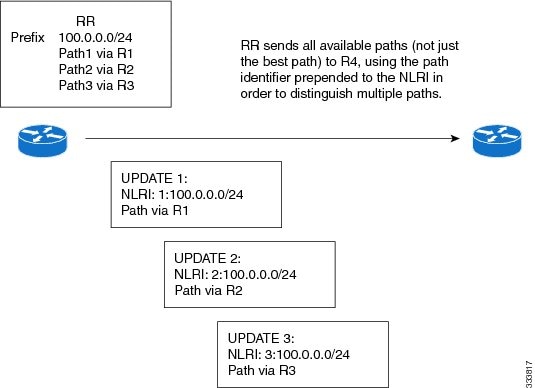
Cisco NX-OS supports the BGP additional paths feature, which allows the BGP speaker to propagate and accept multiple paths for the same prefix without the new paths replacing any previous ones. This feature allows BGP speaker peers to negotiate whether they support advertising and receiving multiple paths per prefix and advertising such paths. A special 4-byte path ID is added to the network layer reachability information (NLRI) to differentiate multiple paths for the same prefix sent across a peer session. The following figure illustrates the BGP additional paths capability.
Figure 8-4 BGP Route Advertisement with the Additional Paths Capability
Route Aggregation
You can configure aggregate addresses. Route aggregation simplifies route tables by replacing a number of more specific addresses with an address that represents all the specific addresses. For example, you can replace these three more specific addresses, 10.1.1.0/24, 10.1.2.0/24, and 10.1.3.0/24 with one aggregate address, 10.1.0.0/16.
Aggregate prefixes are present in the BGP route table so that fewer routes are advertised.
Note![]() Cisco NX-OS does not support automatic route aggregation.
Cisco NX-OS does not support automatic route aggregation.
Route aggregation can lead to forwarding loops. To avoid this problem, when BGP generates an advertisement for an aggregate address, it automatically installs a summary discard route for that aggregate address in the local routing table. BGP sets the administrative distance of the summary discard to 220 and sets the route type to discard. BGP does not use discard routes for next-hop resolution.
BGP Conditional Advertisement
BGP conditional advertisement allows you to configure BGP to advertise or withdraw a route based on whether or not a prefix exists in the BGP table. This feature is useful, for example, in multihomed networks, in which you want BGP to advertise some prefixes to one of the providers only if information from the other provider is not present.
Consider an example network with three BGP autonomous systems: AS1, AS2, and AS3, where AS1 and AS3 connect to the Internet and to AS2. Without conditional advertisement, AS2 propagates all routes to both AS1 and AS3. With conditional advertisement, you can configure AS2 to advertise certain routes to AS3 only if routes from AS1 do not exist (if for example, the link to AS1 fails).
BGP conditional advertisement adds an exist or not-exist test to each route that matches the configured route map. See the “Configuring BGP Conditional Advertisement” section for more information.
BGP Next-Hop Address Tracking
BGP monitors the next-hop address of installed routes to verify next-hop reachability and to select, install, and validate the BGP best path. BGP next-hop address tracking speeds up this next-hop reachability test by triggering the verification process when routes change in the RIB that may affect BGP next-hop reachability.
BGP receives notifications from the RIB when next-hop information changes (event-driven notifications). BGP is notified when any of the following events occurs:
- Next hop becomes unreachable.
- Next hop becomes reachable.
- Fully recursed IGP metric to the next hop changes.
- First hop IP address or first hop interface changes.
- Next hop becomes connected.
- Next hop becomes unconnected.
- Next hop becomes a local address.
- Next hop becomes a nonlocal address.
Note![]() Reachability and recursed metric events trigger a best-path recalculation.
Reachability and recursed metric events trigger a best-path recalculation.
Event notifications from the RIB are classified as critical and noncritical. Notifications for critical and noncritical events are sent in separate batches. However, a noncritical event is sent with the critical events if the noncritical event is pending and there is a request to read the critical events.
- Critical events are related to the reachability (reachable and unreachable), connectivity (connected and unconnected), and locality (local and nonlocal) of the next hops. Notifications for these events are not delayed.
- Noncritical events include only the IGP metric changes.
See the “Configuring BGP Next-Hop Address Tracking” section for more information.
Route Redistribution
You can configure BGP to redistribute static routes or routes from other protocols. You configure a route policy with the redistribution to control which routes are passed into BGP. A route policy allows you to filter routes based on attributes such as the destination, origination protocol, route type, route tag, and so on. See “Configuring Route Policy Manager,” for more information. Prior to Cisco NX-OS Release 5.2(1), when you redistribute BGP to IGP, iBGP is redistributed as well. To override this behavior, you must insert an additional deny statement into the route map. iBGP is not redistributed to IGP by default.
You can use route maps to override the default behavior, but be careful when doing so as incorrect use of route maps can result in network loops. The following example shows how to use route maps to change the default behavoir.
You can change the default behavoir by modifying the route map as follows:
BFD
BGP supports bidirectional forwarding detection (BFD) for IPv4 only. BFD is a detection protocol designed to provide fast forwarding-path failure detection times. BFD provides subsecond failure detection between two adjacent devices and can be less CPU-intensive than protocol hello messages because some of the BFD load can be distributed onto the data plane on supported modules.
BFD for BGP is supported on eBGP peers and iBGP single-hop peers. Configure the update-source option in neighbor configuration mode for iBGP single-hop peers using BFD.
Note![]() BFD is not supported on other iBGP peers or for multihop eBGP peers.
BFD is not supported on other iBGP peers or for multihop eBGP peers.
See the Cisco Nexus 5500 Series NX-OS Interfaces Configuration Guide, Release 6.0 for more information.
Tuning BGP
You can modify the default behavior of BGP through BGP timers and by adjusting the best-path algorithm.
BGP Timers
BGP uses different types of timers for neighbor session and global protocol events. Each established session has a minimum of two timers for sending periodic keepalive messages and for timing out sessions when peer keepalives do not arrive within the expected time. In addition, there are other timers for handling specific features. Typically, you configure these timers in seconds. The timers include a random adjustment so that the same timers on different BGP peers trigger at different times.
Tuning the Best-Path Algorithm
You can modify the default behavior of the best-path algorithm through optional configuration parameters, including changing how the algorithm handles the MED attribute and the router ID.
Multiprotocol BGP
BGP on Cisco NX-OS supports multiple address families. Multiprotocol BGP (MP-BGP) carries different sets of routes depending on the address family. For example, BGP can carry one set of routes for IPv4 unicast routing, and one set of routes for IPv4 multicast routing. You can use MP-BGP for reverse-path forwarding (RPF) checks in IP multicast networks.
Note![]() Because Multicast BGP does not propagate multicast state information, you need a multicast protocol, such as Protocol Independent Multicast (PIM).
Because Multicast BGP does not propagate multicast state information, you need a multicast protocol, such as Protocol Independent Multicast (PIM).
Use the router address-family and neighbor address-family configuration modes to support multiprotocol BGP configurations. MP-BGP maintains separate RIBs for each configured address family, such as a unicast RIB and a multicast RIB for BGP.
A multiprotocol BGP network is backward compatible but BGP peers that do not support multiprotocol extensions cannot forward routing information, such as address family identifier information, that the multiprotocol extensions carry.
Virtualization Support
Cisco NX-OS supports multiple instances of BGP that run on the same system.
Licensing Requirements for Advanced BGP
The following table shows the licensing requirements for this feature:
Prerequisites for BGP
BGP has the following prerequisites:
- You must enable the BGP feature (see the “Enabling the BGP Feature” section).
- You should have a valid router ID configured on the system.
- You must have an AS number, either assigned by a Regional Internet Registry (RIR) or locally administered.
- You must have reachability (such as an interior gateway protocol (IGP), a static route, or a direct connection) to the peer that you are trying to make a neighbor relationship with.
- You must explicitly configure an address family under a neighbor for the BGP session establishment.
Guidelines and Limitations for BGP
BGP has the following configuration guidelines and limitations:
- The dynamic AS number prefix peer configuration overrides the individual AS number configuration inherited from a BGP template.
- If you configure a dynamic AS number for prefix peers in an AS confederation, BGP establishes sessions with only the AS numbers in the local confederation.
- BGP sessions created through a dynamic AS number prefix peer ignore any configured eBGP multihop time-to-live (TTL) value or a disabled check for directly connected peers.
- Configure a router ID for BGP to avoid automatic router ID changes and session flaps.
- Use the maximum-prefix configuration option per peer to restrict the number of routes received and system resources used.
- Configure the update-source to establish a session with eBGP multihop sessions.
- Specify a BGP route map if you configure redistribution.
- Configure the BGP router ID within a VRF.
- Cisco NX-OS does not support multi-hop BFD. BFD for BGP has the following limitations:
–![]() BFD is supported only for BGP IPv4.
BFD is supported only for BGP IPv4.
–![]() BFD is supported only for eBGP peers and iBGP single-hop peers.
BFD is supported only for eBGP peers and iBGP single-hop peers.
–![]() To enable BFD for iBGP single-hop peers, you must configure the update-source option on the physical interface.
To enable BFD for iBGP single-hop peers, you must configure the update-source option on the physical interface.
–![]() BFD is not supported for multi-hop iBGP peers and multi-hop eBGP peers.
BFD is not supported for multi-hop iBGP peers and multi-hop eBGP peers.
If you decrease the keepalive and hold timer values, the network might experience session flaps.
Default Settings
Table 8-1 lists the default settings for BGP parameters.
|
|
|
|---|---|
Configuring Advanced BGP
This section describes how to configure advanced BGP and includes the following topics:
- Configuring BGP Session Templates
- Configuring BGP Peer-Policy Templates
- Configuring BGP Peer Templates
- Configuring Prefix Peering
- Configuring BGP Authentication
- Resetting a BGP Session
- Modifying the Next-Hop Address
- Configuring BGP Next-Hop Address Tracking
- Configuring Next-Hop Filtering
- Disabling Capabilities Negotiation
- Configuring BGP Additional Paths
- Configuring AS Confederations
- Configuring Route Reflector
- Configuring Route Dampening
- Configuring Load Sharing and ECMP
- Configuring Maximum Prefixes
- Configuring Dynamic Capability
- Configuring Aggregate Addresses
- Configuring BGP Conditional Advertisement
- Configuring Route Redistribution
- Configuring Multiprotocol BGP
- Tuning BGP
- Configuring Virtualization
- Configuring Policy-Based Administrative Distance
Note![]() If you are familiar with the Cisco IOS CLI, be aware that the Cisco NX-OS commands for this feature might differ from the Cisco IOS commands that you would use.
If you are familiar with the Cisco IOS CLI, be aware that the Cisco NX-OS commands for this feature might differ from the Cisco IOS commands that you would use.
Configuring BGP Session Templates
You can use BGP session templates to simplify BGP configuration for multiple BGP peers with similar configuration needs. BGP templates allow you to reuse common configuration blocks. You configure BGP templates first, and then apply these templates to BGP peers.
With BGP session templates, you can configure session attributes such as inheritance, passwords, timers, and security.
A peer-session template can inherit from one other peer-session template. You can configure the second template to inherit from a third template. The first template also inherits this third template. This indirect inheritance can continue for up to seven peer-session templates.
Any attributes configured for the neighbor take priority over any attributes inherited by that neighbor from a BGP template.
BEFORE YOU BEGIN
Note![]() Ensure that you have enabled the BGP feature (see the “Enabling the BGP Feature” section).When editing a template, you can use the no form of a command at either the peer or template level to explicitly override a setting in a template. You must use the default form of the command to reset that attribute to the default state.
Ensure that you have enabled the BGP feature (see the “Enabling the BGP Feature” section).When editing a template, you can use the no form of a command at either the peer or template level to explicitly override a setting in a template. You must use the default form of the command to reset that attribute to the default state.
SUMMARY STEPS
2.![]() router bgp autonomous-system-number
router bgp autonomous-system-number
3.![]() template peer-session template-name
template peer-session template-name
7.![]() neighbor ip-address remote-as as-number
neighbor ip-address remote-as as-number
8.![]() inherit peer-session template-name
inherit peer-session template-name
9.![]() (Optional) description text
(Optional) description text
DETAILED STEPS
Use the show bgp neighbor command to see the template applied. See the Cisco Nexus 5000 Series Command Reference, Cisco NX-OS Releases 4.x, 5.x, for details on all commands available in the template.
This example shows how to configure a BGP peer-session template and apply it to a BGP peer:
switch(config)# router bgp 65536
switch(config-router)# template peer-session BaseSession
switch(config-router-stmp)# timers 30 90
switch(config-router-stmp)# exit
switch(config-router)# neighbor 192.168.1.2 remote-as 65536
switch(config-router-neighbor)# inherit peer-session BaseSession
switch(config-router-neighbor)# description Peer Router A
switch(config-router-neighbor)# address-family ipv4 unicast
switch(config-router-neighbor)# copy running-config startup-config
Configuring BGP Peer-Policy Templates
You can configure a peer-policy template to define attributes for a particular address family. You assign a preference to each peer-policy template and these templates are inherited in the order specified, for up to five peer-policy templates in a neighbor address family.
Cisco NX-OS evaluates multiple peer policies for an address family using the preference value. The lowest preference value is evaluated first. Any attributes configured for the neighbor take priority over any attributes inherited by that neighbor from a BGP template.
Peer-policy templates can configure address family-specific attributes such as AS-path filter lists, prefix lists, route reflection, and soft reconfiguration.
BEFORE YOU BEGIN
Note![]() Ensure that you have enabled the BGP feature (see the “Enabling the BGP Feature” section).When editing a template, you can use the no form of a command at either the peer or template level to explicitly override a setting in a template. You must use the default form of the command to reset that attribute to the default state.
Ensure that you have enabled the BGP feature (see the “Enabling the BGP Feature” section).When editing a template, you can use the no form of a command at either the peer or template level to explicitly override a setting in a template. You must use the default form of the command to reset that attribute to the default state.
SUMMARY STEPS
2.![]() router bgp autonomous-system-number
router bgp autonomous-system-number
3.![]() template peer-policy template-name
template peer-policy template-name
7.![]() neighbor ip-address remote-as as-number
neighbor ip-address remote-as as-number
8.![]() address-family ipv4 {multicast | unicast}
address-family ipv4 {multicast | unicast}
9.![]() inherit peer-policy template-name preference
inherit peer-policy template-name preference
DETAILED STEPS
Use the show bgp neighbor command to see the template applied. See the Cisco Nexus 5000 Series Command Reference, Cisco NX-OS Releases 4.x, 5.x, for details on all commands available in the template.
This example shows how to configure a BGP peer-session template and apply it to a BGP peer:
switch(config)# router bgp 65536
switch(config-router)# template peer-session BasePolicy
switch(config-router-ptmp)# maximum-prefix 20
switch(config-router-ptmp)# exit
switch(config-router)# neighbor 192.168.1.1 remote-as 65536
switch(config-router-neighbor)# address-family ipv4 unicast
switch(config-router-neighbor-af)# inherit peer-policy BasePolicy
switch(config-router-neighbor-af)# copy running-config startup-config
Configuring BGP Peer Templates
You can configure BGP peer templates to combine session and policy attributes in one reusable configuration block. Peer templates can also inherit peer-session or peer-policy templates. Any attributes configured for the neighbor take priority over any attributes inherited by that neighbor from a BGP template. You configure only one peer template for a neighbor, but that peer template can inherit peer-session and peer-policy templates.
Peer templates support session and address family attributes, such as eBGP multihop time-to-live, maximum prefix, next-hop self, and timers.
BEFORE YOU BEGIN
Note![]() Ensure that you have enabled the BGP feature (see the “Enabling the BGP Feature” section).When editing a template, you can use the no form of a command at either the peer or template level to explicitly override a setting in a template. You must use the default form of the command to reset that attribute to the default state.
Ensure that you have enabled the BGP feature (see the “Enabling the BGP Feature” section).When editing a template, you can use the no form of a command at either the peer or template level to explicitly override a setting in a template. You must use the default form of the command to reset that attribute to the default state.
SUMMARY STEPS
2.![]() router bgp autonomous-system-number
router bgp autonomous-system-number
3.![]() template peer template-name
template peer template-name
4.![]() (Optional) inherit peer-session template-name
(Optional) inherit peer-session template-name
5.![]() (Optional) address-family { ipv4 | ipv6 } { multicast | unicast }
(Optional) address-family { ipv4 | ipv6 } { multicast | unicast }
6.![]() (Optional) inherit peer template-name
(Optional) inherit peer template-name
8.![]() (Optional) timers keepalive hold
(Optional) timers keepalive hold
10.![]() neighbor ip-address remote-as as-number
neighbor ip-address remote-as as-number
11.![]() inherit peer template-name
inherit peer template-name
12.![]() (Optional) timers keepalive hold
(Optional) timers keepalive hold
DETAILED STEPS
Use the show bgp neighbor command to see the template applied. See the Cisco Nexus 5000 Series Command Reference, Cisco NX-OS Releases 4.x, 5.x, for details on all commands available in the template.
This example shows how to configure a BGP peer template and apply it to a BGP peer:
)# template peer BasePeer
)# exit
Configuring Prefix Peering
BGP supports the definition of a set of peers using a prefix for both IPv4. This feature allows you to not have to add each neighbor to the configuration.
When defining a prefix peering, you must specify the remote AS number with the prefix. BGP accepts any peer that connects from that prefix and autonomous system if the prefix peering does not exceed the configured maximum peers allowed.
When a BGP peer that is part of a prefix peering disconnects, Cisco NX-OS holds its peer structures for a defined prefix peer timeout value. An established peer can reset and reconnect without danger of being blocked because other peers have consumed all slots for that prefix peering.
To configure the BGP prefix peering timeout value, use the following command in router configuration mode:
To configure the maximum number of peers, use the following command in neighbor configuration mode:
|
|
|
|---|---|
Configures the maximum number of peers for this prefix peering. The range is from 1 to 1000. |
This example shows how to configure a prefix peering that accepts up to 10 peers:
Use the show ip bgp neighbor command to show the details of the configuration for that prefix peering with a list of the currently accepted instances and the counts of active, maximum concurrent, and total accepted peers.
Configuring BGP Authentication
You can configure BGP to authenticate route updates from peers using MD5 digests.
To configure BGP to use MD5 authentication, use the following command in neighbor configuration mode:
|
|
|
|---|---|
Resetting a BGP Session
If you modify a route policy for BGP, you must reset the associated BGP peer sessions. If the BGP peers do not support route refresh, you can configure a soft reconfiguration for inbound policy changes. Cisco NX-OS automatically attempts a soft reset for the session.
To configure soft reconfiguration inbound, use the following command in neighbor address-family configuration mode:
To reset a BGP neighbor session, use the following command in any mode:
|
|
|
|---|---|
clear bgp ip { unicast | multicast } ip-address soft { in | out } |
Resets the BGP session without tearing down the TCP session. |
Modifying the Next-Hop Address
You can modify the next-hop address used in a route advertisement in the following ways:
- Disable the next-hop calculation and use the local BGP speaker address as the next-hop address.
- Set the next-hop address as a third-party address. Use this feature in situations where the original next-hop address is on the same subnet as the peer that the route is being sent to. Using this feature saves an extra hop during forwarding.
To modify the next-hop address, use the following parameters in commands address-family configuration mode:
Configuring BGP Next-Hop Address Tracking
BGP next-hop address tracking is enabled by default and cannot be disabled.
You can modify the delay interval between RIB checks to increase the performance of BGP next-hop tracking. You can configure the critical timer for routes that affect BGP next-hop reachability, and you can configure the noncritical timer for all other routes in the BGP table.
To modify the BGP next-hop address tracking, use the following commands address-family configuration mode:
Configuring Next-Hop Filtering
BGP next-hop filtering allows you to specify that when a next-hop address is checked with the RIB, the underlying route for that next-hop address is passed through the route map. If the route map rejects the route, the next-hop address is treated as unreachable.
BGP marks all next hops that are rejected by the route policy as invalid and does not calculate the best path for the routes that use the invalid next-hop address.
To configure BGP next-hop filtering, use the following command in address-family configuration mode:
|
|
|
|---|---|
Specifies a route map to match the BGP next-hop route to. The name can be any case-sensitive, alphanumeric string up to 63 characters. |
Disabling Capabilities Negotiation
You can disable capabilities negotiations to interoperate with older BGP peers that do not support capabilities negotiation.
To disable capabilities negotiation, use the following command in neighbor configuration mode:
|
|
|
|---|---|
Disables capabilities negotiation. You must manually reset the BGP sessions after configuring this command. |
Configuring BGP Additional Paths
BGP supports sending and receiving multiple paths per prefix and advertising such paths.
Configuring Sending and Receiving of Additional Paths
Advertising the Capability of Sending and Receiving Additional Paths
Configuring Sending and Receiving of Additional Paths
You can configure the capability of sending and receiving additional paths to and from the BGP peers.
Procedure
This example shows how to enable the additional paths send and receive capability for neighbors under the specified address family for which this capability has not been disabled:
Advertising the Capability of Sending and Receiving Additional Paths
You can configure BGP to advertise the capability of sending and receiving additional paths to and from the BGP peers.
Procedure
This example shows how to advertise the capability to send and receive additional paths to the BGP peer:
Configuring Advertised Paths
Procedure
This example shows how to specify the paths to be advertised for the specified prefix:
Configuring Additional Path Selection
You can configure the capability of selecting additional paths for a prefix.
Procedure
This example shows how to specify that all paths be advertised for the specified prefix:
Configuring eBGP
This section includes the following topics:
- Disabling eBGP Single-Hop Checking
- Configuring eBGP Multihop
- Disabling a Fast External Failover
- Limiting the AS-path Attribute
Disabling eBGP Single-Hop Checking
You can configure eBGP to disable checking whether a single-hop eBGP peer is directly connected to the local router. Use this option for configuring a single-hop loopback eBGP session between directly connected switches.
To disable checking whether or not a single-hop eBGP peer is directly connected, use the following command in neighbor configuration mode:
|
|
|
|---|---|
Disables checking whether or not a single-hop eBGP peer is directly connected. You must manually reset the BGP sessions after using this command. |
Configuring eBGP Multihop
You can configure the eBGP time-to-live (TTL) value to support eBGP multihop. In some situations, an eBGP peer is not directly connected to another eBGP peer and requires multiple hops to reach the remote eBGP peer. You can configure the eBGP TTL value for a neighbor session to allow these multihop sessions.
To configure eBGP multihop, use the following command in neighbor configuration mode:
|
|
|
|---|---|
Configures the eBGP TTL value for eBGP multihop. The range is from 2 to 255. You must manually reset the BGP sessions after using this command. |
Disabling a Fast External Failover
Typically, when a BGP router loses connectivity to a directly connected eBGP peer, BGP triggers a fast external failover by resetting the eBGP session to the peer. You can disable this fast external failover to limit the instability caused by link flaps.
To disable fast external failover, use the following command in router configuration mode:
|
|
|
|---|---|
Disables a fast external failover for eBGP peers. This command is enabled by default. |
Configuring Local AS Support
The local AS feature allows a router to appear to be a member of a second autonomous system (AS), in addition to its real AS. Local AS allows two ISPs to merge without modifying peering arrangements. Routers in the merged ISP become members of the new autonomous system but continue to use their old AS numbers for their customers.
This feature can only be used for true eBGP peers. You cannot use this feature for two peers that are members of different confederation sub-autonomous systems.
To configure eBGP local AS support, use the following command in neighbor configuration mode:
This example shows how to configure local AS support on a VRF:
Limiting the AS-path Attribute
You can configure eBGP to discard routes that have a high number of AS numbers in the AS-path attribute.
To discard routes that have a high number of AS numbers in the AS-path attribute, use the following command in router configuration mode:
|
|
|
|---|---|
Discards eBGP routes that have a number of AS-path segments that exceed the specified limit. The range is from 1 to 2000. |
Configuring AS Confederations
To configure an AS confederation, you must specify a confederation identifier. The group of autonomous systems within the AS confederation looks like a single autonomous system with the confederation identifier as the autonomous system number.
To configure a BGP confederation identifier, use the following command in router configuration mode:
|
|
|
|---|---|
Configures a confederation identifier for an AS confederation. This command triggers an automatic notification and session reset for the BGP neighbor sessions. |
To configure the autonomous systems that belong to the AS confederation, use the following command in router configuration mode:
|
|
|
|---|---|
Specifies a list of autonomous systems that belong to the confederation. This command triggers an automatic notification and session reset for the BGP neighbor sessions. |
Configuring Route Reflector
You can configure iBGP peers as route reflector clients to the local BGP speaker, which acts as the route reflector. Together, a route reflector and its clients form a cluster. A cluster of clients usually has a single route reflector. In such instances, the cluster is identified by the router ID of the route reflector. To increase redundancy and avoid a single point of failure in the network, you can configure a cluster with more than one route reflector. You must configure all route reflectors in the cluster with the same 4-byte cluster ID so that a route reflector can recognize updates from route reflectors in the same cluster.
BEFORE YOU BEGIN
Ensure that you have enabled the BGP feature (see the “Enabling the BGP Feature” section).
SUMMARY STEPS
4.![]() address-family ipv4 { unicast | multicast }
address-family ipv4 { unicast | multicast }
5.![]() (Optional) client-to-client reflection
(Optional) client-to-client reflection
7.![]() neighbor ip-address remote-as as-number
neighbor ip-address remote-as as-number
8.![]() address-family ipv4 { unicast | multicast }
address-family ipv4 { unicast | multicast }
DETAILED STEPS
This example shows how to configure the router as a route reflector and add one neighbor as a client:
Configuring Route Dampening
You can configure route dampening to minimize route flaps propagating through your iBGP network.
To configure route dampening, use the following command in address-family or VRF address family configuration mode:
|
|
|
|---|---|
dampening [{ half-life reuse-limit suppress-limit max-suppress-time | route-map map-name }] |
Disables capabilities negotiation. The parameter values are as follows: |
Configuring Load Sharing and ECMP
You can configure the maximum number of paths that BGP adds to the route table for equal-cost multipath load balancing.
To configure the maximum number of paths, use the following command in router address-family configuration mode:
|
|
|
|---|---|
Configures the maximum number of equal-cost paths for load sharing. The range is from 1 to 64. The default is 8. |
Configuring Maximum Prefixes
You can configure the maximum number of prefixes that BGP can receive from a BGP peer. If the number of prefixes exceeds this value, you can optionally configure BGP to generate a warning message or tear down the BGP session to the peer.
To configure the maximum allowed prefixes for a BGP peer, use the following command in neighbor address-family configuration mode:
Configuring Dynamic Capability
You can configure dynamic capability for a BGP peer.
To configure dynamic capability, use the following command in neighbor configuration mode:
|
|
|
|---|---|
Enables dynamic capability. This command triggers an automatic notification and session reset for the BGP neighbor sessions. |
Configuring Aggregate Addresses
You can configure aggregate address entries in the BGP route table.
To configure an aggregate address, use the following command in router address-family configuration mode:
Configuring BGP Conditional Advertisement
You can configure BGP conditional advertisement to limit the routes that BGP propagates. You define the following two route maps:
- Advertise map—Specifies the conditions that the route must match before BGP considers the conditional advertisement. This route map can contain any appropriate match statements.
- Exist map or nonexist map—Defines the prefix that must exist in the BGP table before BGP propagates a route that matches the advertise map. The nonexist map defines the prefix that must not exist in the BGP table before BGP propagates a route that matches the advertise map. BGP processes only the permit statements in the prefix list match statements in these route maps.
If the route does not pass the condition, BGP withdraws the route if it exists in the BGP table.
BEFORE YOU BEGIN
Ensure that you have enabled the BGP feature (see the “Enabling the BGP Feature” section).
SUMMARY STEPS
3.![]() neighbor ipaddress remote-as as-number
neighbor ipaddress remote-as as-number
4.![]() address-family ipv4 { unicast | multicast }
address-family ipv4 { unicast | multicast }
5.![]() advertise-map adv-map { exist-map exist-rmap | non-exist-map nonexist-rmap }
advertise-map adv-map { exist-map exist-rmap | non-exist-map nonexist-rmap }
DETAILED STEPS
This example shows how to configure BGP conditional advertisement:
switch(config)# router bgp 65536
switch(config-router)# neighbor 192.0.2.2 remote-as 65537
switch(config-router-neighbor)# address-family ipv4 unicast
switch(config-router-neighbor-af)# advertise-map advertise exist-map exist
switch(config-router-neighbor-af)# exit
switch(config-router-neighbor)# exit
switch(config)# route-map advertise
switch(config-route-map)# match as-path pathList
switch(config-route-map)# exit
switch(config)# route-map exit
switch(config-route-map)# match ip address prefix-list plist
switch(config-route-map)# exit
switch(config)# ip prefix-list plist permit 209.165.201.0/27
Configuring Route Redistribution
You can configure BGP to accept routing information from another routing protocol and redistribute that information through the BGP network. Optionally, you can assign a default route for redistributed routes.
Note![]() Redistribution does not work if the access list is used as a match option in route-maps.
Redistribution does not work if the access list is used as a match option in route-maps.
BEFORE YOU BEGIN
Ensure that you have enabled the BGP feature (see the “Enabling the BGP Feature” section).
SUMMARY STEPS
3.![]() address-family ipv4 { unicast | multicast }
address-family ipv4 { unicast | multicast }
4.![]() redistribute { direct | { eigrp | ospf | ospfv3 | rip } instance-tag | static } route-map map-name
redistribute { direct | { eigrp | ospf | ospfv3 | rip } instance-tag | static } route-map map-name
DETAILED STEPS
|
|
|
|
|---|---|---|
Enters BGP mode and assigns the autonomous system number to the local BGP speaker. |
||
address-family ipv4 { unicast | multicast } |
||
redistribute { direct | { eigrp | ospf | ospfv3 | rip } instance-tag | static } route-map map-name switch(config-router-af)# redistribute eigrp 201 route-map Eigrpmap |
Redistributes routes from other protocols into BGP. See the “Configuring Route Maps” section for more information about route maps. |
|
copy running-config startup-config switch(config-router-af)# copy running-config startup-config |
This example shows how to redistribute EIGRP into BGP:
switch(config)# router bgp 65536
switch(config-router)# address-family ipv4 unicast
switch(config-router-af)# redistribute eigrp 201 route-map Eigrpmap
switch(config-router-af)# copy running-config startup-config
Configuring Multiprotocol BGP
You can configure MP-BGP to support multiple address families, including IPv4 unicast and multicast routes.
BEFORE YOU BEGIN
Ensure that you have enabled the BGP feature (see the “Enabling the BGP Feature” section).
SUMMARY STEPS
3.![]() neighbor ip-address remote-as as-numbe r
neighbor ip-address remote-as as-numbe r
DETAILED STEPS
Tuning BGP
You can tune BGP characteristics through a series of optional parameters.
To tune BGB, use the following optional commands in router configuration mode:
To tune BGP, use the following optional command in router address-family configuration mode:
|
|
|
|---|---|
Sets the administrative distance for BGP. The range is from 1 to 255. The defaults are as follows: |
To tune BGP, use the following optional commands in neighbor configuration mode:
To tune BGP, use the following optional commands in neighbor address-family configuration mode:
Configuring Virtualization
You can create multiple VRFs and use the same BGP process in each VRF.
BEFORE YOU BEGIN
Ensure that you have enabled the BGP feature (see the “Enabling the BGP Feature” section).
SUMMARY STEPS
DETAILED STEPS
This example shows how to create a VRF and configure the router ID in the VRF:
Configuring Policy-Based Administrative Distance
You can configure a distance for external BGP (eBGP) and internal BGP (iBGP) routes that match a policy described in the configured route map. The distance configured in the route map is downloaded to the unicast RIB along with the matching routes. BGP uses the best path to determine the administrative distance when downloading next hops in the unicast RIB table. If there is no match or a deny clause in the policy, BGP uses the distance configured in the distance command or the default distance for routes.
The policy-based administrative distance feature is useful when there are two or more different routes to the same destination from two different routing protocols.
BEFORE YOU BEGIN
DETAILED STEPS
Step 1![]() Enters global configuration mode.
Enters global configuration mode.
Step 2![]() Creates a prefix list to match IP packets or routes with the permit keyword.
Creates a prefix list to match IP packets or routes with the permit keyword.
Step 3![]() Creates a route map and enters route-map configuration mode with the permit keyword. If the match criteria for the route is met in the policy, the packet is policy routed.
Creates a route map and enters route-map configuration mode with the permit keyword. If the match criteria for the route is met in the policy, the packet is policy routed.
Step 4![]() Matches IPv4 network routes based on a prefix list. The prefix-list name can be any alphanumeric string up to 63 characters.
Matches IPv4 network routes based on a prefix list. The prefix-list name can be any alphanumeric string up to 63 characters.
Step 5![]() Specifies the administrative distance for interior BGP (iBGP) or exterior BGP (eBGP) routes and BGP routes originated in the local autonomous system. The range is from 1 to 255.
Specifies the administrative distance for interior BGP (iBGP) or exterior BGP (eBGP) routes and BGP routes originated in the local autonomous system. The range is from 1 to 255.
Step 6![]() Exits route-map configuration mode.
Exits route-map configuration mode.
Step 7![]() Enters BGP mode and assigns the AS number to the local BGP speaker.
Enters BGP mode and assigns the AS number to the local BGP speaker.
Step 8![]() Enters address family configuration mode.
Enters address family configuration mode.
Step 9![]() Configures the selective administrative distance for a route map for BGP routes before forwarding them to the RIB table. The table-map name can be any alphanumeric string up to 63 characters.
Configures the selective administrative distance for a route map for BGP routes before forwarding them to the RIB table. The table-map name can be any alphanumeric string up to 63 characters.
Note![]() You can also configure the table-map command under the VRF address-family configuration mode.
You can also configure the table-map command under the VRF address-family configuration mode.
Step 10![]() (Optional) Displays forwarding information distribution.
(Optional) Displays forwarding information distribution.
Step 11![]() (Optional) Saves the change persistently through reboots and restarts by copying the running configuration to the startup configuration.
(Optional) Saves the change persistently through reboots and restarts by copying the running configuration to the startup configuration.
Verifying the Advanced BGP Configuration
To display the BGP configuration information, perform one of the following tasks:
Displaying BGP Statistics
To display BGP statistics, use the following commands:
Related Topics
Additional References
For additional information related to implementing BGP, see the following sections:
Related Documents
|
|
|
|---|---|
Cisco Nexus 5000 Series Command Reference, Cisco NX-OS Releases 4.x, 5.x |
 Feedback