Configuring ERSPAN

This chapter contains the following sections:

Information About ERSPAN

The Cisco NX-OS system supports the Encapsulated Remote Switching Port Analyzer (ERSPAN) feature on both source and destination ports. ERSPAN transports mirrored traffic over an IP network. The traffic is encapsulated at the source router and is transferred across the network. The packet is decapsulated at the destination router and then sent to the destination interface.

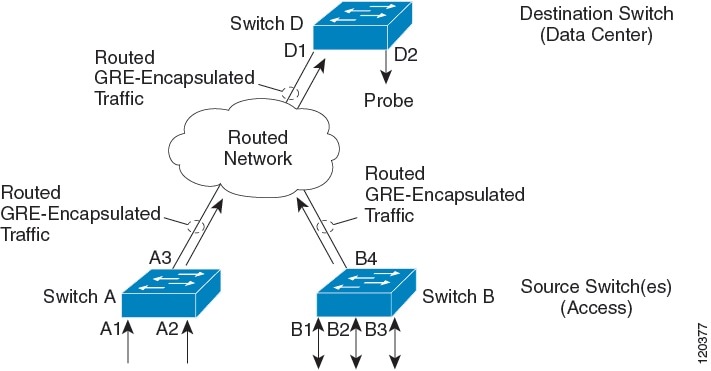
ERSPAN consists of an ERSPAN source session, routable ERSPAN generic routing encapsulation (GRE)-encapsulated traffic, and an ERSPAN destination session. You can separately configure ERSPAN source sessions and destination sessions on different switches.

ERSPAN Source Sessions

An ERSPAN source session is defined by the following:

  • A session ID.

  • A list of source ports, source VLANs, or source VSANs to be monitored by the session.

  • An ERSPAN flow ID.

  • Optional attributes related to the GRE envelope such as IP TOS and TTL.

  • Destination IP address.

  • Virtual Routing and Forwarding tables.

ERSPAN source sessions do not copy ERSPAN GRE-encapsulated traffic from source ports. Each ERSPAN source session can have ports, VLANs, or VSANs as sources. However, there are some limitations. For more information, see Guidelines and Limitations for ERSPAN.

The following figure shows an example ERSPAN configuration.

Figure 1. ERSPAN Configuration

Monitored Traffic

By default, ERSPAN monitors all traffic, including multicast and bridge protocol data unit (BPDU) frames.

The direction of the traffic that ERSPAN monitors depends on the source, as follows:

  • For a source port, the ERSPAN can monitor ingress, egress, or both ingress and egress traffic.

  • For a source VLAN or source VSAN, the ERSPAN can monitor only ingress traffic.

ERSPAN Types

Cisco NX-OS Release 6.1 and later releases support ERSPAN Type II (default) and Type III. All previous Cisco NX-OS releases support only ERSPAN Type II.

ERSPAN Type III supports all of the ERSPAN Type II features and functionality and adds these enhancements:

  • Provides timestamp information in the ERSPAN Type III header that can be used to calculate packet latency among edge, aggregate, and core switches.

  • Identifies possible traffic sources using the ERSPAN Type III header fields.

  • Provides the ability to configure timestamp granularity to determine how the clock manager synchronizes the ERSPAN timers.

  • Beginning with Cisco NX-OS Release 7.1(1)N1(1), ERSPAN Type III provides configurable switch IDs that can be used to identify traffic flows across multiple switches.

Table 1. Differences between ERSPAN Type II and ERSPAN Type III
Attribute Type II Type III
Timestamp NA Timestamp provided.
Platform-specific info NA Platform-specific info is required for Nexus 5500, Nexus 5600 and Nexus 6000 platforms.
Source Port Identification at Termination Switch Limited identification. Detailed identification. Provision of switch IDs.

ERSPAN Sources

The interfaces from which traffic can be monitored are called ERSPAN sources. Sources designate the traffic to monitor and whether to copy ingress, egress, or both directions of traffic. ERSPAN sources include the following:
  • Ethernet ports and port channels.

  • VLANs—When a VLAN is specified as an ERSPAN source, all supported interfaces in the VLAN are ERSPAN sources.

ERSPAN source ports have the following characteristics:
  • A port configured as a source port cannot also be configured as a destination port.

  • ERSPAN does not monitor any packets that are generated by the supervisor, regardless of their source.

Truncated ERSPAN

Truncated ERSPAN can be used to reduce the amount of fabric or network bandwidth used in sending ERSPAN packets.

The default is no truncation so switches or routers receiving large ERSPAN packets might drop these oversized packets.


Note


Do not enable the truncated ERSPAN feature if the destination ERSPAN router is a Cisco Nexus 6001 or Cisco Nexus 6004 switch because the Cisco Nexus 6000 Series switch drops these truncated packets.


High Availability

The ERSPAN feature supports stateless and stateful restarts. After a reboot or supervisor switchover, the running configuration is applied.

Licensing Requirements for ERSPAN

The following table shows the licensing requirements for this feature:

Product License Requirement

Cisco NX-OS

ERSPAN requires no license. Any feature not included in a license package is bundled with the Cisco NX-OS system images and is provided at no extra charge to you. For a complete explanation of the Cisco NX-OS licensing scheme, see the License and Copyright Information for Cisco NX-OS Software available at the following URL: http://www.cisco.com/en/US/docs/switches/datacenter/sw/4_0/nx-os/license_agreement/nx-ossw_lisns.html.

Prerequisites for ERSPAN

ERSPAN has the following prerequisite:

•You must first configure the Ethernet interfaces for ports on each device to support the desired ERSPAN configuration. For more information, see the Interfaces configuration guide for your platform.

Guidelines and Limitations for ERSPAN

ERSPAN has the following guidelines and limitations:

  • A maximum of 16 active sessions are supported. They can be ERSPAN sessions only or a mixture of ERSPAN and SPAN sessions.

  • The maximum number of ports for each ERSPAN session is 128.

  • The maximum number of VLANs per session is 32.

  • You can have source ports, source VLANs, and source VSANs in one ERSPAN session.

  • ERSPAN can monitor ingress, egress, or both ingress and egress traffic on a source port and only ingress traffic on source VLANs or source VSANs as long as the VLAN is not mapped to a VSAN. ERSPAN cannot monitor egress traffic on source VLANs and VSANs.

  • To bring up an ERSPAN monitor session, you must first configure a global origin address using the monitor erspan origin ip-address ip-address global command.

  • Source ports and source VLANs can be in the same ERSPAN session.

  • ERSPAN traffic can exit the switch through a Layer 2 interface, Layer 3 interface, port channel, or FabricPath core port.

  • A destination IP address of a remote switch cannot be reached through a virtual Ethernet port or FEX port. This functionality is not supported.

  • Configuring a FEX interface as a destination port for ERSPAN is not supported.

  • ERSPAN traffic is not load balanced if the reachability to a destination IP address is a Layer 3 ECMP or a port channel. In the case of ECMP, the ERSPAN traffic is sent to only one next-hop router or one member of the port channel.

  • ERSPAN supports Fast Ethernet, Gigabit Ethernet, TenGigabit Ethernet, and port channel interfaces as source ports for a source session.

  • When a session is configured through the ERSPAN configuration commands, the session ID and the session type cannot be changed. In order to change them, you must first use the no version of the configuration command to remove the session and then reconfigure the session.

  • ERSPAN traffic might compete with regular data traffic.

  • ERSPAN traffic is assigned to the QoS class-default system class (qos-group 0).

  • To ensure that data traffic is prioritized over ERSPAN traffic, you can create a QoS system class with prioritization above the class-default system class on the ERSPAN destination port.

    On Layer 3 networks, ERSPAN traffic can be marked with a the desired Differentiated Services Code Point (DSCP) value using the ip dscp command. By default, ERSPAN traffic is marked with a DSCP value of 0.

  • The rate limit command is not supported.

  • ERSPAN is not supported on a management interface.

  • You cannot use the same source interface in multiple SPAN or ERSPAN sessions.

The following limitations apply to ERSPAN source sessions Access Control Lists (ACL) configurations:

  • The SPAN session ignores any permit or deny actions specified in the access-list, and spans only the packets that match the access-list filter criteria.

  • ACLs are supported on ERSPAN source sessions only. ACLs are not supported on ERSPAN destination sessions.

  • Due to system limitations, the extent to which an ACL associated to ERSPAN session can scale depends on the how the SPAN source is configured. The following table shows different scenarios and the corresponding maximum ACL size supported.


    Note


    These calculations assume that each ACE in the ACL results in one final TCAM entry.
    Scenario Maximum ACL Size

    ERSPAN has single Switch Port as source with both Tx and Rx.

    Current Available TCAM Entries/2

    ERSPAN has multiple Switch Ports as source with both Tx and Rx.

    Current Available TCAM Entries/3

    ERSPAN has Port Channel (with one or more member switch ports) as source with both Tx and Rx.

    Current Available TCAM Entries/3

    ERSPAN has single HIF Ports as source with both Tx and Rx.

    Current Available TCAM Entries/3

    ERSPAN has multiple HIF Ports as source with both Tx and Rx.

    Current Available TCAM Entries/4

    ERSPAN has HIF Port Channel (with one or more member HIF ports) as source with both Tx and Rx.

    Current Available TCAM Entries/4

  • The following scenarios are unaffected by any system limitations for ACL and SPAN session scaling:

    • ERSPAN has single Switch Port as source with Tx only.

    • ERSPAN has multiple Switch Ports as source with Tx only.

    • ERSPAN has a Port Channel (with one or more member switch ports) as source with Tx only.

    • ERSPAN has a single Host Interface (HIF) Port as source with Tx only.

    • ERSPAN has multiple HIF Ports as source with Tx only.

    • ERSPAN has a single Port HIF Channel (with one or more member HIF ports) as source with Tx only.

    • ERSPAN has a single Switch Port as source with Rx only.

    • ERSPAN has multiple Switch Ports as source with Rx only.

    • ERSPAN has a Port Channel (with one or more member switch ports) as source with Rx only.

    • ERSPAN has a single HIF Port as source with with Rx only.

    • ERSPAN has multiple HIF Ports as source with Rx only.

    • ERSPAN has a HIF Port Channel (with one or more member HIF ports) as source with Rx only

  • The following guidelines apply when configuring ERSPAN source sessions with ACLs:

    • When you associate an ACL with an ERSPAN session, you must ensure that its size is not greater than the calculations given in the table above. Otherwise the ERSPAN session fails and generate a "TCAM resource unavailable" error. If the ACL has Layer 4 Operations and TCAM resource expansion is enabled, you need to know the expected expanded size and you need to use the expanded size to calculate the maximum ACL size.

    • If you change the ACL that is attached to a ERSPAN session, the ACL size can exceed the maximum ACL size allowed. In this scenario, the SPAN session continues to work with the modified ACL. However, you should undo the ACEs added to the ACL to limit the size to maximum allowed ACL size.

    • If you add a ERSPAN session when one already exists, then to modify the first span session there should be free TCAM entries of size equal to number of ACEs in the associated ACL (Assuming that each ACE requires one TCAM entry. If it gets expanded, the expanded size should be considered). Therefore, TCAM entries consumed by the second ERSPAN session should be released.

    • To replace a large ACL with another large ACL (which could cause the ERSPAN session to enter a generic error state), you must first remove the existing filter access group (using the no filter access-group current acl name command), and then configure the new filter access group (using the filter access-group new acl name command).

Guidelines and Limitations for ERSPAN Type III

ERSPAN Type III has the following guidelines and limitations:

  • Only IPv4 networks are supported by ERSPAN Type III. IPv6 networks are not supported by ERSPAN Type III but IPv6 packets can be captured by ERSPAN.

  • To calculate packet latency across ports, ERSPAN timestamp should be taken from the Precision Time Protocol (PTP) clock and the PTP feature must be enabled on the switch.

Default Settings for ERSPAN

The following table lists the default settings for ERSPAN parameters.

Table 2. Default ERSPAN Parameters

Parameters

Default

ERSPAN sessions

Created in the shut state.

Configuring ERSPAN

Configuring an ERSPAN Source Session

The ERSPAN source session defines the session configuration parameters and the ports or VLANs to be monitored. This section describes how to configure an ERSPAN source session.

Procedure

  Command or Action Purpose

Step 1

configuration terminal

Example:

switch# config t
switch(config)#

Enters global configuration mode.

Step 2

monitor session span-session-number type {erspan-source | local}

Example:

switch(config)# monitor session 1 type erspan-source
switch(config-erspan-src)#

Defines an ERSPAN source session using the session ID and the session type, and places the command in ERSPAN monitor source session configuration mode.

The span-session-number argument range is from 1 to 1024. The same session number cannot be used more than once.

The session IDs for source sessions are in the same global ID space, so each session ID is globally unique.

The session ID (configured by the span-session-number argument) and the session type (configured by the erspan-source keyword) cannot be changed once entered. To change session ID or session type, use the no version of the command to remove the session and then recreate the session through the command with a new session ID or a new session type.

Step 3

(Optional) description erspan_session_description

Example:

switch(config-erspan-src)# description source1
(Optional)

Describes the ERSPAN source session.

The erspan_session_description argument can be up to 32 characters and cannot contain special characters or spaces.

Step 4

source interface { ethernet slot/chassis number | portchannel number }

Example:

switch(config-erspan-src)# source interface eth 1/1

Associates the ERSPAN source session number with the source ports (1-255).

Step 5

source vlan number

Example:

switch(config-erspan-src)# source vlan 1

Associates the ERSPAN source session number with the VLANs (1-4096).

Step 6

source vsan number

Example:

switch(config-erspan-src)# source vsan 1

Specifies the VSAN ID number. The range is 1 to 4093.

Step 7

destination ip ip-address

Example:

switch(config-erspan-src)# destination ip 192.0.2.2

Configures the destination IP address in the ERSPAN session. Only one destination IP address is supported per ERSPAN source session.

Step 8

erspan-id flow-id

Example:

switch(config-erspan-src)# erspan-id 5

Configures the flow ID to identify the ERSPAN flow. The range is from 1 to 1023.

Step 9

vrf {vrf-name | default }

Example:

switch(config-erspan-src)# vrf default

Configures the VRF to use instead of the global routing table. You can use a VRF that you have specifically configured or the default VRF.

Step 10

[no] filter access-group acl_filter

Example:

switch(config-erspan-src)# filter access-group erspan_acl_filter

Configures the ACL filter for packets in this ERSPAN session. The ACL filter can be a MAC or an IP access-list.

Step 11

(Optional) ip ttl ttl-number

Example:

switch(config-erspan-src)# ip ttl 5
(Optional)

Configures the IP time-to-live (TTL) value of the packets in the ERSPAN traffic. Valid values are from 1 to 255. The default value is 255.

Step 12

(Optional) ip dscp dscp_value

Example:

switch(config-erspan-src)# ip dscp 42
(Optional)

Configures the IP Differentiated Services Code Point (DSCP) value of the packets in the ERSPAN traffic. Valid values are from 0 to 63. The default value is 0.

Step 13

no shut

Example:

switch(config-erspan-src)# no shut

Enables the ERSPAN source session. By default, the session is created in the shut state.

Step 14

exit

Example:

switch(config-erspan-src)# exit
switch(config)# exit

Updates the configuration and exits ERSPAN source session configuration mode.

Step 15

(Optional) copy running-config startup-config

Example:

switch(config-erspan-src)# copy running-config startup-config
(Optional)

Copies the running configuration to the startup configuration.

Configuring an ERSPAN Type III Source Session

Procedure

  Command or Action Purpose

Step 1

configuration terminal

Example:

switch# config t
switch(config)#

Enters global configuration mode.

Step 2

monitor erspan switch-id switch-id

Example:


switch(config)# monitor erspan switch-id 1009

Configures the ERSPAN global switch ID. The switch ID is applicable for all ERSPAN Type III sessions. Default value is 0.

Step 3

monitor erspan granularity 1588

Example:


switch(config)# monitor erspan granularity 1588

Specifies granularity for all ERSPAN Type III sessions. 1588 (in seconds or nanoseconds) is the only option available and it is the default value.

Step 4

monitor session span-session-number type {erspan-source | local}

Example:

switch(config)# monitor session 1 type erspan-source
switch(config-erspan-src)#

Defines an ERSPAN source session using the session ID and the session type, and places the command in ERSPAN monitor source session configuration mode.

The span-session-number argument range is from 1 to 1024. The same session number cannot be used more than once.

The session IDs for source sessions are in the same global ID space, so each session ID is globally unique for both session types.

The session ID (configured by the span-session-number argument) and the session type (configured by the erspan-source keyword) cannot be changed once entered. To change session ID or session type, use the no version of the command to remove the session and then recreate the session through the command with a new session ID or a new session type.

Step 5

header-type version

Example:


switch(config-erspan-src)# header-type 3

Changes the ERSPAN source session from Type II to Type III.

Note


You can use the no form of this command to change an ERSPAN source session from Type III to Type II.

Step 6

(Optional) description erspan_session_description

Example:

switch(config-erspan-src)# description source1
(Optional)

Describes the ERSPAN source session.

The erspan_session_description argument can be up to 240 characters and cannot contain special characters or spaces.

Step 7

source interface { ethernet slot/chassis number | portchannel number }

Example:

switch(config-erspan-src)# source interface eth 1/1

Associates the ERSPAN source session number with the source ports (1-255).

Step 8

source vlan number

Example:

switch(config-erspan-src)# source vlan 1

Associates the ERSPAN source session number with the VLANs (1-4096).

Step 9

source vsan number

Example:

switch(config-erspan-src)# source vsan 1

On Cisco Nexus 5000 Series switches, specifies the VSAN ID number. The range is 1 to 4093. On Cisco Nexus 5500 Series switches, you cannot configure source VSANs.

Step 10

destination ip ip-address

Example:

switch(config-erspan-src)# destination ip 192.0.2.2

Configures the destination IP address in the ERSPAN session. Only one destination IP address is supported per ERSPAN source session.

Step 11

erspan-id flow-id

Example:

switch(config-erspan-src)# erspan-id 5

Configures the flow ID to identify the ERSPAN flow. The range is from 1 to 1023.

Step 12

vrf {vrf-name | default }

Example:

switch(config-erspan-src)# vrf default

Configures the VRF to use instead of the global routing table. You can use a VRF that you have specifically configured or the default VRF.

Step 13

[no] filter access-group acl_filter

Example:

switch(config-erspan-src)# filter access-group erspan_acl_filter

Configures the ACL filter for packets in this ERSPAN session. The ACL filter can be a MAC or an IP access-list.

Step 14

(Optional) ip ttl ttl-number

Example:

switch(config-erspan-src)# ip ttl 5
(Optional)

Configures the IP time-to-live (TTL) value of the packets in the ERSPAN traffic. Valid values are from 1 to 255. The default value is 255.

Step 15

(Optional) ip dscp dscp_value

Example:

switch(config-erspan-src)# ip dscp 42
(Optional)

Configures the IP Differentiated Services Code Point (DSCP) value of the packets in the ERSPAN traffic. Valid values are from 0 to 63. The default value is 0.

Step 16

no shut

Example:

switch(config-erspan-src)# no shut
Enables the ERSPAN source session. By default, the session is created in the shut state.

Note


On Cisco Nexus 5000 Series switches, only two ERSPAN source sessions can be running simultaneously. On Cisco Nexus 5500 Series switches, up to four source sessions can be running simultaneously.

Step 17

exit

Example:

switch(config-erspan-src)# exit
switch(config)# exit

Updates the configuration and exits ERSPAN source session configuration mode.

Step 18

(Optional) copy running-config startup-config

Example:

switch(config-erspan-src)# copy running-config startup-config
(Optional)

Copies the running configuration to the startup configuration.

Configuring Truncated ERSPAN

You can configure an MTU size for the ERSPAN traffic to reduce the amount of fabric or network bandwidth used in sending ERSPAN packets.

Procedure

  Command or Action Purpose

Step 1

enable

Example:

switch> enable

Enables privileged EXEC mode. Enter your password if prompted.

Step 2

configure terminal

Example:

switch# configure terminal
switch(config)#

Enters global configuration mode.

Step 3

monitor session erspan_session_number type {erspan-source | local}

Example:


switch(config)# monitor session 1 type
erspan-source
switch(config-erspan-src)#

Defines an ERSPAN source session using the session ID and the session type, and places the command in ERSPAN monitor source session configuration mode.

The span-session-number argument range is from 1 to 1024. The same session number cannot be used more than once.

The session IDs for source sessions are in the same global ID space, so each session ID is globally unique for both session types.

The session ID (configured by the span-session number argument) and the session type (configured by the erspan-source keyword) cannot be changed once entered. To change session ID or session type, use the no version of the command to remove the session and then re-create the session through the command with a new session ID or a new session type.

Step 4

mtu mtu-value

Example:

switch(config-erspan-src)# mtu 64

Defines the maximum transmission unit (MTU) truncation size for ERSPAN packets. Valid values are from 64 to 1518.

The default is no truncation enabled.

Step 5

exit

Example:

switch(config-mon-erspan-src)# exit

Updates the configuration and exits ERSPAN source session configuration mode.

Step 6

(Optional) copy running-config startup-config

Example:

switch(config)# copy running-config startup-config
(Optional)

Saves the change persistently through reboots and restarts by copying the running configuration to the startup configuration.

Shutting Down or Activating an ERSPAN Session

You can shut down ERSPAN sessions to discontinue the copying of packets from sources to destinations. Because only a specific number of ERSPAN sessions can be running simultaneously, you can shut down a session to free hardware resources to enable another session. By default, ERSPAN sessions are created in the shut state.

You can enable ERSPAN sessions to activate the copying of packets from sources to destinations. To enable an ERSPAN session that is already enabled but operationally down, you must first shut it down and then enable it. You can shut down and enable the ERSPAN session states with either a global or monitor configuration mode command.

Procedure

  Command or Action Purpose

Step 1

configuration terminal

Example:

switch# configuration terminal
switch(config)#

Enters global configuration mode.

Step 2

monitor session {session-range | all} shut

Example:

switch(config)# monitor session 3 shut

Shuts down the specified ERSPAN sessions. The session range is from . By default, sessions are created in the shut state.

Note

 
  • In Cisco Nexus 5000 and 5500 platforms, two sessions can run simultaneously.

  • In Cisco Nexus 5600 and 6000 platforms, 16 sessions can run simultaneously.

Step 3

no monitor session {session-range | all} shut

Example:

switch(config)# no monitor session 3 shut
Resumes (enables) the specified ERSPAN sessions. The session range is from . By default, sessions are created in the shut state. .

Note


If a monitor session is enabled but its operational status is down, then to enable the session, you must first specify the monitor session shut command followed by the no monitor session shut command.

Step 4

monitor session session-number type erspan-source

Example:

switch(config)# monitor session 3 type erspan-source
switch(config-erspan-src)#

Enters the monitor configuration mode for the ERSPAN source type. The new session configuration is added to the existing session configuration.

Step 5

monitor session session-number type erspan-destination

Example:

switch(config-erspan-src)# monitor session 3 type erspan-destination

Enters the monitor configuration mode for the ERSPAN destination type.

Step 6

shut

Example:

switch(config-erspan-src)# shut

Shuts down the ERSPAN session. By default, the session is created in the shut state.

Step 7

no shut

Example:

switch(config-erspan-src)# no shut

Enables the ERSPAN session. By default, the session is created in the shut state.

Step 8

(Optional) show monitor session all

Example:

switch(config-erspan-src)# show monitor session all
(Optional)

Displays the status of ERSPAN sessions.

Step 9

(Optional) show running-config monitor

Example:

switch(config-erspan-src)# show running-config monitor
(Optional)

Displays the running ERSPAN configuration.

Step 10

(Optional) show startup-config monitor

Example:

switch(config-erspan-src)# show startup-config monitor
(Optional)

Displays the ERSPAN startup configuration.

Step 11

(Optional) copy running-config startup-config

Example:

switch(config-erspan-src)# copy running-config startup-config
(Optional)

Copies the running configuration to the startup configuration.

Verifying the ERSPAN Configuration

Use the following command to verify the ERSPAN configuration information:

Command

Purpose

show monitor session {all | session-number | range session-range}

Displays the ERSPAN session configuration.

show running-config monitor

Displays the running ERSPAN configuration.

show startup-config monitor

Displays the ERSPAN startup configuration.

Configuration Examples for ERSPAN

Configuration Example for an ERSPAN Source Session

The following example shows how to configure an ERSPAN source session:

switch# config t
switch(config)# interface e14/30
switch(config-if)# no shut
switch(config-if)# exit
switch(config)# monitor erspan origin ip-address 3.3.3.3 global
switch(config)# monitor erspan granularity 100_ns
switch(config-erspan-src)# header-type 3
switch(config)# monitor session 1 type erspan-source
switch(config-erspan-src)# source interface e14/30
switch(config-erspan-src)# erspan-id 1
switch(config-erspan-src)# ip ttl 16
switch(config-erspan-src)# ip dscp 5
switch(config-erspan-src)# vrf default
switch(config-erspan-src)# destination ip 9.1.1.2
switch(config-erspan-src)# no shut
switch(config-erspan-src)# exit
switch(config)# show monitor session 1

switch# configure terminal
Enter configuration commands, one per line. End with CNTL/Z.
switch(config)# monitor session 1 type erspan-source
switch(config-erspan-src)# description source1
switch(config-erspan-src)# source interface ethernet 1/1
switch(config-erspan-src)# source vlan 1
switch(config-erspan-src)# source vsan 1
switch(config-erspan-src)# destination ip 192.0.2.2
switch(config-erspan-src)# erspan-id 1
switch(config-erspan-src)# vrf default
switch(config-erspan-src)# ip ttl 5
switch(config-erspan-src)# ip dscp 5
switch(config-erspan-src)# no shut
switch(config-erspan-src)# exit
switch(config)# copy running-config startup config

Configuration Example for an ERSPAN Type III Source Session

The following example shows how to configure an ERSPAN Type III source session:


switch# config t
switch(config)# monitor erspan origin ip-address 10.0.0.1 global
switch(config)# monitor session 1 type erspan-source
switch(config-erspan-src)# header-type 3
switch(config-erspan-src)# erspan-id 1
switch(config-erspan-src)# vrf default
switch(config-erspan-src)# destination ip 10.0.0.1
switch(config-erspan-src)# source interface ethernet 1/22 both
switch(config-erspan-src)# mtu 100
switch(config-erspan-src)# no shut
switch(config-erspan-src)# exit
switch(config)# exit
switch# show monitor session all

Configuration Example for an IP Address as the Source for an ERSPAN Session

This example shows how to configure an IP address as the source for an ERSPAN session:


switch# configure terminal
switch(config)# monitor erspan origin ip-address 192.0.2.1
switch(config)#  exit
switch(config)# copy running-config startup config

Configuration Example for Truncated ERSPAN

This example shows how to configure truncated ERSPAN:

switch# configure terminal
switch(config)# monitor session 1 type erspan-source
switch(config-erspan-src)# mtu 64
switch(config-mon-erspan-src)# exit
switch(config)# copy running-config startup config

Additional References

Related Documents

Related Topic

Document Title

ERSPAN commands: complete command syntax, command modes, command history, defaults, usage guidelines, and examples

Cisco Nexus NX-OS System Management Command Reference for your platform.