- Preface
- New and Changed Information
- Overview
- Configuring Switch Profiles
- Configuring Module Pre-Provisioning
- Using Cisco Fabric Services
- Configuring PTP
- Configuring User Accounts and RBAC
- Configuring Session Manager
- Configuring Online Diagnostics
- Configuring System Message Logging
- Configuring Smart Call Home
- Configuring Rollback
- Configuring DNS
- Configuring SNMP
- Configuring RMON
- Configuring SPAN
- Configuring ERSPAN
- Index
- Information About CFS
- Guidelines and Limitations for CFS
- CFS Distribution
- CFS Support for Applications
- CFS Regions
- Enabling CFS to Distribute Smart Call Home Configurations
- Enabling CFS to Distribute DPVM Configurations
- Enabling CFS to Distribute FC Domain Configurations
- Enabling CFS to Distribute FC Port Security Configurations
- Enabling CFS to Distribute FC Timer Configurations
- Enabling CFS to Distribute IVR Configurations
- Enabling CFS to Distribute NTP Configurations
- Enabling CFS to Distribute RADIUS Configurations
- Enabling CFS to Distribute RSCN Configurations
- Enabling CFS to Distribute TACACS+ Configurations
Using Cisco Fabric Services
This chapter contains the following sections:
- Information About CFS
- Guidelines and Limitations for CFS
- CFS Distribution
- CFS Support for Applications
- CFS Regions
- Configuring CFS over IP
- Displaying CFS Distribution Information
- Default Settings for CFS
Information About CFS
Some features in the Cisco Nexus Series switch require configuration synchronization with other switches in the network to function correctly. Synchronization through manual configuration at each switch in the network can be a tedious and error-prone process.
Cisco Fabric Services (CFS) provides a common infrastructure for automatic configuration synchronization in the network. It provides the transport function and a set of common services to the features. CFS has the ability to discover CFS-capable switches in the network and to discover feature capabilities in all CFS-capable switches.
Cisco Nexus Series switches support CFS message distribution over Fibre Channel and IPv4 or IPv6 networks. If the switch is provisioned with Fibre Channel ports, CFS over Fibre Channel is enabled by default while CFS over IP must be explicitly enabled.
CFS provides the following features:
-
Peer-to-peer protocol with no client-server relationship at the CFS layer.
-
CFS message distribution over Fibre Channel and IPv4 or IPv6 networks.
-
Three modes of distribution.
-
Coordinated distributions—Only one distribution is allowed in the network at any given time.
-
Uncoordinated distributions—Multiple parallel distributions are allowed in the network except when a coordinated distribution is in progress.
-
Unrestricted uncoordinated distributions—Multiple parallel distributions are allowed in the network in the presence of an existing coordinated distribution. Unrestricted uncoordinated distributions are allowed to run in parallel with all other types of distributions.
-
The following features are supported for CFS distribution over IP:
The following features are supported for CFS distribution over Fibre Channel SANs:
-
Three scopes of distribution over SAN fabrics.
-
Logical scope — The distribution occurs within the scope of a VSAN.
-
Physical scope — The distribution spans the entire physical topology.
-
Over a selected set of VSANs — Some features require configuration distribution over some specific VSANs. These features can specify to CFS the set of VSANs over which to restrict the distribution.
-
-
Supports a merge protocol that facilitates the merge of feature configuration during a fabric merge event (when two independent SAN fabrics merge).
Cisco Fabric Services over Ethernet
The Cisco Fabric Services over Ethernet (CFSoE) is a reliable state transport mechanism that you can use to synchronize the actions of the vPC peer devices. CFSoE carries messages and packets for many features linked with vPC, such as STP and IGMP. Information is carried in CFS/CFSoE protocol data units (PDUs).
When you enable the vPC feature, the device automatically enables CFSoE, and you do not have to configure anything. CFSoE distributions for vPCs do not need the capabilities to distribute over IP or the CFS regions. You do not need to configure anything for the CFSoE feature to work correctly on vPCs.
You can use the show mac address-table command to display the MAC addresses that CFSoE synchronizes for the vPC peer link.
 Note | Do not enter the no cfs eth distribute or the no cfs distribute command. CFSoE must be enabled for vPC functionality. If you do enter either of these commands when vPC is enabled, the system displays an error message. |
When you enter the show cfs application command, the output displays "Physical-eth," which shows the applications that are using CFSoE.
Guidelines and Limitations for CFS
CFS has the following configuration guidelines and limitations:
-
If the virtual port channel (vPC) feature is enabled for your device, do not disable CFSoE.
Note
CFSoE must be enabled for the vPC feature to work.
-
All CFSoIP-enabled devices with similar multicast addresses form one CFSoIP fabric.
-
Make sure that CFS is enabled for the applications that you want to configure.
-
Anytime you lock a fabric, your username is remembered across restarts and switchovers.
-
Anytime you lock a fabric, configuration changes attempted by anyone else are rejected.
-
While a fabric is locked, the application holds a working copy of configuration changes in a pending database or temporary storage area, not in the running configuration.
-
Configuration changes that have not been committed yet (still saved as a working copy) are not in the running configuration and do not display in the output of show commands.
-
If you start a CFS session that requires a fabric lock but forget to end the session, an administrator can clear the session.
-
An empty commit is allowed if configuration changes are not previously made. In this case, the commit command results in a session that acquires locks and distributes the current database.
-
You can use the commit command only on the specific device where the fabric lock was acquired.
-
CFSoIP and CFSoE are not supported for use together.
-
CFS regions can be applied only to CFSoIP applications.
CFS Distribution
The CFS distribution functionality is independent of the lower layer transport. Cisco Nexus Series switches support CFS distribution over IP and over Fibre Channel. Features that use CFS are unaware of the lower layer transport.
- CFS Distribution Modes
- Disabling or Enabling CFS Distribution on a Switch
- Verifying the CFS Distribution Status
- CFS Distribution over IP
- CFS Distribution over Fibre Channel
- CFS Distribution Scopes
- CFS Merge Support
CFS Distribution Modes
CFS supports three distribution modes to accommodate different feature requirements:
Only one mode is allowed at any given time.
Uncoordinated Distribution
Uncoordinated distributions are used to distribute information that is not expected to conflict with information from a peer. Parallel uncoordinated distributions are allowed for a feature.
Coordinated Distribution
Coordinated distributions allow only one feature distribution at a given time. CFS uses locks to enforce this feature. A coordinated distribution is not allowed to start if locks are taken for the feature anywhere in the network. A coordinated distribution consists of three stages:
-
A network lock is acquired.
-
The configuration is distributed and committed.
-
The network lock is released.
Coordinated distribution has two variants:
-
CFS driven —The stages are executed by CFS in response to a feature request without intervention from the feature.
-
Feature driven—The stages are under the complete control of the feature.
Coordinated distributions are used to distribute information that can be manipulated and distributed from multiple switches, for example, the port security configuration.
Unrestricted Uncoordinated Distributions
Unrestricted uncoordinated distributions allow multiple parallel distributions in the network in the presence of an existing coordinated distribution. Unrestricted uncoordinated distributions are allowed to run in parallel with all other types of distributions.
Disabling or Enabling CFS Distribution on a Switch
If the switch is provisioned with Fibre Channel ports, CFS over Fibre Channel is enabled by default. CFS over IP must be explicitly enabled.
You can globally disable CFS on a switch to isolate the features using CFS from network-wide distributions while maintaining physical connectivity. When CFS is globally disabled on a switch, CFS operations are restricted to the switch.
Verifying the CFS Distribution Status
The show cfs status command displays the status of CFS distribution on the switch:
switch# show cfs status
Distribution : Enabled
Distribution over IP : Enabled - mode IPv4
IPv4 multicast address : 239.255.70.83
IPv6 multicast address : ff15::efff:4653
Distribution over Ethernet : Enabled
CFS Distribution over IP
CFS distribution over IP supports the following features:
-
Physical distribution over an entirely IP network.
-
Physical distribution over a hybrid Fibre Channel and IP network with the distribution reaching all switches that are reachable over either Fibre Channel or IP.
Note | The switch attempts to distribute information over Fibre Channel first and then over the IP network if the first attempt over Fibre Channel fails. CFS does not send duplicate messages if distribution over both IP and Fibre Channel is enabled. |
-
Distribution over IP version 4 (IPv4) or IP version 6 (IPv6).
Note
CFS cannot distribute over both IPv4 and IPv6 from the same switch.
-
Keepalive mechanism to detect network topology changes using a configurable multicast address.
-
Compatibility with Cisco MDS 9000 Family switches running release 2.x or later.
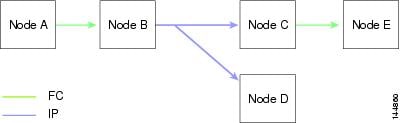
The following figure (Network Example 1) shows a network with both Fibre Channel and IP connections. Node A forwards an event to node B over Fibre Channel. Node B forwards the event node C and node D using unicast IP. Node C forwards the event to node E using Fibre Channel.
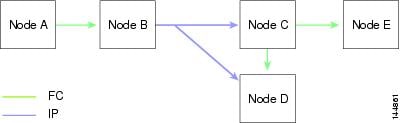
The following figure (Network Example 2) is the same as the previous figure except that node C and node D are connected using Fibre Channel. All processes is the same in this example because node B has node C and node D the distribution list for IP. Node C does not forward to node D because node D is already in the distribution list from node B.
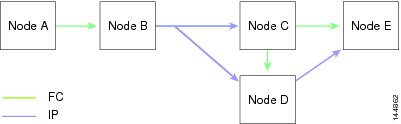
The following figure (Network Example 3) is the same as the previous figure except that node D and node E are connected using IP. Both node C and node D forward the event to E because the node E is not in the distribution list from node B.
CFS Distribution over Fibre Channel
For FCS distribution over Fibre Channel, the CFS protocol layer resides on top of the FC2 layer. CFS uses the FC2 transport services to send information to other switches. CFS uses a proprietary SW_ILS (0x77434653) protocol for all CFS packets. CFS packets are sent to or from the switch domain controller addresses.
CFS Distribution Scopes
Different applications on the Cisco Nexus Series switches need to distribute the configuration at various levels. The following levels are available when using CFS distribution over Fibre Channel:
-
VSAN level (logical scope)
Applications that operate within the scope of a VSAN have the configuration distribution restricted to the VSAN. An example application is port security where the configuration database is applicable only within a VSAN.
Note
Logical scope is not supported for FCS distribution over IP.
-
Physical topology level (physical scope)
Some applications (such as NTP) need to distribute the configuration to the entire physical topology.
-
Between two selected switches
Some applications operate only between selected switches in the network.
CFS Merge Support
CFS Merge is supported for CFS distribution over Fibre Channel.
An application keeps the configuration synchronized in a SAN fabric through CFS. Two such fabrics might merge as a result of an ISL coming up between them. These two fabrics could have two different sets of configuration information that need to be reconciled in the event of a merge. CFS provides notification each time an application peer comes online. If a fabric with M application peers merges with another fabric with N application peers, and if an application triggers a merge action on every notification, a link-up event results in M×N merges in the fabric.
CFS supports a protocol that reduces the number of merges required to one by handling the complexity of the merge at the CFS layer. This protocol runs per application per scope. The protocol involves selecting one switch in a fabric as the merge manager for that fabric. The other switches do not have a role in the merge process.
During a merge, the merge manager in the two fabrics exchange their configuration databases with each other. The application on one of them merges the information, decides if the merge is successful, and informs all switches in the combined fabric of the status of the merge.
In case of a successful merge, the merged database is distributed to all switches in the combined fabric and the entire new fabric remains in a consistent state. You can recover from a merge failure by starting a distribution from any of the switches in the new fabric. This distribution restores all peers in the fabric to the same configuration database.
CFS Support for Applications
CFS Application Requirements
All switches in the network must be CFS capable. Switches that are not CFS capable do not receive distributions, which results in part of the network not receiving the intended distribution. CFS has the following requirements:
-
Implicit CFS usage—The first time that you issue a CFS task for a CFS-enabled application, the configuration modification process begins and the application locks the network.
-
Pending database—The pending database is a temporary buffer to hold uncommitted information. The uncommitted changes are not applied immediately to ensure that the database is synchronized with the database in the other switches in the network. When you commit the changes, the pending database overwrites the configuration database (also known as the active database or the effective database).
-
CFS distribution enabled or disabled on a per-application basis—The default (enable or disable) for the CFS distribution state differs between applications. If CFS distribution is disabled for an application, that application does not distribute any configuration and does not accept a distribution from other switches in the network.
-
Explicit CFS commit—Most applications require an explicit commit operation to copy the changes in the temporary buffer to the application database, to distribute the new database to the network, and to release the network lock. The changes in the temporary buffer are not applied if you do not perform the commit operation.
Enabling CFS for an Application
All CFS-based applications provide an option to enable or disable the distribution capabilities.
Applications have the distribution enabled by default.
The application configuration is not distributed by CFS unless distribution is explicitly enabled for that application.
Verifying Application Registration Status
The show cfs application command displays the applications that are currently registered with CFS. The first column displays the application name. The second column indicates whether the application is enabled or disabled for distribution (enabled or disabled). The last column indicates the scope of distribution for the application (logical, physical, or both).
Note | The show cfs application command only displays applications registered with CFS. Conditional services that use CFS do not appear in the output unless these services are running. |
switch# show cfs application
----------------------------------------------
Application Enabled Scope
----------------------------------------------
ntp No Physical-all
fscm Yes Physical-fc
rscn No Logical
fctimer No Physical-fc
syslogd No Physical-all
callhome No Physical-all
fcdomain Yes Logical
device-alias Yes Physical-fc
Total number of entries = 8
The show cfs application name command displays the details for a particular application. It displays the enabled/disabled state, timeout as registered with CFS, merge capability (if it has registered with CFS for merge support), and the distribution scope.
switch# show cfs application name fscm
Enabled : Yes
Timeout : 100s
Merge Capable : No
Scope : Physical-fc
Locking the Network
When you configure (first-time configuration) a feature (application) that uses the CFS infrastructure, that feature starts a CFS session and locks the network. When a network is locked, the switch software allows configuration changes to this feature only from the switch that holds the lock. If you make configuration changes to the feature from another switch, the switch issues a message to inform the user about the locked status. The configuration changes are held in a pending database by that application.
If you start a CFS session that requires a network lock but forget to end the session, an administrator can clear the session. If you lock a network at any time, your username is remembered across restarts and switchovers. If another user (on the same machine) tries to perform configuration tasks, that user’s attempts are rejected.
Verifying CFS Lock Status
The show cfs lock command displays all the locks that are currently acquired by any application. For each application the command displays the application name and scope of the lock taken. If the application lock is taken in the physical scope, then this command displays the switch WWN, IP address, user name, and user type of the lock holder. If the application is taken in the logical scope, then this command displays the VSAN in which the lock is taken, the domain, IP address, user name, and user type of the lock holder.
switch# show cfs lock

Application: ntp
Scope      : Physical
--------------------------------------------------------------------
 Switch WWN               IP Address       User Name    User Type
--------------------------------------------------------------------
 20:00:00:05:30:00:6b:9e  10.76.100.167    admin        CLI/SNMP v3
 Total number of entries = 1

Application: port-security
Scope      : Logical
-----------------------------------------------------------
VSAN   Domain   IP Address       User Name    User Type
-----------------------------------------------------------
 1      238      10.76.100.167    admin        CLI/SNMP v3
 2      211      10.76.100.167    admin        CLI/SNMP v3
 Total number of entries = 2
The show cfs lock name command displays the lock details for the specified application.
switch# show cfs lock name ntp

Scope      : Physical
--------------------------------------------------------------------
 Switch WWN               IP Address       User Name    User Type
--------------------------------------------------------------------
 20:00:00:05:30:00:6b:9e  10.76.100.167    admin        CLI/SNMP v3

 Total number of entries = 1
Committing Changes
A commit operation saves the pending database for all application peers and releases the lock for all switches.
The commit function does not start a session; only a lock function starts a session. However, an empty commit is allowed if configuration changes are not previously made. In this case, a commit operation results in a session that acquires locks and distributes the current database.
When you commit configuration changes to a feature using the CFS infrastructure, you receive a notification about one of the following responses:
-
One or more external switches report a successful status—The application applies the changes locally and releases the network lock.
-
None of the external switches report a successful state—The application considers this state a failure and does not apply the changes to any switch in the network. The network lock is not released.
You can commit changes for a specified feature by entering the commit command for that feature.
Discarding Changes
If you discard configuration changes, the application flushes the pending database and releases locks in the network. Both the abort and commit functions are supported only from the switch from which the network lock is acquired.
You can discard changes for a specified feature by using the abort command for that feature.
Saving the Configuration
Configuration changes that have not been applied yet (still in the pending database) are not shown in the running configuration. The configuration changes in the pending database overwrite the configuration in the effective database when you commit the changes.
 Caution | If you do not commit the changes, they are not saved to the running configuration. |
Clearing a Locked Session
You can clear a lock held by an application from any device in the fabric.
Caution | When you clear a lock in the fabric, any pending configurations in any device in the fabric are discarded. |
You must have administrator permissions to release a lock.
switch# show ntp status
Distribution : Enabled
Last operational state: Fabric Locked
switch# clear ntp session
switch# show ntp status
Distribution : Enabled
Last operational state: No session
CFS Regions
About CFS Regions
A CFS region is a user-defined subset of switches for a given feature or application in its physical distribution scope. When a network spans a vast geography, you might need to localize or restrict the distribution of certain profiles among a set of switches based on their physical proximity. CFS regions allow you to create multiple islands of distribution within the network for a given CFS feature or application. CFS regions are designed to restrict the distribution of a feature’s configuration to a specific set or grouping of switches in a network.
Note | You can only configure a CFS region based on physical switches. You cannot configure a CFS region in a VSAN. |
Example Scenario
The Smart Call Home application triggers alerts to network administrators when a situation arises or something abnormal occurs. When the network covers many geographies, and there are multiple network administrators who are each responsible for a subset of switches in the network, the Smart Call Home application sends alerts to all network administrators regardless of their location. For the Smart Call Home application to send message alerts selectively to network administrators, the physical scope of the application has to be fine tuned or narrowed down. You can achieve this scenario by implementing CFS regions.
CFS regions are identified by numbers ranging from 0 through 200. Region 0 is reserved as the default region and contains every switch in the network. You can configure regions from 1 through 200. The default region maintains backward compatibility.
If the feature is moved, that is, assigned to a new region, its scope is restricted to that region; it ignores all other regions for distribution or merging purposes. The assignment of the region to a feature has precedence in distribution over its initial physical scope.
You can configure a CFS region to distribute configurations for multiple features. However, on a given switch, you can configure only one CFS region at a time to distribute the configuration for a given feature. Once you assign a feature to a CFS region, its configuration cannot be distributed within another CFS region.
Managing CFS Regions
Creating CFS Regions
You can create a CFS region.
| Command or Action | Purpose |
|---|
Assigning Applications to CFS Regions
You can assign an application on a switch to a region.
The following example shows how to assign applications to a region:
switch# configure terminal
switch(config)# cfs region 1
switch(config-cfs-region)# ntp
switch(config-cfs-region)# callhome
Moving an Application to a Different CFS Region
You can move an application from one region to another region.
| Command or Action | Purpose | |||
|---|---|---|---|---|
| Step 1 |
switch#
configure
terminal
|
Enters global configuration mode. | ||
| Step 2 |
switch(config)#
cfs
region
region-id
|
Enters CFS region configuration submode. | ||
| Step 3 |
switch(config-cfs-region)#
application
|
Indicates application(s) to be moved from one region into another.
|
The following example shows how to move an application into Region 2 that was originally assigned to Region 1:
switch# configure terminal
switch(config)# cfs region 2
switch(config-cfs-region)# ntp
Removing an Application from a Region
Removing an application from a region is the same as moving the application back to the default region (Region 0), which brings the entire network into the scope of distribution for the application.
| Command or Action | Purpose |
|---|
Deleting CFS Regions
Deleting a region nullifies the region definition. All the applications bound by the region are released back to the default region.
| Command or Action | Purpose |
|---|
Configuring CFS over IP
Enabling CFS over IPv4
You can enable or disable CFS over IPv4.
Note | CFS cannot distribute over both IPv4 and IPv6 from the same switch. |
| Command or Action | Purpose |
|---|
Enabling CFS over IPv6
You can enable or disable CFS over IPv6.
Note | CFS cannot distribute over both IPv4 and IPv6 from the same switch. |
| Command or Action | Purpose |
|---|
Verifying the CFS Over IP Configuration
The following example show how to verify the CFS over IP configuration:
switch# show cfs status
Distribution : Enabled
Distribution over IP : Enabled - mode IPv4
IPv4 multicast address : 239.255.70.83
IPv6 multicast address : ff15::efff:4653
Configuring IP Multicast Addresses for CFS over IP
All CFS over IP enabled switches with similar multicast addresses form one CFS over IP network. CFS protocol-specific distributions, such as the keepalive mechanism for detecting network topology changes, use the IP multicast address to send and receive information.
Note | CFS distributions for application data use directed unicast. |
Configuring IPv4 Multicast Address for CFS
You can configure a CFS over IP multicast address value for IPv4. The default IPv4 multicast address is 239.255.70.83.
| Command or Action | Purpose | |
|---|---|---|
| Step 1 |
switch#
configure
terminal
|
Enters global configuration mode. |
| Step 2 |
switch(config)#
cfs ipv4
mcast-address
ipv4-address
|
Configures the IPv4 multicast address for CFS distribution over IPv4. The ranges of valid IPv4 addresses are 239.255.0.0 through 239.255.255.255 and 239.192/16 through 239.251/16. |
| Step 3 |
switch(config)#
no cfs ipv4
mcast-address
ipv4-address
| (Optional)
Reverts to the default IPv4 multicast address for CFS distribution over IPv4. The default IPv4 multicast address for CFS is 239.255.70.83. |
Configuring IPv6 Multicast Address for CFS
You can configure a CFS over IP multicast address value for IPv6. The default IPv6 multicast address is ff13:7743:4653.
| Command or Action | Purpose | |
|---|---|---|
| Step 1 |
switch#
configure
|
Enters configuration mode. |
| Step 2 |
switch(config)#
cfs ipv6 mcast-address
ipv4-address
|
Configures the IPv6 multicast address for CFS distribution over IPv6. The range of valid IPv6 addresses is ff15::/16 (ff15::0000:0000 through ff15::ffff:ffff) and ff18::/16 (ff18::0000:0000 through ff18::ffff:ffff). |
| Step 3 |
switch(config)#
no cfs ipv6 mcast-address
ipv4-address
| (Optional)
Reverts to the default IPv6 multicast address for CFS distribution over IPv6. The default IPv6 multicast address for CFS over IP is ff15::efff:4653. |
Verifying the IP Multicast Address Configuration for CFS over IP
The following example shows how to verify the IP multicast address configuration for CFS over IP:
switch# show cfs status
Fabric distribution Enabled
IP distribution Enabled mode ipv4
IPv4 multicast address : 10.1.10.100
IPv6 multicast address : ff13::e244:4754
Displaying CFS Distribution Information
The show cfs merge status name command displays the merge status for a given application. The following example displays the output for an application distributing in logical scope. It shows the merge status in all valid VSANs on the switch. The command output shows the merge status as one of the following: Success, Waiting, or Failure or In Progress. In case of a successful merge, all the switches in the network are shown under the local network. In case of a merge failure or a merge in progress, the local network and the remote network involved in the merge are indicated separately. The application server in each network that is mainly responsible for the merge is indicated by the term Merge Master.
switch# show cfs merge status name port-security
Logical [VSAN 1] Merge Status: Failed
Local Fabric
----------------------------------------------------------------
Domain Switch WWN IP Address
----------------------------------------------------------------
238 20:00:00:05:30:00:6b:9e 10.76.100.167 [Merge Master]
Remote Fabric
----------------------------------------------------------------
Domain Switch WWN IP Address
----------------------------------------------------------------
236 20:00:00:0e:d7:00:3c:9e 10.76.100.169 [Merge Master]
Logical [VSAN 2] Merge Status: Success
Local Fabric
----------------------------------------------------------------
Domain Switch WWN IP Address
----------------------------------------------------------------
211 20:00:00:05:30:00:6b:9e 10.76.100.167 [Merge Master]
1 20:00:00:0e:d7:00:3c:9e 10.76.100.169
Logical [VSAN 3] Merge Status: Success
Local Fabric
----------------------------------------------------------------
Domain Switch WWN IP Address
----------------------------------------------------------------
221 20:00:00:05:30:00:6b:9e 10.76.100.167 [Merge Master]
103 20:00:00:0e:d7:00:3c:9e 10.76.100.169
The following example of the show cfs merge status name command output displays an application using the physical scope with a merge failure. The command uses the specified application name to display the merge status based on the application scope.
switch# show cfs merge status name ntp
Physical Merge Status: Failed
Local Fabric
---------------------------------------------------------
Switch WWN IP Address
---------------------------------------------------------
20:00:00:05:30:00:6b:9e 10.76.100.167 [Merge Master]
Remote Fabric
---------------------------------------------------------
Switch WWN IP Address
---------------------------------------------------------
20:00:00:0e:d7:00:3c:9e 10.76.100.169 [Merge Master]
The show cfs peers command output displays all the switches in the physical network in terms of the switch WWN and the IP address. The local switch is indicated as Local.
switch# show cfs peers
Physical Fabric
-------------------------------------------------
Switch WWN IP Address
-------------------------------------------------
20:00:00:05:30:00:6b:9e 10.76.100.167 [Local]
20:00:00:0e:d7:00:3c:9e 10.76.100.169
Total number of entries = 2
The show cfs peers name command displays all the peers for which a particular application is registered with CFS. The command output shows all the peers for the physical scope or for each of the valid VSANs on the switch, depending on the application scope. For physical scope, the switch WWNs for all the peers are indicated. The local switch is indicated as Local.
switch# show cfs peers name ntp
Scope : Physical
-------------------------------------------------
Switch WWN IP Address
-------------------------------------------------
20:00:00:44:22:00:4a:9e 172.22.92.27 [Local]
20:00:00:05:30:01:1b:c2 172.22.92.215
The following example show cfs peers name command output displays all the application peers (all switches in which that application is registered). The local switch is indicated as Local.
switch# show cfs peers name port-security
Scope : Logical [VSAN 1]
-----------------------------------------------------------
Domain Switch WWN IP Address
-----------------------------------------------------------
124 20:00:00:44:22:00:4a:9e 172.22.92.27 [Local]
98 20:00:00:05:30:01:1b:c2 172.22.92.215
Total number of entries = 2
Scope : Logical [VSAN 3]
-----------------------------------------------------------
Domain Switch WWN IP Address
-----------------------------------------------------------
224 20:00:00:44:22:00:4a:9e 172.22.92.27 [Local]
151 20:00:00:05:30:01:1b:c2 172.22.92.215
Total number of entries = 2
Default Settings for CFS
The following table lists the default settings for CFS configurations.
|
Parameters |
Default |
|---|---|
|
CFS distribution on the switch |
Enabled |
|
Database changes |
Implicitly enabled with the first configuration change |
|
Application distribution |
Differs based on application |
|
Commit |
Explicit configuration is required |
|
CFS over IP |
Disabled |
|
IPv4 multicast address |
239.255.70.83 |
|
IPv6 multicast address |
ff15::efff:4653 |
The CISCO-CFS-MIB contains SNMP configuration information for any CFS-related functions. See the MIB reference for your platform.
- Enabling CFS to Distribute Smart Call Home Configurations
- Enabling CFS to Distribute DPVM Configurations
- Enabling CFS to Distribute FC Domain Configurations
- Enabling CFS to Distribute FC Port Security Configurations
- Enabling CFS to Distribute FC Timer Configurations
- Enabling CFS to Distribute IVR Configurations
- Enabling CFS to Distribute NTP Configurations
- Enabling CFS to Distribute RADIUS Configurations
- Enabling CFS to Distribute RSCN Configurations
- Enabling CFS to Distribute TACACS+ Configurations
Enabling CFS to Distribute Smart Call Home Configurations
You can enable CFS to distribute Call Home configurations to all Cisco NX-OS devices in the network. The entire Call Home configuration is distributed except the device priority and the sysContact names.
| Command or Action | Purpose | |
|---|---|---|
| Step 1 | switch# configure terminal |
Enters global configuration mode. |
| Step 2 | switch(config)# callhome |
Enters Call Home configuration mode. |
| Step 3 | switch(config-callhome)# distribute |
Enables CFS to distribute Smart Call Home configuration updates. |
| Step 4 | switch(config-callhome)# show application-name status | (Optional)
For the specified application, displays the CFS distribution status. |
| Step 5 | switch(config-callhome)# copy running-config startup-config | (Optional)
Saves the change persistently through reboots and restarts by copying the running configuration to the startup configuration. |
switch# configure terminal
switch(config)# callhome
switch(config-callhome)# distribute
switch(config-callhome)# show callhome status
Distribution : Enabled
switch(config-callhome)# copy running-config startup-config
Enabling CFS to Distribute DPVM Configurations
You can enable CFS to distribute dynamic port VSAN membership (DPVM) configurations in order to consistently administer and maintain the DPVM database across all Cisco NX-OS devices in the fabric.
Make sure that you are in the storage VDC. To change to the storage VDC, use the switchto vdc fcoe command.
Make sure that you enable the DPVM feature. To do so, use the feature dpvm command.
| Command or Action | Purpose | |
|---|---|---|
| Step 1 | switch# configure terminal |
Enters global configuration mode. |
| Step 2 | switch(config)# dpvm distribute |
Enables CFS to distribute DPVM configuration updates. |
| Step 3 | switch(config)# show application-name status | (Optional)
For the specified application, displays the CFS distribution status. |
| Step 4 | switch(config)# copy running-config startup config | (Optional)
Saves the change persistently through reboots and restarts by copying the running configuration to the startup configuration. |
This example shows how to enable CFS to distribute DPVM configurations:
switch(config)# dpvm distribute
switch(config)# show dpvm status
Distribution is enabled.
switch(config)# copy running-config startup-config
[########################################] 100%
Enabling CFS to Distribute FC Domain Configurations
You can enable CFS to distribute Fibre Channel (FC) domain configurations in order to synchronize the configuration across the fabric from the console of a single Cisco NX-OS device and to ensure consistency in the allowed domain ID lists on all devices in the VSAN.
Make sure that you are in the storage VDC. To change to the storage VDC, use the switchto vdc fcoe command.
| Command or Action | Purpose | |
|---|---|---|
| Step 1 | switch# configure terminal |
Enters global configuration mode. |
| Step 2 | switch(config)# fcdomain distribute |
Enables CFS to distribute FC domain configuration updates. |
| Step 3 | switch(config)# show application-name status | (Optional)
For the specified application, displays the CFS distribution status. |
| Step 4 | switch(config)# copy running-config startup config | (Optional)
Saves the change persistently through reboots and restarts by copying the running configuration to the startup configuration. |
This example shows how to enable CFS to distribute FC domain configurations:
switch(config)# fcdomain distribute
switch(config)# show fcdomain status
fcdomain distribution is enabled
switch(config)# copy running-config startup-config
[########################################] 100%
Enabling CFS to Distribute FC Port Security Configurations
You can enable CFS to distribute Fibre Channel (FC) port security configurations in order to provide a single point of configuration for the entire fabric in the VSAN and to enforce the port security policies throughout the fabric.
Make sure that you are in the storage VDC. To change to the storage VDC, use the switchto vdc fcoe command.
Make sure that you enable the FC port security feature. To do so, use the feature fc-port-security command.
| Command or Action | Purpose | |
|---|---|---|
| Step 1 | switch# configure terminal |
Enters global configuration mode. |
| Step 2 | switch(config)# fc-port-security distribute |
Enables CFS to distribute FC port security configuration updates. |
| Step 3 | switch(config)# show cfs application | (Optional)
Displays the CFS distribution status. |
| Step 4 | switch(config)# copy running-config startup config | (Optional)
Saves the change persistently through reboots and restarts by copying the running configuration to the startup configuration. |
This example shows how to enable CFS to distribute FC port security configurations:
switch(config)# fc-port-security distribute
switch(config)# show cfs application
----------------------------------------------
Application Enabled Scope
----------------------------------------------
fc-port-securi Yes Logical
switch(config)# copy running-config startup-config
[########################################] 100%
Enabling CFS to Distribute FC Timer Configurations
You can enable CFS to distribute Fibre Channel (FC) timer configurations for all Cisco NX-OS devices in the fabric.
Make sure that you are in the storage VDC. To change to the storage VDC, use the switchto vdc fcoe command.
| Command or Action | Purpose | |
|---|---|---|
| Step 1 | switch# configure terminal |
Enters global configuration mode. |
| Step 2 | switch(config)# fctimer distribute |
Enables CFS to distribute FC timer configuration updates. |
| Step 3 | switch(config)# show application-name status | (Optional)
For the specified application, displays the CFS distribution status. |
| Step 4 | switch(config)# copy running-config startup config | (Optional)
Saves the change persistently through reboots and restarts by copying the running configuration to the startup configuration. |
This example shows how to enable CFS to distribute FC timer configurations:
switch(config)# fctimer distribute
switch(config)# show fctimer status
Distribution : Enabled
switch(config)# copy running-config startup-config
[########################################] 100%
Enabling CFS to Distribute IVR Configurations
You can enable CFS to distribute inter-VSAN routing (IVR) configurations in order to enable efficient IVR configuration management and to provide a single point of configuration for the entire fabric in the VSAN.
Make sure that you are in the storage VDC. To change to the storage VDC, use the switchto vdc fcoe command.
Make sure that you install the Advanced SAN Services license.
Make sure that you enable the IVR feature. To do so, use the feature ivr command.
| Command or Action | Purpose | |||
|---|---|---|---|---|
| Step 1 | switch# configure terminal |
Enters global configuration mode. | ||
| Step 2 | switch(config)# ivr distribute |
Enables CFS to distribute IVR configuration updates.
| ||
| Step 3 | switch(config)# show cfs application | (Optional)
Displays the CFS distribution status. | ||
| Step 4 | switch(config)# copy running-config startup config | (Optional)
Saves the change persistently through reboots and restarts by copying the running configuration to the startup configuration. |
This example shows how to enable CFS to distribute IVR configurations:
switch(config)# ivr distribute
switch(config)# show cfs application
----------------------------------------------
Application Enabled Scope
----------------------------------------------
ivr Yes Physical-fc
switch(config)# copy running-config startup-config
[########################################] 100%
Enabling CFS to Distribute NTP Configurations
You can enable CFS to distribute NTP configurations to all Cisco NX-OS devices in the network.
Make sure that you enable the NTP feature (using the feature ntp command).
| Command or Action | Purpose | |
|---|---|---|
| Step 1 | switch# configure terminal |
Enters global configuration mode. |
| Step 2 | switch(config)# ntp distribute |
Enables CFS to distribute NTP configuration updates. |
| Step 3 | switch(config)# show application-name status | (Optional)
For the specified application, displays the CFS distribution status. |
| Step 4 | switch(config)# copy running-config startup config | (Optional)
Saves the change persistently through reboots and restarts by copying the running configuration to the startup configuration. |
switch# configure terminal
switch(config)# ntp distribute
switch(config)# show ntp status
Distribution : Enabled
switch(config)# copy running-config startup-config
Enabling CFS to Distribute RADIUS Configurations
You can enable CFS to distribute RADIUS configurations to all Cisco NX-OS devices in the network.
| Command or Action | Purpose | |
|---|---|---|
| Step 1 | switch# configure terminal |
Enters global configuration mode. |
| Step 2 | switch(config)# radius distribute |
Enables CFS to distribute RADIUS configuration updates. |
| Step 3 | switch(config)# show application-name status | (Optional)
For the specified application, displays the CFS distribution status. |
| Step 4 | switch(config)# copy running-config startup config | (Optional)
Saves the change persistently through reboots and restarts by copying the running configuration to the startup configuration. |
switch# configure terminal
switch(config)# radius distribute
switch(config)# show radius status
Distribution : Enabled
switch(config)# copy running-config startup-config
Enabling CFS to Distribute RSCN Configurations
You can enable CFS to distribute registered state change notification (RSCN) configurations to all Cisco NX-OS devices in the fabric.
Make sure that you are in the storage VDC. To change to the storage VDC, use the switchto vdc fcoe command.
| Command or Action | Purpose | |
|---|---|---|
| Step 1 | switch# configure terminal |
Enters global configuration mode. |
| Step 2 | switch(config)# rscn distribute |
Enables CFS to distribute RSCN configuration updates. |
| Step 3 | switch(config)# show cfs application | (Optional)
Displays the CFS distribution status. |
| Step 4 | switch(config)# copy running-config startup config | (Optional)
Saves the change persistently through reboots and restarts by copying the running configuration to the startup configuration. |
This example shows how to enable CFS to distribute RSCN configurations:
switch(config)# rscn distribute
switch(config)# show cfs application
----------------------------------------------
Application Enabled Scope
----------------------------------------------
rscn Yes Logical
switch(config)# copy running-config startup-config
[########################################] 100%
Enabling CFS to Distribute TACACS+ Configurations
You can enable CFS to distribute TACACS+ configurations to all Cisco NX-OS devices in the network.
Make sure that you enable the TACACS+ feature (using the feature tacacs+ command).
| Command or Action | Purpose | |
|---|---|---|
| Step 1 | switch# configure terminal |
Enters global configuration mode. |
| Step 2 | switch(config)# tacacs+ distribute |
Enables CFS to distribute TACACS+ configuration updates. |
| Step 3 | switch(config)# show application-name status | (Optional)
For the specified application, displays the CFS distribution status. |
| Step 4 | switch(config)# copy running-config startup config | (Optional)
Saves the change persistently through reboots and restarts by copying the running configuration to the startup configuration. |
switch# configure terminal
switch(config)# tacacs+ distribute
switch(config)# show tacacs+ status
Distribution : Enabled
switch(config)# copy running-config startup-config
 Feedback