QSFP+ Ports Operations and Switch Fabric Mode
This chapter describes the application-specific integrated circuit (ASIC) mapping and configuration of quad small form-factor pluggable plus (QSFP+) ports on the Cisco Nexus 2248PQ Fabric Extender (FEX), the Cisco Nexus 5500 with QSFP+ Generic Expansion Module (N55-M4Q) switch, the Cisco Nexus 6004 switch and the Cisco Nexus 6004 switch fabric mode.
Quad Small Form-Factor Pluggable Plus
The quad small form-factor pluggable plus (QSFP+) is a transceiver module that offers high-density 40 Gigabit Ethernet connectivity options for datacenter and high-performance computing networks. The QSFP+ transceiver module is a hot-swappable, parallel fiber-optical/copper module with four independent optical transmit and receive channels. These channels can terminate in another 40 Gigabit Ethernet QSFP+ transceiver, or the channels can be broken out to four separate 10 Gigabit Ethernet SFP+ transceivers. The QSFP+ transceiver module connects the electrical circuitry of the system with either a copper or an optical external network. For more information about the Cisco 40 Gigabit Ethernet modules, see:
http://www.cisco.com/en/US/partner/products/ps11708/tsd_products_support_model_home.html.
Cisco Nexus 2248PQ Fabric Extender
The Cisco Nexus 2248PQ is a 1 rack unit (1 RU) Fabric Extender(FEX) with 48 SFP+ host ports and 4 QSFP+ uplink ports. The host ports can be operated in either 1 Gigabit Ethernet or 10 Gigabit Ethernet mode. The 4 QSFP+ uplink ports can operate only in 4 x10 Gigabit Ethernet mode. The uplink ports do not support the native 40 Gigabit Ethernet mode.
You can connect the Cisco Nexus 2248PQ FEX to its parent switch in the following two ways:
Figure 1-1 shows the cabling options for a Cisco Nexus 2248PQ FEX to Cisco Nexus 5500 and Cisco Nexus 6004 Series switches.
Figure 1-1 Connection Cable Options for a Cisco Nexus 2248PQ FEX to Cisco Nexus 5500 and Cisco Nexus 6004 Series Switches
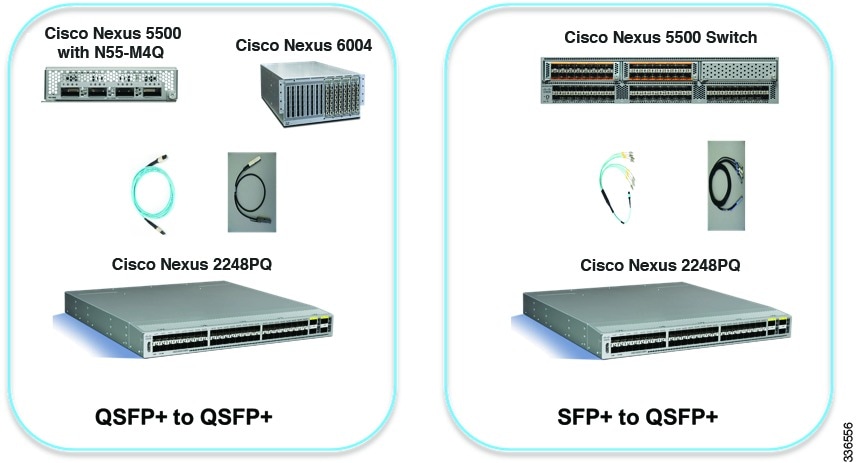

Note![]() For the Cisco Nexus 6004 switch, the default mode of the QSFP+ ports is native 40 Gigabit Ethernet. You must configure QSFP+ ports on the Cisco Nexus 6004 that are connected to the Cisco Nexus 2248PQ in 4x10 Gigabit Ethernet mode. See the Configuring QSFP+ Ports section for more details about the configuration.
For the Cisco Nexus 6004 switch, the default mode of the QSFP+ ports is native 40 Gigabit Ethernet. You must configure QSFP+ ports on the Cisco Nexus 6004 that are connected to the Cisco Nexus 2248PQ in 4x10 Gigabit Ethernet mode. See the Configuring QSFP+ Ports section for more details about the configuration.
Cisco Nexus 5500 Series with QSFP+ GEM
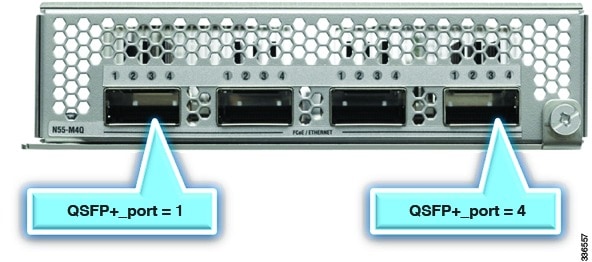
The QSFP+ GEM (N55-M4Q) is a generic expansion module (GEM) that provides 16x10 Gigabit Ethernet SFP+ in a 4 x QSFP+ form factor. This module does not support native 40 Gigabit Ethernet on the QSFP+ port. This module is supported on all Cisco Nexus 5500 chassis (Cisco Nexus 5548P, Cisco Nexus 5548UP, Cisco Nexus 5596UP, and Cisco Nexus 5596T). This module is suitable for any expansion slot on the Cisco Nexus 5500 Series and you can populate all the expansion slots on the Cisco Nexus 5596 chassis with N55-M4Qs. There is no additional configuration needed to specify the operation mode of the QSFP+ ports because all the ports only operate in 4 x10 Gigabit Ethernet mode. The numbering of the ports uses the following convention(see Figure 1-2):
interface ethernet [chassis_ID/] slot/ QSFP_port [/.subintf_ port-no]
Note![]() The argument, chassis_ID, is not optional when addressing the host interfaces of a Cisco Nexus 2000 Series Fabric Extender.
The argument, chassis_ID, is not optional when addressing the host interfaces of a Cisco Nexus 2000 Series Fabric Extender.
Figure 1-2 QSFP+ Slot Number on N55-M4Q Module
This example shows how to display the information about the module and interface on the Cisco Nexus 5596 switch:
Cisco Nexus 6004 Switch and QSFP+ Ports
The Cisco Nexus 6000 Series platform uses Cisco's ASIC technology. It provides line rate throughput and low latency performance. The ASICs on the Cisco Nexus 6000 Series platform are unified port controllers (UPCs) and switch fabric (SF). The UPCs provide data-plane processing and the SF cross-connects the UPCs. Each UPC can be operated as either 3 ports of 40G Ethernet or 12 ports of 10G Ethernet.
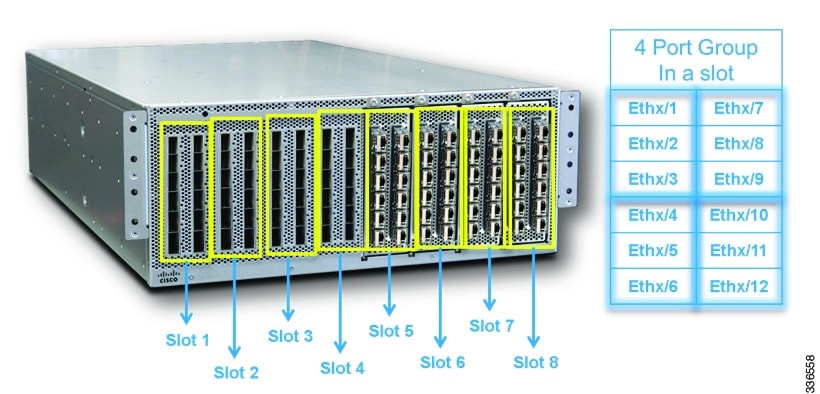
The Cisco Nexus 6004 switch is a 4 RU unit chassis with 8 vertical slots. The first 4 slots are fixed with 12 QSFP+ ports per slot. The remaining 4 slots are for linecard expansion modules(LEM). A QSFP+ LEM is a 12 QSFP+ port, field-replaceable module that has the same functionality as the fixed slots. These 4 slots provide up to 48 additional 40 Gigabit Ethernet ports. Figure 1-3 shows the Cisco Nexus 6004 switch port numbering and port mapping with UPCs in a slot.
This section includes the following topics:
Figure 1-3 Cisco Nexus 6004 Switch Port Numbering and Port Mapping with UPCs in a Slot
Configuring QSFP+ Ports
QSFP+ ports can operate as either 40 Gigabit Ethernet or 4x10 Gigabit Ethernet modes on the Cisco Nexus 6004 switch. The default mode is 40 Gigabit Ethernet for the fixed QSFP+ ports and QSFP+ ports on a LEM. The port numbering of the QSFP+ port operating in 40 Gigabit Ethernet mode contains two levels. The first level is the slot number. There are eight slots in the Cisco Nexus 6004 switch. The farthest left slot is slot 1 and the farthest right is slot 8. The second level is the QSFP+ port number. There are 16 ports in the built-in slot and 16 ports in the QSFP+ LEM. The QSFP+ port numbering system is from top to bottom and left to right as indicated in Figure 1-3. The QSFP+ port reference on the Cisco Nexus 6004 switch is as follows:
interface ethernet [chassis_ID/] slot/ QSFP_port [/.subintf_ port-no]
To change from the default mode to 4x10 Gigabit Ethernet mode, you have to change it on a per port group basis. A port group is the ports that are managed by the same UPC. The table in Figure 1-3 shows the four available port groups within a given slot. To change from the default mode of 40 Gigabit Ethernet to 4x10 Gigabit Ethernet mode for any port group, follow these steps:
SUMMARY STEPS
2.![]() interface breakout slot slot-number port port-range map 10g-4x
interface breakout slot slot-number port port-range map 10g-4x
DETAILED STEPS
Examples
This example shows how to change QSFP+ ports 1 to 3 and 7 to 12 to 4 x10 Gigabit Ethernet mode on slot 2:
This example shows you how to power off a module:
After the module is back inline, the port naming changes to three levels. The change takes effect only after you have entered the power off module and power on module commands. The port reference to the 10 Gigabit Ethernet ports changes to the following:
interface ethernet [chassis_ID/] slot/ QSFP_port/ breakout_port [/.subintf port-no]
To change the ports configuration back to 40 Gigabit Ethernet mode, use the no form of the interface breakout slot command as follows:
no interface breakout slot slot-number port port-range map 10g-4x
After the module is back inline, the port naming returns to two levels. The change takes effect only after you have entered the power off module and power on module commands. The port reference to the 40 Gigabit Ethernet ports changes back to the following:
interface ethernet [chassis_ID/] slot/ QSFP_port/ [/.subintf_ port-no]
Cisco Nexus 6004 Switch Fabric Mode
Switch fabric mode refers to the single link speed configuration on the Cisco Nexus 6004 switch. The following are the characteristics of switch fabric mode:
- There are two user configurable switch fabric modes: 40 Gigabit Ethernet and 10 Gigabit Ethernet. The default switch fabric mode is 40 Gigabit Ethernet.
- The switch fabric mode is a system-wide configuration.
- Changing the switch fabric mode requires a chassis reload.
- The total bandwidth between UPCs and switch fabric remain the same regardless of the switch fabric mode configuration.
- The switch fabric mode configuration is independent of the QSFP+ port speed configuration (40 Gigabit Ethernet or 4 x10 Gigabit Ethernet).
We recommend that you use the default switch fabric mode of 40 Gigabit Ethernet. You can change to the 10 Gigabit Ethernet mode if most of the front panel ports are operating in 10 Gigabit Ethernet mode and the application desires a lowest latency between 10 Gigabit Ethernet ports. For this software release, when the fabric mode is set to 10 Gigabit Ethernet, an In Service Software Upgrade (ISSU) is disabled. For future software releases, when the fabric mode is set to 10 Gigabit Ethernet, an ISSU will be enabled.
To change the switch fabric mode, use the fabric-mode command. You must perform a system reload for the change to take place.
SUMMARY STEPS
DETAILED STEPS
EXAMPLES
This example shows how to select a fabric mode of 10 Gigabit Ethernet:
This example shows how to select a fabric mode of 40 Gigabit Ethernet:
 Feedback