Configuring Tap Aggregation and MPLS Stripping

This chapter contains the following sections:

Information About Tap Aggregation

Network Taps

You can use various methods to monitor packets. One method uses physical hardware taps.

Network taps can be extremely useful in monitoring traffic because they provide direct inline access to data that flows through the network. In many cases, it is desirable for a third party to monitor the traffic between two points in the network. If the network between points A and B consists of a physical cable, a network tap might be the best way to accomplish this monitoring. The network tap has at least three ports: an A port, a B port, and a monitor port. A tap inserted between the A and B ports passes all traffic through unimpeded, but it also copies that same data to its monitor port, which could enable a third party to listen.

Taps have the following benefits:
  • They can handle full-duplex data transmission

  • They are nonobtrusive and not detectable by the network with no physical or logical addressing

  • Some taps support full inline power with the capability to build a distributed tap

Whether you are trying to gain visibility into the server-to-server data communication at the edge or virtual edge of your network or to provide a copy of traffic to the Intrusion Prevention System (IPS) appliance at the Internet edge of your network, you can use network taps nearly anywhere in the environment. However, this deployment can add significant costs, operation complexities, and cabling challenges in a large-scale environment.
Tap Aggregation

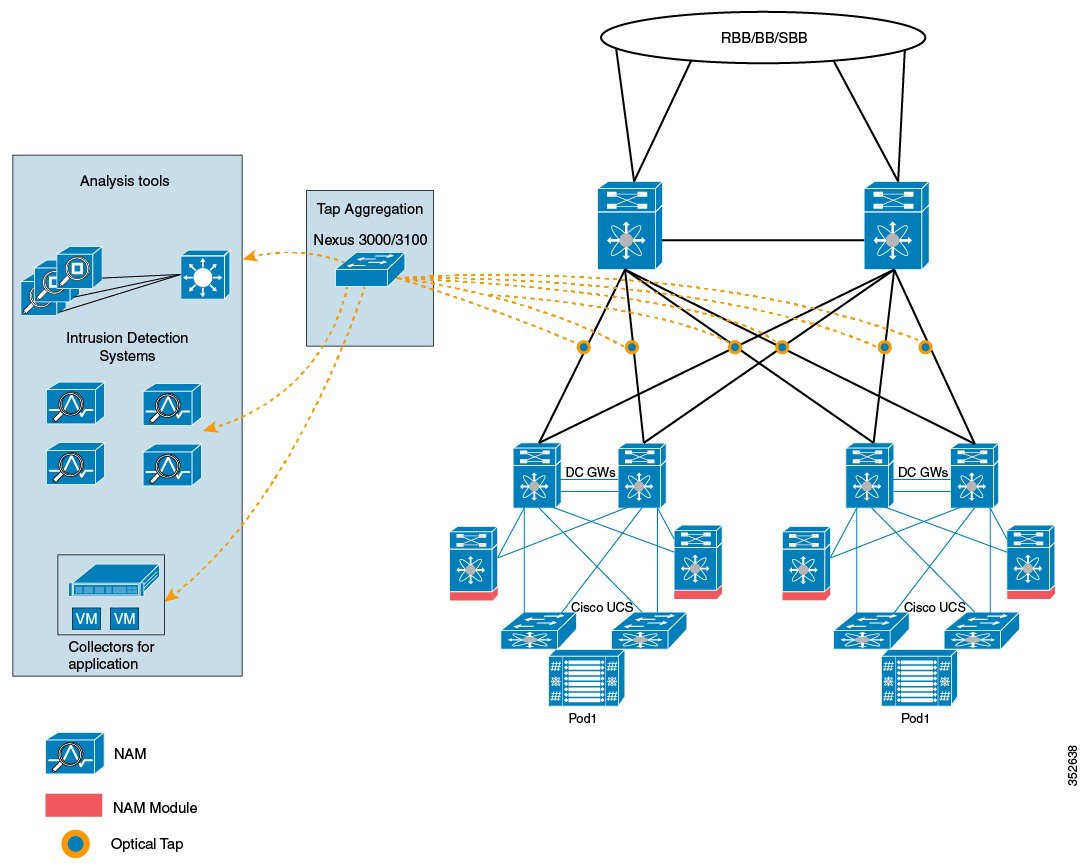
An alternative solution to help with monitoring and troubleshooting tasks in the data center is a device that is especially designated to allow the aggregation of multiple taps and that also connects to multiple monitoring systems. This solution is referred to as tap aggregation. Tap aggregation switches link all the monitoring devices directly to specific points in the network fabric that handle the packets that need to be observed.

Figure 1. Tap Aggregation Switch Solution

In the tap aggregation switch solution, the Cisco Nexus 3000 or Cisco Nexus 3100 Series switch is connected to various points in the network at which packet monitoring is advantageous. From each network element, you can use Switched Port Analyzer (SPAN) ports or optical taps to send traffic flows directly to this tap aggregation switch. The tap aggregation switch itself is directly connected to all the analysis tools used to monitor the events in the network fabric. These monitoring devices include remote monitor (RMON) probes, application firewalls, IPS devices, and packet sniffer tools.

You can dynamically program the tap aggregation switch with a configuration that allows traffic to enter the switch through a certain set of ports that are connected to the network elements. You can also configure a number of match criteria and actions to filter specific traffic and redirect them to one or more tools.

Guidelines and Limitations for Tap Aggregation

Tap aggregation has the following guidelines and limitations:

  • TAP aggregation filters on MPLS tags is not supported on the Cisco Nexus 3000 Series switches.

  • The interface to be applied with the tap aggregation policy must be in Layer 2. You can configure a Layer 3 interface with the policy, but the policy becomes nonfunctional.

  • Each rule must be associated with only one unique match criterion.

  • All tap aggregation interfaces must share the same ACL. Multiple ACLs are not required across interfaces because the match criteria includes an ingress interface.

  • The actions vlan-set and vlan-strip must always be specified after the redirect action. Otherwise, the entry will be rejected as invalid.

  • The deny rule does not support actions such as redirect, vlan-set, and vlan-strip .

  • When you enter a list of inputs, for example, a list of interfaces for the policy, you must separate them with commas, but no spaces. For example, port-channel50,ethernet1/12,port-channel20.

  • When you specify target interfaces in a policy, ensure that you enter the whole interface type and not just the short form of it. For example, ensure that you enter ethernet1/1 instead of eth1/1 and port-channel 50 instead of po50.

Information About MPLS Stripping

MPLS Overview

Multiprotocol Label Switching (MPLS) integrates the performance and traffic management capabilities of Layer 2 switching with the scalability, flexibility, and performance of Layer 3 routing.

An MPLS architecture provides the following benefits:

  • Data can be transferred over any combination of Layer 2 technologies

  • Support is offered for all Layer 3 protocols

  • Scaling is possible well beyond anything offered in today's networks

MPLS Header Stripping

The ingress ports of Cisco Nexus 3172 receive various MPLS packet types. Each data packet in an MPLS network has one or more label headers. These packets are redirected on the basis of a redirect ACL.

A label is a short, four-byte, fixed-length, locally significant identifier that is used to identify a Forwarding Equivalence Class (FEC). The label that is put on a particular packet represents the FEC to which that packet is assigned. It has the following components:
  • Label—Label value (unstructured), 20 bits

  • Exp—Experimental use, 3 bits; currently used as a Class of Service (CoS) field

  • S—Bottom of stack, 1 bit

  • TTL—Time to live, 8 bits

Because the MPLS label is imposed between the Layer 2 header and the Layer 3 header, its headers and data are not located at the standard byte offset. Standard network monitoring tools cannot monitor and analyze this traffic. To enable standard network monitoring tools to monitor this traffic, single-labeled packets are stripped off their MPLS label headers and redirected to T-cache devices.

MPLS packets with multiple label headers are sent to deep packet inspection (DPI) devices without stripping their MPLS headers.

Guidelines and Limitations for MPLS Stripping

MPLS stripping has the following guidelines and limitations:

  • Disable all Layer 3 and vPC features before you enable MPLS stripping.

  • Ensure that global tap-aggregation mode is enabled.

  • The ingress and egress interfaces involved in MPLS stripping must have mode tap-aggregation enabled.

  • You must configure the tap-aggregation ACL with a redirect action on the ingress interface to forward the packet to the desired destination.

  • Only one tap ACL is supported on the system.

  • The egress interface where stripped packets will exit must be an interface that has VLAN 1 as an allowed VLAN. We recommend that you configure the egress interface as a trunk with all VLANs allowed by default.

  • To enable MPLS stripping, ensure that you configure the Control Plane Policing (CoPP) class for MPLS, copp-s-mpls.

  • For MPLS stripped packets, port-channel load balancing is supported.

  • Layer 3 header-based hashing and Layer 4 header-based hashing are supported, but Layer 2 header-based hashing is not supported.

  • During MPLS stripping, the VLAN is also stripped with the MPLS label.

  • MPLS stripping is supported only on Cisco Nexus 3100 Series switches.

Configuring Tap Aggregation

Enabling Tap Aggregation

Ensure that you run the copy running-config startup-config command and reload the switch after enabling tap aggregation.

Procedure

  Command or Action Purpose

Step 1

switch# configure terminal

Enters global configuration mode.

Step 2

switch (config)# [no] hardware profile tap-aggregation [l2drop]

Enables tap aggregation and reserves entries in the interface table that are needed for VLAN tagging.

The l2drop option drops non-IP traffic ingress on tap interfaces.

The no form of this command disables the feature.

Step 3

switch (config)# copy running-config startup-config

Saves the change persistently through reboots and restarts by copying the running configuration to the startup configuration.

Step 4

switch (config)# reload

Reloads the Cisco NX-OS software.

Example

This example shows how to configure tap aggregation globally on the switch:

switch# configure terminal
switch(config)# hardware profile tap-aggregation
switch(config)# copy running-config startup-config
switch(config)# reload

Configuring a Tap Aggregation Policy

You can configure a TAP aggregation policy on an IP access control list (ACL) or on a MAC ACL.

Procedure

  Command or Action Purpose

Step 1

switch# configure terminal

Enters global configuration mode.

Step 2

  • switch(config)# ip access-list access-list-name
  • switch(config)# mac access-list access-list-name

Creates an IP ACL and enters IP access list configuration mode or creates a MAC ACL and enters MAC access list configuration mode.

Note


Starting with Release 7.0(3)I5(1), support for IPv6 ACLs is added on the Cisco Nexus 3000 Series switches. The redirect action is supported in IPv6 ACLs. All the match options that are currently supported for IPv6 PACL are now supported with the redirect action.

Step 3

switch(config-acl)# statistics per-entry

Starts recording statistics for how many packets are permitted or denied by each entry.

Step 4

switch(config-acl)# [no] permit protocol source destination match-criteria action

Creates an IP access control list (ACL) rule that permits traffic to match its conditions.

The no version of this command removes the permit rule from the policy.

match-criteria can be one of the following:

  • ingress-intf

    Note

     
    The ingress interface can be a match criteria only on Layer 2—EtherType or port channel
  • vlan

  • vlan-priority

    Note

     
    Each policy can have only one rule associated with a unique match criterion.

action can be one of the following:

  • redirect

  • priority

  • set-vlan

A tap ACL that matches on non-IP ethertype must be specified with a priority value greater than 0.

Step 5

switch(config-acl)# [no] deny protocol source destination match-criteria action

Creates an IP access control list (ACL) rule that denies traffic matching its conditions.

The no version of this command removes the deny rule from the policy.

It does not support redirect, and vlan-set actions.

Example

This example shows how to configure a tap aggregation policy:

switch# configure terminal
switch(config)# ip access-list test
switch(config-acl)# statistics per-entry
switch(config-acl)# permit ip any any ingress-intf Ethernet1/4 redirect Ethernet1/8 
switch(config-acl)# permit ip any any ingress-intf Ethernet1/6 redirect Ethernet1/1,Ethernet1/2,port-channel7,port-channel8,Ethernet1/12,Ethernet1/13
switch(config-acl)# permit tcp any eq www any ingress-intf Ethernet1/10 redirect port-channel4
switch(config-acl)# deny ip any any

Attaching a Tap Aggregation Policy to an Interface

To attach a tap aggregation policy to an interface, enter the tap aggregation mode and apply the ACL configured with tap aggregation to the interface. Ensure that the interface to which you attach the policy is a Layer 2 interface.

Procedure

  Command or Action Purpose

Step 1

switch# configure terminal

Enters global configuration mode.

Step 2

switch(config)# interface type slot/port

Enters the interface configuration mode for the specified interface.

Step 3

switch (config-if)# [no] mode tap-aggregation

Allows an attachment of the ACL with the match and action criteria.

The no form of this command disallows the attachment of an ACL with the tap aggregation policy to the interface. To remove the ACL from the interface, use the no ip port access-group command.

Step 4

switch(config-if)# [no] ip port access-group access-list-name in

Applies an IPv4 access control list (ACL) to an interface as a port ACL.

The no form of this command removes an ACL from an interface.

Example

This example shows how to attach a tap aggregation policy to an interface:

switch# configure terminal
switch(config)# interface ethernet1/2
switch (config-if)# mode tap-aggregation
switch(config-if)# ip port access-group test in

Verifying the Tap Aggregation Configuration

Command Purpose
show ip access-list access-list-name

Displays all IPv4 access control lists (ACLs) or a specific IPv4 ACL.

Example

This example shows how to display an IPv4 ACL:

switch(config)# show ip access-list test
IPV4 ACL test
        10 permit ip any any ethertype 0x800 ingress-intf Ethernet1/4 redirect E
thernet1/8
        20 permit ip any any ingress-intf Ethernet1/6 redirect Ethernet1/1,Ether
net1/2,port-channel7,port-channel8,Ethernet1/12,Ethernet1/13
        30 permit tcp any eq www any ethertype 0x800 ingress-intf Ethernet1/10 r
edirect port-channel4
        40 deny ip any any 

Configuring MPLS Stripping

Enabling MPLS Stripping

You can enable MPLS stripping globally.

Procedure

  Command or Action Purpose

Step 1

switch# configure terminal

Enters global configuration mode.

Step 2

switch(config)# [no] mpls strip

Globally enables MPLS stripping.

The no form of this command disables MPLS stripping.

Example

The following example shows how to enable MPLS stripping:

switch# configure terminal
switch(config)# mpls strip

Adding and Deleting MPLS Labels

The device can learn the labels dynamically whenever a frame is received with an unknown label on a mode tap interface. You can also add or delete static MPLS labels by using the following commands:

Before you begin

  • Enable tap aggregation

  • Configure tap aggregation policy

  • Attach a tap aggregation policy to an interface

Procedure

  Command or Action Purpose

Step 1

switch# configure terminal

Enters global configuration mode.

Step 2

switch(config)# mpls strip label label

Adds the specified static MPLS label.

The value of the label can range from 1 to 1048575.

Step 3

switch(config)# no mpls strip label label | all

Deletes the specified static MPLS label.

The all option deletes all static MPLS labels.

Example

The following example shows how to add static MPLS labels:

switch# configure terminal
switch(config)# mpls strip label 100
switch(config)# mpls strip label 200
switch(config)# mpls strip label 300

The following example shows how to delete a static MPLS label:

switch# configure terminal
switch(config)# no mpls strip label 200

The following example shows how to delete all static MPLS labels:

switch# configure terminal
switch(config)# no mpls strip label all

Clearing Label Entries

You can clear dynamic label entries from the MPLS label table by using the following command:

Procedure

Command or Action Purpose

switch# clear mpls strip label dynamic

Clears dynamic label entries from the MPLS label table.

Example

The following example shows how to clear dynamic label entries:

switch# clear mpls strip label dynamic

Clearing MPLS Stripping Counters

You can clear all software and hardware MPLS stripping counters.

Procedure

Command or Action Purpose

switch# clear counters mpls strip

Clears all MPLS stripping counters.

Example

The following example shows how to clear all MPLS stripping counters:

switch# clear counters mpls strip
switch# show mpls strip labels
MPLS Strip Labels:
    Total      : 15000
    Static     : 2
Legend:     * - Static Label
    Interface - where label was first learned
    Idle-Age  - Seconds since last use
    SW-Counter- Packets received in Software
    HW-Counter- Packets switched in Hardware
--------------------------------------------------------------------------------
     Label    Interface      Idle-Age   SW-Counter       HW-Counter
--------------------------------------------------------------------------------
     4096    Eth1/44              15            0                0
     8192    Eth1/44              17            0                0
    12288    Eth1/44              15            0                0
    16384    Eth1/44              39            0                0
    20480    Eth1/44              47            0                0
    24576    Eth1/44               7            0                0
    28672    Eth1/44               5            0                0
    36864    Eth1/44               7            0                0
    40960    Eth1/44              19            0                0
    45056    Eth1/44               9            0                0
    49152    Eth1/44              45            0                0
    53248    Eth1/44               9            0                0

Configuring MPLS Label Aging

You can define the amount of time after which dynamic MPLS labels will age out, if unused.

Procedure

  Command or Action Purpose

Step 1

switch# configure terminal

Enters global configuration mode.

Step 2

switch(config)# mpls strip label-age age

Specifies the amount of time after which dynamic MPLS labels age out.

Example

The following example shows how to configure label age for dynamic MPLS labels:

switch# configure terminal
switch(config)# mpls strip label-age 300

Configuring Destination MAC Addresses

You can configure the destination MAC address for stripped egress frames.

Procedure

  Command or Action Purpose

Step 1

switch# configure terminal

Enters global configuration mode.

Step 2

switch(config)# mpls strip dest-mac mac-address

Specifies the destination MAC address for egress frames that are stripped of their headers.

The MAC address can be specified in one of the following four formats:
  • E.E.E

  • EE-EE-EE-EE-EE-EE

  • EE:EE:EE:EE:EE:EE

  • EEEE.EEEE.EEEE

Example

The following example shows how to configure the destination MAC address for egress frames:

switch# configure terminal
switch(config)# mpls strip dest-mac 1.1.1

Verifying the MPLS Label Configuration

Use the following command to display the MPLS label configuration:

Command Purpose

show mpls strip labels [label | all | dynamic |static]

Displays information about MPLS labels. You can specify the following options:
  • label —Label to be displayed
  • all —Specifies that all labels must be displayed. This is the default option.
  • dynamic —Specifies that only dynamic labels must be displayed.
  • static —Specifies that only static labels must be displayed.

Example

The following example shows how to display all MPLS labels:

switch# show mpls strip labels
MPLS Strip Labels:
    Total      : 3005
    Static     : 5
Legend:     * - Static Label
    Interface - where label was first learned
    Idle-Age  - Seconds since last use
    SW-Counter- Packets received in Software
    HW-Counter- Packets switched in Hardware
--------------------------------------------------------------------------------
     Label    Interface      Idle-Age   SW-Counter       HW-Counter
--------------------------------------------------------------------------------
     4096    Eth1/53/1            15            1              210
     4097    Eth1/53/1            15            1              210
     4098    Eth1/53/1            15            1              210
     4099    Eth1/53/1             7            2              219
     4100    Eth1/53/1             7            2              219
     4101    Eth1/53/1             7            2              219
     4102    Eth1/53/1            39            1              206
     4103    Eth1/53/1            39            1              206
     4104    Eth1/53/1            39            1              206
     4105    Eth1/53/1             1            1              217
     4106    Eth1/53/1             1            1              217
     4107    Eth1/53/1             1            1              217
     4108    Eth1/53/1            15            1              210
*   25000    None <User>          39            1              206
*   20000    None <User>          39            1              206
*   21000    None <User>           1            1              217

The following example shows how to display only static MPLS labels:

switch(config)# show mpls strip labels static
MPLS Strip Labels:
    Total      : 3005
    Static     : 5
Legend:     * - Static Label
    Interface - where label was first learned
    Idle-Age  - Seconds since last use
    SW-Counter- Packets received in Software
    HW-Counter- Packets switched in Hardware
--------------------------------------------------------------------------------
     Label    Interface      Idle-Age   SW-Counter       HW-Counter
--------------------------------------------------------------------------------
*     300    None <User>         403            0                0
*     100    None <User>         416            0                0
*   25000    None <User>         869            0                0
*   20000    None <User>         869            0                0
*   21000    None <User>         869            0                0