Configuring Tenants

Creating a Tenant, VRF, and Bridge Domain

This topic describes the following steps in the basic provisioning of a new tenant:

  1. Create a tenant

  2. Associate the tenant with a security domain

  3. Create a VRF for the tenant

  4. Create a bridge domain for endpoint groups within the tenant

Procedure

  Command or Action Purpose
Step 1

configure

Example:

apic1# configure

Enters configuration mode.

Step 2

tenant tenant-name

Example:

apic1(config)# tenant exampleCorp

Creates a tenant if it does not exist and enters the tenant configuration mode.

Step 3

security domain domain-name

Example:

apic1(config-tenant)# security domain exampleCorp_dom1

Associates the tenant with one or more security domains.

Step 4

[no] vrf context vrf-name

Example:

apic1(config-tenant)# vrf context exampleCorp_v1

Creates a private network (VRF) for the tenant. A tenant can have one or more VRFs configured.

Step 5

[no] contract {provider | consumer} contract-name

Example:

apic1(config-tenant-vrf)# contract provider web

Provide or consume contracts for all the EPGs under the VRF.

Step 6

exit

Example:

apic1(config-tenant-vrf)# exit

Returns to the tenant configuration mode.

Step 7

[no] bridge-domain bd-name

Example:

apic1(config-tenant)# bridge-domain exampleCorp_b1

Creates or deletes a bridge domain under the tenant. Enters bridge domain configuration mode.

Step 8

[no] vrf member vrf-name

Example:

apic1(config-tenant-bd)# vrf member exampleCorp_v1

Assigns the bridge-domain to a VRF.

Step 9

exit

Example:

apic1(config-tenant-bd)# exit

Returns to the tenant configuration mode.

Step 10

interface bridge-domain bd-name

Example:

apic1(config-tenant)# interface bridge-domain exampleCorp_b1

Enters tenant interface configuration mode to enable routing and to apply interfaces to the bridge domain.

Step 11

[no] {ip | ipv6} address address/mask-length [scope {private | public}] [secondary]

Example:


apic1(config-tenant-if)# ip address 172.1.1.1/24
apic1(config-tenant-if)# ipv6 address 2001:1:1::1/64

Assigns or removes the gateway IP address of the bridge domain and enters the IP address mode to configure optional IP address properties.

The scope of the gateway address can be one of the following:

  • Public —Can be advertised to external Layer 3 networks through routing protocols (BGP, OSPF, EIGRP).

  • Private —Not advertised to external Layer 3 networks.

The optional secondary keyword allows you to configure a secondary gateway address.

Examples

This example shows the basic configuration of a tenant including assignment to a security domain, creation of a VRF with contracts, and creation of a bridge domain.


apic1# configure
apic1(config)# tenant exampleCorp
apic1(config-tenant)# security domain exampleCorp_dom1
apic1(config-tenant)# vrf context exampleCorp_v1
apic1(config-tenant-vrf)# contract enforce
apic1(config-tenant-vrf)# contract provider web
apic1(config-tenant-vrf)# contract consumer db
apic1(config-tenant-vrf)# contract provider icmp
apic1(config-tenant-vrf)# contract consumer icmp
apic1(config-tenant-vrf)# exit
apic1(config-tenant)# bridge-domain exampleCorp_b1
apic1(config-tenant-bd)# vrf member exampleCorp_v1
apic1(config-tenant-bd)# exit
apic1(config-tenant)# interface bridge-domain exampleCorp_b1
apic1(config-tenant-interface)# ip address 172.1.1.1/24
apic1(config-tenant-interface)# ipv6 address 2001:1:1::1/64
apic1(config-tenant-interface)# exit

This example shows the VRF configuration specific to a leaf.


apic1# configure
apic1(config)# leaf 101
apic1(config-leaf)# vrf context exampleCorp_v1 tenant exampleCorp
apic1(config-leaf-vrf)# ip route 1.2.3.4 5.6.7.8

This example shows the VRF configuration specific to a leaf interface.


apic1# configure
apic1(config)# leaf 101
apic1(config-leaf)# int eth 1/1
apic1(config-leaf-if)# vrf member exampleCorp_v1 tenant exampleCorp

What to do next

Add an application profile, create an application endpoint group (EPG), and associate the EPG to the bridge domain.
Additional Bridge Domain Configuration

This topic describes the following configurations for a bridge domain:

  • Configuring a MAC address

  • Configuring a DHCP relay address

  • Configuring route leaking for shared services

Procedure

  Command or Action Purpose
Step 1

configure

Example:

apic# configure

Enters configuration mode.

Step 2

tenant tenant-name

Example:

apic(config-tenant)# tenant exampleCorp

Enters the tenant configuration mode.

Step 3

interface bridge-domain bd-name

Example:

apic(config-tenant)# interface bridge-domain exampleCorp_bd1

Enters tenant interface configuration mode to configure the bridge domain.

Step 4

(Optional) mac-address mac-address

Example:

apic(config-tenant-interface)# mac-address 1234.5678.abcd
(Optional)

Configures the MAC address to be used in the ARP reply for the pervasive gateway functionality.

Step 5

(Optional) no mac-address

Example:

apic(config-tenant-interface)# no mac-address
(Optional)

Changes the MAC address to its default.

Step 6

(Optional) [no] ip dhcp relay address tenant tenant-name dhcp-address {application app-name epg epg-name | external-l2 l2-epg-name | external-l3 l3-epg-name}

Example:

apic(config-tenant-interface)# ip dhcp relay address 192.0.20.1 tenant exampleCorp application app1 epg epg1
(Optional)

Sets or removes a DHCP relay address for the bridge-domain along with any supported options.

Step 7

(Optional) [no] {ip | ipv6} shared address address/mask-length provider application app-name epg epg-name

Example:

apic(config-tenant-interface)# ip shared address 7.8.9.1/24 provider application app2 epg epg2
(Optional)

Route leaking is allowed across VRFs to provide common services like DHCP, DNS for multiple tenant VRFs. Shared service is enabled by marking subnets as provider or consumer subnets and specifying the EPGs providing the shared service.

Step 8

(Optional) [no] {ip | ipv6} shared address address/mask-length consumer application any epg any

Example:

apic(config-tenant-interface)# ip shared address 3.2.3.4/24 consumer application any epg any
(Optional)

See the previous step.

Examples


apic1# configure
apic1(config)# tenant exampleCorp
apic1(config-tenant)# interface bridge-domain exampleCorp_bd1
apic1(config-tenant-interface)# mac-address 1234.5678.abcd
apic(config-tenant-interface)# ip dhcp relay address 192.0.20.1 tenant exampleCorp application app1 epg epg1
apic1(config-tenant-interface)# ip shared address 1.2.3.4/24 provider application any
apic1(config-tenant-interface)# ip shared address 3.2.3.4/24 consumer application any epg any
apic1(config-tenant-interface)# exit
apic1(config-tenant)# exit
apic1(config)# tenant my_dhcp_provider
apic1(config-tenant)# interface bridge-domain bd_dhcp
apic1(config-tenant-interface)# ip shared address 7.8.9.1/24 provider application app2 epg epg2

Configuring an Enforced Bridge Domain

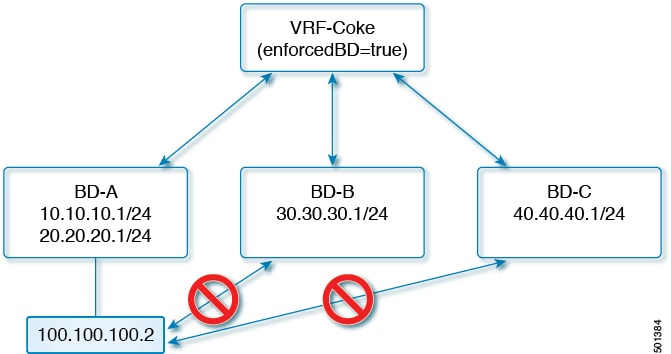
An enforced bridge domain (BD) configuration entails creating an endpoint in a subject endpoint group (EPG) which can only ping subnet gateways within the associated bridge domain.

With this configuration, you can then create a global exception list of IP addresses which can ping any subnet gateway.

Figure 1. Enforced Bridge Domain

Note

  • The exception IP addresses can ping all of the BD gateways across all of your VRFs.

  • A loopback interface configured for an L3 out does not enforce reachability to the IP address that is configured for the subject loopback interface.

  • When an eBGP peer IP address exists in a different subnet than the subnet of the L3out interface, the peer subnet must be added to the allowed exception subnets.

    Otherwise, eBGP traffic is blocked because the source IP address exists in a different subnet than the L3out interface subnet.


Configuring an Enforced Bridge Domain

An enforced bridge domain (BD) configuration entails creating an endpoint in a subject endpoint group (EPG) which can only ping subnet gateways within the associated bridge domain.

With this configuration, you can then create a global exception list of IP addresses which can ping any subnet gateway.

Figure 2. Enforced Bridge Domain

Note

  • The exception IP addresses can ping all of the BD gateways across all of your VRFs.

  • A loopback interface configured for an L3 out does not enforce reachability to the IP address that is configured for the subject loopback interface.

  • When an eBGP peer IP address exists in a different subnet than the subnet of the L3out interface, the peer subnet must be added to the allowed exception subnets.

    Otherwise, eBGP traffic is blocked because the source IP address exists in a different subnet than the L3out interface subnet.


Configuring an Enforced Bridge Domain Using the NX-OS Style CLI

This section provides information on how to configure your enforced bridge domain using the NX-OS style command line interface (CLI).

Procedure


Step 1

Create and enable the tenant:

Example:

In the following example ("cokeVrf") is created and enabled.

apic1(config-tenant)# vrf context cokeVrf
apic1(config-tenant-vrf)# bd-enforce enable
apic1(config-tenant-vrf)# exit
apic1(config-tenant)#exit
Step 2

Add the subnet to the exception list.

Example:

apic1(config)#bd-enf-exp-ip add1.2.3.4/24
apic1(config)#exit

You can confirm if the enforced bridge domain is operational using the following type of command:
apic1# show running-config all | grep bd-enf
bd-enforce enable
bd-enf-exp-ip add 1.2.3.4/24

Example

The following command removes the subnet from the exception list:
apic1(config)# no bd-enf-exp-ip 1.2.3.4/24
apic1(config)#tenant coke
apic1(config-tenant)#vrf context cokeVrf

What to do next

To disable the enforced bridge domain run the following command:
apic1(config-tenant-vrf)# no bd-enforce enable

Creating an Application Endpoint Group

This topic describes the following steps in the basic provisioning of a static application EPG:

  1. Create an application profile within the tenant

  2. Create an EPG in the application profile

  3. Assign a bridge domain to the EPG

  4. Deploy the EPG to a Layer 2 interface

Before you begin

Before you can create an application profile and an application endpoint group (EPG), you must create a VLAN domain, tenant, VRF, and bridge domain.

Procedure

  Command or Action Purpose
Step 1

configure

Example:

apic1# configure

Enters configuration mode.

Step 2

tenant tenant-name

Example:

apic1(config)# tenant exampleCorp

Enters the tenant configuration mode.

Step 3

[no] application app-name

Example:

apic1(config-tenant)# application OnlineStore

Creates an application profile and enters application profile configuration mode.

Step 4

[no] epg epg-name

Example:

apic1(config-tenant-app)# epg exampleCorp_webepg1

Creates (or deletes) an EPG in the application profile and enters EPG configuration mode.

Step 5

[no] bridge-domain member epg-name

Example:

apic1(config-tenant-app-epg)# bridge-domain member exampleCorp_b1

Associates the EPG to the bridge domain. Every EPG must belong to a BD.

Step 6

exit

Example:

apic1(config-tenant-app-epg)# exit

Returns to the tenant application configuration mode.

Step 7

exit

Example:

apic1(config-tenant-app)# exit

Returns to the tenant configuration mode.

Step 8

exit

Example:

apic1(config-tenant)# exit

Returns to the global configuration mode.

Step 9

leaf node-id

Example:

apic1(config)# leaf 101

Specifies the leaf to be configured.

Step 10

interface type

Example:

apic1(config-leaf)# interface eth 1/2

Specifies the interface that you are configuring. For an Ethernet port, use “ethernet slot / port.”

Step 11

(Optional) switchport

Example:

apic1(config-leaf-if)# switchport
(Optional)

Because layer 2 is the default state of a port, this command is only needed when the port must be converted from a layer 3 configuration.

Step 12

vlan-domain member domain-name

Example:

apic1(config-leaf-if)# vlan-domain member dom1

Associates the interface with a VLAN domain.

Step 13

switchport trunk allowed vlan vlan-id tenant tenant-name app app-name epg epg-name

Example:

apic1(config-leaf-if)# switchport trunk allowed vlan 10 tenant exampleCorp application OnlineStore epg exampleCorp_webepg1

Deploys the EPG on the interface and identifies the EPG through EPG-to-VLAN mapping. This configuration applies only to static EPG deployment. If the VLAN is in use for another EPG or external SVI, you must delete the VLAN configuration before using it for this EPG.

Note 

The interface must be associated with a VLAN domain or this command is rejected.

Examples

This example shows how to create an application EPG deployed to a layer 2 port.


apic1# configure
apic1(config)# tenant exampleCorp
apic1(config-tenant)# application OnlineStore
apic1(config-tenant-app)# epg exampleCorp_webepg1
apic1(config-tenant-app-epg)# bridge-domain member exampleCorp_b1
apic1(config-tenant-app-epg)# exit
apic1(config-tenant-app)# exit
apic1(config-tenant)# exit

apic1(config)# leaf 101
apic1(config-leaf)# interface eth 1/2
apic1(config-leaf-if)# switchport
apic1(config-leaf-if)# vlan-domain member dom1
apic1(config-leaf-if)# switchport trunk allowed vlan 10 tenant exampleCorp application OnlineStore epg exampleCorp_webepg1

This example shows how to deploy the EPG to a port channel.


apic1(config)# leaf 101
apic1(config-leaf)# interface port-channel po1
apic1(config-leaf-if)# switchport
apic1(config-leaf-if)# vlan-domain member dom1
apic1(config-leaf-if)# switchport trunk allowed vlan 10 tenant exampleCorp application OnlineStore epg exampleCorp_webepg1

What to do next

Map a VLAN on a port to the EPG.

Configuring Legacy Forwarding Mode in the Bridge Domain

Legacy forwarding mode allows switching and routing without the use of contracts or EPGs. In this mode, the VLAN on a port directly maps to a bridge domain. The legacy forwarding vlan command automatically creates all necessary objects so that no EPG-related configuration is required.

Procedure

  Command or Action Purpose
Step 1

configure

Example:


configure

Enters configuration mode.

Step 2

tenant tenant-name

Example:

apic1(config)# tenant exampleCorp

Enters the tenant configuration mode.

Step 3

bridge-domain bd-name

Example:

apic1(config-tenant)# bridge-domain exampleCorp_b1

Enters tenant interface configuration mode to configure the bridge domain.

Step 4

[no] legacy forwarding vlan vlan-id vlan-domain vlan-domain-name

Example:

apic1(config-tenant-bd)# legacy-forwarding vlan 50 vlan-domain dom1

Maps the VLAN to the bridge domain.

Step 5

exit

Example:

apic1(config-tenant-bd)# exit

Returns to the tenant configuration mode.

Step 6

exit

Example:

apic1(config-tenant)# exit

Returns to the global configuration mode.

Step 7

leaf node-id

Example:

apic1(config)# leaf 101

Specifies the leaf to be configured.

Step 8

interface type

Example:

apic1(config-leaf)# interface eth 1/1

Specifies the interface that you are configuring. For an Ethernet port, use ethernet slot/port .

Step 9

[no] switchport trunk allowed vlan vlan-id tenant tenant-name legacy-forwarding

Example:

apic1(config-leaf-if)# switchport trunk allowed vlan 50 tenant exampleCorp legacy-forwarding

Enables the VLAN on the interface and associates it to the tenant bridge domain that uses the VLAN in the legacy forwarding mode.

Examples

This example shows how to configure legacy forwarding mode for forwarding between bridge domains.


apic1# configure
apic1(config)# tenant exampleCorp
apic1(config-tenant)# bridge-domain exampleCorp_b1
apic1(config-tenant-bd)# legacy-forwarding vlan 50 vlan-domain dom1
apic1(config-tenant-bd)# exit
apic1(config-tenant)# bridge-domain exampleCorp_b2
apic1(config-tenant-bd)# legacy-forwarding vlan 60 vlan-domain dom1
apic1(config-tenant-bd)# exit
apic1(config-tenant)# exit

apic1(config)# leaf 101
apic1(config-leaf)# interface eth 1/1
apic1(config-leaf-if)# vlan-domain member dom1
apic1(config-leaf-if)# switchport trunk allowed vlan 50 tenant exampleCorp legacy-forwarding
apic1(config-leaf-if)# exit
apic1(config-leaf)# interface eth 1/2
apic1(config-leaf-if)# vlan-domain member dom1
apic1(config-leaf-if)# switchport trunk allowed vlan 60 tenant exampleCorp legacy-forwarding

Configuring Contracts

Contracts are configured under a tenant with the following tasks:

  • Define filters as access lists

  • Define the contract and subjects

  • Link the contract to an EPG

The tasks need not follow this order. For example, you can link a contract name to an EPG before you have defined the contract.


Note

Filters (ACLs) in APIC use match instead of permit | deny as in the traditional NX-OS ACL. The purpose of a filter entry is only to match a given traffic flow. The traffic will be permitted or denied when the ACL is applied on a contract or on a taboo contract.


Procedure

  Command or Action Purpose
Step 1

configure

Example:

apic1# configure

Enters configuration mode.

Step 2

tenant tenant-name

Example:


tenant exampleCorp

Creates a tenant if it does not exist and enters the tenant configuration mode.

Step 3

access-list acl-name

Example:

apic1(config-tenant)# access-list http_acl

Creates an access list (filter) that can be used in a contract.

Step 4

(Optional) match {arp | icmp | ip}

Example:

apic1(config-tenant-acl)# match arp
(Optional)

Creates a rule to match traffic of the selected protocol.

Step 5

(Optional) match {tcp | udp} [src from[-to]] [dest from[-to]]

Example:


apic1(config-tenant-acl)# match tcp dest 80
apic1(config-tenant-acl)# match tcp dest 443
(Optional)

Creates a rule to match TCP or UDP traffic.

Step 6

(Optional) match raw options

Example:

apic1(config-tenant-acl)# 
(Optional)

Creates a rule to match a raw vzEntry.

Step 7

exit

Example:

apic1(config-tenant-acl)# exit

Returns to the tenant configuration mode.

Step 8

contract contract-name

Example:

apic1(config-tenant)# contract web80

Creates a contract and enters the contract configuration mode.

Step 9

subject subject-name

Example:

apic1(config-tenant-contract)# subject web80

Creates a contract subject and enters the subject configuration mode.

Step 10

(Optional) [no] access-group acl-name [in | out | both]

Example:

apic1(config-tenant-contract-subj)# access-group http_acl both
(Optional)

Adds (removes) an access list from the contract, specifying the direction of the traffic to be matched.

Step 11

(Optional) [no] label name label-name {provider | consumer}

Example:

apic1(config-tenant-contract-subj)# 
(Optional)

Adds (removes) a provider or consumer label to the subject.

Step 12

(Optional) [no] label match {provider | consumer} [any | one | all | none]

Example:

apic1(config-tenant-contract-subj)# 
(Optional)

Specifies the match type for the provider or consumer label:

  • any —Match if any label is found in the contract relation.

  • one —Match if exactly one label is found in the contract relation.

  • all —Match if all labels are found in the contract relation.

  • none —Match if no labels are found in the contract relation.

Step 13

exit

Example:

apic1(config-tenant-contract-subj)# exit

Returns to the contract configuration mode.

Step 14

exit

Example:

apic1(config-tenant-contract)# exit

Returns to the tenant configuration mode.

Step 15

application app-name

Example:

apic1(config-tenant)# application OnlineStore

Enters application configuration mode.

Step 16

epg epg-name

Example:

apic1(config-tenant-app)# epg exampleCorp_webepg1

Enters configuration mode for the EPG to be linked to the contract.

Step 17

bridge-domain member bd-name

Example:

apic1(config-tenant-app-epg)# bridge-domain member exampleCorp_bd1

Specifies the bridge domain for this EPG.

Step 18

contract provider provider-contract-name

Example:

apic1(config-tenant-app-epg)# contract provider web80

Specifies the provider contract for this EPG. Communication with this EPG can be initiated from other EPGs as long as the communication complies with this provider contract.

Step 19

contract consumer consumer-contract-name

Example:

apic1(config-tenant-app-epg)# contract consumer rmi99

Specifies the consumer contract for this EPG. The endpoints in this EPG may initiate communication with any endpoint in an EPG that is providing this contract.

Examples

This example shows how to create and apply contracts to an EPG.


apic1# configure
apic1(config)# tenant exampleCorp

    # CREATE FILTERS
apic1(config-tenant)# access-list http_acl
apic1(config-tenant-acl)# match tcp dest 80
apic1(config-tenant-acl)# match tcp dest 443
apic1(config-tenant-acl)# exit

				# CREATE CONTRACT WITH FILTERS
apic1(config-tenant)# contract web80
apic1(config-tenant-contract)# subject web80
apic1(config-tenant-contract-subj)# access-group http_acl both
apic1(config-tenant-contract-subj)# exit
apic1(config-tenant-contract)# exit

    # ASSOCIATE CONTRACTS TO EPG
apic1(config-tenant)# application OnlineStore
apic1(config-tenant-app)# epg exampleCorp_webepg1
apic1(config-tenant-app-epg)# bridge-domain member exampleCorp_bd1
apic1(config-tenant-app-epg)# contract consumer rmi99
apic1(config-tenant-app-epg)# contract provider web80
apic1(config-tenant-app-epg)# exit
apic1(config-tenant-app)#exit
apic1(config-tenant)#exit

    # ASSOCIATE PORT AND VLAN TO EPG
apic1(config)#leaf 101
apic1(config-leaf)# interface ethernet 1/4
apic1(config-leaf-if)# switchport trunk allowed vlan 102 tenant exampleCorp application
 OnlineStore epg exampleCorp_webepg1

This example shows a simpler method for defining a contract by declaring the filters inline in the contract itself.


apic1# configure
apic1(config)# tenant exampleCorp
apic1(config-tenant)# contract web80
apic1(config-tenant-contract)# match tcp 80
apic1(config-tenant-contract)# match tcp 443

Contract Inheritance

About Contract Inheritance

To streamline associating contracts to new EPGs, you can now enable an EPG to inherit all the (provided and consumed) contracts associated directly to another EPG in the same tenant. Contract inheritance can be configured for application, microsegmented, L2Out, and L3Out EPGs.

With Release 3.x, you can also configure contract inheritance for Inter-EPG contracts, both provided and consumed. Inter-EPG contracts are supported on Cisco Nexus 9000 Series switches with EX or FX at the end of their model name or later models.

You can enable an EPG to inherit all the contracts associated directly to another EPG, using the APIC GUI, NX-OS style CLI, and the REST API.

Figure 3. Contract Inheritance

In the diagram above, EPG A is configured to inherit Provided-Contract 1 and 2 and Consumed-Contract 3 from EPG B (contract master for EPG A).

Use the following guidelines when configuring contract inheritance:

  • Contract inheritance can be configured for application, microsegmented (uSeg), external L2Out EPGs, and external L3Out EPGs. The relationships must be between EPGs of the same type.

  • Both provided and consumed contracts are inherited from the contract master when the relationship is established.

  • Contract masters and the EPGs inheriting contracts must be within the same tenant.

  • Changes to the masters’ contracts are propagated to all the inheritors. If a new contract is added to the master, it is also added to the inheritors.

  • An EPG can inherit contracts from multiple contract masters.

  • Contract inheritance is only supported to a single level (cannot be chained) and a contract master cannot inherit contracts.

  • Contract subject label and EPG label inheritance is supported. When EPG A inherits a contract from EPG B, if different subject labels are configured under EPG A and EPG B, APIC only uses the subject label configured under EPG B and not a collection of labels from both EPGs.

  • Whether an EPG is directly associated to a contract or inherits a contract, it consumes entries in TCAM. So contract scale guidelines still apply. For more information, see the Verified Scalability Guide for your release.

  • vzAny security contracts and taboo contracts are not supported.

For information about configuring Contract Inheritance and viewing inherited and standalone contracts, see Cisco APIC Basic Configuration Guide.

Configuring Application or uSeg EPG Contract Inheritance Using the NX-OS Style CLI

To configure contract inheritance for application or uSeg EPGs, use the following commands:

Before you begin

Configure the tenant, application profile, and bridge-domain to be used by the EPGs.

Configure the contracts to be shared by the EPGs at the VRF level.

Procedure

  Command or Action Purpose
Step 1

configure

Example:

apic1# configure

Enters configuration mode.

Step 2

tenant tenant-name

Example:

apic1# (config) tenant Tn1

Creates or specifies the tenant to be configured; and enters into tenant configuration mode.

Step 3

application application-name

Example:

apic1(config-tenant)# application AP1

Creates or specifies an application and enters into application mode.

Step 4

epg epg-name [type micro-segmented]

Example:

apic1(config-tenant-app)# epg AEPg403

Creates or specifies the application or uSeg EPG to be configured and enters into EPG configuration mode. For uSeg EPGs add the type.

In this example, this is the application EPG contract master.

Step 5

bridge-domain member bd-name

Example:

apic1(config-tenant-app-epg)# bridge-domain member T1BD1

Associates the EPG with the bridge domain.

Step 6

contract consumer contract-name

Example:

apic1(config-tenant-app-epg)# contract consumer cctr5

Adds a contract to be consumed by this EPG.

Step 7

contract provider [label label]

Example:

apic1(config-tenant-app-epg)# contract provider T1ctrl_cif

Adds a contract to be provided by this EPG, including an optional list of subject or EPG labels (must be previously configured).

Step 8

exit

Example:

apic1(config-tenant-app-epg)# exit

Exits the configuration mode

Step 9

epg epg-name [type micro-segmented]

Example:

apic1(config-tenant-app)# epg AEPg404

Creates or specifies the application or uSeg EPG to be configured and enters into EPG configuration mode. For uSeg EPGs add the type.

In this example, this is the EPG inheriting contracts.

Step 10

bridge-domain member bd-name

Example:

apic1(config-tenant-app-epg)# bridge-domain member T1BD1

Associates the EPG with the bridge domain.

Step 11

inherit-from-epg application application-name epg EPG-contract-master-name]

Example:

apic1(config-tenant-app-epg)# inherit-from-epg application AP1 epg AEPg403

Configures this EPG to inherit contracts from the EPG contract master.

Step 12

exit

Example:

apic1(config-tenant-app-epg)# exit

Exits the configuration mode

Step 13

epg epg-name [type micro-segmented]

Example:

apic1(config-tenant-app)# epg uSeg1_403_10 type micro-segmented

Creates or specifies the application or uSeg EPG to be configured and enters into EPG configuration mode.

In this example, this is the uSeg EPG contract master.

Step 14

bridge-domain member bd-name

Example:

apic1(config-tenant-app-epg)# bridge-domain member T1BD1

Associates the EPG with the bridge domain.

Step 15

contract provider [label label]

Example:

apic1(config-tenant-app-epg)# contract provider T1ctrl_uSeg_l3out

Adds a contract to be provided by this EPG, including an optional list of subject or EPG labels (must be previously configured).

Step 16

attribute-logical-expression logical-expression

Example:

apic1(config-tenant-app-epg)# attribute-logical-expression 'ip equals 192.168.103.10 force'

Adds a logical expression to the uSeg EPG as matching criteria.

Step 17

exit

Example:

apic1(config-tenant-app-epg)# exit

Exits the configuration mode

Step 18

epg epg-name [type micro-segmented]

Example:

apic1(config-tenant-app)# epg uSeg1_403_30 type micro-segmented

Creates or specifies the application or uSeg EPG to be configured and enters into EPG configuration mode.

In this example, this is the uSeg EPG that inherits contracts from the EPG contract master.

Step 19

bridge-domain member bd-name

Example:

apic1(config-tenant-app-epg)# bridge-domain member T1BD1

Associates the EPG with the bridge domain.

Step 20

attribute-logical-expression logical-expression

Example:

apic1(config-tenant-app-epg)# attribute-logical-expression 'ip equals 192.168.103.30 force'

Adds a logical expression to the uSeg EPG as criteria.

Step 21

inherit-from-epg application application-name epg EPG-contract-master-name

Example:

apic1(config-tenant-app-epg)# inherit-from-epg application AP1 epg uSeg1_403_10

Configures this EPG to inherit contracts from the EPG contract master.

Step 22

exit

Example:

apic1(config-tenant-app-epg)# exit

Exits the configuration mode

Step 23

exit

Example:

apic1(config-tenant-app)# exit

Exits the configuration mode

Step 24

exit

Example:

apic1(config-tenant)# exit

Exits the configuration mode

Step 25

exit

Example:

apic1(config)# exit

Exits the configuration mode

Example

ifav90-ifc1# show running-config tenant Tn1 application AP1
# Command: show running-config tenant Tn1 application AP1
# Time: Fri Apr 28 17:28:32 2017
  tenant Tn1
    application AP1
      epg AEPg403
        bridge-domain member T1BD1
        contract consumer cctr5 imported
        contract provider T1ctr1_cif
        exit
      epg AEPg404
        bridge-domain member T1BD1
        inherit-from-epg application AP1 epg AEPg403
        exit
      epg uSeg1_403_10 type micro-segmented
        bridge-domain member T1BD1
        contract provider T1Ctr1_uSeg_l3out
        attribute-logical-expression 'ip equals 192.168.103.10 force'
        exit
      epg uSeg1_403_30 type micro-segmented
        bridge-domain member T1BD1
        attribute-logical-expression 'ip equals 192.168.103.30 force'
        inherit-from-epg application AP1 epg uSeg1_403_10
        exit
      exit
    exit

Configuring L2Out EPG Contract Inheritance Using the NX-OS Style CLI

To configure contract inheritance for an external L2Out EPG, use the following commands:

Before you begin

Configure the tenant, VRF, and bridge-domain to be used by the EPGs.

Configure the Layer 2 outside network (L2Out) that the EPGs will use.

Configure the contracts to be shared by the EPGs, at the VRF level.

Procedure

  Command or Action Purpose
Step 1

configure

Example:

apic1# configure

Enters configuration mode.

Step 2

tenant tenant-name

Example:

apic1(config)# tenant Tn1

Creates or specifies the tenant to be configured; and enters into tenant configuration mode.

Step 3

external-l2 epg external-l2-epg-name

Example:

apic1(config-tenant)# external-l2 epg l2out1:l2Ext1

Configures or specifies an external L2Out EPG. In this example, this is the L2out contract master.

Step 4

bridge-domain member bd-name

Example:


apic1(config-tenant-l2ext-epg)# bridge-domain member T1BD1

Associates the L2Out EPG with a bridge domain.

Step 5

contract provider contract-name [label label]

Example:

apic1(config-tenant-l2ext-epg)# contract provider T1ctr_tcp

Adds a contract to be provided by this EPG.

Step 6

exit

Example:

apic1(config-tenant-l2ext-epg)# exit

Exits the configuration mode

Step 7

external-l2 epg external-l2-epg-name

Example:

apic1(config-tenant)# external-l2 epg L2out12:l2Ext12

Configures an external L2Out EPG. In this example, this is the EPG that inherits contracts from the L2out contract master.

Step 8

bridge-domain member bd-name

Example:

apic1(config-tenant-l2ext-epg)# bridge-domain member T1BD1

Associates the L2out EPG with the bridge domain.

Step 9

inherit-from-epg L2Out-contract-master-name

Example:

apic1(config-tenant-l2ext-epg)# inherit-from-epg epg l2out1:l2Ext1

Configures this EPG to inherit contracts from the L2Out contract master.

Step 10

exit

Example:

apic1(config-tenant-l2ext-epg)# exit

Exits the configuration mode

Example

The steps above are taken from the following example:

apic1# show running-config tenant Tn1 external-l2          
# Command: show running-config tenant Tn1 external-l2
# Time: Thu May 11 13:10:14 2017
  tenant Tn1
    external-l2 epg l2out1:l2Ext1
      bridge-domain member T1BD1
      contract provider T1ctr_tcp
      exit
    external-l2 epg l2out10:l2Ext10
      bridge-domain member T1BD10
      contract provider T1ctr_tcp
      exit
    external-l2 epg l2out11:l2Ext11
      bridge-domain member T1BD11
      contract provider T1ctr_udp
      exit
    external-l2 epg l2out12:l2Ext12
      bridge-domain member T1BD12
      inherit-from-epg epg l2out1:l2Ext1
      inherit-from-epg epg l2out10:l2Ext10
      inherit-from-epg epg l2out11:l2Ext11
      inherit-from-epg epg l2out2:l2Ext2
      inherit-from-epg epg l2out3:l2Ext3
      inherit-from-epg epg l2out4:l2Ext4
      inherit-from-epg epg l2out5:l2Ext5
      inherit-from-epg epg l2out6:l2Ext6
      inherit-from-epg epg l2out7:l2Ext7
      inherit-from-epg epg l2out8:l2Ext8
      inherit-from-epg epg l2out9:l2Ext9
      exit
    external-l2 epg l2out2:l2Ext2
      bridge-domain member T1BD2
      contract provider T1ctr_tcp
      exit
    external-l2 epg l2out3:l2Ext3
      bridge-domain member T1BD3
      contract provider T1ctr_tcp
      exit
    external-l2 epg l2out4:l2Ext4
      bridge-domain member T1BD4
      contract provider T1ctr_tcp
      exit
    external-l2 epg l2out5:l2Ext5
      bridge-domain member T1BD5
      contract provider T1ctr_tcp
      exit
    external-l2 epg l2out6:l2Ext6
      bridge-domain member T1BD6
      contract provider T1ctr_tcp
      exit
    external-l2 epg l2out7:l2Ext7
      bridge-domain member T1BD7
      contract provider T1ctr_tcp
      exit
    external-l2 epg l2out8:l2Ext8
      bridge-domain member T1BD8
      contract provider T1ctr_tcp
      exit
    external-l2 epg l2out9:l2Ext9
      bridge-domain member T1BD9
      contract provider T1ctr_tcp
      exit
    exit

Configuring External L3Out EPG Contract Inheritance Using the NX-OS Style CLI

To configure contract inheritance for an external L3Out EPG, use the following commands:

Before you begin

Configure the tenant, VRF, and bridge-domain to be used by the EPGs.

Configure the Layer 3 outside network (L3Out) that the EPGs will use.

Configure the contracts to be shared by the EPGs, at the VRF level.

Procedure

  Command or Action Purpose
Step 1

configure

Example:

apic1# configure

Enters configuration mode.

Step 2

tenant tenant-name

Example:

apic1(config)# tenant Tn1

Creates or specifies the tenant to be configured; and enters into tenant configuration mode.

Step 3

external-l3 epg external-l3-epg-name l3out l3out-name

Example:

apic1(config-tenant-app)# external-l3 epg l3Ext108 l3out T1L3out1

Configures an external L3Out EPG. In this example, this is the L3out contract master.

Step 4

vrf member vrf-name

Example:

apic1(tenant-l3out)# vrf member T1ctx1

Associates the L3out with the VRF.

Step 5

match ip ip-address-and-mask

Example:

apic1(config-tenant-l3ext-epg)# match ip 192.168.110.0/24 shared

Adds a subnet that identifies hosts as part of the EPG and adds the optional shared scope for the subnet.

Step 6

contract provider contract-name [label label]

Example:

apic1(config-tenant-l3ext-epg)# contract provider T1ctrl-L3out

Adds a contract to be provided by this EPG.

Step 7

exit

Example:

apic1(config-tenant-l3ext-epg)# exit

Exits the configuration mode

Step 8

external-l3 epg external-l3-epg-name l3out l3out-name

Example:

apic1(config-tenant-app)# external-l3 epg l3Ext110 l3out T1L3out1

Configures an external L3Out EPG. In this example, this is the EPG that inherits contracts from the L3out contract master.

Step 9

vrf member vrf-name

Example:

apic1(tenant-l3out)# vrf member T1ctx1

Associates the L3out with the VRF.

Step 10

match ip ip-address-and-mask

Example:

apic1(config-tenant-l3ext-epg)# match ip 192.168.112.0/24 shared

Adds a subnet that identifies hosts as part of the EPG and adds the optional shared scope for the subnet.

Step 11

inherit-from-epg L3Out-contract-master-name

Example:

apic1(config-tenant-l3ext-epg)# inherit-from-epg l3Ext108

Configures this EPG to inherit contracts from the L3Out contract master.

Step 12

exit

Example:

apic1(config-tenant-l3ext-epg)# exit

Exits the configuration mode

Example

ifav90-ifc1# show running-config tenant Tn1 external-l3 epg l3Ext110
# Command: show running-config tenant Tn1 external-l3 epg l3Ext110
# Time: Fri Apr 28 17:36:15 2017
  tenant Tn1
    external-l3 epg l3Ext108 l3out T1L3out1
      vrf member T1ctx1
      match ip 192.168.110.0/24 shared
      contract provider T1ctrl-L3out
      exit
    external-l3 epg l3Ext110 l3out T1L3out1
      vrf member T1ctx1
      match ip 192.168.112.0/24 shared
      inherit-from-epg epg l3Ext108
      exit
    exit

Configuring Contract Preferred Groups

About Contract Preferred Groups

There are two types of policy enforcements available for EPGs in a VRF with a contract preferred group configured:

  • Included EPGs: EPGs can freely communicate with each other without contracts, if they have membership in a contract preferred group. This is based on the source-any-destination-any-permit default rule.

  • Excluded EPGs: EPGs that are not members of preferred groups require contracts to communicate with each other. Otherwise, the default source-any-destination-any-deny rule applies.

The contract preferred group feature enables greater control of communication between EPGs in a VRF. If most of the EPGs in the VRF should have open communication, but a few should only have limited communication with the other EPGs, you can configure a combination of a contract preferred group and contracts with filters to control inter-EPG communication precisely.

EPGs that are excluded from the preferred group can only communicate with other EPGs if there is a contract in place to override the source-any-destination-any-deny default rule.

Figure 4. Contract Preferred Group Overview

Limitations

The following limitations apply to contract preferred groups:

  • In topologies where an L3Out and application EPG are configured in a Contract Preferred Group, and the EPG is deployed only on a VPC, you may find that only one leaf switch in the VPC has the prefix entry for the L3Out. In this situation, the other leaf switch in the VPC does not have the entry, and therefore drops the traffic.

    To workaround this issue, you can do one of the following:

    • Disable and reenable the contract group in the VRF

    • Delete and recreate the prefix entries for the L3Out EPG

  • Also, where the provider or consumer EPG in a service graph contract is included in a contract group, the shadow EPG can not be excluded from the contract group. The shadow EPG will be permitted in the contract group, but it does not trigger contract group policy deployment on the node where the shadow EPG is deployed. To download the contract group policy to the node, you deploy a dummy EPG within the contract group .

Configuring Contract Preferred Groups Using the NX-OS Style CLI

You can use the APIC NX-OS style CLI to configure a contract preferred group. In this example, a contract preferred group is configured for a VRF. One of the EPGs using the VRF is included in the preferred group.

Before you begin

Create the tenants, VRFs, and EPGs that will consume the contract preferred group.

Procedure

  Command or Action Purpose
Step 1

configure

Example:

apic1# configure
apic1(config)#

Enters configuration mode

Step 2

tenant tenant-name

Example:

apic1(config)# tenant tenant64

Creates a tenant or enters into tenant configuration mode

Step 3

vrf context vrf-name

Example:

apic1(config-tenant)# vrf context vrf64

Creates a VRF or enters into VRF configuration mode.

Step 4

whitelist-blacklist-mix

Example:

apic1(config-tenant-vrf)# whitelist-blacklist-mix
apic1(config-tenant-vrf)# exit

Enables a contract preferred group for the VRF and then returns to tenant configuration mode.

Step 5

bridge-domain bd-name

Example:

apic1(config-tenant)# bridge-domain  bd64

Creates a bridge-domain for the VRF or enters into BD configuration mode.

Step 6

vrf member vrf-name

Example:

apic1(config-tenant-bd)# vrf member vrf64
apic1(config-tenant-bd)# exit

Associates the VRF with the bridge-domain and returns to teanant configuration mode.

Step 7

application app-name

Example:

apic1(config-tenant)# application app-ldap 

Creates an application or enters into application configuration mode.

Step 8

epg epg-name

Example:

apic1(config-tenant-app)# epg epg-ldap 

Creates an EPG or enters into EPG tenant-app EPG configuration mode.

Step 9

bridge-domain member bd-name

Example:

apic1(config-tenant-app-epg)# bridge-domain member bd64

Associates the EPG with the bridge-domain .

Step 10

vrf-blacklist-mode

Example:

apic1(config-tenant-app-epg)# vrf-blacklist-mode 

Configures this EPG to be included in the contract preferred group.

Example

The following example creates a contract preferred group for vrf64 and includes epg-ldap in it.

apic1# configure
apic1(config)# tenant tenant64
apic1(config-tenant)# vrf context vrf64
apic1(config-tenant-vrf)# whitelist-blacklist-mix
apic1(config-tenant-vrf)# exit

apic1(config-tenant)# bridge-domain bd64
apic1(config-tenant-bd)# vrf member vrf64
apic1(config-tenant-bd)# exit

apic1(config-tenant)# application app-ldap
apic1(config-tenant-app)# epg epg-ldap
apic1(config-tenant-app-epg)# bridge-domain member bd64
apic1(config-tenant-app-epg)# vrf-blacklist-mode

Exporting a Contract to Another Tenant

You can export a contract from one tenant and import it to another. In the tenant that imports the contract, the contract can be applied only as a consumer contract. The contract can be renamed during the export.

Procedure

  Command or Action Purpose
Step 1

configure

Example:

apic1# configure

Enters configuration mode.

Step 2

tenant tenant-name

Example:

apic1(config)# tenant RedCorp

Enters the tenant configuration mode for the exporting tenant.

Step 3

contract contract-name

Example:

apic1(config-tenant)# contract web80

Enters the contract configuration mode for the contract to be exported.

Step 4

scope {application | exportable | tenant | vrf}

Example:

apic1(config-tenant-contract)# scope exportable

Configures how the contract can be shared. The scope can be:

  • application —Can be shared among the EPGs of the same application.

  • exportable —Can be shared across tenants.

  • tenant —Can be shared among the EPGs of the same tenant.

  • vrf —Can be shared among the EPGs of the same VRF.

Step 5

export to tenant other-tenant-name as new-contract-name

Example:

apic1(config-tenant-contract)# export to tenant BlueCorp as webContract1

Exports the contract to the other tenant. You can use the same contract name or you can rename it.

Step 6

exit

Example:

apic1(config-tenant-contract)# exit

Returns to the tenant configuration mode.

Step 7

exit

Example:

apic1(config-tenant)# exit

Returns to the global configuration mode.

Step 8

tenant tenant-name

Example:


tenant BlueCorp

Enters the tenant configuration mode for the importing tenant.

Step 9

application app-name

Example:

apic1(config-tenant)# application BlueStore

Enters application configuration mode.

Step 10

epg epg-name

Example:

apic1(config-tenant-app)# epg BlueWeb

Enters configuration mode for the EPG to be linked to the contract.

Step 11

contract consumer consumer-contract-name imported

Example:

apic1(config-tenant-app-epg)# contract consumer webContract1 imported

Specifies the imported consumer contract for this EPG. The endpoints in this EPG may initiate communication with any endpoint in an EPG that is providing this contract.

Examples

This example shows how to export a contract from the tenant RedCorp to the tenant BlueCorp, where it will be a consumer contract.


apic# configure
apic1(config)# tenant RedCorp
apic1(config-tenant)# contract web80
apic1(config-tenant-contract)# scope exportable
apic1(config-tenant-contract)# export to tenant BlueCorp as webContract1
apic1(config-tenant-contract)# exit
apic1(config-tenant)# exit
apic1(config)# tenant BlueCorp
apic1(config-tenant)# application BlueStore
apic1(config-tenant-application)# epg BlueWeb
apic1(config-tenant-application-epg)# contract consumer webContract1 imported

Configuring Contract or Subject Exceptions

Configuring Contract or Subject Exceptions for Contracts

In Cisco APIC Release 3.2(1), contracts between EPGs are enhanced to enable denying a subset of contract providers or consumers from participating in the contract. Inter-EPG contracts and Intra-EPG contracts are supported with this feature.

You can enable a provider EPG to communicate with all consumer EPGs except those that match criteria configured in a subject or contract exception. For example, if you want to enable an EPG to provide services to all EPGs for a tenant, except a subset, you can enable those EPGs to be excluded. To configure this, you create an exception in the contract or one of the subjects in the contract. The subset is then denied access to providing or consuming the contract.

Labels, counters, and permit and deny logs are supported with contracts and subject exceptions.

To apply an exception to all subjects in a contract, add the exception to the contract. To apply an exception only to a single subject in the contract, add the exception to the subject.

When adding filters to subjects, you can set the action of the filter (to permit or deny objects that match the filter criteria). Also for Deny filters, you can set the priority of the filter. Permit filters always have the default priority. Marking the subject-to-filter relation to deny automatically applies to each pair of EPGs where there is a match for the subject. Contracts and subjects can include multiple subject-to-filter relationships that can be independently set to permit or deny the objects that match the filters.

Exception Types

Contract and subject exceptions can be based on the following types and include regular expressions, such as the * wildcard:

Exception criteria exclude these objects as defined in the Consumer Regex and Provider Regex fields

Example

Description

Tenant

<vzException consRegex= “common” field= “Tenant” name= “excep03” provRegex= “t1” />

This example, excludes EPGs using the common tenant from consuming contracts provided by the t1 tenant.

VRF

<vzException consRegex= “ctx1” field= “Ctx” name= “excep05” provRegex= “ctx1” />

This example excludes members of ctx1 from consuming the services provided by the same VRF.

EPG

<vzException consRegex= “EPgPa*” field= “EPg” name= “excep03” provRegex= “EPg03” />

The example assumes that multiple EPGs exist, with names starting with EPGPa, and they should all be denied as consumers for the contract provided by EPg03

Dn

<vzException consRegex= “uni/tn-t36/ap-customer/epg-epg193” field= “Dn” name=“excep04” provRegex= “uni/tn-t36/ap-customer/epg-epg200” />

This example excludes epg193 from consuming the contract provided by epg200.

Tag

<vzException consRegex= “red” field= “Tag” name= “excep01” provRegex= “green” />

The example excludes objects marked with the red tag from consuming and those marked with the green tag from participating in the contract.

Configure a Contract or Subject Exception Using the NX-OS Style CLI

In this task, you configure a contract that will allow most of the EPGs to communicate, but deny access to a subset of them. Multiple exceptions can be added to a contract or a subject.

Before you begin

Configure the tenant, VRF, application profile, and EPGs to provide and consume the contract.

Procedure


Step 1

Configure filters for HTTP and HTTPS, using commands as in the following example:

Example:

apic1(config)# tenant t2
apic1(config-tenant)# access-list ac1
apic1(config-tenant-acl)# match ip
apic1(config-tenant-acl)# match tcp dest 80
apic1(config-tenant-acl)# exit
apic1(config-tenant)# access-list ac2
apic1(config-tenant-acl)# match ip
apic1(config-tenant-acl)# match tcp dest 443
Step 2

Configure a contract that excludes EPg01 from consuming it and EPg03 from providing it.

Example:


apic1(config-tenant)# contract webCtrct
apic1(config-tenant-contract)# subject https-subject
apic1(config-tenant-contract-subj)# exception name EPG consumer-regexp EPg01 field EPg provider-regexp EPg03
apic1(config-tenant-contract-subj)# access-group ac1 in blacklist
apic1(config-tenant-contract-subj)# access-group ac2 in whitelist

Creating Quota Management

About APIC Quota Management Configuration

Starting in the Cisco Application Policy Infrastructure Controller (APIC) Release 2.3(1), there are limits on number of objects a tenant admin can configure. This enables the admin to limit what managed objects that can be added under a given tenant or globally across tenants.

This feature is useful when you want to limit any tenant or group of tenants from exceeding ACI maximums per leaf or per fabric or unfairly consuming a majority of available resources, potentially affecting other tenants on the same fabric.

Creating a Quota Management Configuration Using the NX-OS Style CLI

This procedure explains how to create a quota management configuration using the NX-OS Style CLI.

Procedure


Create a quota management configuration using the NX-OS CLI:

Example:

apic1# conf t
apic1(config)# quota fvBD max 100 scope uni/tn-green exceed-action fault
apic1(config)# quota fvBD max 1000 scope uni exceed-action fail
apic1(config)# quota fvBD max 34 tenant red

Syntax:

[no] quota <className> max <maxValue> [exceed-action {fail|fault}] \
[{scope <containerDn>| tenant <tenantName> \
[{bridge-domain <bd>|application <ap> [epg <epgName>]}]}]

where <className> is the managed object className such as fvBD or fvCtx etc. All the eligible classes accordingly to the presence of the quota flag in the model are accepted.

where <maxValue> is the value after which the <exceed-action> is applied.

where <exceed-action> is the action to be taken after the <maxValue> is exceeded, can either be:

  • fail: when you want to fail the transaction exceeding the limit.

  • fault: raise a fault.

where <containerDn> is the tree under which the limit will be enforced. "uni" will be across the whole ACI policy model, "tenant green" will be for the tenant green.