TLS/SSL Rule Examples
This chapter provides an example of TLS/SSL rule that illustrate our best practices.
The documentation set for this product strives to use bias-free language. For the purposes of this documentation set, bias-free is defined as language that does not imply discrimination based on age, disability, gender, racial identity, ethnic identity, sexual orientation, socioeconomic status, and intersectionality. Exceptions may be present in the documentation due to language that is hardcoded in the user interfaces of the product software, language used based on RFP documentation, or language that is used by a referenced third-party product. Learn more about how Cisco is using Inclusive Language.
This chapter provides an example of TLS/SSL rule that illustrate our best practices.
Prefiltering is the first phase of access control, before the system performs more resource-intensive evaluation. Prefiltering is simple, fast, and early compared to subsequent evaluation, which uses inner headers and has more robust inspection capabilities.
Based on your security needs and traffic profile, you should consider prefiltering and therefore excluding from any policy and inspection the following:
Common intraoffice applications such as Microsoft Outlook 365
Elephant flows, such as server backups
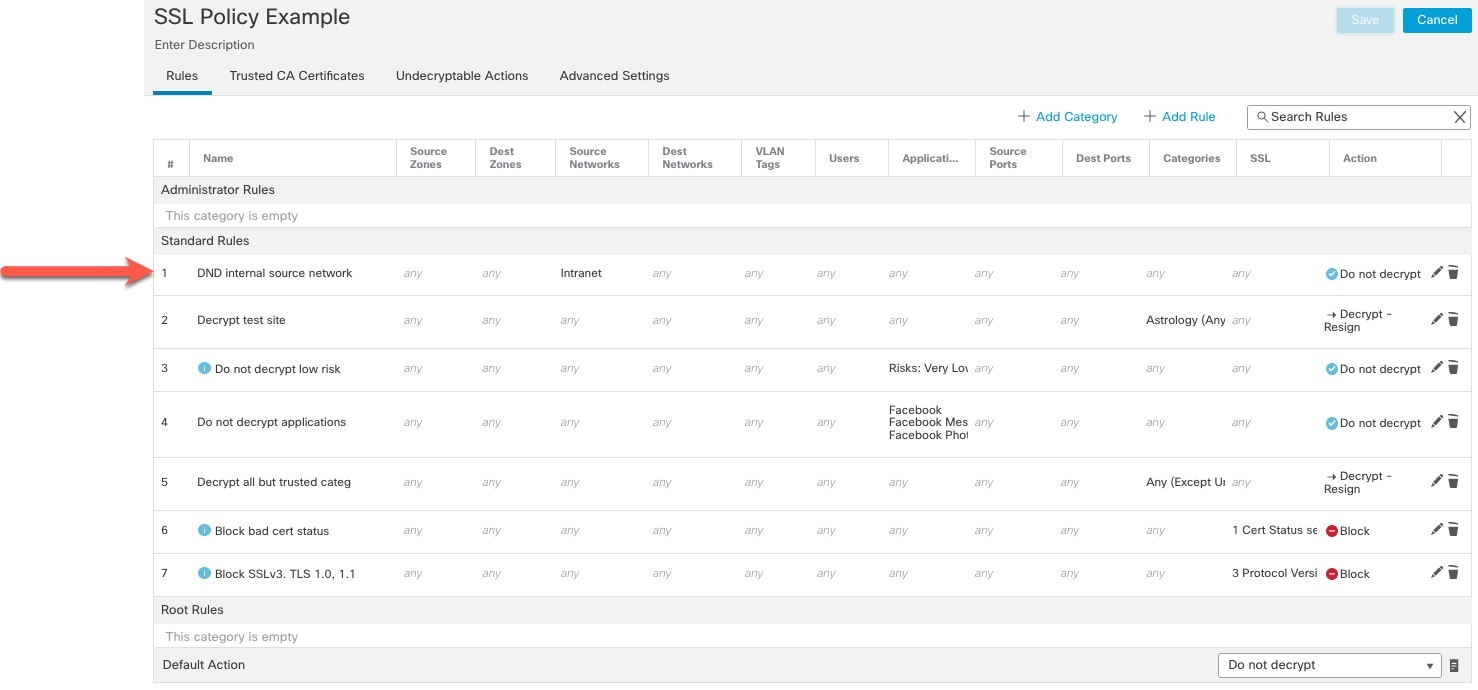
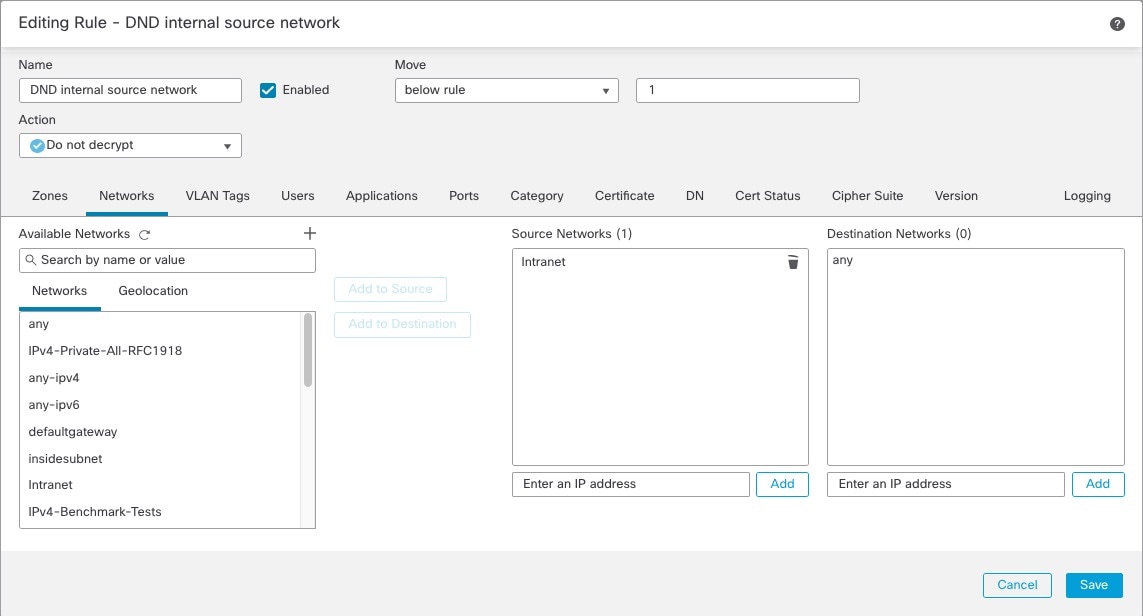
The first TLS/SSL rule in the example does not decrypt traffic that goes to an internal network (defined as intranet ). Do Not Decrypt rule actions are matched during ClientHello so they are processed very fast.
 Note |
If you have traffic going from internal DNS servers to internal DNS resolvers (such as Cisco Umbrella Virtual Appliances), you can add Do Not Decrypt rules for them as well. You can even add those to prefiltering policies if the internal DNS servers do their own logging. However, we strongly recommend you do not use Do Not Decrypt rules or prefiltering for DNS traffic that goes to the internet, such as internet root servers (for example, Microsoft internal DNS resolvers built into Active Directory). In those cases, you should fully inspect the traffic or even consider blocking it. |
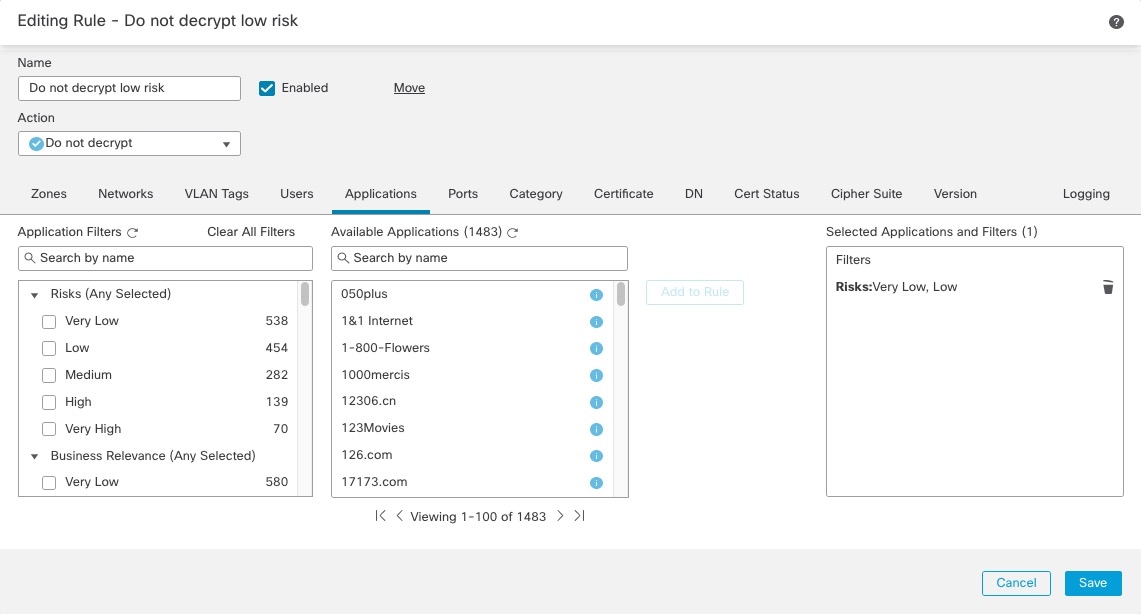
The next rule is optional in the example; use it to decrypt and monitor limited types of traffic before determining whether or not to allow it on your network.

Rule detail:
Evaluate the traffic on your network to determine which would match low-risk categories, reputations, or applications, and add those rules with a Do Not Decrypt action. Put these rules after other more specific Do Not Decrypt rules because the system needs more time to process the traffic.
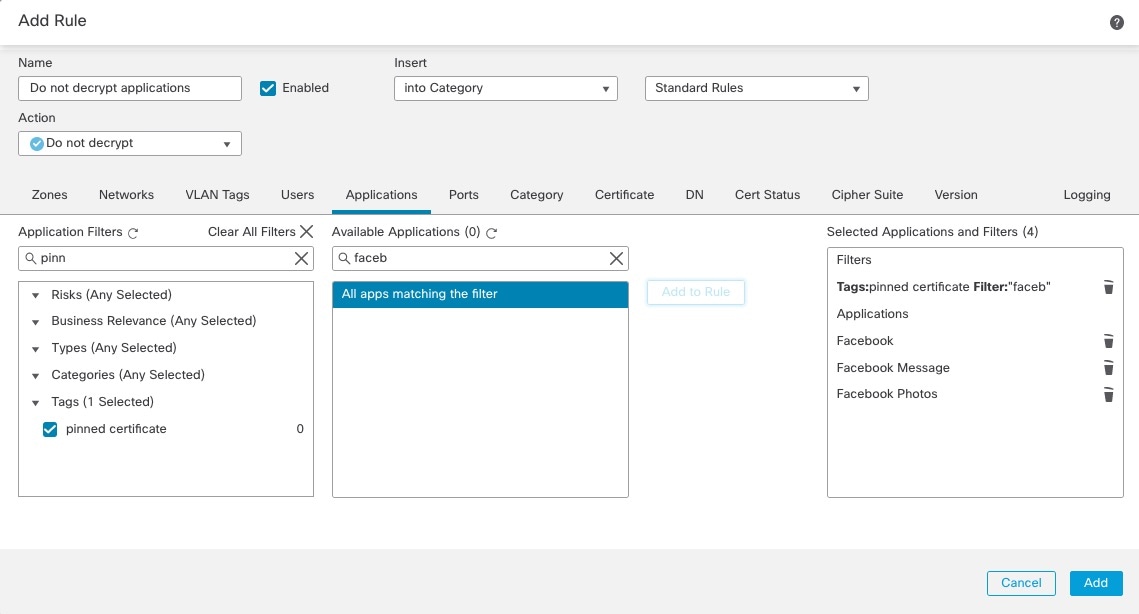
Following is the example.
Rule details:
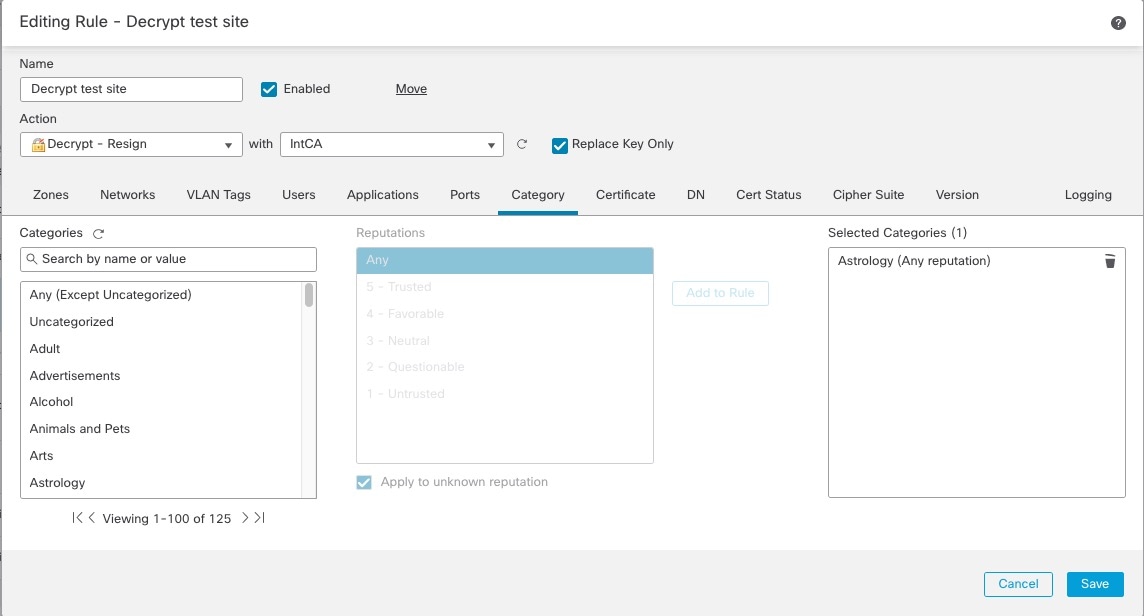
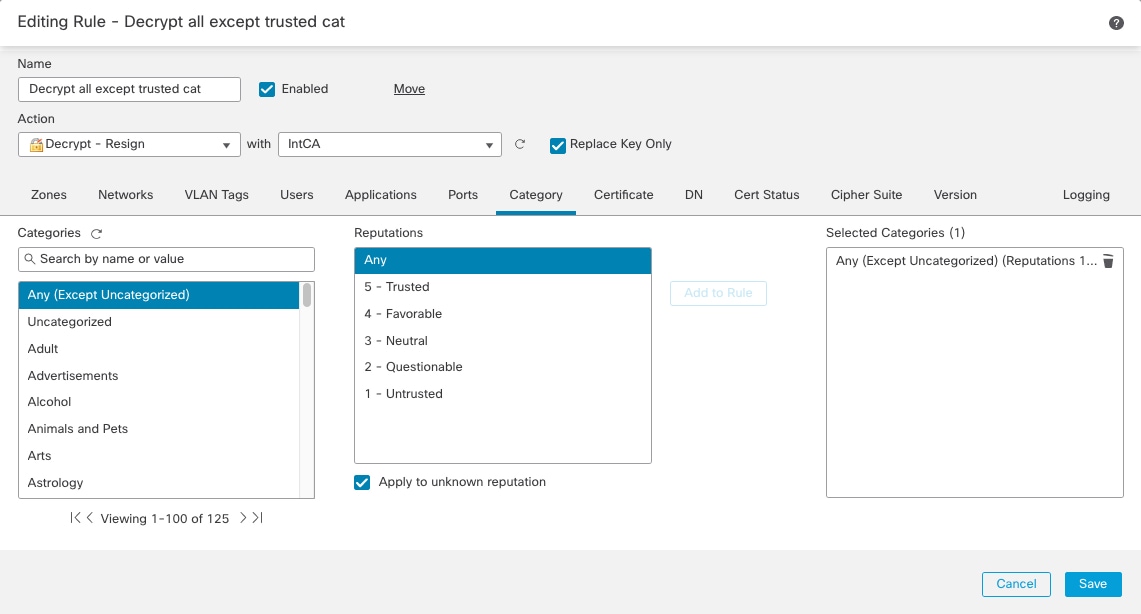
This topic shows an example of creating a TLS/SSL rule with a Decrypt - Resign action for all but uncategorized sites. The rule uses the optional Replace Key Only option, which we always recommend with a Decrypt-Resign rule action.
Replace Key Only causes the user to see a security warning in the web browser when they browse to a site that uses a self-signed certificate, making the user aware that they are communicating with an unsecure site.
By putting this rule near the bottom, you get the best of both worlds: you can decrypt and optionally inspect traffic while not affecting performance as much as if you had put the rule earlier in the policy.
| Step 1 |
Log in to the Secure Firewall Management Center if you haven't already done so. |
| Step 2 |
If you haven't already done so, upload an internal certificate authority (CA) to the Secure Firewall Management Center (, then ). |
| Step 3 |
Click . |
| Step 4 |
Click Edit ( |
| Step 5 |
Click Add Rule. |
| Step 6 |
In the Name field, enter a name to identify the rule. |
| Step 7 |
From the Action list, click Decrypt - Resign. |
| Step 8 |
From the with list, click the name of your internal CA. |
| Step 9 |
Check the Replace Key Only box. The following figure shows an example.
|
| Step 10 |
Click the Category tab page. |
| Step 11 |
From the top of the Categories list, click Any (Except Uncategorized). |
| Step 12 |
From the Reputations list, click Any. |
| Step 13 |
Click Add to Rule. The following figure shows an example.
|
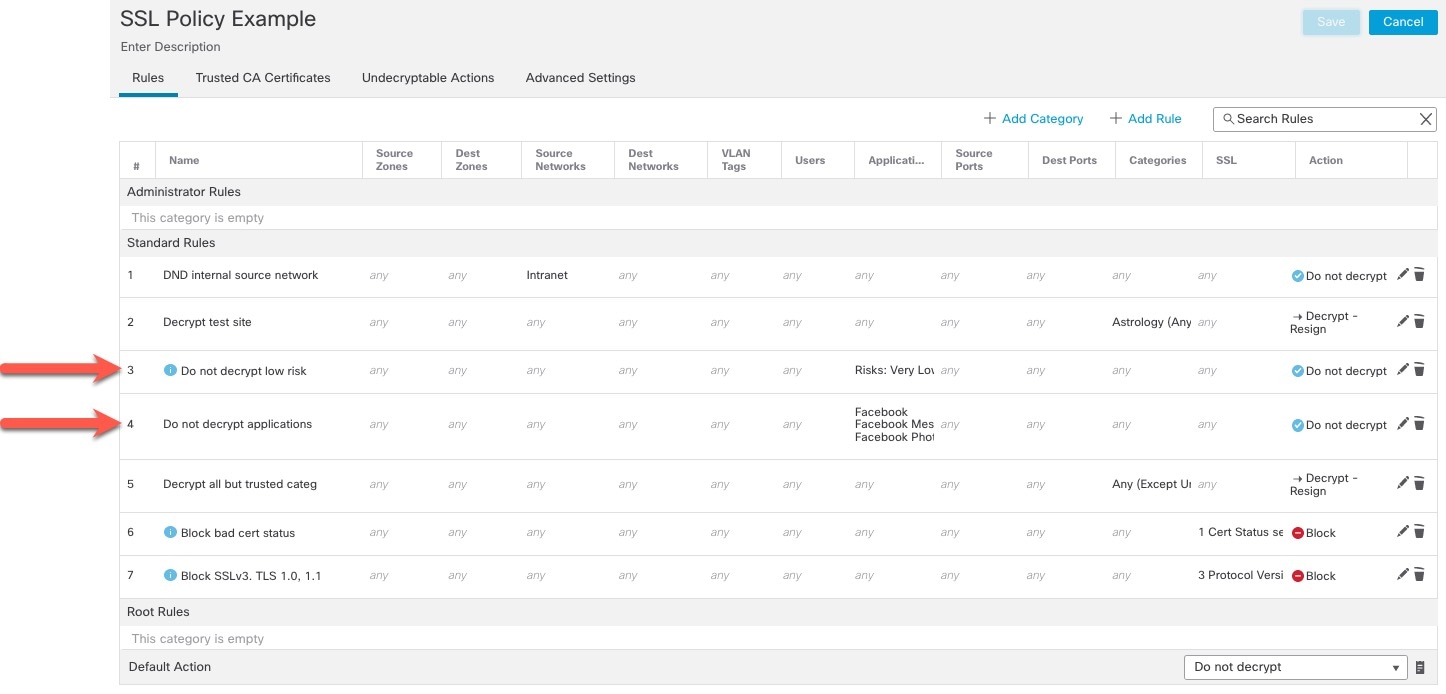
The last TLS/SSL rules, because they are the most specific and require the most processing, are rules that either monitor or block bad certificates and unsecure protocol versions.
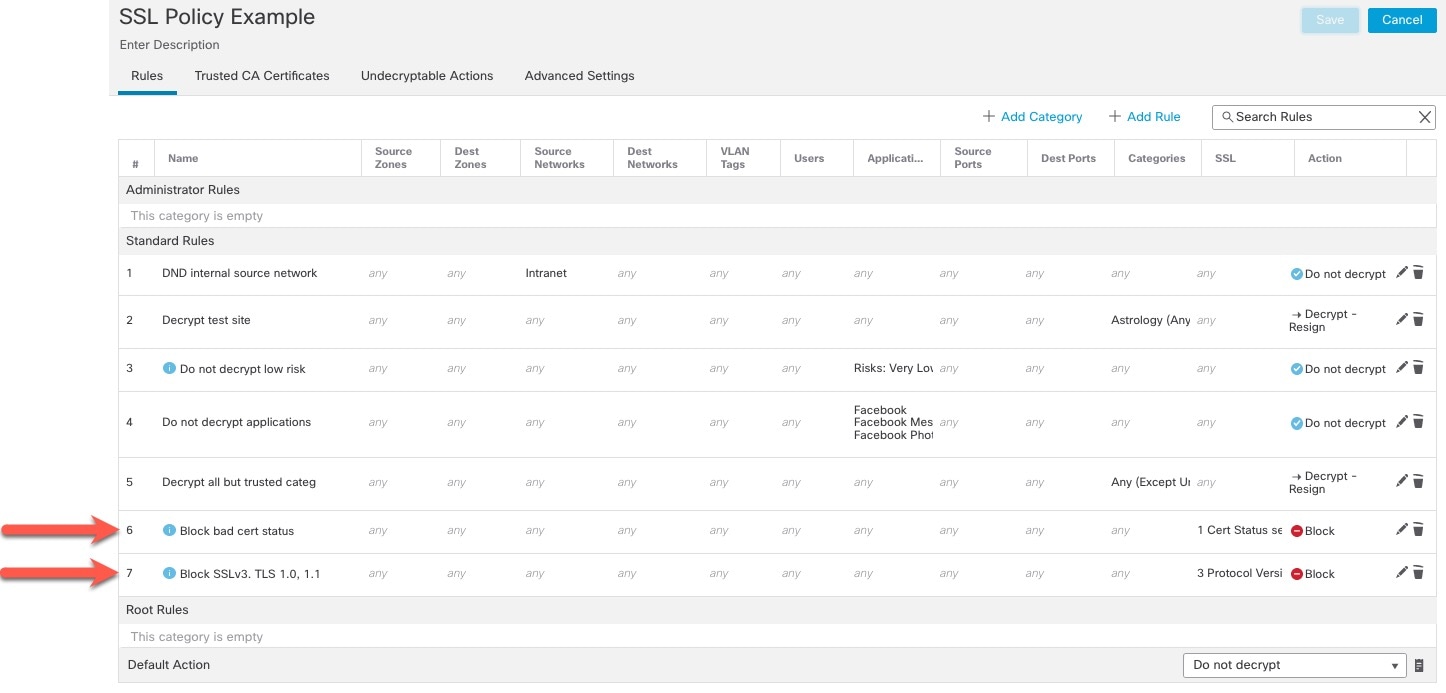
Rule details:
The last TLS/SSL rules, because they are the most specific and require the most processing, are rules that either monitor or block bad certificates and unsecure protocol versions. The example in this section shows how to monitor or block traffic by certificate status.
Note |
Use the Cipher Suite and Version rule conditions only in rules with either the Block or Block with reset rule actions. The use of these conditions in rules with other rule actions can interfere with the system's ClientHello processing, resulting in unpredictable performance. |
| Step 1 |
Log in to the Secure Firewall Management Center if you haven't already done so. |
| Step 2 |
Click . |
| Step 3 |
Click Edit ( |
| Step 4 |
Click Edit ( |
| Step 5 |
Click Add Rule. |
| Step 6 |
n the Add Rule dialog box, in the Name field, enter a name for the rule. |
| Step 7 |
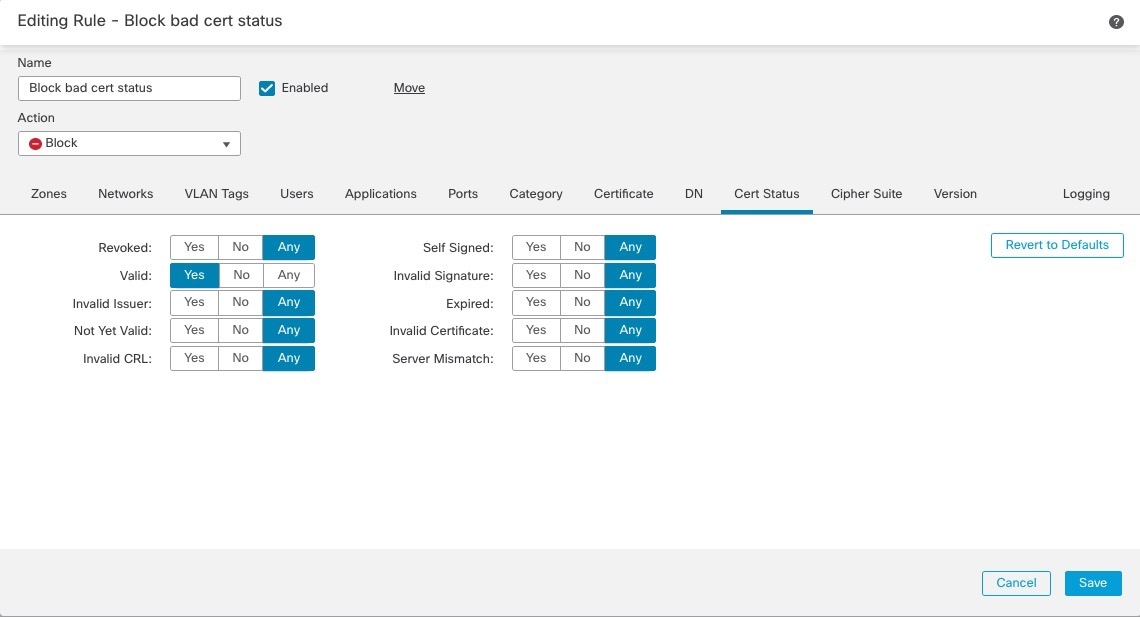
Click Cert Status. |
| Step 8 |
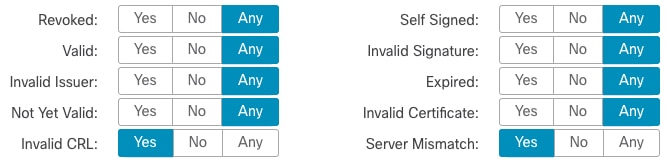
For each certificate status, you have the following options:
|
| Step 9 |
From the Action list, click either Monitor to only monitor and log traffic that matches the rule or click Block or Block with Reset to block the traffic and optionally reset the connection. |
| Step 10 |
To save changes to the rule, at the bottom of the page, click Save. |
| Step 11 |
To save changes to the policy, at the top of the page, click Save. |
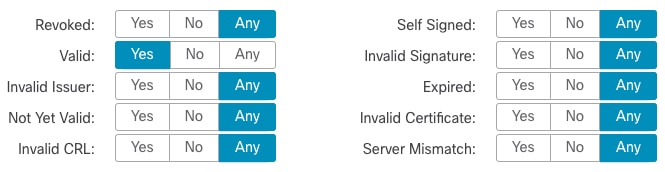
The organization trusts the Verified Authority certificate authority. The organization does not trust the Spammer Authority certificate authority. The system administrator uploads the Verified Authority certificate and an intermediate CA certificate issued by Verified Authority to the system. Because Verified Authority revoked a certificate it previously issued, the system administrator uploads the CRL that Verified Authority provided.
The following figure shows a certificate status rule condition checking for valid certificates, those issued by a Verified Authority, are not on the CRL, and still within the Valid From and Valid To date. Because of the configuration, traffic encrypted with these certificates is not decrypted and inspected with access control.
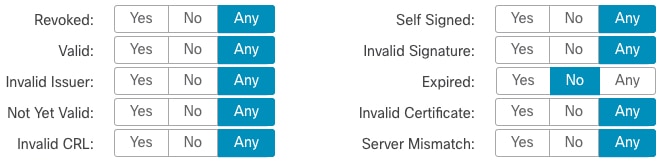
The following figure shows a certificate status rule condition checking for the absence of a status. In this case, because of the configuration, it matches against traffic encrypted with a certificate that has not expired and monitors that traffic.
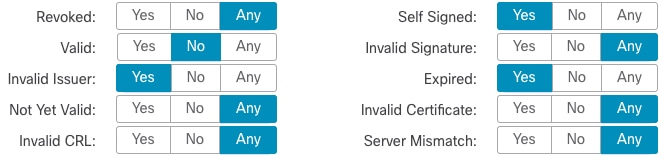
In the following example, traffic would match this rule condition if the incoming traffic is using a certificate that has an invalid issuer, is self-signed, expired, and it is an invalid certificate.
The following graphic illustrates a certificate status rule condition that matches if the SNI of the request matches the server name or if the CRL is not valid.
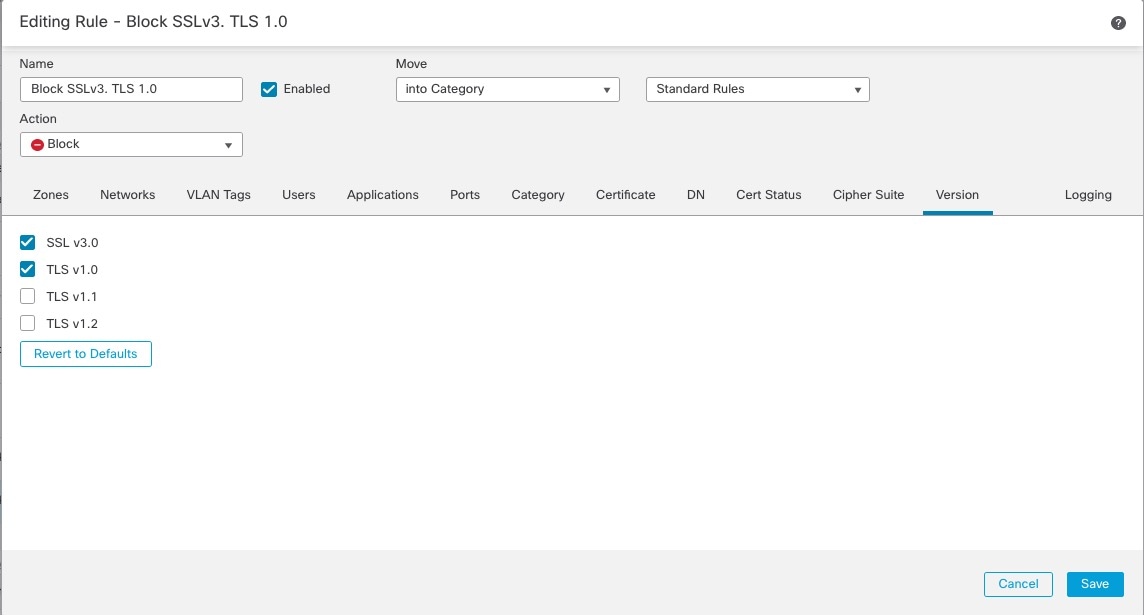
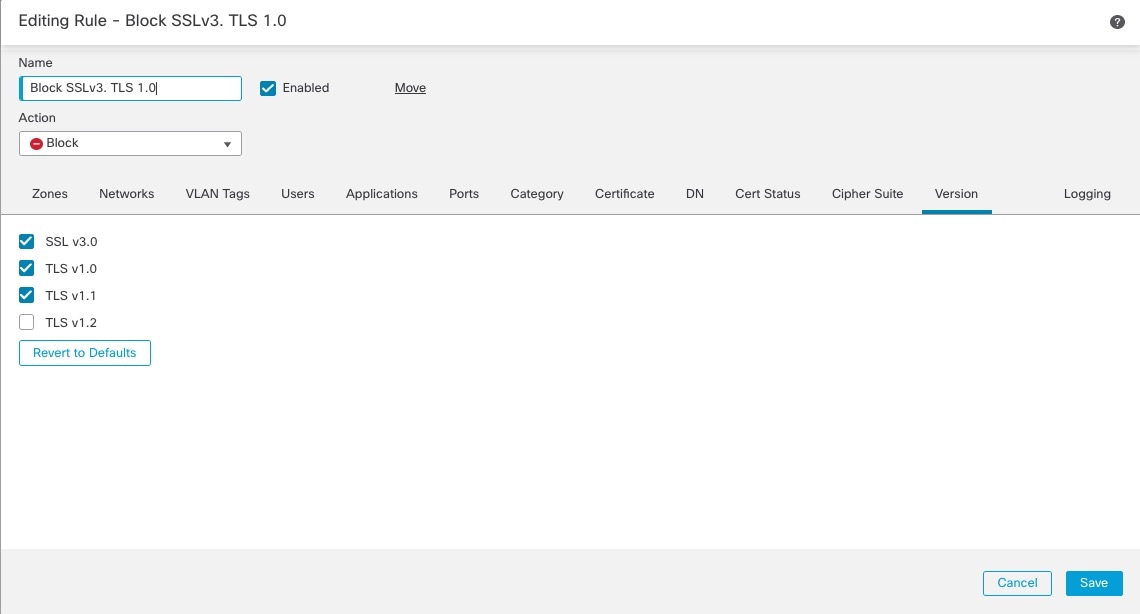
This example shows how to block TLS and SSL protocols on your network that are no longer considered secure, such as TLS 1.0, TLS 1.1, and SSLv3. It's included to give you a little more detail about how protocol version rules work.
You should exclude nonsecure protocols from your network because they are all exploitable. In this example:
You can block some protocols using Version page on the SSL rule.
Because the system considers SSLv2 as undecryptable, you can block it using the Undecryptable Actions on the SSL policy.
Similarly, because compressed TLS/SSL is not supported, you should block it as well.
Note |
Use the Cipher Suite and Version rule conditions only in rules with either the Block or Block with reset rule actions. The use of these conditions in rules with other rule actions can interfere with the system's ClientHello processing, resulting in unpredictable performance. |
| Step 1 |
Log in to the Secure Firewall Management Center if you haven't already done so. |
| Step 2 |
Click . |
| Step 3 |
Click Edit ( |
| Step 4 |
Click Edit ( |
| Step 5 |
Click Add Rule. |
| Step 6 |
In the Add Rule dialog box, in the Name field, enter a name for the rule. |
| Step 7 |
From the Action list, click Block or Block with reset. |
| Step 8 |
Click Version page. |
| Step 9 |
Check the check boxes for protocols that are no longer secure, such as SSL v3.0, TLS 1.0, and TLS 1.1. Clear the check boxes for any protocols that are still considered secure. The following figure shows an example.
|
| Step 10 |
Choose other rule conditions as needed. |
| Step 11 |
Click Save. |
This rule is included to give you an idea about how to monitor or block traffic based on the server certificate's Distinguished Name. It's included to give you a little more detail.
The distinguished name can consist of country code, common name, organization, and organizational unit, but typically consists
of a common name only. For example, the common name in the certificate for https://www.cisco.com is cisco.com. (However, it's not always this simple; the section on Distinguished Name Rule Conditions in the Cisco Secure Firewall Management
Center Device Configuration Guide shows how to find common names.)
The host name portion of the URL in the client request is the Server Name Indication (SNI). The client specifies which hostname they want to connect to (for example, auth.amp.cisco.com) using the SNI extension in the TLS handshake. The server then selects the corresponding private key and certificate chain
that are required to establish the connection while hosting all certificates on a single IP address.
| Step 1 |
Log in to the Secure Firewall Management Center if you haven't already done so. |
||
| Step 2 |
Click . |
||
| Step 3 |
Click Edit ( |
||
| Step 4 |
Click Edit ( |
||
| Step 5 |
Click Add Rule. |
||
| Step 6 |
In the Add Rule dialog box, in the Name field, enter a name for the rule. |
||
| Step 7 |
From the Action list, click Block or Block with reset. |
||
| Step 8 |
Click DN. |
||
| Step 9 |
Find the distinguished names you want to add from the Available DNs, as follows:
|
||
| Step 10 |
To select an object, click it. To select all objects, right-click and then select Select All. |
||
| Step 11 |
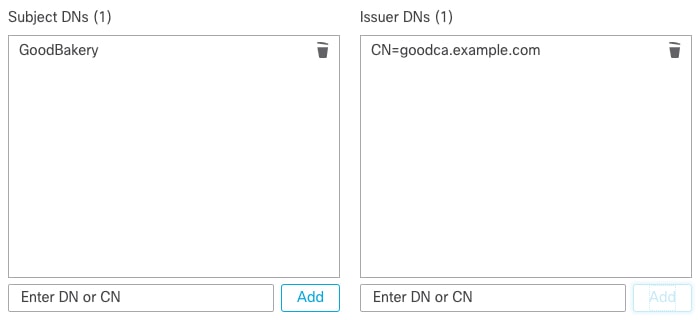
Click Add to Subject or Add to Issuer.
|
||
| Step 12 |
Add any literal common names or distinguished names that you want to specify manually. Click the Enter DN or CN prompt below the Subject DNs or Issuer DNs list; then type a common name or distinguished name and click Add. Although you can add a CN or DN to either list, it's more common to add them to the Subject DNs list. |
||
| Step 13 |
Add or continue editing the rule. |
||
| Step 14 |
When you're done, to save changes to the rule, click Save at the bottom of the page. |
||
| Step 15 |
To save changes to the policy, click Save at the top of the page. |
The following figure shows a distinguished name rule condition searching for certificates issued to goodbakery.example.com or issued by goodca.example.com. Traffic encrypted with these certificates is allowed, subject to access control.
How to configure recommended best practice settings for your TLS/SSL rules.
TLS/SSL rule: Enable logging for every rule except those with a Do Not Decrypt rule action. (It's up to you; if you want to see information about traffic that isn't decrypted, enable logging for those rules also.)
| Step 1 |
Log in to the Secure Firewall Management Center if you haven't already done so. |
| Step 2 |
Click . |
| Step 3 |
Click Edit ( |
| Step 4 |
Click Edit ( |
| Step 5 |
Click the Logging tab. |
| Step 6 |
Click Log at End of Connection. |
| Step 7 |
Click Save. |
| Step 8 |
Click Save at the top of the page. |
 )
)
 )
) Feedback