Manually Quarantine an IP Address

In the event your quarantine fails, you can manually quarantine one or more IP addresses as discussed in the followint topics.

Overview of Manually Quarantining an IP Address

If a quarantine fails as discussed in earlier sections in this guide, you can manually quarantine that IP address. You must find the IP address and MAC address to quarantine. The IP address is shown in the Secure Firewall Management Center and the MAC address is shown in APIC.
Find an IP Address to Quarantine

This topic discusses how to look at correlation logs in the Firewall Management Center to find an IP address to quarantine.

Procedure


Step 1

If you haven't done so already, log in to the Firewall Management Center.

Step 2

Click Analysis > Correlation > Status.

Step 3

Find the timestamp of entry for the unsuccessful quarantine and make note of the source IP address.

Step 4

Log in to APIC if you haven't already done so.

Step 5

On the Operations tab page, click EP Tracker, enter the IP address, and press Enter.

Step 6

If no information is displayed, the endpoint cannot be quarantined. If more than one IP address is displayed, look for the one in the offending tenant.


What to do next

Create a uSeg EPG Attribute

Create a uSeg EPG Attribute

If you can identify the EPG of the endpoint that you want to quarantine, create a uSeg EPG attribute corresponding to this endpoint.

Procedure


Step 1

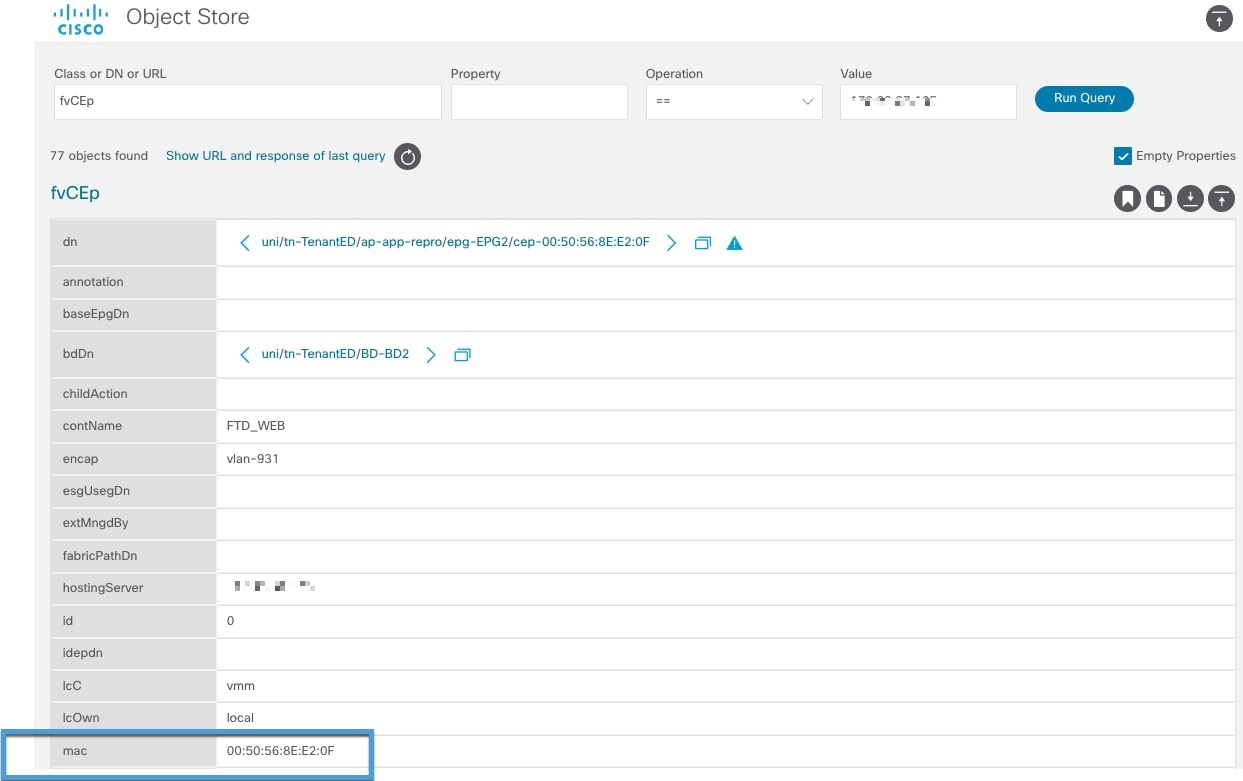
To find the MAC address of the IP address to quarantine, go to the APIC Object Store Browser at https://apic_IP_address/visore.html . Use the IP address of the endpoint to run a query and display the MAC address.

The following figure shows an example.

Find MAC addresses for the devices you want to quarantine manually

Step 2

Log in to APIC if you haven't already done so.

Step 3

Click Tenants > ALL TENANTS.

Step 4

Double-click the tenant that contains the endpoint to be quarantined.

Step 5

Expand Networking > Bridge Domains.

Step 6

Make note of the EPG bridge domain.

Step 7

Expand Application Profiles > profile-name > Application EPGs > epg-name and make note of the domain profile name.

Step 8

Expand Application Profiles and right-click uSeg EPG.

Step 9

Click Create uSeg EPG.

Step 10

Enter a name for the uSeg EPG, in the format uSegEPGendpoint-name . (For example, uSegEPG-EPG1 .)

Step 11

From the Bridge Domain list, click the EPG's bridge domain.

Step 12

Click Next.

Step 13

On the Domains page, click Add (add icon).

Step 14

From the Domain Profiles list, click the domain profile.

Step 15

Set Deployment Immediacy to Immediate.

Step 16

Set Resolution Immediacy to Immediate.

Step 17

Add an IP filter attribute by clicking Add (add icon) on the lower right and entering the IP address for the name and filter.

Step 18

Click Update and then click Finish.

If the uSeg EPG is not displayed, refresh your browser page.

Step 19

Click uSeg Attributes.

Step 20

Click Add (add icon)

Step 21

Add attributes for the quarantined host's IP address and MAC address with an operator of Match Any.

For the IP filter, use the IP address as the name. For MAC filter, use the IP address plus an underscore and the last three octets of the MAC address as a name.

Step 22

Right-click Domains (VMs and Bare Metals) under the newly created uSeg EPG, and add a domain association with the same name and domain type as the original EPG.

Step 23

For Bare Metal, right-click Static Leafs, and click Statically Link With Node.

Step 24

Click Submit.


What to do next

Verify the Manual IP Address Quarantine

Verify the Manual IP Address Quarantine

Verify that no traffic can go into or out from the quarantined endpoint.

Before you begin

Procedure


Step 1

Perform some task such as pinging a quarantined IP address.

The operation should fail.

Step 2

If the ping succeeds, verify the IP and MAC addresses of the endpoint to quarantine and try again.