- Preface
- Cisco Video Surveillance Storage System Component Overview
- Unpacking and Preparing Components
- Rack Mounting Components
- Cabling & Power-up Procedures
- Field-Replaceable Units
- CPS-SS-4RU Technical Specifications
- CIVS-SS-4RU-84000 Technical Specifications
- CPS-SS-2RU Technical Specifications
- CPS-SS-4RU-EX Technical Specifications
- Index
Field-Replaceable Units
In order to use the Cisco Storage Series components, it is important for you to know how to correctly install and remove the plugable components. This chapter describes how to replace each of these modules in the field while the unit is running:
•![]() Front Drive Drawer Fan Assembly
Front Drive Drawer Fan Assembly
•![]() Rear Drive Drawer Fan Assembly
Rear Drive Drawer Fan Assembly
 |
Warning |
Power Supply Units (PSUs)
In the event of a power supply or PSU fan failure, use the following procedure to replace the PSU:

Procedure
Step 1 ![]() Determine which PSU or PSU fan has failed by examining the PSU status LEDs on each module (see Overview of the CPS-SS-4RU and CPS-SS-4RU-EX, Rear Panel (CPS-SS-4RU), or Overview of the CPS-SS-4RU and CPS-SS-4RU-EX, Rear Panel (CPS-SS-4RU-EX)). A red LED indicates the failed module. The Home page of the graphical user interface (GUI) also tells you which unit has failed (see the Software Manual).
Determine which PSU or PSU fan has failed by examining the PSU status LEDs on each module (see Overview of the CPS-SS-4RU and CPS-SS-4RU-EX, Rear Panel (CPS-SS-4RU), or Overview of the CPS-SS-4RU and CPS-SS-4RU-EX, Rear Panel (CPS-SS-4RU-EX)). A red LED indicates the failed module. The Home page of the graphical user interface (GUI) also tells you which unit has failed (see the Software Manual).
Step 2 ![]() Remove the power cable from the power cable socket on the PSU where the failure has occurred.
Remove the power cable from the power cable socket on the PSU where the failure has occurred.
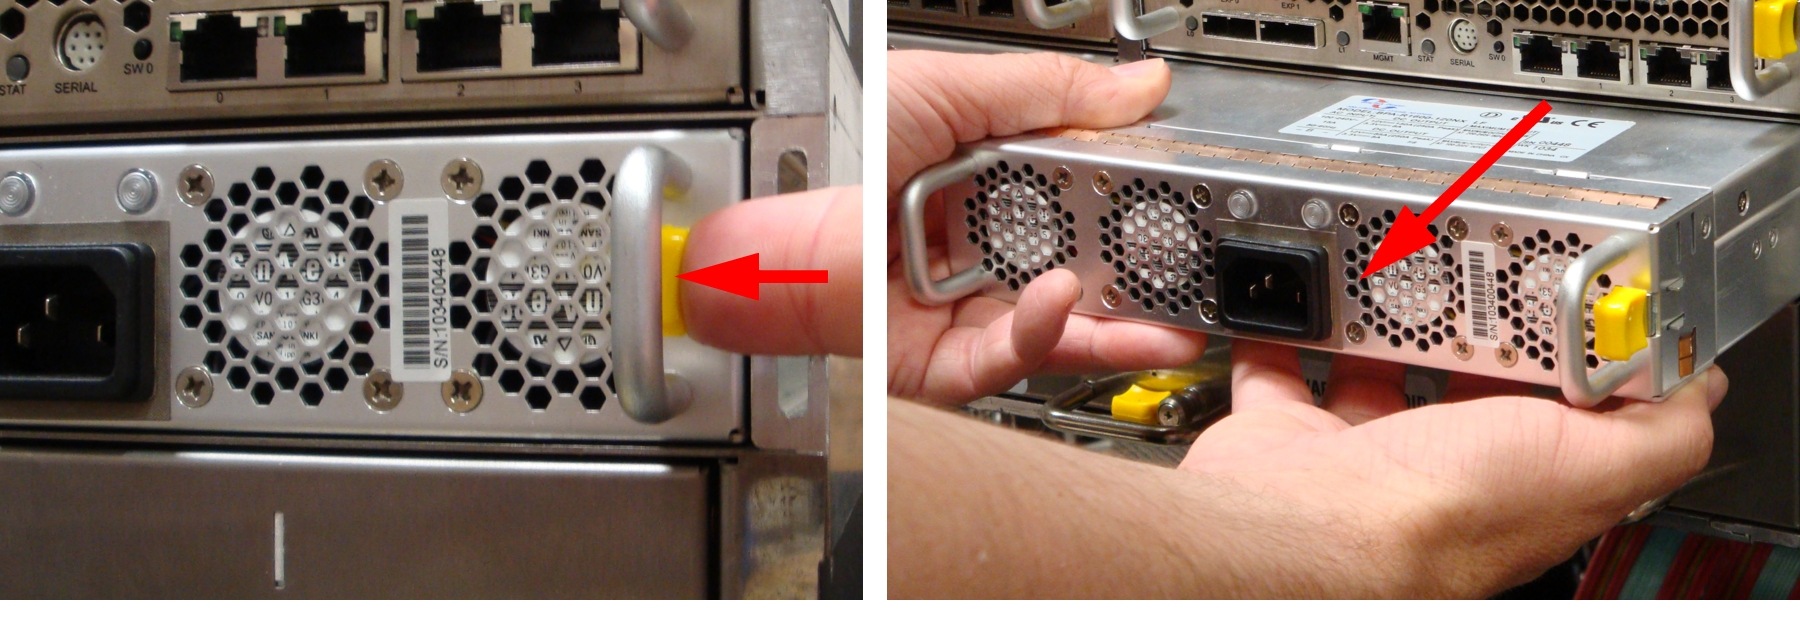
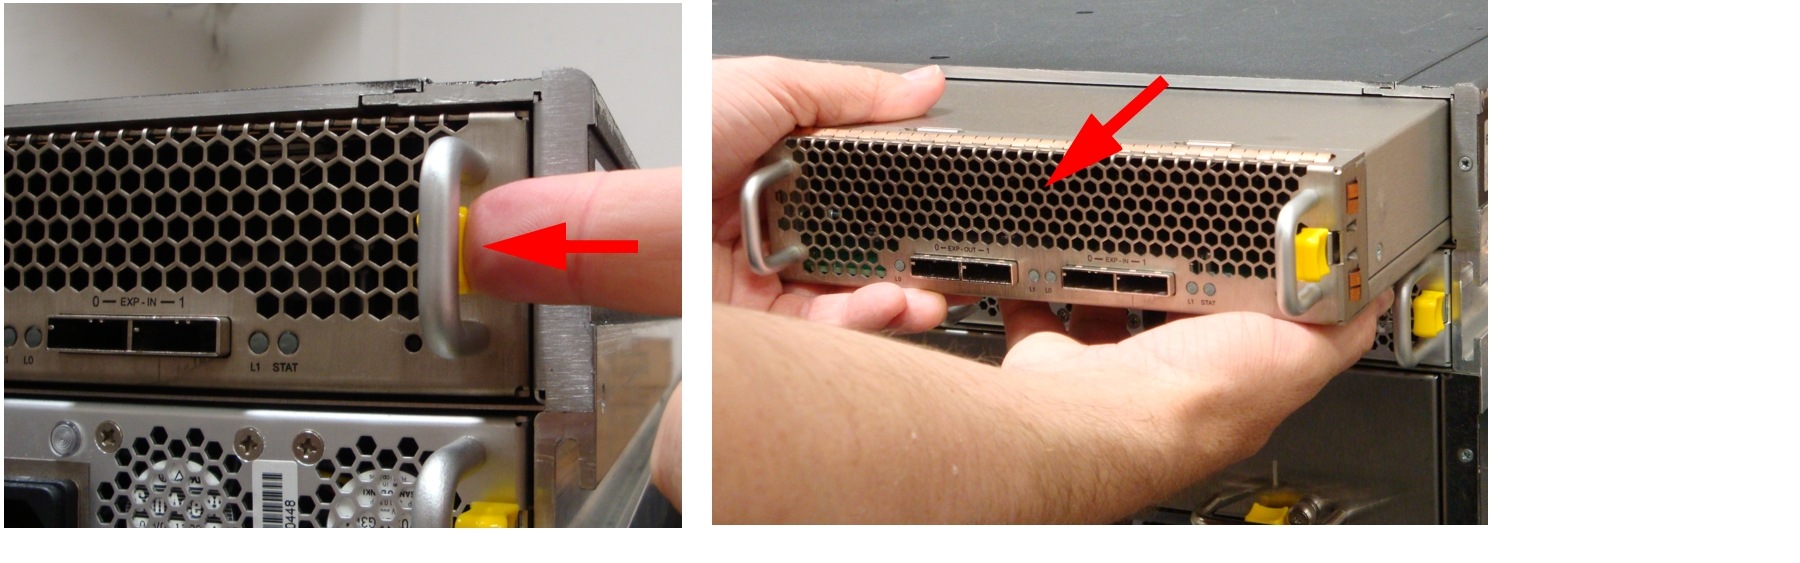
Step 3 ![]() Press the spring lock tab away from the edge of the PSU, then carefully remove the PSU from the unit. Support the weight of the PSU with your free hand while removing it.
Press the spring lock tab away from the edge of the PSU, then carefully remove the PSU from the unit. Support the weight of the PSU with your free hand while removing it.
Figure 5-1 Removing the PSUs from the CPS-SS-4RU or CPS-SS-4RU-EX
Step 4 ![]() Make sure that the PSU is right-side up. The yellow spring lock tab should be on the right side.
Make sure that the PSU is right-side up. The yellow spring lock tab should be on the right side.
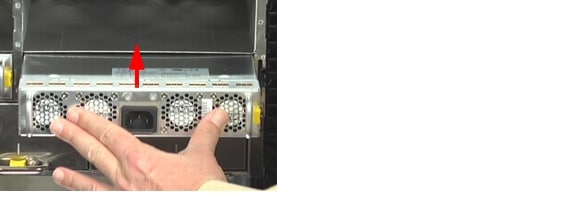
Step 5 ![]() Insert the PSU into the slot and carefully slide it back until the spring lock tab clicks into place.
Insert the PSU into the slot and carefully slide it back until the spring lock tab clicks into place.
Figure 5-2 Inserting the PSU
Step 6 ![]() Plug the power cable into the power cable socket on the replacement PSU.
Plug the power cable into the power cable socket on the replacement PSU.
The two PSU status LEDs light up green to indicate that the unit is functioning properly and supplying power to the unit.
Step 7 ![]() In the graphical user interface (GUI), go to the Home page and verify that the status bar for the new Power Supply Unit is green. See the Software Manual for more information.
In the graphical user interface (GUI), go to the Home page and verify that the status bar for the new Power Supply Unit is green. See the Software Manual for more information.
RAID Controllers
In the event of a RAID Controller failure, use the following procedures to replace the controller:
Procedure
Step 1 ![]() Determine which RAID Controller has failed by examining the STAT LED on each module (see Overview of the CPS-SS-4RU and CPS-SS-4RU-EX, Rear Panel (CPS-SS-4RU)). A flashing red LED indicates the failed unit. The Home page of the graphical user interface (GUI) also tells you which unit has failed (see the Software Manual).
Determine which RAID Controller has failed by examining the STAT LED on each module (see Overview of the CPS-SS-4RU and CPS-SS-4RU-EX, Rear Panel (CPS-SS-4RU)). A flashing red LED indicates the failed unit. The Home page of the graphical user interface (GUI) also tells you which unit has failed (see the Software Manual).

Note ![]() In some cases, a RAID Controller needs to be replaced even if it has not failed outright. In this case, you must determine which RAID Controller to replace by following the troubleshooting procedures in the Software Manual.
In some cases, a RAID Controller needs to be replaced even if it has not failed outright. In this case, you must determine which RAID Controller to replace by following the troubleshooting procedures in the Software Manual.
Step 2 ![]() Do one of the following:
Do one of the following:
•![]() If you have a dual-controller unit, navigate to System Admin > Reboot in the graphical user interface (GUI). Under Controller Maintenance, select the controller that has failed, select the confirmation check box, and click Execute NOW.
If you have a dual-controller unit, navigate to System Admin > Reboot in the graphical user interface (GUI). Under Controller Maintenance, select the controller that has failed, select the confirmation check box, and click Execute NOW.
•![]() If you have a single-controller unit, navigate to System Admin > Reboot in the graphical user interface (GUI), select System Shutdown, select the confirmation check box, and click Execute NOW.
If you have a single-controller unit, navigate to System Admin > Reboot in the graphical user interface (GUI), select System Shutdown, select the confirmation check box, and click Execute NOW.
Step 3 ![]() Remove all cables from the failed RAID Controller.
Remove all cables from the failed RAID Controller.
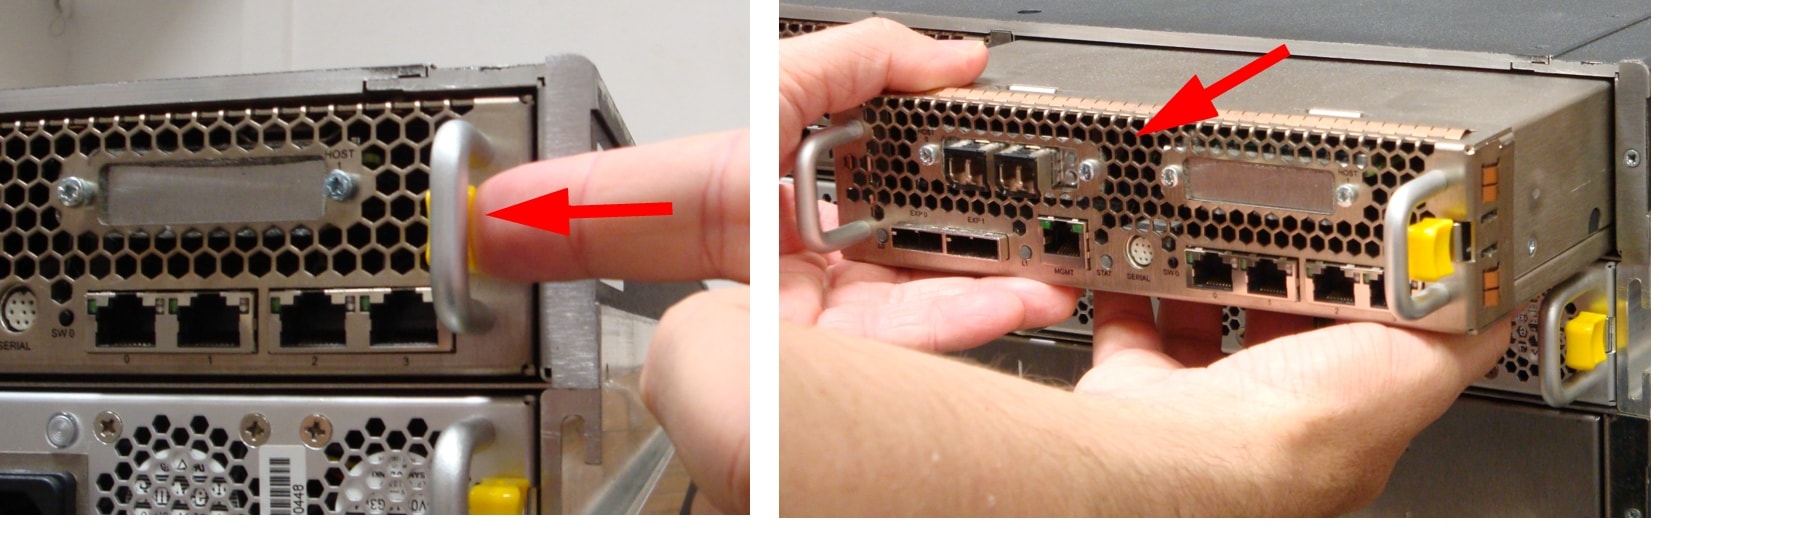
Step 4 ![]() Press the spring lock tab away from the edge of the controller, then carefully remove the controller from the unit. Support the weight of the controller with your free hand while removing it.
Press the spring lock tab away from the edge of the controller, then carefully remove the controller from the unit. Support the weight of the controller with your free hand while removing it.
Figure 5-3 Removing the RAID Controller from the CPS-SS-4RU
Step 5 ![]() Make sure that the replacement RAID Controller is right side up. The yellow spring lock tab should be on the right.
Make sure that the replacement RAID Controller is right side up. The yellow spring lock tab should be on the right.
Note ![]() If you have a CPS-SS-4RU-EX expansion unit attached to your main storage unit, plug the SAS cables from the CPS-SS-4RU-EX into the SAS ports on the replacement RAID Controller BEFORE you insert the RAID Controller into its slot.
If you have a CPS-SS-4RU-EX expansion unit attached to your main storage unit, plug the SAS cables from the CPS-SS-4RU-EX into the SAS ports on the replacement RAID Controller BEFORE you insert the RAID Controller into its slot.
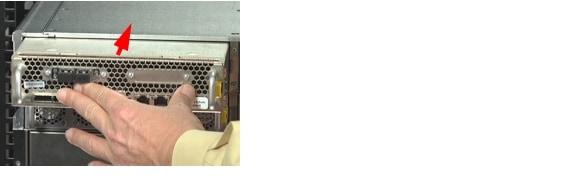
Step 6 ![]() Insert the replacement RAID Controller into the slot and carefully slide it back until the spring lock tab clicks.
Insert the replacement RAID Controller into the slot and carefully slide it back until the spring lock tab clicks.
Figure 5-4 Inserting the RAID Controller
The STAT LED lights up blue or green to let you know that the unit is functioning properly.
Step 7 ![]() Attach all other cables (Fibre Channel/10Gb iSCSI, Ethernet, serial) to the appropriate connectors on the replaced RAID Controller.
Attach all other cables (Fibre Channel/10Gb iSCSI, Ethernet, serial) to the appropriate connectors on the replaced RAID Controller.
Note ![]() If you have a single-controller unit, press and hold the SW0 switch for approximately four seconds to turn the unit back on.
If you have a single-controller unit, press and hold the SW0 switch for approximately four seconds to turn the unit back on.
Step 8 ![]() In the graphical user interface (GUI), go to the Home page and verify that the status bar for the new RAID Controller is green. See the Software Manual for more information.
In the graphical user interface (GUI), go to the Home page and verify that the status bar for the new RAID Controller is green. See the Software Manual for more information.
Expansion Controllers
In the event of an Expansion Controller failure on a CPS-SS-4RU-EX, use the following procedure to replace the controller:
CPS-SS-4RU-EX only
Procedure
Step 1 ![]() Determine which Expansion Controller has failed by examining the STAT LED on each module (see Overview of the CPS-SS-4RU and CPS-SS-4RU-EX, Rear Panel (CPS-SS-4RU-EX)). A flashing red LED indicates the failed unit. The Home page of the graphical user interface (GUI) also tells you which unit has failed (see the Software Manual).
Determine which Expansion Controller has failed by examining the STAT LED on each module (see Overview of the CPS-SS-4RU and CPS-SS-4RU-EX, Rear Panel (CPS-SS-4RU-EX)). A flashing red LED indicates the failed unit. The Home page of the graphical user interface (GUI) also tells you which unit has failed (see the Software Manual).
Step 2 ![]() Remove the SAS cables from the failed Expansion Controller.
Remove the SAS cables from the failed Expansion Controller.
Step 3 ![]() Press the spring lock tab away from the edge of the controller, then carefully remove the controller from the unit. Support the weight of the controller with your free hand while removing it.
Press the spring lock tab away from the edge of the controller, then carefully remove the controller from the unit. Support the weight of the controller with your free hand while removing it.
Figure 5-5 Removing the Expansion Controller from the CPS-SS-4RU-EX
Step 4 ![]() Make sure that the replacement Expansion Controller is right side up. The yellow spring lock tab should be on the right.
Make sure that the replacement Expansion Controller is right side up. The yellow spring lock tab should be on the right.
Step 5 ![]() Insert the replacement Expansion Controller into the slot and carefully slide it back until the spring lock tab clicks.
Insert the replacement Expansion Controller into the slot and carefully slide it back until the spring lock tab clicks.
Figure 5-6 Inserting the Expansion Controller on the CPS-SS-4RU-EX
The STAT LED lights up green to let you know that the unit is functioning properly.
Step 6 ![]() Attach the SAS cables to the EXP IN 0 and 1 connectors on the replaced Expansion Controller.
Attach the SAS cables to the EXP IN 0 and 1 connectors on the replaced Expansion Controller.
Step 7 ![]() In the graphical user interface (GUI), go to the Home page and verify that the status bar for the new RAID Controller is green. See the Software Manual for more information.
In the graphical user interface (GUI), go to the Home page and verify that the status bar for the new RAID Controller is green. See the Software Manual for more information.
Disk Drives
In the event of a disk drive failure, use the following procedures to replace the drive:
Procedure
Step 1 ![]() Determine which drive drawer contains the failed drive by examining the DSK LEDs on the front of each drawer (see Overview of the CPS-SS-4RU and CPS-SS-4RU-EX, Front Panel (Both Units)). A red LED indicates which drawer contains the failed drive. The Disk Drives page (under RAID Information) of the graphical user interface (GUI) also tells you which drawer contains the failed drive (see the Software Manual).
Determine which drive drawer contains the failed drive by examining the DSK LEDs on the front of each drawer (see Overview of the CPS-SS-4RU and CPS-SS-4RU-EX, Front Panel (Both Units)). A red LED indicates which drawer contains the failed drive. The Disk Drives page (under RAID Information) of the graphical user interface (GUI) also tells you which drawer contains the failed drive (see the Software Manual).
Step 2 ![]() Turn the drawer lock counter-clockwise to unlock the left drive drawer.
Turn the drawer lock counter-clockwise to unlock the left drive drawer.
Figure 5-7 Unlocking the Drive Drawer
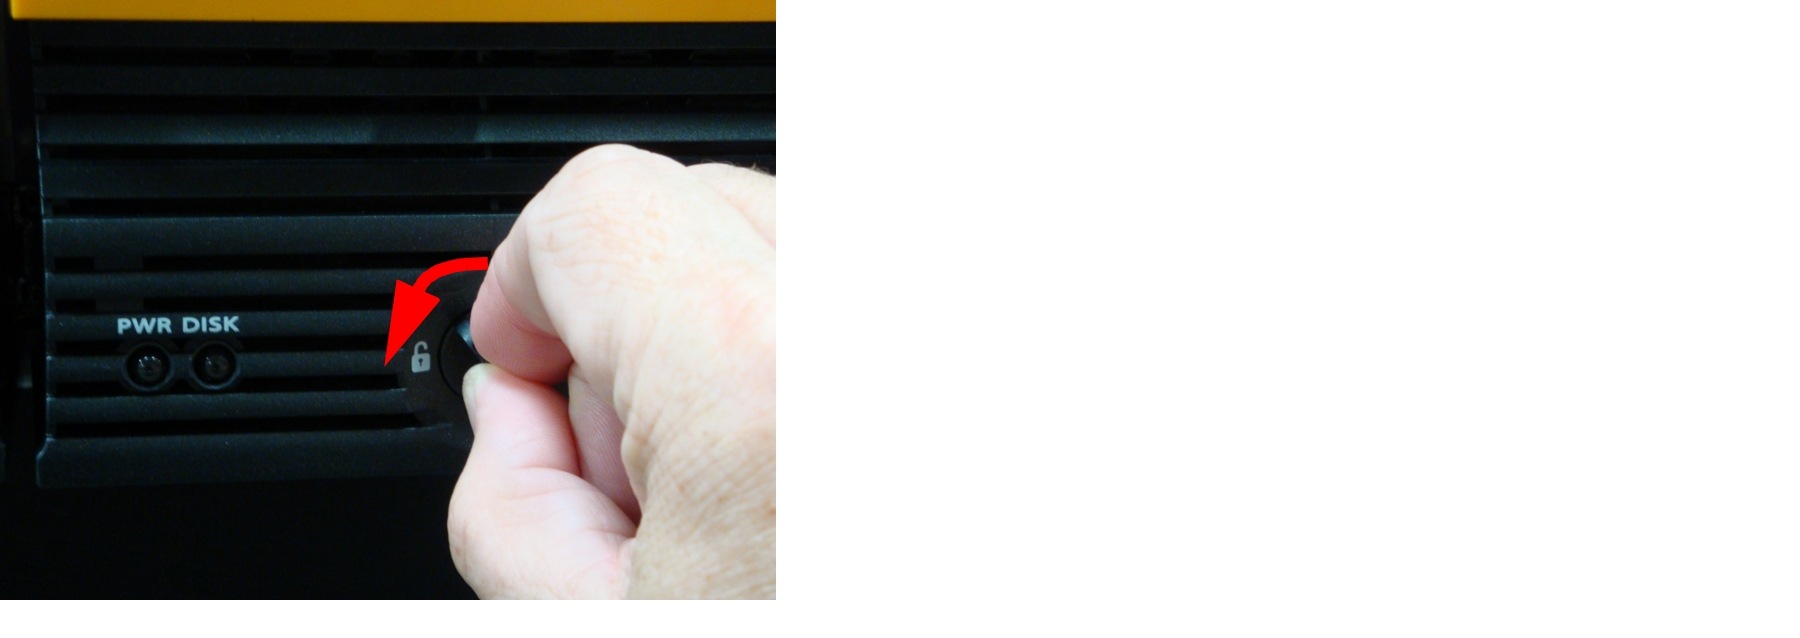
The STAT LED turns amber to let you know that the drive drawer is unlocked.
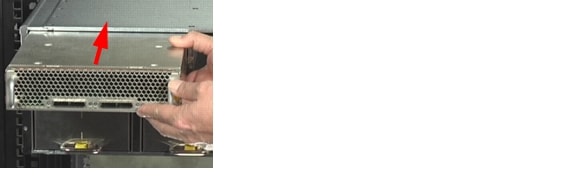
Step 3 ![]() Carefully slide the drawer all the way out until the side rail locking tab clicks into place.
Carefully slide the drawer all the way out until the side rail locking tab clicks into place.
Figure 5-8 Sliding the Drive Drawer Out
Step 4 ![]() For CPS-SS-4RU or CPS-SS-4RU-EX units, open the drive drawer lid.
For CPS-SS-4RU or CPS-SS-4RU-EX units, open the drive drawer lid.
Figure 5-9 Opening the Drive Drawer Lid
Step 5 ![]() Determine which drive has failed by examining the arrow-shaped drive status LEDs next to each drive (see Overview of the CPS-SS-4RU and CPS-SS-4RU-EX, Drawer Interior (Both Units)). A red LED indicates the failed drive.
Determine which drive has failed by examining the arrow-shaped drive status LEDs next to each drive (see Overview of the CPS-SS-4RU and CPS-SS-4RU-EX, Drawer Interior (Both Units)). A red LED indicates the failed drive.
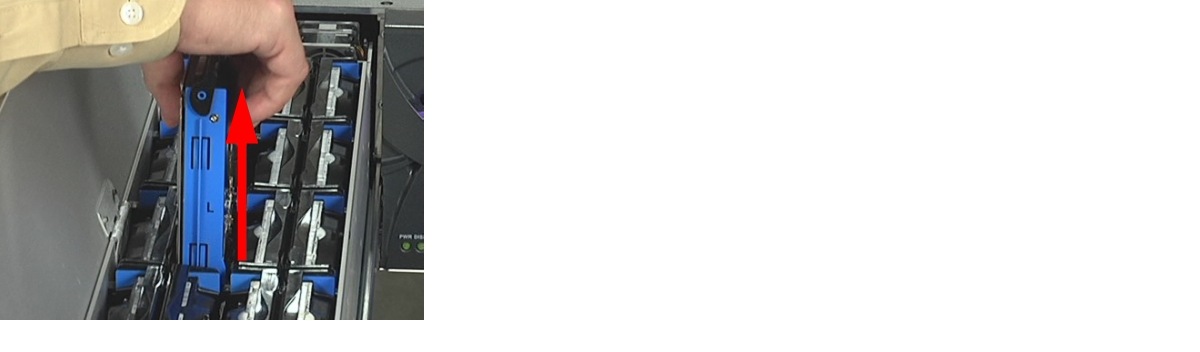
Step 6 ![]() Carefully lift the drive's ejection handle to disengage the drive, then remove the drive from the drive slot. Support the weight of the drive with your free hand while removing it.
Carefully lift the drive's ejection handle to disengage the drive, then remove the drive from the drive slot. Support the weight of the drive with your free hand while removing it.
Figure 5-10 Removing a Disk Drive
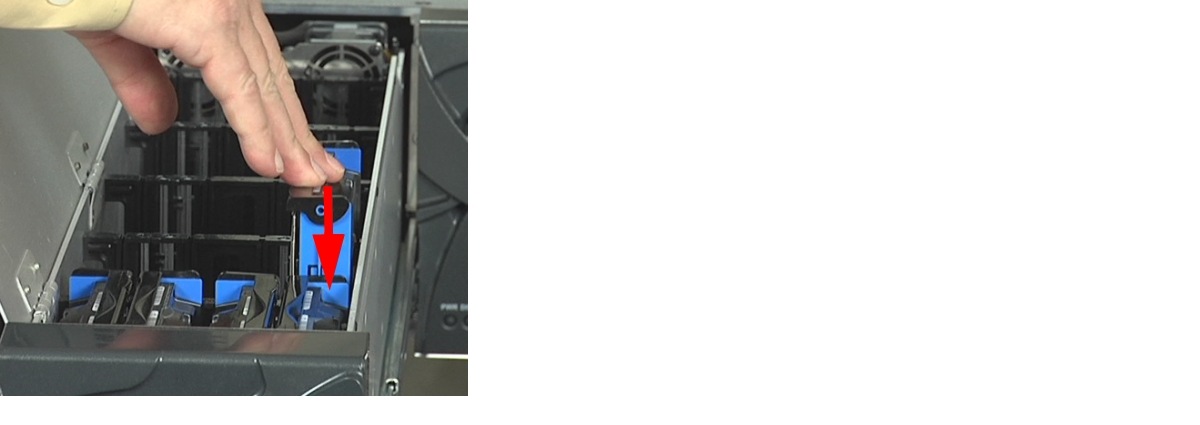
Step 7 ![]() Using the drive guide to help you orient the disk, carefully load the replacement disk drive into the drive slot. Make sure that the disk is fully seated and that the drive ejection handle is flat against the drive.
Using the drive guide to help you orient the disk, carefully load the replacement disk drive into the drive slot. Make sure that the disk is fully seated and that the drive ejection handle is flat against the drive.
Figure 5-11 Replacing the Disk Drive
The drive status LED lights up green to let you know that the disk is connected and functioning properly.
Step 8 ![]() For CPS-SS-4RU or CPS-SS-4RU-EX units, close the drive drawer lid.
For CPS-SS-4RU or CPS-SS-4RU-EX units, close the drive drawer lid.
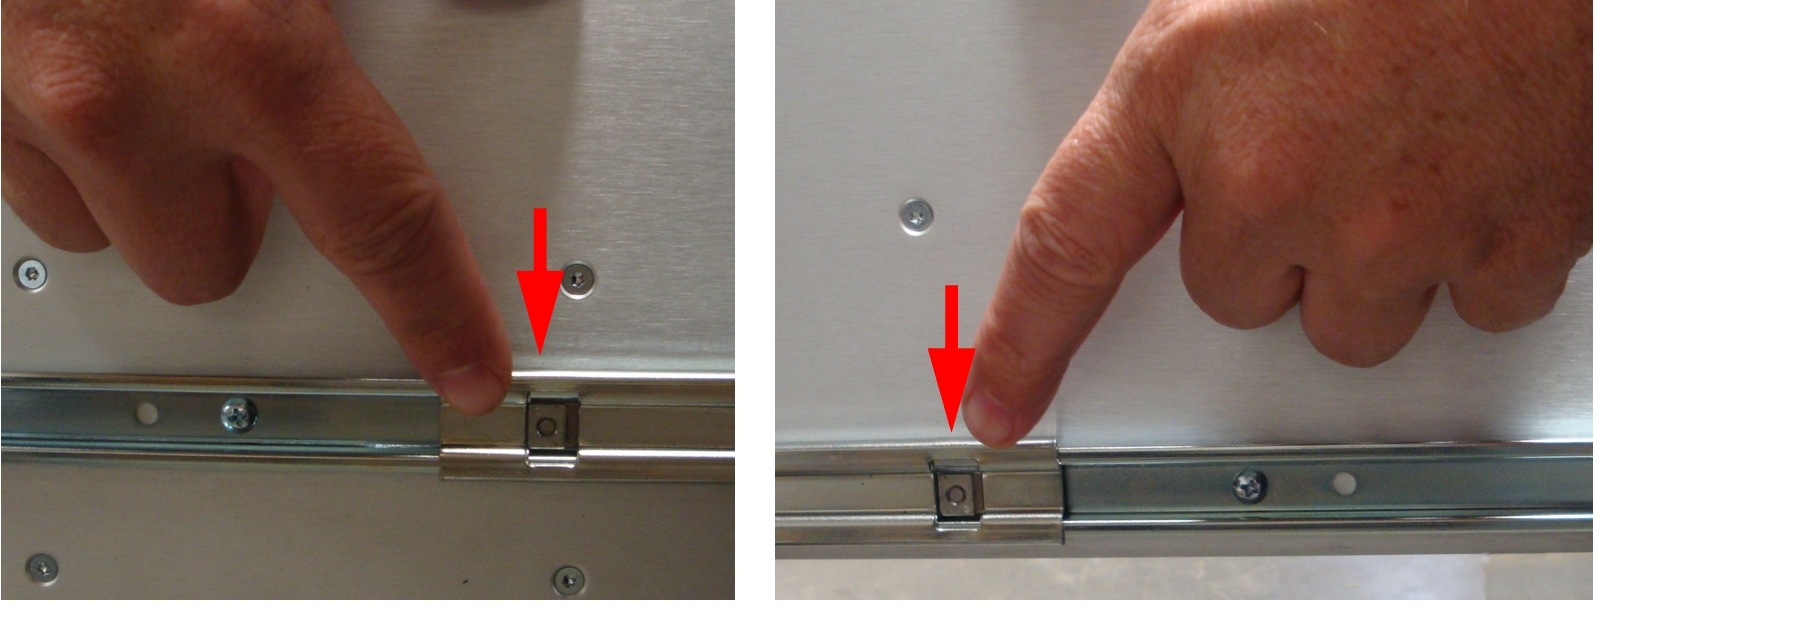
Step 9 ![]() Press the latches on either side of the drive drawer to disengage the drawer, then carefully slide the drawer back into the unit, making sure that it is flush with the rest of the front panel.
Press the latches on either side of the drive drawer to disengage the drawer, then carefully slide the drawer back into the unit, making sure that it is flush with the rest of the front panel.
Figure 5-12 Disengaging the Side Rail Latches
Step 10 ![]() Turn the drawer lock clockwise to lock the drawer into place.
Turn the drawer lock clockwise to lock the drawer into place.
The STAT LED on the front of the drawer turns from amber to green to let you know that the drive drawer is properly latched. The DSK LED lights up green to let you know that all drives are functioning properly.
Step 11 ![]() In the graphical user interface (GUI), go to the Home page and verify that the status bar for the new drive is blue, meaning that it has been automatically detected and assigned as a pool spare. See the Software Manual for more information.
In the graphical user interface (GUI), go to the Home page and verify that the status bar for the new drive is blue, meaning that it has been automatically detected and assigned as a pool spare. See the Software Manual for more information.
Note ![]() If the status bar for the new drive is gray, you must manually assign the drive. See the Software Manual for instructions.
If the status bar for the new drive is gray, you must manually assign the drive. See the Software Manual for instructions.
Front Drive Drawer Fan Assembly
In the event of the failure of a front drive drawer fan, use the following procedure to replace the drawer front assembly:
Procedure
Step 1 ![]() Determine which drive drawer contains the failed fan by examining the ENV LEDs on the front of each drawer see Overview of the CPS-SS-4RU and CPS-SS-4RU-EX, Front Panel (Both Units)). A red LED indicates which drawer has the failed fan. The Home page of the graphical user interface (GUI) also tells you which fan has failed (see the Software Manual).
Determine which drive drawer contains the failed fan by examining the ENV LEDs on the front of each drawer see Overview of the CPS-SS-4RU and CPS-SS-4RU-EX, Front Panel (Both Units)). A red LED indicates which drawer has the failed fan. The Home page of the graphical user interface (GUI) also tells you which fan has failed (see the Software Manual).
Step 2 ![]() Turn the drawer lock counter-clockwise to unlock the left drive drawer (see Figure 5-7).
Turn the drawer lock counter-clockwise to unlock the left drive drawer (see Figure 5-7).
The STAT LED turns amber to let you know that the drive drawer is unlocked.
Step 3 ![]() Carefully slide the drawer all the way out until the side rail locking tab clicks into place (see Figure 5-8).
Carefully slide the drawer all the way out until the side rail locking tab clicks into place (see Figure 5-8).
Step 4 ![]() Open the drive drawer lid (see Figure 5-9).
Open the drive drawer lid (see Figure 5-9).
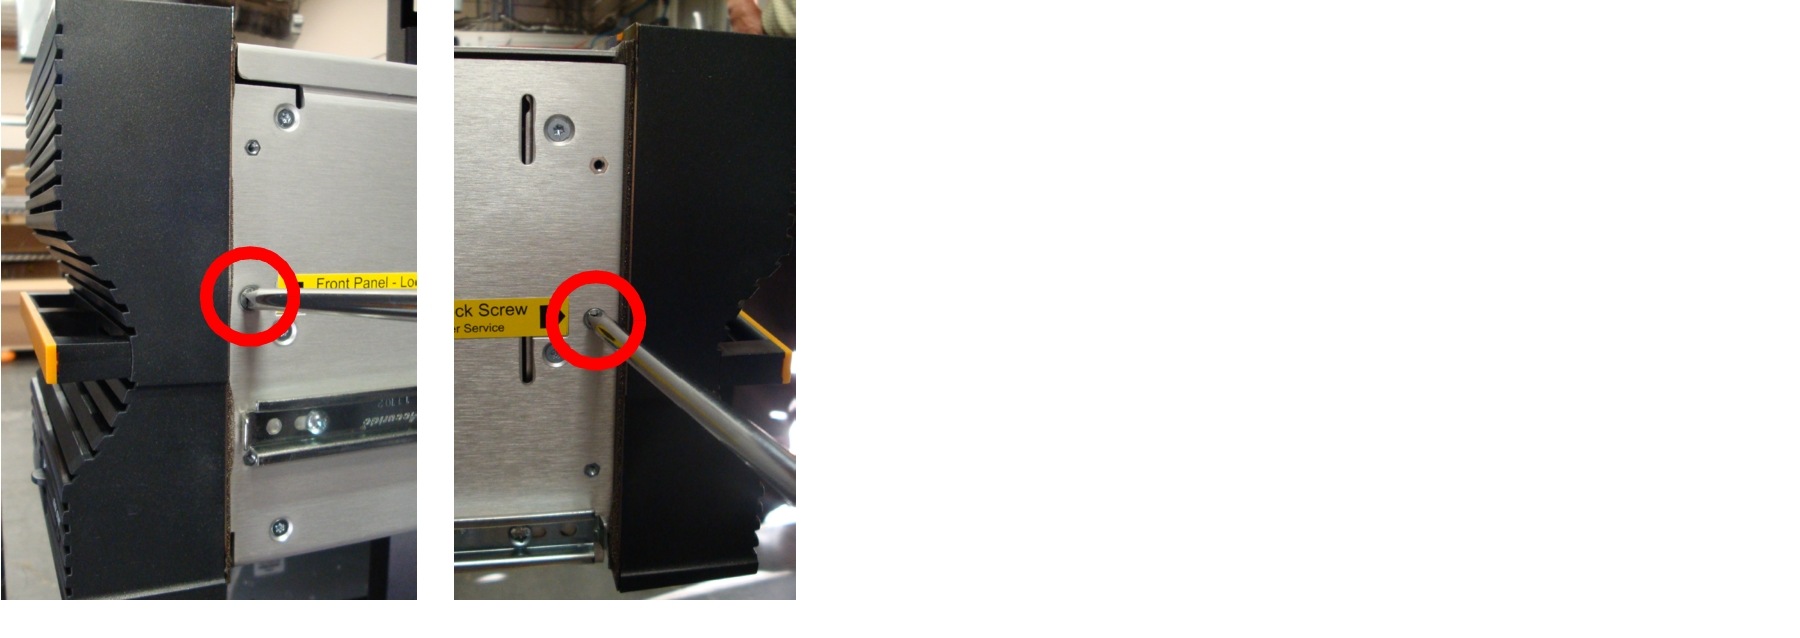
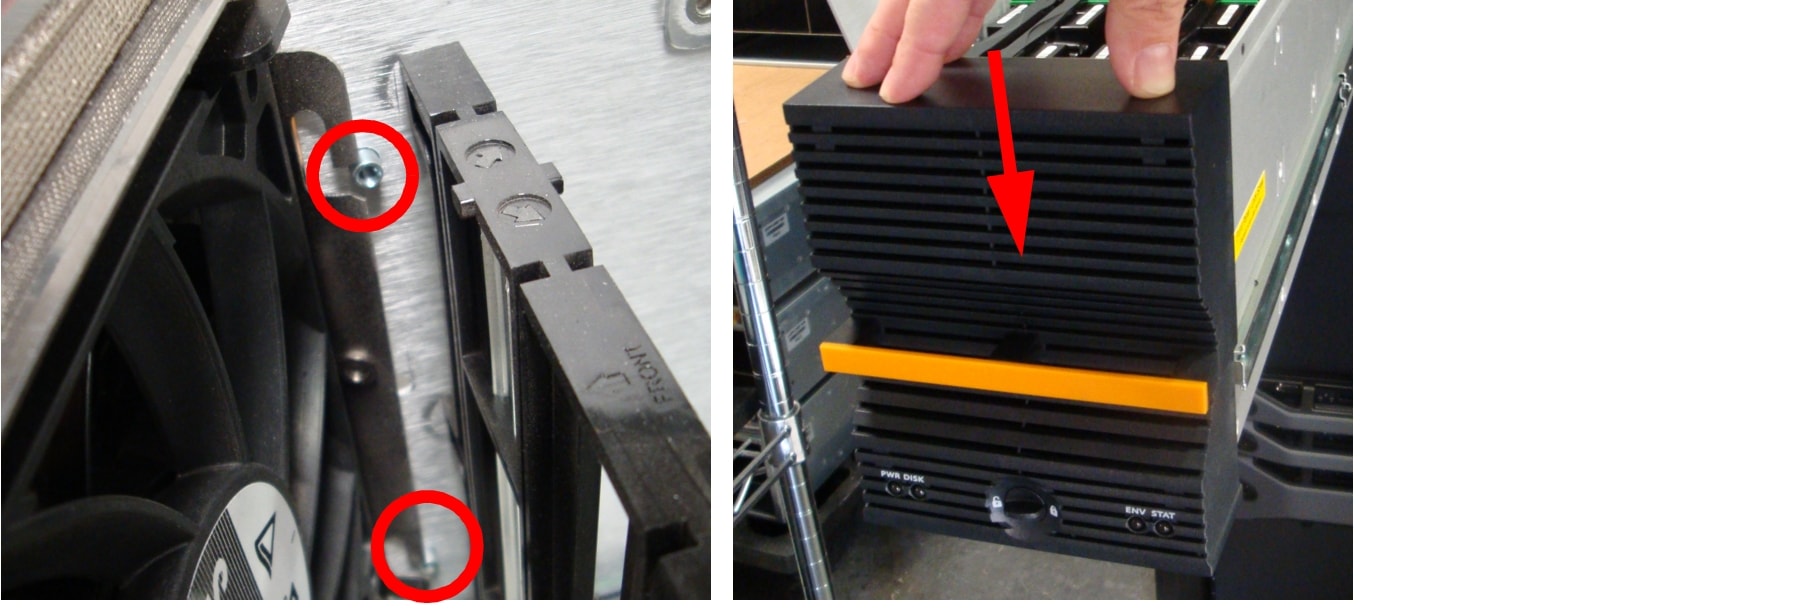
Step 5 ![]() Unscrew the retaining screws on either side of the drive drawer.
Unscrew the retaining screws on either side of the drive drawer.
Figure 5-13 Unscrewing the Drawer Front Assembly Retaining Screws
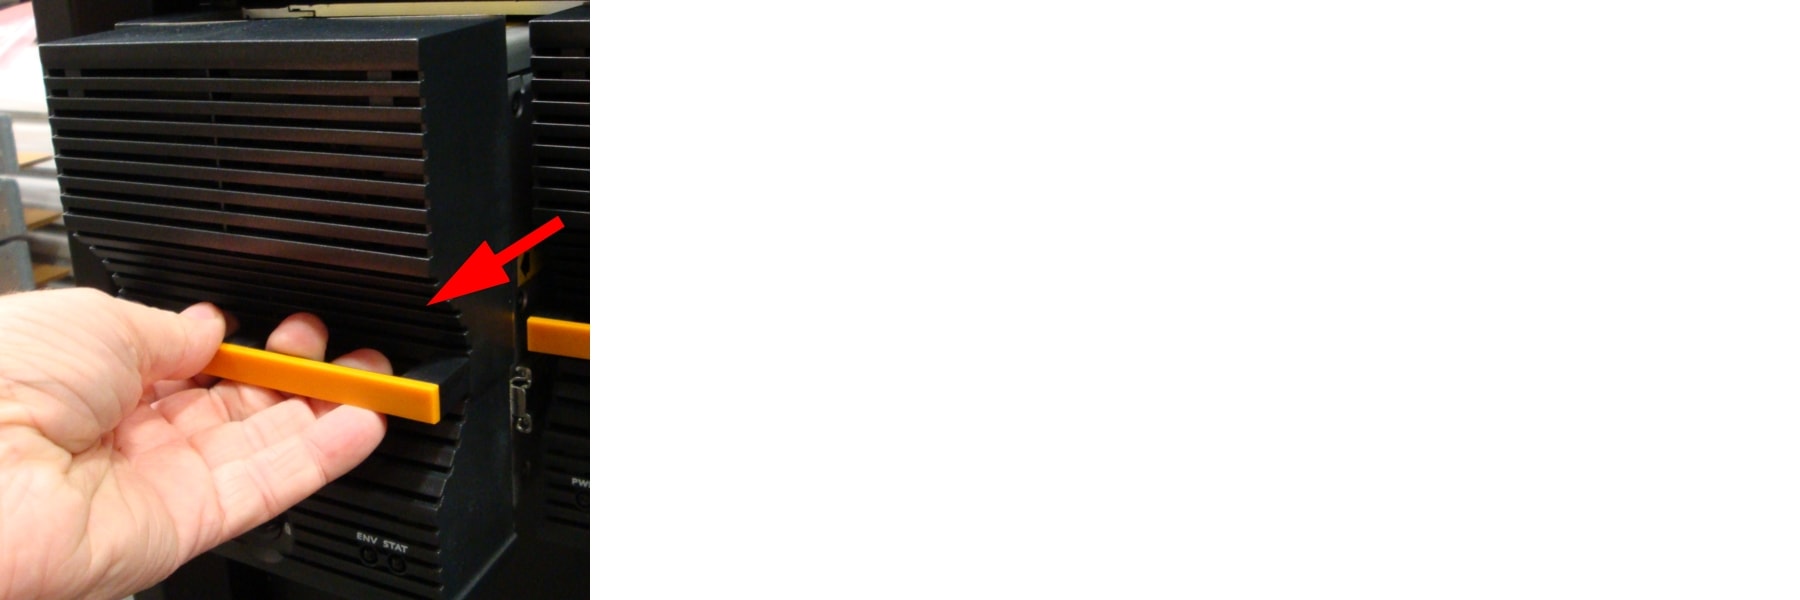
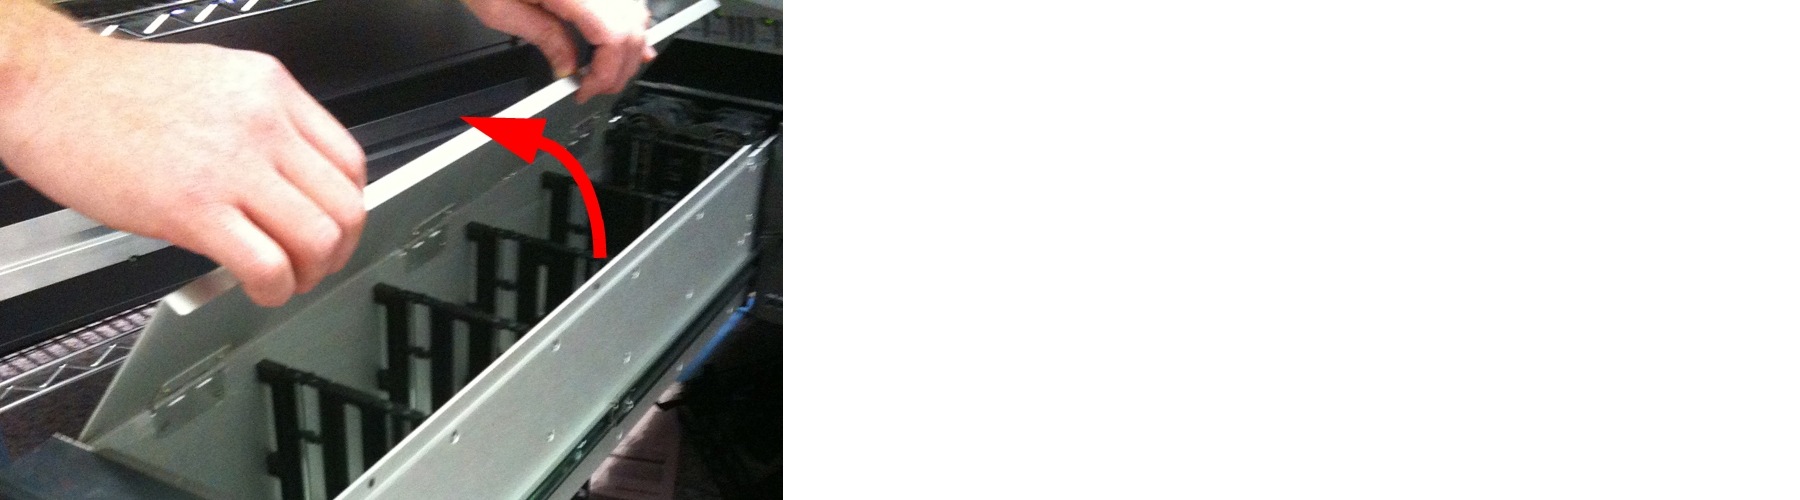
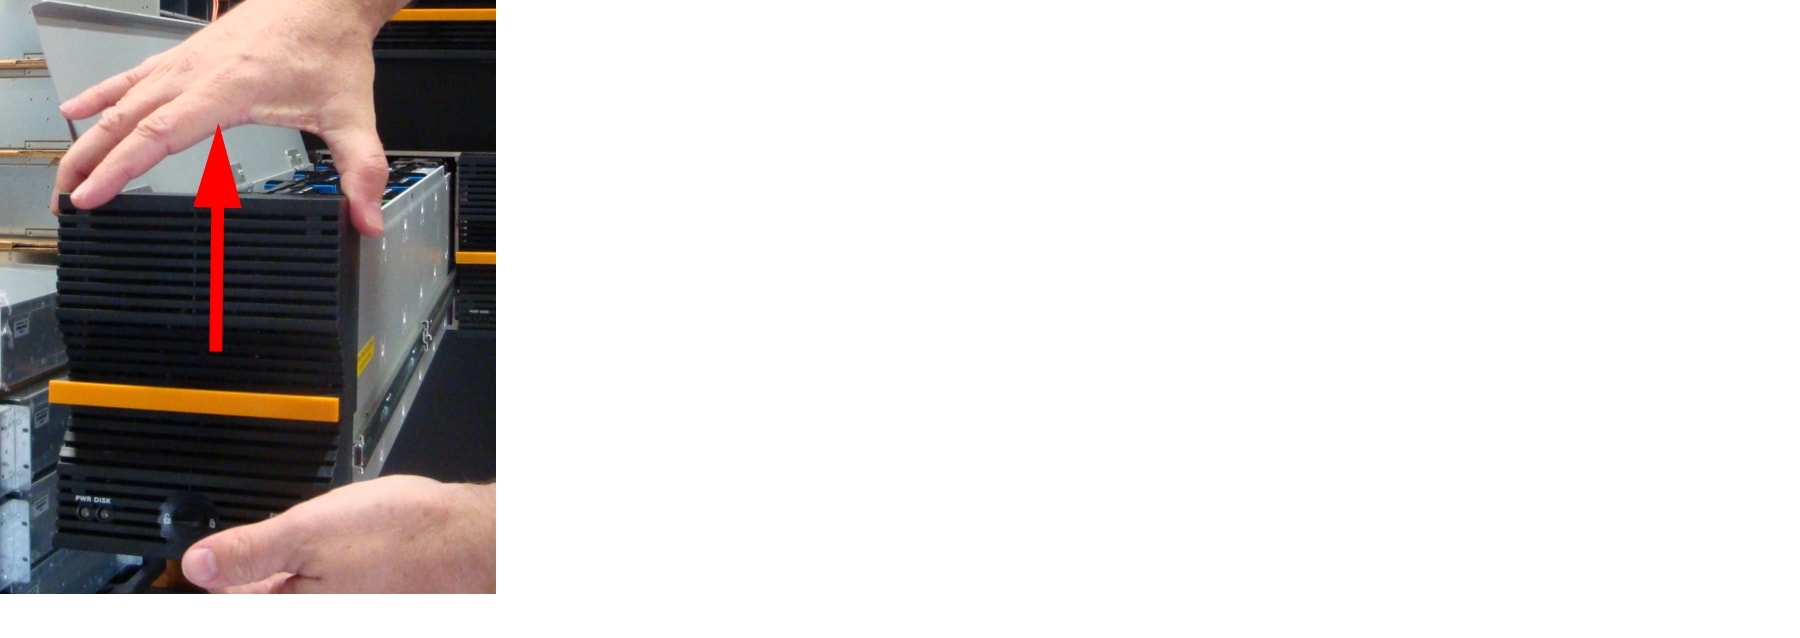
Step 6 ![]() Carefully slide the drawer front assembly upwards to disengage it, then remove it from the front of the drive drawer.
Carefully slide the drawer front assembly upwards to disengage it, then remove it from the front of the drive drawer.
Figure 5-14 Removing the Drawer Front Assembly
Step 7 ![]() Guide the replacement drawer front assembly onto the guides in the front of the drawer, then carefully push down to seat it.
Guide the replacement drawer front assembly onto the guides in the front of the drawer, then carefully push down to seat it.
Figure 5-15 Replacing the Drawer Front Assembly
The LEDs on the front of the drawer front assembly light up to let you know that the assembly is properly in place.
Step 8 ![]() Replace the retaining screws on the sides of the drive drawer.
Replace the retaining screws on the sides of the drive drawer.
Step 9 ![]() Close the drive drawer lid.
Close the drive drawer lid.
Step 10 ![]() Press the latches on either side of the drive drawer to disengage them, then carefully slide the drawer back into the unit, making sure that it is flush with the rest of the front panel.
Press the latches on either side of the drive drawer to disengage them, then carefully slide the drawer back into the unit, making sure that it is flush with the rest of the front panel.
Figure 5-16 Disengaging the Side Rail Latches for CPS-SS-4RU/CPS-SS-4RU-EX

Step 11 ![]() Turn the drawer lock clockwise to lock the drawer into place.
Turn the drawer lock clockwise to lock the drawer into place.
The STAT LED on the front of the drawer turns from amber to green to let you know that the drive drawer is properly latched. The ENV LED lights up green to let you know that the fan is functioning properly and that the drawer temperature is within specifications.
Step 12 ![]() In the graphical user interface (GUI), go to the Home page and verify that the status bar for the new fan assembly is green. See the Software Manual for more information.
In the graphical user interface (GUI), go to the Home page and verify that the status bar for the new fan assembly is green. See the Software Manual for more information.
Rear Drive Drawer Fan Assembly
In the event of the failure of a rear drive drawer fan, use the following procedure to replace the rear fan assembly:
Procedure
Step 1 ![]() Determine which drive drawer contains the failed fan by examining the ENV LEDs on the front of each drawer see Overview of the CPS-SS-4RU and CPS-SS-4RU-EX, Front Panel (Both Units)). A red LED indicates which drawer has the failed fan. The Home page of the graphical user interface (GUI) also tells you which fan has failed (see the Software Manual).
Determine which drive drawer contains the failed fan by examining the ENV LEDs on the front of each drawer see Overview of the CPS-SS-4RU and CPS-SS-4RU-EX, Front Panel (Both Units)). A red LED indicates which drawer has the failed fan. The Home page of the graphical user interface (GUI) also tells you which fan has failed (see the Software Manual).
Step 2 ![]() Turn the drawer lock counter-clockwise to unlock the left drive drawer (see Figure 5-7).
Turn the drawer lock counter-clockwise to unlock the left drive drawer (see Figure 5-7).
The STAT LED turns amber to let you know that the drive drawer is unlocked.
Step 3 ![]() Carefully slide the drawer all the way out until the side rail locking tab clicks into place (see Figure 5-8).
Carefully slide the drawer all the way out until the side rail locking tab clicks into place (see Figure 5-8).
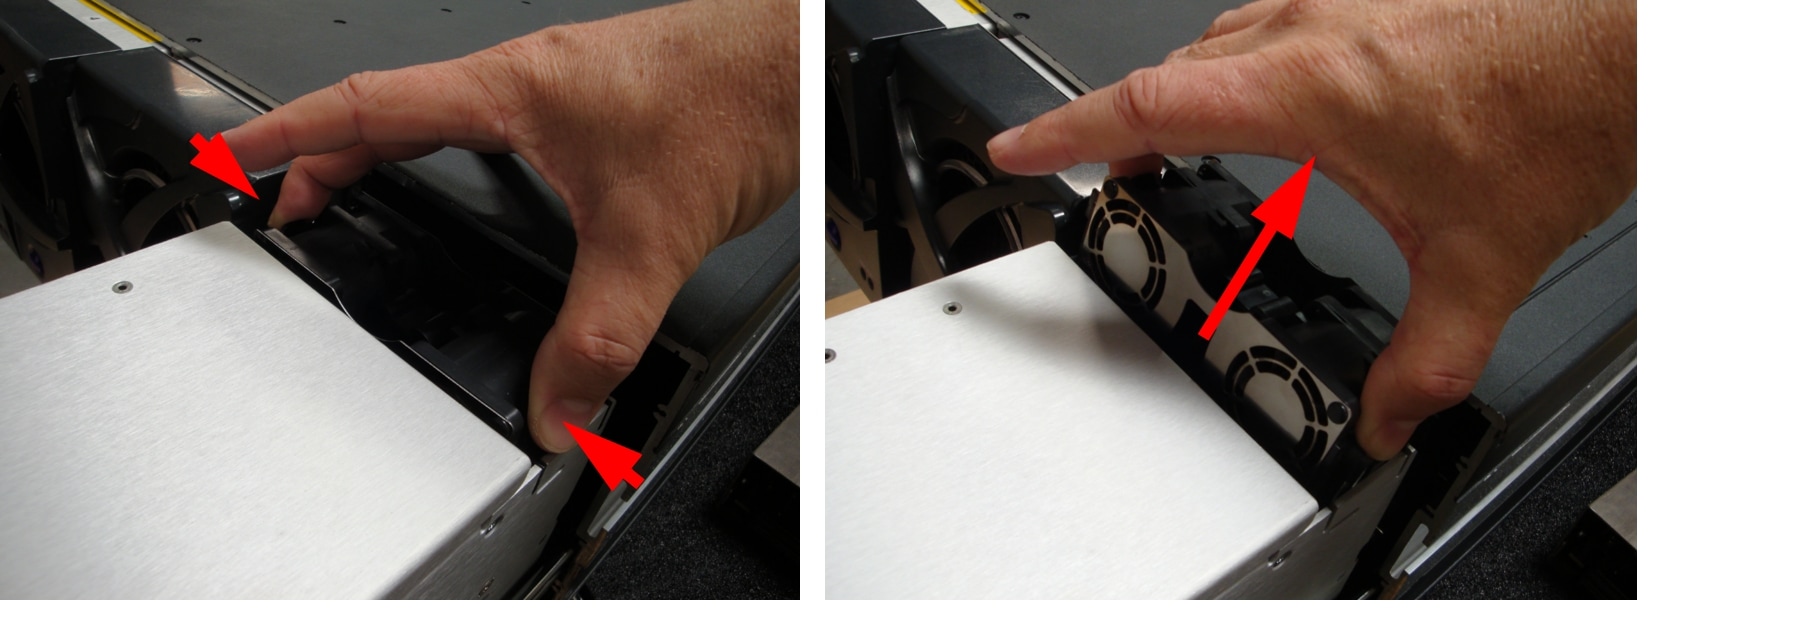
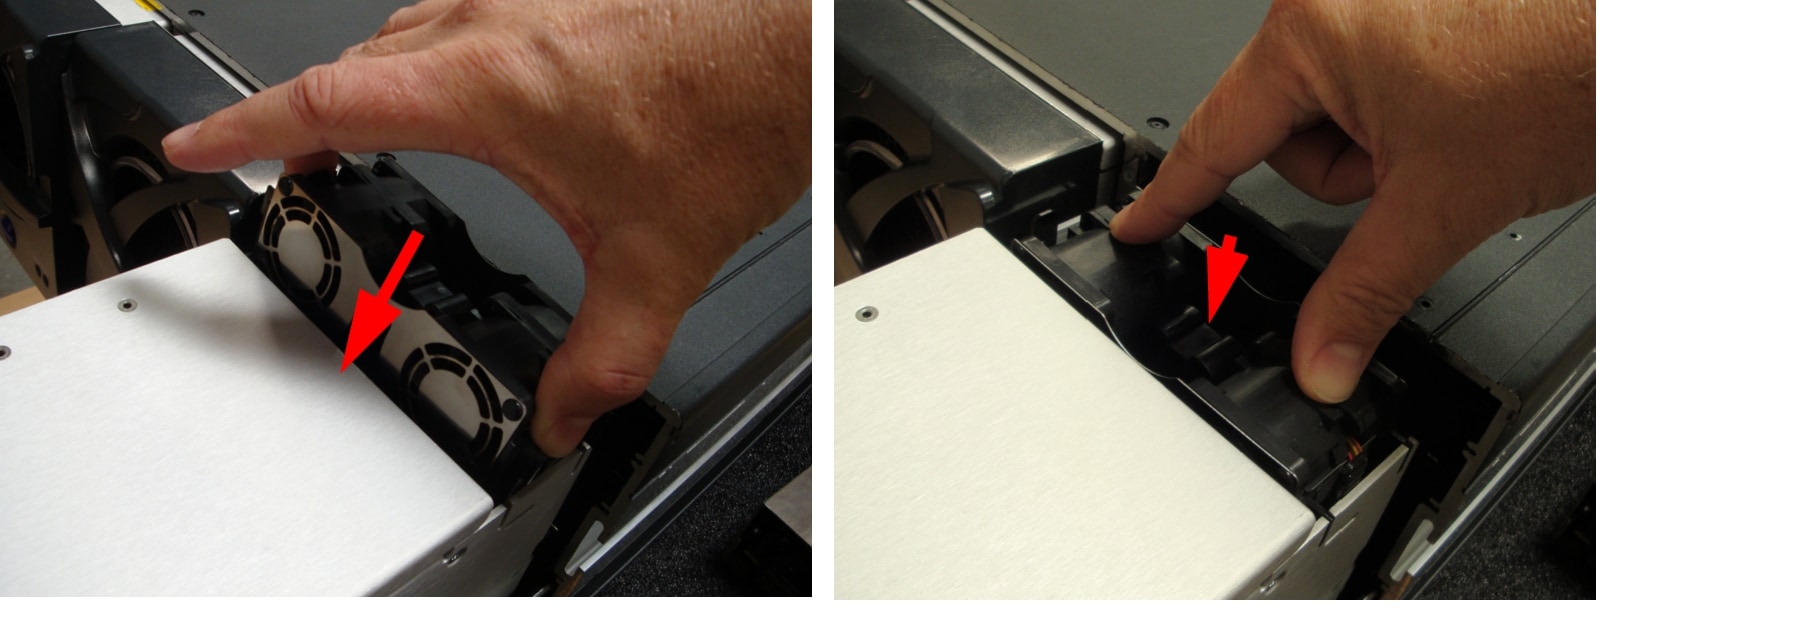
Step 4 ![]() On the fan assembly at the back of the drawer, press the left and right release tabs inward. Then carefully pull the fan assembly out of the drawer.
On the fan assembly at the back of the drawer, press the left and right release tabs inward. Then carefully pull the fan assembly out of the drawer.
Figure 5-17 Disengaging and Removing the Rear Fan Assembly
Step 5 ![]() Carefully slide the replacement fan assembly down until the two tabs click into place.
Carefully slide the replacement fan assembly down until the two tabs click into place.
Figure 5-18 Inserting the Rear Fan Assembly.
Step 6 ![]() Close the drive drawer lid.
Close the drive drawer lid.
Step 7 ![]() Press the latches on either side of the drive drawer to disengage them, then carefully slide the drawer back into the unit, making sure that it is flush with the rest of the front panel.
Press the latches on either side of the drive drawer to disengage them, then carefully slide the drawer back into the unit, making sure that it is flush with the rest of the front panel.
Figure 5-19 Disengaging the Side Rail Latches for CPS-SS-4RU/CPS-SS-4RU-EX

Step 8 ![]() Turn the drawer lock clockwise to lock the drawer into place.
Turn the drawer lock clockwise to lock the drawer into place.
The STAT LED on the front of the drawer turns from amber to green to let you know that the drive drawer is properly latched. The ENV LED lights up green to let you know that the fan is functioning properly and that the drawer temperature is within specifications.
Step 9 ![]() In the graphical user interface (GUI), go to the Home page and verify that the status bar for the new fan assembly is green. See the Software Manual for more information.
In the graphical user interface (GUI), go to the Home page and verify that the status bar for the new fan assembly is green. See the Software Manual for more information.
 Feedback