- Getting Started With Firepower
-
- An Overview of Intrusion Detection and Prevention
- Layers in Intrusion and Network Analysis Policies
- Getting Started with Intrusion Policies
- Tuning Intrusion Policies Using Rules
- Tailoring Intrusion Protection to Your Network Assets
- Sensitive Data Detection
- Globally Limiting Intrusion Event Logging
- The Intrusion Rules Editor
- Intrusion Prevention Performance Tuning
- Security, Internet Access, and Communication Ports
- Command Line Reference
Access Control Rules: Network-Based
The following topics describe how to configure network traffic logging and handling:
- Introduction to Network-Based Access Control Rules
- Access Control Rules: Security Zone Conditions
- Access Control Rules: Network and Geolocation Conditions
- Access Control Rules: VLAN Tag Conditions
- Access Control Rules: Port Conditions
Introduction to Network-Based Access Control Rules
Access control rules within access control policies exert granular control over network traffic logging and handling. Network-based conditions allow you to manage which traffic can traverse your network, using one or more of the following criteria:
-
source and destination IP addresses or geographical locations
-
source and destination port, which also includes transport layer protocol and ICMP code options
You can combine network-based conditions with each other and with other types of conditions to create an access control rule. These access control rules can be simple or complex, matching and inspecting traffic using multiple conditions.
Hardware-based fast-path rules, Security Intelligence-based traffic filtering, SSL inspection, user identification, and some decoding and preprocessing occur before access control rules evaluate network traffic.
 Note | The system builds a separate network map for each leaf domain. In a multidomain deployment, using literal IP addresses to constrain this configuration can have unexpected results. |
Access Control Rules: Security Zone Conditions
Zone conditions in access control rules allow you to control traffic by its source and destination security zones. A security zone is a grouping of one or more interfaces, which may be located across multiple devices. An option you choose during a device’s initial setup, called its detection mode, determines how the system initially configures the device’s interfaces, and whether those interfaces belong to a security zone.
As a simple example, when you register device with an Inline detection mode, the Firepower Management Center creates two zones: Internal and External, and assigns the first pair of interfaces on the device to those zones. Hosts connected to the network on the Internal side represent your protected assets.
To extend this scenario, you could deploy additional identically configured devices—managed by the same Firepower Management Center—to protect similar resources in several different locations. Like the first device, each of these devices protects the assets in its Internal security zone.
 Tip | You are not required to group all internal (or external) interfaces into a single zone. Choose the grouping that makes sense for your deployment and security policies. |
In this deployment, you may decide that although you want these hosts to have unrestricted access to the Internet, you nevertheless want to protect them by inspecting incoming traffic for intrusions and malware.
To accomplish this using access control, configure an access control rule with a zone condition where the Destination Zone is set to Internal. This simple access control rule matches traffic that leaves the device from any interface in the Internal zone.
To ensure that the system inspects matching traffic for intrusions and malware, choose a rule action of Allow, then associate this rule with an intrusion and a file policy.
Requirements for Security Zone Conditions
You can add a maximum of 50 zones to each of the Source Zones and Destination Zones in a single zone condition:
-
To match traffic leaving the device from an interface in the zone, add that zone to the Destination Zones. Because devices deployed passively do not transmit traffic, you cannot use a zone comprised of passive interfaces in a Destination Zone condition.
-
To match traffic entering the device from an interface in the zone, add that zone to the Source Zones.
-
If you add both source and destination zone conditions to a rule, matching traffic must originate from one of the specified source zones and egress through one of the destination zones.
All interfaces in a zone must be of the same type (all inline, all passive, all switched, or all routed). All zones used in a zone condition for an access control rule must also be of the same type. You cannot write a single rule that matches traffic to or from zones of different types.
Controlling Traffic by Security Zone
|
Smart License |
Classic License |
Supported Devices |
Supported Domains |
Access |
|---|---|---|---|---|
|
Any |
Any |
Any |
Any |
Admin/Access Admin/Network Admin |
What to Do Next
-
Deploy configuration changes; see Deploying Configuration Changes.
Access Control Rules: Network and Geolocation Conditions
Network conditions in access control rules allow you to control traffic by its source and destination IP address. You can either:
Requirements for Network and Geolocation Conditions
When you build a network-based access control rule condition, you can manually specify IP address and geographical locations. Alternately, you can configure network conditions with network and geolocation objects, which are reusable and associate a name with one or more IP addresses, address blocks, countries, continents, and so on.
If you want to write rules to control traffic by geographical location, to ensure you are using up-to-date geolocation data to filter your traffic, Cisco strongly recommends you regularly update the geolocation database (GeoDB).
You can add a maximum of 50 items to each of the Source Networks and Destination Networks in a single network condition, and you can mix network and geolocation-based configurations:
-
To match traffic from an IP address or geographical location, configure the Source Networks.
-
To match traffic to an IP address or geographical location, configure the Destination Networks.
If you add both source and destination network conditions to a rule, matching traffic must originate from one of the specified IP addresses and be destined for one of the destination IP addresses.
Controlling Traffic by Network or Geolocation
|
Smart License |
Classic License |
Supported Devices |
Supported Domains |
Access |
|---|---|---|---|---|
|
Any |
Any |
Any |
Any |
Admin/Access Admin/Network Admin |
| Step 1 | In the access control rule editor, click the Networks tab. | ||
| Step 2 | Find and select the networks you want to add from the
Available Networks, as follows:
| ||
| Step 3 | Click Add to Source or Add to Destination, or drag and drop. | ||
| Step 4 | Add any source or destination IP addresses or address blocks
that you want to specify manually. Click the
Enter an IP address prompt below the
Source Networks or
Destination Networks list; then type an IP address
or address block and click
Add.
| ||
| Step 5 | Save or continue editing the rule. |
Example
The following graphic shows the network condition for an access control rule that blocks connections originating from your internal network and attempting to access resources either in North Korea or on 93.184.216.119 (example.com).
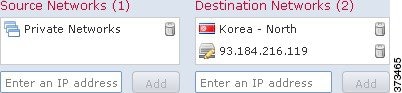
In this example, a network object group called Private Networks (that comprises the IPv4 and IPv6 Private Networks network objects, not shown) represents your internal networks. The example also manually specifies the example.com IP address, and uses a system-provided North Korea geolocation object to represent North Korea IP addresses.
-
Deploy configuration changes; see Deploying Configuration Changes.
Access Control Rules: VLAN Tag Conditions
VLAN conditions in access control rules allow you to control VLAN-tagged traffic. The system uses the innermost VLAN tag to identify a packet by VLAN.
When you build a VLAN-based access control rule condition, you can manually specify VLAN tags. Alternately, you can configure VLAN conditions with VLAN tag objects, which are reusable and associate a name with one or more VLAN tags.
You can add a maximum of 50 items to the Selected VLAN Tags in a single VLAN tag condition.
Controlling VLAN-Tagged Traffic
|
Smart License |
Classic License |
Supported Devices |
Supported Domains |
Access |
|---|---|---|---|---|
|
Any |
Any |
Any |
Any |
Admin/Access Admin/Network Admin |
| Step 1 | In the access control rule editor, click the VLAN Tags tab. | ||
| Step 2 | Find and select the VLANs you want to add from the
Available VLAN Tags, as follows:
| ||
| Step 3 | Click Add to Rule, or drag and drop. | ||
| Step 4 | Add any VLAN tags that you want to specify manually. Click the
Enter a VLAN Tag prompt below the
Selected VLAN Tags list; then type a VLAN tag or
range and click
Add. You can specify any VLAN tag from 1 to 4094;
use a hyphen to specify a range of VLAN tags.
| ||
| Step 5 | Save or continue editing the rule. |
Example
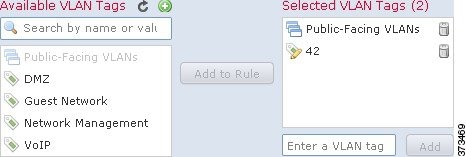
The following graphic shows a VLAN tag condition for an access control rule that matches traffic on public-facing VLANs (represented by a VLAN tag object group), as well as the manually added VLAN 42.
-
Deploy configuration changes; see Deploying Configuration Changes.
Access Control Rules: Port Conditions
Network conditions in access control rules allow you to control traffic by its source and destination port. In this context, “port” refers to one of the following:
-
For TCP and UDP, you can control traffic based on the transport layer protocol. The system represents this configuration using the protocol number in parentheses, plus an optional associated port or port range. For example: TCP(6)/22.
-
For ICMP and ICMPv6 (IPv6-ICMP), you can control traffic based on its Internet layer protocol plus an optional type and code. For example: ICMP(1):3:3.
-
You can control traffic using other protocols that do not use ports.
Requirements for Port Conditions
When you build a port-based access control rule condition, you can manually specify ports. Alternately, you can configure port conditions with port objects, which are reusable and associate a name with one or more ports.
You can add a maximum of 50 items to each of the Selected Source Ports and Selected Destination Ports lists in a single network condition:
-
To match traffic from a port, configure the Selected Source Ports.
If you add only source ports to a condition, you can add ports that use different transport protocols. For example, you can add both DNS over TCP and DNS over UDP as source port conditions in a single access control rule.
-
To match traffic to a port, configure the Selected Destination Ports.
If you add only destination ports to a condition, you can add ports that use different transport protocols.
-
To match traffic both originating from specific Selected Source Portsand destined for specific Selected Destination Ports, configure both.
If you add both source and destination ports to a condition, you can only add ports that share a single transport protocol (TCP or UDP). For example, if you add DNS over TCP as a source port, you can add Yahoo Messenger Voice Chat (TCP) as a destination port but not Yahoo Messenger Voice Chat (UDP).
Keep the following points in mind when building a port condition:
-
When you add a destination ICMP port with the type set to 0 or a destination ICMPv6 port with the type set to 129, the access control rule only matches unsolicited echo replies. ICMP echo replies sent in response to ICMP echo requests are ignored. For a rule to match on any ICMP echo, use ICMP type 8 or ICMPv6 type 128.
-
When you use the GRE (47) protocol as a destination port condition, you can only add other network-based conditions to the access control rule, that is, zone, network, and VLAN tag conditions. You cannot save the rule if you add reputation or user-based conditions.
Controlling Traffic by Port and ICMP Codes
|
Smart License |
Classic License |
Supported Devices |
Supported Domains |
Access |
|---|---|---|---|---|
|
Any |
Any |
Any |
Any |
Admin/Access Admin/Network Admin |
| Step 1 | In the access control rule editor, click the Ports tab. |
| Step 2 | Find and select the ports you want to add from the
Available Ports, as follows:
To select an object, click it, or right-click and then select Select All. |
| Step 3 | Click Add to Source or Add to Destination, or drag and drop. |
| Step 4 | Add any source or destination ports that you want to specify
manually.
|
| Step 5 | Click Add. |
| Step 6 | Save or continue editing the rule. |
What to Do Next
-
Deploy configuration changes; see Deploying Configuration Changes.
 Feedback