- Getting Started With Firepower
-
- An Overview of Intrusion Detection and Prevention
- Layers in Intrusion and Network Analysis Policies
- Getting Started with Intrusion Policies
- Tuning Intrusion Policies Using Rules
- Tailoring Intrusion Protection to Your Network Assets
- Sensitive Data Detection
- Globally Limiting Intrusion Event Logging
- The Intrusion Rules Editor
- Intrusion Prevention Performance Tuning
- Security, Internet Access, and Communication Ports
- Command Line Reference
- Internal Certificate Authority Objects
- CA Certificate and Private Key Import
- Importing a CA Certificate and Private Key
- Generating a New CA Certificate and Private Key
- New Signed Certificates
- Creating an Unsigned CA Certificate and CSR
- Uploading a Signed Certificate Issued in Response to a CSR
- CA Certificate and Private Key Downloads
- Downloading a CA Certificate and Private Key
- Trusted Certificate Authority Objects
- External Certificate Objects
- Internal Certificate Objects
Reusable Objects
The following topics describe how to manage reusable objects in the Firepower System:
- Reusable Object Basics
- The Object Manager
- Network Objects
- Port Objects
- Security Zones
- Application Filters
- VLAN Tag Objects
- URL Objects
- Geolocation Objects
- Variable Sets
- Security Intelligence Lists and Feeds
- Sinkhole Objects
- File Lists
- Cipher Suite Lists
- Distinguished Name Objects
- PKI Objects
Reusable Object Basics
For increased flexibility and web interface ease-of-use, the Firepower Management Center allows you to create named objects, which are reusable configurations that associate a name with a value. When you want to use that value, use the named object instead.
You can create the following types of objects:
-
network-based objects that represent IP addresses and networks, port/protocol pairs, VLAN tags, security zones, and origin/destination country (geolocation)
-
reputation-based objects that represent Security Intelligence feeds and lists, application filters based on category and reputation, and file lists
-
intrusion policy variable sets that contain variables you associate with an intrusion policy
-
objects that help you handle encrypted traffic, including cipher suites, public key certificates and paired private keys, and certificate distinguished names
You can use these objects in various places in the system’s web interface, including access control policies, network analysis policies, intrusion policies and rules, network discovery rules, event searches, reports, dashboards, and so on.
You can also:
-
Group objects to reference multiple objects with a single configuration; see Object Groups.
-
Override object values for selected devices or, in a multidomain deployment, selected domains; see Object Overrides.
The Object Manager
You can use the object manager to create and manage objects and object groups.
The object manager displays 20 objects or groups per page. If
you have more than 20 of any type of object or group, use the navigation links
at the bottom of the page to view additional pages. You can also go to a
specific page or click the refresh icon (![]() )
to refresh your view.
)
to refresh your view.
By default, the page lists objects and groups alphabetically by name. However, you can sort each type of object or group by any column in the display. You can also filter the objects on the page by name or value.
- Object Types
- Guidelines for Managing Objects
- Editing Objects
- Filtering Objects or Object Groups
- Sorting Objects
- Object Groups
- Object Overrides
Object Types
The table below lists the type of objects you can create in the Firepower System. The table also indicates whether the object type can be configured to allow overrides or can be grouped.
|
Object Type |
Can Group? |
Can Configure to Allow Overrides? |
|---|---|---|
|
Network |
yes |
yes |
|
Port |
yes |
yes |
|
Security Zones |
no |
no |
|
Application Filters |
no |
no |
|
VLAN Tag |
yes |
yes |
|
URL |
yes |
yes |
|
Geolocation |
no |
no |
|
Variable Set |
no |
no |
|
Security Intelligence Includes: |
no |
no |
|
Sinkhole |
no |
no |
|
File List |
no |
no |
|
Cipher Suite List |
no |
no |
|
Distinguished Name |
yes |
no |
|
Public Key Infrastructure (PKI) Includes: |
yes |
no |
Guidelines for Managing Objects
Observe the following guidelines when managing objects:
-
You can create objects in the object manager or on the fly while configuring access control, DNS, network discovery, or SSL policies.
-
You can edit all settings in existing objects as follows:
Object
Editable Settings
Network
All
Port
All
Security Zones
All except Type. If you want to change the type of zone, create a new object.
Application Filters
All
VLAN Tag
All
URL
All
Geolocation
All
Variable Set
You can edit but not rename or delete default variables and variable sets.
Security Intelligence Lists and Feeds
You can edit all settings for feeds. You can edit object names only for lists; source files must be downloaded, modified externally, and re-uploaded.
Sinkhole
All
File List
You can edit entries in the lists, but not the predefined list names.
Cipher Suite List
All
Distinguished Name
All
Public Key Infrastructure (PKI)
You can edit object names only; certificates must be downloaded, modified externally, and re-uploaded.
-
After you edit an object used in an active policy, you must re-deploy the changed configuration for your changes to take effect.
-
You cannot delete an object that is in use by an active policy.
-
In a multidomain deployment, object names must be unique within the domain hierarchy. The system may identify a conflict with the name of an object you cannot view in your current domain.
-
In a multidomain deployment, the system displays objects created in the current domain, which you can edit. It also displays objects created in ancestor domains, which you cannot edit in most cases. The only ancestor objects you can edit are security zones. If object overrides are allowed, you can add override values to objects created in ancestor domains.
Editing Objects
|
Smart License |
Classic License |
Supported Devices |
Supported Domains |
Access |
|---|---|---|---|---|
|
Any |
Any |
Any |
Any |
Admin/Access Admin/Network Admin |
In a multidomain deployment, the system displays objects created in the current domain, which you can edit. It also displays objects created in ancestor domains, which in most cases you cannot edit. To view and edit objects in a descendant domain, switch to that domain.
| Step 1 | Choose . |
| Step 2 | Choose an object type from the list; see Object Types. |
| Step 3 | Click the edit icon ( If a view icon ( |
| Step 4 | Modify the object settings as desired. If the controls are dimmed, the configuration belongs to an ancestor domain, or you do not have permission to modify the configuration. |
| Step 5 | If you are editing a variable set, manage the variables in the set; see Managing Variables. |
| Step 6 | For objects that
can be configured to allow overrides:
|
| Step 7 | Click Save. |
| Step 8 | If you are editing a variable set, and that set is in use by an access control policy, click Yes to confirm that you want to save your changes. |
What to Do Next
-
If an active policy references your object, deploy configuration changes; see Deploying Configuration Changes.
Filtering Objects or Object Groups
|
Smart License |
Classic License |
Supported Devices |
Supported Domains |
Access |
|---|---|---|---|---|
|
Any |
Any |
Any |
Any |
Admin/Access Admin/Network Admin |
In a multidomain deployment, the system displays objects created in the current and ancestor domains, which you can filter.
Sorting Objects
|
Smart License |
Classic License |
Supported Devices |
Supported Domains |
Access |
|---|---|---|---|---|
|
Any |
Any |
Any |
Any |
Admin/Access Admin/Network Admin |
In a multidomain deployment, the system displays objects created in the current domain, which you can edit. It also displays objects created in ancestor domains, which in most cases you cannot edit. To view and edit objects in a descendant domain, switch to that domain.
Object Groups
Grouping objects allows you to reference multiple objects with a single configuration. The system allows you to use objects and object groups interchangeably in the web interface. You can group network, port, VLAN tag, URL, and PKI objects. For example, anywhere you would use a port object, you can also use a port object group.
Objects and object groups of the same type cannot have the same name. In a multidomain deployment, the names of object groups must be unique within the domain hierarchy. Note that the system may identify a conflict with the name of an object group you cannot view in your current domain.
When you edit an object group used in a policy (for example, a network object group used in an access control policy), you must re-deploy the changed configuration for your changes to take effect.
Deleting a group does not delete the objects in the group, just their association with each other. Additionally, you cannot delete a group that is in use in an active policy. For example, you cannot delete a VLAN tag group that you are using in a VLAN condition in a saved access control policy.
Grouping Reusable Objects
|
Smart License |
Classic License |
Supported Devices |
Supported Domains |
Access |
|---|---|---|---|---|
|
Any |
Any |
Any |
Any |
Admin/Access Admin/Network Admin |
In a multidomain deployment, the system displays objects created in the current domain, which you can edit. It also displays objects created in ancestor domains, which in most cases you cannot edit. To view and edit objects in a descendant domain, switch to that domain.
You can group objects in the current domain with objects inherited from ancestor domains.
| Step 1 | Choose . |
| Step 2 | If the object type you want to group is Network, Port, URL, or VLAN Tag: |
| Step 3 | If the object type you want to group is Distinguished Name: |
| Step 4 | If the object
type you want to group is
PKI:
|
| Step 5 | Enter a unique Name. |
| Step 6 | Choose one or more objects from the list, and click
Add.
You can also:
|
| Step 7 | Optionally for
Network,
Port,
URL, and
VLAN
Tag groups:
|
| Step 8 | Click Save. |
What to Do Next
-
If an active policy references your object group, deploy configuration changes; see Deploying Configuration Changes.
Object Overrides
An object override allows you to define an alternate value for an object, which the system uses for the devices you specify.
You can create an object whose definition works for most devices, and then use overrides to specify modifications to the object for the few devices that need different definitions. You can also create an object that needs to be overridden for all devices, but its use allows you to create a single policy for all devices. Object overrides allow you to create a smaller set of shared policies for use across devices without giving up the ability to alter policies when needed for individual devices.
For example, you might want to deny ICMP traffic to the different departments in your company, each of which is connected to a different network. You can do this by defining an access control policy with a rule that includes a network object called Departmental Network. By allowing overrides for this object, you can then create overrides on each relevant device that specifies the actual network where that device is connected.
In a multidomain deployment, you can define a default value for an object in an ancestor domain and allow administrators in descendant domains to add override values for that object. For example, a managed security service provider (MSSP) might use a single Firepower Management Center to manage network security for multiple customers. Administrators at the MSSP can define an object in the Global domain for use in all customers' deployments. Administrators for each customer can log into descendant domains to override that object for their organizations. These local administrators cannot view or affect the override values of other customers of the MSSP.
You can target an object override to a specific domain. In this case, the system uses the object override value for all devices in the targeted domain unless you override it at the device level.
From the object manager, you can choose an object that can be overridden and define a list of device-level or domain-level overrides for that object.
You can use object overrides with the following object types only:
If you can override an object, the Override column appears for the object type in the object manager. Possible values for this column include:
-
Green checkmark — indicates that you can create overrides for the object and no overrides have been added yet
-
Red X — indicates that you cannot create overrides for the object
-
Number — represents a count of the overrides that have been added to that object (for example, "2" indicates two overrides have been added)
Managing Object Overrides
|
Smart License |
Classic License |
Supported Devices |
Supported Domains |
Access |
|---|---|---|---|---|
|
Any |
Any |
Any |
Any |
Admin/Access Admin/Network Admin |
| Step 1 | Choose . |
| Step 2 | Choose from the list of object types; see Object Types. |
| Step 3 | Click the edit icon ( If a view icon ( |
| Step 4 | Manage the
object overrides:
|
Allowing Object Overrides
|
Smart License |
Classic License |
Supported Devices |
Supported Domains |
Access |
|---|---|---|---|---|
|
Any |
Any |
Any |
Any |
Admin/Access Admin/Network Admin |
What to Do Next
-
Add object override values; see Adding Object Overrides.
Adding Object Overrides
|
Smart License |
Classic License |
Supported Devices |
Supported Domains |
Access |
|---|---|---|---|---|
|
Any |
Any |
Any |
Any |
Admin/Access Admin/Network Admin |
-
Allow object overrides; see Allowing Object Overrides.
What to Do Next
-
If an active policy references your object, deploy configuration changes; see Deploying Configuration Changes.
Editing Object Overrides
|
Smart License |
Classic License |
Supported Devices |
Supported Domains |
Access |
|---|---|---|---|---|
|
Any |
Any |
Any |
Any |
Admin/Access Admin/Network Admin |
You can modify the description and the value of an existing override, but you cannot modify the existing target list. Instead, you must add a new override with new targets, which replaces the existing override.
What to Do Next
-
If an active policy references your object, deploy configuration changes; see Deploying Configuration Changes.
Network Objects
A network object represents one or more IP addresses that you can specify either individually or as address blocks. You can use network objects and groups in various places in the system’s web interface, including access control policies, network variables, intrusion rules, identity rules, network discovery rules, event searches, reports, and so on.
Creating Network Objects
|
Smart License |
Classic License |
Supported Devices |
Supported Domains |
Access |
|---|---|---|---|---|
|
Any |
Any |
Any |
Any |
Admin/Access Admin/Network Admin |
| Step 1 | Choose . |
| Step 2 | Choose Network from the list of object types. |
| Step 3 | Choose Add Object from the Add Network drop-down menu. |
| Step 4 | Enter a
Name.
In a multidomain deployment, object names must be unique within the domain hierarchy. The system may identify a conflict with the name of an object you cannot view in your current domain. |
| Step 5 | Optionally, enter a Description. |
| Step 6 | In the Network field, enter an IP address or address block to add to the object. |
| Step 7 | Manage overrides for the object:
|
| Step 8 | Click Save. |
What to Do Next
-
If an active policy references your object, deploy configuration changes; see Deploying Configuration Changes.
Port Objects
Port objects represent different protocols in slightly different ways:
- TCP and UDP
-
A port object represents the transport layer protocol, with the protocol number in parentheses, plus an optional associated port or port range. For example: TCP(6)/22.
- ICMP and ICMPv6 (IPv6-ICMP)
-
A port object represents the Internet layer protocol plus an optional type and code. For example: ICMP(1):3:3.
You can restrict an ICMP or IPV6-ICMP port object by type and, if applicable, code. For more information on ICMP types and codes, see:
- Other
-
A port object can represent other protocols that do not use ports.
The Firepower System provides default port objects for well-known ports. You cannot modify or delete these default objects. You can create custom port objects in addition to the default objects.
You can use port objects and groups in various places in the system’s web interface, including access control policies, identity rules, network discovery rules, port variables, and event searches. For example, if your organization uses a custom client that uses a specific range of ports and causes the system to generate excessive and misleading events, you can configure your network discovery policy to exclude monitoring those ports.
When using port objects, observe the following guidelines:
-
You cannot add any protocol other than TCP or UDP for source port conditions in access control rules. Also, you cannot mix transport protocols when setting both source and destination port conditions in a rule.
-
If you add an unsupported protocol to a port object group used in a source port condition, the rule where it is used does not take affect on the managed device when the configuration is deployed.
-
If you create a port object containing both TCP and UDP ports, then add it as a source port condition in a rule, you cannot add a destination port, and vice versa.
Creating Port Objects
|
Smart License |
Classic License |
Supported Devices |
Supported Domains |
Access |
|---|---|---|---|---|
|
Any |
Any |
Any |
Any |
Admin/Access Admin/Network Admin |
| Step 1 | Choose . |
| Step 2 | Choose Port from the list of object types. |
| Step 3 | Choose Add Object from the Add Port drop-down list. |
| Step 4 | Enter a
Name.
In a multidomain deployment, object names must be unique within the domain hierarchy. The system may identify a conflict with the name of an object you cannot view in your current domain. |
| Step 5 | Choose a
Protocol.
Available protocols include TCP, UDP, IP, ICMP, IPv6-ICMP, and any protocol from the Other drop-down list (including All protocols). |
| Step 6 | If you want to restrict a
TCP or
UDP object by port or port range, or if you chose
All from the
Other drop-down list, enter a value in the
Port field.
You can specify any port or port range from 1 to 65535, or any to match all ports. Use a hyphen to specify a range of ports. |
| Step 7 | Restrict an ICMP or IPV6-ICMP port object by
Type and, if applicable,
Code.
You can set the type to any to match any type or set the code to any to match any code for the specified type. |
| Step 8 | Manage overrides for the object:
|
| Step 9 | Click Save. |
What to Do Next
-
If an active policy references your object, deploy configuration changes; see Deploying Configuration Changes.
Security Zones
A security zone is a grouping of one or more inline, passive, switched, routed, or ASA FirePOWER interfaces. Zones divide the network into segments to help you manage and classify traffic flow in various policies and configurations.
The interfaces in a single zone may span multiple devices; you can also configure multiple zones on a single device. An interface can belong to only one zone. All interfaces in a security zone must be of the same type, that is, all inline, passive, switched, routed, or ASA FirePOWER. After you create a security zone, you cannot change the type of interfaces it contains.
You can use zones in various places in the system’s web interface, including access control policies, network discovery rules, and event searches. For example, you could constrain an access control rule by zone, so that it matches only traffic flowing through a particular set of interfaces.
Security zones are created in the following ways:
-
During initial configuration of a 7000 or 8000 Series device, the system creates security zones based on the detection mode you selected for the device. For example, the system creates a Passive zone in passive deployments, while in inline deployments the system creates External and Internal zones. When you register the device to the Firepower Management Center, those security zones are added to the Management Center.
-
You can create security zones on the fly while configuring interfaces on a managed device.
The Security Zones page of the object manager lists the zones configured on your managed devices. The page also displays the type of interfaces in each zone, and you can expand each zone to view which interfaces on which devices belong to each zone.
In a multidomain deployment, you can create security zones at any level. A zone created in an ancestor domain can contain interfaces that reside on devices in different domains. In this situation, subdomain users viewing the ancestor zone configuration in the object manager can see only the interfaces in their domain.
Unless restricted by role, subdomain users can view and edit zones created in ancestor domains. Subdomain users can add and delete interfaces from these zones. They cannot, however, delete or rename the zones. You can neither view nor edit zones created in descendant domains.
If you modify your ASA FirePOWER security contexts, switching from single context mode to multi-context mode or vice versa, the system removes all interfaces from your security zone configurations.
When you update a security zone object, re-deploy configuration changes to managed devices.
Creating Security Zone Objects
|
Smart License |
Classic License |
Supported Devices |
Supported Domains |
Access |
|---|---|---|---|---|
|
Any |
Any |
Any |
Any |
Admin/Access Admin/Network Admin |
If you have not yet configured interfaces on your managed devices, you can create an empty zone and add interfaces to it later.
What to Do Next
-
If an active policy references your object, deploy configuration changes; see Deploying Configuration Changes.
Application Filters
When the Firepower System analyzes IP traffic, it attempts to identify the commonly used applications on your network. Application awareness is crucial to performing application-based access control. The system is delivered with detectors for many applications, and Cisco frequently updates and adds additional detectors via system and vulnerability database (VDB) updates. You can also create your own application protocol detectors to enhance the system’s detection capabilities.
Application filters group applications according to criteria associated with the applications’ risk, business relevance, type, categories, and tags. When you create an application protocol detector, you must characterize the application using those criteria as well. Using application filters allows you to quickly create application conditions for access control rules because you do not have to search for and add applications individually.
Another advantage to using application filters is that you do not have to update access control rules that use filters when you modify or add new applications. For example, if you configure your access control policy to block all social networking applications, and a VDB update includes a new social networking application detector, the policy is updated when you update the VDB. Although you must re-deploy the policy before the system can block the new application, you do not have to update the access control rule that blocks the application.
If the system-provided application filters do not group applications according to your needs, you can create your own filters. User-defined filters can group and combine system-provided filters. For example, you could create a filter that would allow you to block all very high risk, low business relevance applications. You can also create a filter by manually specifying individual applications, although you should keep in mind those filters do not automatically update when you update the system software or the VDB.
As with system-provided application filters, you can use user-defined application filters in access control rules.
The Application Filters list contains the system-provided application filters that you can select to build your own filter. You can constrain the filters that appear by using a search string; this is especially useful for categories and tags.
The Available Applications list contains the individual applications in the filters you select. You can also constrain the applications that appear by using a search string.
The system links multiple filters of the same filter type with an OR operation. Consider a scenario where the medium risk filter contains 100 applications and the high risk filter contains 50 applications. If you select both filters, the system would display 150 available applications.
The system links different types of filters with an AND operation. For example, if you select the medium and high risk filters and the medium and high business relevance filters, the system displays the applications that have medium or high risk, and also have medium or high business relevance.
 Tip | Click an information icon ( |
After you determine the applications you want to add to the filter, you can add them either individually, or if you selected an application filter, All apps matching the filter. You can add multiple filters and multiple applications, in any combination, as long as the total number of items in the Selected Applications and Filters list does not exceed 50.
After you create the application filter, it is listed on the Application Filters page of the object manager. The page displays the total number of conditions that comprise each filter.
Creating Application Filters
|
Smart License |
Classic License |
Supported Devices |
Supported Domains |
Access |
|---|---|---|---|---|
|
Any |
Any |
Any |
Any |
Admin/Access Admin/Network Admin |
What to Do Next
-
If an active policy references your object, deploy configuration changes; see Deploying Configuration Changes.
VLAN Tag Objects
Each VLAN tag object you configure represents a VLAN tag or range of tags.
You can group VLAN tag objects. Note that groups represent multiple objects; using a range of VLAN tags in a single object is not considered a group in this sense.
You can use VLAN tag objects and groups in various places in the system’s web interface, including access control policies, identity rules, and event searches. For example, you could write an access control rule that applies only to a specific VLAN.
Creating VLAN Tag Objects
|
Smart License |
Classic License |
Supported Devices |
Supported Domains |
Access |
|---|---|---|---|---|
|
Any |
Any |
Any |
Any |
Admin/Access Admin/Network Admin |
| Step 1 | Choose . |
| Step 2 | Chose VLAN Tag from the list of object types. |
| Step 3 | Choose Add Object from the Add VLAN Tag drop-down list. |
| Step 4 | Enter a
Name.
In a multidomain deployment, object names must be unique within the domain hierarchy. The system may identify a conflict with the name of an object you cannot view in your current domain. |
| Step 5 | Enter a Description. |
| Step 6 | Enter a value in the VLAN Tag field. Use a hyphen to specify a range of VLAN tags. |
| Step 7 | Manage overrides for the object:
|
| Step 8 | Click Save. |
What to Do Next
-
If an active policy references your object, deploy configuration changes; see Deploying Configuration Changes.
URL Objects
Each URL object you configure represents a single URL or IP address. You can use URL objects and groups in various places in the system’s web interface, including access control policies and event searches. For example, you could write an access control rule that blocks a specific website.
When creating URL objects, especially if you do not configure SSL inspection to decrypt or block encrypted traffic, keep the following points in mind:
-
If you plan to use a URL object to match HTTPS traffic in an access control rule, create the object using the subject common name in the public key certificate used to encrypt the traffic. Also, the system disregards subdomains within the subject common name, so do not include subdomain information. For example, use example.com rather than www.example.com.
-
When matching web traffic using access control rules with URL conditions, the system disregards the encryption protocol (HTTP vs HTTPS). In other words, if you block a website, both HTTP and HTTPS traffic to that website is blocked, unless you use an application condition to refine the rule. When creating a URL object, you do not need to specify the protocol when creating an object. For example, use example.com rather than http://example.com/.
Creating URL Objects
|
Smart License |
Classic License |
Supported Devices |
Supported Domains |
Access |
|---|---|---|---|---|
|
Any |
Any |
Any |
Any |
Admin/Access Admin/Network Admin |
| Step 1 | Choose . |
| Step 2 | Choose URL from the list of object types. |
| Step 3 | Choose Add Object from the Add URL drop-down list. |
| Step 4 | Enter a
Name.
In a multidomain deployment, object names must be unique within the domain hierarchy. The system may identify a conflict with the name of an object you cannot view in your current domain. |
| Step 5 | Optionally, enter a Description. |
| Step 6 | Enter the URL or IP address. You cannot use wildcards (*) in this field. |
| Step 7 | Manage
overrides for the object:
|
| Step 8 | Click Save. |
What to Do Next
-
If an active policy references your object, deploy configuration changes; see Deploying Configuration Changes.
Geolocation Objects
Each geolocation object you configure represents one or more countries or continents that the system has identified as the source or destination of traffic on your monitored network. You can use geolocation objects in various places in the system’s web interface, including access control policies, SSL policies, and event searches. For example, you could write an access control rule that blocks traffic to or from certain countries.
To ensure that you are using up-to-date information to filter your network traffic, Cisco strongly recommends that you regularly update your Geolocation Database (GeoDB).
Creating Geolocation Objects
|
Smart License |
Classic License |
Supported Devices |
Supported Domains |
Access |
|---|---|---|---|---|
|
Any |
Any |
Any |
Any |
Admin/Access Admin/Network Admin |
What to Do Next
-
If an active policy references your object, deploy configuration changes; see Deploying Configuration Changes.
Variable Sets
Variables represent values commonly used in intrusion rules to identify source and destination IP addresses and ports. You can also use variables in intrusion policies to represent IP addresses in rule suppressions, adaptive profiles, and dynamic rule states.
Tip | Preprocessor rules can trigger events regardless of the hosts defined by network variables used in intrusion rules. |
You use variable sets to manage, customize, and group your variables. You can use the default variable set provided by the system or create your own custom sets. Within any set you can modify predefined default variables and add and modify user-defined variables.
Most of the shared object rules and standard text rules that the Firepower System provides use predefined default variables to define networks and port numbers. For example, the majority of the rules use the variable $HOME_NET to specify the protected network and the variable $EXTERNAL_NET to specify the unprotected (or outside) network. In addition, specialized rules often use other predefined variables. For example, rules that detect exploits against web servers use the $HTTP_SERVERS and $HTTP_PORTS variables.
Rules are more effective when variables more accurately reflect your network environment. At a minimum, you should modify default variables in the default set. By ensuring that a variable such as $HOME_NET correctly defines your network and $HTTP_SERVERS includes all web servers on your network, processing is optimized and all relevant systems are monitored for suspicious activity.
To use your variables, you link variable sets to intrusion policies associated with access control rules or with the default action of an access control policy. By default, the default variable set is linked to all intrusion policies used by access control policies.
Adding a variable to any set adds it to all sets; that is, each variable set is a collection of all variables currently configured on your system. Within any variable set, you can add user-defined variables and customize the value of any variable.
Initially, the Firepower System provides a single, default variable set comprised of predefined default values. Each variable in the default set is initially set to its default value, which for a predefined variable is the value set by the Cisco Talos Security Intelligence and Research Group (Talos) and provided in rule updates.
Although you can leave predefined default variables configured to their default values, Cisco recommends that you modify a subset of predefined variables.
You could work with variables only in the default set, but in many cases you can benefit most by adding one or more custom sets, configuring different variable values in different sets, and perhaps even adding new variables.
When using multiple sets, it is important to remember that the current value of any variable in the default set determines the default value of the variable in all other sets.
When you select Variable Sets on the Object Manager page, the object manager lists the default variable set and any custom sets you created.
On a freshly installed system, the default variable set is comprised only of the default variables predefined by Cisco.
Each variable set includes the default variables provided by the system and all custom variables you have added from any variable set. Note that you can edit the default set, but you cannot rename or delete the default set.
In a multidomain deployment, the system generates a default variable set for each subdomain.
Variable Sets in Intrusion Policies
By default, the Firepower System links the default variable set to all intrusion policies used in an access control policy. When you deploy an access control policy that uses an intrusion policy, intrusion rules that you have enabled in the intrusion policy use the variable values in the linked variable set.
When you modify a custom variable set used by an intrusion policy in an access control policy, the system reflects the status for that policy as out-of-date on the Access Control Policy page. You must re-deploy the access control policy to implement changes in your variable set. When you modify the default set, the system reflects the status of all access control policies that use intrusion policies as out-of-date, and you must re-deploy all access control policies to implement your changes.
Variables
Variables belong to one of the following categories:
- Default Variables
-
Variables provided by the Firepower System. You cannot rename or delete a default variable, and you cannot change its default value. However, you can create a customized version of a default variable.
- Customized Variables
-
Variables you create. These variables can include:
-
When you edit the value for a default variable, the system moves the variable from the Default Variables area to the Customized Variables area. Because variable values in the default set determine the default values of variables in custom sets, customizing a default variable in the default set modifies the default value of the variable in all other sets.
-
You can add and delete your own variables, customize their values within different variable sets, and reset customized variables to their default values. When you reset a user-defined variable, it remains in the Customized Variables area.
For example, if you create custom standard text rules, you might also want to add your own user-defined variables to more accurately reflect your traffic or as shortcuts to simplify the rule creation process. Alternatively, if you create a rule that you want to inspect traffic in the “demilitarized zone” (or DMZ) only, you can create a variable named $DMZ whose value lists the server IP addresses that are exposed. You can then use the $DMZ variable in any rule written for this zone.
-
- Advanced Variables
-
Variables provided by the Firepower System under specific conditions. These variables have a very limited deployment.
- Predefined Default Variables
- Network Variables
- Port Variables
- Advanced Variables
- Variable Reset
- Adding Variables to Sets
Predefined Default Variables
By default, the Firepower System provides a single default variable set, which is comprised of predefined default variables. The Cisco Talos Security Intelligence and Research Group (Talos) uses rule updates to provide new and updated intrusion rules and other intrusion policy elements, including default variables.
Because many intrusion rules provided by the system use predefined default variables, you should set appropriate values for these variables. Depending on how you use variable sets to identify traffic on your network, you can modify the values for these default variables in any or all variable sets.
The following table describes the variables provided by the system and indicates which variables you typically would modify. For assistance determining how to tailor variables to your network, contact Professional Services or Support.
Network Variables
Network variables represent IP addresses you can use in intrusion rules that you enable in an intrusion policy and in intrusion policy rule suppressions, dynamic rule states, and adaptive profiles. Network variables differ from network objects and network object groups in that network variables are specific to intrusion policies and intrusion rules, whereas you can use network objects and groups to represent IP addresses in various places in the system’s web interface, including access control policies, network variables, intrusion rules, network discovery rules, event searches, reports, and so on.
You can use network variables in the following configurations to specify the IP addresses of hosts on your network:
-
Intrusion rule Source IPs and Destination IPs header fields allow you to restrict packet inspection to the packets originating from or destined to specific IP addresses.
-
The Network field in source or destination intrusion rule suppressions allows you to suppress intrusion event notifications when a specific IP address or range of IP addresses triggers an intrusion rule or preprocessor.
-
The Network field in source or destination dynamic rule states allows you to detect when too many matches for an intrusion rule or preprocessor rule occur in a given time period.
-
The adaptive profiles Networks field identifies hosts in the network map where you want to improve reassembly of packet fragments and TCP streams in passive deployments.
When you use variables in the fields identified in this section, the variable set you link to an intrusion policy determines the variable values in the network traffic handled by an access control policy that uses the intrusion policy.
You can add any combination of the following network configurations to a variable:
-
any combination of network variables, network objects, and network object groups that you select from the list of available networks
-
individual network objects that you add from the New Variable or Edit Variable page, and can then add to your variable and to other existing and future variables
-
literal, single IP addresses or address blocks
You can list multiple literal IP addresses and address blocks by adding each individually. You can list IPv4 and IPv6 addresses and address blocks alone or in any combination. When specifying IPv6 addresses, you can use any addressing convention defined in RFC 4291.
The default value for included networks in any variable you add is the word any, which indicates any IPv4 or IPv6 address. The default value for excluded networks is none, which indicates no network. You can also specify the address :: in a literal value to indicate any IPv6 address in the list of included networks, or no IPv6 addresses in the list of exclusions.
Adding networks to the excluded list negates the specified addresses and address blocks. That is, you can match any IP address with the exception of the excluded IP address or address blocks.
For example, excluding the literal address 192.168.1.1 specifies any IP address other than 192.168.1.1, and excluding 2001:db8:ca2e::fa4c specifies any IP address other than 2001:db8:ca2e::fa4c.
You can exclude any combination of networks using literal or available networks. For example, excluding the literal values 192.168.1.1 and 192.168.1.5 includes any IP address other than 192.168.1.1 or 192.168.1.5. That is, the system interprets this as “not 192.168.1.1 and not 192.168.1.5,” which matches any IP address other than those listed between brackets.
Note the following points when adding or editing network variables:
-
You cannot logically exclude the value any which, if excluded, would indicate no address. For example, you cannot add a variable with the value any to the list of excluded networks.
-
Network variables identify traffic for the specified intrusion rule and intrusion policy features. Note that preprocessor rules can trigger events regardless of the hosts defined by network variables used in intrusion rules.
-
Excluded values must resolve to a subset of included values. For example, you cannot include the address block 192.168.5.0/24 and exclude 192.168.6.0/24.
Port Variables
Port variables represent TCP and UDP ports you can use in the Source Port and Destination Port header fields in intrusion rules that you enable in an intrusion policy. Port variables differ from port objects and port object groups in that port variables are specific to intrusion rules. You can create port objects for protocols other than TCP and UDP, and you can use port objects in various places in the system’s web interface, including port variables, access control policies, network discovery rules, and event searches.
You can use port variables in the intrusion rule Source Port and Destination Port header fields to restrict packet inspection to packets originating from or destined to specific TCP or UDP ports.
When you use variables in these fields, the variable set you link to the intrusion policy associated with an access control rule or policy determines the values for these variables in the network traffic where you deploy the access control policy.
You can add any combination of the following port configurations to a variable:
-
any combination of port variables and port objects that you select from the list of available ports
Note that the list of available ports does not display port object groups, and you cannot add these to variables.
-
individual port objects that you add from the New Variable or Edit Variable page, and can then add to your variable and to other existing and future variables
Only TCP and UDP ports, including the value any for either type, are valid variable values. If you use the new or edit variables page to add a valid port object that is not a valid variable value, the object is added to the system but is not displayed in the list of available objects. When you use the object manager to edit a port object that is used in a variable, you can only change its value to a valid variable value.
-
single, literal port values and port ranges
You must separate port ranges with a dash (-). Port ranges indicated with a colon (:) are supported for backward compatibility, but you cannot use a colon in port variables that you create.
You can list multiple literal port values and ranges by adding each individually in any combination.
Note the following points when adding or editing port variables:
-
The default value for included ports in any variable you add is the word any, which indicates any port or port range. The default value for excluded ports is none, which indicates no ports.
Tip
To create a variable with the value any, name and save the variable without adding a specific value.
-
You cannot logically exclude the value any which, if excluded, would indicate no ports. For example, you cannot save a variable set when you add a variable with the value any to the list of excluded ports.
-
Adding ports to the excluded list negates the specified ports and port ranges. That is, you can match any port with the exception of the excluded ports or port ranges.
-
Excluded values must resolve to a subset of included values. For example, you cannot include the port range 10-50 and exclude port 60.
Advanced Variables
Advanced variables allow you to configure features that you cannot otherwise configure via the web interface. The Firepower System currently provides only two advanced variables, and you can only edit the USER_CONF advanced variable.
USER_CONF
USER_CONF provides a general tool that allows you to configure one or more features not otherwise available via the web interface.
When editing USER_CONF, you can type up to 4096 total characters on a single line; the line wraps automatically. You can include any number of valid instructions or lines until you reach the 8192 maximum character length for a variable or a physical limit such as disk space. Use the backslash (\) line continuation character after any complete argument in a command directive.
SNORT_BPF
SNORT_BPF is a legacy advanced variable that appears only when it was configured on your system in a Firepower System software release before Version 5.3.0 that you subsequently upgraded to Version 5.3.0 or greater. You can only view or delete this variable. You cannot edit it or recover it after deleting it.
This variable allowed you to apply a Berkeley Packet Filter (BPF) to filter traffic before it reached the system. You should now use access control rules instead of this variable to enforce the filtering once offered by SNORT_BPF. This variable appears only with configurations that existed before system upgrade.
Variable Reset
You can reset a variable to its default value on the variable set new or edit variables page. The following table summarizes the basic principles of resetting variables.
Resetting a variable in a custom set simply resets it to the current value for that variable in the default set.
Conversely, resetting or modifying the value of a variable in the default set always updates the default value of that variable in all custom sets. When the reset icon is grayed out, indicating that you cannot reset the variable, this means that the variable has no customized value in that set. Unless you have customized the value for a variable in a custom set, a change to the variable in the default set updates the value used in any intrusion policy where you have linked the variable set.
You can hover your pointer over the reset icon (![]() )
in a variable set to see the reset value. When the customized value and the
reset value are the same, this indicates one of the following:
)
in a variable set to see the reset value. When the customized value and the
reset value are the same, this indicates one of the following:
Adding Variables to Sets
Adding a variable to a variable set adds it to all other sets. When you add a variable from a custom set, you must choose whether to use the configured value as the customized value in the default set:
-
If you do use the configured value (for example, 192.168.0.0/16), the variable is added to the default set using the configured value as a customized value with a default value of any. Because the current value in the default set determines the default value in other sets, the initial, default value in other custom sets is the configured value (which in the example is 192.168.0.0/16).
-
If you do not use the configured value, the variable is added to the default set using only the default value any and, consequently, the initial, default value in other custom sets is any.
- Example: Adding User-Defined Variables to Default Sets
- Example: Adding User-Defined Variables to Custom Sets
Example: Adding User-Defined Variables to Default Sets
The following diagram illustrates set interactions when you add the user-defined variable Var1 to the default set with the value 192.168.1.0/24.
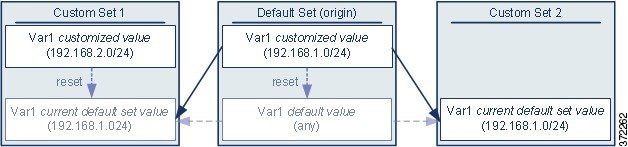
You can customize the value of Var1 in any set. In Custom Set 2 where Var1 has not been customized, its value is 192.168.1.0/24. In Custom Set 1 the customized value 192.168.2.0/24 of Var1 overrides the default value. Resetting a user-defined variable in the default set resets its default value to any in all sets.
It is important to note in this example that, if you do not update Var1 in Custom Set 2, further customizing or resetting Var1 in the default set consequently updates the current, default value of Var1 in Custom Set 2, thereby affecting any intrusion policy linked to the variable set.
Although not shown in the example, note that interactions between sets are the same for user-defined variables and default variables except that resetting a default variable in the default set resets it to the value configured by Cisco in the current rule update.
Example: Adding User-Defined Variables to Custom Sets
The next two examples illustrate variable set interactions when you add a user-defined variable to a custom set. When you save the new variable, you are prompted whether to use the configured value as the default value for other sets. In the following example, you elect to use the configured value.
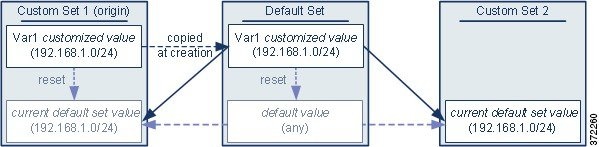
Note that, except for the origin of Var1 from Custom Set 1, this example is identical to the example above where you added Var1 to the default set. Adding the customized value 192.168.1.0/24 for Var1 to Custom Set 1 copies the value to the default set as a customized value with a default value of any. Thereafter, Var1 values and interactions are the same as if you had added Var1 to the default set. As with the previous example, keep in mind that further customizing or resetting Var1 in the default set consequently updates the current, default value of Var1 in Custom Set 2, thereby affecting any intrusion policy linked to the variable set.
In the next example, you add Var1 with the value 192.168.1.0/24 to Custom Set 1 as in the previous example, but you elect not to use the configured value of Var1 as the default value in other sets.
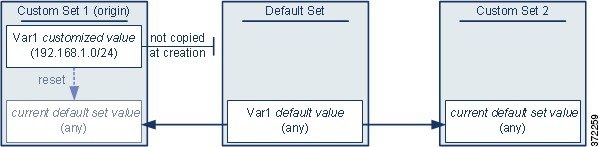
This approach adds Var1 to all sets with a default value of any. After adding Var1, you can customize its value in any set. An advantage of this approach is that, by not initially customizing Var1 in the default set, you decrease your risk of customizing the value in the default set and thus inadvertently changing the current value in a set such as Custom Set 2 where you have not customized Var1.
Managing Variable Sets
|
Smart License |
Classic License |
Supported Devices |
Supported Domains |
Access |
|---|---|---|---|---|
|
Threat |
Protection |
Any |
Any |
Admin/Access Admin/Network Admin |
In a multidomain deployment, the system displays objects created in the current domain, which you can edit. It also displays objects created in ancestor domains, which in most cases you cannot edit. To view and edit objects in a descendant domain, switch to that domain.
| Step 1 | Choose . | ||
| Step 2 | Choose Variable Set from the list of object types. | ||
| Step 3 | Manage your variable sets:
|
Creating Variable Sets
|
Smart License |
Classic License |
Supported Devices |
Supported Domains |
Access |
|---|---|---|---|---|
|
Any |
Any |
Any |
Any |
Admin/Access Admin/Network Admin |
| Step 1 | Choose . |
| Step 2 | Choose Variable Set from the list of object types. |
| Step 3 | Click Add Variable Set. |
| Step 4 | Enter a
Name.
In a multidomain deployment, object names must be unique within the domain hierarchy. The system may identify a conflict with the name of an object you cannot view in your current domain. |
| Step 5 | Optionally, enter a Description. |
| Step 6 | Manage the variables in the set; see Managing Variables. |
| Step 7 | Click Save. |
What to Do Next
-
If an active policy references your object, deploy configuration changes; see Deploying Configuration Changes.
Managing Variables
|
Smart License |
Classic License |
Supported Devices |
Supported Domains |
Access |
|---|---|---|---|---|
|
Threat |
Protection |
Any |
Any |
Admin/Access Admin/Network Admin |
In a multidomain deployment, the system displays objects created in the current domain, which you can edit. It also displays objects created in ancestor domains, which in most cases you cannot edit. To view and edit objects in a descendant domain, switch to that domain.
| Step 1 | Choose . | ||
| Step 2 | Choose Variable Set from the list of object types. | ||
| Step 3 | Click the edit icon ( If a view icon ( | ||
| Step 4 | Manage your variables:
| ||
| Step 5 | Click
Save to save the variable set. If the variable set
is in use by an access control policy, click
Yes to confirm that you want to save your changes.
Because the current value in the default set determines the default value in all other sets, modifying or resetting a variable in the default set changes the current value in other sets where you have not customized the default value. |
What to Do Next
-
If an active policy references your object, deploy configuration changes; see Deploying Configuration Changes.
Adding Variables
|
Smart License |
Classic License |
Supported Devices |
Supported Domains |
Access |
|---|---|---|---|---|
|
Threat |
Protection |
Any |
Any |
Admin/Access Admin/Network Admin |
What to Do Next
-
If an active policy references your object, deploy configuration changes; see Deploying Configuration Changes.
Editing Variables
|
Smart License |
Classic License |
Supported Devices |
Supported Domains |
Access |
|---|---|---|---|---|
|
Threat |
Protection |
Any |
Any |
Admin/Access Admin/Network Admin |
In a multidomain deployment, the system displays objects created in the current domain, which you can edit. It also displays objects created in ancestor domains, which in most cases you cannot edit. To view and edit objects in a descendant domain, switch to that domain.
You can edit both custom and default variables.
You cannot change the Name or Type values in an existing variable.
| Step 1 | In the variable set editor, click the edit icon ( If a view icon ( | ||||
| Step 2 | Modify the variable:
| ||||
| Step 3 | Click Save to save the variable. | ||||
| Step 4 | Click Save to save the variable set. If the variable set is in use by an access control policy, click Yes to confirm that you want to save your changes. Your changes are saved, and any access control policy the variable set is linked to displays an out-of-date status. |
What to Do Next
-
If an active policy references your object, deploy configuration changes; see Deploying Configuration Changes.
Security Intelligence Lists and Feeds
The Security Intelligence feature allows you to specify the traffic that can traverse your network based on the source or destination IP address, domain name, or URL. You configure Security Intelligence in access control policies, separate from access control rules. This is especially useful if you want to blacklist — deny traffic to and from — specific IP addresses or URLs, before the traffic is analyzed by access control rules. You can also add IP addresses, URLs, and domain names to a whitelist to force the system to handle their connections using access control.
If you are not sure whether you want to blacklist a particular IP address or URL, a monitor-only setting allows the system to handle a connection using access control, but also logs the connection’s match to the blacklist.
By default, access control policies use Global whitelists and blacklists for IP addresses and URLs. Similarly, DNS policies use the Global DNS whitelist and blacklist.
In a multidomain deployment, access control policies can also use:
-
Descendant whitelists and blacklists. In ancestor domains, descendant lists represent items whitelisted or blacklisted in subdomains. Descendant lists can also contain items added for lower-level domains by higher-level domain administrators. From an ancestor domain, you cannot view the contents of descendant lists.
-
Domain-specific whitelists and blacklists. In subdomains, domain-specific lists represent items whitelisted or blacklisted in or for the named domain. You can view the contents of domain-specific lists for ancestor domains, and edit the contents of the domain-specific list for your domain.
Global, Descendant, and Domain-specific lists apply to any zone, and you can disable them on a per-policy basis.
Finally, you can build custom whitelists and blacklists for IP addresses, URLs, or domain names, using:
You can constrain these by security zone. In a DNS policy, you can also constrain DNs based on network or VLAN.
Comparing Feeds and Lists
A Security Intelligence feed is a dynamic collection of IP addresses, URLs, or domain names that the Firepower Management Center downloads from an HTTP or HTTPS server at the interval you configure. Because feeds are regularly updated, the system can use up-to-date information to filter your network traffic.
 Note | The system does not perform peer SSL certificate verification when downloading custom feeds, nor does the system support the use of certificate bundles or self-signed certificates to verify the remote peer. |
To help you build blacklists, the Firepower System provides:
-
the Intelligence Feed, which represents IP addresses determined by Talos to have a poor reputation
-
the DNS and URL Intelligence Feed, comprised of domain names and URLs with a poor reputation
When the Firepower Management Center downloads updated feed information, it automatically updates its managed devices. Although it may take a few minutes for a feed update to take effect throughout your deployment, you do not have to re-deploy access control policies after you create or modify a feed, or after a scheduled feed update.
Note | If you want strict control over when the system downloads a feed from the Internet, you can disable automatic updates for that feed. However, Cisco recommends that you allow automatic updates. Although you can manually perform on-demand updates, allowing the system to download feeds on a regular basis provides you with the most up-to-date, relevant data. |
A Security Intelligence list, contrasted with a feed, is a simple static list of IP addresses, domain names, or URLs that you manually upload to the system. Use custom lists to augment and fine-tune feeds and default whitelists and blacklists. Note that editing custom lists (as well as editing network objects and removing entries from a whitelist or blacklist) require an access control policy deploy for your changes to take effect.
Formatting and Corrupt Feed Data
Feed and list source must be a simple text file no larger than 500MB, with one IP address, address block, URL, or domain name per line. Each source must contain only IP addresses, or URLs, or domain names. List source files must use the .txt extension.
In a DNS list entry, you can specify an asterisk (*) wildcard character for a domain label. All labels match the wildcard. For example, an entry of www.example.* matches both www.example.com and www.example.co.
If you add comment lines within the source file, they must start with the pound (#) character. If you upload a source file with comments, the system removes your comments during upload. Source files you download contain all your entries without your comments.
If the system downloads a corrupt feed or a feed with no recognizable entries, the system continues using the old feed data (unless it is the first download). However, if the system can recognize even one entry in the feed, it uses the entries it can recognize.
The default health policy includes the Security Intelligence module, which alerts in a few situations involving Security Intelligence filtering, including if the system cannot update a feed, or if a feed is corrupt or contains no recognizable entries.
Managing Feeds and Lists
You create and manage Security Intelligence lists and feeds, collectively called Security Intelligence objects, using the object manager’s Security Intelligence page.
Note that you cannot delete a custom list or feed that is currently being used in a saved or deployed access control policy. In a multidomain deployment, you also cannot delete a Global list or the default domain-associated lists. You can, however, remove individual items from these lists if the lists belong to the current domain. Similarly, although you cannot delete Intelligence Feeds, editing them allows you to disable or change the update frequency.
- Security Intelligence Object Quick Reference
- Default Whitelists and Blacklists
- Intelligence Feeds
- Custom Security Intelligence Feeds
- Custom Security Intelligence Lists
Security Intelligence Object Quick Reference
The following table provides a quick reference to the system-provided objects you can use to perform Security Intelligence filtering. You cannot constrain these by security zone, nor can you delete them from the system.
|
Object Type |
Method of Use |
Object Manager Edit Capabilities |
Requires Access Control Policy Re-deploy When Modified? |
|---|---|---|---|
|
System-provided Whitelists or Blacklists |
in access control and DNS policies by default |
delete entries only (add entries using the context menu) |
yes when deleting entries; no when adding entries |
|
Intelligence Feed |
in any access control or DNS policy as either a whitelist or blacklist object |
disable or change update frequency |
no |
The following table provides a quick reference to the custom objects you can use to perform Security Intelligence filtering. You can constrain an object by security zone or delete it, unless the system uses the object in a saved or deployed policy.
|
Object Type |
Method of Use |
Object Manager Edit Capabilities |
Requires Access Control Policy Re-deploy When Modified? |
|---|---|---|---|
|
Custom Feeds and Lists |
in any access control or DNS policy as either a whitelist or blacklist object |
fully modify custom feeds, upload modified lists |
no for custom feed, yes for custom lists |
|
Network Object |
in any access control or DNS policy as either a whitelist or blacklist object |
fully modify |
yes |
|
URL Object |
in any access control policy as either a whitelist or blacklist object |
fully modify |
yes |
|
Sinkhole Object |
in a DNS policy rule to redirect traffic to a sinkhole |
fully modify |
yes |
Default Whitelists and Blacklists
In the course of your analysis, you can use the context (right-click) menu to build the following Security Intelligence blacklists and whitelists that apply to your entire deployment:
-
Global Blacklist and Global Whitelist (using IP address hotspots)
-
Global Blacklist for DNS, Global Whitelist for DNS (using DNS query hotspots)
-
Global Blacklist for URL, Global Whitelist for URL (using URL hotspots)
For example, if you notice a set of routable IP addresses in intrusion events associated with exploit attempts, you can immediately blacklist those IP addresses.
By default, access control policies and DNS policies use these Global lists, which apply to any security zone (in DNS policies, to any Network and VLAN as well). You can opt not to use these lists on a per policy basis.
When you add an entry to a Global list, the system automatically updates its managed devices. Although it may take a few minutes for your changes to propagate, you do not have to re-deploy. However, removing an item requires a redeploy.
- Whitelists and Blacklists in a Multitenancy Deployment
- Adding IP Addresses to Security Intelligence Lists Using the Context Menu
- Adding Domain Names and URLs to Security Intelligence Lists Using the Context Menu
- Adding DNS Queries to Security Intelligence Lists Using the Context Menu
Whitelists and Blacklists in a Multitenancy Deployment
In a multidomain deployment, the Global domain owns the Global blacklists and whitelists. Only Global administrators can add to or remove items from the Global lists.
So that subdomain users can whitelist and blacklist networks, domain names, and URLs, multitenancy uses the concepts of Domain lists and Descendant Domain lists:
-
A Domain list is a whitelist or blacklist whose contents apply to a particular subdomain only. The Global lists are Domain lists for the Global domain.
-
A Descendant Domain list is a whitelist or blacklist that aggregates the Domain lists of the current domain’s descendants.
Access control policies and DNS policies use Domain lists and Descendant Domain lists, which apply to any security zone (in DNS policies, to any Network and VLAN as well). Depending on how Security Intelligence is enforced in your deployment, you can opt not to use these lists on a per-policy basis.
Domain Lists
In addition to being able to access (but not edit) the Global lists, each subdomain has its own named lists, the contents of which apply only to that subdomain. For example, a subdomain named Company A owns:-
Domain Blacklist - Company A and Domain Whitelist - Company A
-
Domain Blacklist for DNS - Company A, Domain Whitelist for DNS - Company A
-
Domain Blacklist for URL - Company A, Domain Whitelist for URL - Company A
Any administrator at or above the current domain can populate these lists. You can use the context menu to whitelist or blacklist an item in the current and all descendant domains. However, only an administrator in the associated domain can remove an item from a Domain list.
For example, a Global administrator could choose to blacklist the same IP address in the Global domain and Company A’s domain, but not blacklist it in Company B’s domain. This action would add the same IP address to:
-
Global Blacklist (where it can be removed only by Global administrators)
-
Domain Blacklist - Company A (where it can be removed only by Company A administrators)
The system builds a separate network map for each leaf domain. In a multidomain deployment, using literal IP addresses to constrain this configuration can have unexpected results.
Descendant Domain Lists
A Descendant Domain list is a whitelist or blacklist that aggregates the Domain lists of the current domain’s descendants. Leaf domains do not have Descendant Domain lists.
Descendant Domain lists are useful because a higher-level domain administrator can enforce general Security Intelligence settings, while still allowing subdomain users to blacklist and whitelist items in their own deployment.
For example, the Global domain has the following Descendant Domain lists:
-
Descendant Blacklists - Global, Descendant Whitelists - Global
-
Descendant Blacklists for URL - Global, Descendant Whitelists for URL - Global
-
Descendant Blacklists for URL - Global, Descendant Whitelists for URL - Global
Note | Descendant Domain lists do not appear in the object manager because they are symbolic aggregations, not hand-populated lists. They appear where you can use them: in access control and DNS policies. |
Adding IP Addresses to Security Intelligence Lists Using the Context Menu
|
Smart License |
Classic License |
Supported Devices |
Supported Domains |
Access |
|---|---|---|---|---|
|
Threat |
Protection |
Any |
Any |
Admin/Access Admin/Network Admin |
Because adding an entry to a Security Intelligence list affects access control, you must have one of the following:
| Step 1 | Hover your pointer over an IP address hotspot.
| ||
| Step 2 | Invoke the context menu: | ||
| Step 3 | From the context menu, choose either Whitelist Now or Blacklist Now. | ||
| Step 4 | In a multidomain deployment, click Choose Domains to choose the domains where you want to whitelist or blacklist the IP address. The system builds a separate network map for each leaf domain. In a multidomain deployment, using literal IP addresses to constrain this configuration can have unexpected results. | ||
| Step 5 | Confirm that you want to whitelist or blacklist the IP address. After the Firepower Management Center communicates your addition to its managed devices, your deployment begins filtering traffic according to your change. |
Adding Domain Names and URLs to Security Intelligence Lists Using the Context Menu
|
Smart License |
Classic License |
Supported Devices |
Supported Domains |
Access |
|---|---|---|---|---|
|
Threat |
Protection |
Any |
Any |
Admin/Access Admin/Network Admin |
Because adding an entry to a Security Intelligence list affects access control, you must have one of the following:
| Step 1 | In a connection event table view or the Context Explorer, hover your pointer over a URL hotspot. |
| Step 2 | Invoke the context menu: |
| Step 3 | You have the following options:
|
| Step 4 | In a multidomain deployment, click
Choose Domains to choose the domains where you
want to whitelist or blacklist the domain name.
The system builds a separate network map for each leaf domain. In a multidomain deployment, using literal IP addresses to constrain this configuration can have unexpected results. |
| Step 5 | Confirm that you want to whitelist or blacklist the URL or domain name. After the Firepower Management Center communicates your addition to its managed devices, your deployment begins filtering traffic according to your change. |
Adding DNS Queries to Security Intelligence Lists Using the Context Menu
|
Smart License |
Classic License |
Supported Devices |
Supported Domains |
Access |
|---|---|---|---|---|
|
Threat |
Protection |
Any |
Any |
Admin/Access Admin/Network Admin |
| Step 1 | In a connection event table view or the Context Explorer, hover your pointer over a DNS query hotspot. |
| Step 2 | Invoke the context menu: |
| Step 3 | You have the following options: |
| Step 4 | In a multidomain deployment, click
Choose Domains to choose the domains where you
want to whitelist or blacklist the domain name.
The system builds a separate network map for each leaf domain. In a multidomain deployment, using literal IP addresses to constrain this configuration can have unexpected results. |
| Step 5 | Confirm that you want to whitelist or blacklist the DNS query. After the Firepower Management Center communicates your addition to its managed devices, your deployment begins filtering traffic according to your change. |
Intelligence Feeds
To help you build blacklists, the Firepower System provides two feeds:
-
the Intelligence Feed, which comprises several regularly updated lists of IP addresses determined by the to have a poor reputation.
-
The DNS and URL Intelligence Feed, which comprises several regularly updated lists of domain names and URLs determined by Talos to have a poor reputation.
Each list in either Intelligence Feed represents a specific category: open relays, known attackers, bogus IP addresses (bogon), and so on. In an access control or DNS policy, you can blacklist any or all of the categories.
Because the Intelligence Feeds are regularly updated, the system can use up-to-date information to filter your network traffic. Malicious IP addresses, domain names, and URLs that represent security threats such as malware, spam, botnets, and phishing may appear and disappear faster than you can update and deploy new policies.
Although you cannot delete either Intelligence Feed, editing them allows you to change the frequency of their updates. By default, each feed updates every two hours.
Modifying an Intelligence Feed’s Update Frequency
|
Smart License |
Classic License |
Supported Devices |
Supported Domains |
Access |
|---|---|---|---|---|
|
Threat |
Protection |
Any |
Any |
Admin/Access Admin/Network Admin |
In a multidomain deployment, you can modify the update frequency for custom feeds belonging to your domain. The system-provided Intelligence Feeds belong to the Global domain and can be modified only by an administrator in that domain.
| Step 1 | Choose . |
| Step 2 | Expand the Security Intelligence node, then choose a feed type whose frequency you want to change. |
| Step 3 | Next to the feed you want to update, click the edit icon ( If a view icon ( |
| Step 4 | Edit the Update Frequency. |
| Step 5 | Click Save. |
Custom Security Intelligence Feeds
Custom or third-party Security Intelligence feeds allow you to augment the system-provided Intelligence Feeds with other regularly-updated reputable whitelists and blacklists on the Internet. You can also set up an internal feed, which is useful if you want to update multiple Firepower Management Centers in your deployment using one source list.
Note | You cannot whitelist or blacklist address blocks using a /0 netmask in a Security Intelligence feed. If you want to monitor or block all traffic targeted by a policy, use an access control rule with the Monitor or Block rule action, respectively, and a default value of any for the Source Networks and Destination Networks. |
When you configure a feed, you specify its location using a URL; the URL cannot be Punycode-encoded. By default, the system downloads the entire feed source on the interval you configure, then automatically updates its managed devices.
You also can configure the system to use an md5 checksum to determine whether to download an updated feed. If the checksum has not changed since the last time the system downloaded the feed, the system does not need to re-download it. You may want to use md5 checksums for internal feeds, especially if they are large. The md5 checksum must be stored in a simple text file with only the checksum. Comments are not supported.
Manually updating Security Intelligence feeds updates all feeds, including the Intelligence Feeds.
Creating Security Intelligence Feeds
|
Smart License |
Classic License |
Supported Devices |
Supported Domains |
Access |
|---|---|---|---|---|
|
Threat |
Protection |
Any |
Any |
Admin/Access Admin/Network Admin |
| Step 1 | Choose . |
| Step 2 | Expand the Security Intelligence node, then choose a feed type you want to add. |
| Step 3 | Click the option appropriate to the feed type you chose above: |
| Step 4 | Enter a
Name for the feed.
In a multidomain deployment, object names must be unique within the domain hierarchy. The system may identify a conflict with the name of an object you cannot view in your current domain. |
| Step 5 | Choose Feed from the Type drop-down list. |
| Step 6 | Enter a Feed URL. |
| Step 7 | Optionally, enter an MD5 URL. |
| Step 8 | Choose an Update Frequency. |
| Step 9 | Click Save. Unless you disabled feed updates, the system attempts to download and verify the feed. |
Manually Updating Security Intelligence Feeds
|
Smart License |
Classic License |
Supported Devices |
Supported Domains |
Access |
|---|---|---|---|---|
|
Threat (Security Intelligence) |
Protection (Security Intelligence) |
Any |
Any |
Admin/Access Admin/Network Admin |
After the Firepower Management Center downloads and verifies the feed updates, it communicates any changes to its managed devices. Your deployment begins filtering traffic using the updated feeds.
Custom Security Intelligence Lists
Security Intelligence lists are simple static list of IP addresses and address blocks, URLs, or domain names that you manually upload to the system. Custom lists are useful if you want to augment and fine-tune feeds or one of the global lists, for a single Firepower Management Center’s managed devices.
For example, if a reputable feed improperly blocks your access to vital resources but is overall useful to your organization, you can create a custom whitelist that contains only the improperly classified IP addresses, rather than removing the IP address feed object from the access control policy’s blacklist.
Note | You cannot whitelist or blacklist address blocks using a /0 netmask in a Security Intelligence list. If you want to monitor or block all traffic targeted by a policy, use an access control rule with the Monitor or Block rule action, respectively, and a default value of any for the Source Networks and Destination Networks. |
Regarding list entry formatting, note the following:
-
Netmasks for address blocks can be integers from 0 to 32 or 0 to 128, for IPv4 and IPv6, respectively.
-
Unicode in domain names must be encoded in punycode format, and are case insensitive.
-
Characters in domain names are case-insensitive.
-
Unicode in URLs should be encoded in percent-encoding format.
-
Characters in URL subdirectories are case-sensitive.
-
List entries that start with the pound sign (#) are treated as comments.
Regarding matching list entries, note the following:
-
The system matches sub-level domains if a higher-level domain exists in a URL or DNS list. For example, if you add example.com to a DNS list, the system matches both www.example.com and test.example.com.
-
The system does not perform DNS lookups (forward or reverse) on DNS or URL list entries. For example, if you add http://192.168.0.2 to a URL list, and it resolves to http://www.example.com, the system only matches http://192.168.0.2, not http://www.example.com.
-
If you add a URL ending in a forward slash (/) character to a URL list, only exact URLs match that entry.
-
If you add a URL that does not end in a forward slash to a URL or DNS list, any URL that shares the same common prefix matches that entry. For example, if you add www.example.com to a URL list, the system matches both www.example.com and www.example.com/example.
- Uploading New Security Intelligence Lists to the Firepower Management Center
- Updating Security Intelligence Lists
Uploading New Security Intelligence Lists to the Firepower Management Center
|
Smart License |
Classic License |
Supported Devices |
Supported Domains |
Access |
|---|---|---|---|---|
|
Any |
Any |
Any |
Any |
Admin/Access Admin/Network Admin |
To modify a Security Intelligence list, you must make your changes to the source file and upload a new copy. You cannot modify the file’s contents using the web interface. If you do not have access to the source file, download a copy from the system.
| Step 1 | Choose . |
| Step 2 | Expand the Security Intelligence node, then choose a list type. |
| Step 3 | Click the option appropriate to the list you chose above: |
| Step 4 | Enter a
Name.
In a multidomain deployment, object names must be unique within the domain hierarchy. The system may identify a conflict with the name of an object you cannot view in your current domain. |
| Step 5 | From the Type drop-down list, choose List. |
| Step 6 | Click Browse to browse to the list .txt file, then click Upload. |
| Step 7 | Click Save. |
What to Do Next
-
If an active policy references your object, deploy configuration changes; see Deploying Configuration Changes.
Updating Security Intelligence Lists
|
Smart License |
Classic License |
Supported Devices |
Supported Domains |
Access |
|---|---|---|---|---|
|
Any |
Any |
Any |
Any |
Admin/Access Admin/Network Admin |
In a multidomain deployment, the system displays objects created in the current domain, which you can edit. It also displays objects created in ancestor domains, which in most cases you cannot edit. To view and edit objects in a descendant domain, switch to that domain.
| Step 1 | Choose . |
| Step 2 | Expand the Security Intelligence node, then choose a list type. |
| Step 3 | Next to the list you want to update, click the edit icon ( If a view icon ( |
| Step 4 | If you need a copy of the list to edit, click Download, then follow your browser’s prompts to save the list as a text file. |
| Step 5 | Make changes to the list as necessary. |
| Step 6 | On the Security Intelligence pop-up window, click Browse to browse to the modified list, then click Upload. |
| Step 7 | Click Save. |
What to Do Next
-
If an active policy references your object, deploy configuration changes; see Deploying Configuration Changes.
Sinkhole Objects
A sinkhole object represents either a DNS server that gives non-routeable addresses for all domain names within the sinkhole, or an IP address that does not resolve to a server. You can reference the sinkhole object within a DNS policy rule to redirect matching traffic to the sinkhole. You must assign the object both an IPv4 address and an IPv6 address.
Creating Sinkhole Objects
|
Smart License |
Classic License |
Supported Devices |
Supported Domains |
Access |
|---|---|---|---|---|
|
Threat |
Protection |
Any |
Any |
Admin/Access Admin/Network Admin |
| Step 1 | Choose . |
| Step 2 | Choose Sinkhole from the list of object types. |
| Step 3 | Click Add Sinkhole. |
| Step 4 | Enter a
Name.
In a multidomain deployment, object names must be unique within the domain hierarchy. The system may identify a conflict with the name of an object you cannot view in your current domain. |
| Step 5 | Enter the IPv4 Address and IPv6 Address of your sinkhole. |
| Step 6 | You have the following options: |
| Step 7 | If you want to assign an Indication of Compromise (IoC) type to your sinkhole, choose one from the Type drop-down. |
| Step 8 | Click Save. |
File Lists
If you use AMP for Firepower, and the AMP cloud incorrectly identifies a file’s disposition, you can add the file to a file list to better detect the file in the future. These files are specified using SHA-256 hash values. Each file list can contain up to 10000 unique SHA-256 values.
There are two predefined categories of file lists:
- Clean List
-
If you add a file to this list, the system treats it as if the AMP cloud assigned a clean disposition.
- Custom Detection List
-
If you add a file to this list, the system treats it as if the AMP cloud assigned a malware disposition.
In a multidomain deployment, a clean list and custom detection list is present for each domain. In lower-level domains, you can view but not modify ancestor's lists.
Because you manually specify the blocking behavior for the files included in these lists, the system does not query the AMP cloud for these files’ dispositions. You must configure a rule in the file policy with either a Malware Cloud Lookup or Block Malware action and a matching file type to calculate a file’s SHA value.
 Caution | Do not include malware on the clean list. The clean list overrides both the AMP cloud and the custom detection list. |
- Source Files for File Lists
- Adding Individual SHA-256 Values to File Lists
- Uploading Individual Files to File Lists
- Uploading Source Files to File Lists
- Editing SHA-256 Values in File Lists
- Downloading Source Files from File Lists
Source Files for File Lists
You can add multiple SHA-256 values to a file list by uploading a comma-separated value (CSV) source file containing a list of SHA-256 values and descriptions. The Firepower Management Center validates the contents and populates the file list with valid SHA-256 values.
The source file must be a simple text file with a .csv file name extension. Any header must start with a pound sign (#); it is treated as a comment and not uploaded. Each entry should contain a single SHA-256 value followed by a description and end with either the LF or CR+LF Newline character. The system ignores any additional information in the entry.
-
Deleting a source file from the file list also removes all associated SHA-256 hashes from the file list.
-
You cannot upload multiple files to a file list if the successful source file upload results in the file list containing more than 10000 distinct SHA-256 values.
-
The system truncates descriptions exceeding 256 characters to the first 256 characters on upload. If the description contains commas, you must use an escape character (\,). If no description is included, the source file name is used instead.
-
All non-duplicate SHA-256 values are added to the file list. If a file list contains a SHA-256 value, and you upload a source file containing that value, the newly uploaded value does not modify the existing SHA-256 value. When viewing captured files, file events, or malware events related to the SHA-256 value, any threat name or description is derived from the individual SHA-256 value.
-
The system does not upload invalid SHA-256 values in a source file.
-
If multiple uploaded source files contain an entry for the same SHA-256 value, the system uses the most recent value.
-
If a source file contains multiple entries for the same SHA-256 value, the system uses the last one.
-
You cannot directly edit a source file within the object manager. To make changes, you must first modify your source file directly, delete the copy on the system, then upload the modified source file.
-
The number of entries associated with a source file refers to the number of distinct SHA-256 values. If you delete a source file from a file list, the total number of SHA-256 entries the file list contains decreases by the number of valid entries in the source file.
Adding Individual SHA-256 Values to File Lists
|
Smart License |
Classic License |
Supported Devices |
Supported Domains |
Access |
|---|---|---|---|---|
|
Malware |
Malware |
Firepower |
Any |
Admin/Network Admin/Access Admin |
You can submit a file’s SHA-256 value to add it to a file list. You cannot add duplicate SHA-256 values.
In a multidomain deployment, the system displays objects created in the current domain, which you can edit. It also displays objects created in ancestor domains, which in most cases you cannot edit. To view and edit objects in a descendant domain, switch to that domain.
| Step 1 | Choose . |
| Step 2 | Choose File List from the list of object types. |
| Step 3 | Click the edit icon ( If a view icon ( |
| Step 4 | Choose Enter SHA Value from the Add by drop-down list. |
| Step 5 | Enter a description of the source file in the Description field. |
| Step 6 | Enter or paste the file’s entire value in the SHA-256 field. The system does not support matching partial values. |
| Step 7 | Click Add. |
| Step 8 | Click Save. |
What to Do Next
-
If an active policy references your object, deploy configuration changes; see Deploying Configuration Changes.
Note | After configuration changes are deployed, the system no longer queries the AMP cloud for files on the list. |
Uploading Individual Files to File Lists
|
Smart License |
Classic License |
Supported Devices |
Supported Domains |
Access |
|---|---|---|---|---|
|
Malware |
Malware |
Any |
Any |
Admin/Access Admin/Network Admin |
If you have a copy of the file you want to add to a file list, you can upload the file to the Firepower Management Center for analysis; the system calculates the file’s SHA-256 value and adds the file to the list. The system does not enforce a limit on the size of files for SHA-256 calculation.
In a multidomain deployment, the system displays objects created in the current domain, which you can edit. It also displays objects created in ancestor domains, which in most cases you cannot edit. To view and edit objects in a descendant domain, switch to that domain.
| Step 1 | Choose . |
| Step 2 | Choose File List from the list of object types. |
| Step 3 | Click the edit icon ( If a view icon ( |
| Step 4 | From the Add by drop-down list, choose Calculate SHA. |
| Step 5 | Optionally, enter a description of the file in the Description field. If you do not enter a description, the file name is used for the description on upload. |
| Step 6 | Click Browse, and choose a file to upload. |
| Step 7 | Click Calculate and Add SHA. |
| Step 8 | Click Save. |
What to Do Next
-
If an active policy references your object, deploy configuration changes; see Deploying Configuration Changes.
Note | After you deploy configuration changes, the system no longer queries the AMP cloud for files on the list. |
Uploading Source Files to File Lists
|
Smart License |
Classic License |
Supported Devices |
Supported Domains |
Access |
|---|---|---|---|---|
|
Malware |
Malware |
Any |
Any |
Admin/Access Admin/Network Admin |
In a multidomain deployment, the system displays objects created in the current domain, which you can edit. It also displays objects created in ancestor domains, which in most cases you cannot edit. To view and edit objects in a descendant domain, switch to that domain.
| Step 1 | Choose . |
| Step 2 | Click File List. |
| Step 3 | Click the edit icon ( If a view icon ( |
| Step 4 | In the Add by drop-down list, choose List of SHAs. |
| Step 5 | Optionally, enter a description of the source file in the Description field. If you do not enter a description, the system uses the file name. |
| Step 6 | Click Browse to browse to the source file, then click Upload and Add List. |
| Step 7 | Click Save. |
What to Do Next
-
If an active policy references your object, deploy configuration changes; see Deploying Configuration Changes.
Note | After you deploy the policies, the system no longer queries the AMP cloud for files on the list. |
Editing SHA-256 Values in File Lists
|
Smart License |
Classic License |
Supported Devices |
Supported Domains |
Access |
|---|---|---|---|---|
|
Malware |
Malware |
Any |
Any |
Admin/Access Admin/Network Admin |
You can edit or delete individual SHA-256 values on a file list. Note that you cannot directly edit a source file within the object manager. To make changes, you must first modify your source file directly, delete the copy on the system, then upload the modified source file.
In a multidomain deployment, the system displays objects created in the current domain, which you can edit. It also displays objects created in ancestor domains, which in most cases you cannot edit. To view and edit objects in a descendant domain, switch to that domain.
| Step 1 | Choose . |
| Step 2 | Click File List. |
| Step 3 | Click the edit icon ( If a view icon ( |
| Step 4 | You can: |
| Step 5 | Click Save to update the file entry in the list. |
| Step 6 | Click Save to save the file list. |
What to Do Next
-
If an active policy references your object, deploy configuration changes; see Deploying Configuration Changes.
Note | After configuration changes are deployed, the system no longer queries the AMP cloud for files on the list. |
Downloading Source Files from File Lists
|
Smart License |
Classic License |
Supported Devices |
Supported Domains |
Access |
|---|---|---|---|---|
|
Malware |
Malware |
Any |
Any |
Admin/Access Admin/Network Admin |
In a multidomain deployment, the system displays objects created in the current domain, which you can edit. It also displays objects created in ancestor domains, which in most cases you cannot edit. To view and edit objects in a descendant domain, switch to that domain.
| Step 1 | Choose . |
| Step 2 | Choose File List from the list of object types. |
| Step 3 | Click the edit icon ( If a view icon ( |
| Step 4 | Next to the source file you want to download, click the view
icon ( |
| Step 5 | Click Download SHA List and follow the prompts to save the source file. |
| Step 6 | Click Close. |
Cipher Suite Lists
A cipher suite list is an object comprised of several cipher suites. Each predefined cipher suite value represents a cipher suite used to negotiate an SSL- or TLS-encrypted session. You can use cipher suites and cipher suite lists in SSL rules to control encrypted traffic based on whether the client and server negotiated the SSL session using that cipher suite. If you add a cipher suite list to an SSL rule, SSL sessions negotiated with any of the cipher suites in the list match the rule.
Note | Although you can use cipher suites in the web interface in the same places as cipher suite lists, you cannot add, modify, or delete cipher suites. |
Creating Cipher Suite Lists
|
Smart License |
Classic License |
Supported Devices |
Supported Domains |
Access |
|---|---|---|---|---|
|
Any |
Any |
Any except NGIPSv |
Any |
Admin/Access Admin/Network Admin |
| Step 1 | Choose . |
| Step 2 | Choose Cipher Suite List from the list of object types. |
| Step 3 | Click Add Cipher Suites. |
| Step 4 | Enter a
Name.
In a multidomain deployment, object names must be unique within the domain hierarchy. The system may identify a conflict with the name of an object you cannot view in your current domain. |
| Step 5 | Choose one or more cipher suites from the Available Ciphers list. |
| Step 6 | Click Add. |
| Step 7 | Optionally,
click the delete icon ( |
| Step 8 | Click Save. |
What to Do Next
-
If an active policy references your object, deploy configuration changes; see Deploying Configuration Changes.
Distinguished Name Objects
Each distinguished name object represents the distinguished name listed for a public key certificate’s subject or issuer. You can use distinguished name objects and groups in SSL rules to control encrypted traffic based on whether the client and server negotiated the SSL session using a server certificate with the distinguished name as subject or issuer.
Your distinguished name object can contain the common name attribute (CN). If you add a common name without “CN=” then the system prepends “CN=” before saving the object.
You can also add a distinguished name with one of each attribute listed in the following table, separated by commas.
|
up to 64 alphanumeric, backslash (/), hyphen (-), quotation ("), or asterisk (*) characters, or spaces |
||
|
up to 64 alphanumeric, backslash (/), hyphen (-), quotation ("), or asterisk (*) characters, or spaces |
||
|
up to 64 alphanumeric, backslash (/), hyphen (-), quotation ("), or asterisk (*) characters, or spaces |
You can define one or more asterisks (*) as wild cards in an attribute. In a common name attribute, you can define one or more asterisks per domain name label. Wild cards match only within that label, though you can define multiple labels with wild cards. See the following table for examples.
Creating Distinguished Name Objects
|
Smart License |
Classic License |
Supported Devices |
Supported Domains |
Access |
|---|---|---|---|---|
|
Any |
Any |
Any except NGIPSv |
Any |
Admin/Access Admin/Network Admin |
| Step 1 | Choose . |
| Step 2 | Expand the Distinguished Name node, and choose Individual Objects. |
| Step 3 | Click Add Distinguished Name. |
| Step 4 | Enter a
Name.
In a multidomain deployment, object names must be unique within the domain hierarchy. The system may identify a conflict with the name of an object you cannot view in your current domain. |
| Step 5 | In the
DN field, enter a value for the distinguished name
or common name. You have the following options:
|
| Step 6 | Click Save. |
What to Do Next
-
If an active policy references your object, deploy configuration changes; see Deploying Configuration Changes.
PKI Objects
PKI objects represent the public key certificates and paired private keys required to support your deployment. Internal and trusted CA objects consist of certificate authority (CA) certificates; internal CA objects also contain the private key paired with the certificate. Internal and external certificate objects consist of server certificates; internal certificate objects also contain the private key paired with the certificate.
If you use trusted certificate authority objects and internal certificate objects to configure ISE, you can establish a connection to ISE.
If you use internal certificate objects to configure captive portal, the system can authenticate the identity of your captive portal device when connecting to users' web browsers.
If you use trusted certificate authority objects to configure realms, you can configure secure connections to LDAP or AD servers.
If you use PKI objects in SSL rules, you can match traffic encrypted with:
If you use PKI objects in SSL rules, you can decrypt:
-
outgoing traffic by re-signing the server certificate with an internal CA object
-
incoming traffic using the known private key in an internal certificate object
You can manually input certificate and key information, upload a file containing that information, or in some cases, generate a new CA certificate and private key.
When you view a list of PKI objects in the object manager, the system displays the certificate’s Subject distinguished name as the object value. Hover your pointer over the value to view the full certificate Subject distinguished name. To view other certificate details, edit the PKI object.
Note | The Firepower Management Center and managed devices encrypt all private keys stored in internal CA objects and internal certificate objects with a randomly generated key before saving them. If you upload private keys that are password protected, the appliance decrypts the key using the user-supplied password, then reencrypts it with the randomly generated key before saving it. |
- Internal Certificate Authority Objects
- Trusted Certificate Authority Objects
- External Certificate Objects
- Internal Certificate Objects
Internal Certificate Authority Objects
Each internal certificate authority (CA) object you configure represents the CA public key certificate of a CA your organization controls. The object consists of the object name, CA certificate, and paired private key. You can use internal CA objects and groups in SSL rules to decrypt outgoing encrypted traffic by re-signing the server certificate with the internal CA.
Note | If you reference an internal CA object in a Decrypt - Resign SSL rule and the rule matches an encrypted session, the user’s browser may warn that the certificate is not trusted while negotiating the SSL handshake. To avoid this, add the internal CA object certificate to either the client or domain list of trusted root certificates. |
You can create an internal CA object in the following ways:
-
import an existing RSA-based or elliptic curve-based CA certificate and private key
-
generate a new self-signed RSA-based CA certificate and private key
-
generate an unsigned RSA-based CA certificate and private key. You must submit a certificate signing request (CSR) to another CA to sign the certificate before using the internal CA object.
After you create an internal CA object containing a signed certificate, you can download the CA certificate and private key. The system encrypts downloaded certificates and private keys with a user-provided password.
Whether system-generated or user-created, you can modify the internal CA object name, but cannot modify other object properties.
You cannot delete an internal CA object that is in use. Additionally, after you edit an internal CA object used in an SSL policy, the associated access control policy goes out-of-date. You must re-deploy the access control policy for your changes to take effect.
- CA Certificate and Private Key Import
- Importing a CA Certificate and Private Key
- Generating a New CA Certificate and Private Key
- New Signed Certificates
- Creating an Unsigned CA Certificate and CSR
- Uploading a Signed Certificate Issued in Response to a CSR
- CA Certificate and Private Key Downloads
- Downloading a CA Certificate and Private Key
CA Certificate and Private Key Import
You can configure an internal CA object by importing an X.509 v3 CA certificate and private key. You can upload files encoded in one of the following supported formats:
If the private key file is password-protected, you can supply the decryption password. If the certificate and key are encoded in the PEM format, you can also copy and paste the information.
You can upload only files that contain proper certificate or key information, and that are paired with each other. The system validates the pair before saving the object.
Note | If you configure a rule with the Decrypt - Resign action, the rule matches traffic based on the referenced internal CA certificate’s encryption algorithm type, in addition to any configured rule conditions. You must upload an elliptic curve-based CA certificate to decrypt outgoing traffic encrypted with an elliptic curve-based algorithm, for example. |
Importing a CA Certificate and Private Key
|
Smart License |
Classic License |
Supported Devices |
Supported Domains |
Access |
|---|---|---|---|---|
|
Any |
Any |
Any except NGIPSv |
Any |
Admin/Access Admin/Network Admin |
In a multidomain deployment, the system displays objects created in the current domain, which you can edit. It also displays objects created in ancestor domains, which in most cases you cannot edit. To view and edit objects in a descendant domain, switch to that domain.
| Step 1 | Choose . |
| Step 2 | Expand the PKI node, and choose Internal CAs. |
| Step 3 | Click Import CA. |
| Step 4 | Enter a
Name.
In a multidomain deployment, object names must be unique within the domain hierarchy. The system may identify a conflict with the name of an object you cannot view in your current domain. |
| Step 5 | Above the Certificate Data field, click Browse to upload a DER or PEM-encoded X.509 v3 CA certificate file. |
| Step 6 | Above the Key field, click Browse to upload a DER or PEM-encoded paired private key file. |
| Step 7 | If the uploaded file is password-protected, check the Encrypted, and the password is: check box, and enter the password. |
| Step 8 | Click Save. |
What to Do Next
-
If an active policy references your object, deploy configuration changes; see Deploying Configuration Changes.
Generating a New CA Certificate and Private Key
|
Smart License |
Classic License |
Supported Devices |
Supported Domains |
Access |
|---|---|---|---|---|
|
Any |
Any |
Any except NGIPSv |
Any |
Admin/Access Admin/Network Admin |
You can configure an internal CA object by providing identification information to generate a self-signed RSA-based CA certificate and private key.
The generated CA certificate is valid for ten years. The Valid From date is a week before generation.
In a multidomain deployment, the system displays objects created in the current domain, which you can edit. It also displays objects created in ancestor domains, which in most cases you cannot edit. To view and edit objects in a descendant domain, switch to that domain.
| Step 1 | Choose . |
| Step 2 | Expand the PKI node, and choose Internal CAs. |
| Step 3 | Click Generate CA. |
| Step 4 | Enter a
Name.
In a multidomain deployment, object names must be unique within the domain hierarchy. The system may identify a conflict with the name of an object you cannot view in your current domain. |
| Step 5 | Enter the identification attributes. |
| Step 6 | Click Generate self-signed CA. |
New Signed Certificates
You can configure an internal CA object by obtaining a signed certificate from a CA. This involves two steps:
-
Provide identification information to configure the internal CA object. This generates an unsigned certificate and paired private key, and creates a certificate signing request (CSR) to a CA you specify.
-
After the CA issues the signed certificate, upload it to the internal CA object, replacing the unsigned certificate.
You can only reference an internal CA object in an SSL rule if it contains a signed certificate.
Creating an Unsigned CA Certificate and CSR
|
Smart License |
Classic License |
Supported Devices |
Supported Domains |
Access |
|---|---|---|---|---|
|
Any |
Any |
Any except NGIPSv |
Any |
Admin/Access Admin/Network Admin |
| Step 1 | Choose . |
| Step 2 | Expand the PKI node, and choose Internal CAs. |
| Step 3 | Click Generate CA. |
| Step 4 | Enter a
Name.
In a multidomain deployment, object names must be unique within the domain hierarchy. The system may identify a conflict with the name of an object you cannot view in your current domain. |
| Step 5 | Enter the identification attributes. |
| Step 6 | Click Generate CSR. |
| Step 7 | Copy the CSR to submit to a CA. |
| Step 8 | Click OK. |
What to Do Next
-
You must upload a signed certificate issued by a CA as described in Uploading a Signed Certificate Issued in Response to a CSR
Uploading a Signed Certificate Issued in Response to a CSR
|
Smart License |
Classic License |
Supported Devices |
Supported Domains |
Access |
|---|---|---|---|---|
|
Any |
Any |
Any except NGIPSv |
Any |
Admin/Access Admin/Network Admin |
In a multidomain deployment, the system displays objects created in the current domain, which you can edit. It also displays objects created in ancestor domains, which in most cases you cannot edit. To view and edit objects in a descendant domain, switch to that domain.
Once uploaded, the signed certificate can be referenced in SSL rules.
| Step 1 | Choose . |
| Step 2 | Expand the PKI node, and choose Internal CAs. |
| Step 3 | Click the edit icon ( |
| Step 4 | Click Install Certificate. |
| Step 5 | Click Browse to upload a DER or PEM-encoded X.509 v3 CA certificate file. |
| Step 6 | If the uploaded file is password protected, check the Encrypted, and the password is: check box, and enter the password. |
| Step 7 | Click Save to upload a signed certificate to the CA object. |
What to Do Next
-
If an active policy references your object, deploy configuration changes; see Deploying Configuration Changes.
CA Certificate and Private Key Downloads
You can back up or transfer a CA certificate and paired private key by downloading a file containing the certificate and key information from an internal CA object.
Caution | Always store downloaded key information in a secure location. |
The system encrypts the private key stored in an internal CA object with a randomly generated key before saving it to disk. If you download a certificate and private key from an internal CA object, the system first decrypts the information before creating a file containing the certificate and private key information. You must then provide a password the system uses to encrypt the downloaded file.
Caution | Private keys downloaded as part of a system backup are decrypted, then stored in the unencrypted backup file. |
Downloading a CA Certificate and Private Key
|
Smart License |
Classic License |
Supported Devices |
Supported Domains |
Access |
|---|---|---|---|---|
|
Any |
Any |
Any except NGIPSv |
Any |
Admin/Access Admin/Network Admin |
In a multidomain deployment, the system displays objects created in the current domain, which you can edit. It also displays objects created in ancestor domains, which in most cases you cannot edit. To view and edit objects in a descendant domain, switch to that domain.
You can download CA certificates for both the current domain and ancestor domains.
| Step 1 | Choose . |
| Step 2 | Expand the PKI node, and choose Internal CAs. |
| Step 3 | Next to the internal CA object whose certificate and private key
you want to download, click the edit icon ( In a multidomain
deployment, click the view icon ( |
| Step 4 | Click Download. |
| Step 5 | Enter an encryption password in the Password and Confirm Password fields. |
| Step 6 | Click OK. |
Trusted Certificate Authority Objects
Each trusted certificate authority (CA) object you configure represents a CA public key certificate belonging to a trusted CA. The object consists of the object name and CA public key certificate. You can use external CA objects and groups in:
-
your SSL policy to control traffic encrypted with a certificate signed either by the trusted CA, or any CA within the chain of trust.
-
your realm configurations to establish secure connections to LDAP or AD servers.
-
your ISE integration configuration to connect to ISE. Select trusted certificate authority objects for the pxGrid Server CA and MNT Server CA fields.
Note | Adding a CRL to an object has no effect when the object is used in your ISE integration configuration. |
You cannot delete a trusted CA object that is in use. Additionally, after you edit a trusted CA object that is in use, the associated access control policy goes out-of-date. You must re-deploy the access control policy for your changes to take effect.
- Trusted CA Object
- Adding a Trusted CA Object
- Certificate Revocation Lists in Trusted CA Objects
- Adding a Certificate Revocation List to a Trusted CA Object
Trusted CA Object
You can configure an external CA object by uploading an X.509 v3 CA certificate. You can upload a file encoded in one of the following supported formats:
If the file is password-protected, you must supply the decryption password. If the certificate is encoded in the PEM format, you can also copy and paste the information.
You can upload a CA certificate only if the file contains proper certificate information; the system validates the certificate before saving the object.
Adding a Trusted CA Object
|
Smart License |
Classic License |
Supported Devices |
Supported Domains |
Access |
|---|---|---|---|---|
|
Any |
Any |
Any except NGIPSv |
Any |
Admin/Access Admin/Network Admin |
| Step 1 | Choose . |
| Step 2 | Expand the PKI node, and choose Trusted CAs. |
| Step 3 | Click Add Trusted CAs. |
| Step 4 | Enter a
Name.
In a multidomain deployment, object names must be unique within the domain hierarchy. The system may identify a conflict with the name of an object you cannot view in your current domain. |
| Step 5 | Click Browse to upload a DER or PEM-encoded X.509 v3 CA certificate file. |
| Step 6 | If the file is password-protected, check the Encrypted, and the password is: check box, and enter the password. |
| Step 7 | Click Save. |
What to Do Next
-
If an active policy references your object, deploy configuration changes; see Deploying Configuration Changes.
Certificate Revocation Lists in Trusted CA Objects
You can upload CRLs to a trusted CA object. If you reference that trusted CA object in an SSL policy, you can control encrypted traffic based on whether the CA that issued the session encryption certificate subsequently revoked the certificate. You can upload files encoded in one of the following supported formats:
After you add the CRL, you can view the list of revoked certificates. If you want to modify a CRL you have uploaded to an object, you must delete the object and recreate it.
You can upload only files that contain a proper CRL. There is no limit to the number of CRLs you can add to a trusted CA object. However, you must save the object each time you upload a CRL, before adding another CRL.
Note | Adding a CRL to an object has no effect when the object is used in your ISE integration configuration. |
Adding a Certificate Revocation List to a Trusted CA Object
|
Smart License |
Classic License |
Supported Devices |
Supported Domains |
Access |
|---|---|---|---|---|
|
Any |
Any |
Any except NGIPSv |
Any |
Admin/Access Admin/Network Admin |
Note | Adding a CRL to an object has no effect when the object is used in your ISE integration configuration. |
| Step 1 | Choose . |
| Step 2 | Expand the PKI node, and choose Trusted CAs. |
| Step 3 | Click the edit icon ( If a view icon ( |
| Step 4 | Click Add CRL to upload a DER or PEM-encoded CRL file. |
| Step 5 | Click OK. |
What to Do Next
-
If an active policy references your object, deploy configuration changes; see Deploying Configuration Changes.
External Certificate Objects
Each external certificate object you configure represents a server public key certificate that does not belong to your organization. The object consists of the object name and certificate. You can use external certificate objects and groups in SSL rules to control traffic encrypted with the server certificate. For example, you can upload a self-signed server certificate that you trust, but cannot verify with a trusted CA certificate.
You can configure an external certificate object by uploading an X.509 v3 server certificate. You can upload a file in one of the following supported formats:
You can upload only files that contains proper server certificate information; the system validates the file before saving the object. If the certificate is encoded in the PEM format, you can also copy and paste the information.
Adding External Certificate Objects
|
Smart License |
Classic License |
Supported Devices |
Supported Domains |
Access |
|---|---|---|---|---|
|
Any |
Any |
Any except NGIPSv |
Any |
Admin/Access Admin/Network Admin |
| Step 1 | Choose . |
| Step 2 | Expand the PKI node, and choose External Certs. |
| Step 3 | Click Add External Cert. |
| Step 4 | Enter a
Name.
In a multidomain deployment, object names must be unique within the domain hierarchy. The system may identify a conflict with the name of an object you cannot view in your current domain. |
| Step 5 | Above the Certificate Data field, click Browse to upload a DER or PEM-encoded X.509 v3 server certificate file. |
| Step 6 | Click Save. |
What to Do Next
-
If an active policy references your object, deploy configuration changes; see Deploying Configuration Changes.
Internal Certificate Objects
Each internal certificate object you configure represents a server public key certificate belonging to your organization. The object consists of the object name, public key certificate, and paired private key. You can use internal certificate objects and groups in:
-
your SSL rules to decrypt traffic incoming to one of your organization’s servers using the known private key.
-
your ISE integration configuration to connect to ISE. Select an internal certificate object for the MC Server Certificate field.
-
your captive portal configuration to authenticate the identity of your captive portal device when connecting to users' web browsers. Select an internal certificate object for the Server Certificate field.
You can configure an internal certificate object by uploading an X.509 v3 RSA-based or elliptic curve-based server certificate and paired private key. You can upload a file in one of the following supported formats:
If the file is password-protected, you must supply the decryption password. If the certificate and key are encoded in the PEM format, you can also copy and paste the information.
You can upload only files that contain proper certificate or key information, and that are paired with each other. The system validates the pair before saving the object.
After you create the internal certificate object, you can modify the name, but cannot modify other object properties.
You cannot delete an internal certificate object that is in use. Additionally, after you edit an internal certificate object that is in use, the associated access control policy goes out-of-date. You must re-deploy the access control policy for your changes to take effect.
Adding Internal Certificate Objects
|
Smart License |
Classic License |
Supported Devices |
Supported Domains |
Access |
|---|---|---|---|---|
|
Any |
Any |
Any except NGIPSv |
Any |
Admin/Access Admin/Network Admin |
| Step 1 | Choose . |
| Step 2 | Expand the PKI node, and choose Internal Certs. |
| Step 3 | Click Add Internal Cert. |
| Step 4 | Enter a
Name.
In a multidomain deployment, object names must be unique within the domain hierarchy. The system may identify a conflict with the name of an object you cannot view in your current domain. |
| Step 5 | Above the Certificate Data field, click Browse to upload a DER or PEM-encoded X.509 v3 server certificate file. |
| Step 6 | Above the Key field, or click Browse to upload a DER or PEM-encoded paired private key file. |
| Step 7 | If the uploaded private key file is password-protected, check the Encrypted, and the password is: check box, and enter the password. |
| Step 8 | Click Save. |
 Feedback