- Introduction
- Requirements
- Set up Secure Email Threat Defense
- Configuration Settings
- Messages
- Downloads
- Insights
- High Impact Personnel List
- Manage Users
- User Settings
- Administration Settings
- Message Rules
- Cisco XDR
- API
- Cisco Security Cloud App for Splunk
- Deactivate Secure Email Threat Defense
- Frequently Asked Questions (FAQ)
Set Up Secure Email Threat Defense
Secure Email Threat Defense setup includes the following:
2.![]() Define your Secure Email Gateway (SEG)
Define your Secure Email Gateway (SEG)
3.![]() Define your Message Sources
Define your Message Sources
6.![]() Import Your Microsoft Email Domains and Review your Policy Configuration
Import Your Microsoft Email Domains and Review your Policy Configuration
These steps assume you meet the Requirements.
Sign in to Your Account
1.![]() Follow the directions in the Welcome email from Cisco to set up your user account.
Follow the directions in the Welcome email from Cisco to set up your user account.
Secure Email Threat Defense uses Cisco Security Cloud Sign On to manage user authentication. For information on Security Cloud Sign On, see https://cisco.com/go/securesignon. If you are an existing Cisco Threat Response, Cisco Secure Malware Analytics (formerly Threat Grid), or Cisco Secure Endpoint (formerly AMP) customer, sign in with your existing credentials. If you are not an existing user, you will need to create a new Security Cloud Sign On account.
2.![]() Once you have successfully signed in, accept the Terms and Conditions.
Once you have successfully signed in, accept the Terms and Conditions.
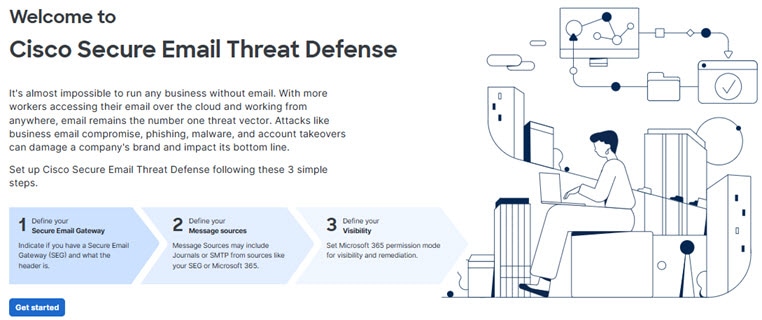
3.![]() You now have access to the Welcome to Cisco Secure Email Threat Defense page. This page shows an overview of the main setup steps. Click Get Started and follow the setup wizard as described in the following sections.
You now have access to the Welcome to Cisco Secure Email Threat Defense page. This page shows an overview of the main setup steps. Click Get Started and follow the setup wizard as described in the following sections.
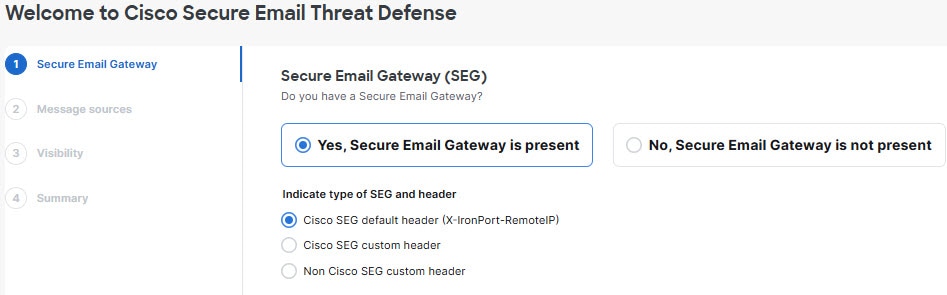
Define your Secure Email Gateway (SEG)
Regardless of your message source (chosen in the next section), it is important to indicate if a Secure Email Gateway (SEG) is present and which header can be used to identify it in incoming journals so Secure Email Threat Defense can determine the true originating sender of a message. Without this configuration, it may appear that all messages come from the SEG, which could result in false positive convictions.
1.![]() Indicate if a Secure Email Gateway (SEG) is present by selecting Yes, Secure Email Gateway is present or No, Secure Email Gateway is not present.
Indicate if a Secure Email Gateway (SEG) is present by selecting Yes, Secure Email Gateway is present or No, Secure Email Gateway is not present.
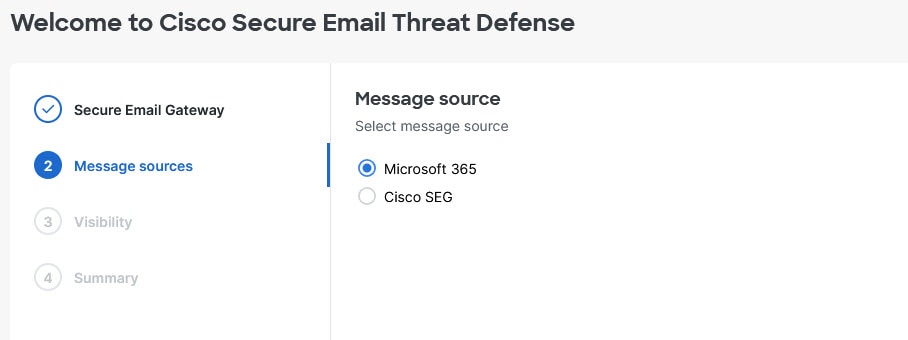
Define your Message Sources
1.![]() Select your message source: Microsoft 365 or Cisco SEG. If you selected No SEG in the previous step, Microsoft 365 is assumed as your message source and the wizard skips this step.
Select your message source: Microsoft 365 or Cisco SEG. If you selected No SEG in the previous step, Microsoft 365 is assumed as your message source and the wizard skips this step.
Define your Visibility
The visibility defines the type of remediation policy you can apply. The options available will differ depending on your previous selections.
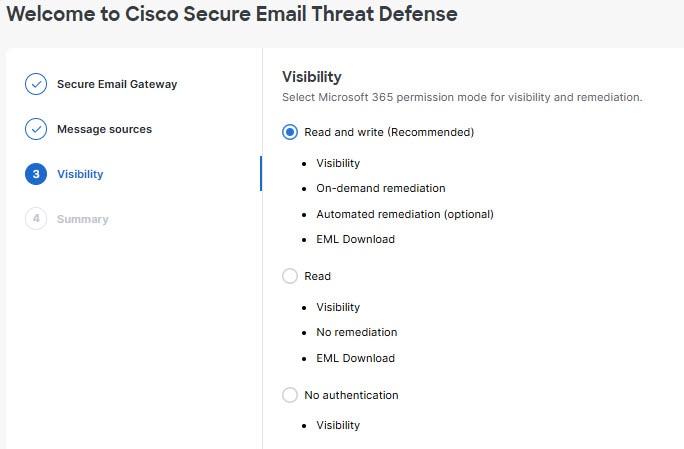
–![]() Read and Write – Allows visibility and on-demand or automated remediation (that is, move or delete suspect messages). Read and write permissions will be requested from Microsoft 365.
Read and Write – Allows visibility and on-demand or automated remediation (that is, move or delete suspect messages). Read and write permissions will be requested from Microsoft 365.
–![]() Read – Allows visibility only, no remediation. Read-only permissions will be requested from Microsoft 365.
Read – Allows visibility only, no remediation. Read-only permissions will be requested from Microsoft 365.
Note: If you choose Read and Write, you will need to turn on the remediation policy in your Configuration Settings once your setup is complete. To apply auto-remediation to all internal emails, ensure the Apply Policy to domains not in the list above box on the Configuration > Mail flow configuration > Domains panel is selected.
For Microsoft 365 Authentication mode, Secure Email Threat Defense requests access permissions from Microsoft. These permissions depend on whether you choose Read and Write or Read mode. You can find details about the permissions in the linked Microsoft documentation.
This option is available if you use a Cisco SEG as your message source. It provides visibility only; you cannot remediate messages.
2.![]() If you chose Microsoft 365 Authentication, connect to Microsoft 365.
If you chose Microsoft 365 Authentication, connect to Microsoft 365.
a.![]() Click Next to connect to Microsoft 365.
Click Next to connect to Microsoft 365.
b.![]() Log in to your Microsoft 365 account, as prompted. This account must have Global Admin rights; Secure Email Threat Defense will not store or use the account. To learn why these rights are required, see Cisco Secure Email Threat Defense FAQ: Why are Microsoft 365 Global Admin rights required to set up Secure Email Threat Defense?.
Log in to your Microsoft 365 account, as prompted. This account must have Global Admin rights; Secure Email Threat Defense will not store or use the account. To learn why these rights are required, see Cisco Secure Email Threat Defense FAQ: Why are Microsoft 365 Global Admin rights required to set up Secure Email Threat Defense?.
c.![]() Click Accept to accept the permissions for the Secure Email Threat Defense app. You will be redirected to the Secure Email Threat Defense setup page.
Click Accept to accept the permissions for the Secure Email Threat Defense app. You will be redirected to the Secure Email Threat Defense setup page.
Set up Your Message Source
A summary page provides instructions to set up your message source to send your email data to Secure Email Threat Defense. Complete the steps below for your message source.
Microsoft 365 Message Source
If you selected Microsoft 365 as your message source, you must configure Microsoft 365 to send journals to Secure Email Threat Defense. To do this, you add a journal rule. If you have a Gateway in place, add a connector in Microsoft 365 before adding your journal rule.
1.![]() For users with a Secure Email Gateway (SEG) : Add a connector in Microsoft 365.
For users with a Secure Email Gateway (SEG) : Add a connector in Microsoft 365.
To ensure journals are sent directly from Microsoft 365 to Secure Email Threat Defense without passing through the Secure Email Gateway, we recommend adding an outbound connector in Microsoft 365. You need to add the connector before setting up journaling.
From the Microsoft 365 Exchange Admin Center, create a new connector by using the following settings in the Add a connector wizard:
–![]() Connection from : Office 365.
Connection from : Office 365.
–![]() Connection to : Partner organization.
Connection to : Partner organization.
–![]() Connector name : Outbound to Cisco Secure Email Threat Defense (select the Turn it on check box).
Connector name : Outbound to Cisco Secure Email Threat Defense (select the Turn it on check box).
–![]() Use of connector : Only when email messages are sent to these domains (add mail.cmd.cisco.com for North American environments, mail.eu.cmd.cisco.com for European environments, mail.au.etd.cisco.com for Australian environments, mail.in.etd.cisco.com for Indian environments, or mail.ua.etd.cisco.com for United Arab Emirates).
Use of connector : Only when email messages are sent to these domains (add mail.cmd.cisco.com for North American environments, mail.eu.cmd.cisco.com for European environments, mail.au.etd.cisco.com for Australian environments, mail.in.etd.cisco.com for Indian environments, or mail.ua.etd.cisco.com for United Arab Emirates).
–![]() Routing : Use the MX record associated with the partner’s domain.
Routing : Use the MX record associated with the partner’s domain.
–![]() Security restrictions : Always use Transport Layer Security (TLS) to secure the connection (recommended); Issued by a trusted certificate authority (CA).
Security restrictions : Always use Transport Layer Security (TLS) to secure the connection (recommended); Issued by a trusted certificate authority (CA).
–![]() Validation email : Your journal address from the Secure Email Threat Defense setup page.
Validation email : Your journal address from the Secure Email Threat Defense setup page.
Note: The connector validation may fail if your Microsoft 365 tenant is already configured with conditional mail routing using an Exchange transport rule to route outbound mail to an existing connector. While journal messages are system-privileged and are not affected by transport rules, the connector validation test email is not privileged and is affected by transport rules.
To overcome this validation issue, locate the preexisting transport rule and add an exception for your Secure Email Threat Defense journal address. Wait for this change to be effective, then retest the new connector validation.
2.![]() Configure Microsoft 365 to send journals to Secure Email Threat Defense. To do this, add a journal rule.
Configure Microsoft 365 to send journals to Secure Email Threat Defense. To do this, add a journal rule.
a.![]() Copy your journal address from the Secure Email Threat Defense setup page. If you need to repeat this process later, you can also find your journal address on the Administration page.
Copy your journal address from the Secure Email Threat Defense setup page. If you need to repeat this process later, you can also find your journal address on the Administration page.
b.![]() Go to your Microsoft Purview compliance portal: https://purview.microsoft.com/
Go to your Microsoft Purview compliance portal: https://purview.microsoft.com/
c.![]() Navigate to Solutions > Data lifecycle management > Exchange (legacy) > Journal rules.
Navigate to Solutions > Data lifecycle management > Exchange (legacy) > Journal rules.
Note: If you haven’t already specified an email to send the undeliverable reports to, go to Settings > Data Lifecycle Management > Exchange (legacy) and add an Exchange recipient to the Send undeliverable journal reports to field, then click Save. The email address used will not be journaled; do not use an address you want Secure Email Threat Defense to analyze. If you do not have a recipient you want to use for this purpose, you will need to create one. When you’re finished, return to the Journal rules page.
d.![]() To create a new journal rule, click + New rule.
To create a new journal rule, click + New rule.
e.![]() Paste the journal address from the Secure Email Threat Defense setup page into the Send journal reports to field.
Paste the journal address from the Secure Email Threat Defense setup page into the Send journal reports to field.
f.![]() In the Journal rule name field, enter Cisco Secure Email Threat Defense.
In the Journal rule name field, enter Cisco Secure Email Threat Defense.
g.![]() Under Journal messages sent or received from, select Everyone.
Under Journal messages sent or received from, select Everyone.
h.![]() Under Type of message to journal, select All messages.
Under Type of message to journal, select All messages.
j.![]() Review your choices, then click Submit to finish creating your rule.
Review your choices, then click Submit to finish creating your rule.
3.![]() Return to the Secure Email Threat Defense setup page. Click Review Policy.
Return to the Secure Email Threat Defense setup page. Click Review Policy.
Gateway Message Source
If you selected Gateway as your message source, enable your Cisco Secure Email Cloud Gateway’s Threat Defense Connector to send messages to Secure Email Threat Defense.
1.![]() Copy your Message Intake Address from the Secure Email Threat Defense setup page. If you need to repeat this process later, you can find your Message Intake address on the Administration page.
Copy your Message Intake Address from the Secure Email Threat Defense setup page. If you need to repeat this process later, you can find your Message Intake address on the Administration page.
2.![]() From the Secure Email Cloud Gateway UI, select Security Services > Threat Defense Connector.
From the Secure Email Cloud Gateway UI, select Security Services > Threat Defense Connector.
3.![]() Select the Enable Threat Defense Connector checkbox.
Select the Enable Threat Defense Connector checkbox.
4.![]() Enter the Message Intake Address you copied from Secure Email Threat Defense in step 1.
Enter the Message Intake Address you copied from Secure Email Threat Defense in step 1.
5.![]() Click Submit to commit your changes.
Click Submit to commit your changes.
6.![]() Return to the Secure Email Threat Defense setup page. Click Review Policy.
Return to the Secure Email Threat Defense setup page. Click Review Policy.
Import Your Microsoft Email Domains and Review your Policy Configuration
When the setup wizard is complete, you will be on a Summary page for the wizard. Click Review policy to review your policy configuration. For information on policy settings, see Configuration Settings.
Secure Email Threat Defense imports domains with email capabilities from your Microsoft 365 tenant. Go to the Configuration > Mail flow configuration > Domains panel to import your domains so you can apply automated remediation to specific domains. Secure Email Threat Defense treats newly imported domains differently depending on whether you have the Unlisted domains setting on or off:
■![]() If the Unlisted domains setting is Apply policy to domains not listed above, your policy is applied to any new domains that are imported.
If the Unlisted domains setting is Apply policy to domains not listed above, your policy is applied to any new domains that are imported.
■![]() If the Unlisted domains setting is Do not apply policy to domains not listed above, your policy is not applied to any new domains that are imported.
If the Unlisted domains setting is Do not apply policy to domains not listed above, your policy is not applied to any new domains that are imported.
By default, the Unlisted domains setting is set to Do not apply policy to domains not listed above. If you have chosen Microsoft 365 Read and Write as your message source and visibility, you should set this setting to Apply policy to domains not listed above as soon as you have imported your current domains.
Manual Import
To manually import your Microsoft 365 email domains (recommended when you set up Secure Email Threat Defense for the first time):
1.![]() Navigate to the Configuration > Mail flow configuration page.
Navigate to the Configuration > Mail flow configuration page.
2.![]() In the Domains panel, click the Update list button to import your domains into Secure Email Threat Defense.
In the Domains panel, click the Update list button to import your domains into Secure Email Threat Defense.
3.![]() Click the pencil icon in the top right corner of the Domains panel to adjust the automated remediation setting for each domain. Click Save to save your settings.
Click the pencil icon in the top right corner of the Domains panel to adjust the automated remediation setting for each domain. Click Save to save your settings.
4.![]() In the Domains panel, we recommend editing the Unlisted domains settings to Apply policy to domains not listed above. This ensures your policy is applied to all internal emails and to any domains that are automatically imported later.
In the Domains panel, we recommend editing the Unlisted domains settings to Apply policy to domains not listed above. This ensures your policy is applied to all internal emails and to any domains that are automatically imported later.
Automatic Import
Domains are automatically imported every 24 hours to ensure the list is up-to-date.
 Feedback