- Introduction
- Requirements
- Set up Secure Email Threat Defense
- Configuration Settings
- Messages
- Downloads
- Insights
- High Impact Personnel List
- Manage Users
- User Settings
- Administration Settings
- Message Rules
- Cisco XDR
- API
- Cisco Security Cloud App for Splunk
- Deactivate Secure Email Threat Defense
- Frequently Asked Questions (FAQ)
Configuration Settings
Note: This chapter describes settings that were previously referred to as Policy settings
The settings on the Configuration pages determine how Secure Email Threat Defense handles mail. Default settings are applied when you Set Up Secure Email Threat Defense. Be sure to review your settings to make sure Secure Email Threat Defense is handling your mail in the way you want it to.
Configuration settings are split into three areas:
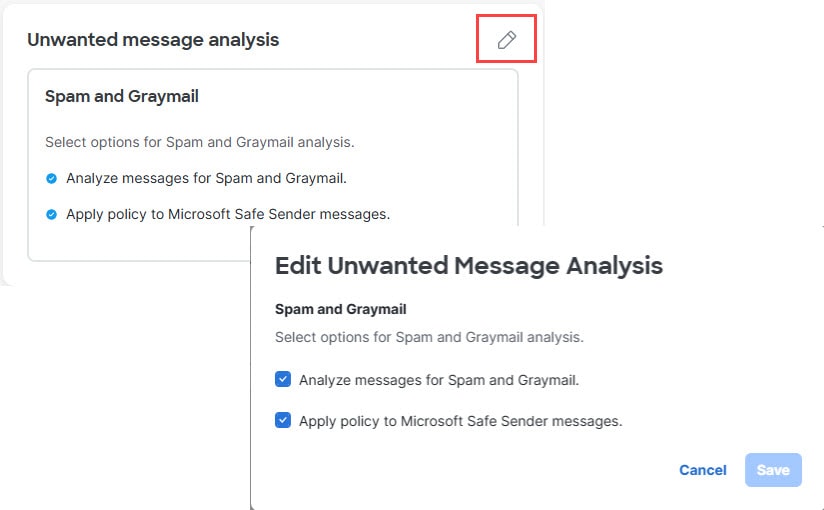
Edit items on these pages by clicking the pencil icon in the top right corner of a panel, or at the end of a row. After you click the pencil, you are taken to a dialog or workflow to make changes to those settings. For example:
Mail Flow Configuration
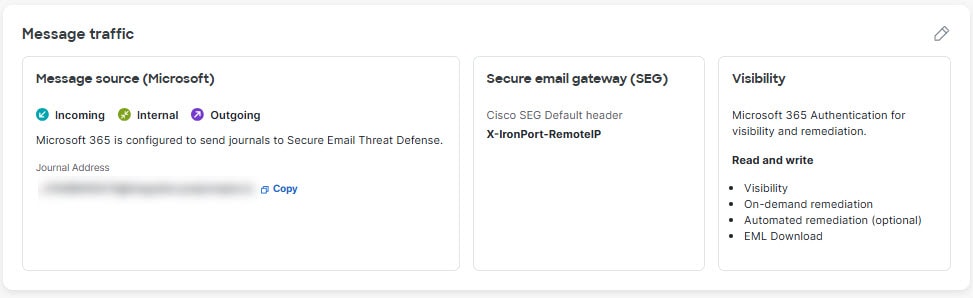
The Mail flow configuration page shows your message sources and Microsoft 365 visibility, and information related to your domains.
The Message traffic panel houses settings for message sources and Microsoft 365 authentication and visibility. Your Microsoft journal address or Secure Email Gateway (SEG) Message intake address is also accessible from this panel. Click the pencil icon to change these settings. This takes you to a workflow to make changes.
The Domains panel lists your email domains. Imported domains help determine message direction. Specific domains can be excluded from automated remediation policies.
The domains list is automatically updated every 24 hours or you can click Import list to refresh your domains immediately.
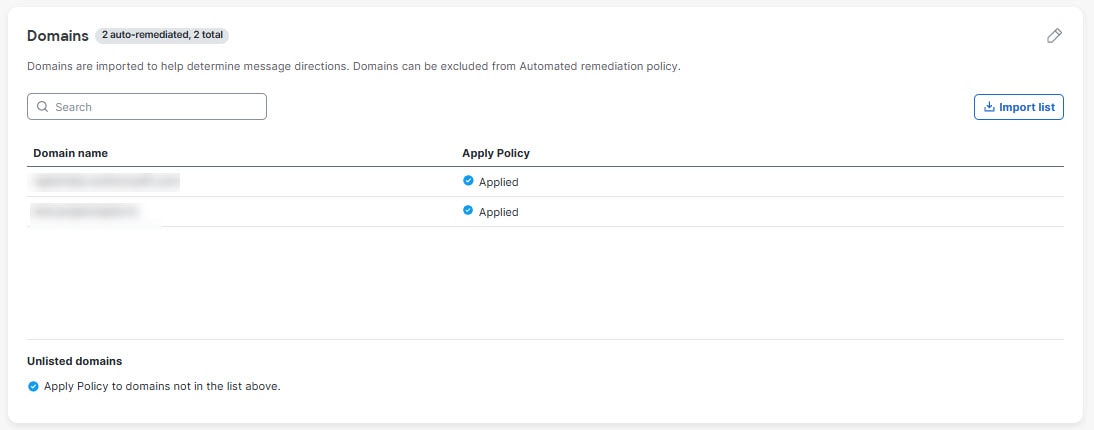
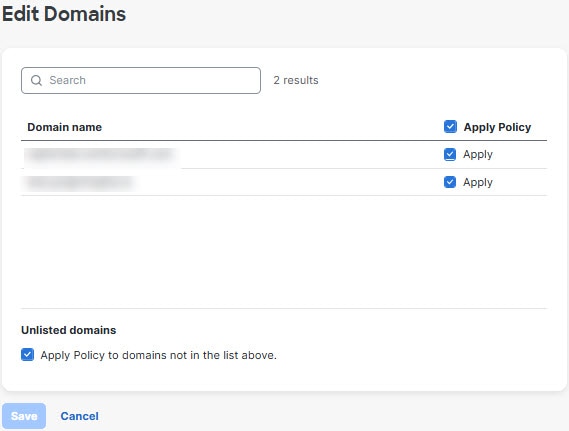
Click the pencil icon in the top right corner of the Domains panel to adjust which domains you want to apply your policies to and if you want to apply policies to domains not in the list. Domains might not be in your list if they haven’t been imported yet.
|
|
|
|
|
|---|---|---|---|
Manually selected when you set up Secure Email Threat Defense. |
|||
■ – – If you select Read, you need only set the Attachment Analysis and Message Analysis directions. Remediation policy will not be applied. |
Manually selected when you set up Secure Email Threat Defense. If you change your Microsoft 365 Authentication setting, you will be redirected to reset your Microsoft 365 permissions. Note: When you choose Microsoft 365 Authentication: Read and Write, you should also verify your Policy configuration settings. |
||
The presence of a Secure Email Gateway (SEG) impacts how Secure Email Threat Defense identifies the Sender IP. |
■ ■ – |
Manually selected when you set up Secure Email Threat Defense. For more information, see Configuration Settings with a Gateway. |
|
| Domains - Domains are imported to help determine message directions. Domains are automatically imported from Microsoft 365 every 24 hours. Domains can be excluded from automated remediation policies. |
|||
Unchecked. When you turn on Read and Write visibility, select this check box. |
|||
Switching Your Message Source
To change your message source, navigate to the Configuration > Mail flow configuration page.
1.![]() Click the pencil icon to be taken to a wizard that will walk you through the steps to change your message source.
Click the pencil icon to be taken to a wizard that will walk you through the steps to change your message source.
2.![]() A notice indicating you are switching your message source appears. Click Continue.
A notice indicating you are switching your message source appears. Click Continue.
3.![]() The Switch Message Source dialog appears. You need to configure your previous message source to stop sending messages to Secure Email Threat Defense. For details on how to do this, see Delete Your Secure Email Threat Defense Journal Rule or Configure your Gateway to Stop Sending Messages.
The Switch Message Source dialog appears. You need to configure your previous message source to stop sending messages to Secure Email Threat Defense. For details on how to do this, see Delete Your Secure Email Threat Defense Journal Rule or Configure your Gateway to Stop Sending Messages.
4.![]() Select the checkbox indicating you have stopped sending journals or messages from your previous source, then click Next.
Select the checkbox indicating you have stopped sending journals or messages from your previous source, then click Next.
5.![]() Configure your new message source using the Message Intake Address or Journal Address shown in the dialog. The steps for setting up each type of message source are detailed in Set up Your Message Source.
Configure your new message source using the Message Intake Address or Journal Address shown in the dialog. The steps for setting up each type of message source are detailed in Set up Your Message Source.
Global Settings
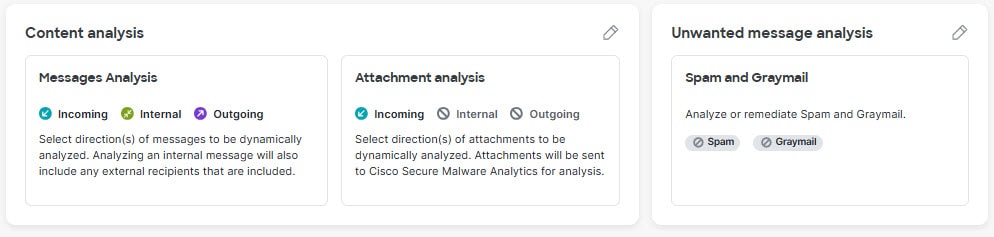
The Global settings page is where you define which content you want to analyze.
The Content analysis panel shows which directions of messages and attachments you want Secure Email Threat Defense to Analyze. The Unwanted message analysis panel shows if you have chosen to analyze or remediate Spam and Graymail messages. Click the pencil next to each panel to edit your settings.
Policy Configuration
The Policy configuration page is where you configure remediation actions the system will use for verdicts returned by the scanners as well as exceptions the system will use based on specific senders and recipients.
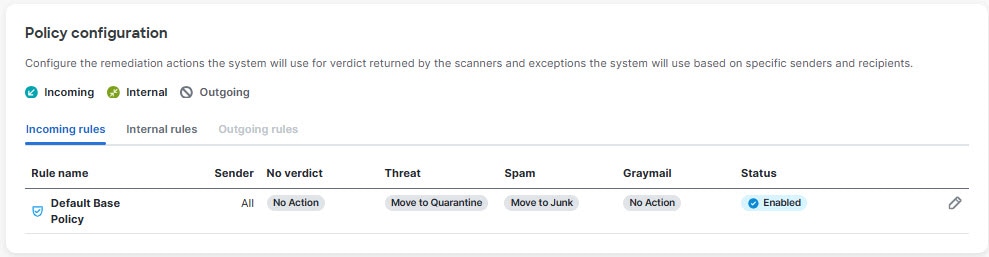
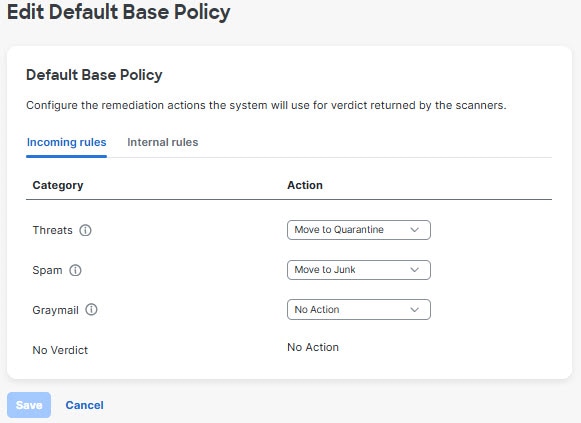
Default Base Policy
The Default Base Policy defines your default remediation actions. You can indicate different actions for different types of messages (Threats, Spam, and Graymail) and different message directions.
Click the pencil icon at the right side of the Default Base Policy row to be taken to the Edit Default Base Policy dialog where you can make adjustments for different directions and categories. You can set different policies by message direction.
Internal message settings also apply to outgoing messages in a sender’s mailbox. For example, if bob@yourcompany.com sends a message to a recipient outside of your domain, the Internal message settings apply to the message in his sent messages folder.
Policy Exceptions
Use the rules under Administration > Message Rules to create exceptions to your default policy. Additional policy exception options will be added to the Policy configuration page in future releases.
Configuration Settings with a Gateway
If you have a Cisco Email Security appliance or similar gateway in place, consider using the following settings.
|
|
|
|---|---|
It is important to indicate that a Secure Email Gateway (SEG) is present and which header can be used to identify it in incoming journals so Secure Email Threat Defense can determine the true originating sender of a message. Without this configuration it may appear that all messages come from the SEG, which could result in false positive convictions.
For information on verifying or configuring the header on Cisco Secure Email Cloud Gateway (formerly CES) or Cisco Secure Email Gateway (formerly ESA), see https://docs.ces.cisco.com/docs/configuring-asyncos-message-filter-to-add-sender-ip-header-for-email-threat-defense.
If you are using Microsoft 365 as your message source, we also recommend bypassing your appliance so journals are sent directly from Microsoft 365 to Secure Email Threat Defense. You can do this by adding a connector in Microsoft 365, as described in Set Up Secure Email Threat Defense.
 Feedback