- About this Guide
-
- Information About Cisco Unified Communications Features
- Using the Cisco Unified Communication Wizard
- Configuring the Cisco Phone Proxy
- Configuring the TLS Proxy for Encrypted Voice Inspection
- Configuring Cisco Mobility Advantage
- Configuring Cisco Unified Presence
- Configuring Cisco Unified Communications Intercompany Media Engine
- Index
Getting Started with Application Layer Protocol Inspection
This chapter describes how to configure application layer protocol inspection. Inspection engines are required for services that embed IP addressing information in the user data packet or that open secondary channels on dynamically assigned ports. These protocols require the ASA to do a deep packet inspection instead of passing the packet through the fast path (see the general operations configuration guide for more information about the fast path). As a result, inspection engines can affect overall throughput. Several common inspection engines are enabled on the ASA by default, but you might need to enable others depending on your network.
Information about Application Layer Protocol Inspection
This section includes the following topics:
How Inspection Engines Work
As illustrated in Figure 9-1, the ASA uses three databases for its basic operation:
- ACLs—Used for authentication and authorization of connections based on specific networks, hosts, and services (TCP/UDP port numbers).
- Inspections—Contains a static, predefined set of application-level inspection functions.
- Connections (XLATE and CONN tables)—Maintains state and other information about each established connection. This information is used by the Adaptive Security Algorithm and cut-through proxy to efficiently forward traffic within established sessions.
Figure 9-1 How Inspection Engines Work
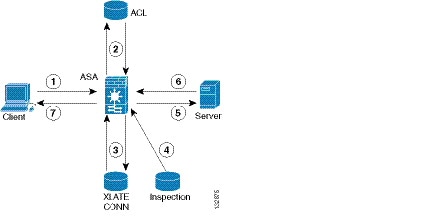
In Figure 9-1, operations are numbered in the order they occur, and are described as follows:
1. A TCP SYN packet arrives at the ASA to establish a new connection.
2. The ASA checks the ACL database to determine if the connection is permitted.
3. The ASA creates a new entry in the connection database (XLATE and CONN tables).
4. The ASA checks the Inspections database to determine if the connection requires application-level inspection.
5. After the application inspection engine completes any required operations for the packet, the ASA forwards the packet to the destination system.
6. The destination system responds to the initial request.
7. The ASA receives the reply packet, looks up the connection in the connection database, and forwards the packet because it belongs to an established session.
The default configuration of the ASA includes a set of application inspection entries that associate supported protocols with specific TCP or UDP port numbers and that identify any special handling required.
When to Use Application Protocol Inspection
When a user establishes a connection, the ASA checks the packet against ACLs, creates an address translation, and creates an entry for the session in the fast path, so that further packets can bypass time-consuming checks. However, the fast path relies on predictable port numbers and does not perform address translations inside a packet.
Many protocols open secondary TCP or UDP ports. The initial session on a well-known port is used to negotiate dynamically assigned port numbers.
Other applications embed an IP address in the packet that needs to match the source address that is normally translated when it goes through the ASA.
If you use applications like these, then you need to enable application inspection.
When you enable application inspection for a service that embeds IP addresses, the ASA translates embedded addresses and updates any checksum or other fields that are affected by the translation.
When you enable application inspection for a service that uses dynamically assigned ports, the ASA monitors sessions to identify the dynamic port assignments, and permits data exchange on these ports for the duration of the specific session.
Guidelines and Limitations
This section includes the guidelines and limitations for this feature.
Supported in single and multiple context mode.
Supported in routed and transparent firewall mode.
State information for multimedia sessions that require inspection are not passed over the state link for stateful failover. The exception is GTP, which is replicated over the state link.
Supports IPv6 for the following inspections:
Supports NAT64 for the following inspections:
Additional Guidelines and Limitations
Some inspection engines do not support PAT, NAT, outside NAT, or NAT between same security interfaces. See “Default Settings and NAT Limitations” for more information about NAT support.
For all the application inspections, the ASA limits the number of simultaneous, active data connections to 200 connections. For example, if an FTP client opens multiple secondary connections, the FTP inspection engine allows only 200 active connections and the 201 connection is dropped and the adaptive security appliance generates a system error message.
Inspected protocols are subject to advanced TCP-state tracking, and the TCP state of these connections is not automatically replicated. While these connections are replicated to the standby unit, there is a best-effort attempt to re-establish a TCP state.
Default Settings and NAT Limitations
By default, the configuration includes a policy that matches all default application inspection traffic and applies inspection to the traffic on all interfaces (a global policy). Default application inspection traffic includes traffic to the default ports for each protocol. You can only apply one global policy, so if you want to alter the global policy, for example, to apply inspection to non-standard ports, or to add inspections that are not enabled by default, you need to either edit the default policy or disable it and apply a new one.
Table 9-1 lists all inspections supported, the default ports used in the default class map, and the inspection engines that are on by default, shown in bold. This table also notes any NAT limitations.
Application1
|
Standards2
|
|||
|---|---|---|---|---|
No NAT support is available for name resolution through WINS. |
||||
Beware of MTU limitations stripping ActiveX and Java. If the MTU is too small to allow the Java or ActiveX tag to be included in one packet, stripping may not occur. |
||||
NetBIOS is supported by performing NAT of the packets for NBNS UDP port 137 and NBDS UDP port 138. |
||||
These ports are not included in the default-inspection-traffic class for the ScanSafe inspection. |
||||
Does not handle TFTP uploaded Cisco IP Phone configurations under certain circumstances. |
||||
The default rule includes UDP port 111; if you want to enable Sun RPC inspection for TCP port 111, you need to create a new rule that matches TCP port 111 and performs Sun RPC inspection. |
||||
The default policy configuration includes the following commands:
Configu ring Application Layer Protocol Inspection
This feature uses Modular Policy Framework to create a service policy. Service policies provide a consistent and flexible way to configure ASA features. For example, you can use a service policy to create a timeout configuration that is specific to a particular TCP application, as opposed to one that applies to all TCP applications. See “Configuring a Service Policy Using the Modular Policy Framework,” for more information. For some applications, you can perform special actions when you enable inspection. See “Configuring a Service Policy Using the Modular Policy Framework,” for more information.
Inspection is enabled by default for some applications. See the “Default Settings and NAT Limitations” section for more information. Use this section to modify your inspection policy.
Detailed Steps
Step 1 To identify the traffic to which you want to apply inspections, add either a Layer 3/4 class map for through traffic or a Layer 3/4 class map for management traffic. See the “Creating a Layer 3/4 Class Map for Through Traffic” section and “Creating a Layer 3/4 Class Map for Management Traffic” section for detailed information. The management Layer 3/4 class map can be used only with the RADIUS accounting inspection.
The default Layer 3/4 class map for through traffic is called “inspection_default.” It matches traffic using a special match command, match default-inspection-traffic , to match the default ports for each application protocol. This traffic class (along with match any , which is not typically used for inspection) matches both IPv4 and IPv6 traffic for inspections that support IPv6. See the “Guidelines and Limitations” section for a list of IPv6-enabled inspections.
You can specify a match access-list command along with the match default-inspection-traffic command to narrow the matched traffic to specific IP addresses. Because the match default-inspection-traffic command specifies the ports to match, any ports in the ACL are ignored.

Tip We suggest that you only inspect traffic on ports on which you expect application traffic; if you inspect all traffic, for example using match any, the ASA performance can be impacted.
If you want to match non-standard ports, then create a new class map for the non-standard ports. See the “Default Settings and NAT Limitations” section for the standard ports for each inspection engine. You can combine multiple class maps in the same policy if desired, so you can create one class map to match certain traffic, and another to match different traffic. However, if traffic matches a class map that contains an inspection command, and then matches another class map that also has an inspection command, only the first matching class is used. For example, SNMP matches the inspection_default class. To enable SNMP inspection, enable SNMP inspection for the default class in Step 5. Do not add another class that matches SNMP.
For example, to limit inspection to traffic from 10.1.1.0 to 192.168.1.0 using the default class map, enter the following commands:
ciscoasa(config)# access-list inspect extended permit ip 10.1.1.0 255.255.255.0 192.168.1.0 255.255.255.0
View the entire class map using the following command:
To inspect FTP traffic on port 21 as well as 1056 (a non-standard port), create an ACL that specifies the ports, and assign it to a new class map:
Step 2 (Optional) Some inspection engines let you control additional parameters when you apply the inspection to the traffic. See the following sections to configure an inspection policy map for your application:
- DCERPC—See the “Configuring a DCERPC Inspection Policy Map for Additional Inspection Control” section
- DNS—See the “(Optional) Configuring a DNS Inspection Policy Map and Class Map” section
- ESMTP—See the “Configuring an ESMTP Inspection Policy Map for Additional Inspection Control” section
- FTP—See the “Configuring an FTP Inspection Policy Map for Additional Inspection Control” section.
- GTP—See the “Configuring a GTP Inspection Policy Map for Additional Inspection Control” section.
- H323—See the “Configuring an H.323 Inspection Policy Map for Additional Inspection Control” section
- HTTP—See the “Configuring an HTTP Inspection Policy Map for Additional Inspection Control” section.
- Instant Messaging—See the “Configuring an Instant Messaging Inspection Policy Map for Additional Inspection Control” section
- IP Options—See the “Configuring an IP Options Inspection Policy Map for Additional Inspection Control” section
- IPsec Pass Through—See the “IPsec Pass Through Inspection” section
- IPv6—See the “(Optional) Configuring an IPv6 Inspection Policy Map” section
- MGCP—See the “Configuring an MGCP Inspection Policy Map for Additional Inspection Control” section.
- NetBIOS—See the “Configuring a NetBIOS Inspection Policy Map for Additional Inspection Control” section
- RADIUS Accounting—See the “Configuring a RADIUS Inspection Policy Map for Additional Inspection Control” section
- RTSP—See the “Configuring an RTSP Inspection Policy Map for Additional Inspection Control” section
- ScanSafe (Cloud Web Security)—See the “Configuring a Service Policy to Send Traffic to Cloud Web Security” section
- SIP—See the “Configuring a SIP Inspection Policy Map for Additional Inspection Control” section
- Skinny—See the “Configuring a Skinny (SCCP) Inspection Policy Map for Additional Inspection Control” section
- SNMP—See the “Configuring an SNMP Inspection Policy Map for Additional Inspection Control” section.
Step 3 To add or edit a Layer 3/4 policy map that sets the actions to take with the class map traffic, enter the following command:
The default policy map is called “global_policy.” This policy map includes the default inspections listed in the “Default Settings and NAT Limitations” section. If you want to modify the default policy (for example, to add or delete an inspection, or to identify an additional class map for your actions), then enter global_policy as the name.
Step 4 To identify the class map from Step 1 to which you want to assign an action, enter the following command:
If you are editing the default policy map, it includes the inspection_default class map. You can edit the actions for this class by entering inspection_default as the name. To add an additional class map to this policy map, identify a different name. You can combine multiple class maps in the same policy if desired, so you can create one class map to match certain traffic, and another to match different traffic. However, if traffic matches a class map that contains an inspection command, and then matches another class map that also has an inspection command, only the first matching class is used. For example, SNMP matches the inspection_default class map.To enable SNMP inspection, enable SNMP inspection for the default class in Step 5. Do not add another class that matches SNMP.
Step 5 Enable application inspection by entering the following command:
The protocol is one of the following values:
If you added a DCERPC inspection policy map according to “Configuring a DCERPC Inspection Policy Map for Additional Inspection Control” section, identify the map name in this command. |
|
If you added a DNS inspection policy map according to “(Optional) Configuring a DNS Inspection Policy Map and Class Map” section, identify the map name in this command. The default DNS inspection policy map name is “preset_dns_map.” The default inspection policy map sets the maximum DNS packet length to 512 bytes. To enable DNS snooping for the Botnet Traffic Filter, enter the dynamic-filter-snoop keyword. See the “Enabling DNS Snooping” section for more information. |
|
If you added an ESMTP inspection policy map according to “Configuring an ESMTP Inspection Policy Map for Additional Inspection Control” section, identify the map name in this command. |
|
Use the strict keyword to increase the security of protected networks by preventing web browsers from sending embedded commands in FTP requests. See the “Using the strict Option” section for more information. If you added an FTP inspection policy map according to “Configuring an FTP Inspection Policy Map for Additional Inspection Control” section, identify the map name in this command. |
|
If you added a GTP inspection policy map according to the “Configuring a GTP Inspection Policy Map for Additional Inspection Control” section, identify the map name in this command. |
|
If you added an H323 inspection policy map according to “Configuring an H.323 Inspection Policy Map for Additional Inspection Control” section, identify the map name in this command. |
|
If you added an H323 inspection policy map according to “Configuring an H.323 Inspection Policy Map for Additional Inspection Control” section, identify the map name in this command. |
|
If you added an HTTP inspection policy map according to the “Configuring an HTTP Inspection Policy Map for Additional Inspection Control” section, identify the map name in this command. |
|
If you added an Instant Messaging inspection policy map according to “Configuring an Instant Messaging Inspection Policy Map for Additional Inspection Control” section, identify the map name in this command. |
|
If you added an IP Options inspection policy map according to “Configuring an IP Options Inspection Policy Map for Additional Inspection Control” section, identify the map name in this command. |
|
If you added an IPsec Pass Through inspection policy map according to “IPsec Pass Through Inspection” section, identify the map name in this command. |
|
If you added an IP Options inspection policy map according to “(Optional) Configuring an IPv6 Inspection Policy Map” section, identify the map name in this command. |
|
If you added an MGCP inspection policy map according to “Configuring an MGCP Inspection Policy Map for Additional Inspection Control” section, identify the map name in this command. |
|
If you added a NetBIOS inspection policy map according to “Configuring a NetBIOS Inspection Policy Map for Additional Inspection Control” section, identify the map name in this command. |
|
The radius-accounting keyword is only available for a management class map. See the “Creating a Layer 3/4 Class Map for Management Traffic” section for more information about creating a management class map. If you added a RADIUS accounting inspection policy map according to “Configuring a RADIUS Inspection Policy Map for Additional Inspection Control” section, identify the map name in this command. |
|
If you added a RTSP inspection policy map according to “Configuring an RTSP Inspection Policy Map for Additional Inspection Control” section, identify the map name in this command. |
|
If you added a ScanSafe (Cloud Web Security) inspection policy map according to “Configuring a Service Policy to Send Traffic to Cloud Web Security” section, identify the map name in this command. |
|
If you added a SIP inspection policy map according to “Configuring a SIP Inspection Policy Map for Additional Inspection Control” section, identify the map name in this command. |
|
If you added a Skinny inspection policy map according to “Configuring a Skinny (SCCP) Inspection Policy Map for Additional Inspection Control” section, identify the map name in this command. |
|
If you added an SNMP inspection policy map according to “Configuring an SNMP Inspection Policy Map for Additional Inspection Control” section, identify the map name in this command. |
|
The default class map includes UDP port 111; if you want to enable Sun RPC inspection for TCP port 111, you need to create a new class map that matches TCP port 111, add the class to the policy, and then apply the inspect sunrpc command to that class. |
|
Step 6 To activate the policy map on one or more interfaces, enter the following command:
Where global applies the policy map to all interfaces, and interface applies the policy to one interface. By default, the default policy map, “global_policy,” is applied globally. Only one global policy is allowed. You can override the global policy on an interface by applying a service policy to that interface. You can only apply one policy map to each interface.
 Feedback