Installing Cisco Enterprise NFVIS Using the KVM Console

Installation Prerequisites

Ensure that the following prerequisties are met:

  • The IP address is configured for Cisco Integrated Management Controller (CIMC) as well as a login account with administrative privileges.

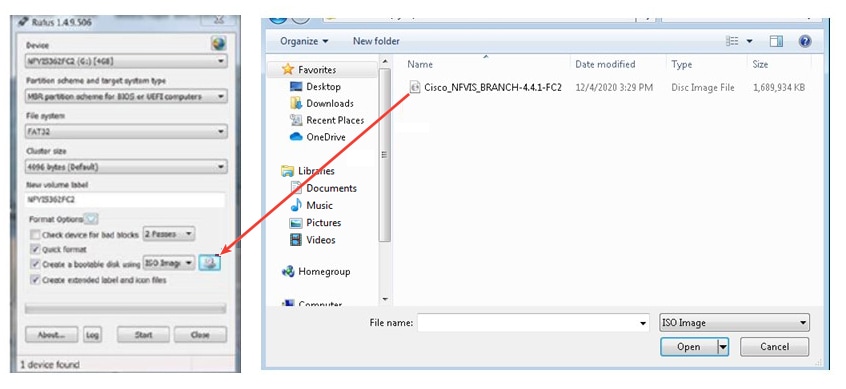
  • The Cisco Enterprise NFVIS ISO image is available.

  • The IP address of the system (required for remote access) is available.

  • Hyper-threading is enabled in BIOS. By default, hyper-threading is enabled in BIOS on the UCS-C, UCS-E and ENCS platforms.


Note


The installation steps are slightly different for Cisco UCS and Cisco ENCS platforms. See the following sections for details:


Installing Cisco Enterprise NFVIS on the Cisco UCS C220 M4 and M5 Rack Servers or Cisco CSP Devices

Installing Cisco Enterprise NFVIS on Cisco UCS E-Series Servers

Installing Cisco Enterprise NFVIS on a Cisco ENCS 5100 and 5400

Assumptions

  • The user is familiar with the supported hardware device, CIMC, Cisco Network Plug and Play, and Cisco Application Policy Infrastructure Controller Enterprise Module (APIC-EM).

  • The initial setup of the hardware device is complete, and the device is ready for loading Cisco Enterprise NFVIS.

  • The user is familiar with general Linux installation.

For more details on the supported hardware devices, see respective documentation available on Cisco.com.

Image Signing and Verification

Cisco Enterprise NFVIS supports RPM signing and signature verification for all RPM packages in the ISO and upgrade images. You can also verify the integrity of the Cisco Enterprise NFVIS ISO and upgrade images.

RPM Signing

All RPM packages in the Cisco Enterprise NFVIS ISO and upgrade images are signed to ensure cryptographic integrity and authenticity. This guarantees that the RPM packages have not been tampered with and the RPM packages are from Cisco Enterprise NFVIS. The private key, used for signing the RPM packages, is created and securely maintained by Cisco.

RPM Signature Verification

Cisco Enterprise NFVIS verifies all RPM packages during installation or upgrade. The following table describes the Cisco Enterprise NFVIS behavior when the signature verification fails during installation or upgrade.

Scenario

Description

Cisco Enterprise NFVIS 3.7.1 installation

If the signature verification fails while installing Cisco Enterprise NFVIS, the installation is aborted.

Cisco Enterprise NFVIS upgrade from 3.6.x to Release 3.7.1

The RPM signatures are verified when the upgrade is being performed. If the signature verification fails, an error is logged but the upgrade is completed.

Cisco Enterprise NFVIS upgrade from Release 3.7.1 to later releases

The RPM signatures are verified when the upgrade image is registered. If the signature verification fails, the upgrade is aborted.

Image Integrity Verification Using sha256sum

RPM signing and signature verification can be done only for the RPM packages available in the Cisco NFVIS ISO and upgrade images. To ensure the integrity of all additional non-RPM files available in the Cisco NFVIS ISO image, a hash of the Cisco NFVIS ISO image is published along with the image. Similarly, a hash of the Cisco NFVIS upgrade image is published along with the image. To verify that the hash of Cisco NFVIS ISO image or upgrade image matches the hash published by Cisco, run the following command and compare the hash with the published hash:

% /usr/bin/sha256sum ImageFile
4db533d96d8705db8af904ab754349151adea504b81337155cc591c6203e3295 ImageFile

Entering BIOS Setup


Note


This section applies only to ENCS 5400 and UCS-E series routers.


When you enter the BIOS setup for the first time, ensure that you secure the BIOS by setting up an admin-level and a user-level password. You have to set up the admin password when you access the BIOS menu for the first time. The user password (which only gives access to a small subset of BIOS options) must be set inside the BIOS setup menu.

To set up the admin password, press F2 when the system boots up. You will be prompted to set the password.

To set up the user password, after you log in, go to the ‘Security’ tab and set the password.

Installing Cisco Enterprise NFVIS on the Cisco UCS C220 M4 and M5 Rack Servers or Cisco CSP Devices

This section provides information about a series of tasks you need to perform to install Cisco Enterprise NFVIS on a Cisco UCS C220 M4 and M5 Rack Server or Cisco CSP 2100-X1, CSP 5228 and CSP 5436.

Logging Into the CIMC GUI

Before you begin

  • Ensure that you have configured the IP address to access CIMC as well as a login account with administrative privileges.

  • The recommended CIMC version is 3.0(3c) or newer.

  • Ensure that a Virtual Drive is created with RAID and Boot Drive is set to true.

For details on how to configure an IP address for CIMC, see the Set up CIMC for UCS C-Series Server guide on cisco.com.

Procedure


Step 1

Log into CIMC.

Step 2

Launch KVM Console:

From theCIMC Homepage, click Launch KVM on the upper right corner.You can choose from Java based KVM or HTML based KVM. It is recommnded to use HTML based KVM. Ensure that the pop-up blocker is disabled. KVM Console will open in a separate window.

Step 3

Map virtual media:

  1. From KVM Console, click on Virtual Media and then click on Activate Virtual Devices.

  2. Click on Virtual Media again and then click on Map CD/DVD, browse, and select the Cisco Enterprise NFVIS ISO image, click Open and Map Drive to mount the image.

  3. Click on Virtual Media again to ensure the NFVIS ISO image is now mapped to CD/DVD.

Step 4

Configure Boot Order:

  1. From the CIMC Compute, select BIOS.

  2. Select Configure Boot Order and click on Configure Boot Order.

    The Configure Boot Order dialog box appears.

  3. Select Advanced.

  4. From Add Boot Device, select Add Virtual Media, and the Add Virtual Media dialog box appears.

  5. Enter a name, select KVM Mapped DVD, set state to Enabled and order to 1, click on Save Changes.

  6. From Add Boot Device, select Add Local HDD, the Add Virtual Media dialog box appears.

  7. Enter a name, set Sstate to Enabled and order to 2, click on Save Changes.

  8. Click Close.

Step 5

Power cycle server to start the installation:

From CIMC Home page, click on Host Power on the upper right corner. Reboot the server by selecting the Power Off option. After the server is down, select the Power On option.

When the server reboots, the KVM console automatically installs Cisco Enterprise NFVIS from the virtual CD/DVD drive. The entire installation might take 30 minutes to one hour to complete.

Step 6

Initial login: After the installation is complete, the system automatically reboots from the hard drive. Log into the system when the command prompt nfvis login is displayed after the reboot.

Use admin as the login name and Admin123# as the default password.

Note


The system prompts you to change the default password at the first login attempt. You must set a strong password as per the on-screen instructions to proceed with the application. You cannot run API commands or proceed with any tasks unless you change the default password at the first login. API will return 401 unauthorized error if the default password is not reset.

Step 7

Verification: You can verify the installation using the System API, CLI, or by viewing the system information from the Cisco Enterprise NFV portal.


Installing Cisco Enterprise NFVIS on Cisco UCS E-Series Servers

Before you begin

  • Configure the Gigabit Ethernet interface on the Cisco ISR router.

  • Configure the UCS E interface on the Cisco ISR router.

  • Ensure that you have the IP address configured for CIMC access as well as a login account with administrative privileges.

  • The recommneded CIMC version is 3.2(7) or newer.

  • Ensure that a Virtual Drive is created with RAID and Boot Drive is set to true.

  • Ensure that the Cisco UCS E server has one of the following supported firmware versions or above:

    • BIOS UCSED.2.5.0.3 or later for UCS-E160D-M2/K9 and UCS-E180D-M2/K9

    • BIOS UCSES.1.5.0.5 or later for UCS-E140S-M2/K9

For more details on how to perform the basic configuration on the Cisco ISR routers, see the following guides:

For details on how to configure an IP address for CIMC, see the Getting Started Guide for Cisco UCS E-Series Servers, Release 1.0 on cisco.com.

Procedure


Step 1

Log into CIMC.

Step 2

Launch KVM Console:

From theCIMC Homepage, click Launch KVM on the upper right corner.You can choose from Java based KVM or HTML based KVM. It is recommnded to use HTML based KVM. Ensure that the pop-up blocker is disabled. KVM Console will open in a separate window.

Step 3

Map virtual media:

  1. From KVM Console, click on Virtual Media and then click on Activate Virtual Devices.

  2. Click on Virtual Media again and then click on Map CD/DVD, browse, and select the Cisco Enterprise NFVIS ISO image, click Open and Map Drive to mount the image.

  3. Click on Virtual Media again to ensure the NFVIS ISO image is now mapped to CD/DVD.

Step 4

Configure Boot Order:

  1. From the CIMC Compute, select BIOS.

  2. Select Configure Boot Order and click on Configure Boot Order.

    The Configure Boot Order dialog box appears.

  3. From the CD/DVD area, select Cisco vKVM-Mapped vDVD, and then click Add.

  4. From HDD, select RAID Adapter, and then click Add.

  5. Set the boot order sequence using the Up and Down options. The Cisco vKVM-Mapped vDVD boot order option must be the first choice. Click Save Changes to complete the boot order setup.

Step 5

Power cycle server to start the installation:

From CIMC Home page, click on Host Power on the upper right corner. Reboot the server by selecting the Power Off option. After the server is down, select the Power On option.

When the server reboots, the KVM console automatically installs Cisco Enterprise NFVIS from the virtual CD/DVD drive. The entire installation might take 30 minutes to one hour to complete.

Step 6

Initial login: After the installation is complete, the system automatically reboots from the hard drive. Log into the system when the command prompt nfvis login is displayed after the reboot.

Use admin as the login name and Admin123# as the default password.

Note


The system prompts you to change the default password at the first login attempt. You must set a strong password as per the on-screen instructions to proceed with the application. You cannot run API commands or proceed with any tasks unless you change the default password at the first login. API will return 401 unauthorized error if the default password is not reset.

Step 7

Verification: You can verify the installation using the System API, CLI, or by viewing the system information from the Cisco Enterprise NFV portal.


What to do next

You can verify the default configuration, and set up initial IP configuration to launch the Cisco Enterprise NFV portal. For details, see Performing Initial System Configuration.

Sample Configuration on the Cisco ISR Router to Bring Up a Cisco UCS E Server

The following sample configuration shows the basic configuration performed on the Cisco ISR 4451 router with DHCP enabled.


Last configuration change at 02:36:37 UTC Thu Feb 18 2016
!
version 15.5
service timestamps debug datetime msec
service timestamps log datetime msec
no platform punt-keepalive disable-kernel-core
!
hostname NFVIS-ISR4451
!
boot-start-marker
boot system bootflash:isr4300-universalk9.03.16.01a.S.155-3.S1a-ext.SPA.bin
boot-end-marker
!
!
vrf definition Mgmt-intf
 !
 address-family ipv4
 exit-address-family
 !
 address-family ipv6
 exit-address-family
!
!
no aaa new-model
!
!
!
ip domain name cisco.com
!
!
!
subscriber templating
!
multilink bundle-name authenticated
!
!
!
license udi pid ISR4331/K9 sn FDO192207MN
!
!
ucse subslot 1/0
 imc access-port shared-lom console
 imc ip address 172.19.183.172 255.255.255.0 default-gateway 172.19.183.1 
!
spanning-tree extend system-id
!
!
redundancy
 mode none
!
!
!
vlan internal allocation policy ascending
!
!
! 
interface GigabitEthernet0/0/0
 ip address 172.19.183.171 255.255.255.0
 media-type rj45
 negotiation auto
!
interface GigabitEthernet0/0/1
 no ip address
 shutdown
 negotiation auto
!
interface GigabitEthernet0/0/2
 no ip address
 shutdown
 negotiation auto
!
interface ucse1/0/0
 ip unnumbered GigabitEthernet0/0/0
 negotiation auto
 switchport mode trunk
 no mop enabled
 no mop sysid
!
interface ucse1/0/1
 no ip address
 no negotiation auto
 switchport mode trunk
 no mop enabled
 no mop sysid
!
interface GigabitEthernet0
 vrf forwarding Mgmt-intf
 no ip address
 shutdown
 negotiation auto
!
interface Vlan1
 no ip address
 shutdown
!
ip default-gateway 172.19.183.1
ip forward-protocol nd
no ip http server
no ip http secure-server
ip tftp source-interface GigabitEthernet0
ip route 0.0.0.0 0.0.0.0 172.19.183.1
ip route 172.19.183.172 255.255.255.255 ucse1/0/0
ip ssh version 2
!
!
!

control-plane
!
!
line con 0
 stopbits 1
line aux 0
 stopbits 1
line vty 0 4
 password lab
 login local
 transport input all
 transport output all
!
!
end

Installing Cisco Enterprise NFVIS on a Cisco ENCS 5100 and 5400


Note


Software or hardware RAID controller setup is not supported with Cisco ENCS in Cisco Enterprise NFVIS Release 3.5.1.

Before you begin

  • Make sure that you have configured the IP address to access CIMC.

  • The recommended CIMC version is 3.2(7) or newer.

For details on how to configure an IP address for CIMC, see the Set up CIMC for UCS C-Series Server and Getting Started Guide for Cisco UCS E-Series Servers and the Cisco UCS E-Series Network Compute Engine on cisco.com.

Procedure


Step 1

Log into CIMC.

Step 2

Launch KVM Console:

From theCIMC Homepage, click Launch KVM on the upper right corner.You can choose from Java based KVM or HTML based KVM. It is recommnded to use HTML based KVM. Ensure that the pop-up blocker is disabled. KVM Console will open in a separate window.

Step 3

Map virtual media:

  1. From KVM Console, click on Virtual Media and then click on Activate Virtual Devices.

  2. Click on Virtual Media again and then click on Map CD/DVD, browse, and select the Cisco Enterprise NFVIS ISO image, click Open and Map Drive to mount the image.

  3. Click on Virtual Media again to ensure the NFVIS ISO image is now mapped to CD/DVD.

Step 4

Configure Boot Order:

  1. From the CIMC Compute, select BIOS.

  2. Select Configure Boot Order and click on Configure Boot Order.

    The Configure Boot Order dialog box appears.

  3. From the CD/DVD area, select Cisco vKVM-Mapped vDVD, and then click Add.

  4. From HDD, select RAID Adapter, and then click Add.

  5. Set the boot order sequence using the Up and Down options. The Cisco vKVM-Mapped vDVD boot order option must be the first choice. Click Save Changes to complete the boot order setup.

Step 5

Power cycle server to start the installation:

From CIMC Home page, click on Host Power on the upper right corner. Reboot the server by selecting the Power Off option. After the server is down, select the Power On option.

When the server reboots, the KVM console automatically installs Cisco Enterprise NFVIS from the virtual CD/DVD drive. The entire installation might take 30 minutes to one hour to complete.

Step 6

Firmware Auto-Upgrade.

Starting from NFVIS 3.8.x release, firmware auto-upgrade is supported. After the NFVIS installation is complete, BIOS and/or CIMC is upgraded to the corresponding versions automatically. CIMC and NFVIS is rebooted multiple times. The firmware upgrade might take 30 minutes to one hour to complete. Do not use the system during the firmware upgrade.

Step 7

Initial login: After the installation is complete, the system automatically reboots from the hard drive. Log into the system when the command prompt nfvis login is displayed after the reboot.

Use admin as the login name and Admin123# as the default password.

Note


The system prompts you to change the default password at the first login attempt. You must set a strong password as per the on-screen instructions to proceed with the application. You cannot run API commands or proceed with any tasks unless you change the default password at the first login. API will return 401 unauthorized error if the default password is not reset.

Step 8

Verification: You can verify the installation using the System API, CLI, or by viewing the system information from the Cisco Enterprise NFV portal.


Install Cisco Enterprise NFVIS on Cisco ENCS 5104

Procedure


Step 1

Create bootable usb with NFVIS image.

In this example, we used rufus utility in Windows environment. Rufus utility can be downloaded https://rufus.akeo.ie/. For this example, following parameters were used to burn bootable NFVIS USB device:
  • Device: USB stick

  • Partition scheme: MBR

  • Filesystem: FAT32

  • Cluster size: use default

  • Volume label: use default

  • Quick format: checked

  • Create bootable: select "ISO Image" and click next icon then choose NFVIS image.

  • Create extended label: checked

Press Start and wait for completion.

Eject USB thumb drive

Step 2

Insert USB device in one of USB slot in ENCS5104.

Step 3

Power on system.

Step 4

During system boot up, press F6 key.


Press <DEL> or <F2> to enter setup, <F6> Boot Menu, <F12> Network Boot in 5 seconds or press any key to continue.

Step 5

Once you press F6, you will see the following screenshot to select which device you want to boot from. Select your USB device.

In the following screenshot example, there is STEC USB being used. That display will vary depending on your usb device vendor. Use the arrow key to select that device.

Step 6

Wait until installation is completed. System will be rebooted once installation is done.

Step 7

Log into the system with username admin and Admin123# as a default password

Step 8

You will be prompted and asked to change password at the first login. You must set a strong password per the on-screen instruction to proceed.

Step 9

You can verify the installation status using the System API or command line interface per the NFVIS user guide.


What to do next

You can verify the default configuration, and set up initial IP configuration to launch the Cisco Enterprise NFV portal. For details, see Performing Initial System Configuration.