FND Configuration for IXM

The Cisco IoT Field Network Director (IoT FND) is a software platform that manages a multi-service network and security infrastructure for IoT applications, such as smart grid applications, including Advanced Metering Infrastructure (AMI), Distribution Automation (DA), distributed intelligence, and substation automation. IoT FND is a scalable, highly-secure, modular, and open platform with an extensible architecture. IoT FND is a multi-vendor, multi-service, communications network management platform that enables network connectivity to an open ecosystem of power grid devices.

For more information about FND, see the FND documentation at the following URL: https://www.cisco.com/c/en/us/support/cloud-systems-management/iot-field-network-director/tsd-products-support-series-home.html.

IoT FND supports the following configurations for the Cisco Wireless Gateway for LoRaWAN:

  • Firmware upgrade

  • Hardware monitoring and events report

  • IP networking configuration and operations (for example, IP address and IPsec)

  • Zero Touch provisioning, including initial installation of the Thingpark LRR software

This chapter contains the following topics.

Preparing FND for IXM ZTD

Follow these steps to prepare FND for IXM ZTD:

Procedure


Step 1

If you are using PSK authentication for tunneloing, add the userPropertyTypes.xml file to the FND server under /opt/cgms/server/cgms/conf. Restart the FND service after adding the following. If you are using RSA, ignore this step.
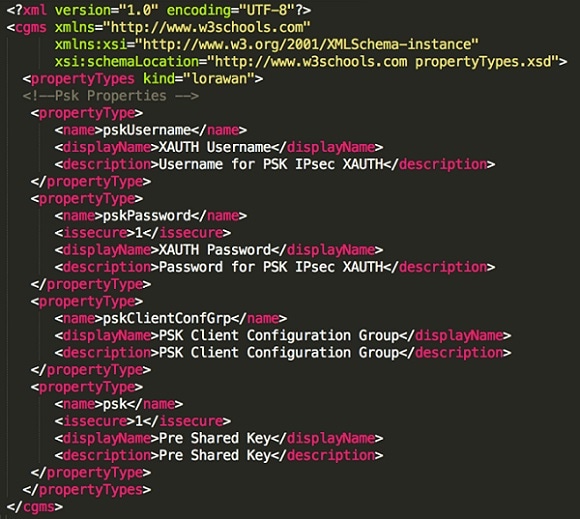
Step 2

Add the Actility LRR and public key to FND by clicking the import button on the File Management page.
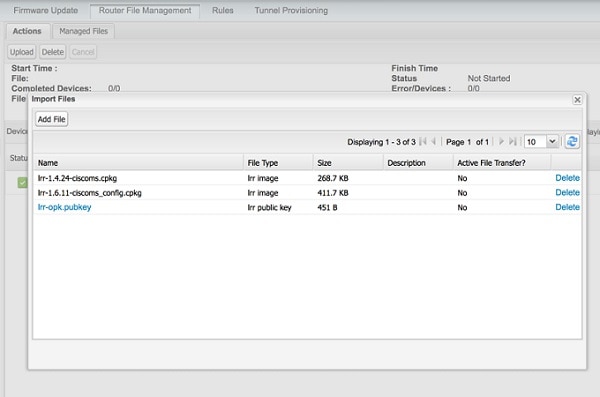
Step 3

Update the Tunnel Configuration group with the following parameters and save the changes. The following figure shows an example for PSK.
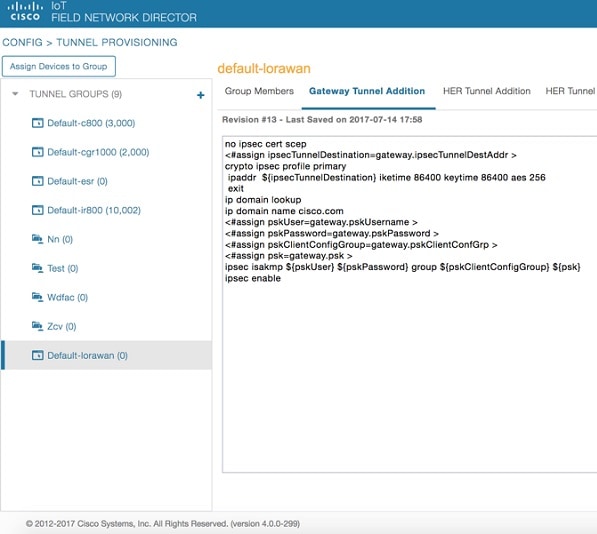
Step 4

Update the Device Configuration group with the following parameters and save the changes. The following figure shows a sample configuration.

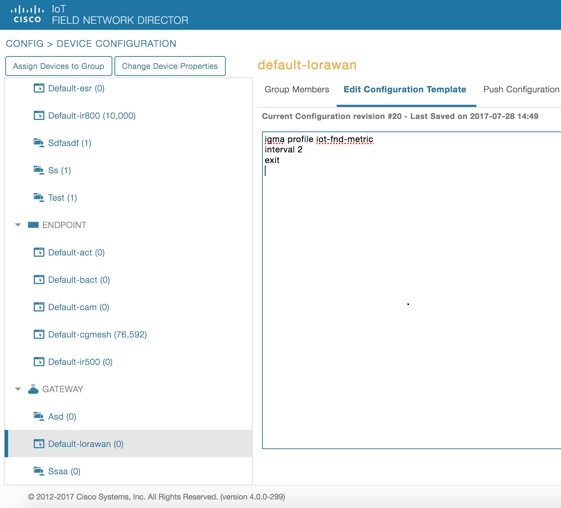
Update the Device Configuration Group properties with the following parameters and save the changes.

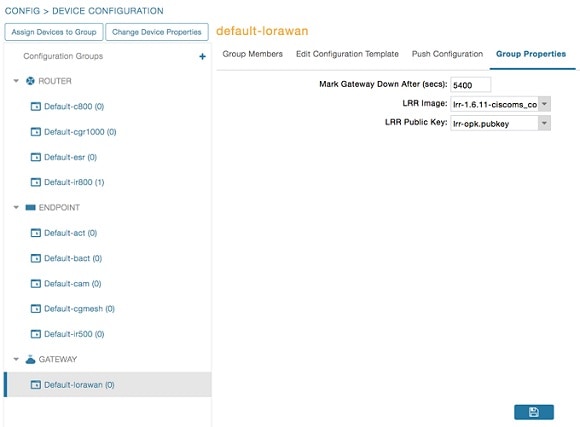
The Tunnel Provisioning settings page will have the FND common name populated as the following figure shows.
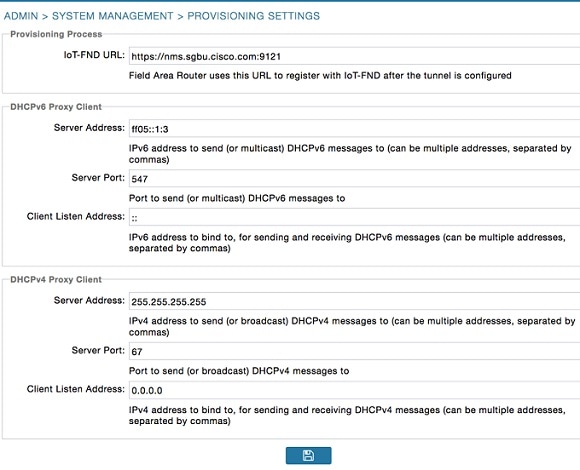
Step 5

Make sure you have obtained certificates from the CA (the same ones used to issue certs for FND). Execute the show ipsec certs command to verify. Make sure the firewall allows ports 9120, 9121, 9122, and all the SSH, telnet, and DHCP ports. Make sure the TPS name is pingable. Then execute the copy running express-setup-config command.


Hostname IXM
!
ip domain lookup
ip domain name cisco.com
!
ip name-server 55.55.0.15
!
interface FastEthernet 0/1
 description interface
 ip address 4.4.4.2 255.255.255.0
 exit
!
ip default-gateway 4.4.4.1
!
ntp server ip 55.55.0.1
!
clock timezone America/Los_Angeles
!
igma profile iot-fnd-tunnel
 active
 add-command show fpga
 interval 5
 url https://ps.sgbu.cisco.com:9120/igma/tunnel
 exit

ipsec cert scep https://55.55.0.15/csertsrv/msecp.dll us ca mil cisco iot test true ndes true 2048

You need to add the HER configuration manually, for example, the tunnel crypto profiles and transform sets. The following easyVPN example uses PSK as authentication.
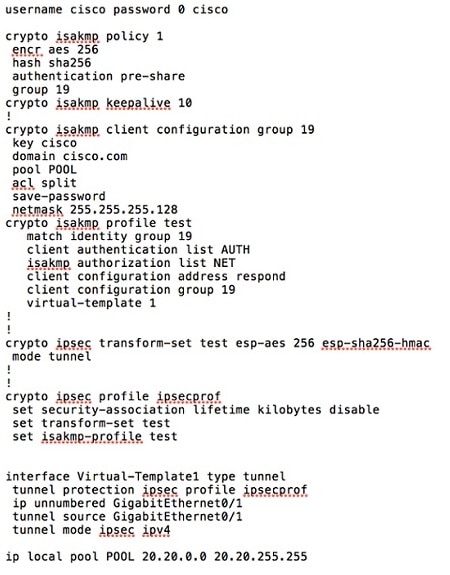
Step 6

Encrypt the PSK passwords using the signature-tool under /opt/cgms-tools/bin. Add the encrypted passwords in the CSV file and prepare it for upload. Add the modem to FND as the following sample CSV shows. Add ISR4K using the following CSV.


eid,netconfUsername,netconfPassword,ip,deviceType,lat,domain,lng,ipsecTunnelDestAddr,tunnelHerEid,
pskUsername,pskPassword,pskClientConfGrp,psk
IXM-LPWA-900-16-K9+FOC21028RAK,,,,lorawan,10,root,10,4.4.4.1,C3900-SPE250/K9+FOC172417YT,cisco,
ki8OjEO5Pr+krJTtUooUMD0GoqmOAznc2JObiUUr4ismXyP0uXs8JRuSPOfojMDavGIHiO8unUUJm3zdxv0LP8b6fe5G+
oshy76A6IqX1jk7ymSFOaVPQBT8fUS6onjsuSThiLERS0B6Brn2gRx/KpQMk9IdYQMOSsHh4khvtxbqBZy6j++pIjeG4+
dPz/v52DmJR+DOrE7ZQpfvS9PSHkJoaqC2o6PrKN5YZ50G9+Tm+diPmbyv/PdHKtXn1ny3qBAdbfDwOjlA+NtJPld3/
06vq6WhHsgujYwMJWs7Cuu3rR0/FVHF/5wFxarakJsfo/zd69EpzrI8Hsic/QmMzA==,19,
ki8OjEO5Pr+krJTtUooUMD0GoqmOAznc2JObiUUr4ismXyP0uXs8JRuSPOfojMDavGIHiO8unUUJm3zdxv0LP8b6fe5G+
oshy76A6IqX1jk7ymSFOaVPQBT8fUS6onjsuSThiLERS0B6Brn2gRx/KpQMk9IdYQMOSsHh4khvtxbqBZy6j++pIjeG4+
dPz/v52DmJR+DOrE7ZQpfvS9PSHkJoaqC2o6PrKN5YZ50G9+Tm+diPmbyv/PdHKtXn1ny3qBAdbfDwOjlA+NtJPld3/
06vq6WhHsgujYwMJWs7Cuu3rR0/FVHF/5wFxarakJsfo/zd69EpzrI8Hsic/QmMzA==
C3900-SPE250/K9+FOC172417YT,nms,sgbu123!,55.55.0.18,isr3900,,,,,,,,,

Step 7

Once the Modem is registered, the IXM will show as up in the FND. Please check the following events if there are issues during ZTD.

Step 8

Detailed IXM modem information can be viewed by clicking on the modem link.
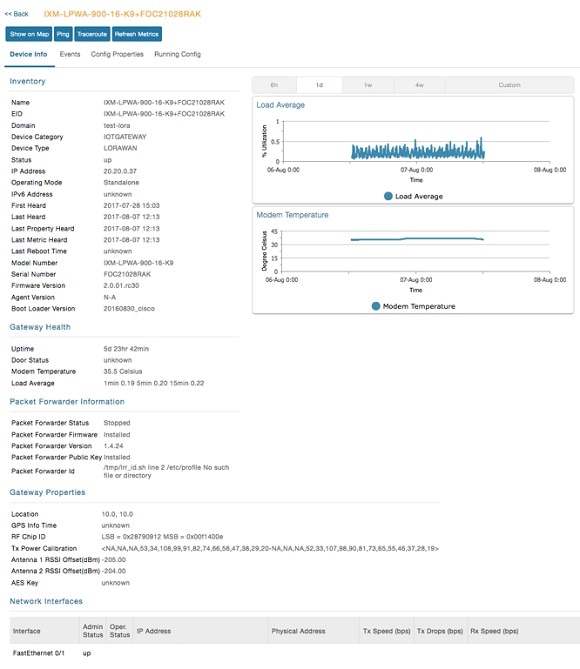
Step 9

If configuration update is required or a new modem is added to the router, follow the same procefure from Step 1. But in this case you invoke a configuration push.
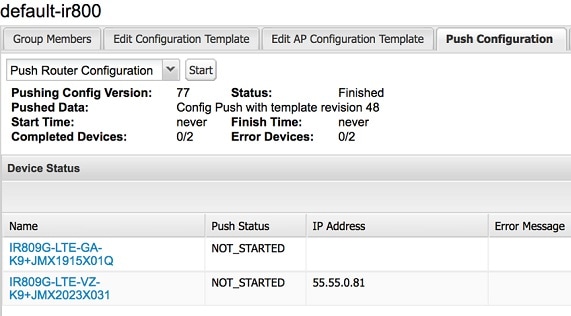

IXM modem Firmware Update

Procedure


Step 1

Load the firmware file to FND.

Step 2

Push the firmware to the IXM modem. If you want to erase the LRR or pubkey, select the clean install option as shown below.

Step 3

When upload is complete, install the image by clicking the install button.


Configuring IGMA

IoT Gateway Management Agent (IGMA) is for management in conjunction with FND.

The IGMA configuration commands are as following:

  • To start IGMA, use the following command:

    IXM#igma start
    IGMA Starting...
  • To configure IGMA, use the following command:

    IXM#configure terminal
    IXM(config)#igma
      event             IGMA Event Configuration
      local-trustpoint  Set IGMA local-trustpoint configuration
      profile           IGMA Profile Configuration
      secure            Set igma secure mode
  • To check the status of IGMA:

    IXM#request shell container-console
    Enter System Password:
     
    Connected to tty 0
                      Type <Ctrl+a q> to exit the console, <Ctrl+a Ctrl+a> to enter Ctrl+a itself
     
    bash-3.2#
    bash-3.2#
    bash-3.2#
    bash-3.2# ps -ef | grep igma
    7151 root       0:00 grep igma
    bash-3.2#
  • Regarding ports, trustpoints and security, Apache web server should be running with the port 443.

    Also the following CLI will activate igma using SUDI:

    igma local-trustpoint sudi
  • Configuration in combination with CPF

    Sample Configuration along with CPF 
    !
    igma secure enable
    !
    igma event destination https://us-int.ciscoiot.com 5683
    !
    igma profile iot-fnd-metric
    active
    add-command show common-packet-forwarder info
    add-command show common-packet-forwarder status
    add-command show fpga
    add-command show inventory
    add-command show ip interface FastEthernet 0/1
    add-command show ipsec status info
    add-command show led status
    add-command show platform status
    add-command show radio
    add-command show version
    interval 15
    url https://us-int.ciscoiot.com/cgna/igma/metric
    exit
     
    igma profile iot-fnd-register
    add-command show fpga
    add-command show inventory
    add-command show ip interface FastEthernet 0/1
    add-command show ipsec status info
    add-command show platform status
    add-command show radio
    add-command show version
    interval 5
    url https://us-int.ciscoiot.com:443/cgna/igma/register
    exit
    !
    common-packet-forwarder profile
    ipaddr us-int.ciscoiot.com port 3001
    antenna 1 omni gain 1.5 loss 0.0
    gatewayid 1000000000000031
    auth-mode none
    country UnitedStates
    cpf enable
    exit
    !
    igma local-trustpoint sudi

Troubleshooting

Enable the following debug categories on FND before troubleshooting:

  • TPS does not have any messages from IXM.

    • Check if the certs are installed correctly on IXM and from the same CA as the FND certs.

    • Make sure the IGMA profile is pointing to the correct tunnel profile and the proxy name resolution is correct.

    • Make sure the proxy can be pinged.

    • Make sure the IGMA profile has the correct commands.

  • FND does not have any messages from the IXM.

    • Check if the tunnel network is reachable from the FND cluster.

    • Make sure the IGMA profile is pointing to the correct FND profile and the name resolution is correct.

    • Make sure the FND can be pinged.

  • Tunnel provisioning request failed.

    • Check the FND tunnel template for command accuracy.

  • FND Registration failed.

    • Check the FND configuration template for command accuracy.

    • Tunnel issues (for example, flapping or disconnect).