- Preface
- New and Changed Security Features
- Configuring AAA Services
- Implementing Certification Authority Interoperability
- Implementing Keychain Management
- Implementing Lawful Intercept
- Implementing Management Plane Protection
- Configuring Software Authentication Manager
- Implementing Secure Shell
- Implementing Secure Socket Layer
- DDoS Mitigation Support on CGSE
- Configuring FIPS Mode
Implementing Secure
Shell
Secure Shell (SSH) is an application and a protocol that provides a secure replacement to the Berkeley r-tools. The protocol secures sessions using standard cryptographic mechanisms, and the application can be used similarly to the Berkeley rexec and rsh tools.
Two versions of the SSH server are available: SSH Version 1 (SSHv1) and SSH Version 2 (SSHv2). SSHv1 uses Rivest, Shamir, and Adelman (RSA) keys and SSHv2 uses either Digital Signature Algorithm (DSA) keys or Rivest, Shamir, and Adelman (RSA) keys. Cisco IOS XR software supports both SSHv1 and SSHv2.
This module describes how to implement Secure Shell on the the Cisco IOS XR Software.
 Note | For a complete description of the Secure Shell commands used in this chapter, see the Secure Shell Commands module in Cisco IOS XR System Security Command Reference for the Cisco CRS Router. |
Feature History for Implementing Secure Shell
|
Release |
Modification |
|---|---|
|
Release 2.0 |
This feature was introduced. |
|
Release 3.8.0 |
|
|
Release 3.9.0 |
Support was added for the following enhancements: |
|
Release 5.1.1 |
Support was added for SSH Multiplexing |
|
Release 6.0 |
Support extended for the Netconf subsystem configuration to be vrf aware. At least one vrf needs to be configured to start the Netconf subsystem support. The configuration of the port is now optional. |
- Prerequisites to Implementing Secure Shell
- Restrictions for Implementing Secure Shell
- Information About Implementing Secure Shell
- How to Implement Secure Shell
- Configuration Examples for Implementing Secure Shell
- Multi-channeling in SSH
- Additional References
Prerequisites to Implementing Secure Shell
The following prerequisites are required to implement Secure Shell:
You must be in a user group associated with a task group that includes the proper task IDs. The command reference guides include the task IDs required for each command. If you suspect user group assignment is preventing you from using a command, contact your AAA administrator for assistance.
-
Download the required image on your router. The SSH server and SSH client require you to have a a crypto package (data encryption standard [DES], 3DES and AES) from Cisco downloaded on your router.
-
To run an SSHv2 server, you must have a VRF. This may be the default VRF or a specific VRF. VRF changes are applicable only to the SSH v2 server.
-
Configure user authentication for local or remote access. You can configure authentication with or without authentication, authorization, and accounting (AAA). For more information, see the Authentication, Authorization, and Accounting Commands on Cisco IOS XR Software module in the Cisco IOS XR System Security Command Reference for the Cisco CRS Router publication and Configuring AAA Services on Cisco IOS XR Software module in the Cisco IOS XR System Security Configuration Guide for the Cisco CRS Router publication.
-
AAA authentication and authorization must be configured correctly for Secure Shell File Transfer Protocol (SFTP) to work.
Restrictions for Implementing Secure Shell
The following are some basic SSH restrictions and limitations of the SFTP feature:
-
A VRF is not accepted as inband if that VRF is already set as an out-of-band VRF. SSH v1 continues to bind only to the default VRF.
-
In order for an outside client to connect to the router, the router needs to have an RSA (for SSHv1 or SSHv2) or DSA (for SSHv2) key pair configured. DSA and RSA keys are not required if you are initiating an SSH client connection from the router to an outside routing device. The same is true for SFTP: DSA and RSA keys are not required because SFTP operates only in client mode.
-
In order for SFTP to work properly, the remote SSH server must enable the SFTP server functionality. For example, the SSHv2 server is configured to handle the SFTP subsystem with a line such as /etc/ssh2/sshd2_config:
-
subsystem-sftp /usr/local/sbin/sftp-server
-
The SFTP server is usually included as part of SSH packages from public domain and is turned on by default configuration.
-
SFTP is compatible with sftp server version OpenSSH_2.9.9p2 or higher.
-
RSA-based user authentication is supported in the SSH and SFTP servers. The support however, is not extended to the SSH client.
-
Execution shell and SFTP are the only applications supported.
-
The AES encryption algorithm is supported on the SSHv2 server and client, but not on the SSHv1 server and client. Any requests for an AES cipher sent by an SSHv2 client to an SSHv1 server are ignored, with the server using 3DES instead.
-
The SFTP client does not support remote filenames containing wildcards (* ,?, []). The user must issue the sftp command multiple times or list all of the source files from the remote host to download them on to the router. For uploading, the router SFTP client can support multiple files specified using a wildcard provided that the issues mentioned in the first through third bullets in this section are resolved.
-
The cipher preference for the SSH server follows the order AES128, AES192, AES256, and, finally, 3DES. The server rejects any requests by the client for an unsupported cipher, and the SSH session does not proceed.
-
Use of a terminal type other than vt100 is unsupported, and the software generates a warning message in this case.
-
Password messages of “none” are unsupported on the SSH client.
-
Because the router infrastructure does not provide support for UNIX-like file permissions, files created on the local device lose the original permission information. For files created on the remote file system, the file permission adheres to the umask on the destination host and the modification and last access times are the time of the copy.
Information About Implementing Secure Shell
To implement SSH, you should understand the following concepts:
- SSH Server
- SSH Client
- SFTP Feature Overview
- RSA Based Host Authentication
- RSA Based User Authentication
- SSHv2 Client Keyboard-Interactive Authentication
SSH Server
The SSH server feature enables an SSH client to make a secure, encrypted connection to a Cisco router. This connection provides functionality that is similar to that of an inbound Telnet connection. Before SSH, security was limited to Telnet security. SSH allows a strong encryption to be used with the Cisco IOS XR software authentication. The SSH server in Cisco IOS XR software works with publicly and commercially available SSH clients.
SSH Client
The SSH client feature is an application running over the SSH protocol to provide device authentication and encryption. The SSH client enables a Cisco router to make a secure, encrypted connection to another Cisco router or to any other device running the SSH server. This connection provides functionality that is similar to that of an outbound Telnet connection except that the connection is encrypted. With authentication and encryption, the SSH client allows for a secure communication over an insecure network.
The SSH client in the Cisco IOS XR software worked with publicly and commercially available SSH servers. The SSH client supported the ciphers of AES, 3DES, message digest algorithm 5 (MD5), SHA1, and password authentication. User authentication was performed in the Telnet session to the router. The user authentication mechanisms supported for SSH were RADIUS, TACACS+, and the use of locally stored usernames and passwords.
The SSH client supports setting DSCP value in the outgoing packets.
ssh client dscp <value from 0 – 63>
If not configured, the default DSCP value set in packets is 16 (for both client and server).
The SSH client supports the following options:
- DSCP—DSCP value for SSH
client sessions.
RP/0/5/CPU0:router#configure
RP/0/5/CPU0:router(config)#ssh ?
  client   Provide SSH client service
  server   Provide SSH server service
  timeout  Set timeout value for SSH
RP/0/5/CPU0:router(config)#ssh client ?
- Knownhost—Enable the host pubkey check by local database.
- Source-interface—Source
interface for SSH client sessions.
RP/0/5/CPU0:router(config)#ssh client source-interface ?
  ATM                  ATM Network Interface(s)
  BVI                  Bridge-Group Virtual Interface
  Bundle-Ether         Aggregated Ethernet interface(s)
  Bundle-POS           Aggregated POS interface(s)
  CEM                  Circuit Emulation interface(s)
  GigabitEthernet      GigabitEthernet/IEEE 802.3 interface(s)
  IMA                  ATM Network Interface(s)
  IMtestmain           IM Test Interface
  Loopback             Loopback interface(s)
  MgmtEth              Ethernet/IEEE 802.3 interface(s)
  Multilink            Multilink network interface(s)
  Null                 Null interface
  PFItestmain          PFI Test Interface
  PFItestnothw         PFI Test Not-HW Interface
  POS                  Packet over SONET/SDH network interface(s)
  PW-Ether             PWHE Ethernet Interface
  PW-IW                PWHE VC11 IP Interworking Interface
  Serial               Serial network interface(s)
  VASILeft             VASI Left interface(s)
  VASIRight            VASI Right interface(s)
  test-bundle-channel  Aggregated Test Bundle interface(s)
  tunnel-ipsec         IPSec Tunnel interface(s)
  tunnel-mte           MPLS Traffic Engineering P2MP Tunnel interface(s)
  tunnel-te            MPLS Traffic Engineering Tunnel interface(s)
  tunnel-tp            MPLS Transport Protocol Tunnel interface
RP/0/5/CPU0:router(config)#ssh client source-interface
RP/0/5/CPU0:router(config)#
- VRF—Source interface VRF for
SSH client sessions:
RP/0/5/CPU0:router(config)#ssh client vrf ?
  WORD  VRF name (max:32 chars)
RP/0/5/CPU0:router(config)#ssh client vrf shan ?
  <cr>
RP/0/5/CPU0:router(config)#ssh client vrf shan
RP/0/5/CPU0:router#ssh ?
  A.B.C.D  IPv4 (A.B.C.D) address
  WORD     Hostname of the remote node
  X:X::X   IPv6 (A:B:C:D...:D) address
  vrf      vrf table for the route lookup
RP/0/5/CPU0:router#ssh 1.1.1.1 ?
  cipher            Accept cipher type
  command           Specify remote command (non-interactive)
  source-interface  Specify source interface
  username          Accept userid for authentication
  <cr>
RP/0/5/CPU0:router#ssh 12.28.46.6 username admin command "show redundancy sum"
Password:


Wed Jan  9 07:05:27.997 PST
    Active Node    Standby Node
    -----------    ------------
       0/4/CPU0        0/5/CPU0 (Node Ready, NSR: Not Configured)

RP/0/5/CPU0:router#
SFTP Feature Overview
SSH includes support for standard file transfer protocol (SFTP) , a new standard file transfer protocol introduced in SSHv2. This feature provides a secure and authenticated method for copying router configuration or router image files.
The SFTP client functionality is provided as part of the SSH component and is always enabled on the router. Therefore, a user with the appropriate level can copy files to and from the router. Like the copy command, the sftp command can be used only in EXEC mode.
The SFTP client is VRF-aware, and you may configure the secure FTP client to use the VRF associated with a particular source interface during connections attempts. The SFTP client also supports interactive mode, where the user can log on to the server to perform specific tasks via the Unix server.
The SFTP Server is a sub-system of the SSH server. In other words, when an SSH server receives an SFTP server request, the SFTP API creates the SFTP server as a child process to the SSH server. A new SFTP server instance is created with each new request.
The SFTP requests for a new SFTP server in the following steps:
-
The user runs the sftp command with the required arguments
-
The SFTP API internally creates a child session that interacts with the SSH server
-
The SSH server creates the SFTP server child process
-
The SFTP server and client interact with each other in an encrypted format
-
The SFTP transfer is subject to LPTS policer "SSH-Known". Low policer values will affect SFTP transfer speeds
Note | In IOS-XR SW release 4.3.1 onwards the default policer value for SSH-Known has been reset from 2500pps to 300pps. Slower transfers are expected due to this change. You can adjust the lpts policer value for this punt cause to higher values that will allow faster transfers |
When the SSH server establishes a new connection with the SSH client, the server daemon creates a new SSH server child process. The child server process builds a secure communications channel between the SSH client and server via key exchange and user authentication processes. If the SSH server receives a request for the sub-system to be an SFTP server, the SSH server daemon creates the SFTP server child process. For each incoming SFTP server subsystem request, a new SSH server child and a SFTP server instance is created. The SFTP server authenticates the user session and initiates a connection. It sets the environment for the client and the default directory for the user.
Once the initialization occurs, the SFTP server waits for the SSH_FXP_INIT message from the client, which is essential to start the file communication session. This message may then be followed by any message based on the client request. Here, the protocol adopts a 'request-response' model, where the client sends a request to the server; the server processes this request and sends a response.
The SFTP server displays the following responses:
Note | The server must be running in order to accept incoming SFTP connections. |
RSA Based Host Authentication
Verifying the authenticity of a server is the first step to a secure SSH connection. This process is called the host authentication, and is conducted to ensure that a client connects to a valid server.
The host authentication is performed using the public key of a server. The server, during the key-exchange phase, provides its public key to the client. The client checks its database for known hosts of this server and the corresponding public-key. If the client fails to find the server's IP address, it displays a warning message to the user, offering an option to either save the public key or discard it. If the server’s IP address is found, but the public-key does not match, the client closes the connection. If the public key is valid, the server is verified and a secure SSH connection is established.
The IOS XR SSH server and client had support for DSA based host authentication. But for compatibility with other products, like IOS, RSA based host authentication support is also added.
RSA Based User Authentication
One of the method for authenticating the user in SSH protocol is RSA public-key based user authentication. The possession of a private key serves as the authentication of the user. This method works by sending a signature created with a private key of the user. Each user has a RSA keypair on the client machine. The private key of the RSA keypair remains on the client machine.
The user generates an RSA public-private key pair on a unix client using a standard key generation mechanism such as ssh-keygen. The max length of the keys supported is 2048 bits, and the minimum length is 512 bits. The following example displays a typical key generation activity:
bash-2.05b$ ssh-keygen –b 1024 –t rsa
Generating RSA private key, 1024 bit long modulus
The public key must be in base64 encoded (binary) format for it to be imported correctly into the box. You can use third party tools available on the Internet to convert the key to the binary format.
Once the public key is imported to the router, the SSH client can choose to use the public key authentication method by specifying the request using the “-o” option in the SSH client. For example:
client$ ssh -o PreferredAuthentications=publickey 1.2.3.4
If a public key is not imported to a router using the RSA method, the SSH server initiates the password based authentication. If a public key is imported, the server proposes the use of both the methods. The SSH client then chooses to use either method to establish the connection. The system allows only 10 outgoing SSH client connections.
Currently, only SSH version 2 and SFTP server support the RSA based authentication. For more information on how to import the public key to the router, see the Implementing Certification Authority Interoperability on the Cisco IOS XR Software chapter in this guide.
Note | The preferred method of authentication would be as stated in the SSH RFC. The RSA based authentication support is only for local authentication, and not for TACACS/RADIUS servers. |
Authentication, Authorization, and Accounting (AAA) is a suite of network security services that provide the primary framework through which access control can be set up on your Cisco router or access server. For more information on AAA, see the Authentication, Authorization, and Accounting Commands on the Cisco IOS XR Software module in the Cisco IOS XR System Security Command Reference for the Cisco CRS Router publication and the Configuring AAA Services on the Cisco IOS XR Software Softwaremodule in the Cisco IOS XR System Security Configuration Guide for the Cisco CRS Router publication.
SSHv2 Client Keyboard-Interactive Authentication
An authentication method in which the authentication information is entered using a keyboard is known as keyboard-interactive authentication. This method is an interactive authentication method in the SSH protocol. This type of authentication allows the SSH client to support different methods of authentication without having to be aware of their underlying mechanisms.
Currently, the SSHv2 client supports the keyboard-interactive authentication. This type of authentication works only for interactive applications.
Note | The password authentication is the default authentication method. The keyboard-interactive authentication method is selected if the server is configured to support only the keyboard-interactive authentication. |
How to Implement Secure Shell
To configure SSH, perform the tasks described in the following sections:
Configuring SSH
Note | For SSHv1 configuration, Step 1 to Step 4 are required. For SSHv2 configuration, Step 2 to Step 4 are optional. |
ssh server dscp <value from 0 – 63>If not configured, the default DSCP value set in packets is 16 (for both client and server).
RP/0/5/CPU0:router(config)#ssh server dscp ?
  <0-63>  DSCP value range

RP/0/5/CPU0:router(config)#ssh server dscp 63 ?
  <cr>
RP/0/5/CPU0:router(config)#ssh server dscp 63
RP/0/5/CPU0:router(config)#

RP/0/5/CPU0:router(config)#ssh client dscp ?
  <0-63>  DSCP value range

RP/0/5/CPU0:router(config)#ssh client dscp 0 ?
  <cr>
RP/0/5/CPU0:router(config)#ssh client dscp 0
RP/0/5/CPU0:router(config)#
Perform this task to configure SSH.
1.
configure
2.
hostname
hostname
3.
domain name
domain-name
4.
commit
5.
crypto key generate rsa
[usage
keys
|
general-keys]
[keypair-label]
6.
crypto
key generate dsa
7.
configure
8.
ssh timeout
seconds
9.
Do one of the
following:
10.
commit
11.
show
ssh
12.
show
ssh session details
DETAILED STEPS
Configuring the SSH Client
Perform this task to configure an SSH client.
1.
configure
2.
ssh client knownhost
device
:
/filename
3.
commit
4.
ssh
[
vrf
vrf-name
]
{ipv4-address
|
ipv6-address |
hostname}
[
username
user-
id}
[
cipher
aes
{
128-cbc
|
192-cbc
|
256-cbc
}]
source-interface
type
instance]
DETAILED STEPS
| Command or Action | Purpose | |||
|---|---|---|---|---|
| Step 1 |
configure
| |||
| Step 2 | ssh client knownhost
device
:
/filename
Example:
RP/0/RP0/CPU0:router(config)# ssh client knownhost slot1:/server_pubkey
|
(Optional) Enables the feature to authenticate and check the server public key (pubkey) at the client end.
| ||
| Step 3 |
commit
| |||
| Step 4 | ssh
[
vrf
vrf-name
]
{ipv4-address
|
ipv6-address |
hostname}
[
username
user-
id}
[
cipher
aes
{
128-cbc
|
192-cbc
|
256-cbc
}]
source-interface
type
instance]
|
Enables an outbound SSH connection.
|
-
If you are using SSHv1 and your SSH connection is being rejected, you have not successfully generated an RSA key pair for your router. Make sure that you have specified a hostname and domain. Then use the crypto key generate rsa command to generate an RSA key pair and enable the SSH server.
-
If you are using SSHv2 and your SSH connection is being rejected, you have not successfully generated a DSA key pair for your router. Make sure that you have specified a hostname and domain. Then use the crypto key generate dsa command to generate a DSA key pair and enable the SSH server.
- When configuring the RSA or
DSA key pair, you might encounter the following error messages:
You must configure a hostname for the router using the hostname command.
You must configure a host domain for the router using the domain-name command.
-
The number of allowable SSH connections is limited to the maximum number of virtual terminal lines configured for the router. Each SSH connection uses a vty resource.
-
SSH uses either local security or the security protocol that is configured through AAA on your router for user authentication. When configuring AAA, you must ensure that the console is not running under AAA by applying a keyword in the global configuration mode to disable AAA on the console.
Note
If you are using Putty version 0.63 or higher to connect to the SSH client, set the 'Chokes on PuTTYs SSH2 winadj request' option under SSH > Bugs in your Putty configuration to 'On.' This helps avoid a possible breakdown of the session whenever some long output is sent from IOS XR to the Putty client.
Configuration Examples for Implementing Secure Shell
This section provides the following configuration example:
Configuring Secure Shell: Example
This example shows how to configure SSHv2 by creating a hostname, defining a domain name, enabling the SSH server for local and remote authentication on the router by generating a DSA key pair, bringing up the SSH server, and saving the configuration commands to the running configuration file.
After SSH has been configured, the SFTP feature is available on the router.
configure
hostname router1
domain name cisco.com
exit
crypto key generate dsa
configure
ssh server
end
Multi-channeling in SSH
Multiplexing is enabled by default in the Cisco IOS XR software server. If your client supports multiplexing, you must explicitly set up multiplexing on the client for it to be able to send multi-channel requests to the server. You can use OpenSSH, Putty, Perl, WinSCP, Putty, FileZilla, TTSSH, Cygwin or any other SSH-based tool to set up multiplexing on the client. Configure Client for Multiplexing provides an example of how you can configure the client for multiplexing using OpenSSH.
For more information on Multichannel feature, see the Cisco ASR 9000 Series Aggregation Services Router System Security Configuration Guide, Release 5.1.1.
- Restrictions for Multi-channeling Over SSH
- Client and Server Interaction Over Multichannel Connection
- Configure Client for Multiplexing
Restrictions for Multi-channeling Over SSH
- Do not use client multiplexing for heavy transfer of data as the data transfer speed is limited by the TCP speed limit. Hence, for a heavy data transfer it is advised that you run multiple SSH sessions, as the TCP speed limit is per connection.
- Client multiplexing must not be used for more than 15 concurrent channels per session simultaneously.
- You must ensure that the first channel created at the time of establishing the session is always kept alive in order for other channels to remain open.
Client and Server Interaction Over Multichannel Connection
The figure below provides an illustration of a client-server interaction over a SSH multichannel connection.
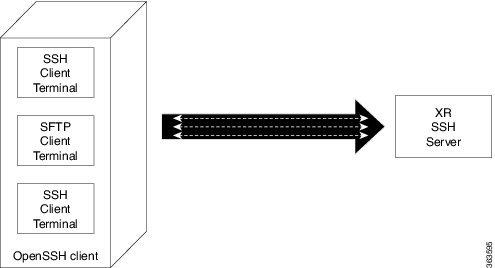
As depicted in the illustration,
- The client multiplexes the collection of channels into a single connection. This allows different operations to be performed on different channels simultaneously. The dotted lines indicate the different channels that are open for a single session.
- After receiving a request from the client to open up a channel, the server processes the request. Each request to open up a channel represents the processing of a single service.
Note | The Cisco IOX software supports server-side multiplexing only. |
Configure Client for Multiplexing
The SSH client opens up one TCP socket for all the connections. In order to do so, the client multiplexes all the connections into one TCP connection. Authentication happens only once at the time of creating the session. After that, all the SSH clients associated with the particular session uses the same TCP socket to communicate to the server. Use the following steps to configure client multiplexing using OpenSSH:
1. Edit the ssh_config file.
2. Add entries ControlMaster auto and ControlPath
3. Create a temporary folder.
DETAILED STEPS
| Command or Action | Purpose | |
|---|---|---|
| Step 1 | Edit the ssh_config file. | Open the ssh_config file with your favorite text editor to configure values for session multiplexing. The system-wide SSH configuration file is located under /etc/ssh/ssh_config. The user configuration file is located under ~/.ssh/config or $HOME/.ssh/config. |
| Step 2 | Add entries
ControlMaster
auto and
ControlPath
Example: Host * ControlMaster auto ControlPath ~/.ssh/tmp/%r@%h:%p | Add the entry
ControlMaster auto and ControlPath to the ssh_config file, save it and exit.
|
| Step 3 | Create a temporary folder. | Create a temporary directory inside the /.ssh folder for storing the control sockets. |
Additional References
The following sections provide references related to implementing secure shell.
Related Documents
|
Related Topic |
Document Title |
|---|---|
|
AAA commands: complete command syntax, command modes, command history, defaults, usage guidelines, and examples |
Authentication, Authorization, and Accounting Commands on the Cisco IOS XR Software module in Cisco IOS XR System Security Command Reference for the Cisco CRS Router. |
|
AAA configuration tasks |
Configuring AAA Services on the Cisco IOS XR Software module in Cisco IOS XR System Security Configuration Guide for the Cisco CRS Router. |
|
Host services and applications commands: complete command syntax, command modes, command history, defaults, usage guidelines, and examples |
Host Services and Applications Commands on the Cisco IOS XR Software Softwaremodule in Cisco IOS XR IP Addresses and Services Command Reference for the Cisco CRS Router. |
|
IPSec commands: complete command syntax, command modes, command history, defaults, usage guidelines, and examples |
IPSec Network Security Commands on the Cisco IOS XR Software module in Cisco IOS XR System Security Command Reference for the Cisco CRS Router |
|
SSH commands: complete command syntax, command modes, command history, defaults, usage guidelines, and examples |
Secure Shell Commands on the Cisco IOS XR Software module in Cisco IOS XR System Security Command Reference for the Cisco CRS Router |
Standards
|
Standards |
Title |
|---|---|
|
Draft-ietf-secsh-userauth-17.txt |
SSH Authentication Protocol, July 2003 |
|
Draft-ietf-secsh-connect-17.txt |
SSH Connection Protocol, July 2003 |
|
Draft-ietf-secsh-architecture-14.txt |
SSH Protocol Architecture, July 2003 |
|
Draft-ietf-secsh-transport-16.txt |
SSH Transport Layer Protocol, July 2003 |
MIBs
|
MIBs |
MIBs Link |
|---|---|
| — |
To locate and download MIBs using Cisco IOS XR software, use the Cisco MIB Locator found at the following URL and choose a platform under the Cisco Access Products menu: http://cisco.com/public/sw-center/netmgmt/cmtk/mibs.shtml |
RFCs
|
RFCs |
Title |
|---|---|
|
RFC 6020 |
Netconf/ Yang |
Technical Assistance
|
Description |
Link |
|---|---|
|
The Cisco Technical Support website contains thousands of pages of searchable technical content, including links to products, technologies, solutions, technical tips, and tools. Registered Cisco.com users can log in from this page to access even more content. |
 Feedback