- Overview of Cisco IoT Field Network Director
- Installing Cisco IoT FND
- Generating and Installing Certificates
- Managing User Access
- Managing System Settings
- Managing Devices
- Managing Firmware Upgrades
- Managing Tunnel Provisioning
- Monitoring System Activity
- Managing High Availability Installations
- Troubleshooting IoT FND
Managing User Access
This section has the following topics for managing users and roles in IoT FND:
■![]() Configuring Remote Authentication
Configuring Remote Authentication
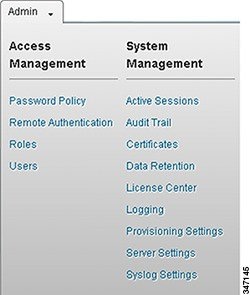
All user management actions are accessed through the Admin > Access Management menu (Admin Menu).
Managing the Password Policy
IoT FND provides default password policy values that you can enforce among IoT FND users.
Note: To modify these values, you must be logged in either as root or as a user with Administrative Operations permissions.
Caution: In some cases, changing password policies immediately terminates all user sessions and resets all passwords.
Note: The “Password history size” and “Max unsuccessful login attempts” policies do not apply to IoT FND North Bound API users.
These changes invalidate all user sessions and expire their passwords (including the root user):
■![]() When you increase the minimum length of passwords
When you increase the minimum length of passwords
■![]() When you decrease the password expiry interval
When you decrease the password expiry interval
■![]() When you enable “ Password cannot contain username or reverse of username ”
When you enable “ Password cannot contain username or reverse of username ”
■![]() When you enable “ Password cannot be cisco or ocsic (cisco reversed) ”
When you enable “ Password cannot be cisco or ocsic (cisco reversed) ”
■![]() When you enable “ No character can be repeated more than three times consecutively in the password ”
When you enable “ No character can be repeated more than three times consecutively in the password ”
■![]() When you enable “ Must contain at least one character from all the character sets (upper-case, lower-case, digits and special characters) ”
When you enable “ Must contain at least one character from all the character sets (upper-case, lower-case, digits and special characters) ”
1.![]() Choose Admin > Access Management > Password Policy.
Choose Admin > Access Management > Password Policy.
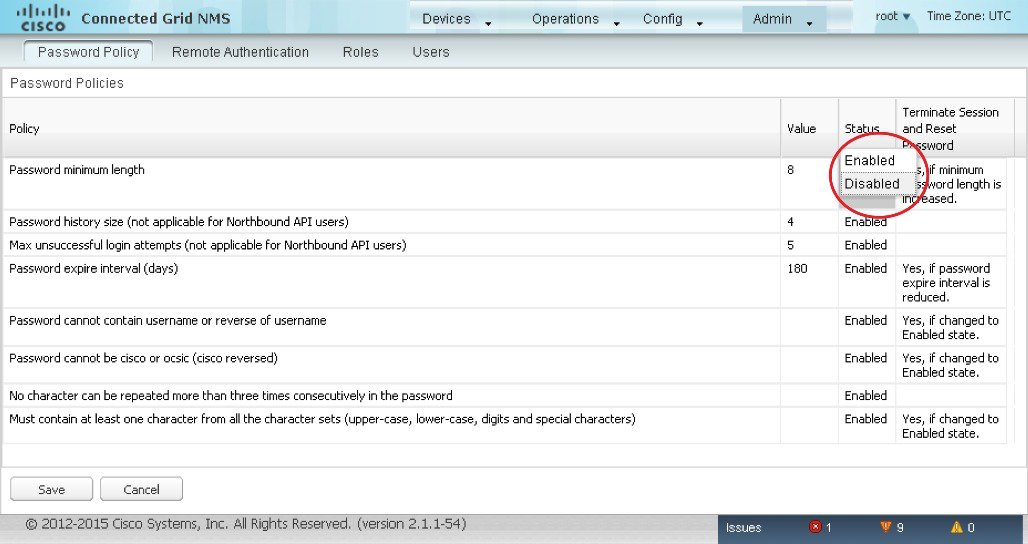
2.![]() To enable or disable a policy, choose the appropriate option (Enabled or Disabled) from the Status drop-down menu.
To enable or disable a policy, choose the appropriate option (Enabled or Disabled) from the Status drop-down menu.
3.![]() To modify the value of a policy, if applicable, enter the new value in the Value field.
To modify the value of a policy, if applicable, enter the new value in the Value field.
Note: IoT FND supports a maximum password length of 32 characters.
4.![]() Click Save to start enforcing the new policies.
Click Save to start enforcing the new policies.
Note: The password policy you configure in IoT FND applies only to local users and not to remote Active Directory (AD) users. The password policy for AD users is determined and enforced by the AD admin.
Configuring Remote Authentication
To configure remote authentication for IoT FND, you need to perform configurations steps in Active Directory (AD) and IoT FND.
■![]() Support for Remote Authentication
Support for Remote Authentication
■![]() Configuring Remote Authentication in AD
Configuring Remote Authentication in AD
■![]() Configuring Security Policies on the RADIUS Server
Configuring Security Policies on the RADIUS Server
■![]() Configuring Remote Authentication in IoT FND
Configuring Remote Authentication in IoT FND
■![]() Enabling and Disabling Remote User Accounts
Enabling and Disabling Remote User Accounts
■![]() Deleting Remote User Accounts
Deleting Remote User Accounts
■![]() Logging In to IoT FND Using a Remote User Account
Logging In to IoT FND Using a Remote User Account
Support for Remote Authentication
With Remote Authentication, it is easier to integrate IoT FND into an existing AD and Network Policy Server (NPS) infrastructure. This allows administrators to configure IoT FND access for users in AD.
When you configure remote authentication in IoT FND, it hands over the authentication and authorization responsibility to AD and NPS. AD performs user authentication to check the validity of user credentials. The RADIUS server performs user authorization to check whether a user belongs to a group that defines the user role. If so, the server returns the role name to IoT FND.
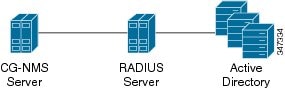
The following is the flow of user authentication and authorization by AD and NPS:
1.![]() The user enters their credentials.
The user enters their credentials.
2.![]() For remote users, if authentication and authorization are successful, the assigned user role returns to the NMS server from the RADIUS server.
For remote users, if authentication and authorization are successful, the assigned user role returns to the NMS server from the RADIUS server.
3.![]() If the role that returns is valid, the user is granted access.
If the role that returns is valid, the user is granted access.
Note: When remote authentication is enabled, user management is done in AD. If an AD user logs in who was deleted from IoT FND, their profile is added back to IoT FND. To prevent access to IoT FND, their AD user profiles must first be deleted from AD.
Configuring Remote Authentication in AD
To configure AD to allow IoT FND to remotely authenticate users:
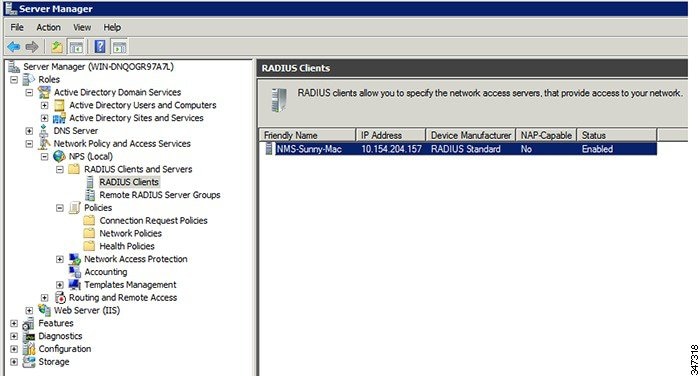
2.![]() Add IoT FND as a radius client on the RADIUS server.
Add IoT FND as a radius client on the RADIUS server.
Provide a friendly name, and IP address or DNS name of the IoT FND server and configure the shared secret that IoT FND uses to connect to the RADIUS server.
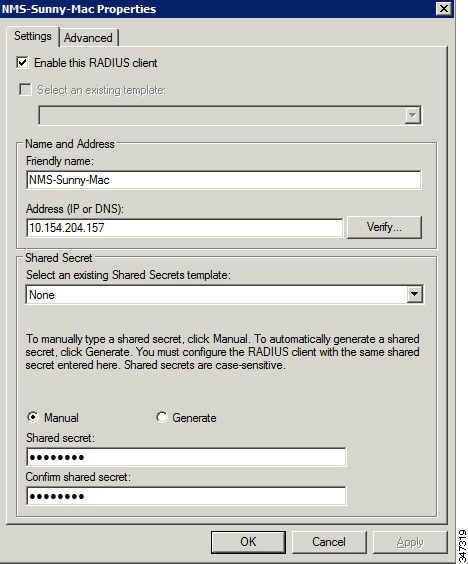
An entry for the RADIUS client appears under RADIUS Clients and Servers.
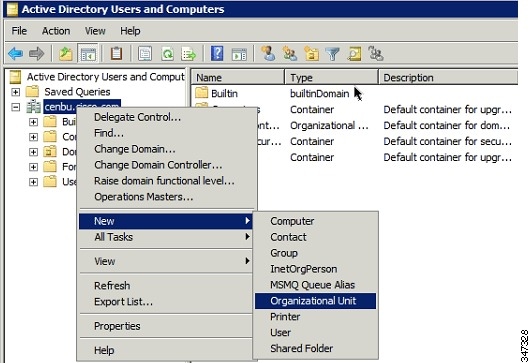
3.![]() Log in to AD and create an organizational unit.
Log in to AD and create an organizational unit.
Cisco recommends that you create all security groups (IoT FND roles) within this organizational unit.
4.![]() Add security groups corresponding to IoT FND roles to the organizational unit.
Add security groups corresponding to IoT FND roles to the organizational unit.
The following example shows the security groups defined in the NMS_ROLES organizational unit.
Tip: When creating the security groups, ensure that they map one-to-one to IoT FND roles (that is, every role defined in IoT FND maps to only one AD security group). The name of the security group does not have to match a role name in IoT FND, but for organizational purposes, Cisco recommends using names that correlate the security group name to a IoT FND role.
Note: You cannot create or assign the IoT FND root role in AD.

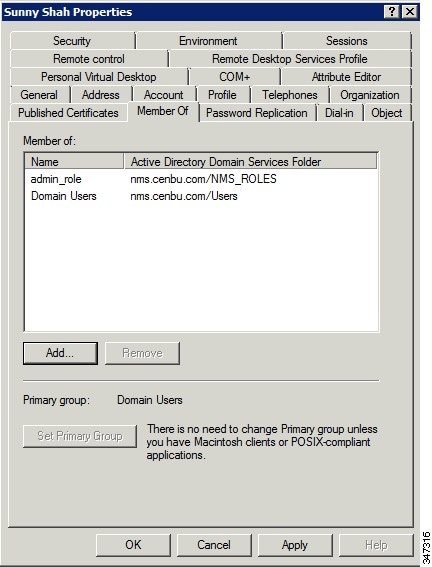
5.![]() Assign AD users a role by adding them to the security group mapping to that role.
Assign AD users a role by adding them to the security group mapping to that role.
Since, users can only belong to one security group, the IoT FND role that the user is assigned after log in is dependent on their assigned AD security group.
Tip: In AD, users cannot be assigned multiple IoT FND roles, and cannot belong to multiple security groups. To assign permissions from more than one role to a group of users, create a new IoT FND role with the required permissions, and a create the corresponding AD security group. Users in this new group can then carry out the tasks allowed by this role.
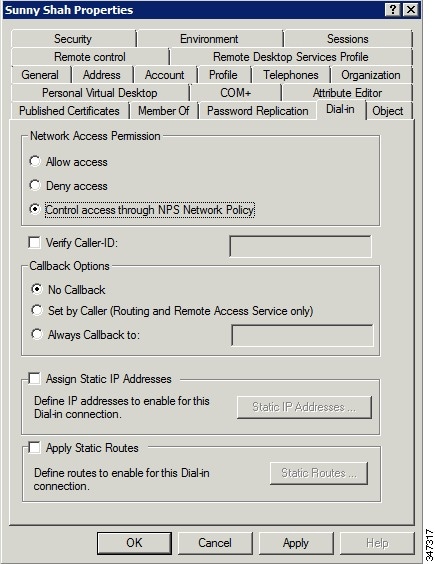
6.![]() Configure the Dial-in Network Access Permission to use the NPS Network Policy.
Configure the Dial-in Network Access Permission to use the NPS Network Policy.
Configuring Security Policies on the RADIUS Server
To authorize users for IoT FND access, configure security policies for the RADIUS server.
To configure security policies on the RADIUS server, follow these steps:
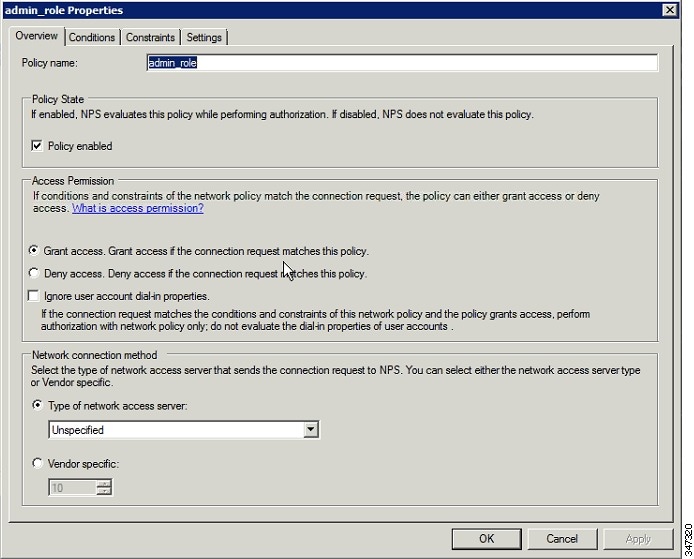
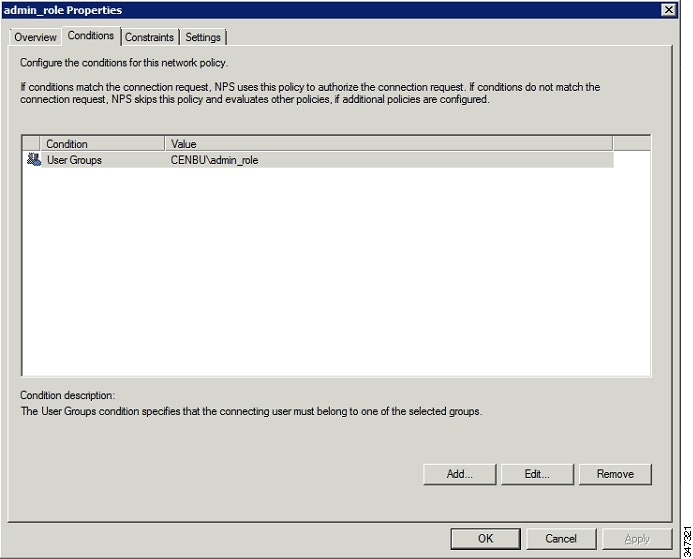
1.![]() Create a network policy for each security group you created in AD.
Create a network policy for each security group you created in AD.
2.![]() Configure the policy as follows:
Configure the policy as follows:
a.![]() In the Overview pane, define the policy name, enable it, and grant access permissions.
In the Overview pane, define the policy name, enable it, and grant access permissions.
b.![]() Click the Conditions tab, select the User Groups condition, and click Add.
Click the Conditions tab, select the User Groups condition, and click Add.
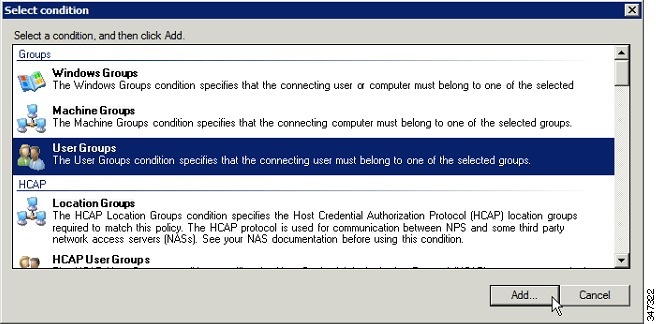
The User Groups condition specifies that the connecting user must belong to the selected group. For this policy to pass, the user being authorized must belong to the user group configured in this policy.
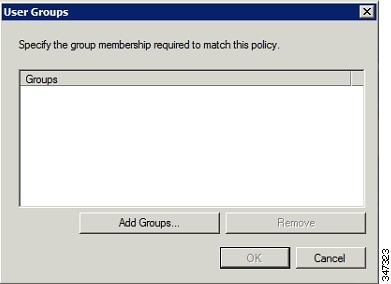
c.![]() In the User Groups window, click Add Groups.
In the User Groups window, click Add Groups.
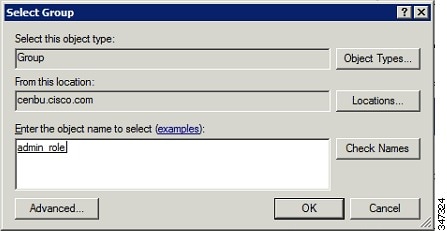
d.![]() In the Select Group window, enter the name of the group
In the Select Group window, enter the name of the group
e.![]() Click OK to close the Select Group dialog box, and then click OK to close the User dialog box.
Click OK to close the Select Group dialog box, and then click OK to close the User dialog box.
f.![]() Click Cancel to close the Select condition window.
Click Cancel to close the Select condition window.
The condition appears in the Conditions pane.
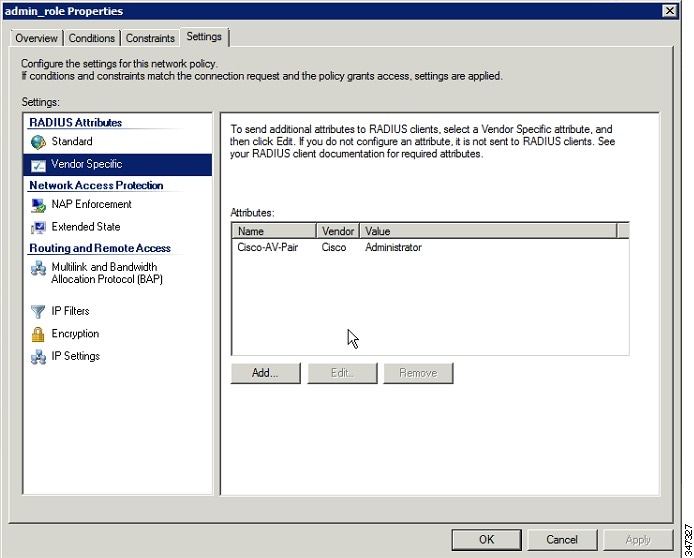
g.![]() Click the Settings tab, and then click Add to display the Attribute Information window.
Click the Settings tab, and then click Add to display the Attribute Information window.
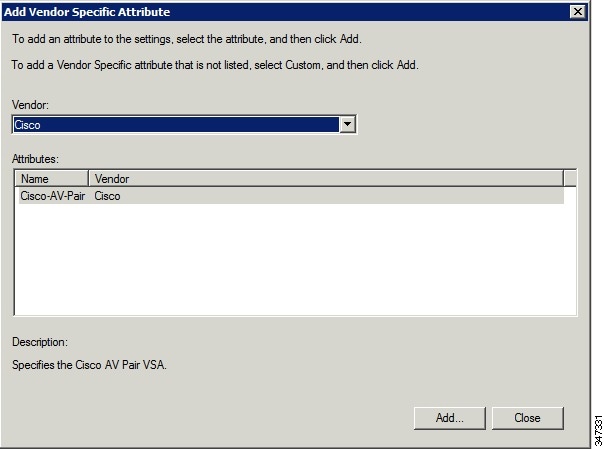
h.![]() Click Add to define a Vendor Specific Attribute (VSA) that is sent to IoT FND (RADIUS client) after the user credentials and security group membership are verified.
Click Add to define a Vendor Specific Attribute (VSA) that is sent to IoT FND (RADIUS client) after the user credentials and security group membership are verified.
| ■ |
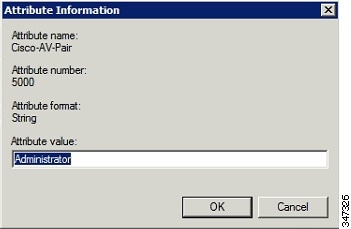
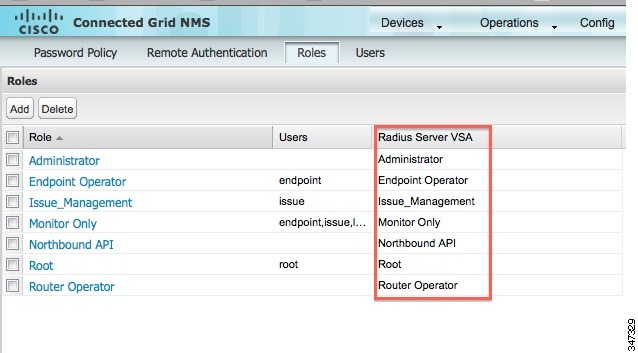
Note: The string entered in the Attribute value field must be the exact string listed in the Radius Server VSA column on the Roles page in IoT FND (Admin >![]() Access Management > Roles).
Access Management > Roles).
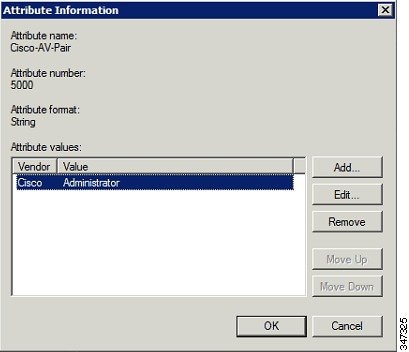
The VSA attribute appears in the Settings pane.
Configuring Remote Authentication in IoT FND
You enable remote user authentication and configure RADIUS server settings on the Remote Authentication page (Admin > Access Management > Remote Authentication).
To configure remote authentication:
1.![]() Choose Admin > Access Management > Remote Authentication.
Choose Admin > Access Management > Remote Authentication.
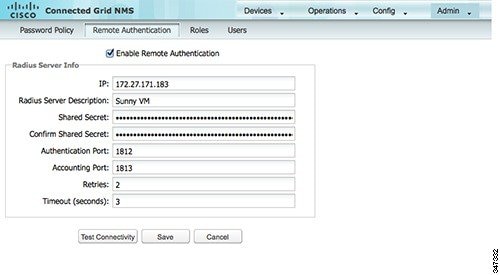
2.![]() Check the Enable Remote Authentication check box.
Check the Enable Remote Authentication check box.
3.![]() Enter this information about the RADIUS server:
Enter this information about the RADIUS server:
4.![]() To ensure that IoT FND can reach the RADIUS server, click Test Configuration.
To ensure that IoT FND can reach the RADIUS server, click Test Configuration.
a.![]() Enter your AD username and password.
Enter your AD username and password.
Enabling and Disabling Remote User Accounts
In IoT FND you cannot enable or disable remote AD user accounts. To enable or disable remote AD user accounts, use your AD server.
Deleting Remote User Accounts
In IoT FND, you can delete remote user accounts. However, this only removes the user from the IoT FND Users page (Admin > Access Management > Users); it does not delete the user account from AD. If a deleted user logs in to IoT FND and AD authentication is successful, an entry for the user is added to the IoT FND Users page.
Logging In to IoT FND Using a Remote User Account
Logging in to IoT FND using a remote AD user account is transparent to the user. In the background, IoT FND checks whether the account is local, and for remote users sends an authentication request to the RADIUS server configured on the Remote Authentication page (Admin > Access Management > Remote Authentication). If both authentication and authorization are successful, IoT FND adds an entry for the user in the Users page (Admin > Access Management > Users).
Unlike entries for local users on the Users page, the user name filed in remote user entries is not a link. You cannot click the name of a remote user to obtain more information about the user.
Note: Remote users cannot be managed through IoT FND. If a remote user wants to update their password, they must use their organization’s AD password update tool. Remote users cannot update their password using IoT FND.
Managing Roles
Use roles to assign permissions based on the role or roles a user plays. Roles define the type of tasks IoT FND users can perform. This section has the following topics:
IoT FND lets you assign a role to any user. The operations the user can perform are based on the permissions enabled for the role. The following topics are discussed in this section:
Basic User Permissions
IoT FND User Permissions describes basic IoT FND permissions.
System-Defined User Roles
Note: The system-defined Root role cannot be assigned to users.
System-defined User Roles lists system-defined roles. These roles cannot be modified.
|
|
|
|---|---|
This role provides users with read-only access to IoT FND. By default, this role is defined for every user. |
|
This role combines the permissions of a Router Operator with: |
|
Custom User Roles
In IoT FND you can define custom roles. For each role you create, you can assign it one or more basic user permissions (see IoT FND User Permissions). These permissions specify the type of actions users with this role can perform.
Adding Roles
1.![]() Choose Admin > Access Management > Roles.
Choose Admin > Access Management > Roles.
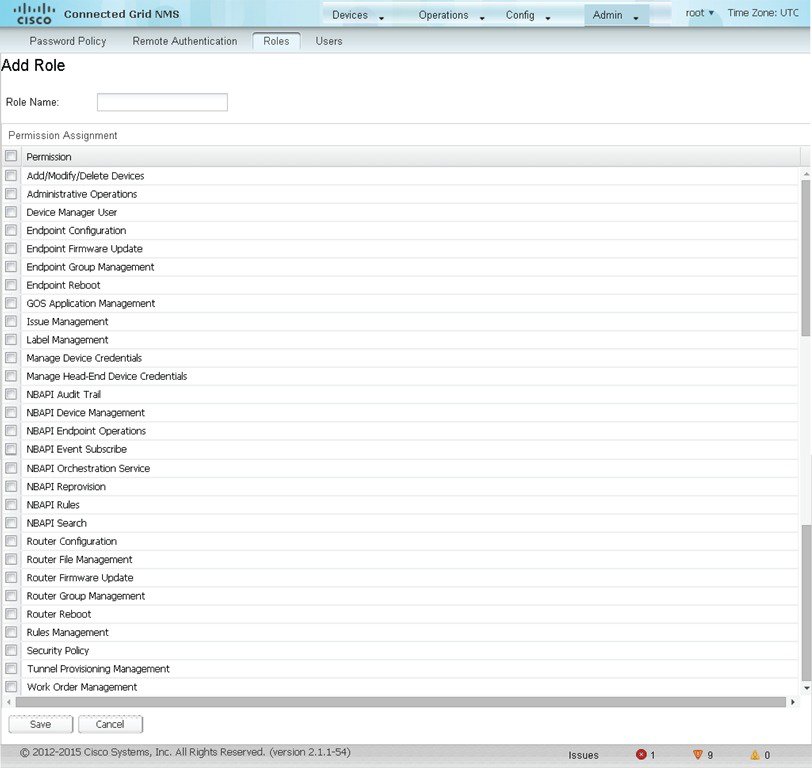
3.![]() Enter the name of the role.
Enter the name of the role.
4.![]() Check the appropriate check boxes to assign permissions.
Check the appropriate check boxes to assign permissions.
6.![]() To continue to add roles, click Yes ; otherwise, click No to return to the Roles page.
To continue to add roles, click Yes ; otherwise, click No to return to the Roles page.
Deleting Roles
Note: You cannot delete a custom role if it is in use.
1.![]() Choose Admin > Access Management > Roles.
Choose Admin > Access Management > Roles.
Editing Roles
Note: You cannot edit system-defined roles, but you can edit custom roles.
1.![]() Choose Admin > Access Management > Roles.
Choose Admin > Access Management > Roles.
3.![]() Make changes to the permission assignments by checking or unchecking the relevant check boxes.
Make changes to the permission assignments by checking or unchecking the relevant check boxes.
Viewing Roles
1.![]() Choose Admin > Access Management > Roles.
Choose Admin > Access Management > Roles.
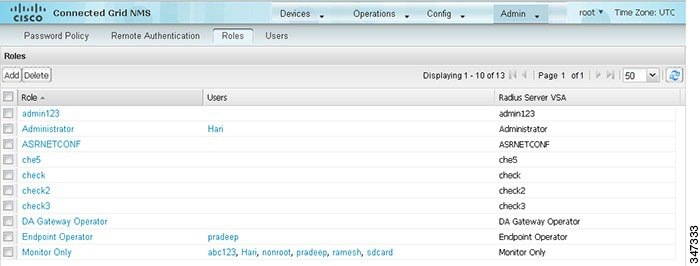
For every role, IoT FND lists the users assigned to this role.
2.![]() To view permission assignments for the role, click the role link.
To view permission assignments for the role, click the role link.
Managing Users
This section has the following topics on managing users:
Resetting Passwords
As the root user of the Linux server on which IoT FND runs, you can reset your password and use the password utility to reset the password for any other IoT FND user.
To reset a password, enter this command:
IoT FND manages its own user account database; therefore, you must add all new local users from the IoT FND user interface at the Admin > Access Management > Users page. Remote users are automatically added to the database. You can also enable, disable, edit, or delete users on this page.
A user with a disabled account cannot log in until an administrator enables their account. After a user account is active, the user must reset their password. There is no limit to the number of users that you can define on the system other than the available database storage.
Viewing Users
To view IoT FND users, open the Users page (Admin > Access Management > Users).
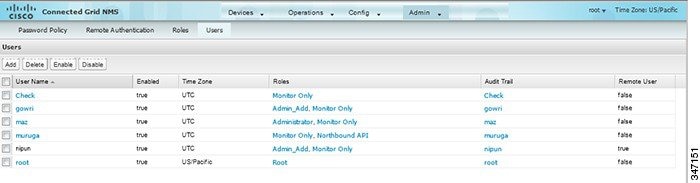
IoT FND displays this information about users:
Adding Users
1.![]() Choose Admin > Access Management > Users.
Choose Admin > Access Management > Users.
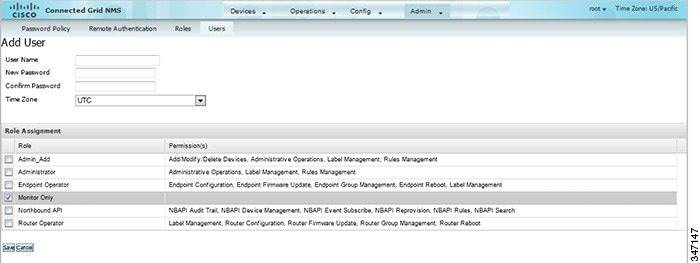
3.![]() Enter the following user information:
Enter the following user information:
|
|
|
|---|---|
| Enter the password. The password must conform to the IoT FND password policy. |
|
4.![]() Select the user roles to assigned to this user by checking the appropriate check box under Role Assignment.
Select the user roles to assigned to this user by checking the appropriate check box under Role Assignment.
IoT FND creates a record for this user in the IoT FND database.
6.![]() To add the new user, click Yes ; otherwise, click No to return to the Users page.
To add the new user, click Yes ; otherwise, click No to return to the Users page.
Note: A new user account is enabled by default. This means that the user can access IoT FND.
Deleting Users
Deleting user accounts removes user preferences such as the default map location from the system. Disable a user account to temporarily deactivate it.
1.![]() Choose Admin > Access Management > Users.
Choose Admin > Access Management > Users.
Enabling Users
You must enable the user account for users to access IoT FND. When users log in for the first time, IoT FND prompts them to change their password.
To enable user accounts in IoT FND:
1.![]() Choose Admin > Access Management > Users.
Choose Admin > Access Management > Users.
Disabling Users
To prevent users from accessing IoT FND, disable their accounts. Disabling user accounts does not delete their records from the IoT FND database.
To disable user accounts in IoT FND:
1.![]() Choose Admin > Access Management > Users.
Choose Admin > Access Management > Users.
2.![]() Check the check boxes for the user accounts to disable.
Check the check boxes for the user accounts to disable.
Note: If you disable a user account, IoT FND resets the user password.
Editing Users
To edit user settings in IoT FND:
 Feedback