The documentation set for this product strives to use bias-free language. For the purposes of this documentation set, bias-free is defined as language that does not imply discrimination based on age, disability, gender, racial identity, ethnic identity, sexual orientation, socioeconomic status, and intersectionality. Exceptions may be present in the documentation due to language that is hardcoded in the user interfaces of the product software, language used based on RFP documentation, or language that is used by a referenced third-party product. Learn more about how Cisco is using Inclusive Language.
This chapter covers details on Cisco Agile Metro Edge Fabric automation use cases that include fabric definition, commissioning
of devices participating in an Edge Fabric, and operations such as software life-cycle management and configuration template
management.
Metro Edge Fabric Manager
Fabric Manager is a container for fabric attributes, fabrics, fabric devices, and fabric connections. It also supports API
calls to perform compliance actions.
Primary elements of Metro Edge Fabric Manager
These are the primary elements of Metro Edge Fabric Manager:
Fabric definition: is a container or database that is used to store all attributes of the fabric including the devices, their
roles, and the connectivity between fabric devices.
Role definition: is a container for a set of attributes which may be applied to multiple devices in the same role.
The role definition must contain the topology role (leaf or spine) along with all required role attributes. The role definitions
are located outside of a specific Fabric instance. So, they may be applied across devices in different fabrics.
Fabric connectivity: is a part of a specific fabric instance that is used to define the connection between all devices and
contains information about the type of connection and the explicit endpoints of the connection.
Metro Edge Fabric automation
Metro Edge Fabric automation use cases
Metro Edge Fabric automation covers these use cases:
Device fabric onboarding: that covers the commissioning of devices participating in an Edge Fabric
Compliance operations that include
Fabric Software Life-Cycle Management (FSLM): that ensures that the devices in the fabric match their intended OS software
version, and
Configuration Template Management: that ensures that the configuration on devices that are previously deployed matches the
updated configuration template.
Metro Edge Fabric automation components
The automation components of Metro Edge Fabric include
NSO fabric service: for fabric definition
CX fabric-enabled ZTP: for automating fabric device onboarding
CX fabric compliance functions: for OS version and template compliance, and
CWM workflows: to better automate Fabric management that includes operations such as performing device upgrades, template
compliance check, applying new templates, and so on.
Use Case: Device Fabric onboarding
Fabric-enabled ZTP
You can manually onboard devices into the fabric or use zero touch provisioning (ZTP).
Zero touch provisioning (ZTP) is the method used for automated device onboarding, with support for various ZTP attributes
and scripts to complete device and fabric onboarding.
Components of Fabric-enabled ZTP
These are the high-level components of fabric-enabled ZTP.
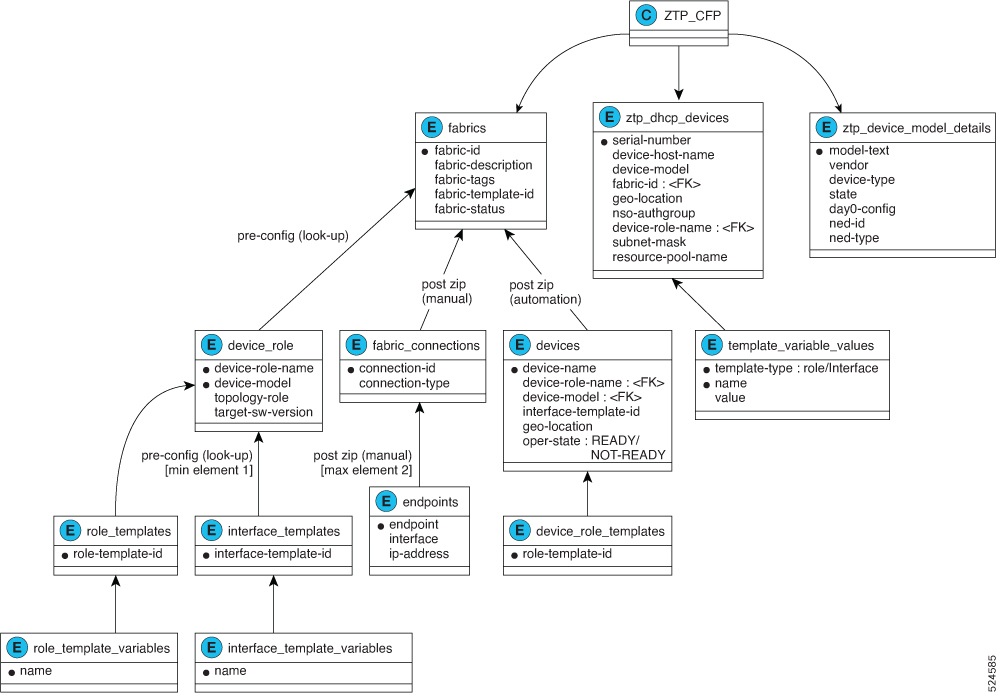
Figure 1. High-level components of Fabric-enabled ZTP
Fabric
The Fabric Definition is the container or database used to store all attributes of the fabric including the devices, their
roles, and the connectivity between fabric devices.
A fabric is defined along with device roles to be assigned to devices when onboarded.
DHCP server (not supplied by Cisco) to bootstrap the device
Web server to download ZTP artifacts
CX NSO ZTP package
Define fabric and roles before onboarding the devices.
Procedure
Step 1
Install and configure DHCP server.
Step 2
Install CX NSO ZTP package and define device ZTP attributes.
Step 3
Install Fabric Manager package.
Guidelines and sample configurations for onboarding devices using ZTP
Sample configuration for ISC DHCPD
If you execute iPXE boot, then the system downloads and boots the image. If you perform non-iPXE ZTP, then the system downloads
and executes Python script to perform NSO onboarding.
Although this example maps specific host to IP address, it is not mandatory to do so.
Follow these guidelines for defining CX NSO ZTP devices:
Configure DHCP ZTP devices under the NSO devices->dhcp-devices tree.
Provide serial number because it is the primary key.
Define the ZTP definition since the fabric ID and device role are defined under ZTP.
Use standard NSO IP resource pool package to allocate management addresses.
This example allocated a /26 out of 192.168.1.0/24.
Create fabric connections
Fabric connections express the intent of connections between two routers. Each connection has a maximum of two endpoints but
can have a single endpoint to pre-configure nodes ahead of time.
When you make a fabric connection, the system applies the interface configuration template, if defined in the role definition.
You can apply the template through NSO CLI or API.
Procedure
Step 1
Create a fabric connection.
CLI: using the NSO populate-fabric-connections command
This action API invokes methods used to add Fabric connection details by using the templates whose name is configured under
the /edge-fabric-manager-instance:fabrics{<FABRIC_ID>}/device-role/.
Input payload has different options for these parameters:
commit-type: can be commit or dry-run
response-type: can be save-dry-run or show-dry-run
The save-dry-run option saves the dry-run output to a file under the path configured in /fabric-static-config:fabric-static-config{dry-run-location}
Step 2
Verify fabric connections.
Example:
Router#show fabrics fabric-connections

FABRIC                                 CONNECTION
ID           CONNECTION ID             TYPE          ENDPOINT       INTERFACE       IP ADDRESS

-----------------------------------------------------------------------------------------------------------------------
edge123  fabric-leaf1-connection     d1-d2-type      fabric-leaf1   TenGigE0/0/0/0   192.168.1.22/24
                                                     fabric-spine1  TenGigE0/0/0/0   192.168.1.24/24
         fabric-spine1-connection    d1-d2-type      fabric-leaf1   TenGigE0/0/0/0   192.168.1.34/24
                                                     fabric-spine1  TenGigE0/0/0/0   192.168.1.26/24
         fabric-spine2-connection    d1-d2-type      fabric-leaf1   TenGigE0/0/0/0   192.168.1.31/24
                                                     fabric-spine2  TenGigE0/0/0/0   192.168.1.24/24
Use Case: Fabric software lifecycle management
Fabric software lifecycle management
Fabric software lifecycle management (FSLM) is a process that ensures that the devices in the fabric match their intended
OS software version.
The NSO Edge Fabric Manager performs the compliance check, and compliance enforcement or remediation.
Supported FSLM base functionalities
FSLM supports these base functionalities:
Upgrade or downgrade single device based on {fabric, device}
Upgrade or downgrade a set of devices based on {fabric, role}
Upgrade or downgrade all devices based on {fabric}
Upgrade cycles including the use of GISO for evolved XR (eXR) and XR7 operating systems
Pre- and post-operations on the device and adjacent fabric devices that can be used for pre- and post-upgrade checks
The dry-run capabilities to determine devices that are not running their target software version
Upgrades as a set of atomic functions—for example, software download (staging), software upgrade, and software commit
Unsupported FSLM functionalities
FSLM does not support these functionalities:
Automated graceful maintenance: the upgrade use case does not cover moving traffic off the node being upgraded. You can modify
your own pre-check and post-check scripts as needed to perform these tasks.
Service awareness
User-guided interaction
FSLM Components
FSLM involves these components:
CX NSO OS Upgrade application
Crosswork Workflow Manager (CWM)
How to upgrade or downgrade a set of devices
The workflow for upgrading or downgrading a set of devices is based on these user inputs: {fabric}, {fabric, role}, or {fabric,
device}.
Fabric Manager definition has a metadata field at the role and device level for target-sw-version. The device-level field is preferred in case the field is defined at both levels. When you want to upgrade the OS software
on a device or set of devices you must augment the target-sw-version value using NSO CLI, Web UI, or API.
Process summary
The defined CWM workflows utilize the fabric database of the Fabric Manager application, or API to retrieve data regarding
devices belonging to a specific fabric or role. The upgrade process is intent based, where one workflow determines the intended
software version from the device or role metadata.
The FSLM workflow consists of
compliance workflow: a workflow that checks the current software version in comparison to the intended software version and
determines the set of devices that are currently non-compliant, and
remediation workflow: a workflow that interacts with the OS upgrade NSO application to update the set of devices based on
either {fabric-id}, {fabric-id, role}, or {fabric-id, device} input.
Automated and user-driven remediation: The compliance and remediation flows are sub-flows. You can use them independently
or combine them into a single parent flow. The parent flow has an option to upgrade a set of devices without prompt—the devices
will be upgraded to the target version without any further user intervention.
Workflow
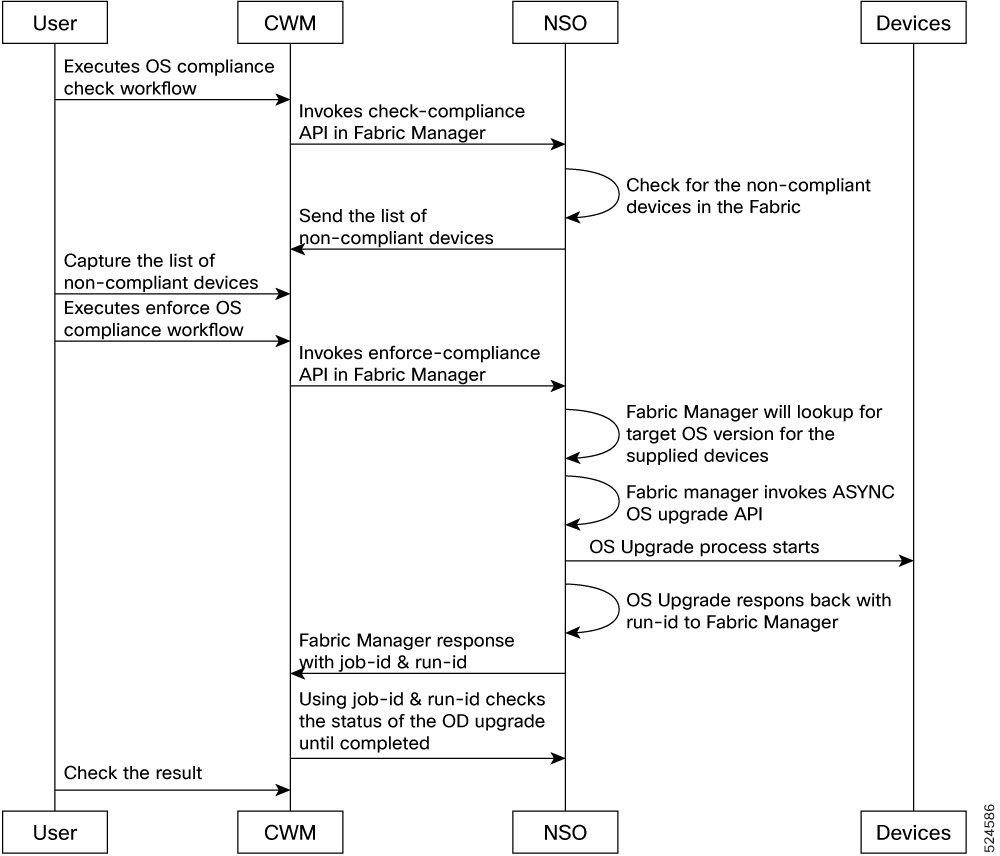
Figure 2. FSLM workflow
These stages describe how FSLM works:
The user executes OS compliance check workflow with these input fields: {{Fabric ID}}, {{Role ID}}, {{Device List}}.
The {{Fabric ID}} is the only mandatory attribute.
The CWM workflow retrieves the list of devices in a Fabric and their attributes using the Fabric Manager API.
The input fields are evaluated for granularity and are used as a filter to retrieve an end set of devices. In Cisco Agile
Metro Release 1.0, these are free text strings and must match a defined Fabric and role in the Fabric Manager.
Once the set of devices is retrieved, CWM evaluates the list to determine which set of devices match the user input.
The next workflow evaluates which devices need to be upgraded.
CWM uses information from the NSO device data or live status to retrieve the current software version from each device.
Devices which do not match the target version will be upgraded or downgraded to match the target version.
The result of this flow feeds into another flow interacting with the CX NSO OS Upgrade package to perform the relevant upgrades.
The upgrade process may be iterative across a single device or done through batches in parallel.
Check OS compliance
This example shows how to check the version for all nodes in the Fabric. It checks the role definition for each device against
the runtime version.
Procedure
Check OS compliance using the check-compliance command.
Example:
Router# edge-fabric-actions check-compliance compliance-type os-version-compliance fabric-details {fabric-id edge123}
fabrics {
    fabric-id edge123
    devices {
        device-name fabric-leaf1
        os-compliant-status false
        response  Device fabric-leaf1 OS version is not compliant. Existing version is: 7.9.2 and target version is: 24.4.1.
    }
    devices {
        device-name fabric-spine1
        os-compliant-status true
        response  Device fabric-spine1 OS version is compliant.
    }
    devices {
        device-name fabric-spine2
        os-compliant-status true
        response  Device fabric-spine2 OS version is compliant.
    }
}
Pre-upgrade and post-upgrade MOP
In the context of upgrades, the upgrade flow commonly includes a pre- and post-upgrade method-of-procedure (MOP) which perform
multiple functions:
Pre-upgrade MOP: ensures that the device and upgrade components are ready for the upgrade procedure. You can also use it to
capture network state information for comparison after upgrade to ensure that the network returns to the correct state post-upgrade.
Post-upgrade MOP: captures network and device state data or perform additional tasks post-upgrade. For example, in IOS XR
routers, you can ensure that the device state is correct before executing install commit command post-upgrade.
NSO upgrade application
Cisco Agile Metro Release 1.0 uses the CX OS-Upgrade NSO application to perform device upgrades. The application remains unchanged to support Edge Fabrics. The OS upgrade package
must be pre-populated with data required for the upgrade. This includes the platform to software image mapping and image repository
details.
Platform dependent software
The target software version is based on the NOS name and the NOS-specific numbering schema. For example, XR7 OS with software
version 24.1.1. There may be platform-specific versions of the same NOS, such as eXR and XR7. In the current CX OS-Upgrade package, the platform type is identified as part of the upgrade process.
Error handling
Each component is responsible for its own error handling for its functions. The CWM workflow is ultimately responsible for
monitoring and managing the lifecycle of the upgrades and reporting events generated by sub-components. As an example, if
an upgrade is attempted on a device that is not currently reachable it would generate an event in CX OS-Upgrade which is being monitored by CWM. CWM would then report this underlying error in its own event reporting.
Use Case: Configuration template management
Configuration compliance
As part of the ongoing fabric infrastructure management, updates may need to be made to templates that were previously deployed.
Configuration compliance mechanism helps to update the configuration on devices that were previously deployed to match the
updated configuration template. The Crosswork Workflow Manager (CWM) drives this automation to update a set of devices.
Templates in Release 1.0 are defined at the fabric, role, and interface level. See the Metro Edge Fabric Manager section for details on configuration template definition.
Configuration template versioning
Configuration template versioning is done in two ways:
Template versioning managed by the user: When a new template is built for a role, use a different name for the template and
update the template being used in the fabric manager role definition.
Templates stored with a revision number: Templates in NSO used for fabric management will be stored with a revision number.
When a device is onboarded into the fabric with a specific role, the latest version of the template referenced in the role
definition is used for configuration. At the device level, we also record the latest role and interface templates assigned
to the device.
Device template compliance check and remediation
The compliance action starts with a CWM workflow that is used to first determine which devices are using a non-compliant template
and then remediation of the device by deploying the correct template.
In the Fabric Manager, the compliance action is used with the config type to check each device to make sure that it is utilizing the correct template. The enforce-compliance API call is then
used with the config type along with the list of devices to deploy the correct template.
Configuration enforcement dry-run
The configuration compliance includes a dry-run capability to see the changes prior to device provisioning.
Use this existing command in the CX Fabric Manager:
 Feedback