Connecting the Router
This chapter describes how to connect Cisco IR829 Integrated Services Router (ISRs) to Ethernet devices and a network. The chapter contains the following sections:
Preparing to Connect the Router
Before you connect the router to the devices, install the router according to the instructions in Chapter 1, “Installing the Router” .
Preventing Damage to the Router
To prevent damage to your router, follow these guidelines when connecting devices to your router:
- Turn off power to the devices and to the router until all connections are completed.
CAUTION : Do not turn on the devices until after you have completed all connections to the router.
Connecting a PC, Server, or Workstation
To connect a PC (or other Ethernet devices) to an Ethernet switch port, follow these steps:
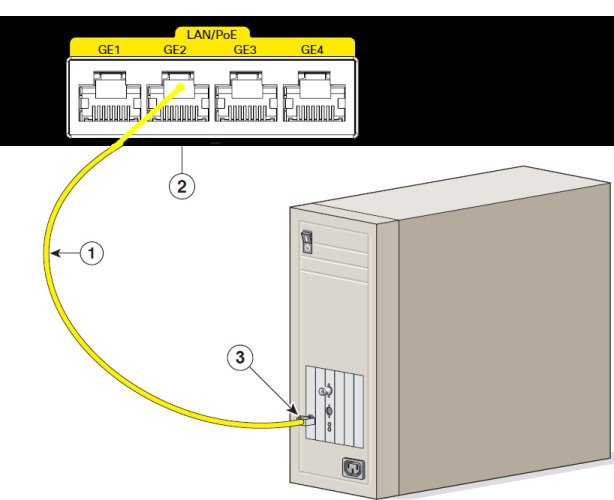
- Connect one end of the Ethernet cable to an Ethernet switch port on the router. In this example a PC is being connected to GE LAN Port 2. See Connecting a Server, PC, or Workstation.

|
1 |
Ethernet cable |
3 |
RJ-45 port on the PC, Server, or Workstation |
|
2 |
Ethernet switch port on the router |
- Connect the other end of the cable to the RJ-45 port on the network interface card (NIC) that is installed in the PC, server, or workstation.
- (Optional) Connect additional servers, PCs, or workstations to the other Ethernet switch ports.
Connecting a Terminal or PC to the Console Port
Connect a terminal or PC to the Console port either to configure the software by using the CLI or to troubleshoot problems with the router.
To connect a terminal or PC to the console port on the router and access the CLI, follow these steps:
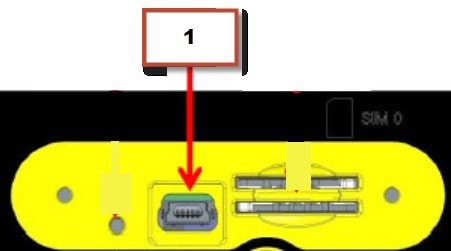
- Connect the mini-USB side of a cable to the USB Console port on the router. Figure 2 shows the mini-USB location (1) for the Console port on the router.
- Connect the opposite end of the mini-USB cable to the USB port on your laptop or PC.
- To communicate with the router, wait for your laptop or PC to discover the new device.
- If your laptop or PC warns you that you do not have the proper drivers to communicate with the router, you can obtain them from your computers manufacturer, or go here: https://www.silabs.com/developers/usb-to-uart-bridge-vcp-drivers
- Run a Terminal Emulation Application (such as Tera Term) from the PC. Select the "standard" serial Com Port (from the standard or enhanced options), and configure it for 9600 Baud rate with no flow control.

Connecting to DC Power
WARNING: This product relies on the building’s installation for short-circuit (overcurrent) protection. Ensure that the protective device is rated not greater than 36 VDC, 6A Statement 1005
WARNING: This product requires short-circuit (overcurrent) protection, to be provided as part of the building installation. Install only in accordance with national and local wiring regulations. Statement 1045
Plugs and Pin-Outs
The IR829 ships with a DC power accessory kit that contains a 4-pin locking connector and pins to use for the power connections. Four contacts are supplied, but only three are used. One is a spare. The Molex power connector is Cisco part number 29-2562-01.
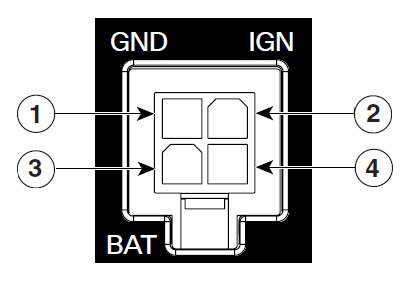
The power entry receptacle is on the IR829. The pin-outs are shown in Power Connector Pin-outs.

|
Pin Number |
Name |
Description |
Color |
|---|---|---|---|
|
1 |
DC In - |
DC Power Return (GND-) |
Black |
|
2 |
Ignition |
Ignition Input (IGN) |
Blue |
|
3 |
DC In + |
DC Power In (BAT+) |
Red |
|
4 |
N/A |
N/A |
N/A |
Constructing a Power cable
Cisco provides a power cable that can be ordered under part number IR829-DC-PWRCORD. If you choose to construct your own power cable, use special care when making the connections for DC power. It is easy to make a mistake when crimping connections, and there is a very good tutorial available at Molex: http://www.molex.com/tnotes/crimp.html
The specifications for the wiring are as follows:
- 16 AWG (1.02-to-1.29mm)
- UL1015 Rated
- Wires will be wound at 1 twist per inch
The example in Power cable shows a cable constructed with a ferrite for a different certification. You can build your cable without the ferrite eliminating items 2 and 3 in the diagram.

Details listed in the power cable example are:
|
1 |
4-pin locking connector |
|
|
2 |
2 loops of DC power and power return wires only. Other wires that may be used should run outside the Ferrite. |
Note: Ferrite bead and the loops of wire are not needed at this time. |
|
3 |
Ferrite Bead |
Note: Ferrite bead and the loops of wire are not needed at this time. |
|
4 |
Wires wound at 1 twist per inch |
Wiring the DC Power
To connect the DC power on your Cisco IR829, follow these steps:
| 1. |
Identify the DC power source and measure 4 strands of copper wire 16 AWG (1.29mm) long enough to connect to the DC power source. NOTE : The maximum length of the cable before twisting is 15 feet (4.6 meters). |
|
| 2. |
Using an 16-gauge wire-stripping tool, strip each of the wires coming from each DC-input power source to 0.25 inch (6.3 mm) ± 0.02 inch (0.5 mm). Do not strip more than 0.27 inch (6.8 mm) of insulation from the wire. Stripping more than the recommended amount of wire can leave exposed wire from the power connector after installation. |
 |
| 3. |
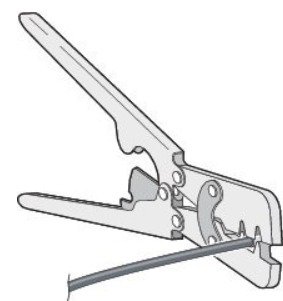
Using the pins included in the kit, crimp each pin onto a wire. |
 |
| 4. |
Insert the pins into the power connector, referring to previous figures for guidance. |
|
| 5. |
Plug the connector into the power entry receptacle. |
|
|
6. |
When connecting the IR829 to a DC power source, a suitable disconnect device shall be provided at the point of connection to the DC power source. |
Vehicle Connections
When connecting to automotive power, it is expected that the ignition output will be +12 VDC, or +24 VDC (following the battery voltage). Connect the Ignition Input (IGN) of the router to the ignition output of the automobile. The DC In + and DC In - leads can be directly connected to the battery, but it is recommended that they be connected after a fuse.
 Important |
For vehicle installations, it is required to connect the Ignition Input (IGN), and use the Ignition Power Management feature of the router. This will eliminate unnecessary power cycling of the router whenever the vehicle is turned off and then turned back on. |
 Note |
For details about the Ignition Power Management Software and setting it up, see the Cisco IR800 Integrated Services Router Software Configuration Guide . |
Connecting to AC Power
The IR829 can be connected to AC power through an AC to DC power adapter. The Cisco part number is IR829-PWR125W-AC, and it meets ITE standards and operating temperature range of -20C to 60C but not suited for industrial environment.
To disconnect the device from power when using the adapter, simply unplug the adapter from the AC power source.
Verifying Connections
To verify that all devices are properly connected to the router, first turn on all the connected devices, then check the LEDs. To verify router operation, refer to Table 1.
For full LED description, see Chapter 1, “LEDs”
|
Power and Link |
LEDs to Check |
Normal Patterns |
|---|---|---|
|
PWR |
Green steady On |
Normal operation |
|
Green (flashing) |
Initializing interface ports |
|
|
Amber |
Solid after powerup - HW failure stateSolid after 60 seconds - In ROM Monitor modeSolid after 60 seconds - Router is unreachable |
|
|
GE0 WAN |
Steady On |
Link is up |
|
Flashing |
Transmitting and Receiving data |
|
|
Off |
No network activity. |
|
|
Ethernet LAN Switch Ports |
Single LED per port |
Off — No link Green Steady on — Link is up Green Flash — Transmitting and Receiving data Amber — POE Fault, implies no link |
|
Sim cards |
SIM0/SIM1 |
Off — No USIM Green — USIM installed and active |
|
Cellular Modems |
CELLULAR0/CELLULAR1 |
Off — Module not powered on On — Module is powered on and connected but not transmitting or receiving Slow Flash — Module is powered on and searching for connection Fast Flash — Module is transmitting or receiving. |
NOTE : There are single LTE and dual LTE SKUs available with the IR829. See Figure 8 on page -17 for details.
 Feedback