- Tools and Equipment Requirements
- PVDM4 Location and Orientation
- Install PVDM4 on the Motherboard of Cisco 4400 Series ISRs
- Remove the PVDM4 from the Motherboard of Cisco 4400 ISRs
- Install the PVDM4 on the Motherboard of Cisco 4331 ISR
- Remove the PVDM4 from the Motherboard of Cisco 4331 ISR
- Install the PVDM4 on Cisco Fourth-Generation T1/E1 Voice and WAN NIM
- Remove the PVDM4 from Cisco Fourth-Generation T1/E1 Voice and WAN NIM
Install and Upgrade Internal Modules and FRUs
This chapter describes how to install and upgrade internal modules and field replaceable units (FRUs) in Cisco 4000 Series Integrated Services Routers (ISRs). The following sections provide the install and upgrade information:
- Safety Warnings
- Modules Supported
- Access Internal Modules
- Locate Internal and External Slots
- Locate Internal and External Slots for Modules on Cisco 4461 ISR
- Locate Internal and External Slots for Modules on Cisco 4451 ISR
- Locate Internal and External Slots for Modules on Cisco 4351 ISR
- Locate Internal and External Slots for Modules on Cisco 4331 ISR
- Overview of NIM-HDD Card
- Remove and Replace Cisco NIM-SSD or NIM-HDD
- Install and Remove DDR DIMMs on Cisco 4400 or 4300 Series ISRs
- Install and Remove NIMs and SM-Xs on Cisco 4000 Series ISRs
- Install and Remove PVDM4 on Cisco 4400 or 4300 Series ISRs
- Remove and Replace the USB Flash Token Memory Stick
- Remove and Replace Cisco 4000 Series ISRs Power Supplies
- Replace Fan Blower on Cisco 4321 ISR
- Remove and Install the Flash Memory Card
- Install and Remove an SSD mSATA Storage Device
- Remove, Replace, and Install the Internal PoE Daughter Card
- Replace a Fan Tray
- Replace Fan Tray on Cisco 4331 ISR
- Replace Fan Blower on Cisco 4321 ISR
- Install and Remove SFP Modules
- Remove and Replace Cisco 4000 Series ISRs Power Supplies

See the “Modules Supported” section for instructions on how to install and replace internal components.
Safety Warnings

Warning![]() Read the installation instructions before connecting the system to the power source. Statement 1004
Read the installation instructions before connecting the system to the power source. Statement 1004

Warning![]() Only trained and qualified personnel should be allowed to install, replace, or service this equipment. Statement 1030
Only trained and qualified personnel should be allowed to install, replace, or service this equipment. Statement 1030

Warning![]() This equipment must be installed and maintained by service personnel as defined by AS/NZS 3260. Incorrectly connecting this equipment to a general-purpose outlet could be hazardous. The telecommunications lines must be disconnected 1) before unplugging the main power connector or 2) while the housing is open, or both. Statement 1043
This equipment must be installed and maintained by service personnel as defined by AS/NZS 3260. Incorrectly connecting this equipment to a general-purpose outlet could be hazardous. The telecommunications lines must be disconnected 1) before unplugging the main power connector or 2) while the housing is open, or both. Statement 1043

Warning![]() Before working on a system that has an on/off switch, turn OFF the power and unplug the power cord. Statement 1
Before working on a system that has an on/off switch, turn OFF the power and unplug the power cord. Statement 1

Warning![]() This unit might have more than one power supply connection. All connections must be removed to de-energize the unit. Statement 1028
This unit might have more than one power supply connection. All connections must be removed to de-energize the unit. Statement 1028

Warning![]() This equipment must be grounded. Never defeat the ground conductor or operate the equipment in the absence of a suitably installed ground conductor. Contact the appropriate electrical inspection authority or an electrician if you are uncertain that suitable grounding is available. Statement 1024
This equipment must be grounded. Never defeat the ground conductor or operate the equipment in the absence of a suitably installed ground conductor. Contact the appropriate electrical inspection authority or an electrician if you are uncertain that suitable grounding is available. Statement 1024

Warning![]() Hazardous network voltages are present in WAN ports regardless of whether power to the unit is OFF or ON. To avoid electric shock, use caution when working near WAN ports. When detaching cables, detach the end away from the unit first. Statement 1026
Hazardous network voltages are present in WAN ports regardless of whether power to the unit is OFF or ON. To avoid electric shock, use caution when working near WAN ports. When detaching cables, detach the end away from the unit first. Statement 1026

Warning![]() Before opening the unit, disconnect the telephone-network cables to avoid contact with telephone-network voltages. Statement 1041
Before opening the unit, disconnect the telephone-network cables to avoid contact with telephone-network voltages. Statement 1041

Warning![]() Before working on equipment that is connected to power lines, remove jewelry (including rings, necklaces, and watches). Metal objects will heat up when connected to power and ground and can cause serious burns or weld the metal object to the terminals. Statement 43
Before working on equipment that is connected to power lines, remove jewelry (including rings, necklaces, and watches). Metal objects will heat up when connected to power and ground and can cause serious burns or weld the metal object to the terminals. Statement 43

Warning![]() Do not use this product near water; for example, near a bath tub, wash bowl, kitchen sink or laundry tub, in a wet basement, or near a swimming pool. Statement 1035
Do not use this product near water; for example, near a bath tub, wash bowl, kitchen sink or laundry tub, in a wet basement, or near a swimming pool. Statement 1035

Warning![]() Never install telephone jacks in wet locations unless the jack is specifically designed for wet locations. Statement 1036
Never install telephone jacks in wet locations unless the jack is specifically designed for wet locations. Statement 1036

Warning![]() Never touch uninsulated telephone wires or terminals unless the telephone line has been disconnected at the network interface. Statement 1037
Never touch uninsulated telephone wires or terminals unless the telephone line has been disconnected at the network interface. Statement 1037

Warning![]() Avoid using a telephone (other than a cordless type) during an electrical storm. There may be a remote risk of electric shock from lightning. Statement 1038
Avoid using a telephone (other than a cordless type) during an electrical storm. There may be a remote risk of electric shock from lightning. Statement 1038

Warning![]() To report a gas leak, do not use a telephone in the vicinity of the leak. Statement 1039
To report a gas leak, do not use a telephone in the vicinity of the leak. Statement 1039

Warning![]() There is the danger of explosion if the battery is replaced incorrectly. Replace the battery only with the same or equivalent type recommended by the manufacturer. Dispose of used batteries according to the manufacturer's instructions. Statement 1015
There is the danger of explosion if the battery is replaced incorrectly. Replace the battery only with the same or equivalent type recommended by the manufacturer. Dispose of used batteries according to the manufacturer's instructions. Statement 1015

Warning![]() Blank faceplates and cover panels serve three important functions: they prevent exposure to hazardous voltages and currents inside the chassis; they contain electromagnetic interference (EMI) that might disrupt other equipment; and they direct the flow of cooling air through the chassis. Do not operate the system unless all cards, faceplates, front covers, and rear covers are in place. Statement 1029
Blank faceplates and cover panels serve three important functions: they prevent exposure to hazardous voltages and currents inside the chassis; they contain electromagnetic interference (EMI) that might disrupt other equipment; and they direct the flow of cooling air through the chassis. Do not operate the system unless all cards, faceplates, front covers, and rear covers are in place. Statement 1029

Warning![]() For connections outside the building where the equipment is installed, the following ports must be connected through an approved network termination unit with integral circuit protection.
For connections outside the building where the equipment is installed, the following ports must be connected through an approved network termination unit with integral circuit protection.
T1 SFP Statement 1044
Modules Supported
For information about interfaces and modules supported by Cisco 4000 Series ISRs, refer to the Interfaces and Modules matrix.
Access Internal Modules
To access the internal modules on the router, you must first remove the chassis cover. See the Remove and Replace Chassis Cover for instructions on how to remove and later replace the chassis cover on the routers.
Remove and Replace Chassis Cover
Cisco 4000 Series ISRs have a removable cover. The tasks that you perform for removing and replacing the router cover are based on the specific model of the Cisco 4000 Series ISRs.
See the relevant removing and replacing sub-section for your specific router in the Cisco 4000 Series ISRs:
- Remove Cover from Cisco 4400 or 4200 ISR
- Remove Cover from Cisco 4300 ISR
- Replace Cover on Cisco 4400 or 4200 ISR
- Replace Cover on Cisco 4300 ISR


Warning![]() Before opening the unit, disconnect the telephone-network cables to avoid contact with telephone-network voltages. Statement 1041
Before opening the unit, disconnect the telephone-network cables to avoid contact with telephone-network voltages. Statement 1041

Note![]() Use a number-2 Phillips screwdriver to perform the following tasks.
Use a number-2 Phillips screwdriver to perform the following tasks.
Remove Cover from Cisco 4400 or 4200 ISR
Step 1![]() Read the “Safety Warnings” section and disconnect the power supply before you replace any module.
Read the “Safety Warnings” section and disconnect the power supply before you replace any module.
Step 2![]() Confirm the router is turned off and disconnected from the power supply or power supplies. If a redundant power is used, disconnect from the redundant power supply.
Confirm the router is turned off and disconnected from the power supply or power supplies. If a redundant power is used, disconnect from the redundant power supply.
Step 3![]() Place the chassis on a flat surface.
Place the chassis on a flat surface.
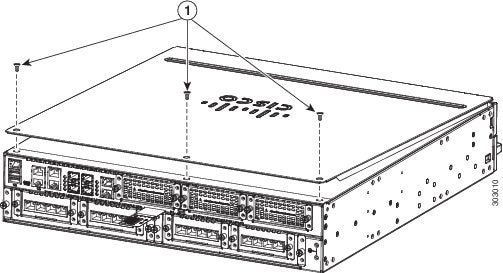
Step 4![]() Remove the three cover screws at the back of the router cover. See Figure 5-1.
Remove the three cover screws at the back of the router cover. See Figure 5-1.
Step 5![]() Lift the cover from the back edge to a 45-degree angle.
Lift the cover from the back edge to a 45-degree angle.
Step 6![]() Pull the cover towards you to disengage the slots along the front (bezel) edge of the chassis. See Figure 5-1.
Pull the cover towards you to disengage the slots along the front (bezel) edge of the chassis. See Figure 5-1.
Remove Cover from Cisco 4300 ISR
Step 1![]() Read the “Safety Warnings” section and disconnect the power supply before you replace any module.
Read the “Safety Warnings” section and disconnect the power supply before you replace any module.
Step 2![]() Confirm the router is turned off and disconnected from the power supply or power supplies. If a redundant power is used, disconnect from the redundant power supply.
Confirm the router is turned off and disconnected from the power supply or power supplies. If a redundant power is used, disconnect from the redundant power supply.
Step 3![]() Place the chassis on a flat surface.
Place the chassis on a flat surface.
Step 4![]() Remove the four cover screws on the top of the router cover and remove the two cover screws from each side of the router cover. See Figure 5-51
Remove the four cover screws on the top of the router cover and remove the two cover screws from each side of the router cover. See Figure 5-51
Step 5![]() Lift the cover from the back edge to a 45-degree angle.
Lift the cover from the back edge to a 45-degree angle.
Step 6![]() Pull the cover towards you to disengage the slots along the front (bezel) edge of the chassis. See Figure 5-1.
Pull the cover towards you to disengage the slots along the front (bezel) edge of the chassis. See Figure 5-1.
Replace Cover on Cisco 4400 or 4200 ISR
Step 1![]() Read the Safety Warnings and disconnect the power supply before you replace any module.
Read the Safety Warnings and disconnect the power supply before you replace any module.
Step 2![]() Confirm the router is turned off and disconnected from the power supply or power supplies. If a redundant power is used disconnect from the redundant power supply.
Confirm the router is turned off and disconnected from the power supply or power supplies. If a redundant power is used disconnect from the redundant power supply.
Step 3![]() Place the chassis on a flat surface.
Place the chassis on a flat surface.
Step 4![]() Hold the cover at a 45-degree angle and insert the cover tabs into the slots along the front (bezel) edge of the chassis. See Figure 5-1.
Hold the cover at a 45-degree angle and insert the cover tabs into the slots along the front (bezel) edge of the chassis. See Figure 5-1.
Step 5![]() Center the cover over the chassis and lower it onto the chassis.
Center the cover over the chassis and lower it onto the chassis.
Step 6![]() Install the three cover screws.
Install the three cover screws.
Figure 5-1 Install the Cover on the Router (Shown Cisco 4451-X ISR)
|
|
Replace Cover on Cisco 4300 ISR
Step 1![]() Read the Safety Warnings and disconnect the power supply before you replace any module.
Read the Safety Warnings and disconnect the power supply before you replace any module.
Step 2![]() Confirm the router is turned off and disconnected from the power supply or power supplies. If a redundant power is used disconnect from the redundant power supply.
Confirm the router is turned off and disconnected from the power supply or power supplies. If a redundant power is used disconnect from the redundant power supply.
Step 3![]() Place the chassis on a flat surface.
Place the chassis on a flat surface.
Step 4![]() Hold the cover at a 45-degree angle and insert the cover tabs into the slots along the front (bezel) edge of the chassis. See Figure 5-1.
Hold the cover at a 45-degree angle and insert the cover tabs into the slots along the front (bezel) edge of the chassis. See Figure 5-1.
Step 5![]() Center the cover over the chassis and lower it onto the chassis.
Center the cover over the chassis and lower it onto the chassis.
Step 6![]() Install the four cover screws on the top of the router and the two cover screws at the side of the router.
Install the four cover screws on the top of the router and the two cover screws at the side of the router.
Locate Internal and External Slots
Cisco 4400 Series ISRs and Cisco 4300 Series ISRs have replaceable internal modules.

Note![]() Cisco 4200 Series ISR do not have any replaceable internal modules.
Cisco 4200 Series ISR do not have any replaceable internal modules.
See the relevant sub-section to locate internal modules for your specific router in Cisco 4000 Series ISRs:
- Locate Internal and External Slots for Modules on Cisco 4461 ISR
- Locate Internal and External Slots for Modules on Cisco 4451 ISR
- Locate Internal and External Slots for Modules on Cisco 4351 ISR
- Locate Internal and External Slots for Modules on Cisco 4331 ISR
- Locate Internal and External Slots for Modules on Cisco 4331 ISR
Locate Internal and External Slots for Modules on Cisco 4461 ISR
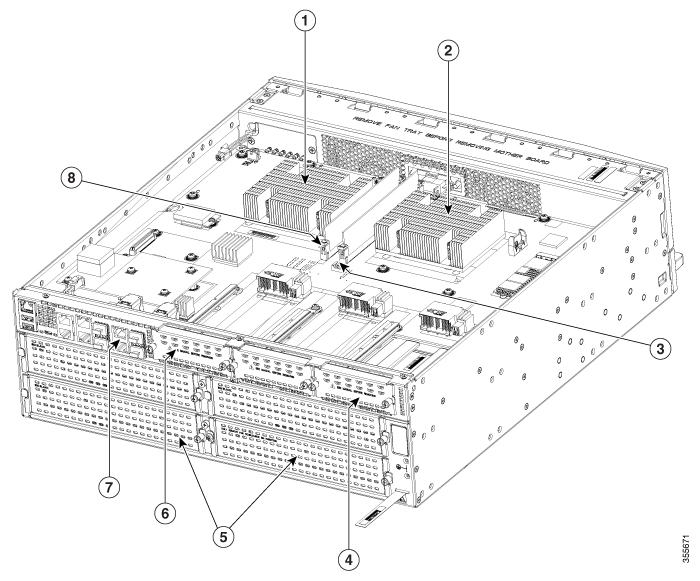
Figure 5-4 shows the locations of internal modules on Cisco 4461 ISR motherboard. Internal modules include DIMMs, PVDM4, and PoE daughter card. Figure 5-27 shows the location of the available slots that includes the Integrated Services Card (ISC) slot.
Figure 5-2 Module Locations in Cisco 4461 ISR
|
|
|
||
|
|
|
||
|
|
|
||
|
|
|
Locate NEBS Module

Note![]() We recommend that you change the air filter every 3 months. However, examine the air filter once a month (or more often in dusty environments) and replace it if it appears to be excessively dirty or damaged. To comply with Telecordia GR-63-Core standard air filter requirements for NEBS deployment, the air filter must be replaced, not cleaned.
We recommend that you change the air filter every 3 months. However, examine the air filter once a month (or more often in dusty environments) and replace it if it appears to be excessively dirty or damaged. To comply with Telecordia GR-63-Core standard air filter requirements for NEBS deployment, the air filter must be replaced, not cleaned.
Figure 5-3 shows the NEBS module on Cisco 4461 ISR.
Figure 5-3 NEBS Module Locations in Cisco 4461 ISR
|
|
|
||
|
|
|
||
|
|
|
Locate Internal and External Slots for Modules on Cisco 4451 ISR
Figure 5-4 shows the locations of internal modules on Cisco 4451 ISR motherboard. Internal modules include DIMMs, PVDM4, and PoE daughter card. Figure 5-27 shows the location of the available slots that includes the Integrated Services Card (ISC) slot.
Figure 5-4 Module Locations in Cisco 4451-X ISR s
|
|
|
||
|
|
|
||
|
|
|
||
|
|
|
Locate Internal and External Slots for Modules on Cisco 4351 ISR
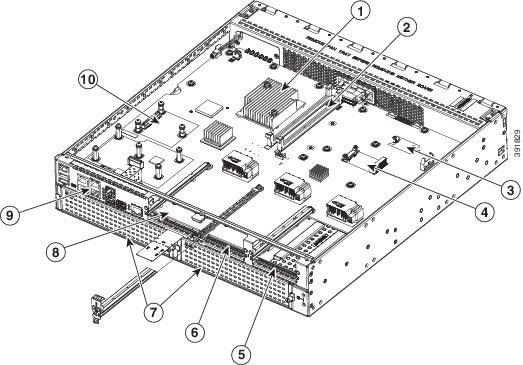
Figure 5-5 shows an internal view of Cisco 4351 ISR chassis indicating the location of internal modules.
Figure 5-5 Module Locations in Cisco 4351 ISR chassis
|
|
|
||
|
|
|
||
|
|
|
||
|
|
|
||
|
|
|

Note![]() Cisco ISR 4351 devices can operate with only one DIMM (minimum 4 GB), installed in slot 0. Older ROMMON versions may flash a warning message for both DIMMs to be installed before boot. To override this warning, upgrade to ROMMON 16.7(3r) or higher.
Cisco ISR 4351 devices can operate with only one DIMM (minimum 4 GB), installed in slot 0. Older ROMMON versions may flash a warning message for both DIMMs to be installed before boot. To override this warning, upgrade to ROMMON 16.7(3r) or higher.
Locate Internal and External Slots for Modules on Cisco 4331 ISR
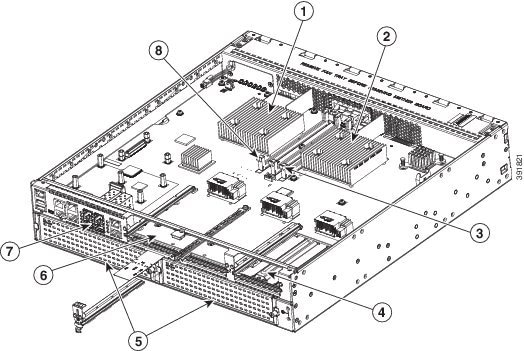
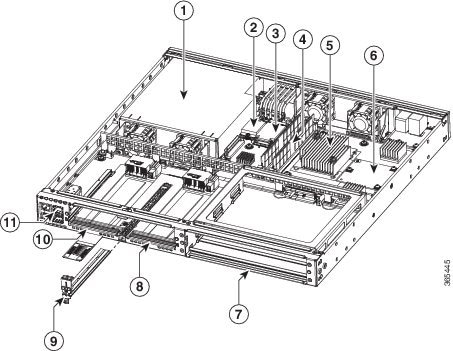
Figure 5-6 shows locations of internal modules on the Cisco 4331 ISR motherboard. Internal modules include DIMMs, PVDM4, and PoE daughter card. Figure 5-28 shows the location of the available slots that includes the Integrated Services Card (ISC) slot.
Figure 5-6 shows an internal view of Cisco 4331 ISR chassis indicating the location of internal modules.
Figure 5-6 Module Locations in Cisco 4331 ISR chassis
|
|
|
||
|
|
|
||
|
|
|
||
|
|
SM-X Slot1 |
|
|
|
|
|
||
|
|
|
|
|
1.Gi0/0 may be configured to be either copper or fiber. Gi0/1 is copper/RJ45 and Gi0/2 is Fiber/SFP. |

Note![]() Cisco ISR 4331 devices can operate with only one DIMM (minimum 4 GB), installed in slot 0. Older ROMMON versions may flash a warning message for both DIMMs to be installed before boot. To override this warning, upgrade to ROMMON 16.7(3r) or higher.
Cisco ISR 4331 devices can operate with only one DIMM (minimum 4 GB), installed in slot 0. Older ROMMON versions may flash a warning message for both DIMMs to be installed before boot. To override this warning, upgrade to ROMMON 16.7(3r) or higher.
Overview of the SSD Carrier Card NIM (NIM-SSD)
This section describes the NIM-SSD and how to remove and replace NIM-SSDs. This section contains the following sections:
- Overview
- Solid State Drives
- Install SSD Drives into the NIM Carrier Card
- Remove SSD Drives from the NIM-SSD
- Remove and Replace Cisco NIM-SSD or NIM-HDD
- Install and Remove DDR DIMMs on Cisco 4400 or 4300 Series ISRs
Overview
The solid state drive (SSD) carrier card network interface module (NIM) enables SSD support on the platform NIM slots. It provides flash storage to the platform and supports dual 2.5” (7mm max) SATA SSDs. The carrier card fits into the NIM slots in the router. The router supports only a single SSD Carrier Card NIM.

Note![]() Refer to the “Network Interface Modules” section of the Software Configuration Guide for Cisco 4000 Series ISRs for configuration information on the SSD carrier card NIM.
Refer to the “Network Interface Modules” section of the Software Configuration Guide for Cisco 4000 Series ISRs for configuration information on the SSD carrier card NIM.

Note![]() When ISR-WAAS is operational, do not perform online insertion or replacement (OIR) of NIM-SSD.
When ISR-WAAS is operational, do not perform online insertion or replacement (OIR) of NIM-SSD.
The SSD carrier card NIM (Figure 5-7) has the following features:
- Single-wide NIM form factor
- LEDs for module and driver status
- On board PCIe x1 Gen 2(5G) dual-port SATA controller
- SFF 2.5” SATA2 or SATA3 (7mm or less) SSDs Support
- Supports module online insertion and removal (OIR): You can remove it from a bay and insert it into a bay while the router is running
- NIM-SSD support in any bay in slot 0
- Support for only one NIM-SSD module per router
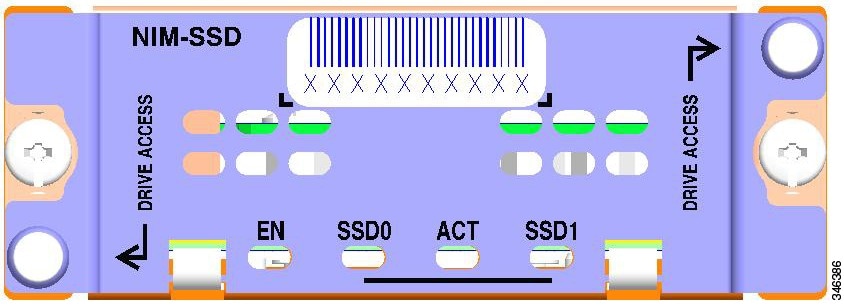
Figure 5-7 shows the front panel of the SSD NIM.
Figure 5-7 Front Panel of the SSD Carrier Card NIM
LEDs on NIM-SSD
Table 5-1 describes the LEDs on NIM-SSD shown in Figure 5-7.
|
|
|
|
|
|---|---|---|---|
Figure 5-8 shows the rear view of the SSD carrier card NIM, which fits into the router.
Figure 5-8 Rear View of the SSD Carrier Card NIM
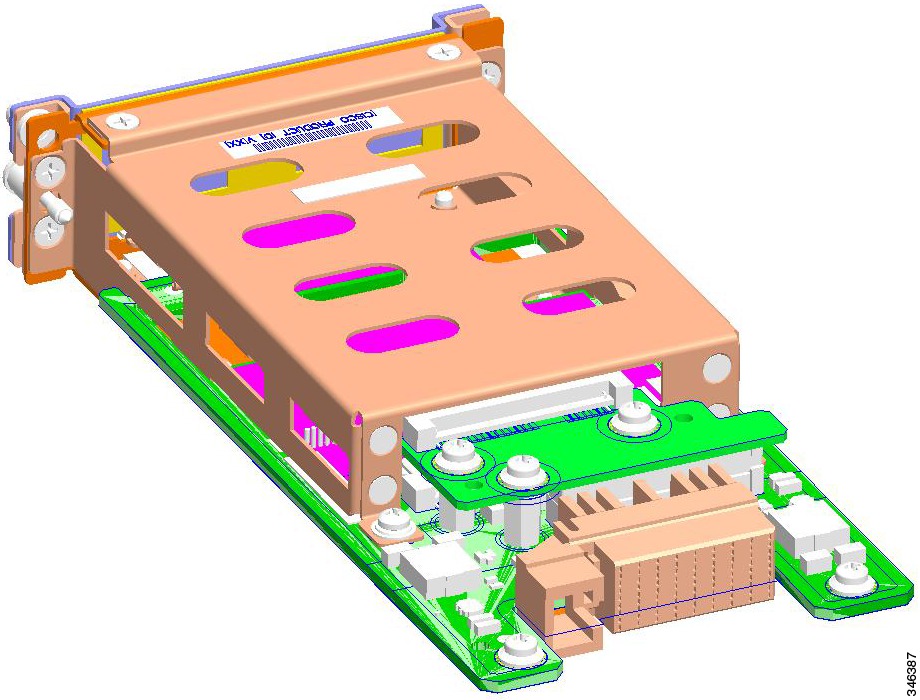
Table 5-2 lists the specifications of the SSD Carrier Card NIM.
|
|
|
|---|---|
|
|
|
|
|
|
|
|
|

Note |
|
|
|
|
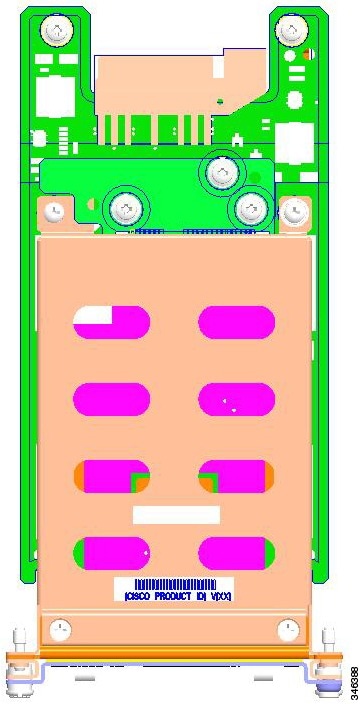
Figure 5-9 shows the top of the SSD carrier card NIM along with the serial number and the label location.
Figure 5-9 Top View of the SSD Carrier Card NIM with Serial Number
Solid State Drives
The routers contain two solid state drives (SSD) that provide nonvolatile storage in the form of an internal flash disk. On the front panel of the router, the SSD LED indicates activity on the hard drive.
The SSD carrier card NIM can support up to two SFF 2.5” SATA2 or SATA3 (7mm or less) SSDs.
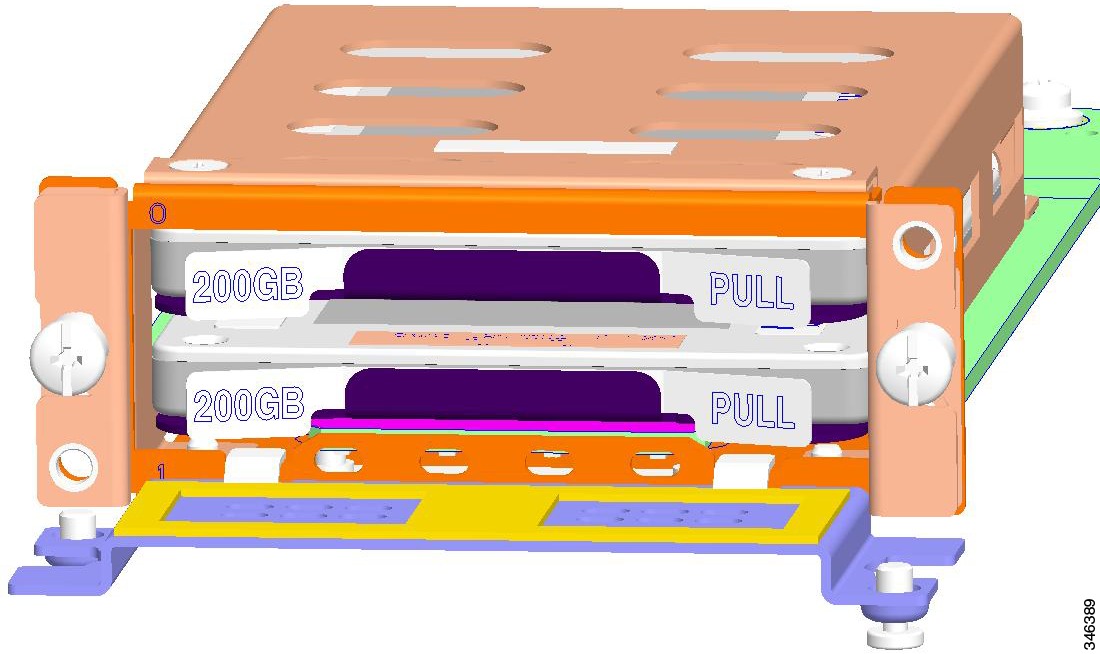
Figure 5-10 shows a top view of the SSD drive that can be inserted into a NIM carrier card. Figure 5-11 shows two SSDs in a NIM carrier card.
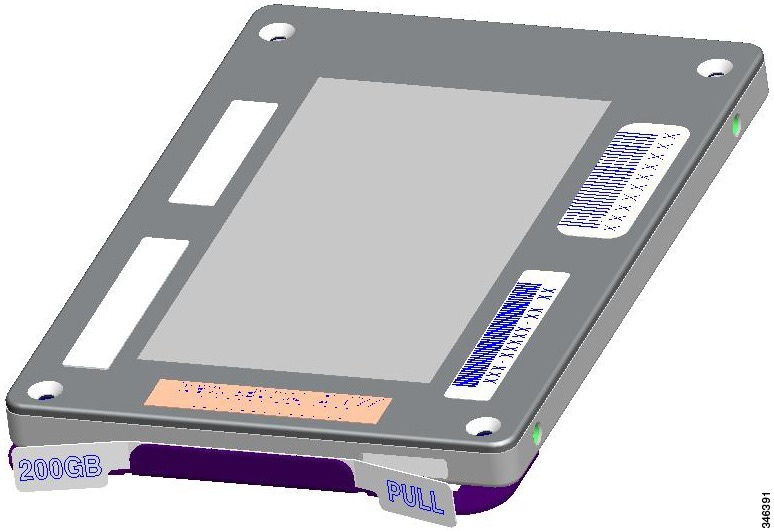
Figure 5-11 NIM-SSD with Two Solid State Drives
Install SSD Drives into the NIM Carrier Card
To insert one or two SSD drives into the carrier NIM:

Note![]() Prior to installing the NIM-SSD card, power off the device using the hw-module subslot slot / subslot stop command in EXEC mode.
Prior to installing the NIM-SSD card, power off the device using the hw-module subslot slot / subslot stop command in EXEC mode.
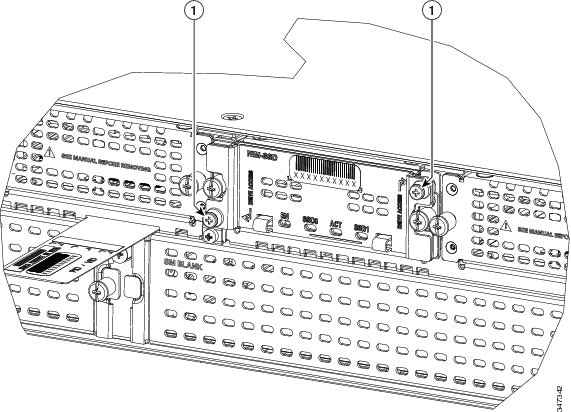
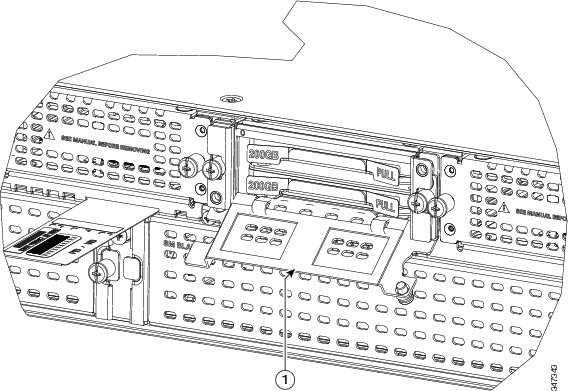
Step 1![]() On the NIM-SSD, loosen the captive screws retaining the SSD card slot cover (Figure 5-12).
On the NIM-SSD, loosen the captive screws retaining the SSD card slot cover (Figure 5-12).
Figure 5-12 Opening the SSD Slot Cover
|
|
Captive screws on the SSD slot cover attaching the SSD Drive to the NIM Carrier Card |
Step 2![]() Rotate the SSD card slot cover down, exposing the slots that hold the SSDs as shown in Figure 5-13.
Rotate the SSD card slot cover down, exposing the slots that hold the SSDs as shown in Figure 5-13.
Figure 5-13 Opening the SSD Slot Cover
|
|
Step 3![]() Insert an SSD in the lower slot first.
Insert an SSD in the lower slot first.
Step 4![]() Insert the SSD connector end first with the connector side down and serial number facing up (Figure 5-10).
Insert the SSD connector end first with the connector side down and serial number facing up (Figure 5-10).
Step 5![]() A second SSD may be inserted in the upper slot as shown in Figure 5-11.
A second SSD may be inserted in the upper slot as shown in Figure 5-11.
Step 6![]() Rotate the SSD card slot cover up and place it over the SSDs.
Rotate the SSD card slot cover up and place it over the SSDs.
Step 7![]() Tighten the captive fasteners on the SSD card slot cover.
Tighten the captive fasteners on the SSD card slot cover.
Remove SSD Drives from the NIM-SSD

Note![]() Prior to removing the NIM-SSD card, power off the device using the hw-module subslot slot / subslot stop command in EXEC mode.
Prior to removing the NIM-SSD card, power off the device using the hw-module subslot slot / subslot stop command in EXEC mode.
To remove the SSD cards from the NIM carrier:
Step 1![]() On the NIM-SSD, loosen the captive screws retaining the NIM-SSD slot cover.
On the NIM-SSD, loosen the captive screws retaining the NIM-SSD slot cover.
Step 2![]() Rotate the SSD card slot cover down, exposing the slots that hold the SSDs.
Rotate the SSD card slot cover down, exposing the slots that hold the SSDs.
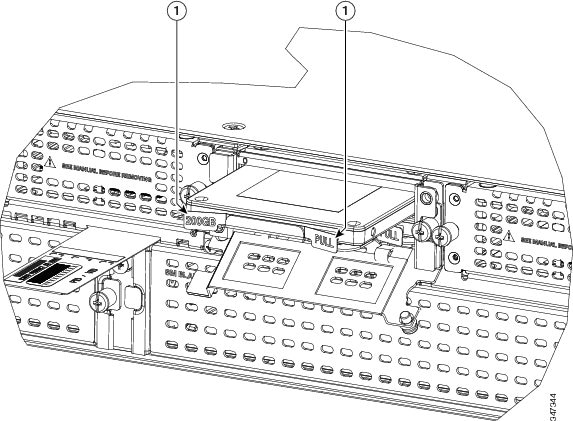
Step 3![]() To remove the SSD one at a time, pull the two tabs on the front of each SSD as shown in Figure 5-14.
To remove the SSD one at a time, pull the two tabs on the front of each SSD as shown in Figure 5-14.
Step 4![]() Rotate the SSD card slot cover up and place it over the SSDs.
Rotate the SSD card slot cover up and place it over the SSDs.
Step 5![]() Tighten the captive fasteners on the SSD card slot cover.
Tighten the captive fasteners on the SSD card slot cover.
Figure 5-14 Pulling Out the Solid State Drives
|
|
Figure 5-15 Side View of the NIM-SSD
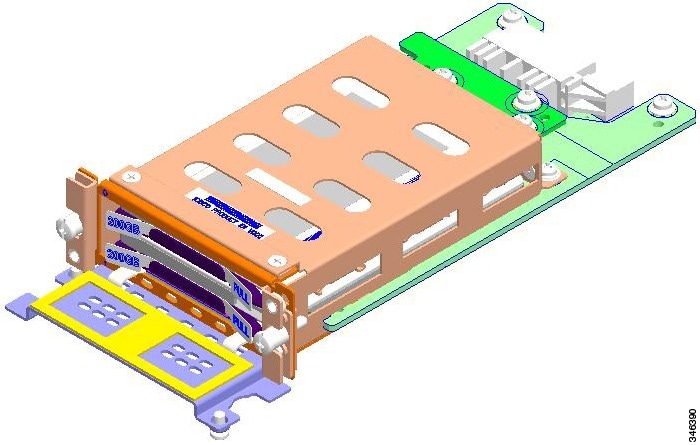
To insert or remove the NIM-SSD into any router NIM slot, see the“Remove and Replace Cisco NIM-SSD or NIM-HDD” section in this chapter.
Overview of NIM-HDD Card
The NIM-HDD is a network interface module that is used to support hard disk drive (HDD) connection for Cisco 4400 Series ISR and Cisco 4300 ISR.
The NIM-HDD module has the following features:
- Provides 1 TB of memory.
- The NIM form-factor supports and houses a single field replaceable 15 mm HDD or two SSDs.
- On-board PCIe dual channel SATA controller enables the NIM-HDD in any NIM slot of the router (Controller Mode)
- Support SATA pass-through mode
- Supports module level OIR operation
- Supports hot plug of SSD/HDDs

Note![]() A drive is removable or insertable while the power is running on the SSD/HDD connector.
A drive is removable or insertable while the power is running on the SSD/HDD connector.

Note![]() The removal of a drive during active read-write operation is not supported. Ensure that the drive is shut down before you replace the NIM-HDD.
The removal of a drive during active read-write operation is not supported. Ensure that the drive is shut down before you replace the NIM-HDD.
Figure 5-16 shows the HDD card that can be inserted into the NIM chassis shown in Figure 5-17. Figure 5-18 shows the entire Cisco NIM-HDD.
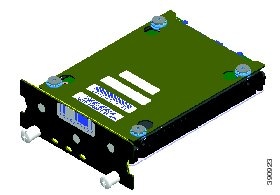
Figure 5-17 NIM Chassis for the HDD
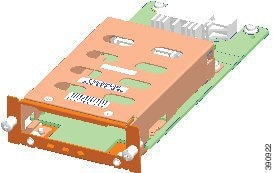
Figure 5-18 HDD in the NIM Chassis
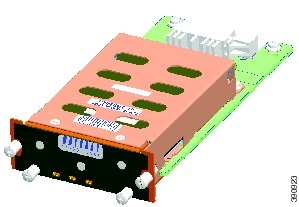
Cisco NIM-HDD LEDs
Table 5-3 shows the LED description for the NIM-HDD.
|
|
|
|
|---|---|---|
Default when module is powered on for the first time. Persistent until changed by the host software. |
||
Remove and Replace Cisco NIM-SSD or NIM-HDD
This section explains how to remove a NIM-SSD or NIM-HDD from the router chassis and replace it with a new external NIM-SSD or NIM-HDD.
Plugging additional SSD Carrier Card NIMs into a bay powers off the module. Power down the NIM-SSD module and wait for the power LED to turn off before removing the module or removing and replacing new SSD drives.
To deactivate and reactivate a NIM, see the “ Deactivating and Reactivating a SSD Carrier Card NIM ” section in the Software Configuration Guide for Cisco 4000 Series ISRs.
- Cisco SSD Carrier Card NIM with no SSD drives is not supported.
- Dynamically removing and inserting SSD drives on a NIM is not supported.
- Only a single SSD Carrier Card NIM per router is supported on any bay.
- Replacing any SSD drive can cause some data loss.

Warning![]() During this procedure, wear grounding wrist straps to avoid ESD damage to the card. Do not directly touch the backplane with your hand or any metal tool, or you could shock yourself. Statement 94
During this procedure, wear grounding wrist straps to avoid ESD damage to the card. Do not directly touch the backplane with your hand or any metal tool, or you could shock yourself. Statement 94
Before you begin, read the following:
- The form-factor internal hard drive is accessible from the front panel of the Cisco 4451-X ISR and supports the online insertion and removal feature (OIR) using the following commands for the standby:
–![]() request platform hardware filesystem harddisk: offline
request platform hardware filesystem harddisk: offline
–![]() To verify the SSD drive installation, use the show platform command. The following sample output from a NIM SSD installed on a 4451-X ISR platform:
To verify the SSD drive installation, use the show platform command. The following sample output from a NIM SSD installed on a 4451-X ISR platform:
- You remove an internal hard drive only when it fails. You can remove the internal drive and recover the data.
- If the drive is in active state, you can back up with the drive plugged into a USB port using the archive tar command.
Remove NIM-SSD or NIM-HDD
To remove the module from the router:
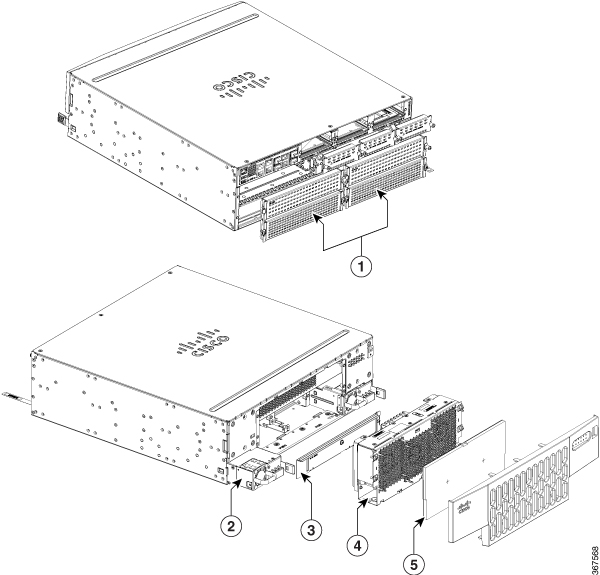
Step 1![]() Slip on the ESD-preventive wrist strap that was included in the accessory kit. Loosen the screw fasteners (11) located on the SSD slots on the right of the input/output (I/O) side of the Cisco 4451-X ISR. (Figure 5-19).
Slip on the ESD-preventive wrist strap that was included in the accessory kit. Loosen the screw fasteners (11) located on the SSD slots on the right of the input/output (I/O) side of the Cisco 4451-X ISR. (Figure 5-19).
Figure 5-19 Remove the NIM-SSD or NIM-HDD from the Router

|
|
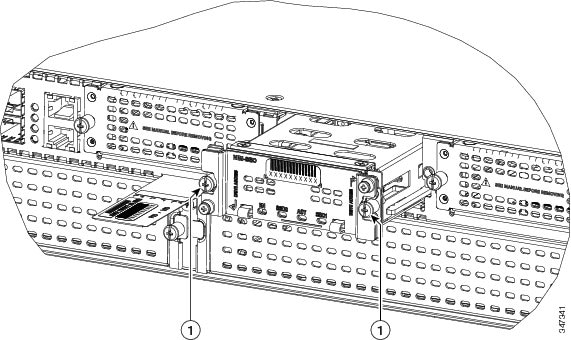
Step 2![]() Using a Phillips screwdriver, loosen the captive screws on either side as shown in Figure 5-19.
Using a Phillips screwdriver, loosen the captive screws on either side as shown in Figure 5-19.
Figure 5-20 Remove the NIM-SSD or NIM-HDD from the Router
|
|
Step 3![]() Holding the two captive screws, slide the entire NIM unit out as shown in Figure 5-20.
Holding the two captive screws, slide the entire NIM unit out as shown in Figure 5-20.
Replace NIM-SSD or NIM-HDD
To replace the NIM-SSD or the NIM-HDD:
Step 1![]() Align the NIM-SSD carrier card to the router base.
Align the NIM-SSD carrier card to the router base.
Step 2![]() Use both hands to slide it back into the slot in the Cisco 4451-X ISR.
Use both hands to slide it back into the slot in the Cisco 4451-X ISR.
Step 3![]() Tighten the captive screws as shown in Figure 5-20.
Tighten the captive screws as shown in Figure 5-20.
Install and Remove DDR DIMMs on Cisco 4400 or 4300 Series ISRs
To access the DIMMs, you must remove the chassis cover as described in the “Remove and Replace Chassis Cover” section.


Note![]() When you upgrade to the latest rommon image, the latest model of the Cisco 4451 ISR will support only a single DIMM operation on the device by default.
When you upgrade to the latest rommon image, the latest model of the Cisco 4451 ISR will support only a single DIMM operation on the device by default.
Locate and Orient DIMM
See the “Locate Internal and External Slots for Modules on Cisco 4451 ISR” section to find DIMM connectors on the router.
DIMMs have a polarization notch on the mating edge to prevent incorrect insertion. Figure 5-21 shows the polarization notch on a DIMM.
Figure 5-21 DIMM Showing Polarization Notch

|
|
Remove DIMM
Step 1![]() Read the “Safety Warnings” section section and disconnect the power supply before you replace any module.
Read the “Safety Warnings” section section and disconnect the power supply before you replace any module.
Step 2![]() Remove the chassis cover. See the “Remove and Replace Chassis Cover” section.
Remove the chassis cover. See the “Remove and Replace Chassis Cover” section.
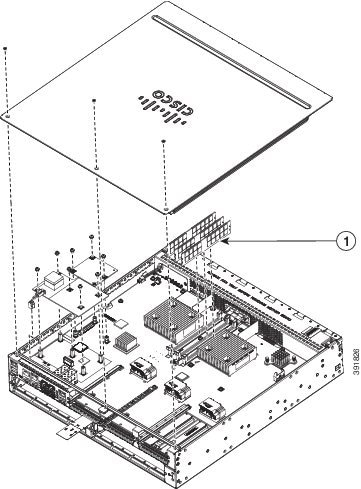
Step 3![]() Locate the DIMM module. See the “Locate Internal and External Slots for Modules on Cisco 4451 ISR” section to find the DIMM sockets on the router.
Locate the DIMM module. See the “Locate Internal and External Slots for Modules on Cisco 4451 ISR” section to find the DIMM sockets on the router.
|
|
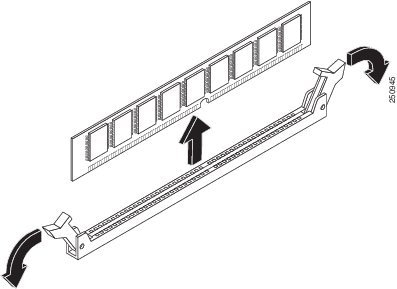
Step 4![]() Pull the latches away from the DIMM at both ends to lift the DIMM slightly. Pull the DIMM out of the socket as shown in Figure 5-22.
Pull the latches away from the DIMM at both ends to lift the DIMM slightly. Pull the DIMM out of the socket as shown in Figure 5-22.
Step 5![]() Place the DIMM in an antistatic bag to protect it from ESD damage.
Place the DIMM in an antistatic bag to protect it from ESD damage.
Step 6![]() Replace the chassis cover. See the “Remove and Replace Chassis Cover” section..
Replace the chassis cover. See the “Remove and Replace Chassis Cover” section..
Install DIMM

Note![]() The DIMMS on the Cisco 4400 Series ISRand Cisco 4300 Series ISR are not interchangeable.
The DIMMS on the Cisco 4400 Series ISRand Cisco 4300 Series ISR are not interchangeable.
Step 1![]() Read the “Safety Warnings” section section and disconnect the power supply before you replace any module.
Read the “Safety Warnings” section section and disconnect the power supply before you replace any module.
Step 2![]() Remove the chassis cover. For the Cisco 4451-X ISRs, see the “Remove and Replace Chassis Cover” section.
Remove the chassis cover. For the Cisco 4451-X ISRs, see the “Remove and Replace Chassis Cover” section.
Step 3![]() Locate the DIMM module. See the “Locate Internal and External Slots for Modules on Cisco 4451 ISR” section to find the DIMM sockets on the router.
Locate the DIMM module. See the “Locate Internal and External Slots for Modules on Cisco 4451 ISR” section to find the DIMM sockets on the router.
Step 4![]() Make sure that both latches on the DIMM connector are in the open position.
Make sure that both latches on the DIMM connector are in the open position.
Step 5![]() Orient the DIMM so that the polarization notch lines up with the polarization key on the connector. See Figure 5-23.
Orient the DIMM so that the polarization notch lines up with the polarization key on the connector. See Figure 5-23.
Figure 5-23 DIMM Showing Polarization Notch

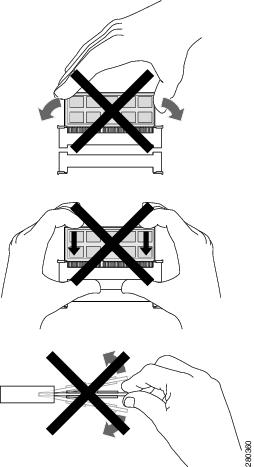
Step 6![]() Insert the DIMM into the connector one side at a time. Figure 5-24 shows what to avoid while handling a DIMM.
Insert the DIMM into the connector one side at a time. Figure 5-24 shows what to avoid while handling a DIMM.
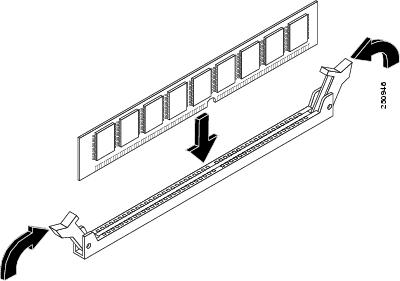
Step 7![]() Firmly press the DIMM into the connector until the latches close onto the DIMM. Ensure that both latches rotate to the closed position against the DIMM. See Figure 5-25.
Firmly press the DIMM into the connector until the latches close onto the DIMM. Ensure that both latches rotate to the closed position against the DIMM. See Figure 5-25.
Step 8![]() Replace the chassis cover. See the “Remove and Replace Chassis Cover” section.
Replace the chassis cover. See the “Remove and Replace Chassis Cover” section.
Install and Remove NIMs and SM-Xs on Cisco 4000 Series ISRs
Network Interface Modules (NIMs), Service Modules (SM-Xs), and Cisco E-Series Server Modules plug into the various slots on the motherboard. SM-Xs are sold as spare parts with labels that identify the SM-X type. See the following sections for SM-X installation tasks:

Note![]() The procedures in this section apply to NIMs, SM-Xs, and Cisco E-Series Server modules.
The procedures in this section apply to NIMs, SM-Xs, and Cisco E-Series Server modules.
- Software Requirement for SM-Xs
- Locate SM-X or NIM
- Remove SM-X or NIM
- Install SM-X
- Verify SM-X Installation


Software Requirement for SM-Xs
Cisco IOS XE software of a specified release or later release is required for using an SM-X.
To determine the version of Cisco IOS software that is running on your router, log in to the router and enter the show version command:
Locate SM-X or NIM
See the “Locate Internal and External Slots” section to locate the SM-X or NIM slot on the motherboard.
Remove SM-X or NIM
Step 1![]() Read the “Safety Warnings” section and disconnect the power supply before you replace any module.
Read the “Safety Warnings” section and disconnect the power supply before you replace any module.
Step 2![]() Access the SM-X slot. See Figure 5-4 for the various NIM and SM-X slot locations.
Access the SM-X slot. See Figure 5-4 for the various NIM and SM-X slot locations.
Step 3![]() Loosen the captive screws to open the slot cover. See Figure 5-12 and Figure 5-13.
Loosen the captive screws to open the slot cover. See Figure 5-12 and Figure 5-13.
Step 4![]() Pull the SM-X out of the connector on the motherboard. Keep the SM-X parallel with the motherboard to prevent damage to the slot and standoff.
Pull the SM-X out of the connector on the motherboard. Keep the SM-X parallel with the motherboard to prevent damage to the slot and standoff.
Step 5![]() Place the SM-X in an antistatic bag to protect it from ESD damage.
Place the SM-X in an antistatic bag to protect it from ESD damage.
Install SM-X
To install an SM-X, use a number 2 Phillips screwdriver or flat-blade screw drive, and a 1/4-inch nut driver or wrench.
Step 1![]() Read the “Safety Warnings” section and disconnect the power supply before you replace any module.
Read the “Safety Warnings” section and disconnect the power supply before you replace any module.
Step 2![]() To inset the SM-X, identify the SM-X slot.
To inset the SM-X, identify the SM-X slot.
Step 3![]() Loosen the captive screws to open the slot cover. See Figure 5-12 and Figure 5-13.
Loosen the captive screws to open the slot cover. See Figure 5-12 and Figure 5-13.
Step 4![]() Insert the SM-X to the system board.
Insert the SM-X to the system board.

Note![]() Press firmly on the SM-X until the board is properly installed on the connector.
Press firmly on the SM-X until the board is properly installed on the connector.
Step 5![]() Insert the screws from the accessory kit through the SM-X into the standoffs. See Figure 5-29. Tighten the screws with a Phillips screwdriver (torque 6 to 8 in-lb or 0.7 to 1.1 Nm.).
Insert the screws from the accessory kit through the SM-X into the standoffs. See Figure 5-29. Tighten the screws with a Phillips screwdriver (torque 6 to 8 in-lb or 0.7 to 1.1 Nm.).
Step 6![]() Check that the SM-X is installed correctly on the system board.
Check that the SM-X is installed correctly on the system board.

Note![]() For more details on installation of SM-Xs, NIMs, and Cisco E-Series Server Modules, see the hardware installation guide for the particular module you have purchased.
For more details on installation of SM-Xs, NIMs, and Cisco E-Series Server Modules, see the hardware installation guide for the particular module you have purchased.
For a list of links to all the SM-Xs and NIMs supported on your router, see the Documentation Roadmap for the Cisco 4000 Series ISRs.
Verify SM-X Installation
Use the show diag command to verify that the SM-X is installed correctly. In the following example, one SM-X is recognized by the system.
Install and Remove PVDM4 on Cisco 4400 or 4300 Series ISRs
This section describes the installation tasks for the PVDM4 used on the router. The tasks that you perform for installing and removing the PVDM4 are based on specific models of the Cisco 4000 Series Integrated Service Routers.
See the relevant sub-section to install and remove PVDM4 for your specific router in the Cisco 4000 Series ISRs:
- Tools and Equipment Requirements
- Install PVDM4 on the Motherboard of Cisco 4400 Series ISRs
- Remove the PVDM4 from the Motherboard of Cisco 4400 ISRs
- Install the PVDM4 on the Motherboard of Cisco 4331 ISR
- Remove the PVDM4 from the Motherboard of Cisco 4331 ISR
- Install the PVDM4 on Cisco Fourth-Generation T1/E1 Voice and WAN NIM
- Remove the PVDM4 from Cisco Fourth-Generation T1/E1 Voice and WAN NIM
Tools and Equipment Requirements
You need the following tools and equipment when you work with PVDM4:
PVDM4 Location and Orientation
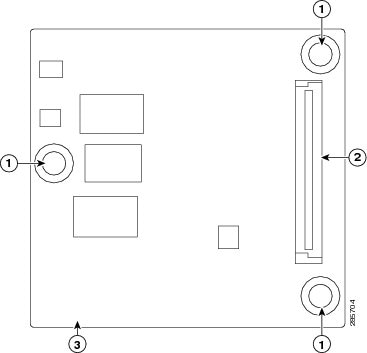
The PVDM4 connector is located on the motherboard. Figure 5-26 shows the PVDM4, screws, and connector. The connector on the PVDM4 must align with the corresponding connector on the motherboard.
Figure 5-26 View of PVDM4 Connector and Screws
Install PVDM4 on the Motherboard of Cisco 4400 Series ISRs
Step 1![]() Read the “Safety Warnings” section and disconnect the power supply before you replace any module.
Read the “Safety Warnings” section and disconnect the power supply before you replace any module.
Step 2![]() Turn off electrical power to the router. Leave the power cable plugged in to channel ESD voltages to ground.
Turn off electrical power to the router. Leave the power cable plugged in to channel ESD voltages to ground.
Step 4![]() Identify the ISC slot on the router’s main motherboard.
Identify the ISC slot on the router’s main motherboard.
Step 5![]() Locate the three standoffs from the motherboard. See Figure 5-27.
Locate the three standoffs from the motherboard. See Figure 5-27.
Step 6![]() Insert the PVDM4 into the ISC slot on the system board.
Insert the PVDM4 into the ISC slot on the system board.

Note![]() Press firmly on the PVDM4 until the board seats onto the connector.
Press firmly on the PVDM4 until the board seats onto the connector.
Step 7![]() Insert the screws from the accessory kit through the PVDM4 into the standoffs. Tighten the screws with a Phillips screwdriver (torque 6 to 8 in-lb. or 0.7 to 1.1 Nm).
Insert the screws from the accessory kit through the PVDM4 into the standoffs. Tighten the screws with a Phillips screwdriver (torque 6 to 8 in-lb. or 0.7 to 1.1 Nm).
Step 8![]() Check if the PVDM4 is installed correctly on the system board.
Check if the PVDM4 is installed correctly on the system board.


|
|

|
|
Remove the PVDM4 from the Motherboard of Cisco 4400 ISRs
Step 1![]() Turn off electrical power to the router. Leave the power cable plugged in to channel ESD voltages to ground.
Turn off electrical power to the router. Leave the power cable plugged in to channel ESD voltages to ground.
Step 2![]() Remove the router cover.
Remove the router cover.
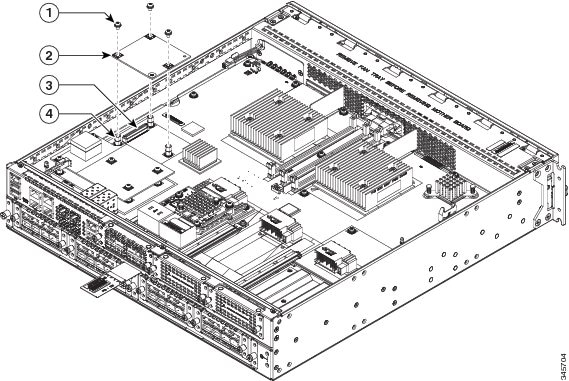
Step 3![]() Locate the PVDM4 on the motherboard. See Figure 5-27.
Locate the PVDM4 on the motherboard. See Figure 5-27.
Figure 5-27 Location of PVDM4 on Cisco 4451-X ISR
|
|
|
||
|
|
|
Step 4![]() Loosen and remove the three screws on the PVDM4.
Loosen and remove the three screws on the PVDM4.
Step 5![]() Lift the PVDM4 up from the motherboard.
Lift the PVDM4 up from the motherboard.
Step 6![]() Place the PVDM4 in an antistatic bag.
Place the PVDM4 in an antistatic bag.
Install the PVDM4 on the Motherboard of Cisco 4331 ISR
Step 1![]() Read the “Safety Warnings” section and disconnect the power supply before you replace any module.
Read the “Safety Warnings” section and disconnect the power supply before you replace any module.
Step 2![]() Turn off electrical power to the router. Leave the power cable plugged in to channel ESD voltages to ground.
Turn off electrical power to the router. Leave the power cable plugged in to channel ESD voltages to ground.
Step 4![]() Identify the ISC slot on the router’s main motherboard.
Identify the ISC slot on the router’s main motherboard.
Step 5![]() Locate the three standoffs from the motherboard. See Figure 5-28.
Locate the three standoffs from the motherboard. See Figure 5-28.
Step 6![]() Insert the PVDM4 into the ISC slot on the system board.
Insert the PVDM4 into the ISC slot on the system board.

Note![]() Press firmly on the PVDM4 until the board seats onto the connector.
Press firmly on the PVDM4 until the board seats onto the connector.
Step 7![]() Insert the screws from the accessory kit through the PVDM4 into the standoffs. Tighten the screws with a Phillips screwdriver (torque 6 to 8 in-lb. or 0.7 to 1.1 Nm).
Insert the screws from the accessory kit through the PVDM4 into the standoffs. Tighten the screws with a Phillips screwdriver (torque 6 to 8 in-lb. or 0.7 to 1.1 Nm).
Step 8![]() Check that the PVDM4 is installed correctly on the system board.
Check that the PVDM4 is installed correctly on the system board.


|
|

|
|
Remove the PVDM4 from the Motherboard of Cisco 4331 ISR
Step 1![]() Turn off electrical power to the router. Leave the power cable plugged into the channel ESD voltages to ground.
Turn off electrical power to the router. Leave the power cable plugged into the channel ESD voltages to ground.
Step 2![]() Remove the router cover.
Remove the router cover.
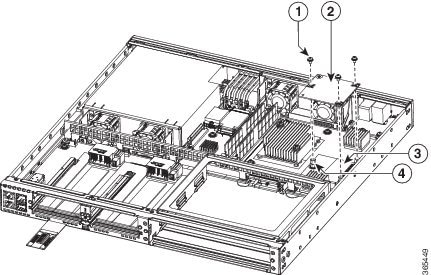
Step 3![]() Locate the PVDM4 on the motherboard. See Figure 5-28.
Locate the PVDM4 on the motherboard. See Figure 5-28.
Figure 5-28 Location of PVDM4 on Cisco 4331 ISR
|
|
|
||
|
|
|
Step 4![]() Loosen and remove the three screws on the PVDM4.
Loosen and remove the three screws on the PVDM4.
Step 5![]() Lift the PVDM4 up from the motherboard.
Lift the PVDM4 up from the motherboard.
Step 6![]() Place the PVDM4 in an anti-static bag.
Place the PVDM4 in an anti-static bag.
Install the PVDM4 on Cisco Fourth-Generation T1/E1 Voice and WAN NIM
Step 1![]() Shut down the electrical power to the slot in the router by either turning off the electrical power to the router or by issuing the online insertion and removal (OIR) commands. Leave the power cable plugged in to channel ESD voltages to ground. For more information on OIR, see the Appendix, “Online Insertion and Removal (OIR) and Hot-Swapping”.
Shut down the electrical power to the slot in the router by either turning off the electrical power to the router or by issuing the online insertion and removal (OIR) commands. Leave the power cable plugged in to channel ESD voltages to ground. For more information on OIR, see the Appendix, “Online Insertion and Removal (OIR) and Hot-Swapping”.
Step 2![]() Loosen the two captive screws on the network interface module.
Loosen the two captive screws on the network interface module.
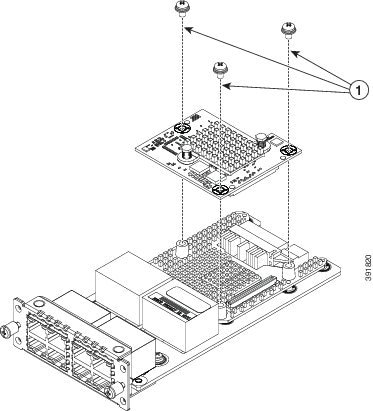
Step 3![]() Remove the network interface module. (See Figure 5-29.)
Remove the network interface module. (See Figure 5-29.)
Figure 5-29 Network Interface Module with PVDM4
|
|
Step 4![]() Locate the three standoffs on the network interface module where the PVDM4 resides.
Locate the three standoffs on the network interface module where the PVDM4 resides.
Step 5![]() Align the PVDM4 with the connector and the standoffs, and attach the PVDM4 with the three screws.
Align the PVDM4 with the connector and the standoffs, and attach the PVDM4 with the three screws.
Step 6![]() Slide the network interface module back in the router, and tighten the captive screws.
Slide the network interface module back in the router, and tighten the captive screws.
Remove the PVDM4 from Cisco Fourth-Generation T1/E1 Voice and WAN NIM
Step 1![]() Shut down the electrical power to the slot in the router by either turning off the electrical power to the router or by issuing the online insertion and removal (OIR) stop command. Leave the power cable plugged in to channel ESD voltages to ground. For more information on OIR, see the OIR Procedures.
Shut down the electrical power to the slot in the router by either turning off the electrical power to the router or by issuing the online insertion and removal (OIR) stop command. Leave the power cable plugged in to channel ESD voltages to ground. For more information on OIR, see the OIR Procedures.
Step 2![]() Loosen the two captive screws on the network interface module.
Loosen the two captive screws on the network interface module.
Step 3![]() Remove the network interface module with the PVDM4. (See Figure 5-29.)
Remove the network interface module with the PVDM4. (See Figure 5-29.)
Step 4![]() Loosen the three screws and standoffs on the PVDM4.
Loosen the three screws and standoffs on the PVDM4.
Step 5![]() Lift the PVDM4 up from the network interface module.
Lift the PVDM4 up from the network interface module.
Step 6![]() Place the PVDM4 in an antistatic bag.
Place the PVDM4 in an antistatic bag.
Step 7![]() If you are not immediately replacing the network module, install the blank cover over the empty network module slot.
If you are not immediately replacing the network module, install the blank cover over the empty network module slot.
Step 8![]() Slide the network interface module back in the router, and tighten the captive screws.
Slide the network interface module back in the router, and tighten the captive screws.
Remove and Replace the USB Flash Token Memory Stick
The Cisco 4000 Series ISRs contain ports for a 1 GB flash token memory stick to store configurations or Cisco IOS XE consolidated packages.

Note![]() Only Cisco USB Flash memory modules are supported on Cisco routers.
Only Cisco USB Flash memory modules are supported on Cisco routers.

To remove and then replace a USB flash token memory stick from the router:
Step 1![]() Pull the memory stick from the USB port.
Pull the memory stick from the USB port.
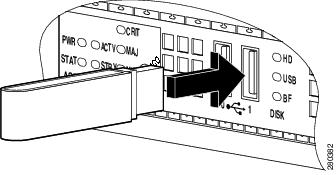
Step 2![]() To replace Cisco USB Flash memory stick, simply insert the module into the USB port 0 or 1 port as shown in Figure 5-30. The Flash memory module can be inserted in only one way, and can be inserted or removed whether the router is powered on or off.
To replace Cisco USB Flash memory stick, simply insert the module into the USB port 0 or 1 port as shown in Figure 5-30. The Flash memory module can be inserted in only one way, and can be inserted or removed whether the router is powered on or off.

Note![]() Figure 5-30 shows how the memory stick is inserted into the port and does not display the actual router faceplate.
Figure 5-30 shows how the memory stick is inserted into the port and does not display the actual router faceplate.
Figure 5-30 Router Flash Token Memory Stick

Note![]() You can insert or remove the memory stick whether the router is powered on or off.
You can insert or remove the memory stick whether the router is powered on or off.
Remove and Replace Cisco 4000 Series ISRs Power Supplies
Cisco 4400 and 4300 Series ISRs have replaceable power supply modules. These modular power supplies can be removed or installed using only a screwdriver.
- AC Power Supplies
- Overview of DC Power Supply
- Replace the Power Supply Module on the Cisco 4331 Router
- PoE Converter Power Supply Unit

Warning![]() Blank faceplates and cover panels serve three important functions: they prevent exposure to hazardous voltages and currents inside the chassis; they contain electromagnetic interference (EMI) that might disrupt other equipment; and they direct the flow of cooling air through the chassis. Do not operate the system unless all cards, faceplates, front covers, and rear covers are in place. Statement 1029
Blank faceplates and cover panels serve three important functions: they prevent exposure to hazardous voltages and currents inside the chassis; they contain electromagnetic interference (EMI) that might disrupt other equipment; and they direct the flow of cooling air through the chassis. Do not operate the system unless all cards, faceplates, front covers, and rear covers are in place. Statement 1029

Warning![]() This unit might have more than one power supply connection. All connections must be removed to de-energize the unit. Statement 1028
This unit might have more than one power supply connection. All connections must be removed to de-energize the unit. Statement 1028

Warning![]() Care should be taken while removing the power supplies and power inverters (especially in boost mode of operation). If the total power consumption is higher than can be supported by one power supply alone and in this condition a power supply is removed, the hardware can be damaged. This may then result in the system being unstable or unusable.
Care should be taken while removing the power supplies and power inverters (especially in boost mode of operation). If the total power consumption is higher than can be supported by one power supply alone and in this condition a power supply is removed, the hardware can be damaged. This may then result in the system being unstable or unusable.
AC Power Supplies
Overview of the AC Power Supply
Power supply has a similar modular form factor without cabling for easy removal and replacement.
Figure 5-31 Power Supply Unit (Cisco 4461 ISR Shown)
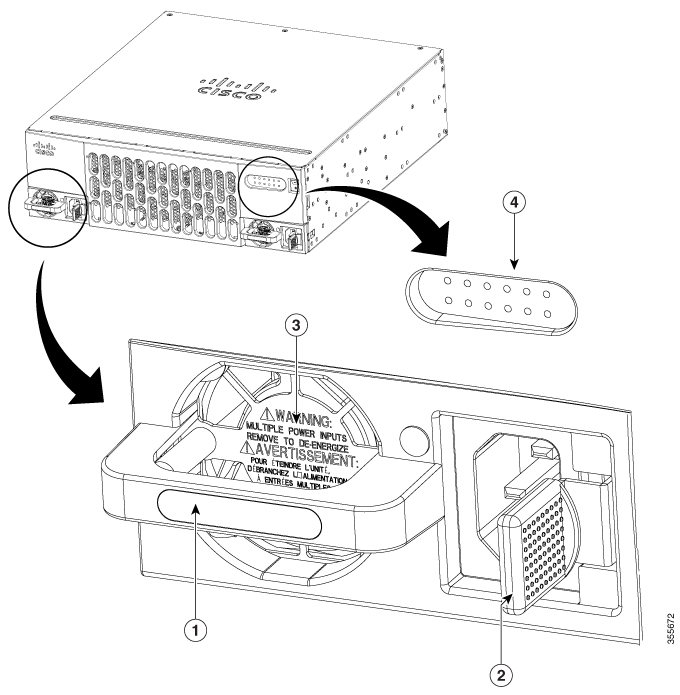
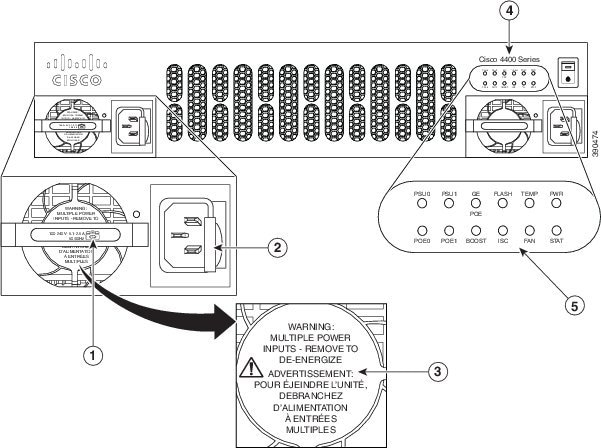
Figure 5-32 Power Supply Unit (Cisco 4451-X ISR Shown)
|
|
|
||
|
|
Multiple power supply unit warning message—appears when there are multiple power inputs |
|
|
|
|
|
Replace AC Power Supply

Similarly, if there is only one PoE power supply and it is providing PoE power to an SM-X, and if the PoE power supply is removed, the hardware may be damage and may result in the system being unstable or unusable.
Step 1![]() Read the “Safety Warnings” section section and disconnect the power supply before you replace any module.
Read the “Safety Warnings” section section and disconnect the power supply before you replace any module.
Step 2![]() Remove the router bezel. The bezel is secured with snap latches. To remove the bezel, hold the top and bottom and pull the bezel.
Remove the router bezel. The bezel is secured with snap latches. To remove the bezel, hold the top and bottom and pull the bezel.
Step 3![]() Pull on the quick-release catch on the side to leverage the power supply from its connector, and then slide the power supply module out of the chassis.
Pull on the quick-release catch on the side to leverage the power supply from its connector, and then slide the power supply module out of the chassis.
Step 4![]() Insert the replacement power supply module.
Insert the replacement power supply module.
Figure 5-33 Cisco 4451-X ISR Power Supply Units
|
|
|
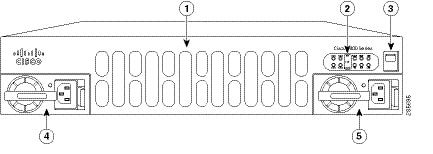
Figure 5-34 Cisco 4451-X ISR Power Supply Units
|
|
|
||
|
|
|
||
|
|
|
Overview of DC Power Supply
This section describes the installation procedure that is common for all Cisco 4400 and 4300 Series ISRs. The DC power supply is only supported on Cisco 4461 ISR, Cisco 4451-X ISR, Cisco 4431 ISR, and Cisco 4351 ISR.
- Remove DC Input Power from Cisco 4461 or 4431 ISR
- Install DC Input Power on Cisco 4431 ISR
- Remove DC Input Power from Cisco 4331 ISR
- Install DC Input Power on Cisco 4431 ISR
- PoE Converter Power Supply Unit
For the Cisco 4431 ISR, the input connector and plug must be UL recognized under UL 486 for field wiring. The connection polarity is from left to right: negative (–), positive (+), and ground.
For the Cisco 4451-X ISR and Cisco 4351 ISR, the input connector and plug must be UL recognized under UL 486 for field wiring. The connection polarity is from left to right: ground, negative (–), positive (+).
The power supply has a handle that is used for insertion and extraction. The module must be supported with one hand because of its length.
For Cisco 4461 ISR, the power supply DC input range is –40 to –72 VDC, and the maximum power is 650 W.
For Cisco 4431 ISR, the power supply DC input range is –48 to –60 VDC, and the maximum power is 350 W.
For Cisco 4451 ISR and Cisco 4351 ISR, the power supply DC input range is –48 to –60 VDC, and the maximum power is 437 W.
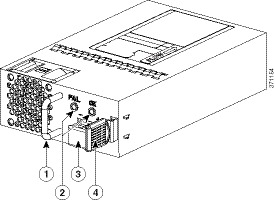
Figure 5-35 Cisco 4461 DC Power Supply

|
|
|
|
|
|
||
|
|
|
Remove DC Input Power from Cisco 4461 or 4431 ISR
This section describes how to remove a DC power supply from Cisco 4461 or 4431 ISR.

Note![]() The Cisco 4431 ISR has redundant power supplies that can be hot-swapped.
The Cisco 4431 ISR has redundant power supplies that can be hot-swapped.
To remove a DC power supply from Cisco 4461 or 4431 ISR:
Step 1![]() If you have redundant power supplies, ensure that the power switch is in the standby position.
If you have redundant power supplies, ensure that the power switch is in the standby position.

Note![]() You do not require to place the power switch in the standby position if you want to hot-swap a single power supply.
You do not require to place the power switch in the standby position if you want to hot-swap a single power supply.

Warning![]() Before performing any of the following procedures, ensure that power is removed from the DC circuit. Statement 1003
Before performing any of the following procedures, ensure that power is removed from the DC circuit. Statement 1003

Warning![]() To reduce risk of electric shock, when installing or replacing the unit, the ground connection must always be made first and disconnected last. Statement 1046
To reduce risk of electric shock, when installing or replacing the unit, the ground connection must always be made first and disconnected last. Statement 1046
Step 2![]() For Cisco 4461 ISR and Cisco 4431 ISR, unscrew the two terminal block wire connectors (negative and positive) on the unit. See Figure 5-40.
For Cisco 4461 ISR and Cisco 4431 ISR, unscrew the two terminal block wire connectors (negative and positive) on the unit. See Figure 5-40.
For Cisco 4451 ISR and Cisco 4351, unscrew the three terminal block wire connectors (ground, negative and positive) on the unit. For Cisco 4331 ISR, remove the power supply cable connector (See Figure 5-41) and remove the two screws that secure the power supply module to the chassis.
Step 3![]() [Only for Cisco 4461, 4431, and 4331 ISRs] Remove the plastic bezel from the router.
[Only for Cisco 4461, 4431, and 4331 ISRs] Remove the plastic bezel from the router.
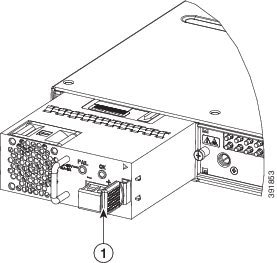
Step 4![]() Press the retaining latch towards the pull handle, grasp the handle with one hand, and pull the power supply out of the slot while supporting the weight of the power supply with the other hand. See Figure 5-37.
Press the retaining latch towards the pull handle, grasp the handle with one hand, and pull the power supply out of the slot while supporting the weight of the power supply with the other hand. See Figure 5-37.
Figure 5-37 Remove DC Power Supply
|
|
|
Install DC Input Power on Cisco 4431 ISR

Warning![]() Only trained and qualified personnel should be allowed to install, replace, or service this equipment. Statement 1030
Only trained and qualified personnel should be allowed to install, replace, or service this equipment. Statement 1030
This section describes how to install the DC power supply input power leads to the Cisco 4431 Router DC input power supply.
- The color coding of the DC input power supply leads depend on the color coding of the DC power source at your site. Ensure that the lead color coding you choose for the DC input power supply matches the lead color coding used at the DC power source. Verify that the power source is connected to the negative (–) terminal and to the positive (+) terminal on the power supply.
- Ensure that the chassis ground is connected on the chassis before you begin installing the DC power supply. Follow the steps provided in the “Chassis Grounding” section.
Wire the DC Input Power Source
The Cisco 4431 ISR DC power supply has a terminal block that is installed into the power supply terminal block header.
To wire the DC input power source:
Step 1![]() If you have redundant power supplies, ensure that the power switch is in the standby position.
If you have redundant power supplies, ensure that the power switch is in the standby position.

Note![]() You do not require to place the power switch in the standby position if you want to hot-swap a single power supply.
You do not require to place the power switch in the standby position if you want to hot-swap a single power supply.
Step 2![]() Insert the power supply in the power-supply slot, and gently push it into the slot. When correctly installed:
Insert the power supply in the power-supply slot, and gently push it into the slot. When correctly installed:
- For Cisco 4431 ISR, the DC power supply (excluding the extraction handle) is flush with the router.
- For Cisco 4451 ISR and Cisco 4351ISR, the DC power supply (excluding the extraction handle) is recessed from the router bezel.
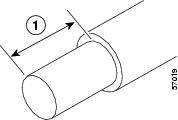
Step 3![]() Wire can be stripped and terminated directly to the power supply terminal block, or a crimp style spade terminal lug can be used. If you are using a terminal lug, follow the manufacturer's instructions for terminating the lug to the wire. If terminating directly to the terminal block using bare wire, follow the instructions in the Figure 5-40. Use a wire-stripping tool to strip each of the two wires coming from the DC input power source and strip the wires to approximately 0.39 inch (10 mm) + 0.02 inch (0.5 mm). We recommend that you use 14 AWG insulated wire. Do not strip more than the recommended length of wire because doing so could leave the wire exposed from the terminal block. Figure 5-38 shows a stripped DC input power source wire.
Wire can be stripped and terminated directly to the power supply terminal block, or a crimp style spade terminal lug can be used. If you are using a terminal lug, follow the manufacturer's instructions for terminating the lug to the wire. If terminating directly to the terminal block using bare wire, follow the instructions in the Figure 5-40. Use a wire-stripping tool to strip each of the two wires coming from the DC input power source and strip the wires to approximately 0.39 inch (10 mm) + 0.02 inch (0.5 mm). We recommend that you use 14 AWG insulated wire. Do not strip more than the recommended length of wire because doing so could leave the wire exposed from the terminal block. Figure 5-38 shows a stripped DC input power source wire.
Figure 5-38 Stripped DC Input Power Source Wire
|
|
0.39 inch (10 mm) is the recommended wire-strip length for the terminal block. |

Warning![]() An exposed wire lead from a DC input power source can conduct harmful levels of electricity. Be sure that no exposed portion of the DC input power source wire extends from the terminal block. Statement 122
An exposed wire lead from a DC input power source can conduct harmful levels of electricity. Be sure that no exposed portion of the DC input power source wire extends from the terminal block. Statement 122
Step 4![]() Identify the positive and negative feed positions for the terminal block connection. The wiring sequence is:
Identify the positive and negative feed positions for the terminal block connection. The wiring sequence is:
1.![]() Positive (+) lead wire (right)
Positive (+) lead wire (right)
2.![]() Negative (–) lead wire (left)
Negative (–) lead wire (left)
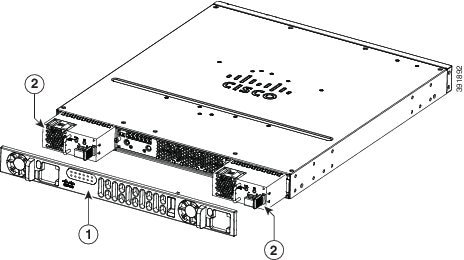
Step 5![]() Remove the router bezel. See Figure 5-39. The bezel is secured with snap latches. To remove the bezel, hold the top and bottom and pull the bezel.
Remove the router bezel. See Figure 5-39. The bezel is secured with snap latches. To remove the bezel, hold the top and bottom and pull the bezel.
|
|
|
Step 6![]() Insert the wires through the holes in the bezel. Replace the bezel.
Insert the wires through the holes in the bezel. Replace the bezel.
Step 7![]() Insert the exposed wire into the terminal block. Ensure that the wire lead is not placed outside the plastic cover. Only wires with insulation should extend from the terminal block.
Insert the exposed wire into the terminal block. Ensure that the wire lead is not placed outside the plastic cover. Only wires with insulation should extend from the terminal block.

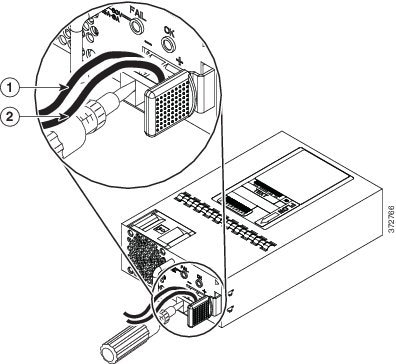
Step 8![]() Use a screwdriver to tighten the terminal block captive screws, as shown in Figure 5-40.
Use a screwdriver to tighten the terminal block captive screws, as shown in Figure 5-40.
Figure 5-40 DC Power Supply with Lead Wires
|
|
|
Step 9![]() Repeat these steps for the remaining DC input power source wire as applicable.
Repeat these steps for the remaining DC input power source wire as applicable.
Step 10![]() Use a tie wrap to secure the wires to the rack, so that the wires are not pulled from the terminal block by casual contact.
Use a tie wrap to secure the wires to the rack, so that the wires are not pulled from the terminal block by casual contact.
Step 11![]() Turn on the circuit breaker at the power source.
Turn on the circuit breaker at the power source.
Step 12![]() If you have changed the standby switch to the standby position in Step 1, turn the standby switch to the On position.
If you have changed the standby switch to the standby position in Step 1, turn the standby switch to the On position.
The power supply LEDs illuminate green.
Replace the Power Supply Module on the Cisco 4331 Router
Step 1![]() Read the “Safety Warnings” section section, and turn off the system power before you perform the power supply module replacement.
Read the “Safety Warnings” section section, and turn off the system power before you perform the power supply module replacement.
Step 2![]() Remove the four cover screws from the top of the chassis.
Remove the four cover screws from the top of the chassis.

Note![]() The length of the cover screw on top of the chassis is shorter.
The length of the cover screw on top of the chassis is shorter.
Step 3![]() Remove the two cover screws from each side of the chassis, and lift the cover away from the router chassis. See Figure 5-51.
Remove the two cover screws from each side of the chassis, and lift the cover away from the router chassis. See Figure 5-51.
Step 4![]() Remove the fan tray. Follow the steps provided in the “Replace Fan Tray on Cisco 4331 ISR” section.
Remove the fan tray. Follow the steps provided in the “Replace Fan Tray on Cisco 4331 ISR” section.
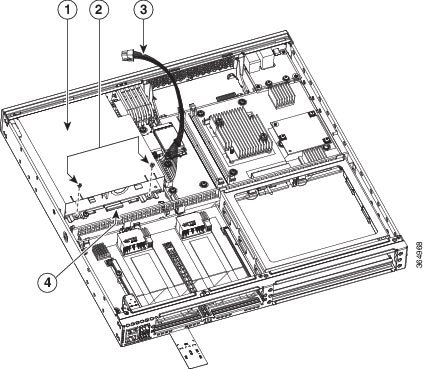
Step 5![]() Remove the power supply cable connector. See Figure 5-41.
Remove the power supply cable connector. See Figure 5-41.
Step 6![]() Remove the two screws that secure the power supply module to the chassis.
Remove the two screws that secure the power supply module to the chassis.
Step 7![]() Pull the power supply module out of the chassis using the power supply tab. See Figure 5-41.
Pull the power supply module out of the chassis using the power supply tab. See Figure 5-41.
Step 8![]() Insert the replacement power supply module and align the power supply module into the slot.
Insert the replacement power supply module and align the power supply module into the slot.
Step 9![]() Tighten the two screws (torque 6 to 9 in-lb) that secure the power supply module to the chassis. See Figure 5-41.
Tighten the two screws (torque 6 to 9 in-lb) that secure the power supply module to the chassis. See Figure 5-41.
Step 10![]() Connect the power supply cable connector.
Connect the power supply cable connector.
Step 11![]() Insert the fan tray and gently push down until the spring-lock is latched and fully engaged onto the slot. Follow the steps provided in the “Replace Fan Tray on Cisco 4331 ISR” section.
Insert the fan tray and gently push down until the spring-lock is latched and fully engaged onto the slot. Follow the steps provided in the “Replace Fan Tray on Cisco 4331 ISR” section.
Step 12![]() Connect the fan connectors on the motherboard. See Figure 5-52.
Connect the fan connectors on the motherboard. See Figure 5-52.
Step 13![]() Turn on the system power and verify that the power supply module is functioning normally.
Turn on the system power and verify that the power supply module is functioning normally.
Step 14![]() Turn off the system power before you cover over the chassis.
Turn off the system power before you cover over the chassis.
Step 15![]() Center the cover over the chassis and lower it onto the chassis.
Center the cover over the chassis and lower it onto the chassis.
Step 16![]() Install the four cover screws (torque 5 to 6 in-lb) on the top of the chassis and install the two cover screws (torque 5 to 6 in-lb) on each side of the chassis. See Figure 5-51.
Install the four cover screws (torque 5 to 6 in-lb) on the top of the chassis and install the two cover screws (torque 5 to 6 in-lb) on each side of the chassis. See Figure 5-51.
Figure 5-41 Cisco 4331 ISR Power Supply Module
|
|
|
||
|
|
|
Remove DC Input Power from Cisco 4331 ISR

Warning![]() Before performing any of the following procedures, ensure that power is removed from the DC circuit. Statement 1003
Before performing any of the following procedures, ensure that power is removed from the DC circuit. Statement 1003

Warning![]() Only trained and qualified personnel should be allowed to install, replace, or service this equipment. Statement 1030
Only trained and qualified personnel should be allowed to install, replace, or service this equipment. Statement 1030

Warning![]() When installing or replacing the unit, the ground connection must always be made first and disconnected last. Statement 1046
When installing or replacing the unit, the ground connection must always be made first and disconnected last. Statement 1046
This section describes how to remove a DC input power from Cisco 4331 Series ISR.
Step 1![]() Turn off the circuit breaker at the power source.
Turn off the circuit breaker at the power source.
Step 2![]() Ensure that the power switch is in the standby position.
Ensure that the power switch is in the standby position.
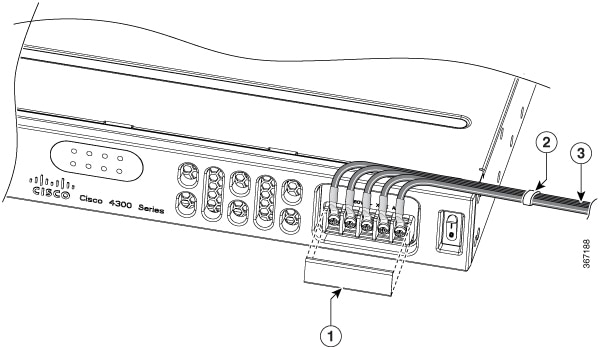
Step 3![]() Remove the plastic cover from the terminal block. Save the covers for re-installation after you finish wiring. See Figure 5-37.
Remove the plastic cover from the terminal block. Save the covers for re-installation after you finish wiring. See Figure 5-37.
Step 4![]() Use a screwdriver to loosen the terminal block captive screws, as shown in Figure 5-41.
Use a screwdriver to loosen the terminal block captive screws, as shown in Figure 5-41.
Step 5![]() Repeat these steps for the remaining DC input power source wire as applicable.
Repeat these steps for the remaining DC input power source wire as applicable.
Step 6![]() Remove the input power cable from the terminal block, and gently push it out of the terminal block.
Remove the input power cable from the terminal block, and gently push it out of the terminal block.
Figure 5-42 Remove the Plastic Cover and DC Input Power
|
|
|
||
|
|
|
Install DC Input Power on Cisco 4331 ISR

Warning![]() Before performing any of the following procedures, ensure that power is removed from the DC circuit. Statement 1003
Before performing any of the following procedures, ensure that power is removed from the DC circuit. Statement 1003

Warning![]() Only trained and qualified personnel should be allowed to install, replace, or service this equipment. Statement 1030
Only trained and qualified personnel should be allowed to install, replace, or service this equipment. Statement 1030
This section describes how to install the DC power supply input power leads to the Cisco 4331 Router DC input power supply.
- The color coding of the DC input power supply leads depend on the color coding of the DC power source at your site. Ensure that the lead color coding you choose for the DC input power supply matches the lead color coding used at the DC power source and verify that the power source is connected to the negative (–) terminal and to the positive (+) terminal on the power supply.
- Ensure that the chassis ground is connected on the chassis before you begin installing the DC power supply. Follow the steps provided in the “Chassis Grounding” section.
Wire the DC Input Power Source on Cisco 4331 ISR
The Cisco 4331 ISR DC power supply supports 12V/21A output with the DC input range from 24 to 60 VDC.

Note![]() The input current should be less than 6.3 A at 48 VDC. It is recommended to use slow blow fuse and have the input fuse value less than or equal to 25 A.
The input current should be less than 6.3 A at 48 VDC. It is recommended to use slow blow fuse and have the input fuse value less than or equal to 25 A.
The Cisco 4331 ISR DC power supply has a terminal block that is installed into the power supply terminal block header.
To wire the DC input power source:
Step 1![]() Ensure that the power switch is in the standby position.
Ensure that the power switch is in the standby position.
Step 2![]() Insert the power supply in the power-supply slot, and gently push it into the slot.
Insert the power supply in the power-supply slot, and gently push it into the slot.
Step 3![]() Wire can be stripped and terminated directly to the power supply terminal block, or a crimp style spade terminal lug can be used. If you are using a terminal lug, follow the manufacturer's instructions for terminating the lug to the wire. If terminating directly to the terminal block using bare wire, follow the instructions in the Figure 5-37. Use a wire-stripping tool to strip each of the two wires coming from the DC input power source and strip the wires to approximately 0.39 inch (10 mm) + 0.02 inch (0.5 mm). It is recommended that 14 AWG insulated wire be used. Do not strip more than the recommended length of wire because doing so could leave the wire exposed from the terminal block. Figure 5-38 shows a stripped DC input power source wire.
Wire can be stripped and terminated directly to the power supply terminal block, or a crimp style spade terminal lug can be used. If you are using a terminal lug, follow the manufacturer's instructions for terminating the lug to the wire. If terminating directly to the terminal block using bare wire, follow the instructions in the Figure 5-37. Use a wire-stripping tool to strip each of the two wires coming from the DC input power source and strip the wires to approximately 0.39 inch (10 mm) + 0.02 inch (0.5 mm). It is recommended that 14 AWG insulated wire be used. Do not strip more than the recommended length of wire because doing so could leave the wire exposed from the terminal block. Figure 5-38 shows a stripped DC input power source wire.
Figure 5-43 Stripped DC Input Power Source Wire

|
|
0.39 inch (10 mm) is the recommended wire-strip length for the terminal block. |

Warning![]() An exposed wire lead from a DC input power source can conduct harmful levels of electricity. Be sure that no exposed portion of the DC input power source wire extends from the terminal block. Statement 122
An exposed wire lead from a DC input power source can conduct harmful levels of electricity. Be sure that no exposed portion of the DC input power source wire extends from the terminal block. Statement 122
Step 4![]() Identify the positive and negative feed positions for the terminal block connection. The wiring sequence is:
Identify the positive and negative feed positions for the terminal block connection. The wiring sequence is:
1.![]() Positive (+) lead wire (right)
Positive (+) lead wire (right)
2.![]() Negative (–) lead wire (left)
Negative (–) lead wire (left)
Step 5![]() Remove the plastic cover from the terminal block. Save the covers for reinstallation after you finish wiring. See Figure 5-37.
Remove the plastic cover from the terminal block. Save the covers for reinstallation after you finish wiring. See Figure 5-37.
Figure 5-44 Remove the Plastic Cover

|
|
|
||
|
|
|
Step 6![]() Insert the wires through the holes. Replace the plastic cover.
Insert the wires through the holes. Replace the plastic cover.
Step 7![]() Insert the exposed wire into the terminal block. Ensure that the wire lead is not placed outside the plastic cover. Only wires with insulation should extend from the terminal block.
Insert the exposed wire into the terminal block. Ensure that the wire lead is not placed outside the plastic cover. Only wires with insulation should extend from the terminal block.

Step 8![]() Use a screwdriver to tighten the terminal block captive screws, as shown in Figure 5-40.
Use a screwdriver to tighten the terminal block captive screws, as shown in Figure 5-40.
Step 9![]() Repeat these steps for the remaining DC input power source wire as applicable.
Repeat these steps for the remaining DC input power source wire as applicable.
Step 10![]() Use a tie wrap to secure the wires to the rack, so that the wires are not pulled from the terminal block by casual contact.
Use a tie wrap to secure the wires to the rack, so that the wires are not pulled from the terminal block by casual contact.
Step 11![]() Turn on the circuit breaker at the power source.
Turn on the circuit breaker at the power source.
Step 12![]() If you have changed the standby switch to the standby position in step 1, turn the standby switch to the On position.
If you have changed the standby switch to the standby position in step 1, turn the standby switch to the On position.
The power supply LEDs illuminate green.
PoE Converter Power Supply Unit
- Overview of the PoE Converter Power Supply Unit
- Remove PoE Power Supply Slot Filler
- Install the PoE Converter Power Supply
- Remove PoE Converter Power Supply
- Install the PoE Power Supply Slot Filler
Overview of the PoE Converter Power Supply Unit
The PoE converter power supply supports online insertion feature. The PoE converter power supply does not support online removal.
The optional PoE converter PSU slots come with factory-installed fillers. You must remove them to install the PoE converter power supplies.

Note![]() If using only one PoE converter power supply, you must install the PoE converter power supply in PoE slot 0.
If using only one PoE converter power supply, you must install the PoE converter power supply in PoE slot 0.
Figure 5-45 shows the location of the PoE converter power supply slots located behind the bezel and fan tray.
Figure 5-45 Remove Bezel and Fan Tray to Locate PoE Slots
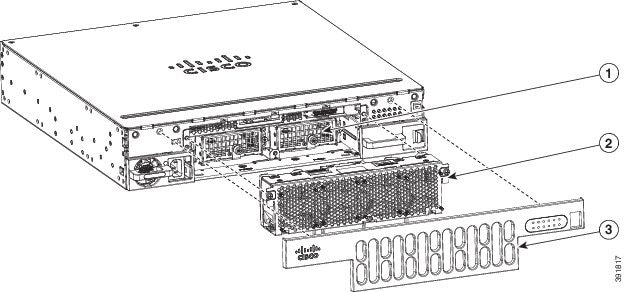
|
|
|
||
|
|
|
Remove PoE Power Supply Slot Filler
Step 1![]() Remove the bezel and fan tray from the router.
Remove the bezel and fan tray from the router.
Step 2![]() Loosen the screws from the securing nuts on the chassis. See Figure 5-46 for details.
Loosen the screws from the securing nuts on the chassis. See Figure 5-46 for details.
Step 3![]() Gently pull out the filler from the filler tab on the chassis.
Gently pull out the filler from the filler tab on the chassis.
Figure 5-46 Install or Remove PoE Fillers
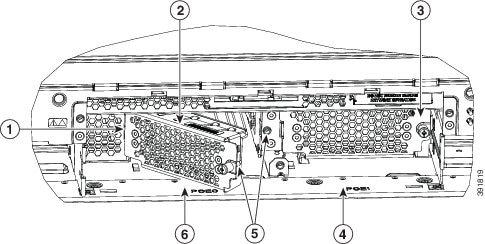
|
|
|
||
|
|
|
||
|
|
|
Install the PoE Converter Power Supply
Step 1![]() Remove the bezel and fan try from the router chassis. See Replace Fan Tray.
Remove the bezel and fan try from the router chassis. See Replace Fan Tray.
Step 2![]() Remove the PoE converter power supply filler. For instructions, see “Remove PoE Power Supply Slot Filler”.
Remove the PoE converter power supply filler. For instructions, see “Remove PoE Power Supply Slot Filler”.
Step 3![]() Open the slot latch before inserting the PoE converter power supply module.
Open the slot latch before inserting the PoE converter power supply module.
Step 4![]() Rotate latch to close it.
Rotate latch to close it.
Step 5![]() Tighten the screws on the module to secure it to the router chassis.See Figure 5-47 for details.
Tighten the screws on the module to secure it to the router chassis.See Figure 5-47 for details.
Remove PoE Converter Power Supply
Step 1![]() Remove the bezel and fan try from the router chassis.
Remove the bezel and fan try from the router chassis.
Open the slot latch. See Figure 5-47 for details.
Step 2![]() Remove the PoE converter power supply module.
Remove the PoE converter power supply module.
Step 3![]() Replace PoE converter power supply filler. See “Remove PoE Power Supply Slot Filler” section for details.
Replace PoE converter power supply filler. See “Remove PoE Power Supply Slot Filler” section for details.
After you remove the PoE converter PSU, you need to either install a replacement power or put the filler.
Install the PoE Power Supply Slot Filler
You cannot keep the slot empty, you need to install the filler.
Step 1![]() Remove the bezel and fan tray from the router.
Remove the bezel and fan tray from the router.
Step 2![]() Insert the filler tab into the slot on the chassis.
Insert the filler tab into the slot on the chassis.
Step 3![]() Tighten the screws into the securing nuts on the chassis. See Figure 5-46 for details.
Tighten the screws into the securing nuts on the chassis. See Figure 5-46 for details.
Figure 5-47 Install the PoE Converter Power Supply
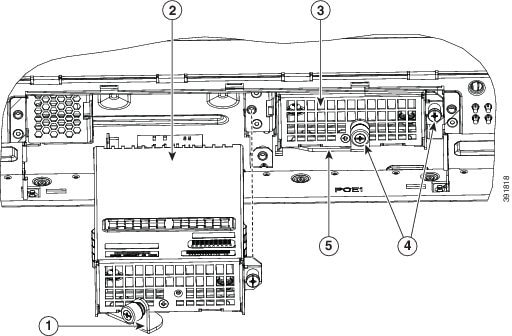
|
|
|
||
|
|
|
||
|
|
|

Warning![]() Care should be taken while removing the power supplies and power inverters (especially in boost mode of operation). If the total power consumption is higher than can be supported by one power supply alone and in this condition a power supply is removed, the hardware can be damaged. This may then result in the system being unstable or unusable.
Care should be taken while removing the power supplies and power inverters (especially in boost mode of operation). If the total power consumption is higher than can be supported by one power supply alone and in this condition a power supply is removed, the hardware can be damaged. This may then result in the system being unstable or unusable.
The following messages are displayed as expected when you try to reload or insert a PoE supply in a router with Ethernet Switch Network Module:
Upon PoE converter power supply insertion, the inline power supply restores automatically in the router. After the insertion, resets are needed for the switch modules in the router for the PoE supply to work properly.
If there are two PoE supplies, the power supplies can operate in a boost mode or redundant mode. In a boost mode, the total power supplied is a sum of the two power supplies capacity. In a redundant mode, if one of the PoE supply fails, the other PoE supplies power.
Replace a Fan Tray
The Cisco 4000 Series ISRs have hot-swappable fan trays that are field replaceable units (FRUs). The fan tray includes all router fans in one assembly. If a fan fails, replace the tray using a flat-blade or Phillips screwdriver.

Note![]() The Cisco 4331 ISR and Cisco 4321 ISR do not have hot-swappable fan trays.
The Cisco 4331 ISR and Cisco 4321 ISR do not have hot-swappable fan trays.
Before Hot-Swapping a Fan Tray
Before hot-swapping a fan tray, read the safety precautions below.
- Read the entire procedure and have the required tools available.
- Do not attempt the hot-swap in ambient air temperature above 90°F (32°C).
- Do not attempt the hot-swap at an altitude above 6000 feet (1829 meters).
- When the router is being operated, we recommend to change the fans in the router within 2 minutes to ensure the router does not overheat:
Replace Fan Tray

Note![]() If hot-swapping the fan tray, we recommend to complete the operation within two minutes to ensure the router remains within operating temperature.
If hot-swapping the fan tray, we recommend to complete the operation within two minutes to ensure the router remains within operating temperature.

Note![]() We recommend that you change the air filter every 3 months. However, examine the air filter once a month (or more often in dusty environments) and replace it if it appears to be excessively dirty or damaged. To comply with Telecordia GR-63-Core standard air filter requirements for NEBS deployment, the air filter must be replaced, not cleaned.
We recommend that you change the air filter every 3 months. However, examine the air filter once a month (or more often in dusty environments) and replace it if it appears to be excessively dirty or damaged. To comply with Telecordia GR-63-Core standard air filter requirements for NEBS deployment, the air filter must be replaced, not cleaned.
Step 1![]() Remove the bezel. The bezel is secured with snap latches. To remove the bezel, hold the top and bottom and pull the bezel.
Remove the bezel. The bezel is secured with snap latches. To remove the bezel, hold the top and bottom and pull the bezel.
Step 2![]() Completely loosen the three captive fan tray screws.
Completely loosen the three captive fan tray screws.
Step 4![]() Insert the replacement fan tray and tighten the three captive screws.
Insert the replacement fan tray and tighten the three captive screws.
Figure 5-48 Cisco 4461 ISR4 Fan Tray
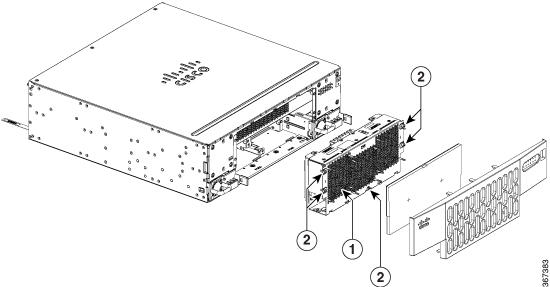
|
|
|
Figure 5-49 Cisco 4351 ISR4 Fan Tray
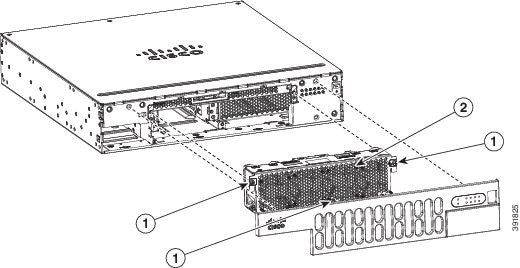
|
|
|
Figure 5-50 Cisco 4431 ISR Fan Tray
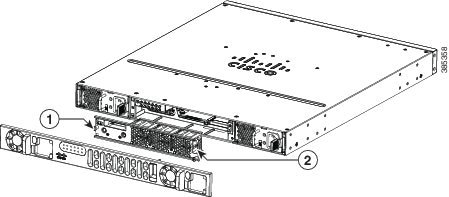
|
|
|
Replace Fan Tray on Cisco 4331 ISR
Step 1![]() Remove the four cover screws from the top of the chassis.
Remove the four cover screws from the top of the chassis.

Note![]() The length of the cover screw on top of the chassis is shorter.
The length of the cover screw on top of the chassis is shorter.
Step 2![]() Remove the two cover screws from each side of the chassis, and lift the cover away from the router chassis. See Figure 5-51.
Remove the two cover screws from each side of the chassis, and lift the cover away from the router chassis. See Figure 5-51.
Step 3![]() Remove the fan connectors from the motherboard. See Figure 5-52.
Remove the fan connectors from the motherboard. See Figure 5-52.
Step 4![]() Press the spring-lock on both the sides of the fan tray to release the spring-lock.
Press the spring-lock on both the sides of the fan tray to release the spring-lock.
Step 5![]() Pull the fan tray up to disengage from the slot. See Figure 5-51.
Pull the fan tray up to disengage from the slot. See Figure 5-51.
Step 6![]() Insert the replacement fan tray and gently push down until the spring-lock is latched and fully engaged onto the slot.
Insert the replacement fan tray and gently push down until the spring-lock is latched and fully engaged onto the slot.
Step 7![]() Connect the fan connectors on the motherboard. See Figure 5-52.
Connect the fan connectors on the motherboard. See Figure 5-52.

Note![]() The connectors are polarized or keyed to allow easy insertion in only one orientation. Orient the connectors correctly before you insert them. Incorrect orientation can damage connector pins.
The connectors are polarized or keyed to allow easy insertion in only one orientation. Orient the connectors correctly before you insert them. Incorrect orientation can damage connector pins.
Step 8![]() Turn on the system power, and verify that the fan tray is functioning normally.
Turn on the system power, and verify that the fan tray is functioning normally.
Step 9![]() Turn off the system power before you cover over the chassis.
Turn off the system power before you cover over the chassis.
Step 10![]() Center the cover over the chassis and lower it onto the chassis.
Center the cover over the chassis and lower it onto the chassis.
Step 11![]() Install the four cover screws (torque 5 to 6 in-lb) on the top of the chassis, and install the two cover screws (torque 5 to 6 in-lb) on each side of the chassis. See Figure 5-51.
Install the four cover screws (torque 5 to 6 in-lb) on the top of the chassis, and install the two cover screws (torque 5 to 6 in-lb) on each side of the chassis. See Figure 5-51.
Figure 5-51 Cisco 4331 ISR Fan Tray
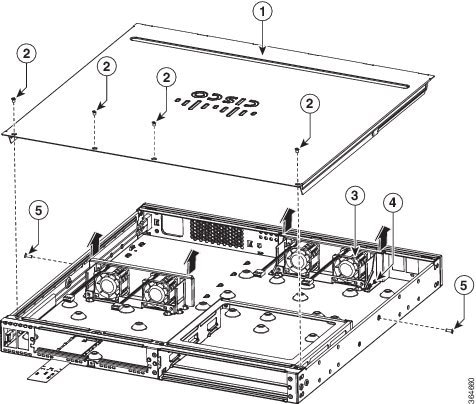
|
|
|
||
|
|
|
||
|
|
|
Figure 5-52 Cisco 4331 ISR Fan Connectors
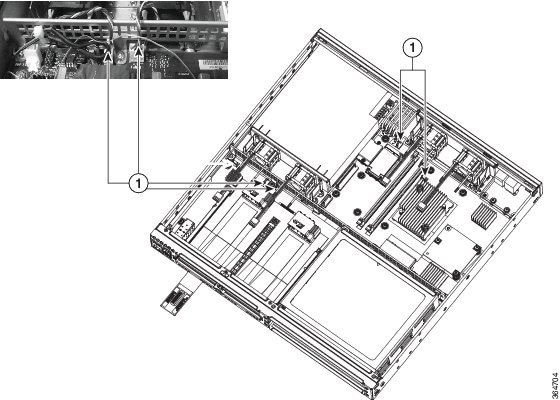
|
|
|
Figure 5-53 Cisco 4331 ISR Fan Tray
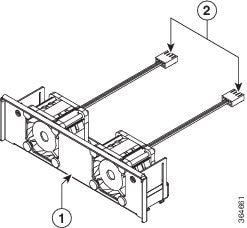
|
|
|
Replace Fan Blower on Cisco 4321 ISR
Step 1![]() Read the “Safety Warnings” section, and disconnect the power supply before you replace any module.
Read the “Safety Warnings” section, and disconnect the power supply before you replace any module.
Step 2![]() Remove the screws (5X) on the I/O module and both sides of the chassis. See Figure 5-54.
Remove the screws (5X) on the I/O module and both sides of the chassis. See Figure 5-54.
Step 3![]() Remove the chassis cover by lifting the front edge, hinging toward the back. See Figure 5-55.
Remove the chassis cover by lifting the front edge, hinging toward the back. See Figure 5-55.
Step 4![]() Disconnect the blower cable connection and remove the screws (2x) that secures the fan blower to the motherboard. See Figure 5-56
Disconnect the blower cable connection and remove the screws (2x) that secures the fan blower to the motherboard. See Figure 5-56
Step 5![]() Remove the fan blower from the motherboard. Use the flat-head screwdriver to disengage the fan blower from the slot. Ensure that you do not damage the motherboard when you disengage the fan blower from the slot. See Figure 5-57
Remove the fan blower from the motherboard. Use the flat-head screwdriver to disengage the fan blower from the slot. Ensure that you do not damage the motherboard when you disengage the fan blower from the slot. See Figure 5-57
Step 6![]() Remove the blue vibration isolator from the motherboard. See Figure 5-58.
Remove the blue vibration isolator from the motherboard. See Figure 5-58.
Step 7![]() Install the new blue vibration isolator and then the fan blower onto the motherboard.
Install the new blue vibration isolator and then the fan blower onto the motherboard.
Step 8![]() Secure the fan blower onto the motherboard with 2 existing or new screws. Tighten the screws with a Phillips screwdriver. (torque 4 to 6 in-lbs). See Figure 5-54.
Secure the fan blower onto the motherboard with 2 existing or new screws. Tighten the screws with a Phillips screwdriver. (torque 4 to 6 in-lbs). See Figure 5-54.

Note![]() Ensure that you do not over tighten the screws as the isolator underneath the screws can be damaged.
Ensure that you do not over tighten the screws as the isolator underneath the screws can be damaged.
Step 9![]() Install the chassis cover by hinging from the back. See Figure 5-55.
Install the chassis cover by hinging from the back. See Figure 5-55.
Step 10![]() Secure the screws (5x) on the I/O module and both sides of the chassis (torque 5 to 6 in-lb).
Secure the screws (5x) on the I/O module and both sides of the chassis (torque 5 to 6 in-lb).
Figure 5-54 Cisco 4321 ISR Chassis
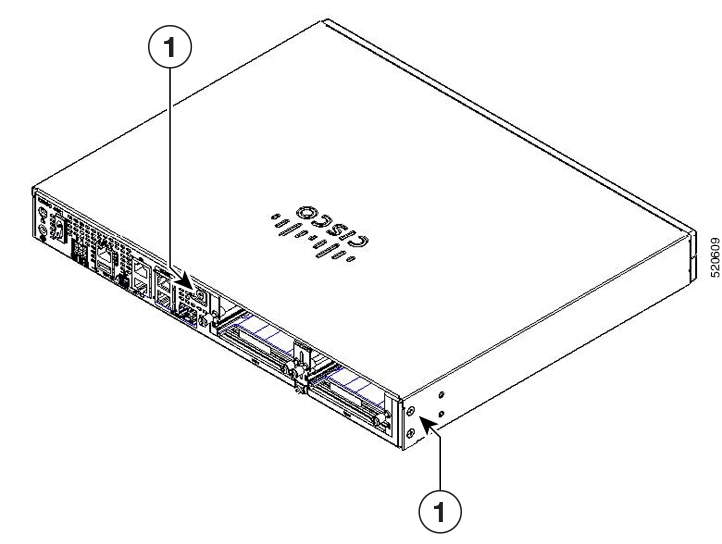
|
|
|
Figure 5-55 Cisco 4321 ISR Chassis Cover
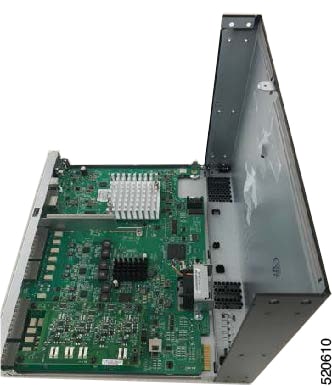
|
|
|
Figure 5-56 Cisco 4321 ISR Blower
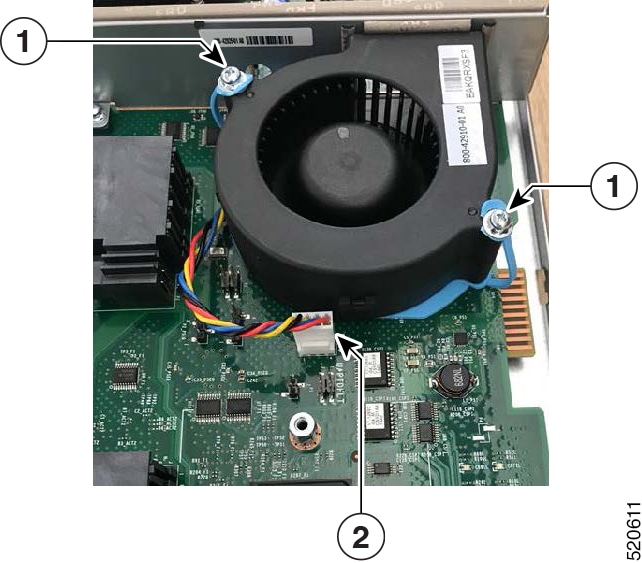
|
|
|
Figure 5-57 Cisco 4321 ISR Blower
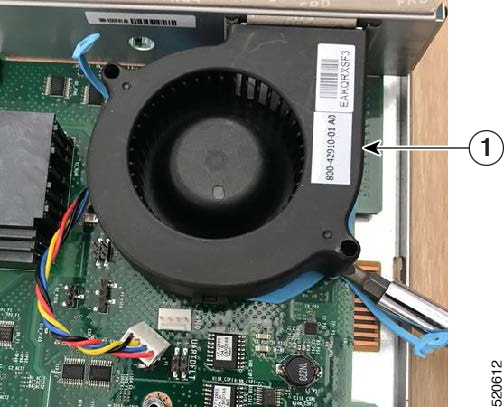
|
|
|
Figure 5-58 Cisco 4321 ISR Vibration Isolator

|
|
|
Remove and Install a CompactFlash Memory Card or eMMC Flash Card
This section describes installing and replacing CompactFlash (CF) or eMMC memory cards in the router. It contains the following sections:
- Prevent Electrostatic Discharge Damage
- Remove the CompactFlash or eMMC Memory Card
- Install the CompactFlash or eMMC Memory Card

Note![]() You must turn off the power supply to the router to replace a CompactFlash Memory card. A CompactFlash memory card must be inserted in order to run a Cisco IOS XE software image
You must turn off the power supply to the router to replace a CompactFlash Memory card. A CompactFlash memory card must be inserted in order to run a Cisco IOS XE software image

Note![]() Depending on the model that you have purchased, the routers use a CompactFlash, or an eUSB flash for the internal bootflash memory. Cisco 4431 ISRs have a eMMC flash device. The device supports 8GB, 16GB, or 32 GB. The latest model of Cisco 4451x ISRs support both eUSB and CompactFlash. If a CompactFlash is installed, it will disable the eUSB. However, you can use the old CompactFlash that is available with the routers.
Depending on the model that you have purchased, the routers use a CompactFlash, or an eUSB flash for the internal bootflash memory. Cisco 4431 ISRs have a eMMC flash device. The device supports 8GB, 16GB, or 32 GB. The latest model of Cisco 4451x ISRs support both eUSB and CompactFlash. If a CompactFlash is installed, it will disable the eUSB. However, you can use the old CompactFlash that is available with the routers.
Prevent Electrostatic Discharge Damage
CF memory cards are sensitive to electrostatic discharge (ESD) damage, which can occur when electronic cards or components are handled improperly. ESD results in complete or intermittent failures.
To prevent ESD damage, follow these guidelines:
- Always use an ESD wrist or ankle strap and ensure that it makes good skin contact.
- Connect the equipment end of the strap to an unfinished chassis surface.
- Place CF memory cards on an antistatic surface or in a static shielding bag. If the card is to be returned to the factory, immediately place it in a static shielding bag.
- Avoid contact between the card and clothing. The wrist strap protects the card from ESD voltages on only the body; ESD voltages on clothing can still cause damage.
- Do not remove the wrist strap until the installation is complete.

Remove the CompactFlash or eMMC Memory Card

Step 1![]() Read the “Safety Warnings” section section and disconnect the power supply before you replace any module.
Read the “Safety Warnings” section section and disconnect the power supply before you replace any module.
Step 3![]() Remove the fan tray. For instructions on removing the fan tray, see “Replace Fan Tray” section.
Remove the fan tray. For instructions on removing the fan tray, see “Replace Fan Tray” section.
Step 4![]() Remove the CF or eMMC cover by placing a flat-blade screwdriver in the slot and pushing sideways against the tensioner to release the cover door.
Remove the CF or eMMC cover by placing a flat-blade screwdriver in the slot and pushing sideways against the tensioner to release the cover door.
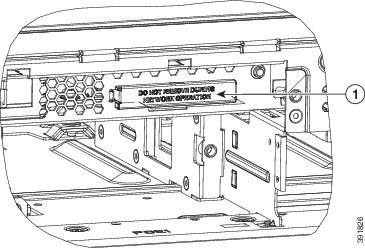
|
|
Step 5![]() Press the ejector button next to the CompactFlash or eMMc memory card. The ejector button moves outward so that it projects from the panel.
Press the ejector button next to the CompactFlash or eMMc memory card. The ejector button moves outward so that it projects from the panel.
Step 6![]() Press the ejector button again. This ejects the CompactFlash or eMMC memory card partially out of its slot.
Press the ejector button again. This ejects the CompactFlash or eMMC memory card partially out of its slot.
Step 7![]() Pull the CF or eMMC memory card out of its slot.
Pull the CF or eMMC memory card out of its slot.
Step 8![]() Push the ejector button in until the button is flush with the bezel.
Push the ejector button in until the button is flush with the bezel.

Step 9![]() Replace the fan tray and then the bezel.
Replace the fan tray and then the bezel.
Install the CompactFlash or eMMC Memory Card
The CompactFlash memory upgrade is supported only on Cisco 4451 ISR. The Cisco 4431 ISR, Cisco 4461 ISR, and Cisco 4300 Series ISRs support the eUSB flash memory upgrade. Also, Cisco 4431 ISR, Cisco 4461 ISR, and Cisco 4300 Series ISRs do not have a CompactFlash memory slot on the chassis. After installing the eUSB flash memory upgrade, the software does not detect the on-board eMMC flash memory card.

Note![]() The Cisco 4200 does not support CopactFlash memory upgrade and it uses the default 8GB eMMC memory card.
The Cisco 4200 does not support CopactFlash memory upgrade and it uses the default 8GB eMMC memory card.
Step 1![]() Read the “Safety Warnings” section and disconnect the power supply before you replace any module.
Read the “Safety Warnings” section and disconnect the power supply before you replace any module.
Step 2![]() Remove the fan tray. For instructions on removing the fan tray, see “Replace Fan Tray” section.
Remove the fan tray. For instructions on removing the fan tray, see “Replace Fan Tray” section.
Step 3![]() Make sure that the ejector button is fully seated until it is flush with the bezel.
Make sure that the ejector button is fully seated until it is flush with the bezel.

Note![]() If the ejector button is projecting out from the panel, push it in until it is flush with the bezel.
If the ejector button is projecting out from the panel, push it in until it is flush with the bezel.
Step 4![]() Insert the CompactFlash memory card into the slot until it is fully seated. The ejector button remains flush with the panel.
Insert the CompactFlash memory card into the slot until it is fully seated. The ejector button remains flush with the panel.

Note![]() If the ejector button is projecting from the panel after you insert the CompactFlash memory card, remove the CompactFlash memory card, press the ejector button until it clicks, and reinsert the CompactFlash memory card.
If the ejector button is projecting from the panel after you insert the CompactFlash memory card, remove the CompactFlash memory card, press the ejector button until it clicks, and reinsert the CompactFlash memory card.

Step 5![]() Replace the CompactFlash cover by inserting the cover lip into the chassis and pushing the cover to snap it back into place.
Replace the CompactFlash cover by inserting the cover lip into the chassis and pushing the cover to snap it back into place.
Remove and Install the Flash Memory Card
This section describes installing and replacing flash memory cards in the router. It contains the following sections:
Prevent Electrostatic Discharge Damage
Flash memory cards are sensitive to electrostatic discharge (ESD) damage, which can occur when electronic cards or components are handled improperly. ESD results in complete or intermittent failures.
To prevent ESD damage, follow these guidelines:
- Always use an ESD wrist or ankle strap, and ensure that it makes good skin contact.
- Connect the equipment end of the strap to an unfinished chassis surface.
- Place flash memory cards on an antistatic surface or in a static shielding bag. If the card is to be returned to the factory, immediately place it in a static shielding bag.
- Avoid contact between the card and clothing. The wrist strap protects the card from ESD voltages on only the body; ESD voltages on clothing can still cause damage.
- Do not remove the wrist strap until the installation is complete.

Install the Flash Memory Card
Step 1![]() Read the “Safety Warnings” section and disconnect the power supply before you replace any module.
Read the “Safety Warnings” section and disconnect the power supply before you replace any module.
Step 2![]() Remove the chassis cover. For instructions on removing the chassis cover, see “Remove and Replace Chassis Cover” section.
Remove the chassis cover. For instructions on removing the chassis cover, see “Remove and Replace Chassis Cover” section.
Step 3![]() Place the flash memory card on top of the flash memory card connector (see Figure 5-59).
Place the flash memory card on top of the flash memory card connector (see Figure 5-59).
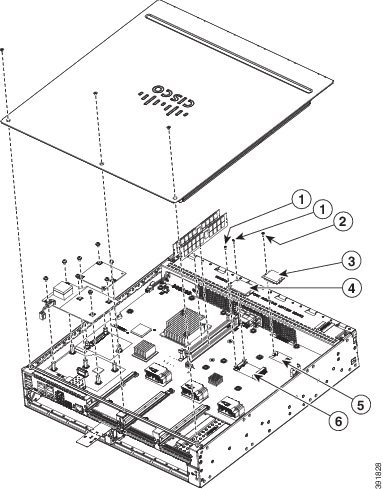
|
|
|
||
|
|
|
||
|
|
|
Step 4![]() Tighten the supplied screw (see Figure 5-59) to secure the flash memory card in place.
Tighten the supplied screw (see Figure 5-59) to secure the flash memory card in place.
Step 5![]() Replace the chassis cover. See “Remove and Replace Chassis Cover” section.
Replace the chassis cover. See “Remove and Replace Chassis Cover” section.
Remove the Flash Memory Card
Step 1![]() Read the “Safety Warnings” section, and disconnect the power supply before you replace any module.
Read the “Safety Warnings” section, and disconnect the power supply before you replace any module.
Step 2![]() Remove the chassis cover. For instructions on removing the chassis cover, see “Remove and Replace Chassis Cover” section.
Remove the chassis cover. For instructions on removing the chassis cover, see “Remove and Replace Chassis Cover” section.
Step 3![]() Unscrew the flash memory card, see Figure 5-59.
Unscrew the flash memory card, see Figure 5-59.
Step 4![]() Install a new flash memory card if needed. See Install the Flash Memory Card.
Install a new flash memory card if needed. See Install the Flash Memory Card.
Step 5![]() Replace the chassis cover. See “Remove and Replace Chassis Cover” section.
Replace the chassis cover. See “Remove and Replace Chassis Cover” section.
Install and Remove an SSD mSATA Storage Device
This section describes installing and replacing an SSD mSATA storage device in Cisco 4300 ISR routers.
- Prevent Electrostatic Discharge Damage
- Install the SSD mSATA Storage Device
- Remove the SSD mSATA Storage Device
Prevent Electrostatic Discharge Damage
The SSD mSATA storage devices are sensitive to electrostatic discharge (ESD) damage, which can occur when electronic cards or components are handled improperly. ESD results in complete or intermittent failures.
To prevent ESD damage, follow these guidelines:
- Always use an ESD wrist or ankle strap and ensure that it makes good skin contact.
- Connect the equipment end of the strap to an unfinished chassis surface.
- Place the SSD mSATA storage devices on an antistatic surface or in a static shielding bag. If the device is to be returned to the factory, immediately place it in a static shielding bag.
- Avoid contact between the device and clothing. The wrist strap protects the device from ESD voltages on only the body; ESD voltages on clothing can still cause damage.
- Do not remove the wrist strap until the installation is complete.

Install the SSD mSATA Storage Device
To install a SSD mSATA storage device:
Step 1![]() Read the “Safety Warnings” section and disconnect the power supply before you replace any module.
Read the “Safety Warnings” section and disconnect the power supply before you replace any module.
Step 2![]() Remove the chassis cover. For instructions on removing the chassis cover, see “Remove and Replace Chassis Cover” section.
Remove the chassis cover. For instructions on removing the chassis cover, see “Remove and Replace Chassis Cover” section.
Step 3![]() Place the SSD mSATA storage device on the SSD mSATA connector and align the device’s contact edge with the corresponding socket in the connector.
Place the SSD mSATA storage device on the SSD mSATA connector and align the device’s contact edge with the corresponding socket in the connector.
Step 4![]() Press the device downward into the connector until it is level with the surface of the connector.
Press the device downward into the connector until it is level with the surface of the connector.
Step 5![]() While holding the device down, screw the device into place (see Figure 5-60).
While holding the device down, screw the device into place (see Figure 5-60).
Figure 5-60 Flash Memory Card and SSD mSATA Storage Device Locations

|
|
|
||
|
|
|
||
|
|
|
Step 6![]() Replace the chassis cover. See “Remove and Replace Chassis Cover” section.
Replace the chassis cover. See “Remove and Replace Chassis Cover” section.
Remove the SSD mSATA Storage Device
Step 1![]() Read the “Safety Warnings” section, and disconnect the power supply before you replace any module.
Read the “Safety Warnings” section, and disconnect the power supply before you replace any module.
Step 2![]() Remove the chassis cover. For instructions on removing the chassis cover, see “Remove and Replace Chassis Cover” section.
Remove the chassis cover. For instructions on removing the chassis cover, see “Remove and Replace Chassis Cover” section.
Step 3![]() Unscrew the screws that attach the SSD mSATA storage device to the chassis. See Figure 5-59.
Unscrew the screws that attach the SSD mSATA storage device to the chassis. See Figure 5-59.
Step 4![]() The card should popup after the screws are removed.
The card should popup after the screws are removed.
Step 5![]() Install a new SSD mSATA memory device if needed. See Install the SSD mSATA Storage Device.
Install a new SSD mSATA memory device if needed. See Install the SSD mSATA Storage Device.
Step 6![]() Replace the chassis cover. See “Remove and Replace Chassis Cover” section.
Replace the chassis cover. See “Remove and Replace Chassis Cover” section.
Install and Remove SFP Modules
This section describes how to install optional small-form-factor pluggable (SFP) modules in the router to provide optical Gigabit Ethernet connectivity.
The SFP module installs into a slot on the router rear panel. When selected in Cisco IOS software, it is assigned port gigabitethernet 0/0/0. The default is the built-in RJ-45 1000Base-T connector, which is enabled on this port.
Only SFP modules certified by Cisco are supported on the routers. Table 5-4 lists SFPs supported on the router.
See Cisco Transceiver Modules Compatibility Information for compatibility issues.
|
|
|
(micrometer) |
(nm) |
|
Distance |
|---|---|---|---|---|---|

Tip![]() Use the show controller command at the Cisco IOS prompt to determine whether you are using an SFP certified by Cisco.
Use the show controller command at the Cisco IOS prompt to determine whether you are using an SFP certified by Cisco.
Install SFPs
Laser Safety Guidelines
Optical SFPs use a small laser to generate the fiber-optic signal. Keep the optical transmit and receive ports covered whenever a cable is not connected to the port.

Warning![]() Ultimate disposal of this product should be handled according to all national laws and regulations. Statement 1040
Ultimate disposal of this product should be handled according to all national laws and regulations. Statement 1040
To install an SFP module in your router:
Step 1![]() Read the “Safety Warnings” section section, and disconnect the power supply before you replace any module.
Read the “Safety Warnings” section section, and disconnect the power supply before you replace any module.
Step 2![]() Slide the SFP into the router connector until it locks into position (see Figure 5-61).
Slide the SFP into the router connector until it locks into position (see Figure 5-61).

Tip![]() If the SFP uses a bale-clasp latch (see Figure 5-61), the handle should be on top of the SFP module.
If the SFP uses a bale-clasp latch (see Figure 5-61), the handle should be on top of the SFP module.
Figure 5-61 Install an SFP Module
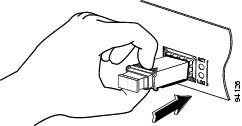

Step 3![]() Connect the network cable to the SFP module.
Connect the network cable to the SFP module.
Remove SFP Modules:
Step 1![]() Read the “Safety Warnings” section section, and disconnect the power supply before you replace any module.
Read the “Safety Warnings” section section, and disconnect the power supply before you replace any module.
Step 2![]() Disconnect all cables from the SFP.
Disconnect all cables from the SFP.

Step 3![]() Disconnect the SFP latch. See Figure 5-62.
Disconnect the SFP latch. See Figure 5-62.

Note![]() SFP modules use various latch designs to secure the module in the SFP port. Latch designs are not linked to SFP model or technology type. For information on the SFP technology type and model, see the label on the side of the SFP.
SFP modules use various latch designs to secure the module in the SFP port. Latch designs are not linked to SFP model or technology type. For information on the SFP technology type and model, see the label on the side of the SFP.
Figure 5-62 Disconnect SFP Latch Mechanisms
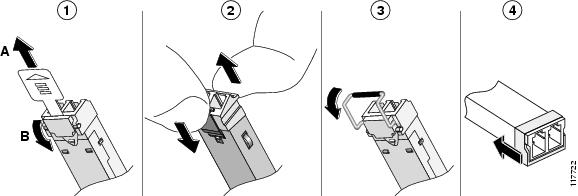
|
|
|
||
|
|
|

Tip![]() Use a pen, screwdriver, or other small straight tool to gently release a bale-clasp handle if you cannot reach it with your fingers.
Use a pen, screwdriver, or other small straight tool to gently release a bale-clasp handle if you cannot reach it with your fingers.
Step 4![]() Grasp the SFP on both sides and remove it from the router.
Grasp the SFP on both sides and remove it from the router.
Remove, Replace, and Install the Internal PoE Daughter Card
Step 1![]() Read the “Safety Warnings” section and disconnect the power supply before you replace any module.
Read the “Safety Warnings” section and disconnect the power supply before you replace any module.
Step 2![]() Remove the five screws.
Remove the five screws.
Step 3![]() Remove the power cable to motherboard.
Remove the power cable to motherboard.
Step 4![]() Access the PoE card slot. See the “Remove and Replace Chassis Cover” section.
Access the PoE card slot. See the “Remove and Replace Chassis Cover” section.
Step 5![]() Locate the card to be removed or replaced. See Figure 5-63 for the location of the PoE card on the motherboard.
Locate the card to be removed or replaced. See Figure 5-63 for the location of the PoE card on the motherboard.
Figure 5-63 Location of the PoE Daughter Card (Shown: Cisco 4451-X ISR)
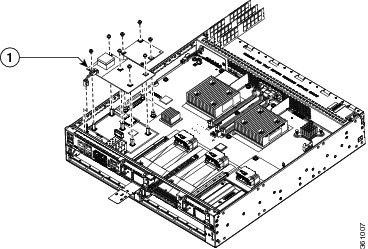
|
|
|||
Step 6![]() Pull the PoE daughter card out of the connector on the motherboard.
Pull the PoE daughter card out of the connector on the motherboard.
If you are replacing the card, insert the new PoE daughter card into the slot. Tighten the screws, and connect the power cable to the motherboard.
Step 7![]() Place the removed card in an antistatic bag to protect it from ESD damage.
Place the removed card in an antistatic bag to protect it from ESD damage.
 Feedback