-
- Managing Configuration Files
- Configuration Generation Performance Enhancement
- Exclusive Configuration Change Access (Configuration Lock) and Access Session Locking
- Configuration Replace and Configuration Rollback
- Contextual Configuration Diff Utility
- Configuration Change Notification and Logging
- Configuration Logger Persistency
- Configuration Partitioning
- Finding Feature Information
- Contents
- Restrictions for Configuring SNMP Support
- Information About Configuring SNMP Support
- How to Configure SNMP Support
- Configuring System Information
- Configuring SNMP Versions 1 and 2
- Configuring SNMP Version 3
- Configuring a Router as an SNMP Manager
- Enabling the SNMP Agent Shutdown Mechanism
- Defining the Maximum SNMP Agent Packet Size
- Limiting the Number of TFTP Servers Used via SNMP
- Disabling the SNMP Agent
- Configuring SNMP Notifications
- Configuring Interface Index Display and Interface Indexes and Long Name Support
- Configuring SNMP Support for VPNs
- Configuring Interface IfIndex Persistence
- Configuring MIB Persistence
- Configuring Event MIB Using SNMP
- Configuring Event MIB Using CLI
- Configuring Expression MIB Using SNMP
- Configuring Expression MIB using CLI
- Example: Configuring SNMPv1, SNMPv2c, and SNMPv3
- Example: Configuring IfAlias Long Name Support
- Example: Configuring IfIndex Persistence
- Example: Configuring SNMP Support for VPNs
- Example: Enabling Event MIB Persistence
- Example: Enabling Expression MIB Persistence
- Example: Configuring Event MIB
- Example: Configuring Expression MIB
Configuring SNMP Support
Simple Network Management Protocol (SNMP) is an application-layer protocol that provides a message format for communication between SNMP managers and agents. SNMP provides a standardized framework and a common language that is used for monitoring and managing devices in a network.
This document discusses how to enable an SNMP agent on a Cisco device and how to control the sending of SNMP notifications from the agent. For information about using SNMP management systems, see the appropriate documentation for your network management system (NMS) application.
For a complete description of the router monitoring commands mentioned in this document, see the Cisco IOS Network Management Command Reference. To locate documentation of other commands that appear in this document, use the Cisco IOS Command Reference Master Index or search online.
Finding Feature Information
Your software release may not support all the features documented in this module. For the latest feature information and caveats, see the release notes for your platform and software release. To find information about the features documented in this module, and to see a list of the releases in which each feature is supported, see the "Feature Information for Configuring SNMP Support" section.
Use Cisco Feature Navigator to find information about platform support and Cisco software image support. To access Cisco Feature Navigator, go to http://www.cisco.com/go/cfn. An account on Cisco.com is not required.
Contents
•![]() Restrictions for Configuring SNMP Support
Restrictions for Configuring SNMP Support
•![]() Information About Configuring SNMP Support
Information About Configuring SNMP Support
•![]() How to Configure SNMP Support
How to Configure SNMP Support
•![]() Configuration Examples for SNMP Support
Configuration Examples for SNMP Support
•![]() Feature Information for Configuring SNMP Support
Feature Information for Configuring SNMP Support
Restrictions for Configuring SNMP Support
Not all Cisco platforms are supported on the features described in this module. Use Cisco Feature Navigator to find information about platform support and Cisco IOS software image support.
Information About Configuring SNMP Support
•![]() Detailed Interface Registration Information
Detailed Interface Registration Information
•![]() Interface IfIndex Persistence
Interface IfIndex Persistence
•![]() Circuit Interface Identification Persistence
Circuit Interface Identification Persistence
Components of SNMP
SNMP is an application-layer protocol that provides a message format for communication between SNMP managers and agents. SNMP provides a standardized framework and a common language used for monitoring and managing devices in a network.
The SNMP framework is made up of three parts:
•![]() SNMP manager
SNMP manager
•![]() SNMP agent
SNMP agent
•![]() MIB
MIB
SNMP Manager
The SNMP manager is a system that controls and monitors the activities of network hosts using SNMP. The most common managing system is an NMS. The term NMS can be applied either to a dedicated device used for network management or to the applications used on such a device. Several network management applications are available for use with SNMP and range from simple command-line applications to applications that use GUIs, such as the CiscoWorks2000 products.
SNMP Agent
The SNMP agent is the software component within a managed device that maintains the data for the device and reports this data, as needed, to managing systems. The agent resides on the routing device (router, access server, or switch). To enable an SNMP agent on a Cisco routing device, you must define the relationship between the manager and the agent.

Note ![]() Although it is possible to configure a Cisco router to be an SNMP agent, this practice is not recommended. Commands that an agent needs to control the SNMP process are available through the Cisco IOS command-line interface (CLI) without additional configuration.
Although it is possible to configure a Cisco router to be an SNMP agent, this practice is not recommended. Commands that an agent needs to control the SNMP process are available through the Cisco IOS command-line interface (CLI) without additional configuration.
MIB
A MIB is a virtual information storage area for network management information and consists of collections of managed objects. Within a MIB are collections of related objects defined in MIB modules. MIB modules are written in the SNMP MIB module language, as defined in STD 58, RFC 2578, RFC 2579, and RFC 2580 (see the "MIBs and RFCs" section for an explanation of RFC and STD documents). Individual MIB modules are also referred to as MIBs; for example, the Interfaces Group MIB (IF-MIB) is a MIB module within the MIB on your system.
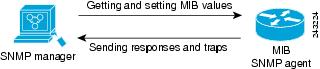
An SNMP agent contains MIB variables whose values the SNMP manager can request or change through Get or Set operations. A manager can get a value from an agent or store a value in that agent. The agent gathers data from the MIB, the repository for information about device parameters and network data. The agent can also respond to manager requests to get or set data.
Figure 1 illustrates the communications between the SNMP manager and agent. A manager sends an agent requests to get and set MIB values. The agent responds to these requests. Independent of this interaction, the agent can send the manager unsolicited notifications (traps or informs) to notify the manager about network conditions.
Figure 1 Communication Between an SNMP Agent and Manager
SNMP Operations
SNMP applications perform the following operations to retrieve data, modify SNMP object variables, and send notifications:
•![]() Get
Get
•![]() Set
Set
•![]() Send notifications
Send notifications
SNMP Get
The SNMP get operation is performed by an NMS to retrieve SNMP object variables. There are three types of get operations:
•![]() get—Retrieves the exact object instance from the SNMP agent.
get—Retrieves the exact object instance from the SNMP agent.
•![]() getNext—Retrieves the next object variable, which is a lexicographical successor to the specified variable.
getNext—Retrieves the next object variable, which is a lexicographical successor to the specified variable.
•![]() getBulk—Retrieves a large amount of object variable data, without the need for repeated getNext operations.
getBulk—Retrieves a large amount of object variable data, without the need for repeated getNext operations.
SNMP Set
The SNMP set operation is performed by an NMS to modify the value of an object variable.
SNMP Notifications
A key feature of SNMP is its capability to generate unsolicited notifications from an SNMP agent.
Traps and Informs
Unsolicited (asynchronous) notifications can be generated as traps or inform requests (informs). Traps are messages alerting the SNMP manager to a condition on the network. Informs are traps that include a request for confirmation of receipt from the SNMP manager. Notifications can indicate improper user authentication, restarts, the closing of a connection, loss of connection to a neighbor router, or other significant events.
Traps are less reliable than informs because the receiver does not send an acknowledgment when it receives a trap. The sender does not know if the trap was received. An SNMP manager that receives an inform acknowledges the message with an SNMP response protocol data unit (PDU). If the sender never receives a response, the inform can be sent again. Thus, informs are more likely to reach their intended destination.
Traps are often preferred even though they are less reliable because informs consume more resources in the router and in the network. Unlike a trap, which is discarded as soon as it is sent, an inform must be held in memory until a response is received or the request times out. Also, traps are sent only once, whereas an inform may be resent several times. The retries increase traffic and contribute to higher overhead on the network. Use of traps and informs requires a trade-off between reliability and resources. If it is important that the SNMP manager receives every notification, use informs, but if traffic volume or memory usage are concerns and receipt of every notification is not required, use traps.
Figure 2 through Figure 5 illustrate the differences between traps and informs.
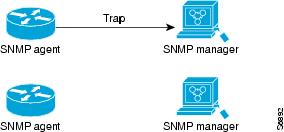
Figure 2 shows that an agent successfully sends a trap to an SNMP manager. Although the manager receives the trap, it does not send an acknowledgment. The agent has no way of knowing that the trap reached its destination.
Figure 2 Trap Successfully Sent to SNMP Manager
In Figure 3, the agent successfully sends an inform to the manager. When the manager receives the inform, a response is sent to the agent and the agent knows that the inform reached its destination. Notice that in this example the traffic generated is twice as much as in the interaction shown in Figure 2.
Figure 3 Inform Request Successfully Sent to SNMP Manager
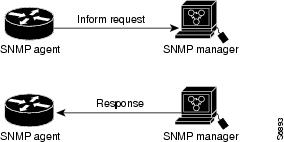
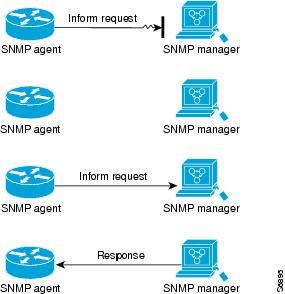
Figure 4 shows an agent sending a trap to a manager that the manager does not receive. The agent has no way of knowing that the trap did not reach its destination. The manager never receives the trap because traps are not resent.
Figure 4 Trap Unsuccessfully Sent to SNMP Manager
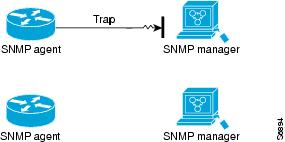
Figure 5 shows an agent sending an inform to a manager that does not reach the manager. Because the manager did not receive the inform, it does not send a response. After a period of time, the agent resends the inform. The manager receives the inform from the second transmission and replies. In this example, more traffic is generated than in the scenario shown in Figure 4 but the notification reaches the SNMP manager.
Figure 5 Inform Unsuccessfully Sent to SNMP Manager
MIBs and RFCs
MIB modules typically are defined in RFC documents submitted to the Internet Engineering Task Force (IETF), an international standards body. RFCs are written by individuals or groups for consideration by the Internet Society and the Internet community as a whole, usually with the intention of establishing a recommended Internet standard. Before being given RFC status, recommendations are published as Internet Draft (I-D) documents. RFCs that have become recommended standards are also labeled as standards (STD) documents. You can learn about the standards process and the activities of the IETF at the Internet Society website at http://www.isoc.org. You can read the full text of all RFCs, I-Ds, and STDs referenced in Cisco documentation at the IETF website at http://www.ietf.org.
The Cisco implementation of SNMP uses the definitions of MIB II variables described in RFC 1213 and definitions of SNMP traps described in RFC 1215.
Cisco provides its own private MIB extensions with every system. Cisco enterprise MIBs comply with the guidelines described in the relevant RFCs unless otherwise noted in the documentation. You can find the MIB module definition files and list of MIBs supported on each Cisco platform on the Cisco MIB website on Cisco.com.
Versions of SNMP
Cisco IOS software supports the following versions of SNMP:
•![]() SNMPv1—Simple Network Management Protocol: a full Internet standard, defined in RFC 1157. (RFC 1157 replaces the earlier versions that were published as RFC 1067 and RFC 1098.) Security is based on community strings.
SNMPv1—Simple Network Management Protocol: a full Internet standard, defined in RFC 1157. (RFC 1157 replaces the earlier versions that were published as RFC 1067 and RFC 1098.) Security is based on community strings.
•![]() SNMPv2c—The community string-based Administrative Framework for SNMPv2. SNMPv2c (the "c" is for "community") is an experimental Internet protocol defined in RFC 1901, RFC 1905, and RFC 1906. SNMPv2c is an update of the protocol operations and data types of SNMPv2p (SNMPv2 Classic) and uses the community-based security model of SNMPv1.
SNMPv2c—The community string-based Administrative Framework for SNMPv2. SNMPv2c (the "c" is for "community") is an experimental Internet protocol defined in RFC 1901, RFC 1905, and RFC 1906. SNMPv2c is an update of the protocol operations and data types of SNMPv2p (SNMPv2 Classic) and uses the community-based security model of SNMPv1.
•![]() SNMPv3—Version 3 of SNMP. SNMPv3 is an interoperable standards-based protocol defined in RFCs 3413 to 3415. SNMPv3 provides secure access to devices by authenticating and encrypting packets over the network.
SNMPv3—Version 3 of SNMP. SNMPv3 is an interoperable standards-based protocol defined in RFCs 3413 to 3415. SNMPv3 provides secure access to devices by authenticating and encrypting packets over the network.
The security features provided in SNMPv3 are as follows:
–![]() Message integrity—Ensuring that a packet has not been tampered with in transit.
Message integrity—Ensuring that a packet has not been tampered with in transit.
–![]() Authentication—Determining that the message is from a valid source.
Authentication—Determining that the message is from a valid source.
–![]() Encryption—Scrambling the contents of a packet to prevent it from being learned by an unauthorized source.
Encryption—Scrambling the contents of a packet to prevent it from being learned by an unauthorized source.
Both SNMPv1 and SNMPv2c use a community-based form of security. The community of SNMP managers able to access the agent MIB is defined by an IP address access control list (ACL) and password.
SNMPv2c support includes a bulk retrieval mechanism and detailed error message reporting to management stations. The bulk retrieval mechanism supports the retrieval of tables and large quantities of information, minimizing the number of round trips required. The SNMPv2c improved error handling support includes expanded error codes that distinguish different types of errors; these conditions are reported through a single error code in SNMPv1. The following three types of exceptions are also reported: no such object, no such instance, and end of MIB view.
SNMPv3 is a security model in which an authentication strategy is set up for a user and the group in which the user resides. A security level is the permitted level of security within a security model. A combination of a security model and a security level determines which security mechanism is employed when handling an SNMP packet.
Three security models are available: SNMPv1, SNMPv2c, and SNMPv3. Table 1 lists the combinations of security models and levels and their meanings.
Note ![]() SNMPv2p (SNMPv2 Classic) is not supported in Cisco IOS Release 11.2 and later releases.
SNMPv2p (SNMPv2 Classic) is not supported in Cisco IOS Release 11.2 and later releases.
SNMPv2c replaces the Party-based Administrative and Security Framework of SNMPv2p with a Community-based Administrative Framework. SNMPv2c retained the bulk retrieval and error handling capabilities of SNMPv2p.
You must configure an SNMP agent to use the version of SNMP supported by the management station. An agent can communicate with multiple managers, however, and you can configure Cisco IOS software to support communications with one management station using the SNMPv1 protocol, one using the SNMPv2c protocol, and another using SMNPv3.
SNMPv3 supports RFCs 1901 to 1908, 2104, 2206, 2213, 2214, and 2271 to 2275. For additional information about SNMPv3, see RFC 2570, Introduction to Version 3 of the Internet-standard Network Management Framework (this is not a standards document).
Detailed Interface Registration Information
The Interface Index Display for SNMP feature introduces new commands and command modifications that allow advanced users of SNMP to view information about the interface registrations directly on the managed agent. You can display MIB information from the agent without using an external NMS.
Note ![]() For the purposes of this document, the agent is a routing device running Cisco IOS software.
For the purposes of this document, the agent is a routing device running Cisco IOS software.
This feature addresses three objects in the Interfaces MIB: ifIndex, ifAlias, and ifName. For a complete definition of these objects, see the IF-MIB.my file available from the Cisco SNMPv2 MIB website at ftp://ftp.cisco.com/pub/mibs/v2/.
Interface Index
The ifIndex object (ifEntry 1) is called the Interface Index. The Interface Index is a unique value greater than zero that identifies each interface or subinterface on the managed device. This value becomes the interface index identification number.
The CLI command show snmp mib ifmib ifindex allows you to view the SNMP Interface Index Identification numbers assigned to interfaces and subinterfaces. An NMS is not required.
Interface Alias
The ifAlias object (ifXEntry 18) is called the Interface Alias. The Interface Alias is a user-specified description of an interface used for SNMP network management. The ifAlias is an object in the Interfaces Group MIB (IF-MIB) that can be set by a network manager to "name" an interface. The ifAlias value for an interface or subinterface can be set using the description command in interface configuration mode or subinterface configuration mode or by using a Set operation from an NMS. Previously, ifAlias descriptions for subinterfaces were limited to 64 characters. (The OLD-CISCO-INTERFACES-MIB allows up to 255 characters for the locIfDescr MIB variable, but this MIB does not support subinterfaces.) A new CLI command, snmp ifmib ifalias long, configures the system to handle IfAlias descriptions of up to 256 characters. IfAlias descriptions appear in the output of the CLI show interfaces command.
Interface Name
The ifName object (ifXEntry 1) is the textual name of the interface. The purpose of the ifName object is to cross reference the CLI representation of a given interface. The value of this object is the name of the interface as assigned by the local device and is suitable for use in CLI commands. If there is no local name or this object is otherwise not applicable, this object contains a zero-length string. No commands introduced by this feature affect the ifName object, but it is discussed here to show its relation to the ifIndex and ifAlias objects.
The show snmp mib command shows all objects in the MIB on a Cisco device (similar to a mibwalk). The objects in the MIB tree are sorted using lexical ordering, meaning that object identifiers are sorted in sequential, numerical order. Lexical ordering is important when using the GetNext operation from an NMS because these operations take an object identifier (OID) or a partial OID as input and return the next object from the MIB tree based on the lexical ordering of the tree.
SNMP Support for VPNs
The SNMP Support for VPNs feature allows SNMP traps and informs to be sent and received using virtual private network (VPN) routing/forwarding (VRF) tables. In particular, this feature adds support to Cisco IOS software for the sending and receiving of SNMP traps and informs specific to individual VPNs.
A VPN is a network that provides high connectivity transfers on a shared system with the same usage guidelines as a private network. A VPN can be built on the Internet over IP, Frame Relay, or ATM networks.
A VRF stores per-VPN routing data. It defines the VPN membership of a customer site attached to the network access server (NAS). A VRF consists of an IP routing table, a derived Cisco Express Forwarding table, and guidelines and routing protocol parameters that control the information that is included in the routing table.
The SNMP Support for VPNs feature provides configuration commands that allow users to associate SNMP agents and managers with specific VRFs. The specified VRF is used for sending SNMP traps and informs and responses between agents and managers. If a VRF is not specified, the default routing table for the VPN is used.
Support for VPNs allows you to configure an SNMP agent to accept only SNMP requests from a certain set of VPNs. With this configuration, service providers can provide network management services to their customers, so customers can manage all user VPN devices.
Interface IfIndex Persistence
Interface Index (IfIndex) is one of the most commonly used identifiers SNMP-based network management applications. IfIndex is a unique identifying number associated with a physical or logical interface; as far as most software is concerned, the ifIndex is the name of the interface.
Although there is no requirement in the relevant RFCs that the correspondence between particular ifIndex values and their interfaces be maintained across reboots, applications such as device inventory, billing, and fault detection increasingly depend on the maintenance of this correspondence.
This feature adds support for an ifIndex value that can persist across reboots, allowing users to avoid the workarounds previously required for consistent interface identification.
It is currently possible to poll the router at regular intervals to correlate the interfaces to the ifIndex, but it is not practical to poll this interface constantly. If this data is not correlated constantly, however, the data may be made invalid because of a reboot or the insertion of a new card into the router in between polls. Therefore, ifIndex persistence is the only way to guarantee data integrity.
IfIndex persistence means that the mapping between the ifDescr object values and the ifIndex object values (generated from the IF-MIB) will be retained across reboots.
Benefits of Interface Index Persistence
Association of Interfaces with Traffic Targets for Network Management
The Interface Index Persistence feature allows for greater accuracy when collecting and processing network management data by uniquely identifying input and output interfaces for traffic flows and SNMP statistics. Relating each interface to a known entity (such as an ISP customer) allows network management data to be more effectively utilized.
Accuracy for Mediation, Fault Detection, and Billing
Network data is increasingly being used worldwide for usage-based billing, network planning, policy enforcement, and trend analysis. The ifIndex information is used to identify input and output interfaces for traffic flows and SNMP statistics. Inability to reliably relate each interface to a known entity, such as a customer, invalidates the data.
MIB Persistence
The MIB Persistence features allow the SNMP data of a MIB to be persistent across reloads; that is, MIB information retains the same set object values each time a networking device reboots. MIB Persistence is enabled by issuing the snmp mib persist command, and the MIB data of all MIBs that have had persistence enabled using this command is then written to NVRAM by issuing the write mib-data command. All modified MIB data must be written to NVRAM using the write mib-data command.
Both Event and Expression MIBs allow you to configure a value for an object and to set up object definitions. Both also allow rows of data to be modified while the row is in an active state.
Scalar objects are stored every time they are changed, and table entries are stored only if the row is in an active state. The Event MIB has two scalar objects and nine tables to be persisted into NVRAM. Following are the tables:
•![]() mteEventNotificationTable
mteEventNotificationTable
•![]() mteEventSetTable
mteEventSetTable
•![]() mteEventTable
mteEventTable
•![]() mteObjectsTable
mteObjectsTable
•![]() mteTriggerBooleanTable
mteTriggerBooleanTable
•![]() mteTriggerDeltaTable
mteTriggerDeltaTable
•![]() mteTriggerExistenceTable
mteTriggerExistenceTable
•![]() mteTriggerTable
mteTriggerTable
•![]() mteTriggerThresholdTable
mteTriggerThresholdTable
The Expression MIB has two scalar objects and three tables to be stored in NVRAM. The scalar objects are expResourceDeltaMinimum and expResourceDeltaWildcardInstanceMaximum. Following are the tables:
•![]() expExpressionTable
expExpressionTable
•![]() expNameTable
expNameTable
•![]() expObjectTable
expObjectTable
Writing MIB data to NVRAM may take several seconds. The length of time depends on the amount of MIB data.
Event MIB Persistence and Expression MIB Persistence both allow MIB objects to be saved from reboot to reboot, allowing long-term monitoring of specific devices and interfaces and configurations of object values that are preserved across reboots.
Circuit Interface Identification Persistence
The Circuit Interface MIB (CISCO-CIRCUIT-INTERFACE-MIB) provides a MIB object (cciDescr) that can be used to identify individual circuit-based interfaces for SNMP monitoring. The Circuit Interface Identification Persistence for SNMP feature maintains this user-defined name of the circuit across reboots, allowing the consistent identification of circuit interfaces. Circuit Interface Identification Persistence is enabled using the snmp mib persist circuit global configuration command.
Cisco IOS Release 12.2(2)T introduces the Circuit Interface Identification Persistence for SNMP feature. The Circuit Interface MIB (CISCO-CIRCUIT-INTERFACE-MIB) provides a MIB object (cciDescr) that can be used to identify individual circuit-based interfaces for SNMP monitoring. The Cisco Circuit Interface MIB was introduced in Cisco IOS Release 12.1(3)T.
The Circuit Interface Identification Persistence for SNMP feature maintains the user-defined name of the circuit (defined in the cciDescr object) across reboots, allowing for the consistent identification of circuits.
The Circuit Interface Identification Persistence for SNMP feature is a supplement to the Interface Index Persistence feature introduced in Cisco IOS Release 12.1(3)T and in Cisco IOS Release 12.0(11)S. Circuit Interface Identification Persistence is enabled with the snmp mib persist circuit global configuration command. Use this command if you need to consistently identify circuits using SNMP across reboots. This command is disabled by default because this feature uses NVRAM.
In addition, the show snmp mib ifmib ifindex EXEC mode command allows you to display the Interfaces MIB ifIndex values directly on your system without an NMS; the show snmp mib EXEC mode command allows you to display a list of the MIB module identifiers registered directly on your system with an NMS. And the snmp ifmib ifalias long command allows you to specify a description for interfaces or subinterfaces of up to 256 characters in length. Prior to the introduction of this command, ifAlias descriptions for SNMP management were limited to 64 characters.
Event MIB
The Event MIB provides the ability to monitor MIB objects on a local or remote system using SNMP and initiate simple actions whenever a trigger condition is met; for example, an SNMP trap can be generated when an object is modified. When the notifications are triggered through events, the NMS does not need to constantly poll managed devices to track changes.
By allowing the SNMP notifications to take place only when a specified condition is met, Event MIB reduces the load on affected devices and improves the scalability of network management solutions.
The Event MIB operates based on event, object lists configured for the event, event action, trigger, and trigger test.
Events
The event table defines the activities to be performed when an event is triggered. These activities include sending a notification and setting a MIB object. The event table has supplementary tables for additional objects that are configured according to event action. If the event action is set to notification, notifications are sent out whenever the object configured for that event is modified.
Object List
The object table lists objects that can be added to notifications based on trigger, trigger test type, or the event that sends a notification. The Event MIB allows wildcarding, which enables you to monitor multiple instances of an object. To specify a group of object identifiers, you can use the wildcard option.
Trigger
The trigger table defines conditions to trigger events. The trigger table lists the objects to be monitored and associates each trigger with an event. An event occurs when a trigger is activated. To create a trigger, you should configure a trigger entry in the mteTriggerTable of the Event MIB. This trigger entry specifies the object identifier of the object to be monitored. Each trigger is configured to monitor a single object or a group of objects specified by a wildcard (*). The Event MIB process checks the state of the monitored object at specified intervals.
Trigger Test
The trigger table has supplementary tables for additional objects that are configured based on the type of test performed for a trigger. For each trigger entry type such as existence, theshold, or Boolean, the corresponding tables (existence, threshold, and Boolean tables) are populated with the information required to perform the test. Event MIB allows you to set event triggers based on existence, threshold, and Boolean trigger types. When the specified test on an object returns a value of true, the trigger is activated. You can configure Event MIB to send out notifications to the interested host when a trigger is activated.
Expression MIB
The Expression MIB allows you to create expressions based on a combination of objects. The expressions are evaluated according to the sampling method. The Expression MIB supports the following types of object sampling:
•![]() Absolute
Absolute
•![]() Delta
Delta
•![]() Changed
Changed
If there are no delta or change values in an expression, the expression is evaluated when a requester attempts to read the value of expression. In this case, all requesters get a newly calculated value.
For expressions with delta or change values, evaluation is performed for every sampling. In this case, requesters get the value as of the last sample period.
Absolute Sampling
Absolute sampling uses the value of the MIB object during sampling.
Delta Sampling
Delta sampling is used for expressions with counters that are identified based on delta (difference) from one sample to the next. Delta sampling requires the application to do continuous sampling, because it uses the value of the last sample.
Changed Sampling
Changed sampling uses the changed value of the object since the last sample.
SNMP Notification Logging
Systems that support SNMP often need a mechanism for recording notification information. This mechanism protects against notifications being lost because they exceeded retransmission limits. The Notification Log MIB provides a common infrastructure for other MIBs in the form of a local logging function. The SNMP Notification Logging feature adds Cisco IOS CLI commands to change the size of the notification log, to set the global ageout value for the log, and to display logging summaries at the command line. The Notification Log MIB improves notification tracking and provides a central location for tracking all MIBs.
Note ![]() The Notification Log MIB supports notification logging on the default log only.
The Notification Log MIB supports notification logging on the default log only.
How to Configure SNMP Support
There is no specific command that you use to enable SNMP. The first snmp-server command that you enter enables the supported versions of SNMP. All other configurations are optional.
This section contains the following procedures:
•![]() Configuring System Information (optional)
Configuring System Information (optional)
•![]() Configuring SNMP Versions 1 and 2 (optional)
Configuring SNMP Versions 1 and 2 (optional)
•![]() Configuring SNMP Version 3 (optional)
Configuring SNMP Version 3 (optional)
•![]() Configuring a Router as an SNMP Manager (optional)
Configuring a Router as an SNMP Manager (optional)
•![]() Enabling the SNMP Agent Shutdown Mechanism (optional)
Enabling the SNMP Agent Shutdown Mechanism (optional)
•![]() Defining the Maximum SNMP Agent Packet Size (optional)
Defining the Maximum SNMP Agent Packet Size (optional)
•![]() Limiting the Number of TFTP Servers Used via SNMP (optional)
Limiting the Number of TFTP Servers Used via SNMP (optional)
•![]() Disabling the SNMP Agent (optional)
Disabling the SNMP Agent (optional)
•![]() Configuring SNMP Notifications (optional)
Configuring SNMP Notifications (optional)
•![]() Configuring Interface Index Display and Interface Indexes and Long Name Support (optional)
Configuring Interface Index Display and Interface Indexes and Long Name Support (optional)
•![]() Configuring SNMP Support for VPNs (optional)
Configuring SNMP Support for VPNs (optional)
•![]() Configuring Interface IfIndex Persistence (optional)
Configuring Interface IfIndex Persistence (optional)
•![]() Configuring MIB Persistence (optional)
Configuring MIB Persistence (optional)
•![]() Configuring Event MIB Using SNMP (optional)
Configuring Event MIB Using SNMP (optional)
•![]() Configuring Event MIB Using CLI (optional)
Configuring Event MIB Using CLI (optional)
•![]() Configuring Expression MIB Using SNMP (optional)
Configuring Expression MIB Using SNMP (optional)
•![]() Configuring Expression MIB using CLI (optional)
Configuring Expression MIB using CLI (optional)
Configuring System Information
You can set the system contact, location, and serial number of the SNMP agent so that these descriptions can be accessed through the configuration file. Although the configuration steps described in this section are optional, configuring the basic information is recommended because it may be useful when troubleshooting your configuration. In addition, the first snmp-server command that you issue enables SNMP on the device.
Perform this task as needed.
SUMMARY STEPS
1. ![]() enable
enable
2. ![]() configure terminal
configure terminal
3. ![]() snmp-server contact text
snmp-server contact text
4. ![]() snmp-server location text
snmp-server location text
5. ![]() snmp-server chassis-id number
snmp-server chassis-id number
6. ![]() exit
exit
7. ![]() show snmp contact
show snmp contact
8. ![]() show snmp location
show snmp location
9. ![]() show snmp chassis
show snmp chassis
DETAILED STEPS
Configuring SNMP Versions 1 and 2
When you configure SNMP versions 1 and 2, you can optionally create or modify views for community strings to limit which MIB objects an SNMP manager can access.
Perform the following tasks when configuring SNMP version 1 or version 2.
•![]() Creating or Modifying an SNMP View Record (optional)
Creating or Modifying an SNMP View Record (optional)
•![]() Creating or Modifying Access Control for an SNMP Community (required)
Creating or Modifying Access Control for an SNMP Community (required)
Prerequisites
•![]() An established SNMP community string that defines the relationship between the SNMP manager and the agent
An established SNMP community string that defines the relationship between the SNMP manager and the agent
•![]() A host defined to be the recipient of SNMP notifications
A host defined to be the recipient of SNMP notifications
Creating or Modifying an SNMP View Record
You can assign views to community strings to limit which MIB objects an SNMP manager can access. You can use a predefined view or create your own view. If you are using a predefined view or no view at all, skip this task.
Perform this task to create or modify an SNMP view record.
SUMMARY STEPS
1. ![]() enable
enable
2. ![]() configure terminal
configure terminal
3. ![]() snmp-server view view-name oid-tree {included | excluded}
snmp-server view view-name oid-tree {included | excluded}
4. ![]() no snmp-server view view-name oid-tree {included | excluded}
no snmp-server view view-name oid-tree {included | excluded}
5. ![]() exit
exit
6. ![]() show snmp view
show snmp view
Examples
The following example shows the SNMP view for the system.1.0 OID tree:
Router# show snmp view
test system.1.0 - included nonvolatile active
*ilmi system - included permanent active
*ilmi atmForumUni - included permanent active
v1default iso - included permanent active
v1default internet - included permanent active
v1default snmpUsmMIB - excluded permanent active
v1default snmpVacmMIB - excluded permanent active
v1default snmpCommunityMIB - excluded permanent active
v1default ciscoIpTapMIB - excluded permanent active
v1default ciscoMgmt.395 - excluded permanent active
v1default ciscoTap2MIB - excluded permanent active
Creating or Modifying Access Control for an SNMP Community
Use an SNMP community string to define the relationship between the SNMP manager and the agent. The community string acts like a password to regulate access to the agent on the router. Optionally, you can specify one or more of the following characteristics associated with the string:
•![]() An access list of IP addresses of the SNMP managers that are permitted to use the community string to gain access to the agent.
An access list of IP addresses of the SNMP managers that are permitted to use the community string to gain access to the agent.
•![]() A MIB view, which defines the subset of all MIB objects accessible to the given community.
A MIB view, which defines the subset of all MIB objects accessible to the given community.
•![]() Read and write or read-only permission for the MIB objects accessible to the community.
Read and write or read-only permission for the MIB objects accessible to the community.
Perform this task to create or modify a community string.
SUMMARY STEPS
1. ![]() enable
enable
2. ![]() configure terminal
configure terminal
3. ![]() snmp-server community string [view view-name] [ro | rw] [ipv6 nacl] [access-list-number]
snmp-server community string [view view-name] [ro | rw] [ipv6 nacl] [access-list-number]
4. ![]() no snmp-server community string
no snmp-server community string
5. ![]() exit
exit
6. ![]() show snmp community
show snmp community
DETAILED STEPS
Examples
The following example shows the community access strings configured to enable access to the SNMP manager:
Router# show snmp community
Community name: private
Community Index: private
Community SecurityName: private
storage-type: nonvolatile active
Community name: private@1
Community Index: private@1
Community SecurityName: private
storage-type: read-only active
Community name: public
Community Index: public
Community SecurityName: public
storage-type: nonvolatile active
Configuring a Recipient of an SNMP Trap Operation
SNMP traps are unreliable because the receiver does not send acknowledgments when it receives traps. The sender does not know if the traps were received. However, a SNMP entity that receives an inform acknowledges the message with a SNMP response protocol data unit (PDU). If the sender never receives the response, the inform can be sent again. Thus, informs are more likely to reach their intended destination.
Compared to traps, informs consume more resources in the agent and in the network. Unlike a trap, which is discarded as soon as it is sent, an inform must be held in memory until a response is received or the request times out. Also, traps are sent only once; an inform may be sent several times. The retries increase traffic and overhead on the network.
If you do not enter a snmp-server host command, no notifications are sent. To configure the router to send SNMP notifications, you must enter at least one snmp-server host command. If you enter the command without keywords, all trap types are enabled for the host.
To enable multiple hosts, you must issue a separate snmp-server host command for each host. You can specify multiple notification types in the command for each host.
When multiple snmp-server host commands are given for the same host and type of notification, each succeeding command overwrites the previous command. Only the last snmp-server host command will be in effect. For example, if you enter an snmp-server host inform command for a host and then enter another snmp-server host inform command for the same host, the second command replaces the first.
The snmp-server host command is used in conjunction with the snmp-server enable command. Use the snmp-server enable command to specify which SNMP notifications are sent globally. For a host to receive most notifications, at least one snmp-server enable command and the snmp-server host command for that host must be enabled.
Some notification types cannot be controlled with the snmp-server enable command. For example, some notification types are always enabled and others are enabled by a different command. For example, the linkUpDown notifications are controlled by the snmp trap link-status command. These notification types do not require an snmp-server enable command.
A notification-type option's availability depends on the router type and Cisco IOS software features supported on the router. For example, the envmon notification type is available only if the environmental monitor is part of the system. To see what notification types are available on your system, use the command help (?) at the end of the snmp-server host command.
Perform this task to configure the recipient of an SNMP trap operation.
SUMMARY STEPS
1. ![]() enable
enable
2. ![]() configure terminal
configure terminal
3. ![]() snmp-server host host-id [traps | informs] [version {1 | 2c | 3 [auth | noauth | priv]}] community-string [udp-port port-number] [notification-type]
snmp-server host host-id [traps | informs] [version {1 | 2c | 3 [auth | noauth | priv]}] community-string [udp-port port-number] [notification-type]
4. ![]() exit
exit
5. ![]() show snmp host
show snmp host
DETAILED STEPS
Examples
The following example shows the host information configured for SNMP notifications:
Router# show snmp host
Notification host: 10.2.28.1 udp-port: 162 type: inform
user: public security model: v2c
traps: 00001000.00000000.00000000
Configuring SNMP Version 3
When you configure SNMP version 3 and you want to use the SNMPv3 security mechanism for handling SNMP packets, you must establish SNMP groups and users with passwords.
Perform the following tasks to configure SNMP version 3.
•![]() Specifying SNMP-Server Group Names (required)
Specifying SNMP-Server Group Names (required)
•![]() Configuring SNMP Server Users (required)
Configuring SNMP Server Users (required)
Specifying SNMP-Server Group Names
SNMPv3 is a security model. A security model is an authentication strategy that is set up for a user and the group in which the user resides.
No default values exist for authentication or privacy algorithms when you configure the snmp-server group command. Also, no default passwords exist. For information about specifying a MD5 password, see the documentation for the snmp-server user command.
Perform this task to specify a new SNMP group or a table that maps SNMP users to SNMP views.
SUMMARY STEPS
1. ![]() enable
enable
2. ![]() configure terminal
configure terminal
3. ![]() snmp-server group [groupname {v1 | v2c | v3 [auth | noauth | priv]}] [read readview] [write writeview] [notify notifyview] [access access-list]
snmp-server group [groupname {v1 | v2c | v3 [auth | noauth | priv]}] [read readview] [write writeview] [notify notifyview] [access access-list]
4. ![]() exit
exit
5. ![]() show snmp group
show snmp group
Examples
The following example shows information about each SNMP group on the network:
Router# show snmp group
groupname: V1 security model:v1
readview : v1default writeview: <no writeview specified>
notifyview: <no notifyview specified>
row status: active
groupname: ILMI security model:v1
readview : *ilmi writeview: *ilmi
notifyview: <no notifyview specified>
row status: active
groupname: ILMI security model:v2c
readview : *ilmi writeview: *ilmi
notifyview: <no notifyview specified>
row status: active
groupname: group1 security model:v1
readview : v1default writeview: <no writeview specified>
notifyview: <no notifyview specified>
row status: active
Configuring SNMP Server Users
To configure a remote user, specify the IP address or port number for the remote SNMP agent of the device where the user resides. Also, before you configure remote users for a particular agent, configure the SNMP engine ID, using the snmp-server engineID command with the remote option. The remote agent's SNMP engine ID is required when computing the authentication and privacy digests from the password. If the remote engine ID is not configured first, the configuration command will fail.
For the privpassword and auth-password arguments, the minimum length is one character; the recommended length is at least eight characters, and should include both letters and numbers.
SNMP passwords are localized using the SNMP engine ID of the authoritative SNMP engine. For informs, the authoritative SNMP agent is the remote agent. You must configure the remote agent's SNMP engine ID in the SNMP database before you can send proxy requests or informs to it.
Perform this task to add a new user to an SNMP group.
Note ![]() Changing the engine ID after configuring the SNMP user, does not allow to remove the user. To remove the configurations, you need to first reconfigure all the SNMP configurations.
Changing the engine ID after configuring the SNMP user, does not allow to remove the user. To remove the configurations, you need to first reconfigure all the SNMP configurations.
No default values exist for authentication or privacy algorithms when you configure the command. Also, no default passwords exist. The minimum length for a password is one character, although we recommend using at least eight characters for security. If you forget a password, you cannot recover it and will need to reconfigure the user. You can specify either a plain text password or a localized MD5 digest.
If you have the localized MD5 or SHA digest, you can specify that string instead of the plain text password. The digest should be formatted as aa:bb:cc:dd where aa, bb, and cc are hexadecimal values. Also, the digest should be exactly 16 octets in length.
SUMMARY STEPS
1. ![]() enable
enable
2. ![]() configure terminal
configure terminal
3. ![]() snmp-server engineID {local engine-id | remote ip-address [udp-port udp-port-number] [vrf vrf-name] engine-id-string}
snmp-server engineID {local engine-id | remote ip-address [udp-port udp-port-number] [vrf vrf-name] engine-id-string}
4. ![]() snmp-server user username groupname [remote ip-address [udp-port port]] {v1 | v2c | v3 [encrypted] [auth {md5 | sha} auth-password]} [access access-list]
snmp-server user username groupname [remote ip-address [udp-port port]] {v1 | v2c | v3 [encrypted] [auth {md5 | sha} auth-password]} [access access-list]
5. ![]() exit
exit
6. ![]() show snmp user [username]
show snmp user [username]
7. ![]() show snmp engineID
show snmp engineID
DETAILED STEPS
Examples
The following example shows the SNMP engine ID configured for the remote user:
Router# show snmp engineID
Local SNMP engineID: 1A2836C0129A
Remote Engine ID IP-addr Port
1A2833C0129A remote 10.2.28.1 120
The following example shows the information about the configured characteristics of the SNMP user1:
Router# show snmp user user1
User name: user1
Engine ID: 00000009020000000C025808
storage-type: nonvolatile active access-list: 10
Rowstatus: active
Authentication Protocol: MD5
Privacy protocol: DES
Group name: group1
Configuring a Router as an SNMP Manager
The SNMP manager feature allows a router to act as a network management station—an SNMP client. As an SNMP manager, the router can send SNMP requests to agents and receive SNMP responses and notifications from agents. When the SNMP manager process is enabled, the router can query other SNMP agents and process incoming SNMP traps.
Perform this task to enable the SNMP manager process and to set the session timeout value.
Most network security policies assume that routers will accept SNMP requests, send SNMP responses, and send SNMP notifications.
With the SNMP manager functionality enabled, the router may also send SNMP requests, receive SNMP responses, and receive SNMP notifications. Your security policy implementation may need to be updated prior to enabling this feature.
SNMP requests typically are sent to User Datagram Protocol (UDP) port 161. SNMP responses are typically sent from UDP port 161. SNMP notifications are typically sent to UDP port 162.
Sessions are created when the SNMP manager in the router sends SNMP requests, such as informs, to a host or receives SNMP notifications from a host. One session is created for each destination host. If there is no further communication between the router and host within the session timeout period, the session will be deleted.
The router tracks statistics, such as the average round-trip time required to reach the host, for each session. Using the statistics for a session, the SNMP manager in the router can set reasonable timeout periods for future requests, such as informs, for that host. If the session is deleted, all statistics are lost. If another session with the same host is later created, the request timeout value for replies will return to the default value.
Sessions consume memory. A reasonable session timeout value should be large enough that regularly used sessions are not prematurely deleted, yet small enough such that irregularly used or one-time sessions are purged expeditiously.
SUMMARY STEPS
1. ![]() enable
enable
2. ![]() configure terminal
configure terminal
3. ![]() snmp-server manager
snmp-server manager
4. ![]() snmp-server manager session-timeout seconds
snmp-server manager session-timeout seconds
5. ![]() exit
exit
6. ![]() show snmp
show snmp
7. ![]() show snmp sessions [brief]
show snmp sessions [brief]
8. ![]() show snmp pending
show snmp pending
Examples
The following example shows the status of SNMP communications:
Router# show snmp
Chassis: 01506199
37 SNMP packets input
0 Bad SNMP version errors
4 Unknown community name
0 Illegal operation for community name supplied
0 Encoding errors
24 Number of requested variables
0 Number of altered variables
0 Get-request PDUs
28 Get-next PDUs
0 Set-request PDUs
78 SNMP packets output
0 Too big errors (Maximum packet size 1500)
0 No such name errors
0 Bad values errors
0 General errors
24 Response PDUs
13 Trap PDUs
SNMP logging: enabled
Logging to 172.17.58.33.162, 0/10, 13 sent, 0 dropped.
SNMP Manager-role output packets
4 Get-request PDUs
4 Get-next PDUs
6 Get-bulk PDUs
4 Set-request PDUs
23 Inform-request PDUs
30 Timeouts
0 Drops
SNMP Manager-role input packets
0 Inform response PDUs
2 Trap PDUs
7 Response PDUs
1 Responses with errors
SNMP informs: enabled
Informs in flight 0/25 (current/max)
Logging to 172.17.217.141.162
4 sent, 0 in-flight, 1 retries, 0 failed, 0 dropped
Logging to 172.17.58.33.162
0 sent, 0 in-flight, 0 retries, 0 failed, 0 dropped
The following example displays the status of SNMP sessions:
Router# show snmp sessions
Destination: 172.17.58.33.162, V2C community: public
Round-trip-times: 0/0/0 (min/max/last)
packets output
0 Gets, 0 GetNexts, 0 GetBulks, 0 Sets, 4 Informs
0 Timeouts, 0 Drops
packets input
0 Traps, 0 Informs, 0 Responses (0 errors)
Destination: 172.17.217.141.162, V2C community: public, Expires in 575 secs
Round-trip-times: 1/1/1 (min/max/last)
packets output
0 Gets, 0 GetNexts, 0 GetBulks, 0 Sets, 4 Informs
0 Timeouts, 0 Drops
packets input
0 Traps, 0 Informs, 4 Responses (0 errors)
The following example shows the current set of pending SNMP requests:
Router# show snmp pending
req id: 47, dest: 172.17.58.33.161, V2C community: public, Expires in 5 secs
req id: 49, dest: 172.17.58.33.161, V2C community: public, Expires in 6 secs
req id: 51, dest: 172.17.58.33.161, V2C community: public, Expires in 6 secs
req id: 53, dest: 172.17.58.33.161, V2C community: public, Expires in 8 secs
Enabling the SNMP Agent Shutdown Mechanism
Using SNMP packets, a network management tool can send messages to users on virtual terminals and on the console. This facility operates in a similar fashion to the send EXEC command; however, the SNMP request that causes the message to be issued to the users also specifies the action to be taken after the message is delivered. One possible action is a shutdown request. After a system is shut down, typically it is reloaded. Because the ability to cause a reload from the network is a powerful feature, it is protected by the snmp-server system-shutdown global configuration command. If you do not issue this command, the shutdown mechanism is not enabled.
Perform this task to enable the SNMP agent shutdown mechanism.
SUMMARY STEPS
1. ![]() enable
enable
2. ![]() configure terminal
configure terminal
3. ![]() snmp-server system-shutdown
snmp-server system-shutdown
DETAILED STEPS
Defining the Maximum SNMP Agent Packet Size
You can define the maximum packet size permitted when the SNMP agent is receiving a request or generating a reply.
Perform this task to set the maximum permitted packet size.
SUMMARY STEPS
1. ![]() enable
enable
2. ![]() configure terminal
configure terminal
3. ![]() snmp-server packetsize byte-count
snmp-server packetsize byte-count
DETAILED STEPS
Limiting the Number of TFTP Servers Used via SNMP
You can limit the number of TFTP servers used for saving and loading configuration files via SNMP by using an access list. Limiting the use of TFTP servers in this way conserves system resources and centralizes the operation for manageability.
Perform this task to limit the number of TFTP servers.
SUMMARY STEPS
1. ![]() enable
enable
2. ![]() configure terminal
configure terminal
3. ![]() snmp-server tftp-server-list number
snmp-server tftp-server-list number
DETAILED STEPS
Troubleshooting Tips
To monitor SNMP trap activity in real time for the purposes of troubleshooting, use the SNMP debug commands, including the debug snmp packet EXEC command. For documentation of SNMP debug commands, see the Cisco IOS Debug Command Reference.
Disabling the SNMP Agent
Perform this task to disable any version of an SNMP agent.
SUMMARY STEPS
1. ![]() enable
enable
2. ![]() configure terminal
configure terminal
3. ![]() no snmp-server
no snmp-server
Configuring SNMP Notifications
To configure a router to send SNMP traps or informs, perform the tasks described in the following sections:
•![]() Configuring the Router to Send SNMP Notifications (required)
Configuring the Router to Send SNMP Notifications (required)
•![]() Changing Notification Operation Values (optional)
Changing Notification Operation Values (optional)
•![]() Controlling Individual RFC 1157 SNMP Traps (optional)
Controlling Individual RFC 1157 SNMP Traps (optional)
•![]() Configuring SNMP Notification Log Options (optional)
Configuring SNMP Notification Log Options (optional)
Note ![]() Many snmp-server commands use the word traps in their command syntax. Unless there is an option within the command to specify either traps or informs, the keyword traps should be taken to mean traps, informs, or both. Use the snmp-server host command to specify whether you want SNMP notifications to be sent as traps or informs.
Many snmp-server commands use the word traps in their command syntax. Unless there is an option within the command to specify either traps or informs, the keyword traps should be taken to mean traps, informs, or both. Use the snmp-server host command to specify whether you want SNMP notifications to be sent as traps or informs.
To use informs, the SNMP manager (also known as the SNMP proxy manager) must be available and enabled on a device. Earlier, the SNMP manager was available only with Cisco IOS PLUS images. However, the SNMP manager is now available with all Cisco IOS releases that support SNMP.
Use Cisco Feature Navigator for information about SNMP manager support for Cisco IOS releases. To access Cisco Feature Navigator, go to http://www.cisco.com/go/cfn.
Configuring the Router to Send SNMP Notifications
Perform this task to configure the router to send traps or informs to a host.
SUMMARY STEPS
1. ![]() enable
enable
2. ![]() configure terminal
configure terminal
3. ![]() snmp-server engineID remote remote-ip-address remote-engineID
snmp-server engineID remote remote-ip-address remote-engineID
4. ![]() snmp-server user username groupname [remote host [udp-port port] {v1 | v2c | v3 [encrypted] [auth {md5 | sha} auth-password]} [access access-list]
snmp-server user username groupname [remote host [udp-port port] {v1 | v2c | v3 [encrypted] [auth {md5 | sha} auth-password]} [access access-list]
5. ![]() snmp-server group groupname {v1 | v2c | v3 {auth | noauth | priv}} [read readview] [write writeview] [notify notifyview] [access access-list]
snmp-server group groupname {v1 | v2c | v3 {auth | noauth | priv}} [read readview] [write writeview] [notify notifyview] [access access-list]
6. ![]() snmp-server host host [traps | informs] [version {1 | 2c | 3 [auth | noauth | priv]}] community-string [notification-type]
snmp-server host host [traps | informs] [version {1 | 2c | 3 [auth | noauth | priv]}] community-string [notification-type]
7. ![]() snmp-server enable traps [notification-type [notification-options]]
snmp-server enable traps [notification-type [notification-options]]
DETAILED STEPS
Changing Notification Operation Values
You can specify a value other than the default for the source interface, message (packet) queue length for each host, or retransmission interval.
Perform this task to change notification operation values as needed.
SUMMARY STEPS
1. ![]() enable
enable
2. ![]() configure terminal
configure terminal
3. ![]() snmp-server trap-source interface
snmp-server trap-source interface
4. ![]() snmp-server queue-length length
snmp-server queue-length length
5. ![]() snmp-server trap-timeout seconds
snmp-server trap-timeout seconds
6. ![]() snmp-server informs [retries retries] [timeout seconds] [pending pending]
snmp-server informs [retries retries] [timeout seconds] [pending pending]
DETAILED STEPS
Controlling Individual RFC 1157 SNMP Traps
Starting with Cisco IOS Release 12.1(3)T, you can globally enable or disable authenticationFailure, linkUp, linkDown, warmStart, and coldStart traps or informs individually. (These traps constitute the "generic traps" defined in RFC 1157.) Note that linkUp and linkDown notifications are enabled by default on specific interfaces but will not be sent unless they are enabled globally.
Perform this task to enable the authenticationFailure, linkUp, linkDown, warmStart, and coldStart notification types.
SUMMARY STEPS
1. ![]() enable
enable
2. ![]() configure terminal
configure terminal
3. ![]() snmp-server enable traps snmp [authentication] [linkup] [linkdown] [warmstart] [coldstart]
snmp-server enable traps snmp [authentication] [linkup] [linkdown] [warmstart] [coldstart]
4. ![]() interface type slot/port
interface type slot/port
5. ![]() no snmp-server link status
no snmp-server link status
6. ![]() exit
exit
7. ![]() exit
exit
8. ![]() show snmp mib ifmib traps
show snmp mib ifmib traps
DETAILED STEPS
Examples
The following example shows the status of linkup and linkdown traps for all interfaces configured for the system:
Router# show snmp mib ifmib traps
ifDescr ifindex TrapStatus
---------------------------------------------------
FastEthernet3/6 14 enabled
FastEthernet3/19 27 enabled
GigabitEthernet5/1 57 enabled
unrouted VLAN 1005 73 disabled
FastEthernet3/4 12 enabled
FastEthernet3/39 47 enabled
FastEthernet3/28 36 enabled
FastEthernet3/48 56 enabled
unrouted VLAN 1003 74 disabled
FastEthernet3/2 10 enabled
Tunnel0 66 enabled
SPAN RP Interface 64 disabled
Tunnel10 67 enabled
FastEthernet3/44 52 enabled
GigabitEthernet1/3 3 enabled
FastEthernet3/11 19 enabled
FastEthernet3/46 54 enabled
GigabitEthernet1/1 1 enabled
FastEthernet3/13 21 enabled
unrouted VLAN 1 70 disabled
GigabitEthernet1/4 4 enabled
FastEthernet3/9 17 enabled
FastEthernet3/16 24 enabled
FastEthernet3/43 51 enabled
Configuring SNMP Notification Log Options
Perform this task to configure SNMP notification log options. These options allow you to control the log size and timing values. The SNMP log can become very large and long if left unmodified.
SUMMARY STEPS
1. ![]() enable
enable
2. ![]() configure terminal
configure terminal
3. ![]() snmp mib notification-log default
snmp mib notification-log default
4. ![]() snmp mib notification-log globalageout seconds
snmp mib notification-log globalageout seconds
5. ![]() snmp mib notification-log globalsize size
snmp mib notification-log globalsize size
6. ![]() exit
exit
7. ![]() show snmp mib notification-log
show snmp mib notification-log
DETAILED STEPS
Examples
This example shows information about the state of local SNMP notification logging:
Router# show snmp mib notification-log
GlobalAgeout 20, GlobalEntryLimit 600
Total Notifications logged in all logs 0
Log Name"", Log entry Limit 600, Notifications logged 0
Logging status enabled
Created by cli
Configuring Interface Index Display and Interface Indexes and Long Name Support
The display of Interface Indexes lets advanced users of SNMP view information about the interface registrations directly on a managed agent. An external NMS is not required.
Configuration of Long Alias Names for the interfaces lets users configure the ifAlias (the object defined in the MIB whose length is restricted to 64) up to 255 bytes.
Prerequisites
SNMP must be enabled on your system.
Restrictions
The Interface Index Display and Interface Alias Long Name Support feature is not supported on all Cisco platforms. Use Cisco Feature Navigator to find information about platform support and Cisco IOS software image support.
Perform this task to configure the IF-MIB to retain ifAlias values of longer than 64 characters and to configure the ifAlias values for an interface.
Note ![]() To verify if the ifAlias description is longer than 64 characters, perform an SNMP MIB walk for the ifMIB ifAlias variable from an NMS and verify that the entire description is displayed in the values for ifXEntry.18.
To verify if the ifAlias description is longer than 64 characters, perform an SNMP MIB walk for the ifMIB ifAlias variable from an NMS and verify that the entire description is displayed in the values for ifXEntry.18.
The description for interfaces also appears in the output from the more system:running config privileged EXEC mode command.
SUMMARY STEPS
1. ![]() enable
enable
2. ![]() configure terminal
configure terminal
3. ![]() snmp ifmib ifalias long
snmp ifmib ifalias long
4. ![]() interface type number
interface type number
5. ![]() description text-string
description text-string
6. ![]() exit
exit
7. ![]() show snmp mib
show snmp mib
8. ![]() show snmp mib ifmib ifindex [type number] [detail] [free-list]
show snmp mib ifmib ifindex [type number] [detail] [free-list]
DETAILED STEPS
Examples
The following example lists the MIB module instance identifiers registered on your system. The resulting display could be lengthy. Only a small portion is shown here.
Router# show snmp mib
system.1
system.2
sysUpTime
system.4
system.5
system.6
system.7
system.8
sysOREntry.2
sysOREntry.3
sysOREntry.4
interfaces.1
ifEntry.1
ifEntry.2
ifEntry.3
ifEntry.4
ifEntry.5
ifEntry.6
ifEntry.7
ifEntry.8
ifEntry.9
ifEntry.10
ifEntry.11
--More--
captureBufferEntry.2
captureBufferEntry.3
captureBufferEntry.4
captureBufferEntry.5
captureBufferEntry.6
captureBufferEntry.7
capture.3.1.1
eventEntry.1
eventEntry.2
eventEntry.3
eventEntry.4
eventEntry.5
eventEntry.6
eventEntry.7
logEntry.1
logEntry.2
logEntry.3
logEntry.4
rmon.10.1.1.2
rmon.10.1.1.3
rmon.10.1.1.4
rmon.10.1.1.5
rmon.10.1.1.6
rmon.10.1.1.7
rmon.10.2.1.2
rmon.10.2.1.3
rmon.10.3.1.2
The following example shows output for the Interfaces MIB ifIndex values registered on a system for a specific interface:
Router# show snmp mib ifmib ifindex Ethernet 2/0
Ethernet2/0: Ifindex = 2
The following example shows output for the Interfaces MIB ifIndex values registered on a system for all interfaces:
Router# show snmp mib ifmib ifindex
ATM1/0: Ifindex = 1
ATM1/0-aal5 layer: Ifindex = 12
ATM1/0-atm layer: Ifindex = 10
ATM1/0.0-aal5 layer: Ifindex = 13
ATM1/0.0-atm subif: Ifindex = 11
ATM1/0.9-aal5 layer: Ifindex = 32
ATM1/0.9-atm subif: Ifindex = 31
ATM1/0.99-aal5 layer: Ifindex = 36
ATM1/0.99-atm subif: Ifindex = 35
Ethernet2/0: Ifindex = 2
Ethernet2/1: Ifindex = 3
Ethernet2/2: Ifindex = 4
Ethernet2/3: Ifindex = 5
Null0: Ifindex = 14
Serial3/0: Ifindex = 6
Serial3/1: Ifindex = 7
Serial3/2: Ifindex = 8
Serial3/3: Ifindex = 9
Troubleshooting Tips
An alternative to using the ifAlias value for the identification of interfaces across reboots is to use the cciDescr object in the Cisco Circuit Interface MIB (CISCO-CIRCUIT-INTERFACE-MIB.my). This MIB object can be used only for circuit-based interfaces such as ATM or Frame Relay interfaces. Cisco IOS Release 12.2(2)T introduced the Circuit Interface Identification Persistence for SNMP feature, which maintains the user-defined name of the circuit (defined in the cciDescr object) across reboots, allowing for the consistent identification of circuit-based interfaces.
Configuring SNMP Support for VPNs
This section describes how to configure SNMP support for VPNs. The SNMP Support for VPNs feature provides configuration commands that allow users to associate SNMP agents and managers with specific VRFs. The specified VRF is used to send SNMP traps and informs and responses between agents and managers. If a VRF is not specified, the default routing table for the VPN is used.
Support for VPNs allows users to configure an SNMP agent to only accept SNMP requests from a certain set of VPNs. With this configuration, providers can provide network management services to their customers who then can manage all user VPN devices.
Restrictions
•![]() This feature is not supported on all Cisco platforms. Use Cisco Feature Navigator to find information about platform support and Cisco IOS software image support.
This feature is not supported on all Cisco platforms. Use Cisco Feature Navigator to find information about platform support and Cisco IOS software image support.
•![]() Not all MIBs are VPN aware. To list the VPN-aware MIBs, use the show snmp mib context command. For more information about VPN-aware MIBs, see the SNMP Support over VPNs—Context-based Access Control configuration module.
Not all MIBs are VPN aware. To list the VPN-aware MIBs, use the show snmp mib context command. For more information about VPN-aware MIBs, see the SNMP Support over VPNs—Context-based Access Control configuration module.
Perform this task to configure SNMP support for a specific VPN.
SUMMARY STEPS
1. ![]() enable
enable
2. ![]() configure terminal
configure terminal
3. ![]() snmp-server host host-address [vrf vrf-name] [traps | informs] [version {1 | 2c | 3 [auth | noauth | priv]}] community-string [udp-port port] [notification-type]
snmp-server host host-address [vrf vrf-name] [traps | informs] [version {1 | 2c | 3 [auth | noauth | priv]}] community-string [udp-port port] [notification-type]
4. ![]() snmp-server engineID remote ip-address [udp-port udp-port-number] [vrf vrf-name] engineid-string
snmp-server engineID remote ip-address [udp-port udp-port-number] [vrf vrf-name] engineid-string
5. ![]() exit
exit
6. ![]() show snmp host
show snmp host
DETAILED STEPS
Configuring Interface IfIndex Persistence
The following sections contain the tasks to configure Interface Index Persistence:
•![]() Enabling and Disabling IfIndex Persistence Globally
Enabling and Disabling IfIndex Persistence Globally
•![]() Enabling and Disabling IfIndex Persistence on Specific Interfaces
Enabling and Disabling IfIndex Persistence on Specific Interfaces
Enabling and Disabling IfIndex Persistence Globally
Perform this task to enable IfIndex persistence globally.
Prerequisites
The configuration tasks described in this section assume that you have configured SNMP on your routing device and are using SNMP to monitor network activity using the Cisco IOS command line interface and/or a network management system (NMS) application.
Restrictions
The interface-specific ifIndex persistence command (snmp ifindex persistence) cannot be used on subinterfaces. A command applied to an interface is automatically applied to all the subinterfaces associated with that interface.
Testing indicates that approximately 25 bytes of NVRAM storage are used by this feature per interface. There may be some boot delay exhibited on platforms with lower CPU speeds.
Note ![]() After ifIndex persistence commands have been entered, the configuration must be saved using the copy running-config startup-config EXEC mode command to ensure consistent ifIndex values.
After ifIndex persistence commands have been entered, the configuration must be saved using the copy running-config startup-config EXEC mode command to ensure consistent ifIndex values.
SUMMARY STEPS
1. ![]() enable
enable
2. ![]() configure terminal
configure terminal
3. ![]() snmp-server ifindex persist
snmp-server ifindex persist
4. ![]() no snmp-server ifindex persist
no snmp-server ifindex persist
5. ![]() exit
exit
DETAILED STEPS
Enabling and Disabling IfIndex Persistence on Specific Interfaces
Perform this task to configure ifIndex persistence only on a specific interface.

Tips ![]() Use the snmp ifindex clear command on a specific interface when you want that interface to use the global configuration setting for ifIndex persistence. This command clears any ifIndex configuration commands previously entered for that specific interface.
Use the snmp ifindex clear command on a specific interface when you want that interface to use the global configuration setting for ifIndex persistence. This command clears any ifIndex configuration commands previously entered for that specific interface.
SUMMARY STEPS
1. ![]() enable
enable
2. ![]() configure terminal
configure terminal
3. ![]() interface type slot/port
interface type slot/port
4. ![]() snmp ifindex persist
snmp ifindex persist
5. ![]() no snmp ifindex persist
no snmp ifindex persist
6. ![]() end
end
DETAILED STEPS
Configuring MIB Persistence
Note ![]() Beginning with Cisco IOS Release 12.4(20)T, MIB persistence is automatic; manual configuration is not required.
Beginning with Cisco IOS Release 12.4(20)T, MIB persistence is automatic; manual configuration is not required.
The MIB Persistence features allow the SNMP data of a MIB to be persistent across reloads; that is, MIB information retains the same set of object values each time a networking device reboots. The following sections contain tasks for using Distributed Management Event and Expression MIB persistence.
•![]() Enabling and Disabling Event MIB Persistence (optional)
Enabling and Disabling Event MIB Persistence (optional)
•![]() Enabling and Disabling Expression MIB Persistence (optional)
Enabling and Disabling Expression MIB Persistence (optional)
Prerequisites
•![]() SNMP is configured on your networking device
SNMP is configured on your networking device
•![]() Values for Event MIB and Expression MIB have been configured
Values for Event MIB and Expression MIB have been configured
Restrictions
•![]() If the number of MIB objects to persist increases, NVRAM storage capacity may be strained. Occasionally, the time taken to write MIB data to NVRAM may be longer than expected.
If the number of MIB objects to persist increases, NVRAM storage capacity may be strained. Occasionally, the time taken to write MIB data to NVRAM may be longer than expected.
•![]() The Distributed Management Event MIB Persistence feature is not supported on all Cisco platforms. Use Cisco Feature Navigator to find information about platform support and Cisco IOS software image support.
The Distributed Management Event MIB Persistence feature is not supported on all Cisco platforms. Use Cisco Feature Navigator to find information about platform support and Cisco IOS software image support.
Enabling and Disabling Event MIB Persistence
Perform this task to configure Event MIB Persistence.
Note ![]() Event MIB Persistence is disabled by default.
Event MIB Persistence is disabled by default.
SUMMARY STEPS
1. ![]() enable
enable
2. ![]() configure terminal
configure terminal
3. ![]() snmp mib persist event
snmp mib persist event
4. ![]() no snmp mib persist event
no snmp mib persist event
5. ![]() exit
exit
6. ![]() write mib-data
write mib-data
7. ![]() copy running-config startup-config
copy running-config startup-config
DETAILED STEPS
Enabling and Disabling Expression MIB Persistence
Perform this task to configure Expression MIB Persistence.
Note ![]() Expression MIB Persistence is disabled by default.
Expression MIB Persistence is disabled by default.
SUMMARY STEPS
1. ![]() enable
enable
2. ![]() configure terminal
configure terminal
3. ![]() snmp mib persist expression
snmp mib persist expression
4. ![]() no snmp mib persist expression
no snmp mib persist expression
5. ![]() exit
exit
6. ![]() write mib-data
write mib-data
7. ![]() copy running-config startup-config
copy running-config startup-config
8. ![]() more system:running-config
more system:running-config
Configuring Event MIB Using SNMP
Event MIB can be configured using SNMP directly. In this procedure, the Event MIB is configured to monitor the delta values of ifInOctets for all interfaces once per minute. If any of the samples exceed the specified threshold, a trap notification will be sent.
There are no Cisco IOS software configuration tasks associated with the Event MIB. All configuration of Event MIB functionality must be performed though applications using SNMP. This section provides a sample configuration session using a network management application on an external device. See the "Related Documents" section for information about configuring SNMP on your Cisco routing device.
All configuration of Event MIB functionality must be performed though applications using SNMP. The following section provides a step-by-step Event MIB configuration using SNMP research tools available for Sun workstations. The setany commands given below are executed using the SNMP application. Note that these commands are not Cisco IOS CLI commands. It is assumed that SNMP has been configured on your routing device.
In this configuration, the objective is to monitor ifInOctets for all interfaces. The Event MIB is configured to monitor the delta values of ifInOctets for all interfaces once per minute. If any of the samples exceed the specified threshold of 30, a Trap notification will be sent.
There are four parts to the following example:
•![]() Setting the Trigger in the Trigger Table
Setting the Trigger in the Trigger Table
•![]() Creating an Event in the Event Table
Creating an Event in the Event Table
•![]() Setting the Trigger Threshold in the Trigger Table
Setting the Trigger Threshold in the Trigger Table
Setting the Trigger in the Trigger Table
Perform this task to set the trigger in the trigger table:
Creating an Event in the Event Table
Perform this task to create an event in the event table:
Setting the Trigger Threshold in the Trigger Table
Perform this task to set the trigger threshold in the trigger table:
Activating the Trigger
Perform this task to activate the trigger:
|
|
|
|
|---|---|---|
Step 1 |
setany -v2c $ADDRESS private mteTriggerEntryStatus.4.106.111.104.110.1 -i 1 |
Makes the trigger active. |
To confirm the above configuration is working, ensure that at least one of the interfaces gets more than 30 packets in a minute. This should cause a trap to be sent out after one minute.
Monitoring and Maintaining Event MIB
Use the following commands to monitor Event MIB activity from the Cisco IOS command-line interface:
Configuring Event MIB Using CLI
Event MIB can be configured using SNMP directly. In this procedure, the Event MIB is configured to monitor the delta values of ifInOctets for all interfaces once per minute. If any of the samples exceed the specified threshold, a trap notification will be sent.
However, in the Cisco IOS Release 12.4(20)T, the Event MIB feature is enhanced to add CLIs to configure events, event action, and trigger.
This section contains the following tasks to configure Event MIB:
•![]() Configuring Event MIB Object List
Configuring Event MIB Object List
•![]() Configuring Existence Trigger Test
Configuring Existence Trigger Test
•![]() Configuring Boolean Trigger Test
Configuring Boolean Trigger Test
•![]() Configuring Threshold Trigger Test
Configuring Threshold Trigger Test
Configuring Scalar Variables
Perform this task to configure scalar variables for Event MIB.
Prerequisites
To configure the scalar variables for Event MIB, you should be familiar with the Event MIB scalar variables.
SUMMARY STEPS
1. ![]() enable
enable
2. ![]() configure terminal
configure terminal
3. ![]() snmp mib event sample minimum value
snmp mib event sample minimum value
4. ![]() snmp mib event sample instance maximum value
snmp mib event sample instance maximum value
5. ![]() exit
exit
DETAILED STEPS
Configuring Event MIB Object List
To configure Event MIB, you need to set up a list of objects that can be added to notifications according to trigger, trigger test, or the event.
Prerequisites
To configure the Event MIB object list, you should be familiar with the Event MIB objects and object identifiers, which can be added to notifications according to event, trigger, or the trigger test.
SUMMARY STEPS
1. ![]() enable
enable
2. ![]() configure terminal
configure terminal
3. ![]() snmp mib event object list owner object-list-owner name object-list-name object-number
snmp mib event object list owner object-list-owner name object-list-name object-number
4. ![]() object id object-identifier
object id object-identifier
5. ![]() wildcard
wildcard
6. ![]() exit
exit
Configuring Event
Perform this task to configure a management event.
Prerequisites
To configure a management event, you should be familiar with the SNMP MIB events and object identifiers.
SUMMARY STEPS
1. ![]() enable
enable
2. ![]() config terminal
config terminal
3. ![]() snmp mib event owner event-owner name event-name
snmp mib event owner event-owner name event-name
4. ![]() description event-description
description event-description
5. ![]() enable
enable
6. ![]() exit
exit
Configuring Event Action
By configuring an event action, you can define the actions that an application can perform during an event trigger. The actions for an event include sending a notification, setting a MIB object and so on. You can set the event action information to either set or notification. The actions for the event can be configured only in the event configuration mode.
The following sections contain the tasks to configure event action:
•![]() Configuring Action Notification
Configuring Action Notification
Perform this task to set the notification action for the event.
SUMMARY STEPS
1. ![]() action notification
action notification
2. ![]() object id object-id
object id object-id
3. ![]() exit
exit
DETAILED STEPS
Perform this task to set actions for an event.
SUMMARY STEPS
1. ![]() action set
action set
2. ![]() object id object-id
object id object-id
3. ![]() value integer-value
value integer-value
4. ![]() exit
exit
DETAILED STEPS
Configuring Event Trigger
By configuring an event trigger, you can list the objects to monitor, and associate each trigger to an event.
Perform this task to configure an event trigger.
SUMMARY STEPS
1. ![]() enable
enable
2. ![]() configure terminal
configure terminal
3. ![]() snmp mib event trigger owner trigger-owner name trigger-name
snmp mib event trigger owner trigger-owner name trigger-name
4. ![]() description trigger-description
description trigger-description
5. ![]() frequency seconds
frequency seconds
6. ![]() object list owner object-list-owner name object-list-name
object list owner object-list-owner name object-list-name
7. ![]() object id object-identifier
object id object-identifier
8. ![]() enable
enable
9. ![]() exit
exit
DETAILED STEPS
Configuring Existence Trigger Test
Perform this task to configure trigger parameters for the test existence trigger type.
You should configure this trigger type in the event trigger configuration mode.
SUMMARY STEPS
1. ![]() test existence
test existence
2. ![]() object list owner object-list-owner name object-list-name
object list owner object-list-owner name object-list-name
3. ![]() event owner event-owner name event-name
event owner event-owner name event-name
4. ![]() type {present | absent | changed}
type {present | absent | changed}
5. ![]() startup {present | absent|}
startup {present | absent|}
6. ![]() exit
exit
DETAILED STEPS
Configuring Boolean Trigger Test
Perform this task to configure trigger parameters for Boolean trigger type. You should configure this trigger test in the event trigger configuration mode.
SUMMARY STEPS
1. ![]() test boolean
test boolean
2. ![]() comparison {unequal | equal | less | lessOrEqual | greater | greaterOrEqual}
comparison {unequal | equal | less | lessOrEqual | greater | greaterOrEqual}
3. ![]() object list owner object-list-owner name object-list-name
object list owner object-list-owner name object-list-name
4. ![]() event owner event-owner name event-name
event owner event-owner name event-name
5. ![]() value integer-value
value integer-value
6. ![]() startup
startup
7. ![]() exit
exit
DETAILED STEPS
Configuring Threshold Trigger Test
Perform this task to configure trigger parameters for the threshold trigger test. You should configure this trigger test in the event trigger configuration mode.
SUMMARY STEPS
1. ![]() test threshold
test threshold
2. ![]() object list owner object-list-owner name object-list-name
object list owner object-list-owner name object-list-name
3. ![]() rising integer-value
rising integer-value
4. ![]() rising event owner event-owner name event-name
rising event owner event-owner name event-name
5. ![]() falling integer-value
falling integer-value
6. ![]() falling event owner event-owner name event-name
falling event owner event-owner name event-name
7. ![]() delta rising integer-value
delta rising integer-value
8. ![]() delta rising event owner event-owner name event-name
delta rising event owner event-owner name event-name
9. ![]() delta falling integer-value
delta falling integer-value
10. ![]() delta falling event owner event-owner name event-name
delta falling event owner event-owner name event-name
11. ![]() startup {rising | falling | rising-or-falling}
startup {rising | falling | rising-or-falling}
12. ![]() exit
exit
DETAILED STEPS
Configuring Expression MIB Using SNMP
Expression MIB can be configured using SNMP directly.
There are no Cisco IOS software configuration tasks associated with the Expression MIB. All configuration of Expression MIB functionality must be performed though applications using SNMP. This section provides a sample configuration session using a network management application on an external device. See the "Related Documents" section for information about configuring SNMP on your Cisco routing device.
All configuration of Expression MIB functionality must be performed though applications using SNMP. The following section provides a step-by-step Expression MIB configuration using SNMP research tools available for Sun workstations. The setany commands given below are executed using the SNMP application. Note that these commands are not Cisco IOS CLI commands. It is assumed that SNMP has been configured on your routing device.
In the following configuration, a wildcarded expression involving the addition of the counters ifInOctects and ifOutOctects are evaluated.
Configuring Expression MIB using CLI
Expression MIB can be configured using SNMP directly. However, in the Cisco IOS Release 12.4(20)T, Expression MIB feature is enhanced to add CLIs to configure expressions. You should be familiar with expressions, object identifiers and sampling methods before configuring Expression MIB.
The following sections contain the tasks to configure Expression MIB:
•![]() Configuring Expression MIB Scalar Objects
Configuring Expression MIB Scalar Objects
Configuring Expression MIB Scalar Objects
Expression MIB has the following scalar objects:
•![]() expResourceDeltaMinimum
expResourceDeltaMinimum
•![]() expResourceDeltaWildcardInstanceMaximum
expResourceDeltaWildcardInstanceMaximum
Perform this task to configure Expression MIB scalar objects.
SUMMARY STEPS
1. ![]() enable
enable
2. ![]() configure terminal
configure terminal
3. ![]() snmp mib expression delta minimum seconds
snmp mib expression delta minimum seconds
4. ![]() snmp mib expression delta wildcard maximum number-of-instances
snmp mib expression delta wildcard maximum number-of-instances
5. ![]() exit
exit
DETAILED STEPS
Configuring Expressions
Perform this task to configure an expression.
SUMMARY STEPS
1. ![]() enable
enable
2. ![]() configure terminal
configure terminal
3. ![]() snmp mib expression owner expression-owner name expression-name
snmp mib expression owner expression-owner name expression-name
4. ![]() description expression-description
description expression-description
5. ![]() expression expression
expression expression
6. ![]() delta interval seconds
delta interval seconds
7. ![]() value type {counter32 | unsigned32 | timeticks | integer32 | ipaddress | octetstring | objectid | counter64}
value type {counter32 | unsigned32 | timeticks | integer32 | ipaddress | octetstring | objectid | counter64}
8. ![]() enable
enable
9. ![]() object object-number
object object-number
10. ![]() id object-identifier
id object-identifier
11. ![]() wildcard
wildcard
12. ![]() discontinuity object discontinuity-object-id [wildcard] [type {timeticks | timestamp | date-and-time}]
discontinuity object discontinuity-object-id [wildcard] [type {timeticks | timestamp | date-and-time}]
13. ![]() conditional object conditional-object-id
conditional object conditional-object-id
14. ![]() sample {absolute | delta | changed}
sample {absolute | delta | changed}
15. ![]() exit
exit
DETAILED STEPS
Configuration Examples for SNMP Support
This section provides the following configuration examples:
•![]() Example: Configuring SNMPv1, SNMPv2c, and SNMPv3
Example: Configuring SNMPv1, SNMPv2c, and SNMPv3
•![]() Example: Configuring IfAlias Long Name Support
Example: Configuring IfAlias Long Name Support
•![]() Example: Configuring IfIndex Persistence
Example: Configuring IfIndex Persistence
•![]() Example: Configuring SNMP Support for VPNs
Example: Configuring SNMP Support for VPNs
•![]() Example: Enabling Event MIB Persistence
Example: Enabling Event MIB Persistence
•![]() Example: Enabling Expression MIB Persistence
Example: Enabling Expression MIB Persistence
•![]() Example: Configuring Event MIB
Example: Configuring Event MIB
•![]() Example: Configuring Expression MIB
Example: Configuring Expression MIB
Example: Configuring SNMPv1, SNMPv2c, and SNMPv3
The following example shows how to enable SNMPv1, SNMPv2c, and SNMPv3. The configuration permits any SNMP manager to access all objects with read-only permissions using the community string named public. This configuration does not cause the router to send traps.
snmp-server community public
The following example shows how to permit SNMP access to all objects with read-only permission using the community string named public. The router also will send ISDN traps to the hosts 172.16.1.111 and 172.16.1.33 using SNMPv1 and to the host 172.16.1.27 using SNMPv2c. The community string named public is sent with the traps.
snmp-server community public
snmp-server enable traps isdn
snmp-server host 172.16.1.27 version 2c public
snmp-server host 172.16.1.111 version 1 public
snmp-server host 172.16.1.33 public
The following example shows how to allow read-only access for all objects to members of access list 4 that specify the comaccess community string. No other SNMP managers have access to any objects. SNMP Authentication Failure traps are sent by SNMPv2c to the host example.com using the community string named public.
snmp-server community comaccess ro 4
snmp-server enable traps snmp authentication
snmp-server host example.com version 2c public
The following example shows how to configure a remote user to receive traps at noAuthNoPriv security level when the SNMPv3 security model is enabled:
snmp-server group group1 v3 noauth
snmp-server user remoteuser1 group1 remote 10.12.8.4
snmp-server host 10.12.8.4 informs version 3 noauth remoteuser config
The following example shows how to configure a remote user to receive traps at the authNoPriv security level when the SNMPv3 security model is enabled:
snmp-server group group2 v3 auth
snmp-server user AuthUser group2 remote 10.12.8.4 v3 auth md5 password1
The following example shows how to configure a remote user to receive traps at the priv security level when the SNMPv3 security model is enabled:
snmp-server group group3 v3 priv
snmp-server user PrivateUser group3 remote 10.12.8.4 v3 auth md5 password1 priv access des56
The following example shows how to send Entity MIB inform notifications to the host example.com. The community string is restricted. The first line enables the router to send Entity MIB notifications in addition to any traps or informs previously enabled. The second line specifies that the notifications should be sent as informs, specifies the destination of these informs, and overwrites the previous snmp-server host commands for the host example.com.
snmp-server enable traps entity
snmp-server host informs example.com restricted entity
The following example shows how to send the SNMP and Cisco environmental monitor enterprise-specific traps to address 172.30.2.160:
snmp-server enable traps
snmp-server host 172.30.2.160 public snmp envmon
The following example shows how to enable the router to send all traps to the host example.com using the community string public:
snmp-server enable traps
snmp-server host example.com public
The following example shows a configuration in which no traps are sent to a host. The BGP traps are enabled for all hosts, but only the ISDN traps are enabled to be sent to a host.
snmp-server enable traps bgp
snmp-server host host1 public isdn
The following example shows how to enable a router to send all informs to the host example.com using the community string named public:
snmp-server enable traps
snmp-server host example.com informs version 2c public
In the following example, the SNMP manager is enabled and the session timeout is set to a value greater than the default:
snmp-server manager
snmp-server manager session-timeout 1000
Example: Configuring IfAlias Long Name Support
In the following example a long description is applied to the Ethernet interface in slot 1, port adapter 0, and port 0:
Router# configure terminal
Router(config)# interface Ethernet1/0/0
Router(config-if)# description ethernet1/0/0 this is a test of a description that exceeds 64 characters in length
Router(config-if)# ip address 192.168.134.55 255.255.255.0
Router(config-if)# no ip directed-broadcast
Router(config-if)# no ip route-cache distributed
Assuming that ifAlias long name support is not yet enabled (the default), the following example shows the results of a mibwalk operation from an NMS:
***** SNMP QUERY STARTED *****
.
.
.
ifXEntry.18.10 (octets) (zero-length)
ifXEntry.18.11 (octets) ethernet1/0/0 this is a test of a description that exceeds 64 ch
ifXEntry.18.12 (octets) (zero-length)
.
.
.
The following output shows the description that is displayed at the CLI:
Router# show interface Ethernet0/0/0
Ethernet1/0/0 is administratively down, line protocol is down
Hardware is Lance, address is 0010.7b4d.7046 (bia 0010.7b4d.7046)
Description: ethernet1/0/0 this is a test of a description that exceeds 64 chh
MTU 1500 bytes, BW 10000 Kbit, DLY 1000 usec,
reliability 252/255, txload 1/255, rxload 1/255
.
.
.
In the following example, ifAlias long name support is enabled and the description is displayed again:
Router(config)# snmp ifmib ifalias long
Router(config)# interface Ethernet1/0/0
Router(config-if)# description ethernet1/0/0 this is a test of a description that exceeds 64 characters in length
Router(config)# end
Router# show interface Ethernet1/0/0
Ethernet1/0/0 is administratively down, line protocol is down
Hardware is Lance, address is 0010.7b4d.7046 (bia 0010.7b4d.7046)
Description: ethernet1/0/0 this is a test of a description that exceeds 64 characters in length
MTU 1500 bytes, BW 10000 Kbit, DLY 1000 usec,
reliability 252/255, txload 1/255, rxload 1/255
.
.
.
***** SNMP QUERY STARTED *****
.
.
.
ifXEntry.18.10 (octets) (zero-length)
ifXEntry.18.11 (octets) ethernet1/0/0 this is a test of a description that exceeds 64 characters in length
ifXEntry.18.12 (octets) (zero-length)
.
.
.
Example: Configuring IfIndex Persistence
The following example shows how to enable IfIndex persistence globally:
Router# configure terminal
Router(config)# snmp-server ifindex persist
The following example shows how to enable IfIndex persistence on Ethernet interface:
Router# configure terminal
Router(config)# interface ethernet 0/1
Router(config)# snmp-server ifindex persist
Example: Configuring SNMP Support for VPNs
In the following example all SNMP notifications are sent to example.com over the VRF named trap-vrf:
Router(config)# snmp-server host example.com vrf trap-vrf
In the following example the VRF named "traps-vrf" is configured for the remote server 172.16.20.3:
Router(config)# snmp-server engineID remote 172.16.20.3 vrf traps-vrf 80000009030000B064EFE100
Example: Enabling Event MIB Persistence
The following example shows how to enable Event MIB Persistence using the snmp mib persist event command in global configuration mode:
Router(config)# snmp mib persist event
Router# write mib-data
Example: Enabling Expression MIB Persistence
The following example shows how to enable Expression MIB Persistence using the snmp mib persist expression command in global configuration mode:
Router(config)# snmp mib persist expression
Router# write mib-data
Example: Configuring Event MIB
The following example shows how to configure scalar variables for an event:
Router# configure terminal
Router(config)# snmp mib event sample minimum
10
Router(config)# snmp mib event sample instance maximum 50
Router(config)# exit
The following example shows how to configure object list for an event:
Router# configure terminal
Router(config)# snmp mib event object list owner owner1 name objectA number 1
Router(config-event-objlist)# object id ifInOctets
Router(config-event-objlist)# wildcard
Router(config-event-objlist)# exit
The following example shows how to configure an event:
Router# configure terminal
Router(config)# snmp mib event owner owner1
event EventA
Router(config-event)# description "eventA is an RMON event."
Router(config-event)# enable
Router(config-event)# exit
The following example shows how to set the notification action for an event:
Router(config-event)# action notification
Router(config-event-action-notification)# object id ifInOctets
Router(config-event-action-notification)# exit
The following example shows how to set actions for an event:
Router(config-event)# action set
Router(config-event-action-set)# object id ifInOctets
Router(config-event-action-set)# value 10
Router(config-event-action-set)# exit
The following example shows how to configure trigger for an event:
Router# configure terminal
Router(config)# snmp mib event trigger owner
owner1 name EventTriggerA
Router(config-event-trigger)# description EventTriggerA is an RMON alarm.
Router(config-event-trigger)# frequency 120
Router(config-event-trigger)# object list owner owner1 name ObjectListA
Router(config-event-trigger)# object id ifInOctets
Router(config-event-trigger)# enable
Router(config-event-trigger)# exit
The following example shows how to configure existence trigger test:
Router(config-event-trigger)# test existence
Router(config-event-trigger-existence)# event owner owner1 name EventA
Router(config-event-trigger-existence)# object list owner owner1 name ObjectListA
Router(config-event-trigger-existence)# type present
Router(config-event-trigger-existence)# startup present
Router(config-event-trigger-existence)# exit
The following example shows how to configure Boolean trigger test:
Router(config-event-trigger)# test boolean
Router(config-event-trigger-boolean)# comparison unequal
Router(config-event-trigger-boolean)# value 10
Router(config-event-trigger-boolean)# object list owner owner1 name ObjectListA
Router(config-event-trigger-boolean)# event owner owner1 name EventA
Router(config-event-trigger-boolean)# startup
Router(config-event-trigger-boolean)# exit
The following example shows how to configure threshold trigger test:
Router(config-event-trigger)# test threshold
Router(config-event-trigger-threshold)# object list owner owner1 name ObjectListA
Router(config-event-trigger-threshold)# rising 100
Router(config-event-trigger-threshold)# rising event owner owner1 name EventA
Router(config-event-trigger-threshold)# falling 50
Router(config-event-trigger-threshold)# falling event owner owner1 name EventA
Router(config-event-trigger-threshold)# delta rising 30
Router(config-event-trigger-threshold)# delta rising event owner owner1 name EventA
Router(config-event-trigger-threshold)# delta falling 10
Router(config-event-trigger-threshold)# delta falling event owner owner1 name EventA
Router(config-event-trigger-threshold)# startup rising
Router(config-event-trigger-threshold)# exit
Example: Configuring Expression MIB
The following example shows how to configure Expression MIB using the snmp mib expression command in global configuration mode:
Router(config)# snmp mib expression owner pcn name exp6
Router(config-expression)# description this expression is created for the sysLocation MIB object
Router(config-expression)# expression ($1+$2)*800/$3
Router(config-expression)# delta interval 120
Router(config-expression)# value type counter32
Router(config-expression)# enable
Router(config-expression)# object 2
Router(config-expression-object)# id ifInOctets
Router(config-expression-object)# wildcard
Router(config-expression-object)# discontinuity object sysUpTime
Router(config-expression-object)# conditional object mib-2.90.1.3.1.1.2.3.112.99.110.4.101.120.112.53 wildcard
Router(config-expression-object)# sample delta
Router(config-expression-object)# exit
Additional References
Related Documents
Standards
|
|
|
|---|---|
CBC-DES (DES-56) standard |
Symmetric Encryption Protocol |
STD: 58 |
Structure of Management Information Version 2 (SMIv2) |
MIBs
RFCs
Technical Assistance
Feature Information for Configuring SNMP Support
Table 2 lists the features in this module and provides links to specific configuration information.
Use Cisco Feature Navigator to find information about platform support and software image support. Cisco Feature Navigator enables you to determine which software images support a specific software release, feature set, or platform. To access Cisco Feature Navigator, go to http://www.cisco.com/go/cfn. An account on Cisco.com is not required.
Note ![]() Table 2 lists only the Cisco IOS software release that introduced support for a given feature in a given software release train. Unless noted otherwise, subsequent releases of that software release train also support that feature.
Table 2 lists only the Cisco IOS software release that introduced support for a given feature in a given software release train. Unless noted otherwise, subsequent releases of that software release train also support that feature.
|
|
|
|
|---|---|---|
SNMP (Simple Network Management Protocol) |
11.2(1) |
The Simple Network Management Protocol (SNMP) feature provides an application layer protocol that facilitates the exchange of management information between network devices. It is part of the Transmission Control Protocol/Internet Protocol (TCP/IP) protocol suite. SNMP enables network administrators to manage network performance, find and solve network problems, and plan for network growth. The following sections provide information about this feature: |
Distributed Management Event and Expression MIB Persistence |
12.0(5)T 12.0(12)S 12.1(3)T |
The MIB Persistence features allow the SNMP data of a MIB to be persistent across reloads; that is, MIB information retains the same set object values each time a networking device reboots. MIB Persistence is enabled by using the snmp mib persist command, and the MIB data of all MIBs that have had persistence enabled using this command is then written to NVRAM storage by using the write mib-data command. Any modified MIB data must be written to NVRAM memory using the write mib-data command. The following sections provide information about this module: |
Interface Index Display and Interface Alias Long Name Support for SNMP |
12.2(2)T |
The Interface Index Display for SNMP feature introduces new commands and command modifications that allow advanced users of SNMP to view information about the interface registrations directly on the managed agent. You can display MIB information from the agent without using an external NMS. This feature addresses three objects in the Interfaces MIB: ifIndex, ifAlias, and ifName. For complete definitions of these objects, see the IF-MIB.my file available from the Cisco SNMPv2 MIB website at ftp://ftp.cisco.com/pub/mibs/v2/. The following sections provide information about this feature: • • |
SNMP Notification Logging |
12.0(22)S |
The SNMP Notification Logging feature adds Cisco IOS CLI commands to change the size of the notification log, to set the global ageout value for the log, and to display logging summaries at the command line. The following sections provide information about this feature: |
SNMP Support for VPNs |
12.2(2)T |
The SNMP Support for VPNs feature allows SNMP traps and informs to be sent and received using VRF tables. In particular, this feature adds support to Cisco IOS software for sending and receiving SNMP traps and informs specific to individual VPNs. This feature was integrated into Cisco IOS Release 15.0(1)S. The following sections provide information about this feature: |
Circuit Interface Identification Persistence for SNMP feature |
12.1(3)T |
This feature can be used to identify individual circuit-based interfaces for SNMP monitoring. This feature was integrated into Cisco IOS Release 15.0(1)S. The following section provides information about this feature: |
Interface IfIndex Persistence |
12.2(15)T |
This feature allows interfaces to be identified with unique values which will remain constant even when a device is rebooted. These interface identification values are used for network monitoring and management using SNMP. This feature was integrated into Cisco IOS Release 15.0(1)S. The following sections provide information about this feature: • |
SNMP Diagnostics |
12.4(20)T |
The SNMP Diagnostics feature adds Cisco IOS CLI commands to display the object identifiers that are recently requested by the network management system, and to display the SNMP debug messages. This feature was integrated into Cisco IOS Release 15.0(1)S. The following commands were introduced or modified: show snmp stats oid and debug snmp detail. |
Event MIB and Expression MIB CLIs |
12.4(20)T |
The Event MIB and Expression MIB feature introduces CLIs to configure the Event MIB and Expression MIB. This feature was integrated into Cisco IOS Release 15.0(1)S. The following section provides information about configuring Event MIB: • • The following section provides information about configuring Expression MIB: • • The following commands were introduced by this feature: action (event), comparison, conditional object, delta (test threshold), delta interval, description (event), description (expression), description (trigger), discontinuity object, enable (event), enable (expression), event owner, enable (expression), expression, falling (test threshold), frequency (event trigger), object (expression), object-id (action notification), object id (action set), object id (event trigger), object list (trigger test), object wildcard, rising (test threshold), sample (expression), snmp mib event object list, snmp mib event owner, snmp mib event trigger, snmp mib expression delta, snmp mib expression owner, startup (test existence), startup (test boolean), startup (test threshold), test (event trigger), type (test existence), value (test boolean), value (event configuration), value type, wildcard (event and expression). |
SNMP Trap Simulations |
12.2(33)SXI |
The SNMP Trap Simulation feature introduces the test snmp trap CLIs to verify the reception of the SNMP, syslog, and config-copy notifications by the SNMP manager, in a simulated scenario. This feature was integrated into Cisco IOS Release 15.0(1)S. |
SNMP Manager |
11.3(1) |
The SNMP manager feature adds a system that controls and monitors the activities of network hosts using SNMP. The most common managing system is an NMS. |
SNMP Version 2 (SNMPv2) |
11.3(1) |
The following sections provide information about this feature: |
SNMP Inform Request |
11.3(1)T |
The following section provide information about this feature: |
SNMP Version 3 (SNMPv3) |
12.0(6)S |
The following sections provide information about this feature: |
Event MIB |
12.1(3)T |
The Event MIB feature provides the ability to monitor Management Information Base (MIB) objects on a local or remote system using SNMP and initiate simple actions whenever a trigger condition is met. By allowing notifications based on events, the Network Management Server (NMS) does not need to constantly poll managed devices to find out if something has changed. |
Expression MIB Support of Delta, Wildcarding and Aggregation |
12.1(3)T |
The Expression MIB Support of Delta, Wildcarding and Aggregation feature adds support of Delta, Wildcarding, Aggregation to the Expression MIB implementation. |
Interfaces MIB: SNMP context based access |
12.2(33)SRB |
The Interfaces MIB: SNMP context based access feature provide ability to query the Interfaces MIB objects and the information returned will be restricted to the VRF to which the SNMP context is mapped to. Notification hosts may also be configured with contexts to restrict the notifications that need to be sent to the particular host. |
SNMPv3 Community MIB Support |
12.2(4)T |
The SNMPv3 Community MIB Support feature implements support for the SNMP Community MIB (SNMP-COMMUNITY-MIB) module, defined in RFC 2576, in Cisco IOS software. |
Entity MIB, Phase I |
11.3(1) |
The Entity MIB feature implements support for Entity MIB module, defined in RFC 2037 and provides a mechanism by which a managed device can advertise its logical components, physical components, and logical to physical mappings. |
Glossary
ifAlias—SNMP Interface Alias. The ifAlias is an object in the Interfaces MIB (IF-MIB). The ifAlias is an alias name for the interface as specified by a network manager that provides a nonvolatile description for the interface. For a complete definition, see the IF-MIB.my file.
ifIndex—SNMP Interface Index. The ifIndex is an object in the Interfaces MIB (IF-MIB). The ifIndex is a unique integer assigned to every interface (including subinterfaces) on the managed system when the interface registers with the IF-MIB. For a complete definition, see the IF-MIB.my file.
OID—MIB object identifier. An object identifier is expressed as a series of integers or text strings. Technically, the numeric form is the object name and the text form is the object descriptor. In practice, both are called object identifiers, or OIDs. For example, the object name for the interfaces MIB is 1.3.6.1.2.1.2, and the object descriptor is `iso.internet.mgmt.mib-2.interfaces' but either can be referred to as the OID. An OID can also be expressed as a combination of the two, such as iso.internet.2.1.2.
Cisco and the Cisco Logo are trademarks of Cisco Systems, Inc. and/or its affiliates in the U.S. and other countries. A listing of Cisco's trademarks can be found at www.cisco.com/go/trademarks. Third party trademarks mentioned are the property of their respective owners. The use of the word partner does not imply a partnership relationship between Cisco and any other company. (1005R)
Any Internet Protocol (IP) addresses and phone numbers used in this document are not intended to be actual addresses and phone numbers. Any examples, command display output, network topology diagrams, and other figures included in the document are shown for illustrative purposes only. Any use of actual IP addresses or phone numbers in illustrative content is unintentional and coincidental.
© 2006-2010 Cisco Systems, Inc. All rights reserved.
Contents
•![]() Restrictions for Configuring SNMP Support
Restrictions for Configuring SNMP Support
•![]() Information About Configuring SNMP Support
Information About Configuring SNMP Support
•![]() How to Configure SNMP Support
How to Configure SNMP Support
•![]() Configuration Examples for SNMP Support
Configuration Examples for SNMP Support
•![]() Feature Information for Configuring SNMP Support
Feature Information for Configuring SNMP Support
Restrictions for Configuring SNMP Support
Not all Cisco platforms are supported on the features described in this module. Use Cisco Feature Navigator to find information about platform support and Cisco IOS software image support.
Information About Configuring SNMP Support
•![]() Detailed Interface Registration Information
Detailed Interface Registration Information
•![]() Interface IfIndex Persistence
Interface IfIndex Persistence
•![]() Circuit Interface Identification Persistence
Circuit Interface Identification Persistence
Components of SNMP
SNMP is an application-layer protocol that provides a message format for communication between SNMP managers and agents. SNMP provides a standardized framework and a common language used for monitoring and managing devices in a network.
The SNMP framework is made up of three parts:
•![]() SNMP manager
SNMP manager
•![]() SNMP agent
SNMP agent
•![]() MIB
MIB
 Feedback