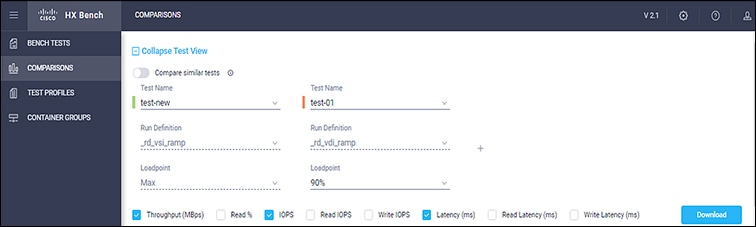
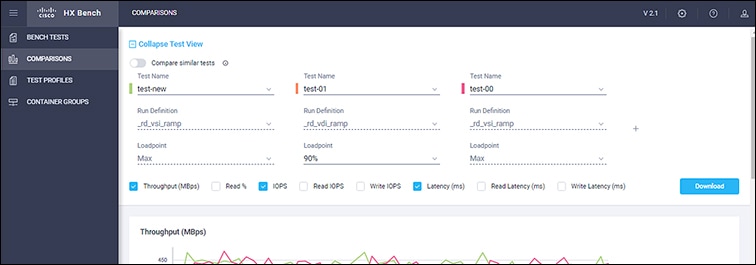
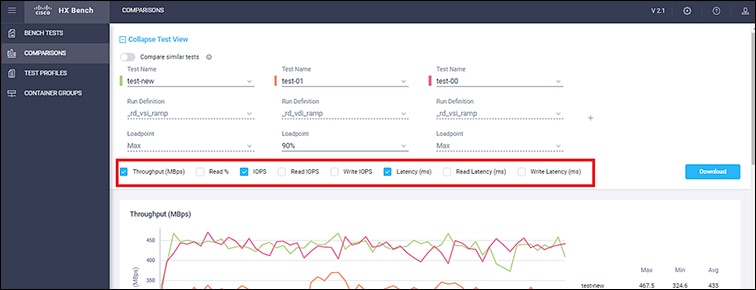
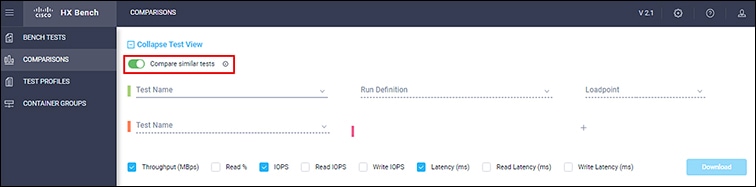
Configure and Run Tests
To test the storage performance in HX Bench complete the steps:
-
Select the Bench Tests tab and click the Create Test button. The Create page appears, this is the first of three pages that guide you through creating a bench test.
-
Complete the following fields on the Test Profile page:
Field Name
Description
Test Name field
Type a unique name into the field. The test name is used to associate test parameters and test results into user-defined reports.
-
Select the desired Profile Type for the named test from the following options:
Table 1. Profile Types Profile Type
Description
Select Existing
Use an existing profile from the list of available Test Profiles.
Create New
Create a new test. Complete the Vdbench test parameter values to define a new custom test:
Test Parameters-
Read Mix (%): Valid range is 1-100%. The default is 60%.
-
IO Type list: Valid values are Random and Sequential. The default is Random.
-
IO Block Size (KB): Valid range is 0-99. The default is 8.
-
Threads per VM: Value must be greater than 1. The default is 32.
Data Set
-
Deduplication (%): Valid range is 0-99%. The default is 50%.
-
Compression (%): Valid range is 0-99%. The default is 50%.
-
Dataset per VM (GB): Value must be greater than 1. The default is 100.
-
Working Set (% of Dataset): Valid range is 0-100%. The default is 100%.
Load point and Run Time
-
Select the Load point: Fixed Load (only 100% load point) or Stepwise Load (Initial calibration, 10%, 50%, 75% 90%, 100% load point)
-
Run Time (min): Length of time of the test: Value must be greater than 1
Upload File
Click the Browsebutton to navigate to upload Vdbench test parameters from a file.
-
-
Click Next to continue to the Container Group page.
-
Provide the infrastructure details of the container you want to test, in the Container Group page:
Infrastructure Type
Description
Use Existing Containers
To use the existing infrastructure to run the tests, select the container group name from Container Group list
Create New Containers
To create a new infrastructure, select Create New and complete the following fields:
-
Container Name: Name of the Container Group.
-
Total Container Across All Nodes: Total Number of containers. Value must be greater than 1.
-
Distribute Container Equally: To deploy containers equally across all the nodes then check the box. Otherwise, leave it as unchecked.
-
Cluster Type:
-
HX: If you want to use HX complete the following fields:
-
HX Connect IP: HX Connect IP address.
-
HX Connect Username: HX Connect Username.
-
HX Connect Password: HX Connect Password
-
-
vSphere:If you want to use vSphere complete the following fields:
-
vCenter Connect DNS/IP: vSphere IP address
-
vCenter Connect Username: vSphere Username
-
vCenter Connect Password: vSphere Password
-
-
-
Storage Class:
Existing: To use the existing Storage class, select the desired Storage Class from Storage Class list .
New: Click new to create a new storage class.
Note To create a new storage class, you must select a data store.
Data Store:
-
Existing: If you want to create storage class with existing datastore click on fetch datastore button, select the desired datastore from datastore dropdown.
New:(HX support only) If you want to create a new data store then click new and enter the data store name and size.
Note vSphere does not support creating a new datastore.
-
-
-
Click Start Test to start the test. As the test progresses, it will automatically transition through the following workflow progress pages.
Workflow Page
Description
Preparing Containers
Container group is validated for its availability and reachability.
Priming Containers
Data disk priming is carried out to run the test. The Container group is ready upon the completion of data disk priming. Now, the Vdbench tool is triggered to run the storage performance test using the provided test inputs on the Container group.
Running
Performance metrics are captured and updated as the test progresses.
Completed
When the test is successfully Completed, the status turns green. The fields under Aggregate Test Results are updated.
-
When the test is successfully Completed, the status turns green and the fields under Load point Averages and Container Average Comparison are updated.
-
You can view the Test containers created with the given specifications. You can view the progress in the Status column. View the progress in the Status column. View the Test container created with the given specifications.
-
Data disk priming is carried out to run the test.
-
The Container is ready upon the completion of data disk priming. The vdbench tool is now triggered to run the storage performance test using the provided test inputs on the container group.
-
Performance metrics are updated as the test progresses on the Run Tests page.
-
When the test is in progress the Create Container Group button is disabled. The button is enabled after test completes, fails or terminates.
-
 Feedback