Access the dashboard
The dashboard shows you the firmware status of the APIC nodes and switches in your fabric. The dashboard also shows the usage of firmware repository on each APICs.
Procedure
|
Navigate to . |
The documentation set for this product strives to use bias-free language. For the purposes of this documentation set, bias-free is defined as language that does not imply discrimination based on age, disability, gender, racial identity, ethnic identity, sexual orientation, socioeconomic status, and intersectionality. Exceptions may be present in the documentation due to language that is hardcoded in the user interfaces of the product software, language used based on RFP documentation, or language that is used by a referenced third-party product. Learn more about how Cisco is using Inclusive Language.
 Note |
Ensure that you check and follow these guidelines:
|
The dashboard shows you the firmware status of the APIC nodes and switches in your fabric. The dashboard also shows the usage of firmware repository on each APICs.
|
Navigate to . |
This procedure downloads firmware images of the Cisco Application Policy Infrastructure Controllers (APICs) and Cisco Application Centric Infrastructure (ACI)-mode switches into the Cisco APIC's firmware repository from an external file server or from your local machine.
If you are downgrading the software on the Cisco APICs, the process is identical to the process for upgrading the software, except that the target release that you choose will be earlier than the currently installed release. The text for dialogs, fields, buttons, and other controls in the Cisco APIC GUI specify "upgrade" even though you are downgrading the software.
Note |
In the Cisco APIC release 6.0(2) and later, download both the 32-bit and 64-bit Cisco ACI-mode switch images to the Cisco APIC. Downloading only one of the images may result in errors during the upgrade process. For more information, see Guidelines and limitations for upgrading or downgrading. In the Cisco ACI-mode switch 16.x releases, the 64-bit switch software has the same image name as the 32-bit software when installed on the switch. To verify which version is running on the switch, use the md5sum command against the image file on switch. Compare this md5sum hash to the switch image contained in the /firmware/fwrepos/fwrepo directory of the Cisco APIC. On subsequent upgrades, the 64-bit and 32-bit image names are differentiated on the switch. |
Follow these steps to download APIC and switch images on APICs:
|
Step 1 |
Download the desired target version from the Cisco Software Download site (for example, 5.2(1g) release) to your file server or local machine. |
|
Step 2 |
On the menu bar, choose Admin > Firmware. |
|
Step 3 |
Click Images in the left navigation bar. |
|
Step 4 |
Click the Actions icon and select Add Firmware from the drop-down menu. |
|
Step 5 |
Determine if you want to import the firmware image from a local or a remote location.
|
|
Step 6 |
Click Submit. The Cisco APICs begins downloading the specified firmware images from the configured source. The download progress is shown in the Download Status column |
Use these GUI-based upgrade or downgrade procedures to upgrade the software on the Cisco APICs in your fabric.
If you are not able to upgrade the software on the Cisco APICs in your fabric using these GUI-based upgrade procedures for some reason (such as if you received a Cisco APIC through a new order or Product Returns & Replacements (RMA), and the version is old and not able to join the fabric to perform an upgrade using the GUI), you can perform a clean installation of the software on the Cisco APICs through the CIMC instead to upgrade your Cisco APIC software. See Installing Cisco APIC Software Using Virtual Media for those procedures. Or, if your Cisco APIC cluster is running the Cisco APIC 6.0(2) release or newer, the new Cisco APIC is automatically upgraded or downgraded to the same version of the existing cluster using Auto Firmware Update on APIC discovery.
If you are downgrading the software on the Cisco APICs, the process is identical to the process for upgrading the software, except that the target release that you choose will be earlier than the currently installed release. The text for dialogs, fields, buttons, and other controls in the Cisco APIC GUI specify "upgrade" even though you are downgrading the software.
Ensure that you check and follow these guidelines:
If you are upgrading from a Cisco APIC release earlier than 5.0 to a 5.0 or later release and you have an IPv4 host route (/32) or IPv6 host route (/128) that is learned using MP-BGP, if those host routes overlap with a local attached non-pervasive subnet, such as an L3Out SVI subnet, the forwarding information base (FIB) process skips the hardware programming for those host routes. This behavior is intentional. You can avoid this situation by using one of the following workarounds:
Do not advertise in the /32 or /128 host route that overlaps with an L3Out interface subnet.
Advertise using any subnet other than /32 or /128.
Peer directly from the border leaf switches to the same peers as the original nodes where there is peering.
Follow these steps to upgrade or downgrade the Cisco APIC software:
|
Step 1 |
On the menu bar, choose . |
||
|
Step 2 |
In the left navigation window, click . |
||
|
Step 3 |
Click the Setup Update button. The Version Selection step of the Setup Controller Firmware Upgrade window appears, showing all of the software images that you have downloaded onto your system.
|
||
|
Step 4 |
Select an image that you want to use for the firmware update, then click Next. |
||
|
Step 5 |
In the browser URL field, enter the URL for the Cisco APIC that has already been upgraded, and sign in to the Cisco APIC as prompted. |
||
|
Step 6 |
Wait for all the Cisco APICs to complete the upgrade or downgrade and become Fully Fit. |
A leaf and spine switch upgrade or downgrade through APIC running release 5.1x or later is a network management process that
enables centralized firmware management of leaf and spine switches through the APIC controller
supports both upgrade and downgrade operations for fabric switches, and
requires APIC release 5.1x or later versions for compatibility and functionality.
This procedure enables you to download switch images to leaf and spine switches at your own timing without performing the actual software installation. During this operation, switches remain up and no reboot is performed.
Note |
When you upgrade a switch from one release to the next release, the fault code F1821 is displayed as the bootflash memory increases. Ignore this fault as it is auto cleared after the switch upgrade. |
If you are downgrading the software on the Cisco Application Policy Infrastructure Controllers (APICs), the process is identical to the process for upgrading the software, except that the target release that you choose will be earlier than the currently installed release. The text for dialogs, fields, buttons, and other controls in the Cisco APIC graphical user interface (GUI) specify "upgrade" even though you are downgrading the software.
Ensure that you check and follow these guidelines:
Wait until all the controllers are upgraded or downgraded to the new firmware version before proceeding to upgrade or downgrade the switch firmware.
Follow these steps to pre-download images to the leaf and spine switches:
|
Step 1 |
On the menu bar, choose . |
||
|
Step 2 |
In the left navigation window, click . |
||
|
Step 3 |
Click the Actions icon and select Create Update Group from the scroll down menu. |
||
|
Step 4 |
In the Setup Switch Update Group window appears, enter a name for the Upgrade Group Name. |
||
|
Step 5 |
In the Switch Selection step, click the Add Switches button, then select the switches that need to be upgraded / downgraded and then click OK, then click Next. |
||
|
Step 6 |
In the Version Selection step, select an Update Type, then in the Select Firmware section select an image that you want to upgrade/downgrade. |
||
|
Step 7 |
(Optional) If you need any of the advanced options listed below, click Advanced Settings to bring up the Advanced Settings window. Note that typically there is no need to set these advanced options. We recommend that you disable the options or use the default values. In the Advanced Settings window, perform any of the following actions if needed:
|
||
|
Step 8 |
Click Update. The download process begins. You can monitor the download progress by viewing the Progress column in the table. If the download fails for some nodes, you can remove the failed nodes from this upgrade group so that you can move forward with the upgrade for the nodes that were successful in the download phase, click the pencil icon next to any node that you want to manually remove from this upgrade group and click Remove. |
See Common reasons for download failure for troubleshooting.
When you see the status of Download Complete for all the nodes in your group, you will see Ready to Install at the top of the screen.
After the pre-download on all switches is done and their upgrade status show Ready to Install, perform the procedure to trigger the upgrade, which will install the firmware and reboot the switches.
Typically, you would perform a pre-download hours or days before this procedure. Make sure that you did not violate any validations since the pre-upgrade validations were performed at the time of pre-download. To perform pre-upgrade validations again at this point, use the Script because the APIC built-in pre-upgrade validator will result in the re-downloading of the switch image.
Ensure that you check and follow these guidelines:
You must first finish the pre-download procedures in Pre-download images to the leaf and spine switches.
Follow these steps to install firmware images and upgrade leaf and spine switches:
|
Step 1 |
When you have a maintenance window where you are able to have the nodes reboot as part of the upgrade process, click Actions, then Begin Install to begin the software installation. You can monitor the progress of the upgrade for the nodes in the upgrade group in the Node Firmware Update window. You can also close this window and click Nodes in the left navigation window to check the overall status of the upgrade group in the Status column in the table. |
|
Step 2 |
When all of the nodes are shown with a status of Completed, click Done and proceed with the next update group. |
App installation behavior is a system process that
determines how apps are installed, upgraded, or downgraded on APICs based on whether they are user-installed or pre-packaged
varies depending on the app type and the current installation status, and
can be configured through REST API or APIC GUI to control pre-packaged app handling policies.
Certain Apps are available to install on APICs and are available to download through the App Center (https://dcappcenter.cisco.com/). These Apps fall into two categories:
User-installed Apps: Apps that you download manually from the App Center and then upload to the APIC.
Pre-packaged Apps: Apps that are installed on an APIC automatically by the plugin-handler.
You can install an App using the REST API or the APIC GUI:
To install an App using the REST API, send a post with XML such as the following examples. The protocol that you choose while triggering a download task depends on the file server hosting the App image. The following post shows an example where the protocol is SCP:
POST {{apic-url}}/api/policymgr/mo/.xml

<polUni>
    <fabricInst>
        <firmwareRepoP>
            <firmwareOSource name="MY-APP" proto="scp" url="URL:PATH-TO-APP-IMAGE" user="MY-USER-NAME" password="MY-PASSWORD"/>
        </firmwareRepoP>
    </fabricInst>
</polUni>
The following example shows a similar post where the protocol is HTTP:
POST {{apic-url}}/api/policymgr/mo/.xml

<polUni>
    <fabricInst>
        <firmwareRepoP>
            <firmwareOSource name="httpuploadapp" proto="http" url="{{downloadserver}}/{{filename}}" status="created,modified"/>
        </firmwareRepoP>
    </fabricInst>
</polUni>
To install an App using the APIC GUI:
For APIC releases prior to 5.2:
Click .
The Downloads screen appears.
Click the Task icon (  ) on the far-right side of the Downloads work pane and select Add File to APIC.
The Add File to APIC dialog appears.
Enter the name of the download file in the Download Name field.
In the Protocol field, choose Secure Copy.
In the URL field, enter the path to the download file image location.
Enter your username and password in the Username and Password field and click Submit.
Click the Operational tab and then click the Refresh icon (  ) on the far-right side of the Downloads work pane to check the status.
The application will automatically install after downloaded. This could take approximately five minutes to complete.
For APIC release 5.2 or later:
Click .
The Downloads screen appears.
Click the Task icon ( ) on the far-right side of the Downloads work pane and select Add File to APIC.
The Add File to APIC dialog appears.
Enter the name of the download file in the Download Name field.
In the Protocol field, choose Secure Copy.
In the URL field, enter the path to the download file image location.
Enter your username and password in the Username and Password field and click Submit.
Click the Operational tab and then click the Refresh icon ( ) on the far-right side of the Downloads work pane to check the status.
The application will automatically install after downloaded. This could take approximately five minutes to complete.
When you install an App from App Center on an APIC, the behavior around that App installation varies, depending on several factors:
Whether the App is a user-installed App or a pre-packaged App
Whether this is a fresh installation, an upgrade, or a downgrade for the App on the APIC
If you are manually installing an App that doesn't normally come pre-installed on an APIC, the behavior around that installation varies, depending on the following situations:
If you do not already have this App installed on your APIC, then this is considered a fresh installation and the App is installed on your APIC in the normal fashion.
If you already have this App installed on your APIC and the App currently installed on your APIC is an earlier version of the App, then the upload of this later version of the App to your APIC triggers an upgrade of the App on your APIC.
If you already have this App installed on your APIC and the App currently installed on your APIC is a later version of the App, then the upload of this earlier version of the App to your APIC triggers a downgrade of the App on your APIC.
When you upgrade or downgrade all of the APICs in a cluster to a new APIC image, the plugin-handler checks for pre-packaged Apps images that come with that new APIC image.
If the plugin-handler finds that an App is available in the new APIC image but that App is not currently installed on your APICs, then the plugin-handler triggers the installation of that App on your APICs.
If the plugin-handler finds that an App is available in the new APIC image and that App is already installed on your APICs, the plugin-handler then checks if the App that is available in the new APIC image is an earlier or later release than the App currently installed on your APICs:
If the version of the App in the new APIC image is a later release than the App currently installed in your APICs, then the plugin-handler triggers an upgrade or downgrade for that App on your APICs. Beginning with release 5.2(3), pre-packaged Apps get upgraded or downgraded to whatever App images are bundled in the APIC image after all of the APICs are upgraded or downgraded in a setup, regardless of what version of those Apps were running on that setup before the APICs got upgraded or downgraded.
If the version of the App in the new APIC image is an earlier release than the App currently installed in your APICs, then the plugin-handler takes no action with the App on your APICs. The plugin-handler does not downgrade the App on your APICs to that earlier version that is available in the new APIC image. This is done so that you can install newer versions of an App, where the version of an App that you install might be later than the version that comes pre-packaged with an APIC image, and the plugin-handler won't automatically overwrite the later version of that App currently on your APICs with an earlier version.
For example, assume the APICs in a cluster are running on release version 1.2(3), and the pre-packaged App AcmeApp is available for APIC release 1.2(3), where 4.5(6) is the version of AcmeApp that is normally pre-packaged on APICs running on release 1.2(3).
Assume that you want to upgrade the AcmeApp at some later date and the latest version of AcmeApp, the 4.6(1) version of AcmeApp, is available at the App Center. You then manually download and install that latest version of AcmeApp so that the APICs and the AcmeApp are at the following versions:
The APICs in the cluster are still running on APIC release 1.2(3)
The AcmeApp on these APICs is now updated to AcmeApp version 4.6(1)
Now assume that you decide to upgrade the APIC from release 1.2(3) to release 1.2(4) at another date later on. However, for APICs running on 1.2(4), the version of AcmeApp that is normally pre-packaged is version 4.5(7). In that case, the plugin-handler would not make any changes to the version of AcmeApp running on your APIC, because your APIC already has a version of AcmeApp running on it [version 4.6(1)] that is later than the 4.5.(7) version that would normally come pre-packaged with APIC release 1.2(4).
Note that you can change the Apps policy for pre-packaged Apps:
Through the REST API, you can change the Apps policy for pre-packaged Apps by modifying the apPrepackagedPlugins MO using one of the following three options:
POST {{apic-url}}/api/policymgr/mo/.xml

<polUni>
  <apPluginPolContainer>
      <apPrepackagedPlugins PrepackagedAppsAction="install-all"/>
  </apPluginPolContainer>
</polUni>
remove-all: This option removes all pre-packaged Apps from APIC.
POST {{apic-url}}/api/policymgr/mo/.xml

<polUni>
  <apPluginPolContainer>
      <apPrepackagedPlugins PrepackagedAppsAction="remove-all"/>
  </apPluginPolContainer>
</polUni>
skip-installation: This option disables the plugin-handler from automatically installing or upgrading pre-packaged Apps in future APIC image upgrades.
POST {{apic-url}}/api/policymgr/mo/.xml

<polUni>
  <apPluginPolContainer>
      <apPrepackagedPlugins PrepackagedAppsAction="skip-installation"/>
  </apPluginPolContainer>
</polUni>
Through the APIC GUI:
Navigate to .
The Apps page is displayed.
Click on the Settings icon ( ), then choose Change Prepackaged Apps Policy.
The Change Prepackaged Apps Policy page appears.
Choose one of the following options (see the options descriptions above in the REST API information):
Install All
Remove All
Skip Installation
For any App that you install, whether it is a user-installed App or a pre-packaged App, you can usually see that App displayed in the Apps window in the APIC GUI, which you can view by navigating to .
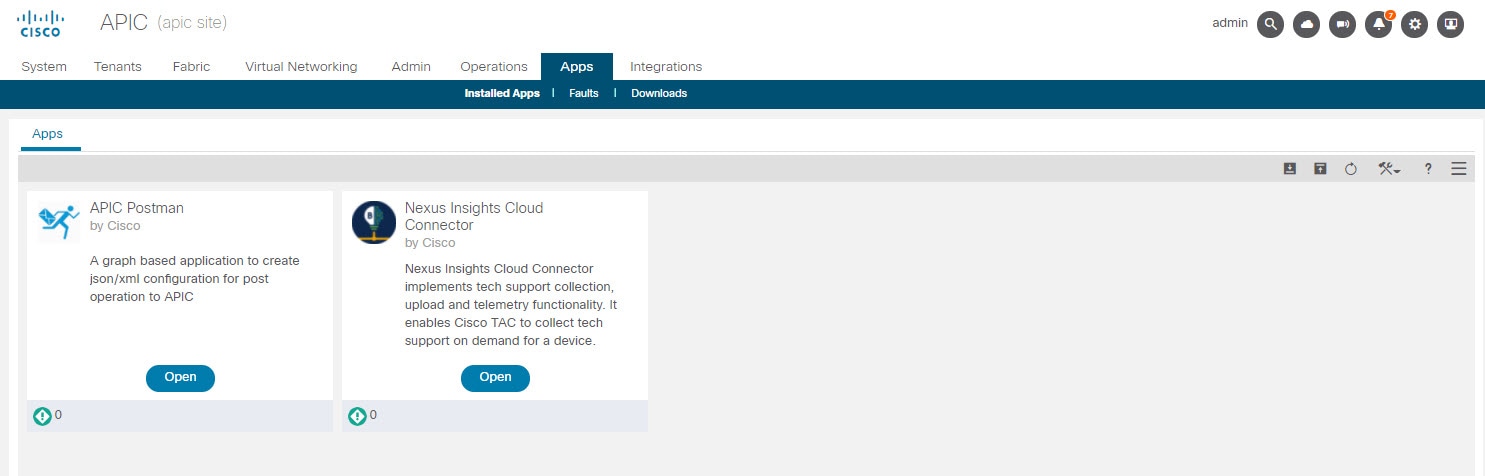
You can perform certain actions for Apps displayed in this window, such as opening, enabling, or deleting those Apps.
However, there are certain pre-packaged Apps that might be installed on your APICs but are not displayed in the Apps window in the APIC GUI, such as the ApicVision App that became available beginning with release 5.2(1). While these hidden Apps won't appear in the Apps window, they might appear in the Faults window if there is an issue with that App ().
Note |
The pre-packaged ApicVision App that became available with release 5.2(1) is not available for download through the App store, so do not make changes to or delete the ApicVision App. Contact Cisco TAC support if you have any issues or faults with the pre-packaged ApicVision App. |
You can locate and work with these hidden pre-packaged Apps through Visore, the APIC Object Store Browser that you can use to directly query Managed Objects (MOs). For more information on Visore, see Application Policy Infrastructure Controller Visore Tool Introduction.
You can access Visore by appending /visore.html to the URL that you would normally use to log into your APIC GUI:
https://<APIC or Switch IP ADDRESS>/visore.html
After you have logged into Visore, the Object Store window is displayed.

From there, you can query the MO for any Apps installed on your APICs by entering apPlugin in the Class or DN or URL field and clicking Run Query. Visore returns output showing the number of objects found for this MO, which is the total number of Apps that are installed
on your APICs, including hidden Apps that aren't displayed in the Apps window in the normal APIC GUI.
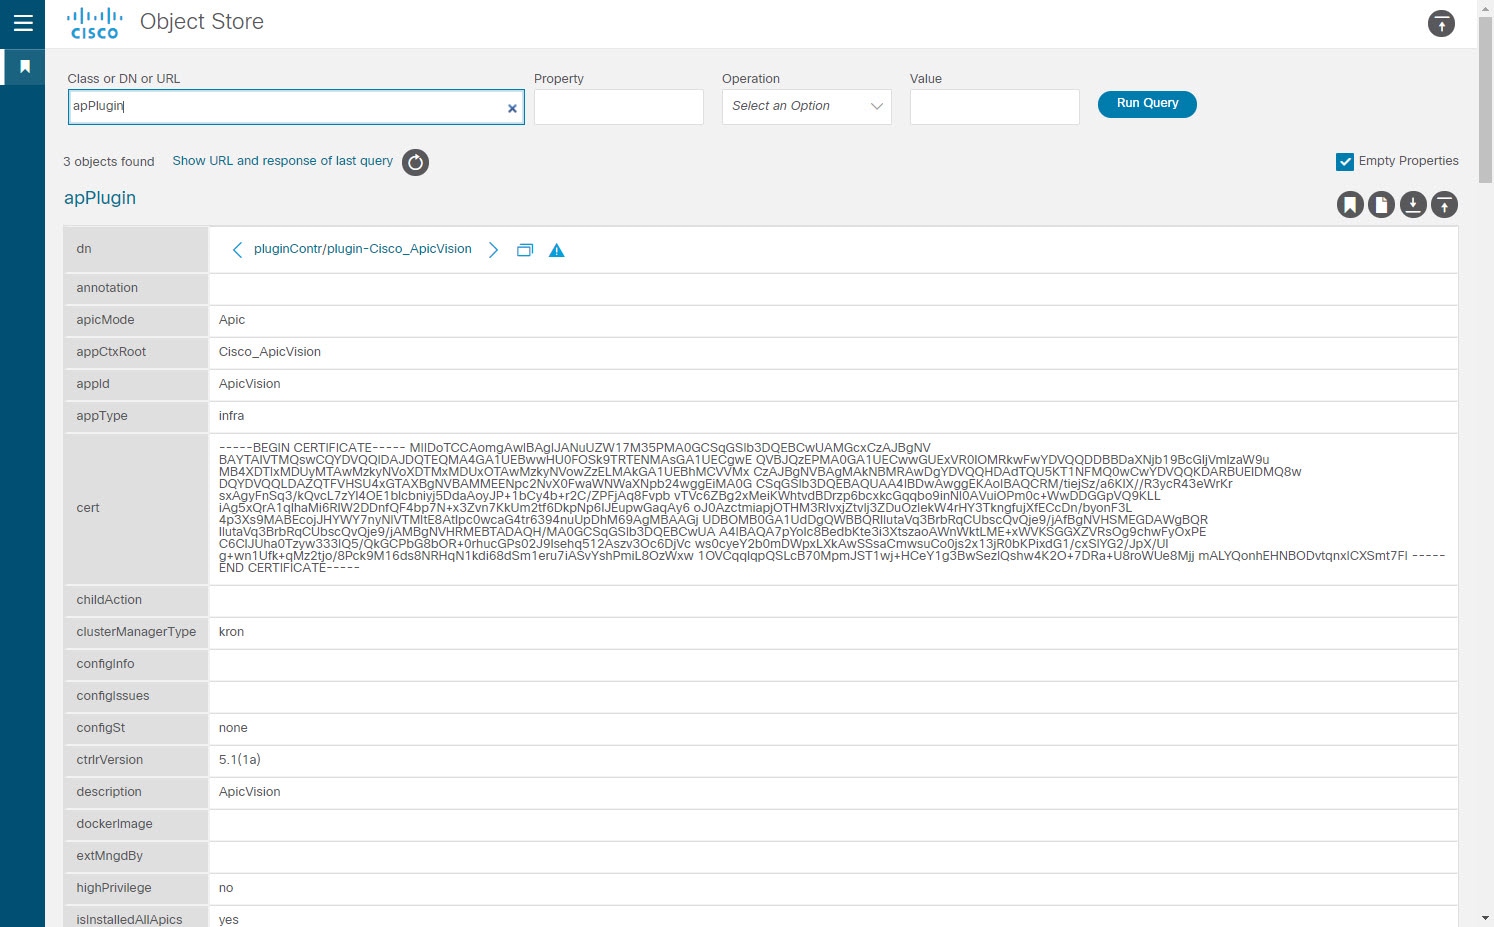
For example, the information provided in the Apps window in the example above shows two Apps installed, whereas the information returned from the apPlugin query in Visore shows three objects found for the Apps MO. Comparing the two lists of Apps, you can see that the ApicVision
App is not shown in the Apps window in the normal APIC GUI but is displayed in the Visore output, so that means that the ApicVision App is a hidden pre-packaged
App.
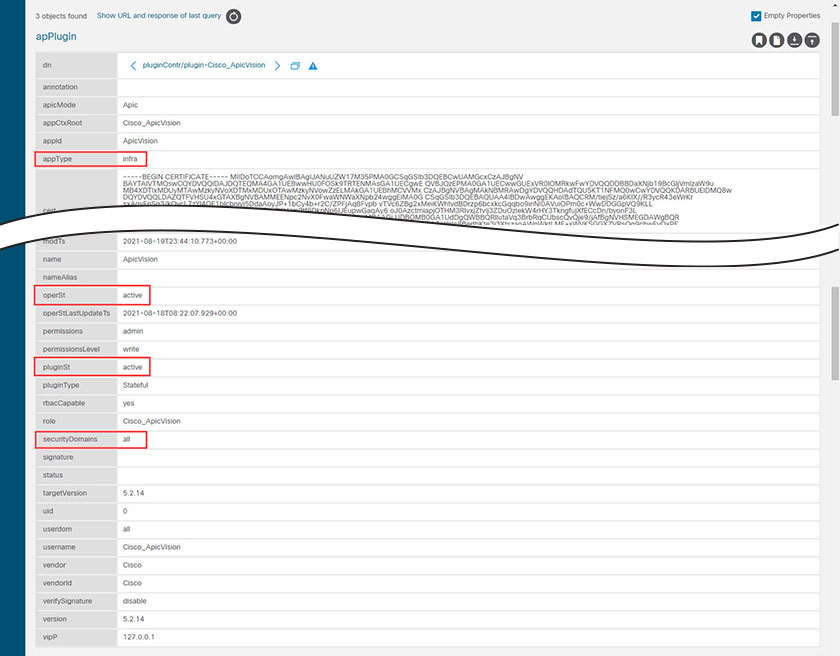
You can now get more information on this hidden pre-packaged App through certain fields displayed in the Visore output, such as the pluginSt field that shows your desired state for the App and the operSt field that shows the operational state for the App.
For example, you could verify that an App is up and running if you see the following for an App:
No faults are shown for this App in the Faults window ()
The state in the operSt field is shown as active
The state in the pluginSt field is shown as active
In addition, you should pick a security domain when you enable an App, and the securityDomains field is populated with that value when you enable an App as described below (when you set the pluginSt field to active for an instance of an apPlugin MO). Note that the plugin-handler selects all as the security domain for infra Apps (for Apps that are set to infra in the appType field in the apPlugin MO instance).
Because you can't view these hidden Apps in the Apps window in the normal APIC GUI, you are not able to perform certain actions such as opening, enabling, or deleting the hidden Apps through the APIC GUI. However, you can perform these actions on a hidden App through the REST API:
To enable a hidden App, send a post with XML such as the following example:
<?xml version="1.0" encoding="UTF-8"?>
<!-- /api/plgnhandler/mo/.xml -->
<apPluginContr>
    <apPlugin appCtxRoot="{{vendordomain}}_{{appid}}" pluginSt="active" securityDomains="{{security-domains}}"/>
</apPluginContr>
Where the pluginSt is active.
To disable a hidden App, send a post with XML such as the following example:
<?xml version="1.0" encoding="UTF-8"?>
<!-- /api/plgnhandler/mo/.xml -->
<apPluginContr>
    <apPlugin appCtxRoot="{{vendordomain}}_{{appid}}" pluginSt="inactive"/>
</apPluginContr>
Where the pluginSt is inactive.
Note the following:
The security domain is not needed when disabling a hidden App.
To find the appCtxRoot value for an App for either of the posts shown above, query for instances of the apPlugin MO and use the entry in the appCtxRoot field in the instance of the apPlugin MO that corresponds to your App of interest.
moquery -c apPlugin | grep appCtxRoot command:
# moquery -c apPlugin | grep appCtxRoot
appCtxRoot           : Cisco_NIBASE
appCtxRoot           : Cisco_ApicVision
To delete a hidden App, send a post with XML such as the following example:
<?xml version="1.0" encoding="UTF-8"?>
<!-- /api/node/mo/.xml -->
<firmwareRepo>
    <firmwareFirmware name="{{vendordomain}}_{{appid}}" deleteIt="true"/>
</firmwareRepo>
 Feedback