Installing or Recovering Cisco APIC Images

Installation Notes

  • For hardware installation instructions, see the Cisco ACI Fabric Hardware Installation Guide.

  • Back up your Cisco APIC configuration prior to installing or upgrading to this release. Single Cisco APIC clusters, which should not be run in production, can lose their configuration if database corruption occurs during the installation or upgrade.

  • For instructions on how to access the Cisco APIC for the first time, see the Cisco APIC Getting Started Guide.

  • Cisco ACI with Microsoft System Center Virtual Machine Manager (SCVMM) or Microsoft Windows Azure Pack only supports ASCII characters. Non-ASCII characters are not supported. Ensure that English is set in the System Locale settings for Windows, otherwise Cisco ACI with SCVMM and Windows Azure Pack will not install. In addition, if the System Locale is later modified to a non-English Locale after the installation, the integration components might fail when communicating with the Cisco APIC and the Cisco ACI fabric.

  • For the Cisco APIC Python SDK documentation, including installation instructions, see the Cisco APIC Python SDK Documentation.

    The SDK egg file that is needed for installation is included in the package. The egg filename has the following format:

    acicobra-A.B_CD-py2.7.egg

    • A: The major release number.

    • B: The minor release number.

    • C: The maintenance release number.

    • D: The release letter (patch letter). The letter is in lowercase.

    For example, the egg filename for the 5.2(4d) release is as follows:

    acicobra-5.2_4d-py2.7.egg

  • Installation of the SDK with SSL support on Unix/Linux and Mac OS X requires a compiler. For a Windows installation, you can install the compiled shared objects for the SDK dependencies using wheel packages.

  • The model package depends on the SDK package; be sure to install the SDK package first.

  • Beginning with Cisco APIC 6.0 (2), support for a new type of SSL certificate - ECDSA certificate has been enabled. This certificate is not supported on the previous versions of Cisco APIC. If you have deployed the ECDSA certificate and then downgrade to a previous version of Cisco APIC, the Cisco APIC web server will not work. You must update your Cisco APIC web server to use a RSA-based certificate before downgrading to a version lower than Cisco APIC 6.0 (2).

  • Starting from Cisco APIC 6.1(2) and later, you must enable the global AES encryption check box before you upgrade to the latest image. This includes a prevalidation check to ensure that Global AES Encryption is enabled prior to proceeding with the upgrade.

Usage Guidelines

  • The Cisco APIC GUI supports the following browsers:

    • Chrome version 59 (at minimum) on Mac and Windows

    • Firefox version 54 (at minimum) on Mac, Linux, and Windows

    • Internet Explorer version 11 (at minimum)

    • Safari 10(at minimum)


      Note


      Restart your browser after upgrading to release 1.3(1).


  • The Cisco APIC GUI includes an online version of the Quick Start guide that includes video demonstrations.

  • The infrastructure IP address range must not overlap with other IP addresses used in the fabric for in-band and out-of-band networks.

  • The Cisco APIC does not provide IPAM services for tenant workloads.

  • To reach the Cisco APIC CLI from the GUI: select System > Controllers, highlight a controller, right-click and select "launch SSH". To get the list of commands, press the escape key twice.

  • In some of the 5-minute statistics data, the count of ten-second samples is 29 instead of 30.

  • For the following services, use a DNS-based host name with out-of-band management connectivity. IP addresses can be used with both in-band and out-of-band management connectivity.

    • Syslog server

    • Call Home SMTP server

    • Tech support export server

    • Configuration export server

    • Statistics export server

  • Both leaf and spine switches can be managed from any host that has IP connectivity to the fabric.

  • When configuring an atomic counter policy between two endpoints, and an IP is learned on one of the two endpoints, it is recommended to use an IP-based policy and not a client endpoint-based policy.

  • When configuring two Layer 3 external networks on the same node, the loopbacks need to be configured separately for both Layer 3 networks.

  • All endpoint groups (EPGs), including application EPGs and Layer 3 external EPGs, require a domain. Interface policy groups must also be associated with an Attach Entity Profile (AEP), and the AEP must be associated with domains. Based on the association of EPGs to domains and of the interface policy groups to domains, the ports and VLANs that the EPG uses are validated. This applies to all EPGs including bridged Layer 2 outside and routed Layer 3 outside EPGs. For more information, see the Cisco Fundamentals Guide and the KB: Creating Domains, Attach Entity Profiles, and VLANs to Deploy an EPG on a Specific Port article.


    Note


    In the 1.0(4x) and earlier releases, when creating static paths for application EPGs or Layer 2/Layer 3 outside EPGs, the physical domain was not required. In this release, it is required. Upgrading without the physical domain will raise a fault on the EPG stating “invalid path configuration.”


  • The only place to associate an EPG with a contract interface is within its own tenant.

  • User passwords must meet the following criteria:

    • Minimum length is 8 characters

    • Maximum length is 64 characters

    • Fewer than three consecutive repeated characters

    • At least three of the following character types: lowercase, uppercase, digit, symbol

    • Cannot be easily guessed

    • Cannot be the username or the reverse of the username

    • Cannot be any variation of “cisco”, “isco”, or any permutation of these characters or variants obtained by changing the capitalization of letters therein

  • The power consumption statistics are not shown on leaf switch node slot 1.

  • For Layer 3 external networks created through the API or Advanced GUI and updated through the CLI, protocols need to be enabled globally on the external network through the API or Advanced GUI, and the node profile for all the participating nodes needs to be added through the API or Advanced GUI before doing any further updates through the CLI.

  • For Layer 3 external networks created through the CLI, you should not to update them through the API. These external networks are identified by names starting with “__ui_”.

  • The output from "show" commands issued in the NX-OS-style CLI are subject to change in future software releases. Cisco does not recommend using the output from the show commands for automation.

  • In this software version, the CLI is supported only for users with administrative login privileges.

  • Do not separate virtual private cloud (vPC) member nodes into different configuration zones. If the nodes are in different configuration zones, then the vPCs’ modes become mismatched if the interface policies are modified and deployed to only one of the vPC member nodes.

  • If you defined multiple login domains, you can choose the login domain that you want to use when logging in to a Cisco APIC. By default, the domain drop-down list is empty, and if you do not choose a domain, the DefaultAuth domain is used for authentication. This can result in login failure if the username is not in the DefaultAuth login domain. As such, you must enter the credentials based on the chosen login domain.

  • A firmware maintenance group should contain a maximum of 80 nodes.

  • When contracts are not associated with an endpoint group, DSCP marking is not supported for a VRF with a vzAny contract. DSCP is sent to a leaf switch along with the actrl rule, but a vzAny contract does not have an actrl rule. Therefore, the DSCP value cannot be sent.

  • We recommend that you should not use a leaf switch as a NTP server for the Cisco ACI fabric.

Conditions for Recovering or Installing Cisco APIC Software Image

This chapter describes how to install or recover a Cisco APIC. You recover the Cisco APIC image when your existing server has a Cisco APIC image that is completely unresponsive, and you want a new Cisco APIC image installed in it.


Note


If you have an existing UCS server, skip to the Installing Cisco APIC Software section.


Installing the Cisco APIC image accomplishes the following tasks:

  • It erases the existing data on the disks

  • It reformats the disks

  • It installs a new software image

You can use one of the following methods to install your Cisco APIC software in a server:

  • Using a PXE server

  • Using virtual media


Note


You can use the Cisco APIC ISO image files for installation just as you perform any other virtual media installation. The detailed steps are not described in this document.


Installing the Cisco APIC Software on an APIC Server M1/L1, M2/L2, or M3/L3 Using a PXE Server

This procedure installs the Cisco Application Policy Infrastructure Controller (APIC) software on an APIC server M1/L1, M2/L2, or M3/L3 using a Preboot Execution Environment (PXE) server.

Procedure


Step 1

Configure the PXE server with a standard configuration for Linux.

Step 2

Verify that the PXE configuration file has an entry similar to the following for installing a Cisco APIC software image for release 4.0 or later.


label 25
   kernel vmlinuz dd blacklist=isci blacklist=ahci nodmraid noprobe=ata1 noprobe=ata2 noprobe=ata3 noprobe=ata4
   append initrd=initrd root=live:squashfs.img_URL rd.live.img rd.live.debug=1 rd.live.ram=1 rd.debug atomix.isourl=iso_URL

Example:


label 25
   kernel ifcimages/vmlinuz dd blacklist=isci blacklist=ahci nodmraid noprobe=ata1 noprobe=ata2 noprobe=ata3 noprobe=ata4
   append initrd=ifcimages/initrd.img root=live:http://192.0.2.10/myisomount/LiveOS/squashfs.img rd.live.img rd.live.debug=1 rd.live.ram=1 rd.debug atomix.isourl=http://192.0.2.10/aci-apic-dk9.4.0.0.iso

Step 3

Download the Cisco APIC .iso image from Cisco.com.

Step 4

Create the mount folder and mount the Cisco APIC .iso image.


$ mkdir -p mount_folder
$ mount –t iso9660 –o loop iso_image mount_folder

Example:


$ cd /home/user
$ mkdir -p myisomount
$ mount –t iso9660 –o loop /local/aci-apic-dk9.4.0.0.iso myisomount

Step 5

Verify that the initrd.img and vmlinuz files are in the mount folder location.

Example:


$ ls /home/user/myisomount/images/pxeboot/
initrd.img  vmlinuz

Step 6

Copy vmlinuz and intird from the mounted Cisco APIC .iso image to your tftpboot path.

Example:


$ mkdir –p /var/lib/tftpboot/ifcimages
$ cp –f /home/user/myisomount/images/pxeboot/vmlinuz /var/lib/tftpboot/ifcimages/
$ cp –f /home/user/myisomount/images/pxeboot/initrd.img /var/lib/tftpboot/ifcimages/

Step 7

Copy the Cisco APIC .iso image and the mount folder to your HTTP root directory.

Example:


$ cp –R /local/aci-apic-dk9.4.0.0.iso /var/www/html
$ cp –R /home/user/myisomount /var/www/html

Step 8

Add an entry to the PXE configuration (/var/lib/tftpboot/pxelinux.cfg/default) so that it points to the kickstart file for the Cisco APIC .iso image.

Example:


[root@pxeserver ~]# cat /var/lib/tftpboot/pxelinux.cfg/default
label 25
   kernel ifcimages/vmlinuz dd blacklist=isci blacklist=ahci nodmraid noprobe=ata1 noprobe=ata2 noprobe=ata3 noprobe=ata4
   append initrd=ifcimages/initrd.img root=live:http://192.0.2.10/myisomount/LiveOS/squashfs.img rd.live.img rd.live.debug=1 rd.live.ram=1 rd.debug atomix.isourl=http://192.0.2.10/aci-apic-dk9.4.0.0.iso

You use this information to verify that your PXE menu entry images set up correctly.

Step 9

Restart the PXE servers.

Step 10

Reboot the Cisco APIC and press F12 for network boot.

Step 11

Choose the options configured on the PXE server to boot the Cisco APIC image.


Installing the Cisco APIC Software on an APIC Server M4/L4 Using a PXE Server

This procedure installs the Cisco Application Policy Infrastructure Controller (APIC) software on an APIC server M4/L4 using a Preboot Execution Environment (PXE) server:

Procedure


Step 1

Install the DNSMasq package and an HTTP server package in the PXE server.

Step 2

Download the ISO you wish to install into a path where your PXE server will host the file, such as /var/www/html.

Step 3

Unpack or mount the ISO as appropriate.

Example:

$ sudo mkdir /mnt/iso /mnt/efi
$ sudo mount -oloop /var/www/html/aci-apic-dk9.6.0.2b.iso /mnt/iso
$ sudo mount -t vfat /mnt/iso/images/efiboot.img /mnt/efi

Step 4

Copy the installer EFI files to the PXE server TFTP path, such as /srv/tftp.

Example:

$ cp -av /mnt/efi/EFI/BOOT/*.EFI /srv/tftp/

Step 5

Unmount the ISO.

Example:

$ sudo umount /mnt/efi
$ sudo umount /mnt/iso

Step 6

Configure DNSMasq.

Example:

The following text is an example configuration; modify as necessary for your setup. Save this in the /etc/dnsmasq.conf configuration file, overwriting the default configuration.

interface=*
bind-interfaces
enable-tftp
tftp-root=/srv/tftp
port=0
log-dhcp
dhcp-no-override

# UEFI PXE clients only.
dhcp-vendorclass=BIOS,PXEClient:Arch:00000

# Boot directly into shim.
dhcp-boot="BOOTX64.EFI"

# Use this option to pass parameters to the installer. Currently only
# atxi.wipe= and atomix.isourl are supported.
dhcp-option-force=129,"atomix.isourl=http://ipaddress-of-PXE-server/path/to/install/iso"

# Create a DHCP range and set the gateway.
dhcp-range=rack-rack1-data0,192.168.41.0,static,255.255.255.0,infinite
dhcp-option=rack-rack1-data0,3,192.168.41.1

# Static mapping for clients.
dhcp-host=52:54:00:a2:34:c0,,192.168.41.2,brick2-data2,infinite
dhcp-host=52:54:00:a2:34:02,,192.168.41.3,brick2-data3,infinite
dhcp-host=52:54:00:a2:34:03,,192.168.41.4,brick2-data4,infinite

Step 7

Restart the PXE servers.

Step 8

Reboot the Cisco APIC and press F12 for network boot.


Installing Cisco APIC Using a PXE Server

You can install Cisco Application Policy Infrastructure Controller (APIC) ISO for UEFI, UEFI SecureBoot, and Legacy BIOS systems using a PXE server.

Ensure that you have the following software installed on your system:

sudo apt install -y dnsmasq lighttpd syslinux-common pxelinux

DNSMasq Configuration

To create a new dnsmasq configuration, run the following command:
$ sudo systemctl stop dnsmasq
$ sudo mv /etc/dnsmasq.conf /etc/dnsmasq.conf.orig
$ sudo mkdir -p /srv/tftp
In the following code snippet, you must enter the IP details of your HTTP server that is hosting ISO and then configure a DHCP subnet range for clients which must be able to reach the HTTP server's IP. After you save your configuration file with the changes, run the following command:
sudo systemct restart dnsmasq
interface=*
bind-interfaces
enable-tftp
tftp-root=/srv/tftp
port=0
log-dhcp
dhcp-no-override

dhcp-match=x86PC,  option:client-arch, 0  # matches legacy BIOS x86
dhcp-match=BC_EFI, option:client-arch, 7  # matches UEFI x86-64

# Load different PXE boot image depending on client architecture
pxe-service=tag:x86PC,X86PC,   "Install Linux on x86 BIOS",    pxelinux.0
pxe-service=tag:BC_EFI,BC_EFI, "Install Linux on x86-64 UEFI", bootx64.efi

# Set bootfile name only when tag is "bios" or "uefi"
dhcp-boot=tag:x86PC,pxelinux.0      # for Legacy BIOS detected by dhcp-match above
dhcp-boot=tag:BC_EFI,bootx64.efi    # for UEFI arch detected by dhcp-match above

# Enable PXELinux client options
dhcp-option=tag:x86PC,208,f1:00:74:7e  # pxelinux.magic string

# set boot params, note the ip/network is tied to the netplan config in this layer
dhcp-option-force=129,"atxi.wipe=true atomix.isourl=http://<IP of your HTTP server>/atomix.iso"

# an example IPV4 subnet range
dhcp-range=192.168.41.3,192.168.41.50,12h
dhcp-lease-max=25

HTTP Configuration

The default lighttpd configuration file will work as it is with no changes required as it listens on all interfaces for port 80.


Note


The name of the file must match the /etc/dnsmasq.conf value in the dhcp-option-force=129 setting. This value is passed into the machine through the DHCP settings and will use the URL to download the iso file.

Copy the installer iso file to following path:

/var/www/html/<ISONAME.iso>


PXELINUX Configuration

Systems that reboot through BIOS/Legacy uses pxelinux to acquire the installer. Ensure that the tftp location in the DNSMasq configuration file above is used to copy these files and configurations or adjust the commands as needed.

sudo mkdir -p /srv/tftp
sudo cp -av /usr/lib/PXELINUX/* /srv/tftp/
sudo cp /usr/lib/syslinux/modules/bios/* /srv/tftp/
sudo mkdir -p /srv/tftp/pxelinux.cfg

Copy the following configuration to this /srv/tftp/pxelinux.cfg/default location and modify the HTTP URL to match the HTTP server’s IP and path to the ISO.

DEFAULT atomix-install

label atomix-install
  kernel vmlinuz
  append initrd=initrd.img ro verbose debug console=tty0 console=ttyS0,115200n8 atomix.isourl=http://<HTTP_IP>/<ISO NAME>
  sysappend 3

Extracting content from ISO

Once you’ve acquired the ISO, you need to extract some files from the ISO and place them in certain directories, as shown below:

$ sudo mkdir /mnt/iso /mnt/efi
$ sudo mount -oloop /var/www/html/<ISO filename> /mnt/iso
$ sudo mount -t vfat /mnt/iso/images/efiboot.img /mnt/efi
$ cp -av /mnt/efi/EFI/BOOT/BOOTX64.efi /srv/tftp/bootx64.efi
$ cp -av /mnt/efi/EFI/BOOT/GRUBX64.efi /srv/tftp/grubx64.efi
$ cp -av /mnt/iso/isolinux/vmlinuz /srv/tftp/vmlinuz
$ cp -av /mnt/iso/isolinux/initrd.img /srv/tftp/initrd.img
$ sudo umount /mnt/efi
$ sudo umount /mnt/iso

Testing

Once you apply the configuration, your test systems must boot into the installer and configure the networking settings and download the ISO through HTTP to the system and proceed with the install.

On the PXE server, you can use the following dnsmasq service:
sudo journalctl --follow -u dnsmasq

Note


Some of the dnsmasq log entries may display an error as shown below. However, these errors are not fatal and the UEFI PXE clients in the firmware will try again.
Feb 17 01:01:25 ubuntu dnsmasq-dhcp[1201]: 1836224829 sent size: 10 option: 43 vendor-encap  06:01:08:0a:04:00:50:58:45:ff
Feb 17 01:01:25 ubuntu dnsmasq-tftp[1201]: error 8 User aborted the transfer received from 192.168.41.3
Feb 17 01:01:25 ubuntu dnsmasq-tftp[1201]: failed sending /srv/tftp/bootx64.efi to 192.168.41.3
Feb 17 01:01:25 ubuntu dnsmasq-tftp[1201]: sent /srv/tftp/bootx64.efi to 192.168.41.3
Feb 17 01:01:47 ubuntu dnsmasq-tftp[1201]: error 3 User provided memory block is too small received from 192.168.41.3
Feb 17 01:01:47 ubuntu dnsmasq-tftp[1201]: failed sending /srv/tftp/grubx64.efi to 192.168.41.3
Feb 17 01:02:09 ubuntu dnsmasq-tftp[1201]: sent /srv/tftp/grubx64.efi to 192.168.41.3

On the PXE client, the serial console output shows the install and in particular displays how it acquires the ISO.

This is part of the installer output that displays how it acquires the installer iso file.
++ cmdline=' BOOT_IMAGE=vmlinuz initrd=initrd.img ro verbose debug console=tty0 console=ttyS0,115200n8 atomix.isourl=http://192.168.41.2/atomix.iso ip=192.168.41.41:192.'
++ case "$cmdline" in
++ val='http://192.168.41.2/atomix.iso ip=192.168.41.41:192.168.41.2:192.168.41.2:255.255.255.0 BOOTIF=01-52-54-00-12-34-56 '
++ val=http://192.168.41.2/atomix.iso
++ echo http://192.168.41.2/atomix.iso
+ ksurl=http://192.168.41.2/atomix.iso
+ '[' -z http://192.168.41.2/atomix.iso ']'
+ '[' -n http://192.168.41.2/atomix.iso ']'
+ '[' -z '' ']'
+ dhclient
[    3.573160] 8021q: adding VLAN 0 to HW filter on device ens4
+ tmpiso=/tmp/atomix.iso
++ seq 1 3
+ for count in $(seq 1 3)
+ '[' http: = https ']'
+ busybox wget --output-document=/tmp/atomix.iso http://192.168.41.2/atomix.iso
Connecting to 192.168.41.2 (192.168.41.2:80)
atomix.iso           100% |********************************|  842M  0:00:00 ETA
+ break
+ mkdir -p /cdrom
+ mount -o loop,ro /tmp/atomix.iso /cdrom
[    4.896038] ISO 9660 Extensions: RRIP_1991A
+ echo 'Found install image through PXE'
Found install image through PXE
...

Installing Cisco APIC Software Using Virtual Media

Installing or upgrading the Cisco Application Policy Infrastructure Controller (APIC) software using virtual media (vMedia) requires the following high-level process:

  • Upgrade the Cisco Integrated Management Controller (CIMC) software, if necessary.

  • Obtain the relevant Cisco APIC .iso image from Cisco.com.

  • Access the CIMC web interface for the controller.


    Note


    For detailed instructions on accessing the CIMC and managing virtual media, please see the corresponding CIMC Configuration Guide for your controller's version of CIMC software (1.5 or 2.0).


  • Mount the .iso image using the CIMC-mapped vDVD functionality. Do not use the vKVM-mapped vDVD feature, which maps a file from your local computer. This is not reliable for large images and will cause installation failures and is not supported on Cisco APIC.

  • Boot or power cycle the controller.

  • During the boot process, press F6 to select Cisco CIMC-Mapped vDVD as the one-time boot device. You may be required to enter the BIOS password. The default password is password.

  • Follow the onscreen instructions to install the Cisco APIC software.


    Note


    To enable a significant speedup in install time we recommend that you provide the URL to the ISO image a second time after the installer starts. This speedup supports both HTTP and HTTPS, but does not support user/password authentication.

    To skip the speedup process and enable user/password authentication, use the following process:

    • For pre-Cisco APIC 6.0(2) releases:

      The console prints the prompt: "To speed up the install, enter the ISO URL:". If no input is provided after 10 minutes, the installer will continue with the slower path of reading the ISO contents through the CIMC vMedia mapping. Even if you press Enter at any time during the 10 minute wait period process it will immediately continue with the slower path installation process. If you press Enter after the 10 minute wait period it will not have any effect.

    • For Cisco APIC 6.0.(2):

      The console prints the prompt: "To speed up the install, enter iso url. Type 'skip' to use local media:" This prompt requires an input. You must provide either the URL or the word 'skip', otherwise it will wait indefinitely.

    • For all Cisco APIC versions:

      If you have skipped the speedup, no further input is required. If you have provided an ISO URL, you will also need to provide the host networking configuration to bring up an interface with connectivity to the host serving the ISO. Answer the prompts by choosing either DHCP, if available, or Static, then select the appropriate interface, and answer further prompts as necessary. At this point the installer will download the ISO completely and install with no further input required.


Upgrading the CIMC Software

If you upgrade the Cisco APIC software in the Cisco ACI fabric, you might also have to upgrade the version of CIMC that is running on your fabric. Therefore, we recommend that you check the appropriate Cisco APIC Release Notes for the list of the supported CIMC software versions for each Cisco APIC release. The Cisco APIC Release Notes are available on the APIC documentation page.

In order to upgrade the CIMC software, you must first determine the type of UCS C Series server that you have for the Cisco APICs in your fabric.

Cisco APICs use the following UCS C Series servers:

  • Cisco UCS 225 M6 (fourth generation appliances APIC-SERVER-M4 and APIC-SERVER-L4)

  • Cisco UCS 220 M5 (third generation appliances APIC-SERVER-M3 and APIC-SERVER-L3)

  • Cisco UCS 220 M4 (second generation appliances APIC-SERVER-M2 and APIC-SERVER-L2)

  • Cisco UCS 220 M3 (first generation appliance APIC-SERVER-M1 and APIC-SERVER-L1)

The Cisco APIC versions of these servers differ from the standard versions in that the Cisco APIC versions are manufactured with an image secured with the Trusted Platform Module (TPM) certificates and an APIC product ID (PID).

The following table provides more information on each of these Cisco APIC servers:

APIC Platform

Corresponding UCS Platform

Description

APIC-SERVER-M1

UCS-C220-M3

Cluster of three Cisco APIC first-generation controllers, with a medium-sized CPU, hard drive, and memory configurations for up to 1000 edge ports.

APIC-SERVER-M2

UCS-C220-M4

Cluster of three Cisco APIC second-generation controllers, with a medium-sized CPU, hard drive, and memory configurations for up to 1000 edge ports.

APIC-SERVER-M3

UCS-C220-M5

Cluster of three Cisco APIC second-generation controllers, with a medium-sized CPU, hard drive, and memory configurations for up to 1000 edge ports.

APIC-SERVER-M4

UCS-C225-M6

Cluster of three Cisco APIC second-generation controllers, with a medium-sized CPU, hard drive, and memory configurations for up to 1000 edge ports.

APIC-SERVER-L1

UCS-C220-M3

Cluster of three Cisco APIC first-generation controllers, with a large-sized CPU, hard drive, and memory configurations for more than 1000 edge ports.

APIC-SERVER-L2

UCS-C220-M4

Cluster of three Cisco APIC second-generation controllers, with a large-sized CPU, hard drive, and memory configurations for more than 1000 edge ports.

APIC-SERVER-L3

UCS-C220-M5

Cluster of three Cisco APIC second-generation controllers, with a large-sized CPU, hard drive, and memory configurations for more than 1000 edge ports.

APIC-SERVER-L4

UCS-C225-M6

Cluster of three Cisco APIC second-generation controllers, with a large-sized CPU, hard drive, and memory configurations for more than 1000 edge ports.

These procedures describe how to upgrade the Cisco APIC CIMC using the Cisco Host Upgrade Utility (HUU). Full instructions for upgrading software using the HUU are provided in Upgrading the Firmware on a Cisco UCS C-Series Server Using the HUU.

Before you begin

  • Review the information that is provided in the Cisco APIC Release Notes and confirm which CIMC software image that you should use for the upgrade. The Cisco APIC Release Notes are available on the APIC documentation page.

  • Obtain the software image from the Software Download site.

  • Confirm that the MD5 checksum of the image matches the one published on Cisco.com.

  • Allow for the appropriate amount of time for the upgrade.

    The time needed for the process of upgrading a CIMC version varies, based on the speed of the link between the local machine and the UCS-C chassis, and the source/target software image, as well as other internal component versions.

  • Changing the CIMC version might also require changes to the Internet browser and Java software version to run the vKVM.


Note


Upgrading the CIMC version does not affect the production network as the Cisco APICs are not in the data path of the traffic. Also, you do not have to decommission the Cisco APICs when upgrading the CIMC software.


Procedure


Step 1

Log in to the CIMC using the CIMC credentials.

Note that the CIMC credentials may be different from the Cisco APIC credentials.

Step 2

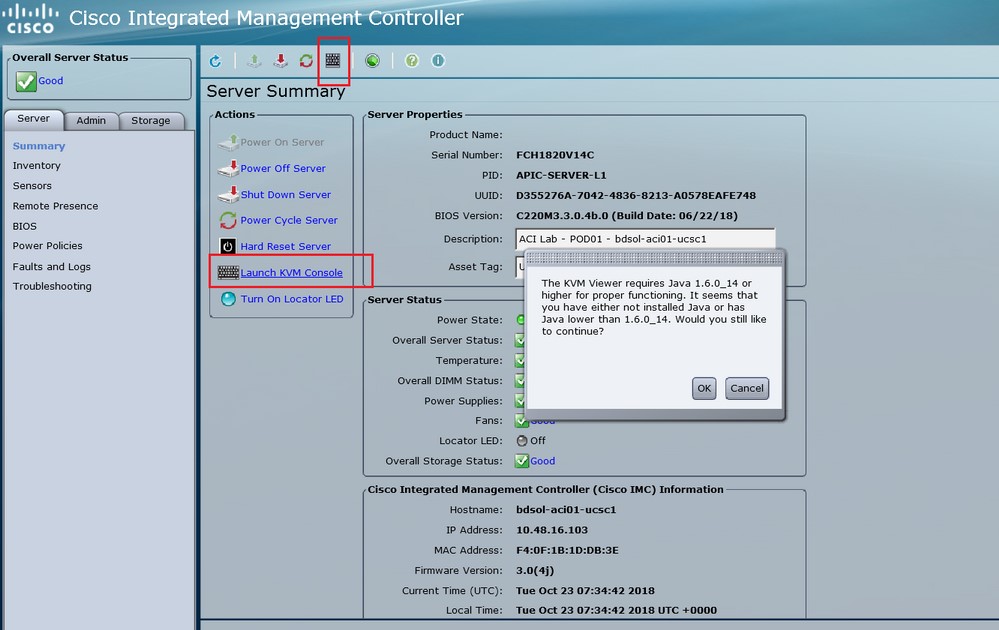
Determine the model of UCS platform for your Cisco APIC through the CIMC GUI.

  1. Locate the PID entry displayed under Server > Summary.

  2. Use the table provided at the beginning of this procedure to find the corresponding UCS platform for the APIC platform displayed in the PID entry.

    For example, you would see that the APIC-SERVER-L1 entry shown in the example above would map to the UCS-C220-M3 platform, based on the information provided at the beginning of this procedure.

Step 3

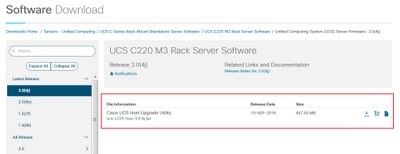
Locate the appropriate HUU .iso image at https://software.cisco.com/download.

  1. In the search window in https://software.cisco.com/download, enter the UCS platform model that you found for your Cisco APIC in the previous step, without the dashes.

    Using the example from the previous step, you might enter UCS C220 M3 in the search window.

  2. Click on the link from the search result to show the software that is available for your UCS platform.

  3. In the list of software available for your server, locate the firmware entry, which will be shown with an entry such as Unified Computing System (UCS) Server Firmware, and click on that firmware link.

  4. Locate the Cisco UCS Host Upgrade Utility .iso image link and make a note of the release information for this image.

Step 4

Go to the Recommended Cisco APIC and Cisco Nexus 9000 Series ACI-Mode Switches Releases document and locate the row that contains the appropriate entry for your UCS platform and APIC software release.

Keep in mind that the UCS version shown in the table might not be the latest version of CIMC software, based on corresponding APIC release. For example, for the 3.0 branch of the APIC release, the corresponding CIMC software release might be 3.0(3e). While that is not necessarily the latest release of the CIMC software, it is the correct version of the CIMC software for the 3.0 branch of the APIC release.

Step 5

Compare the information from the two sources to verify that you are downloading the correct version of the HUU .iso image.

If you find conflicting information between the two sources, use the information provided in the Recommended Cisco APIC and Cisco Nexus 9000 Series ACI-Mode Switches Releases document as the final word on the correct version of the HUU .iso image for your UCS platform and APIC software release.

Step 6

Download the appropriate HUU .iso image from the https://software.cisco.com/download site.

Step 7

Launch the KVM console from CIMC GUI.

Note


If you are having problems opening the KVM console, this is generally an issue with your Java version. Review the information in the Cisco APIC Release Notes, available on the APIC documentation page, for your CIMC version to learn the different workarounds available.

Step 8

In the KVM console, click Virtual Media > Activate Virtual Devices and accept the session.

Step 9

Click Virtual Media > Map CD/DVD and navigate to the downloaded HUU .iso image on your PC.

Step 10

Select the downloaded HUU .iso image, then click Map Device to map the downloaded ISO on your PC.

Step 11

Click Macros > Static Macros > Ctrl-Alt-Del to reboot the server.

If you are not able to reboot the server using this option, click Power > Power cycle System to perform a cold reboot instead.

Step 12

Press F6 to enter the boot menu so that you can select the mapped DVD that you want to boot from.

You can also create a user-defined macro to perform this action, if you are using a Remote Desktop application, by selecting Macros > User Defined Macros > F6.

Step 13

When prompted, enter the password.

The default password is password.

Step 14

When prompted to select the boot device, select the Cisco vKVM-Mapped vDVD option, as shown in the figure below.

Step 15

Wait for the proces to complete, then accept the terms and conditions when prompted.

It will take around 10-15 minutes for the ISO to be extracted by the HUU, then another 15-20 minutes to copy the firmware and other tools.

Step 16

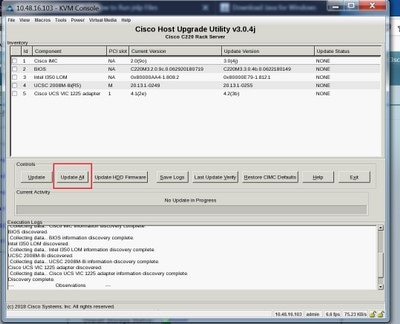
Make the appropriate selection in the HUU screen, when it appears.

We recommend that you select the Update All option to update all the firmware for all components.

Step 17

If you see a pop-up asking if you want to enable Cisco IMC Secure Boot, select No for that option.

Refer to the "Introduction to Cisco IMC Secure Boot" section in the Cisco UCS C-Series Servers Integrated Management Controller CLI Configuration Guide, Release 4.0 document for more information.

Step 18

Monitor the progress of the updates using the information provided in the Update Status column in the HUU.

Step 19

Once you see a status of PASS for each component, click Exit to reboot the server.

When the server reboots, you will be pushed out of the CIMC GUI. You will need to log back into the CIMC and verify the upgrade has completed successfully.

You can verify the upgrade was completed successfully through the GUI or by booting up the CIMC HUU and selecting Last Update Verify to ensure that all of the components passed the upgrade successfully.


Installing the Cisco APIC Software Using CIMC Virtual Media

Use this procedure to install the Cisco APIC software using Cisco Integrated Management Controller (CIMC) Virtual Media.


Note


You will open two console windows in these procedures:

  • vKVM console

  • Serial over LAN (SOL) console

You will be flipping back and forth between the two console windows, entering certain commands in one or the other console window for most of the steps in this procedure.


Before you begin

Review the information in Upgrading the CIMC Software to determine if you should upgrade your Cisco Integrated Management Controller (CIMC) software before you begin the procedures in this section.

  • APIC-M4/L4 servers must be configured with a CIMC connection.

  • The Cisco APIC ISO must be available on an HTTP server reachable from the APIC-M4/L4 Server CIMC management interface and the OOB management interface.

  • Obtain the relevant Cisco APIC .iso image from Cisco.com and copy the .iso image to the HTTP server.

Procedure


Step 1

Access the vKVM console:

  1. Open the Cisco Integrated Management Controller (CIMC) GUI for the controller.

  2. For an APIC-M1, M2, M3, L1, L2, or L3 server, from the CIMC GUI, choose Server > Summary > Launch KVM, then select either Java based KVM or HTML based KVM to access the KVM console.

    We recommend using the Java based KVM option whenever possible, because it is a more reliable option for larger-sized files.

  3. For an APIC-M4/L4 server, from the CIMC GUI, choose Server > Summary > Launch vKVM to access the HTTP-based vKVM console.

Step 2

Access the Serial over LAN (SOL) console:

  1. From a terminal window, log in to the CIMC console:

    # ssh admin@cimc_ip


    Where cimc_ip is the CIMC IP address. For example:

    # ssh admin@192.0.2.1
    admin@192.0.2.1's password: 
    system#
    
    
  2. Change the scope to virtual media:

    system# scope vmedia
    system /vmedia #
    
    
  3. Map the .iso image to the HTTP server:

    system /vmedia # map-www volume_name http://http_server_ip_and_path iso_file_name


    Where:

    • volume_name is the name of the volume.

    • http_server_ip_and_path is the IP address of the HTTP server and the path to the .iso file location.

    • iso_filename is the name of the .iso file.

    Note that there is a space between the http_server_ip_and_path and the iso_filename.

    For example:

    system /vmedia # map-www apic http://198.51.100.1/home/images/ aci-apic-dk9.4.0.3d.iso
    Server username:
    
    
  4. Check the mapping status:

    system /vmedia # show mappings detail


    The Map-Status should be shown as OK.

  5. Connect to SOL to monitor the installation process:

    system /vmedia # connect host


Step 3

From the KVM console: Choose Power > Power Cycle System (cold boot) to power cycle the controller.

Step 4

From the SOL console: Watch the screen during the boot process and prepare to press F6 at the appropriate moment to enter the boot selection menu.

You should first see the following messages as the boot process begins:


Cisco Systems, Inc.
Configuring and testing memory..
Configuring platform hardware...
...

System bootup messages continue to appear, until the point where you should see the following screen:


...
Press <F2> Setup, <F6> Boot Menu, <F7> Diagnostics, <F8> Cisco IMC COnfiguration, <F12> Network Boot

Step 5

From the SOL console: When you see the message above, press F6 to enter the boot selection menu.

You should see Entering boot selection menu... if you were able to press F6 at the appropriate moment. If you miss your opportunity and were not able to press F6 at the appropriate moment, go back to Step 3 to power cycle the controller and repeat the process until you are able to press F6 to enter the boot selection menu.

Step 6

From the SOL console: At the boot selection menu, select the Cisco CIMC-Mapped vDVD1.22 option as the one-time boot device.


/------------------------------------\
| Please select boot device:         |
|------------------------------------|
| (Bus 05 Dev 00)PCI RAID Adapter    |
| UNIGEN PHF16H0CM1-DTE PMAP         |
| Cisco vKVM-Mapped vHDD1.22         |
| Cisco CIMC-Mapped vHDD1.22         |
| Cisco vKVM-Mapped vDVD1.22         |
| Cisco CIMC-Mapped vDVD1.22         |
| Cisco vKVM-Mapped vFDD1.22         |
| UEFI: Built-in EFI Shell           |
| IBA GE Slot 0100 v1585             |
| IBA GE Slot 0101 v1585             |
| Enter Setup                        |
|------------------------------------|
|    ^ and v to move selection       |
|    ENTER to select boot device     |
|     ESC to boot using defaults     |
\------------------------------------/

You might also have to enter the BIOS password. The default password is password.

Step 7

From the SOL console: Enter the following:

  1. Determine if you want to enter the ISO URL to speed up the installation process.

    During the boot-up process, you might see the following message:

    To speed up the install, enter iso url in next ten minutes:

    You have two options at this stage:

    • Enter the ISO URL: This option will make the installation process go faster. Following is an example HTTP URL that you might enter here:

      http://10.75.61.1/aci-apic-dk9.4.2.1j.iso

      If you choose this option, you will be asked to provide the protocol type, as shown in the following example:

      
      ? http://10.75.61.1/aci-apic-dk9.4.2.1j.iso
      ++ awk -F '/|:' '{print $4}'
      + urlip=10.75.61.1
      + '[' -z http://10.75.61.1/aci-apic-dk9.4.2.1j.iso ']'
      + '[' -z 10.75.61.1 ']'
      + break
      + '[' -n http://10.75.61.1/aci-apic-dk9.4.2.1j.iso ']'
      + set +e
      + configured=0
      + '[' 0 -eq 0 ']'
      + echo 'Configuring network interface'
      Configuring network interface
      + echo 'type static, dhcp, bash for a shell to configure networking, or url to re-enter the url: '
      

      Choose the appropriate protocol type:

      • static: If you choose this option, you will be asked to enter the interface name, management IP address and gateway. Following is an example of how to find the correct management interface:

        
        ? static
        + case $ntype in
        + configure_static
        + echo 'Available interfaces'
        Available interfaces
        + ls -l /sys/class/net
        total 0
        lrwxrwxrwx. 1 root root 0 Sep 26 16:04 enp11s0 -> ../../devices/pci0000:00/0000:00:03.0/0000:06:00.0/0000:07:01.0/0000:09:00.0/0000:0a:00.0/0000:0b:00.0/net/enp11s0
        lrwxrwxrwx. 1 root root 0 Sep 26 16:04 enp12s0 -> ../../devices/pci0000:00/0000:00:03.0/0000:06:00.0/0000:07:01.0/0000:09:00.0/0000:0a:01.0/0000:0c:00.0/net/enp12s0
        lrwxrwxrwx. 1 root root 0 Sep 26 16:04 enp1s0f0 -> ../../devices/pci0000:00/0000:00:01.0/0000:01:00.0/net/enp1s0f0
        lrwxrwxrwx. 1 root root 0 Sep 26 16:04 enp1s0f1 -> ../../devices/pci0000:00/0000:00:01.0/0000:01:00.1/net/enp1s0f1
        lrwxrwxrwx. 1 root root 0 Sep 26 16:04 lo -> ../../devices/virtual/net/lo
        + read -p 'Interface to configure: ' interface
        Interface to configure:
        [anaconda] 1:main* 2:shell  3:log  4:storage-lo> Switch tab: Alt+Tab | Help: F1


        In the output above, the network interface with the shorter pci numbering corresponds to the two Out-Of-Band management interfaces: enp1s0f0 (eth1-1) and enp1s0f1 (eth1-2). If both interfaces are cabled as they should be, you can select either of them. However, if only one interface has a cable connected to it, you must choose the interface that corresponds to the cabled port.

      • dhcp

      Also note that you do not have a space between the http_server_ip_and_path and the iso_filename for this ISO URL (for example, http://198.51.100.1/home/images/aci-apic-dk9.4.0.3d.iso).

    • Do not enter the ISO URL: If you do not want to enter the ISO URL, the installation process starts after ten minutes. This option is not supported on Cisco APIC versions 5.3(x) , 6.0(2), and above.

    The system starts fetching the ISO at this point.

    
    + read -p 'Interface to configure: ' interface
    Interface to configure: enp1s0f0
    + read -p 'address: ' addr
    address: 10.75.39.72/24
    + read -p 'gateway: ' gw
    gateway: 10.75.39.254
    + ip addr add 10.75.39.72/24 dev enp1s0f0
    + ip link set enp1s0f0 up
    + ip route add default via 10.75.39.254
    ++ seq 1 2
    + for count in '$(seq 1 2)'
    + ping -c 1 10.75.61.1
    PING 10.75.61.1 (10.75.61.1) 56(84) bytes of data.
    64 bytes from 10.75.61.1: icmp_seq=1 ttl=125 time=0.875 ms
     
    --- 10.75.61.1 ping statistics ---
    1 packets transmitted, 1 received, 0% packet loss, time 0ms
    rtt min/avg/max/mdev = 0.875/0.875/0.875/0.000 ms
    + configured=1
    + break
    + '[' 1 -eq 0 ']'
    + echo 'Fetching http://10.75.61.1/aci-apic-dk9.4.2.1j.iso'
    Fetching http://10.75.61.1/aci-apic-dk9.4.2.1j.iso
    + wget -o /dev/null -O /tmp/cdrom.iso http://10.75.61.1/aci-apic-dk9.4.2.1j.iso
    

    You can track the status of the process by going to Tools > Stats in the KVM console.

  2. Wait until you see the message poweroff in the SOL console, then exit from SOL by pressing Ctrl and x (Ctrl+x).

  3. Change the scope to virtual media again:

    system# scope vmedia
    system /vmedia #
    
    
  4. Unmap the .iso image that you mapped in 2.c:

    system /vmedia # unmap volume_name


    At the Save mapping prompt, enter yes if you want to save the mapping or no if you do not want to save the mapping. For example:

    system /vmedia # unmap apic
    Save mapping? Enther 'yes' or 'no' to confirm (CTRL-C to cancel) → yes
    system /vmedia # 
  5. Connect back to SOL again:

    system /vmedia #  connect host


Step 8

From the KVM console: Choose Power > Power on System to power on the controller.

Step 9

From the SOL console: Enter the following:

  1. Enter the options for the initial setup, such as fabric name, number of controllers, tunnel endpoint address pool, and infra VLAN ID to complete the installation process.


Performing a Clean Initialization of the ACI Fabric

Do a clean reboot of the fabric when you are bringing up the fabric for the first time, and when your fabric is not healthy, and a clean reboot is your only option to bring the fabric back up. This will remove all configurations from the Cisco APIC and switch nodes. You will then have to start the configuration from scratch or re-import it from a configuration backup.

Procedure


Step 1

Log in to each Cisco APIC through the out-of-band management to stop the Cisco APIC DME applications.

Example:

acidiag stop mgmt

Step 2

Log in to each switch through the out-of-band management. If out-of-band management is not available, log in using the console. Then, clean reboot the switch one of the following set of commands:

Example:

leaf101# setup-clean-config.sh
In progress
In progress
Done
leaf101# reload
This command will reload the chassis, Proceed (y/n)? [n]: y

Or:

leaf101# acidiag touch clean
This command will wipe out this device, Proceed? [y/N] y
leaf101# reload
This command will reload the chassis, Proceed (y/n)? [n]: y

Step 3

Log in to each Cisco APIC and clean reboot the Cisco APIC as follows:

Example:

acidiag touch clean
acidiag reboot

Alternatively, if you would also like to re-configure the initial setup parameters, you must also include the acidiag touch setup command, as shown below:

acidiag touch clean
acidiag touch setup
acidiag reboot

Note


Ignore this error: acidiag: error: curl: (52) Empty reply from server.

The fabric is now clean rebooted, but the nodes are not discovered. You can now post node policies, register the switches using the UI, or import a configuration backup.