Provision a LAN Underlay

Provision a LAN Underlay

Use LAN automation to provision a LAN underlay.

Before you begin

Procedure


Step 1

Reserve an IP address pool for the site that you will be provisioning.

Note


The size of the LAN automation IP address pool must be at least 25 bits of netmask or larger.

  1. Click the menu icon () and choose Design > Network Settings > IP Address Pools.

  2. From the Network Hierarchy pane, choose a site.

  3. Click Reserve and complete the following fields in the Reserve IP Pool window to reserve all or part of an available global IP address pool, for the specific site:

    • IP Address Pool Name: Unique name for the reserved IP address pool.

    • Type: Type of IP address pool. For LAN automation, choose LAN.

    • IP Address Space: Check IPv4 or IPv6 to create an address pool. To create a dual-stack pool, check both IPv4 and IPv6 check boxes.

    • Global IP Pool: IPv4 address pool from which you want to reserve all or part of the IP addresses.

      Note


      LAN automation uses only the IPv4 subnet.

    • Prefix length / Number of IP Addresses: IP subnet and mask address used to reserve all or part of the global IP address pool or the number of IP addresses that you want to reserve.

    • Gateway: Gateway IP address.

    • DHCP Server(s): DHCP server(s) IP address(es).

    • DNS Server(s): DNS Server(s) IP address(es).

  4. Click Reserve.

Step 2

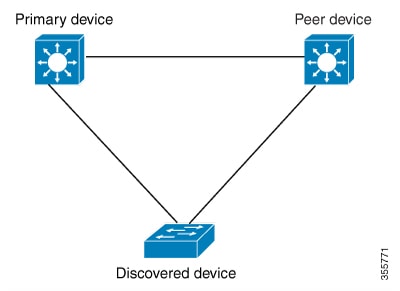
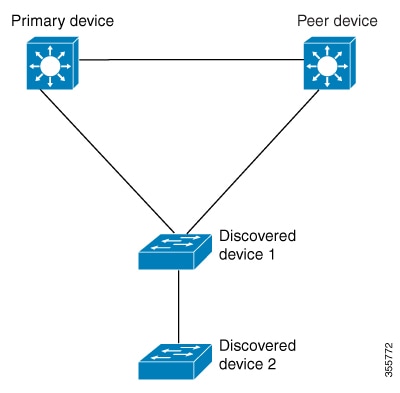
Discover and provision the devices.

  1. Click the menu icon () and choose Provision > Inventory.

    All the discovered devices are displayed.

  2. Click Actions > Provision > LAN Automation.

  3. In the LAN Automation window, complete the following fields:

    • Primary Site: Select your Primary Device from this site.

    • Peer Site: This site is used for selection of Peer Device. Note that this site can be different from the Primary Site.

    • Primary Device: Select the primary device that Cisco DNA Center uses as the starting point to discover and provision new devices.

    • Peer Device: Select the peer device.

    • SELECTED PORTS OF PRIMARY DEVICE: Ports to be used to discover and provision new devices. Click Modify Selections to enter the port numbers.

    • Discovered Device Site: All newly discovered devices are assigned to this site. This site can be different from Primary and Peer Sites.

    • Main IP Pool: IP address pool that was reserved for LAN automation. (See Step 1.)

    • Link Overlapping IP Pool: IP address pool that is shared with other sites, is used to specifically configure the /31 IP addresses on point-to-point links in the underlay.

      A link overlapping IP pool can be a subpool that is inherited from a parent site or a subpool that is defined in any other site.

      A link overlapping IP pool allows you to overlap /31 IP addresses in a multisite deployment. Hosts in different sites will be able to reuse IP addresses on the /31 links.

      If you choose to define a link overlapping IP pool, the addresses defined in the Main IP Pool field are used for Management IPs (like loopback address, VLAN address, and so on).

    • ISIS Domain Password: A user-provided IS-IS password when LAN automation starts. If the password already exists on the seed device, it is reused and is not overwritten. If no user-provided password is entered and there is no existing IS-IS password on the device, the default domain password is used. If both primary and secondary seeds have domain passwords, ensure that they match.

    • Enable Multicast: Check this check box to enable underlay native multicast. LAN automation creates a multicast tree from seed devices as RPs and discovered devices as subscribers.

    • Device Name Prefix: Name prefix for the devices being provisioned. As Cisco DNA Center provisions each device, it prefixes the device with the text that you provide and adds a unique number at the end. For example, if you enter Access as the name prefix, as each device is provisioned, it is named Access-1, Access-2, Access-3, and so on.

    • Choose a File: Click Browse to choose a hostname map File. Configures user-provided names for discovered devices using the chosen CSV file that contains a mapping between serial numbers and hostnames. If the discovered device is a stack, all serial numbers of the stack are provided in the CSV file.

      Here is a sample CSV file:

      standalone-switch,FCW2212L0NF
      stack-switch,"FCW2212E00Y,FCW2212L0GV" 
  4. Click Start.

    Cisco DNA Center begins to discover and provision the new devices.

    LAN automation configures an IP address on the seed device of VLAN 1. If this VLAN 1 IP address of the seed device is not reachable from Cisco DNA Center, an error message is displayed on the LAN Automation Status window. Hover your cursor over the See Details link on this window to see the error details and possible remedial actions.

Step 3

Monitor and review the progress of the devices being provisioned.

  1. Click Actions > Provision > LAN Automation Status.

    The LAN Automation Status window displays the progress of the devices being provisioned.

    Note


    The provisioning of new devices may take several minutes.

  2. After all devices have been discovered, added to Inventory, and are in Managed state, click Stop in the LAN Automation Status window.

    The LAN automation process is complete, and the new devices are added to the Inventory.


Peer Device in LAN Automation Use Case

Provision a Dual-Homed Switch

You must always select a peer device to provision the dual-homed switch.

Cisco DNA Center configures the DHCP server on the primary device. Because Cisco DNA Center understands that the discovered device is connected to both the primary and peer devices, it configures two Layer 3 point-to-point connections when the LAN automation task is stopped. One connection is established between the discovered device and the primary device; the other connection is established between the discovered device and the peer device.


Note


If the link between the primary and the peer device is not configured before the LAN automation job is executed, you must select the interface of the primary device that connects to the peer device as part of the LAN automation configuration in Cisco DNA Center.


LAN Automation's Two-Hop Limitation

For the preceding topology, Cisco DNA Center configures the following links:

  • A point-to-point Layer 3 routed connection from Discovered device 1 to Primary device

  • A point-to-point Layer 3 routed connection from Discovered device 1 to Peer device

  • A point-to-point Layer 3 routed connection from Discovered device 1 to Discovered device 2

Consider the scenario where a device—named Discovered device 3—is directly connected below Discovered device 2. The connection between Discovered device 2 and Discovered device 3 is not configured as part of the LAN automation job, because it is more than two hops away from Primary device.

Check the LAN Automation Status

You can view the status of in-progress LAN automation jobs.

Before you begin

You must have created and started a LAN automation job.

Procedure


Step 1

Click the menu icon () and choose Provision > Inventory.

All discovered devices are displayed.

Step 2

Choose Actions > Provision > LAN Automation Status.

The LAN Automation Status window displays the status of all running or completed LAN automation jobs.