The documentation set for this product strives to use bias-free language. For the purposes of this documentation set, bias-free is defined as language that does not imply discrimination based on age, disability, gender, racial identity, ethnic identity, sexual orientation, socioeconomic status, and intersectionality. Exceptions may be present in the documentation due to language that is hardcoded in the user interfaces of the product software, language used based on RFP documentation, or language that is used by a referenced third-party product. Learn more about how Cisco is using Inclusive Language.
Assurance provides a comprehensive solution to assure better and consistent service levels to meet growing business demands. It addresses
not just the reactive network monitoring and troubleshooting, but also the proactive and predictive aspects of running a network
and ensuring optimal client, application, and service performance.
Assurance provides the following benefits:
Provides actionable insights into network, client, and application related issues. These issues consist of basic and advanced
correlation of multiple pieces of information, thus eliminating white noise and false positives.
Provides both system-guided as well as self-guided troubleshooting. For a large number of issues, Assurance provides a system-guided approach, where multiple Key Performance Indicators (KPIs) are correlated, and the results from
tests and sensors are used to determine the root cause of a problem, after which possible actions are provided to resolve
the problem. The focus is on highlighting the issue rather than monitoring data. Quite frequently, Assurance performs the work of a Level 3 support engineer.
Provides in-depth health scores for a network and its devices, clients, applications, and services. Client experience is assured
both for access (onboarding) and connectivity.
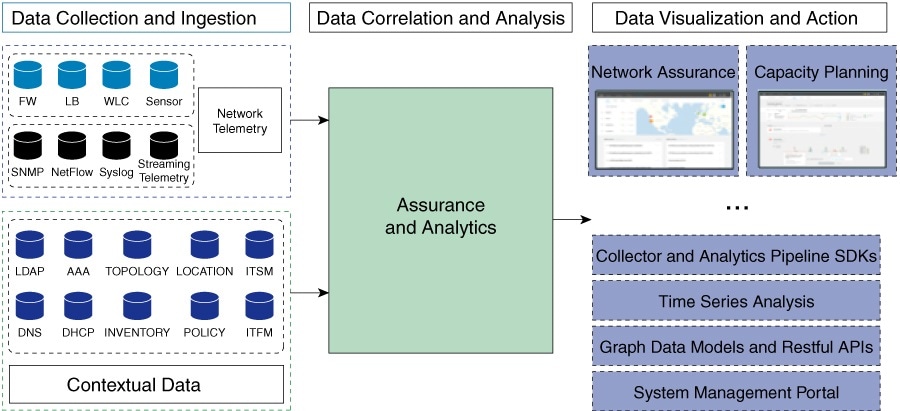
Assurance Architecture
Companies deal with an abundance of network data. Tackling the volume, variety, speed, and accuracy of network data is crucial
for IT organizations. Assurance is designed to handle network data issues, if any.
Assurance is a multipurpose, real-time, network data collection and analytics engine that can significantly increase the business potential
of network data.
Assurance simplifies and abstracts the collection and analysis layers and offers a rich set of APIs along with a web interface. By
using a single set of network data, Assurance powers a broad set of use cases. These advantages streamline the operational and network management overhead of collecting
and analyzing network data, thereby allowing companies to effectively focus on their business goals.
Given its flexible architecture, Assurance addresses many common use cases, including monitoring and troubleshooting, cost management, and policy discovery, while supporting
the broader Cisco DNA strategy.
The following figure and the information that follows describes the Assurance architecture:
Data Collection and Ingestion: Assurance leverages streaming technologies to collect a variety of network telemetry and contextual data in real time.
Data Correlation and Analysis: As and when data is ingested, Assurance correlates and analyzes the data.
Data Visualization and Action: Data is stored in databases and exposed through APIs to Assurance as well as other applications, such as Capacity Planning. Assurance is an open system that provides the following:
Collector and analytics pipeline SDKs
Time-series analysis
Graph data models and restful APIs
System management portal
Log In
Access Cisco DNA Center by entering its network IP address in your browser. For compatible browsers, see the Cisco DNA Center Release Notes. This IP address connects to the external network and is configured during the Cisco DNA Center installation. For more information about installing and configuring Cisco DNA Center, see the Cisco DNA Center Installation Guide.
You should continuously use Cisco DNA Center to remain logged in. If you are inactive for too long, Cisco DNA Center logs you out of your session automatically.
Procedure
Step 1
Enter an address in your web browser's address bar in the following format. Here, server-ip is the IP address (or the hostname) of the server on which you have installed Cisco DNA Center:
https://server-ip
Example: https://192.0.2.1
Depending on your network configuration, you might have to update your browser to trust the Cisco DNA Center server security certificate. Doing so will help ensure the security of the connection between your client and Cisco DNA Center.
Step 2
Enter the Cisco DNA Center username and password assigned to you by the system administrator. Cisco DNA Center displays its home page.
If your user ID has the SUPER-ADMIN-ROLE and no other user with the same role has logged in before, you will see a first-time
setup wizard instead of the home page.
Step 3
To log out, click the Menu icon () and choose Sign Out.
Complete the Quick Start Workflow
After you have installed and configured the Cisco DNA Center appliance, you can log in to its GUI. Use a compatible, HTTPS-enabled browser when accessing Cisco DNA Center.
When you log in for the first time as the admin superuser (with the username admin and the SUPER-ADMIN-ROLE assigned), the Quick Start workflow automatically starts. Complete this workflow to discover the
devices that Cisco DNA Center will manage and enable the collection of telemetry from those devices.
Before you begin
To log in to Cisco DNA Center and complete the Quick Start workflow, you will need:
Configure the Primary Node Using the Maglev Wizard
Configure the Primary Node Using the Expert Configuration Wizard (44- or 56-core appliance)
Configure the Primary Node Using the Expert Configuration Wizard (112-core appliance)
The requisite information, as described in the installation guide's Required First-Time Setup Information topic.
Procedure
Step 1
After the Cisco DNA Center appliance reboot is completed, launch your browser.
Step 2
Enter the host IP address to access the Cisco DNA Center GUI, using HTTPS:// and the IP address of the Cisco DNA Center GUI that was displayed at the end of the configuration process.
After entering the IP address, one of the following messages appears (depending on the browser you are using):
Google Chrome: Your connection is not private
Mozilla Firefox: Warning: Potential Security Risk Ahead
Step 3
Ignore the message and click Advanced.
One of the following messages appears:
Google Chrome:
This server could not prove that it is GUI-IP-address; its security certificate is not trusted by your computer's
 operating system. This may be caused by a misconfiguration or an attacker intercepting your connection.
Mozilla Firefox:
Someone could be trying to impersonate the site and you should not continue.

Websites prove their identity via certificates. Firefox does not trust GUI-IP-address because its certificate issuer is unknown,
the certificate is self-signed, or the server is not sending the correct intermediate certificates.
These messages appear because the controller uses a self-signed certificate. For information on how Cisco DNA Center uses certificates, see the "Certificate and Private Key Support" section in the Cisco DNA Center Administrator Guide.
Step 4
Ignore the message and do one of the following:
Google Chrome: Click the Proceed toGUI-IP-address(unsafe) link.
Mozilla Firefox: Click Accept the Risk and Continue.
The Cisco DNA Center login screen appears.
Step 5
Enter the admin's username (admin) and password that you set when you configured Cisco DNA Center, then click Log In.
In the resulting screen, you are prompted to specify a new admin password (as a security measure).
Step 6
Do the following, then click Next:
Enter the same admin password you specified in Step 5.
Enter and confirm a new admin password.
Step 7
In the resulting screen, enter your cisco.com username and password and then click Next.
These credentials are used to register software downloads and receive system communications.
The Terms & Conditions screen opens, providing links to the software End User License Agreement (EULA) and any supplemental terms that are currently
available.
Step 8
After reviewing these documents, click Next to accept the EULA.
The Quick Start Overview slider opens. Click > to view a description of the tasks that the Quick Start workflow will help you complete in order to start using Cisco DNA Center.
Step 9
Complete the Quick Start workflow:
Click Let's Do it.
In the Discover Devices: Provide IP Ranges screen, enter the following information and then click Next:
The name for the device discovery job.
The IP address ranges of the devices you want to discover. Click + to enter additional ranges.
Specify whether you want to designate your appliance's loopback address as its preferred management IP address. For more information,
see the "Preferred Management IP Address" topic in the Cisco DNA Center User Guide.
In the Discover Devices: Provide Credentials screen, enter the information described in the following table for the type of credentials you want to configure and then
click Next:
Field
Description
CLI (SSH) Credentials
Username
Username used to log in to the CLI of the devices in your network.
Password
Password used to log in to the CLI of the devices in your network.
Name/Description
Name or description of the CLI credentials.
Enable Password
Password used to enable a higher privilege level in the CLI. Configure this password only if your network devices require
it.
SNMP Credentials: SNMPv2c Read tab
Name/Description
Name or description of the SNMPv2c read community string.
Community String
Read-only community string password used only to view SNMP information on the device.
SNMP Credentials: SNMPv2c Write tab
Name/Description
Name or description of the SNMPv2c write community string.
Community String
Write community string used to make changes to the SNMP information on the device.
SNMP Credentials: SNMPv3
Name/Description
Name or description of the SNMPv3 credentials.
Username
Username associated with the SNMPv3 credentials.
Mode
Security level that SNMP messages require:
No Authentication, No Privacy (noAuthnoPriv): Does not provide authentication or encryption.
Authentication, No Privacy (authNoPriv): Provides authentication, but does not provide encryption.
Authentication and Privacy (authPriv): Provides both authentication and encryption.
Authentication Password
Password required to gain access to information from devices that use SNMPv3. The password must be at least eight characters
in length. Note the following points:
Some wireless controllers require that passwords be at least 12 characters long. Be sure to check the minimum password requirements
for your wireless controllers. Failure to ensure these required minimum character lengths for passwords results in devices
not being discovered, monitored, or managed by Cisco DNA Center.
Passwords are encrypted for security reasons and are not displayed in the configuration.
Authentication Type
Hash-based Message Authentication Code (HMAC) type used when either Authentication and Privacy or Authentication, No Privacy is set as the authentication mode:
SHA: HMAC-SHA authentication.
MD5: HMAC-MD5 authentication.
Privacy Type
Privacy type used when Authentication and Privacy is set as the authentication mode:
DES: 56-bit DES encryption.
Note
DES encryption is being deprecated and will be removed in a future release.
AES128: 128-bit AES encryption.
None: No privacy.
Privacy Password
Password used to generate the secret key for encrypting messages that are exchanged with devices that support DES or AES128
encryption. Passwords must be at least eight characters long. Note the following points:
Some wireless controllers require that passwords be at least 12 characters long. Be sure to check the minimum password requirements
for your wireless controllers. Failure to ensure these required minimum character lengths for passwords results in devices
not being discovered, monitored, or managed by Cisco DNA Center.
Passwords are encrypted for security reasons and are not displayed in the configuration.
NETCONF
Port
The NETCONF port that Cisco DNA Center should use in order to discover wireless controllers that run Cisco IOS-XE.
In the Create Site screen, group the devices you are going to discover into one site in order to facilitate telemetry and then click Next.
You can enter the site's information manually or click the location you want to use in the provided map.
In the Enable Telemetry screen, check the network components that you want Cisco DNA Center to collect telemetry for and then click Next.
To open a pop-up window that lists the commands Cisco DNA Center will send to enable telemetry on a particular component, click its View Sample Commands link.
In the Summary screen, review the settings that you have entered and then do one of the following:
If you want to make changes, click the appropriate Edit link to open the relevant screen.
If you're happy with the settings, click Start Discovery and Telemetry. Cisco DNA Center validates your settings to ensure that they will not result in any issues. After validation is complete, the screen updates.
Cisco DNA Center begins the process of discovering your network's devices and enabling telemetry for the network components you selected.
The process will take a minimum of 30 minutes (more for larger networks).
Click Launch Homepage to open the Cisco DNA Center homepage.
While Cisco DNA Center discovers your network's devices and enables telemetry, you can click the Explore link to open a page that provides pointers to product documentation and videos.
A message appears at the top of the homepage to indicate when the Quick Start workflow has completed.
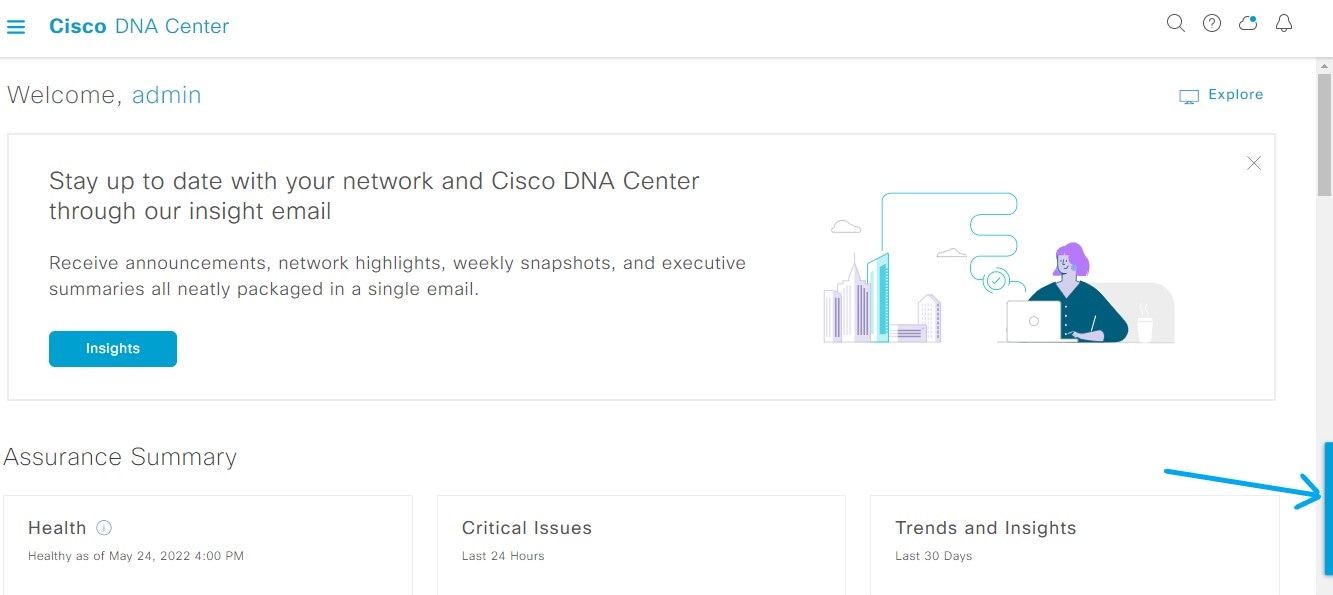
Default Home Page
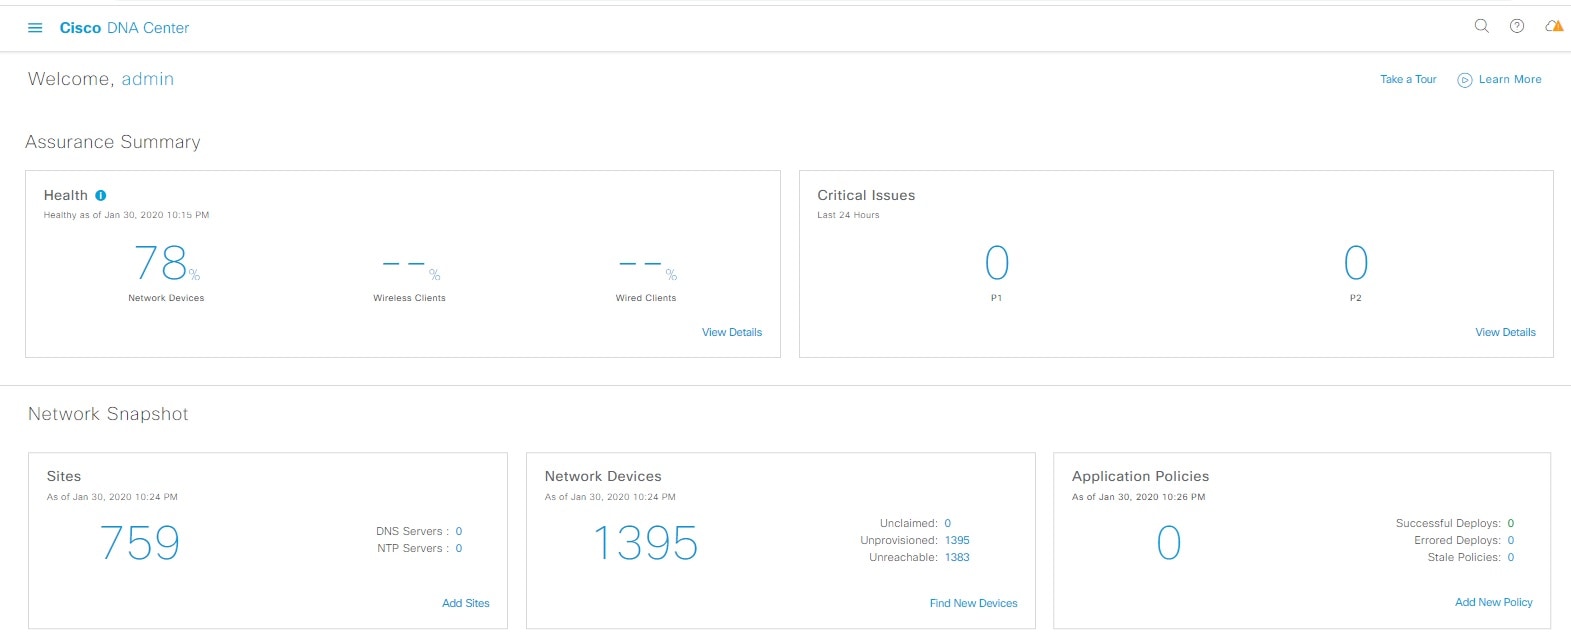
After you log in, Cisco DNA Center displays its home page. The home page has the following main areas: AssuranceSummary, Network Snapshot, Network Configuration, and Tools.
The AssuranceSummary area includes:
Health: Provides the health score of your overall enterprise, which includes network devices, wired clients, and wireless clients.
Clicking View Details takes you to the Overall Health window.
Critical Issues: Provides the count of P1 and P2 issues. Clicking View Details takes you to the Open Issues window.
P1: Critical issues that need immediate attention before they cause a wider impact on network operations.
P2: Major issues that can potentially impact multiple devices or clients.
Trends and Insights: Provides insights about the performance of your network. Clicking View Details takes you to the Network Insights window.
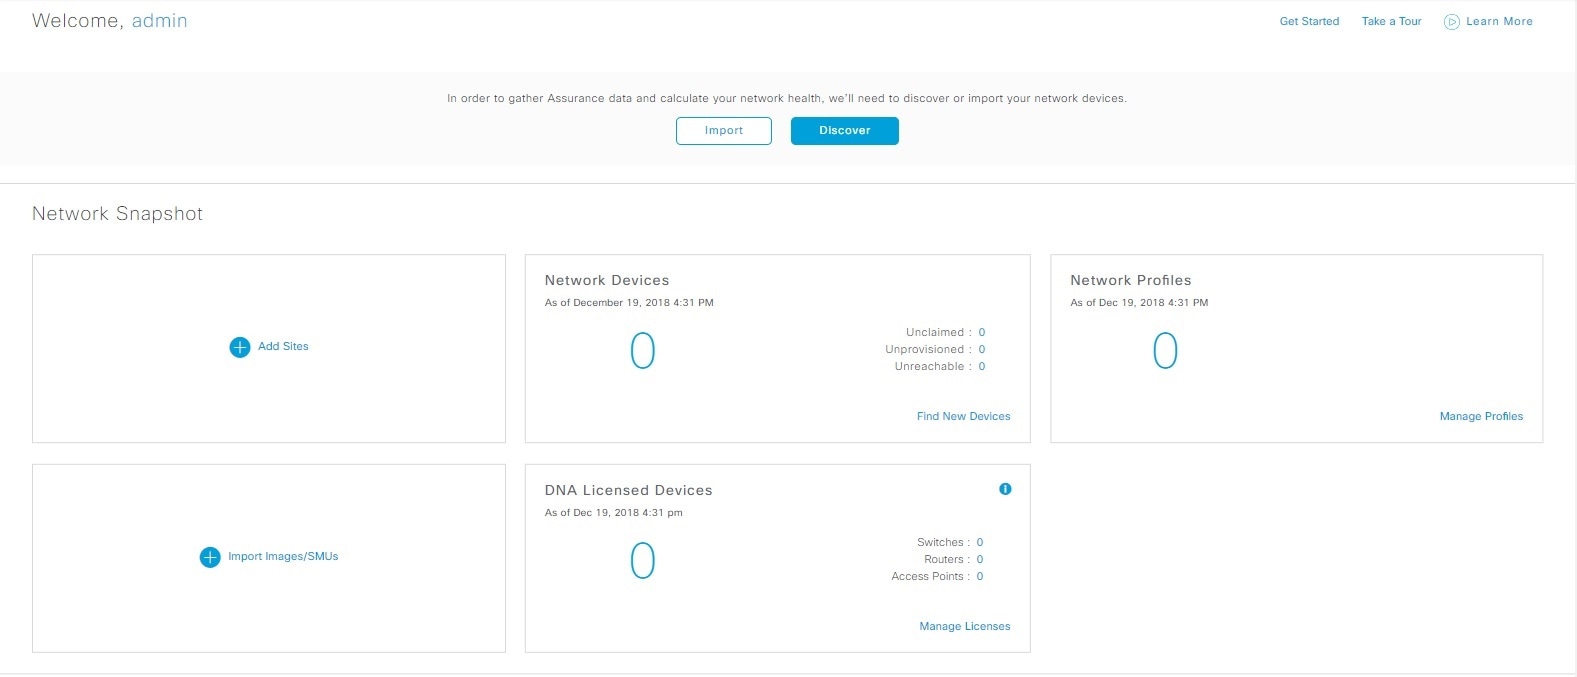
The Network Snapshot area includes:
Sites: Provides the number of sites discovered on your network along with the number of DNS and NTP servers. Clicking Add Sites takes you to the Add Site window.
Network Devices: Provides the number of network devices discovered on your network along with the number of unclaimed, unprovisioned, and
unreachable devices. Clicking Find New Devices takes you to the New Discovery window.
Application Policies: Provides the number of application policies discovered on your network along with the number of successful and errored deployments.
Clicking Add New Policy takes you to the Application Policies window.
Network Profiles: Provides the number of profiles discovered on your network. Clicking Manage Profiles takes you to the Network Profiles window.
Images: Provides the number of images discovered on your network along with the number of untagged and unverified images. Clicking
Import Images/SMUs takes you to the Image Repository window.
Licensed Devices: Provides the number of devices that have a Cisco DNA Center license along with the number of switches, routers, and access points. Clicking Manage Licenses takes you to the License Management window.
The Network Configuration area includes:
Design: Create the structure and framework of your network, including the physical topology, network settings, and device type profiles
that you can apply to devices throughout your network.
Policy: Create policies that reflect your organization's business intent for a particular aspect of the network, such as network
access. Cisco DNA Center takes the information collected in a policy and translates it into network-specific and device-specific configurations required
by the different types, makes, models, operating systems, roles, and resource constraints of your network devices.
Provision: Prepare and configure devices, including adding devices to sites, assigning devices to the inventory, deploying the required
settings and policies, creating fabric domains, and adding devices to the fabric.
Assurance: Provide proactive and predictive actionable insights about the performance and health of the network infrastructure, applications,
and end-user clients.
Platform: Allows you to programmatically access your network through APIs, integrate with your preferred IT systems to create end-to-end
solutions, and add support for multivendor devices.
Tools: Use the Tools area to configure and manage your network.
Figure 1. Cisco DNA Center Home Page
Different Views of Home Page:
Getting Started
When you log in to Cisco DNA Center for the first time as a Network Administrator or System Administrator, or when there are no devices in the system, you see
the following dashlet. Click Get Started and complete the getting started workflow to discover new devices in your network.
When you log in to Cisco DNA Center for the first time as an Observer, you see the following message:
Day 0 Home Page
If you skipped getting started, or when there are no devices in the system, you see the following home page.
When discovery is in progress, you see a progress message with a link to the Discovery window.
When there are devices in the system, you see a network snapshot of discovered devices.
Click the Menu icon () at the top-left corner of the home page to access the following menus:
Design
Policy
Provision
Assurance
Workflows
Tools
Platform
Activity
System
Click the icons at the top- and bottom-right corner of the home page to perform common tasks:
Icon
Description
Search: Search for devices, users, hosts, and other items, anywhere they are stored in the Cisco DNA Center database.
Help
About:
Display the current Cisco DNA Center software version.
Click Release Notes to launch the release notes in a separate browser tab.
Click Packages to view the system and application package versions.
Click Serial number to view the serial number of the Cisco DNA Center appliance.
API Reference: Open the Cisco DNA Center platform API documentation in Cisco DevNet.
Developer Resources: Open Cisco DevNet, where you can access developer tools.
Help: Launch context-sensitive online help in a separate browser tab.
Contact Support: Open a support case with the Cisco Technical Assistance Center (TAC).
Make a Wish: Submit your comments and suggestions to the Cisco DNA Center product team.
Software Updates: See a list of available software updates. Click the Go to Software Updates link to view system and application updates.
Notifications: Displays event notifications and sets notification preferences. A red circle by the notification icon indicates that there
are new notifications.
Interactive Help: Opens a menu of interactive help flows that help you complete specific tasks from the GUI.
Note
By default, the login name you provided is displayed in the Welcome text. To change the name, click the name link; for example,
admin. You are taken to the User Management window, where you can edit the display name.
IPv6 Address Support
Cisco DNA Center supports IPv6 addresses. A single IPv6 address can be represented in many text formats, but Cisco DNA Center supports the IPv6 address in the canonical format only. The canonical format is also called the normalized compressed format
as shown below:
2001:db8::1:0:0:1
Start with Assurance
To start using Assurance, you must first configure the Cisco DNA Center settings so that the server can communicate outside the network.
After you configure the Cisco DNA Center settings, your current environment determines how you start using Assurance:
Existing infrastructure: If you have an existing infrastructure (brownfield deployment), start by running Discovery. After
you run Discovery, all your devices are displayed on the Inventory window. For more information, see Basic Setup Workflow.
New or nonexisting infrastructure: If you do not have an existing infrastructure and are starting from scratch (greenfield
deployment), design a network hierarchy. For information about designing a network hierarchy, see the Cisco DNA Center User Guide.


 Feedback